
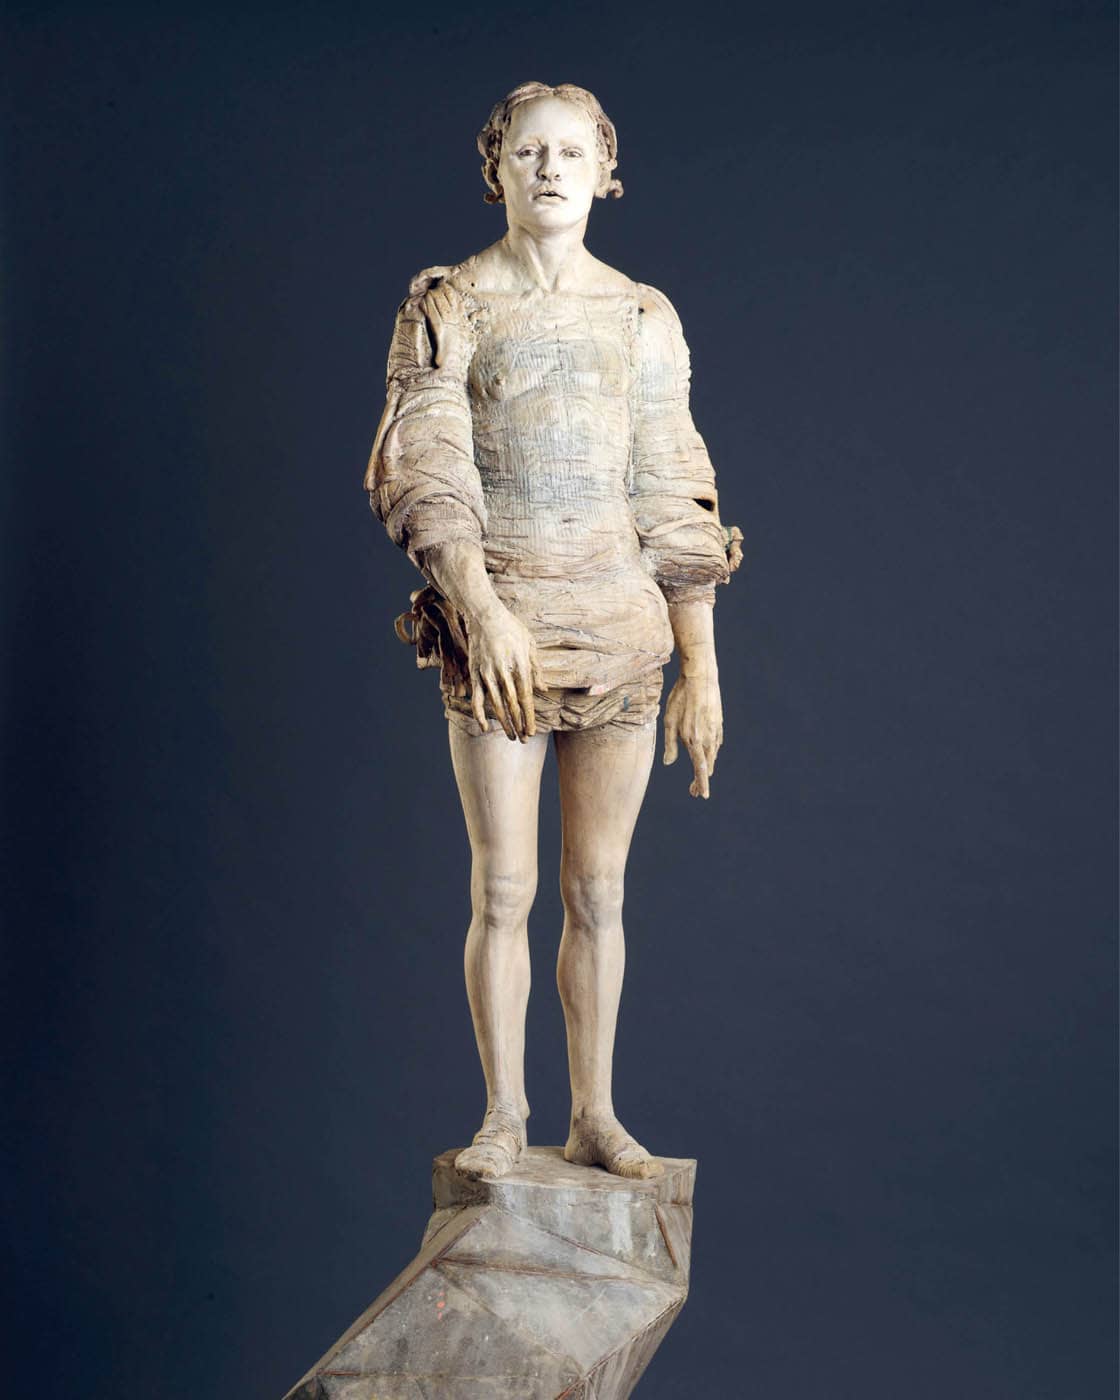
NOW THAT YOU have prepared your space and assembled your tools, materials, and references, you have reached the most exciting part of the figure sculpting process—creating your forms and assembling your sculpture over its armature from the ground up. You will start by preparing the base. Next, you will slide your clay footprints onto the armature and establish the placement of the lower legs. With lower legs in place, you will elaborate the structures of the feet and then continue to the upper legs, reconciling the pattern-generated shapes with specifics observed from your reference images as you continue stacking form onto form. Finally, you will assemble the pelvis and fine-tune its alignment in relation to the legs, capturing the contra postural gesture created by the interplay of the engaged leg and the angled pelvis.
While the pattern-generated shapes you will be using hold useful information, it is important to understand that they will need to be modified in accordance with your photographic references to hone in on the dynamics of the gesture and articulate your volumes to their full extension. However, you could also consider using the pattern-generated forms more loosely to create open, stylized figurative compositions that do not adhere as closely to a naturalistic agenda. This process offers many possibilities and space for discovery at every stage!
PREPARING YOUR ARMATURE
As you begin to build your sculpture onto the armature, the four photographic views printed to scale should align with the four views of your sculpture from each of the four edges of your armature base. In other words, for a square base, one edge of the square will be facing you when looking at the sculpture from the front, and another when looking at the left side, and so on. This setup creates an easy way to ensure your perspectives remain consistent and that the information you are referencing matches the angle from which you are sculpting. Later in the sculpting process we will introduce additional photographic references of our model. These transitional views impart visual information that cannot be gleaned from our four cardinal images alone. To orient these new views, you will approximate the vantage point by aligning the outer edges of the reference model and negative spaces created by her position with that of your sculpture.
JOINERY
HOW TO MAKE JOINING SLIP
To make joining slip, roll or pinch out flakes of clay, as thin as possible, and let them sit out until they are completely bone-dry. (You can also do what I do and save the cutoffs and scraps that I generate throughout my sculpting process so that I have a supply of bone-dry clay to turn into more joining slip when I run out.) Place the small pieces of clay in the base of a lidded plastic container. Run water over your flakes until they are just covered, and then listen for the pleasant fizzing sound of slaking clay. I like to let my clay sit for several hours or overnight before stirring, adjusting water content if needed before putting it into a covered container for use.
Note: For this process, you want your joining slip to be thick like toothpaste. If in slaking (or breaking down) your bits of clay you end up with a slip that is too soft, just leave it out, stirring it often until it reaches the right consistency, or add more dry clay to balance the mix.
KEYING
In the context of figurative sculpture, keys are drawn registration marks that record the placement of various sculptural components while those pieces are temporarily separated. Like a bookmark, a registration key helps you find your place. There are numerous instances in which registration keys can be helpful. For example, keys are crucial in the hollowing out of solid-built sculptures. In this book, we primarily use them after we have made choices about the final positioning of a new body component, for instance, how the torso will join the lower part of the body. At this point, we are ready to slip and score the edges of our cylindrical forms to permanently attach them. This task involves removing the top form to access the seam with our scoring tool, but we don’t want to lose the alignment we have so carefully chosen. This is where keys come in, making sure we can easily find our way back.
Because our figurative compositions are complex—aligned along the x, y, and z axes—I recommend drawing at least three keys across every line of separation. Keys should be clearly visible and roughly perpendicular to the line of separation across which they are drawn. It may be helpful to smooth or clean up a heavily textured surface before drawing in keys. While single perpendicular lines are certainly sufficient, it can also be helpful to create some variation among your keys: a single line for one, two parallel lines right next to each other for the second, three lines for the third. Use whatever method works for you. Be sure to draw your keys long enough so that you don’t accidentally erase them when you score and slip the inner edges of the forms you are attaching.
SLIPPING, SCORING, ATTACHING, AND CLEANING SEAMS
Throughout this process, you will be joining clay together, when first forming your slabs into your preliminary shapes, and later as you begin to combine different body segments. When joining clay, you will score, or rough up, both sides of the joint and stick them together using a tacky clay slip, paying attention to the water content of your slabs or forms and making sure to compress thoroughly to ensure proper adhesion. Slipping and scoring is the common term used to describe this process.
As a rule of thumb, when creating the initial forms from slabs, you want to assemble them while the clay is still very pliable, as soon as the clay can hold the shape without collapsing, to ensure the joined areas are completely integrated and the seam isn’t visible in the final product.
When attaching the different body parts, such as the torso to a pelvis, it is helpful to have the pieces be of comparable dryness. As clay dries, clay particles shrink together, and it is important to have this shrinking rate be consistent in adjoining segments to avoid any cracking.
Pieces that are being attached should be firm enough to hold their shape and withstand the firm pressure of compressing one form against the other. Each clay body has its own window for joining two pieces together, and it’s important to get to know these properties in the clay you use. If the clay becomes too stiff, it will not adhere properly. In cases where the joining edges seem too dry, you can rehydrate the area by placing moist rags or shop towels over the edges and covering the joint with plastic to gradually bring the clay to a proper water content for joining.
Things to keep in mind:
- When unifying two body components, slip and score along the outside of the seam to pack fresh clay, reinforcing and disappearing it.
- Have an assortment of scoring tools for different scales. In my practice, I use a fork for the larger pieces and a toothed stainless-steel tool to score in tighter locations. I also use a wire brush scoring tool or an X-ACTO knife for the most delicate work.
- Score deeply enough to create plenty of texture for edges to adhere properly. The drier the clay is the sharper your scoring tool will need to be.
- Make sure your joining slip is tacky and not watery.
- Once the seam or joint has been compressed and recovered, allow some time for it to set before putting it under any strain. If you are joining body parts that stand against gravity, like outstretched arms, be prepared to use external supports such as clay, metal rods, or stiff wire, to take the weight off the joint until the clay begins to dry and is firm enough to hold weight.
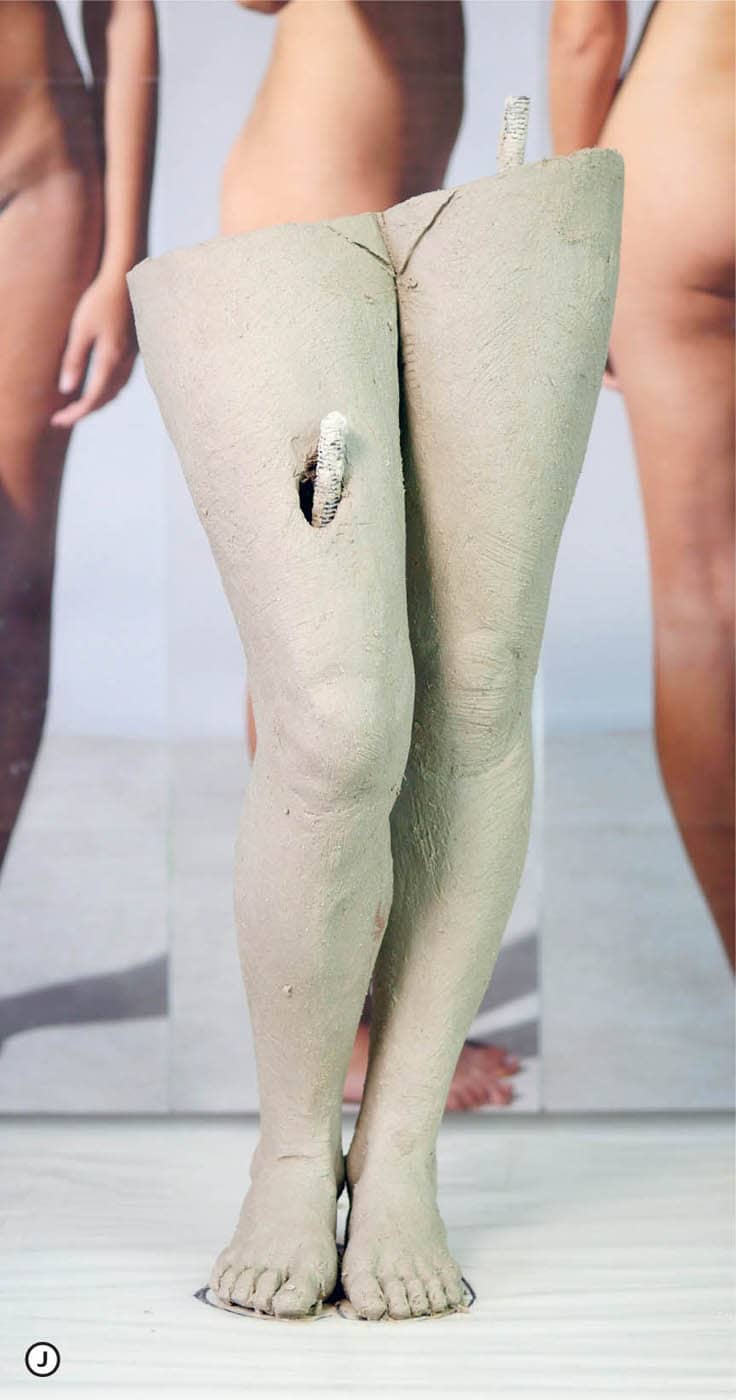
FOOTPRINT AND LOWER LEG
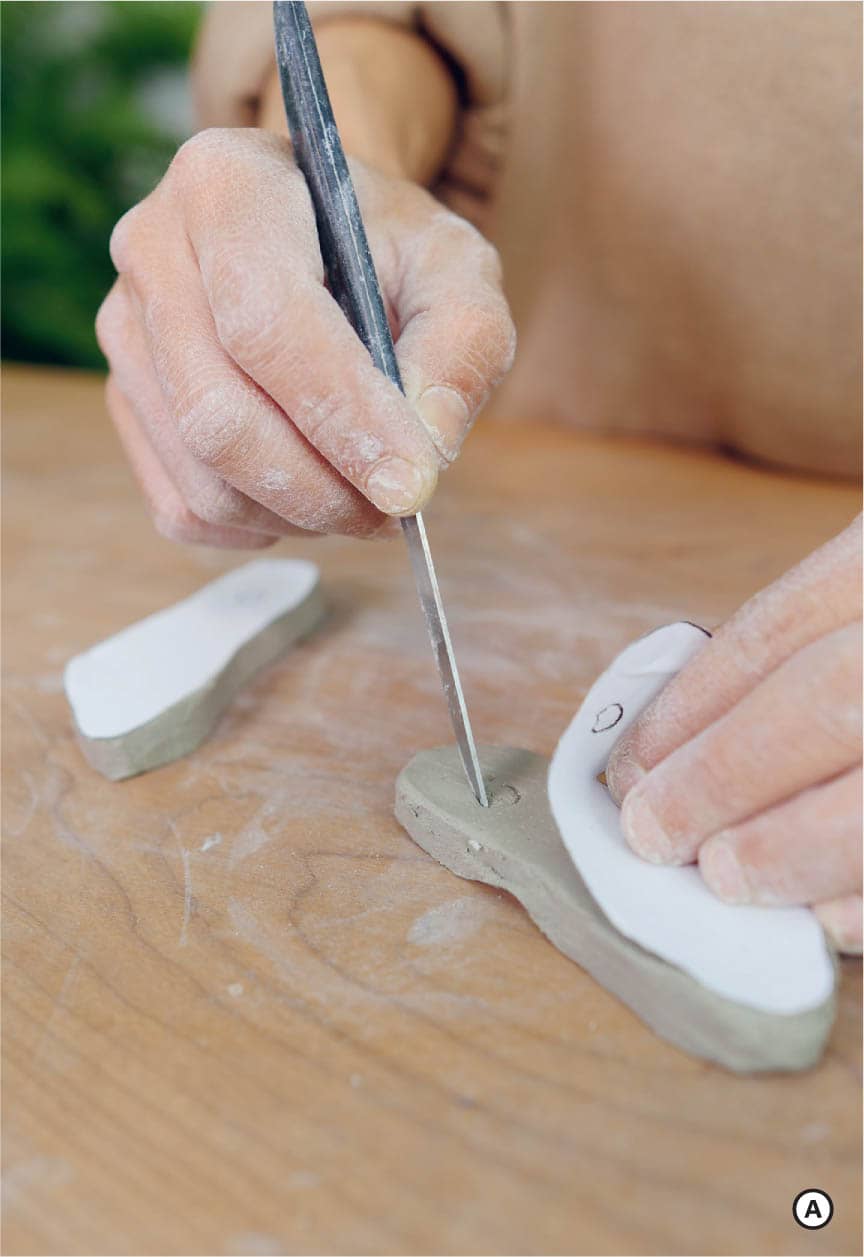
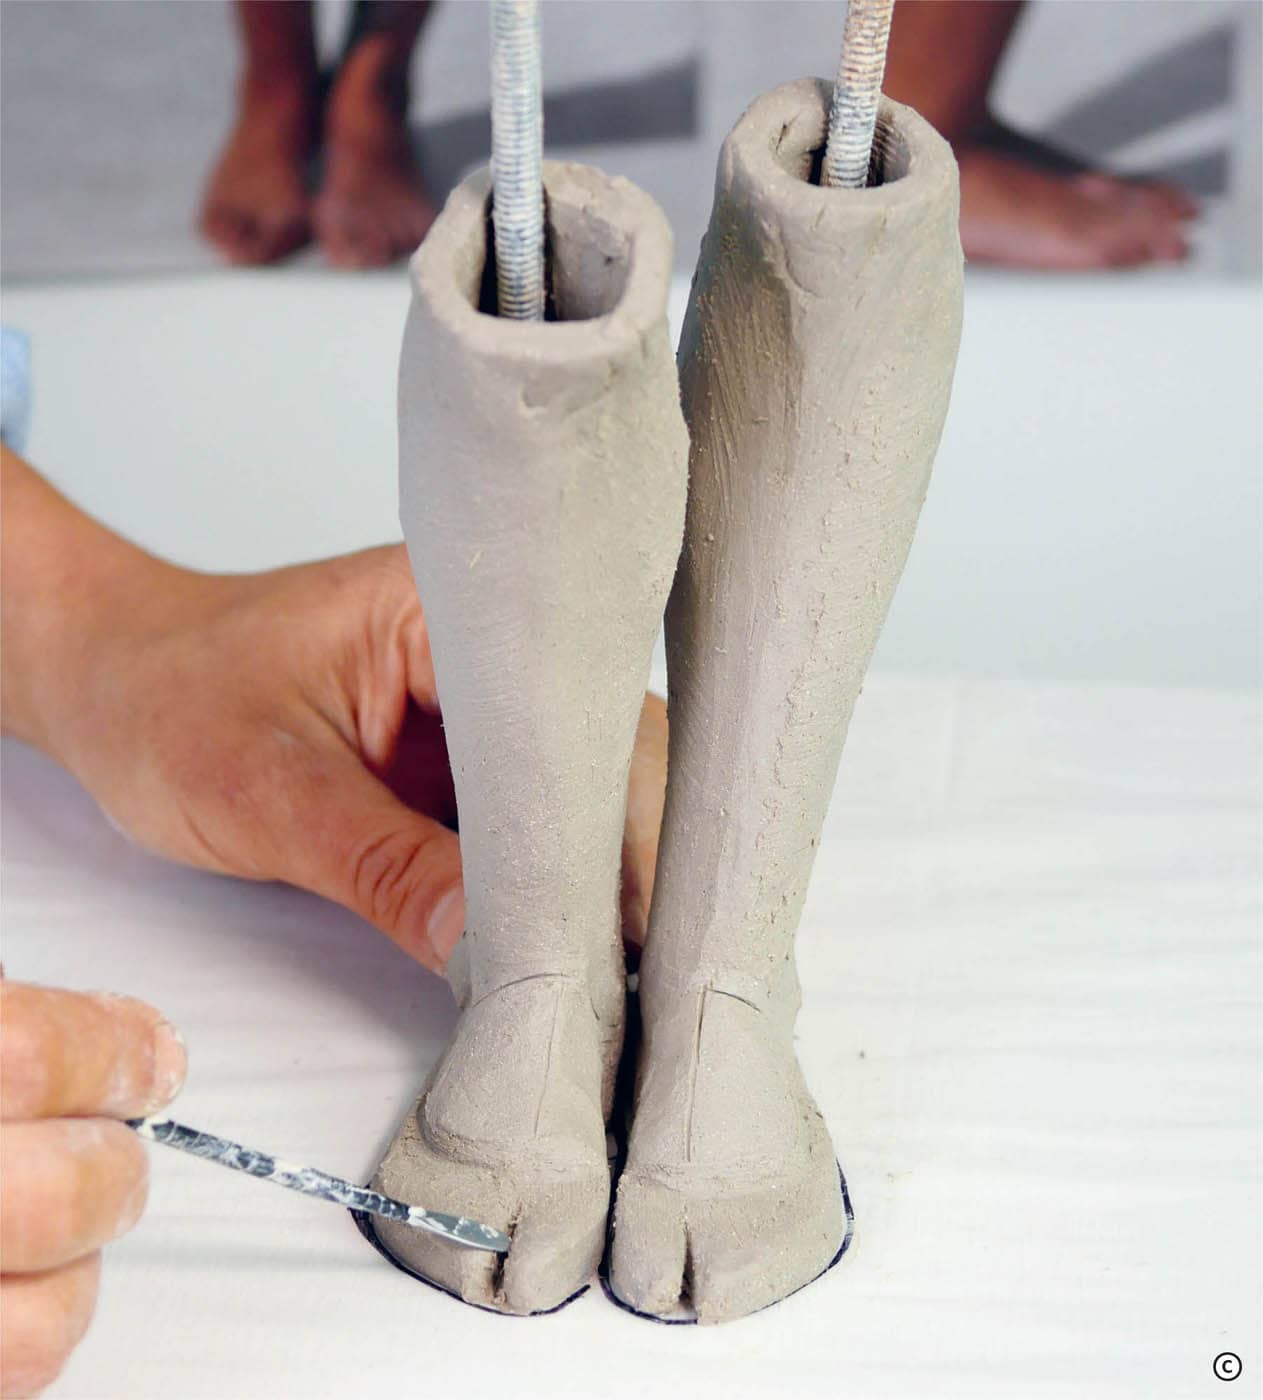
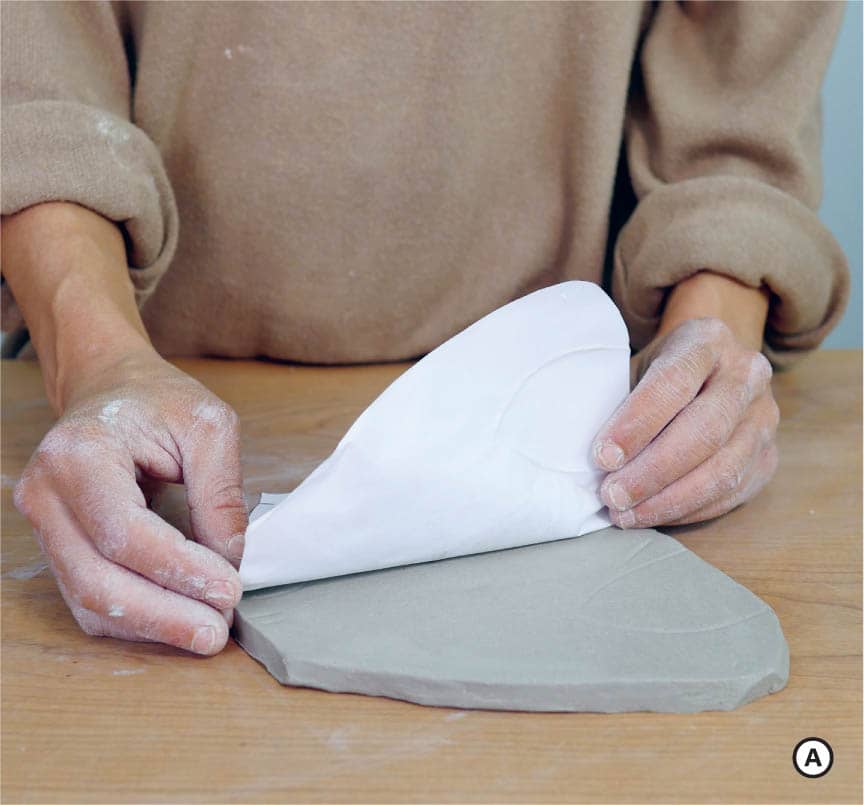
To begin your sculpture, use the templates (see Appendix D) to cut out the clay footprints. ![]() Slide your cut clay footprints over the rods, making sure there is about a ¼ inch (6 mm) space between the rod and the clay to allow space for shrinkage and adjustments. Check the alignment of the footprints against your photographic reference images by turning your sculpture so that it lines up with each of the four cardinal views. In each orientation, bounce your eyes back and forth from sculpture to reference image and make the necessary adjustments. Once satisfied, trace your footprints onto the plastic with a permanent marker so that you can easily return them to their placement if they shift throughout the subsequent steps.
Slide your cut clay footprints over the rods, making sure there is about a ¼ inch (6 mm) space between the rod and the clay to allow space for shrinkage and adjustments. Check the alignment of the footprints against your photographic reference images by turning your sculpture so that it lines up with each of the four cardinal views. In each orientation, bounce your eyes back and forth from sculpture to reference image and make the necessary adjustments. Once satisfied, trace your footprints onto the plastic with a permanent marker so that you can easily return them to their placement if they shift throughout the subsequent steps. ![]()
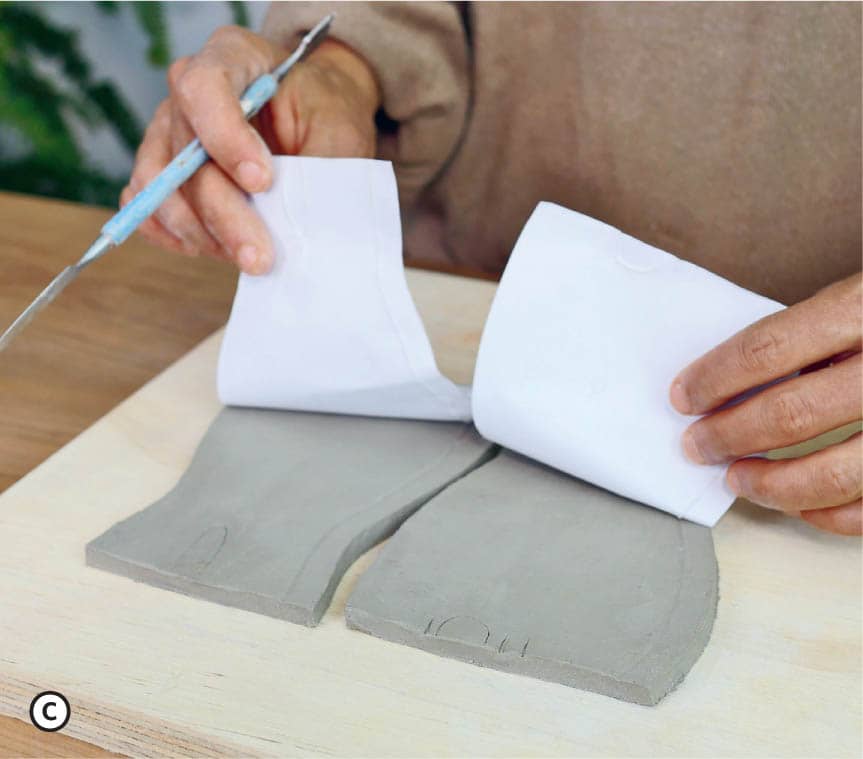
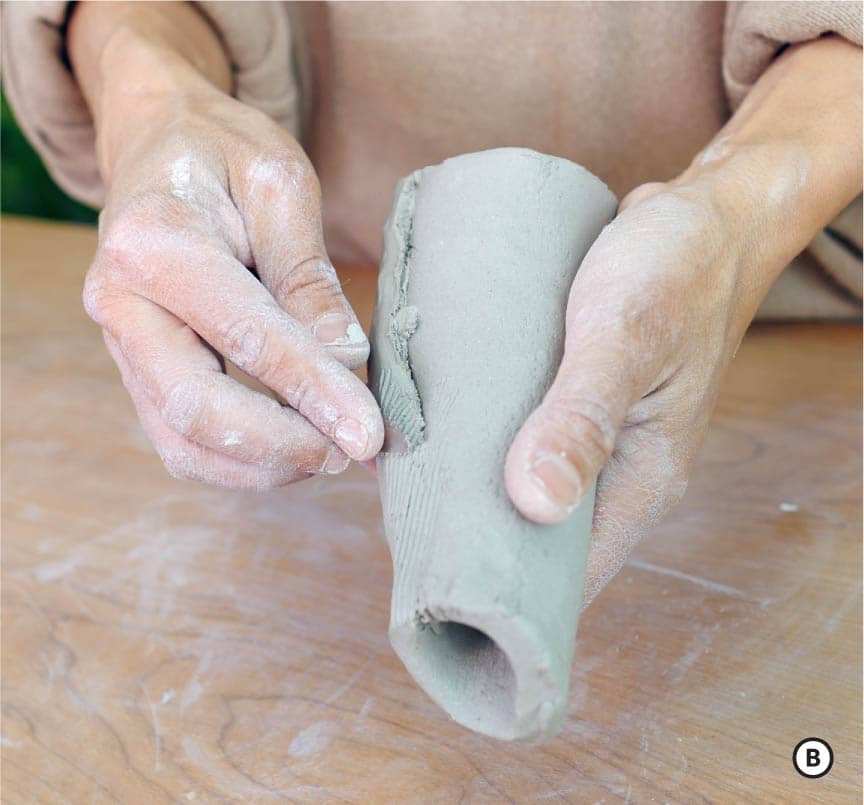
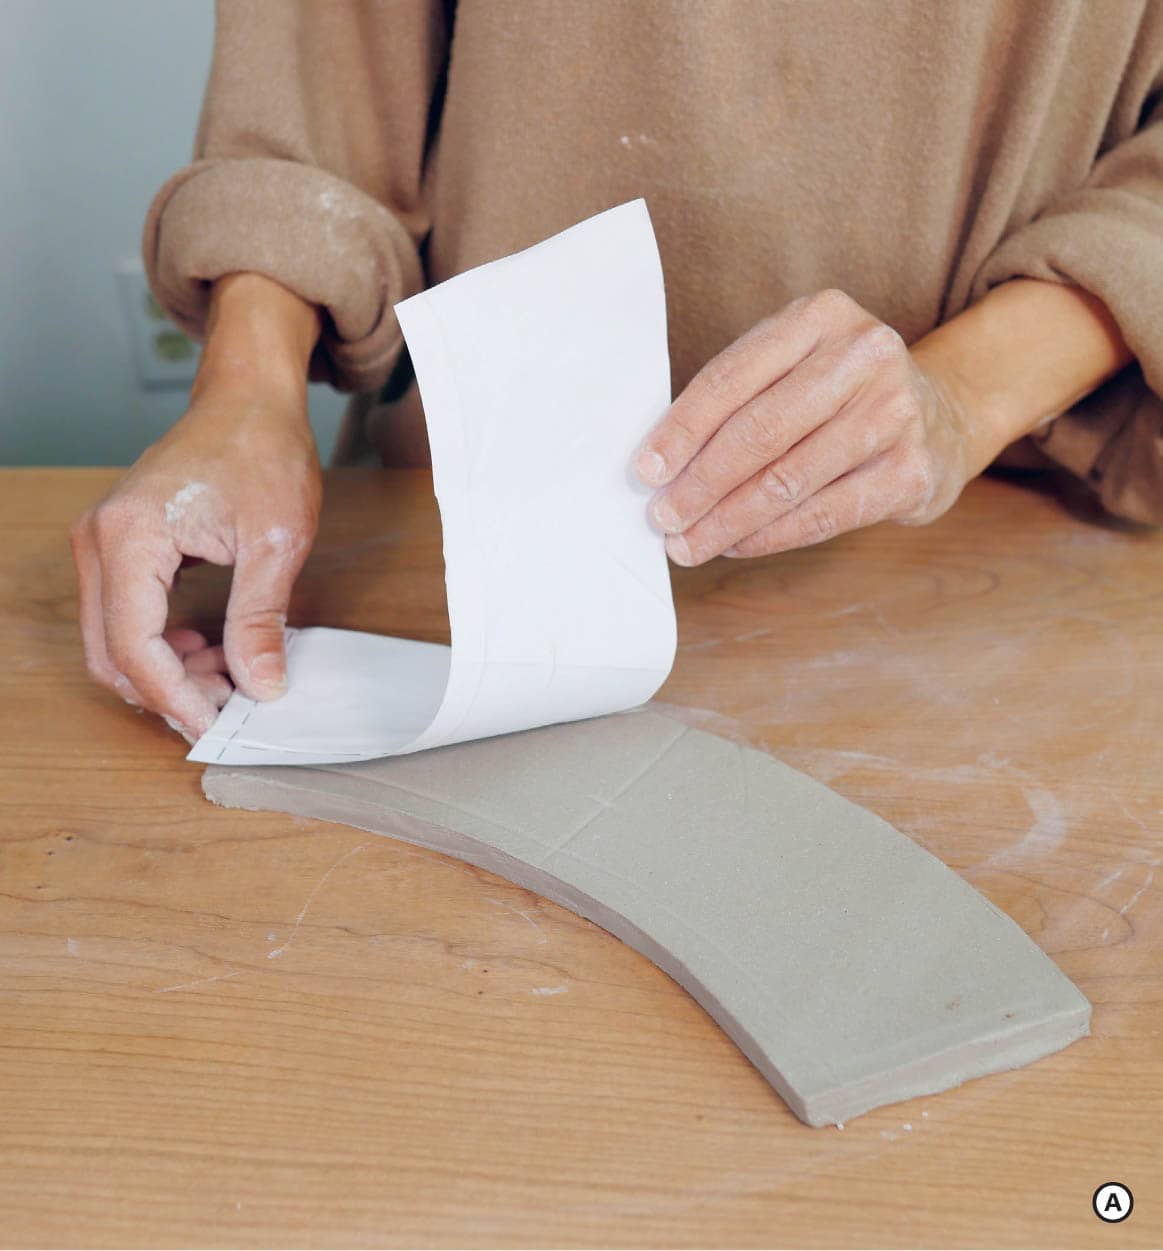
Place your printed lower leg templates on top of a ⅜ inch (1 cm)–thick slab and use a knife to cut the edges and trace guidelines of these templates. Remove the templates and lightly redraw the guidelines so that they are more legible. ![]() Next, curl each slab until the two long edges come together and overlap along the guideline.
Next, curl each slab until the two long edges come together and overlap along the guideline.
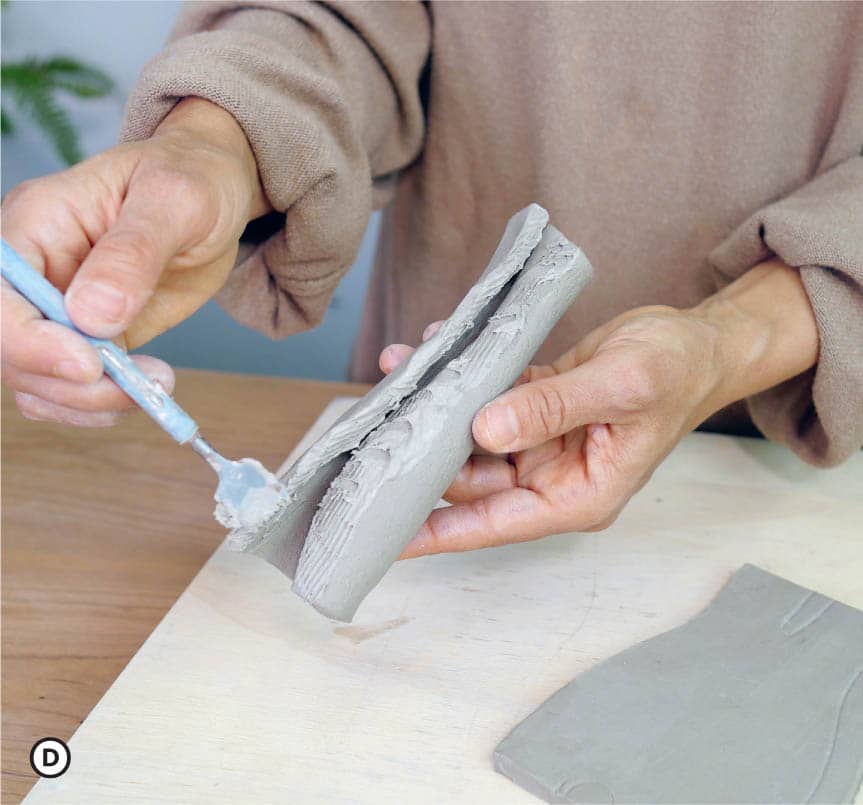
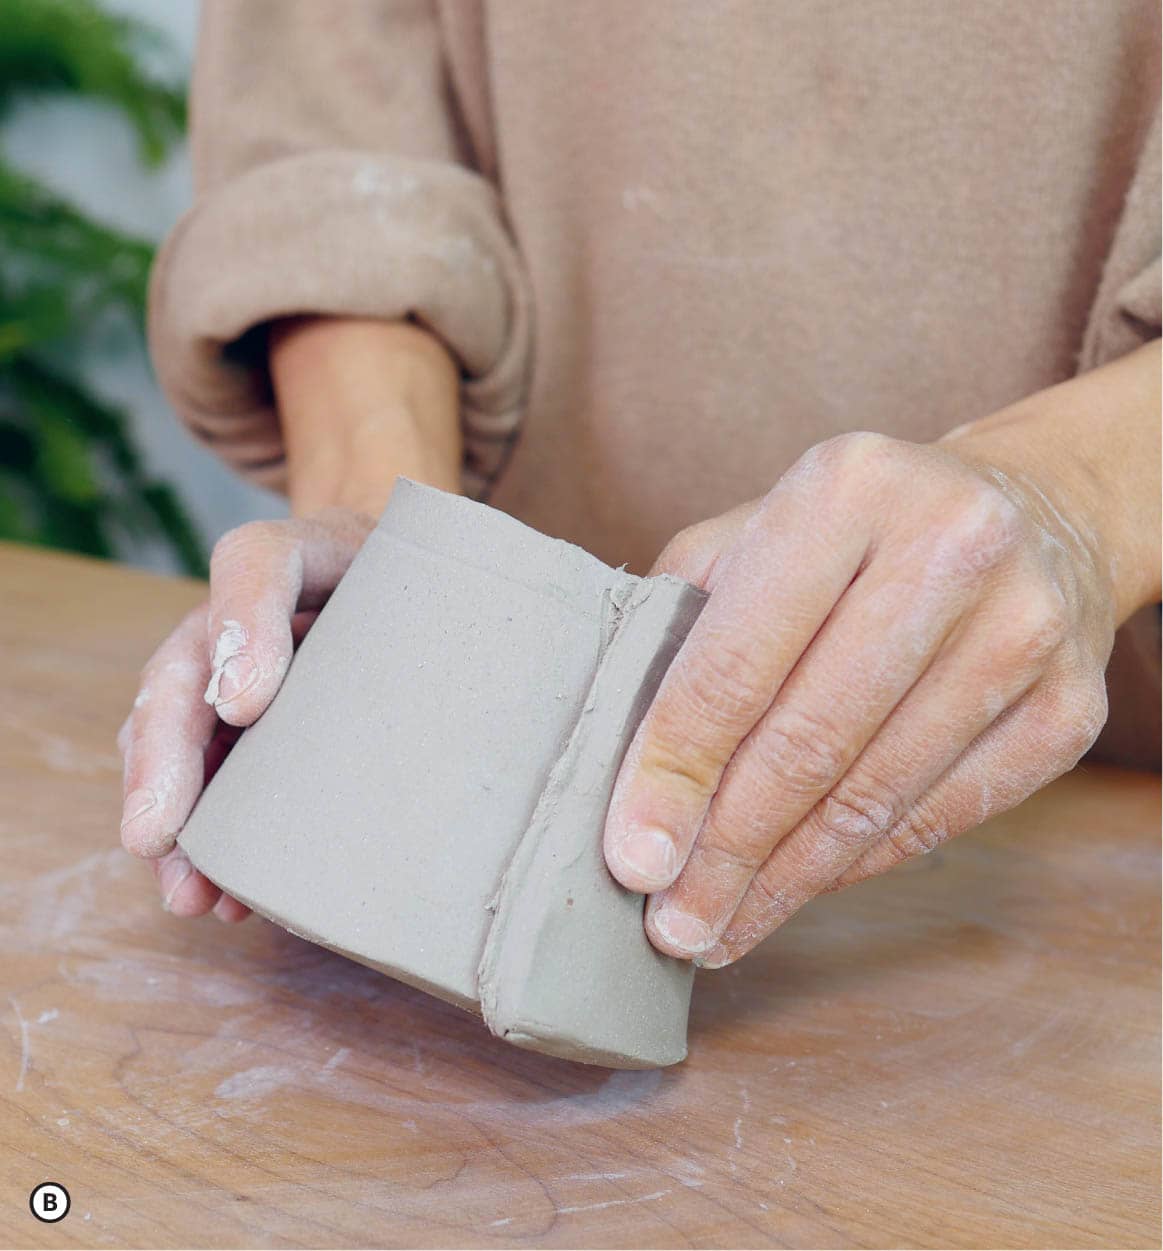
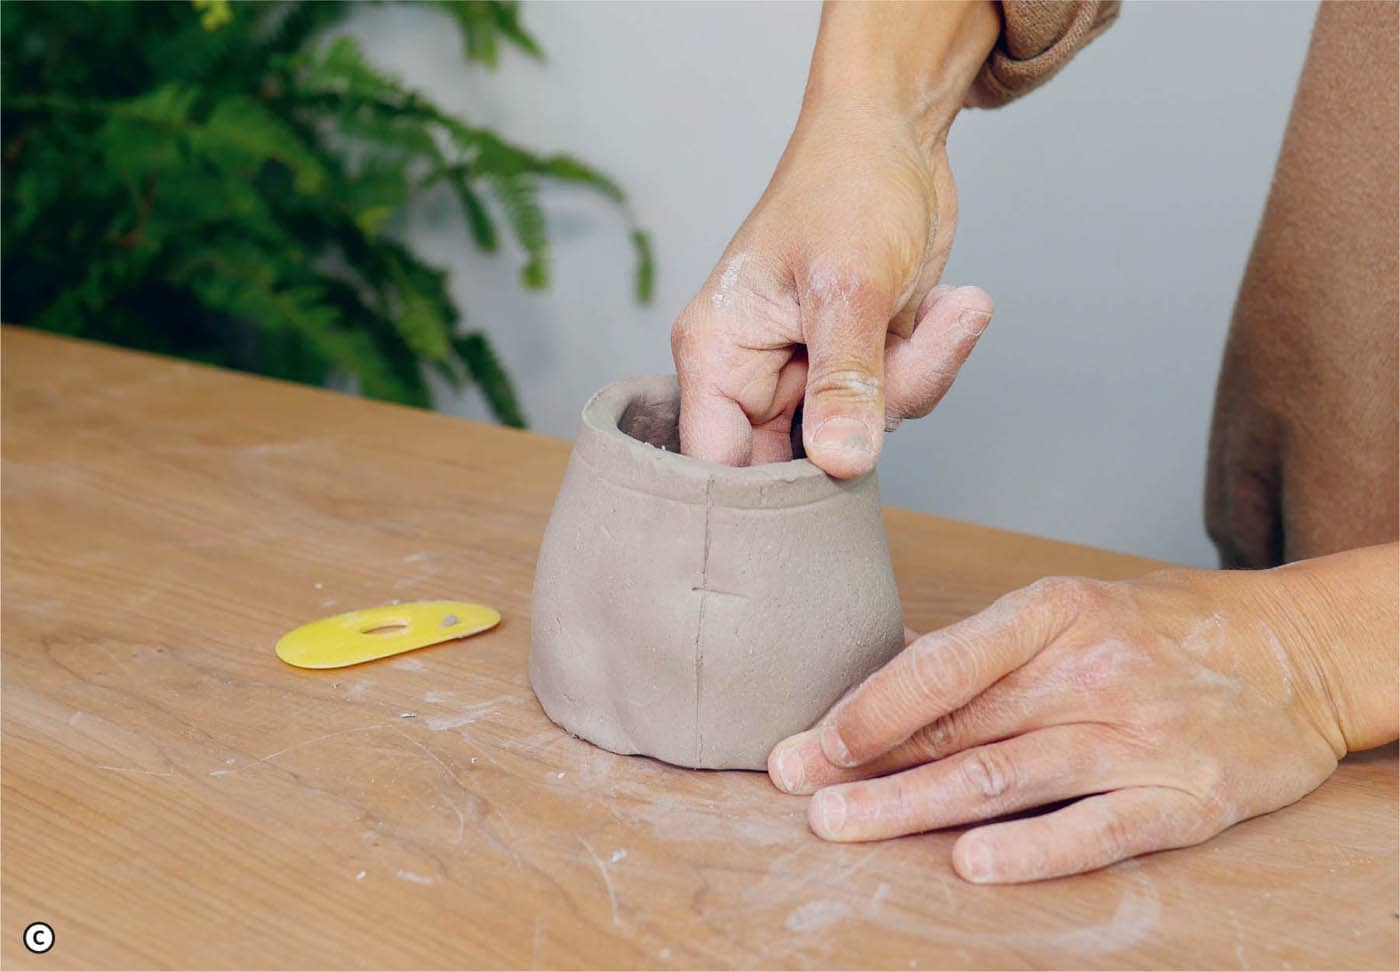
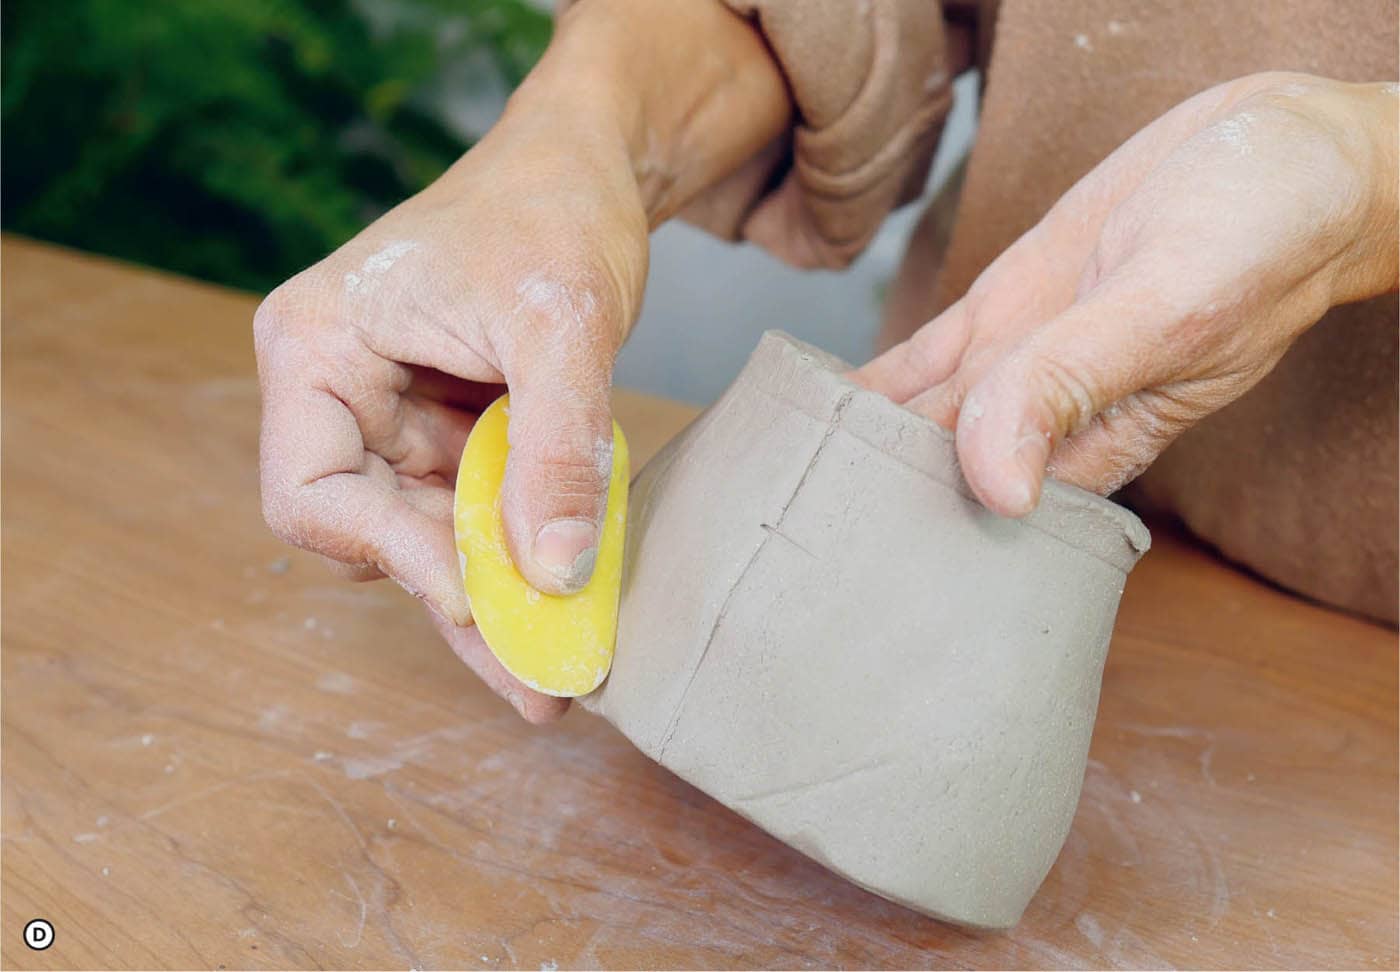
Slip and score these edges where they will touch and compress the seam together. Move your serrated rib across the outside of your seam in a cross-hatching motion to interlace the clay particles and strengthen this connection point. On the inside areas of the seam that you cannot access with your fingers, use a dowel or your threaded rod to help with compression. Slide the rod through the lower leg form and turn it gently as you support and guide pressure with your hand from the outside. Apply enough pressure to secure the seam but not to distort the shape. Make sure the opening through the cylindrical form is at least ½ inch (1.3 cm) to allow for shrinkage and small adjustments. ![]()
![]()
![]()
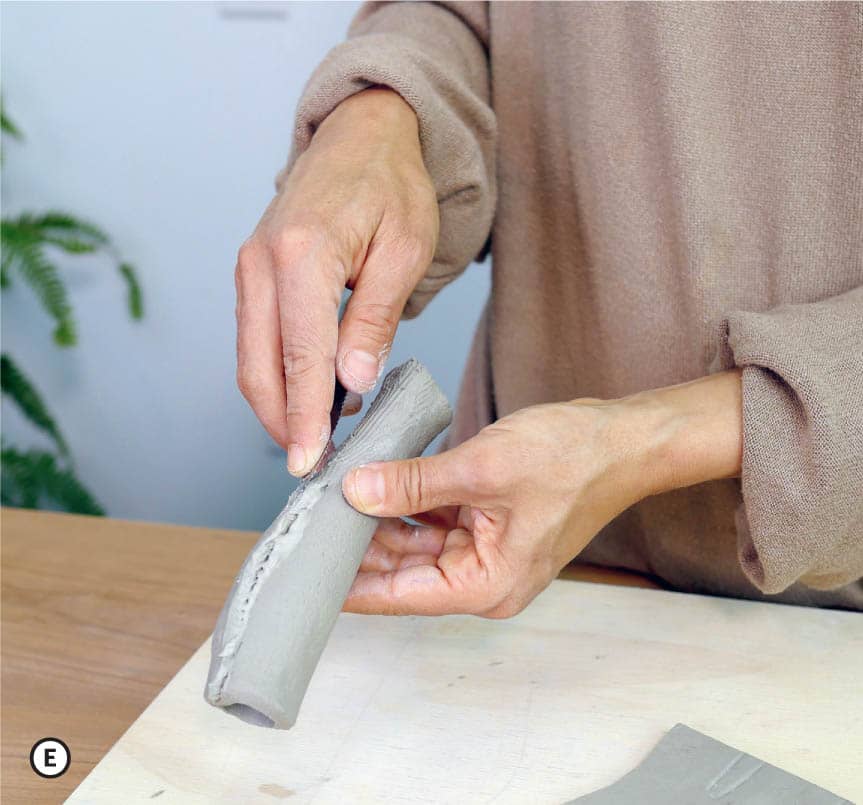
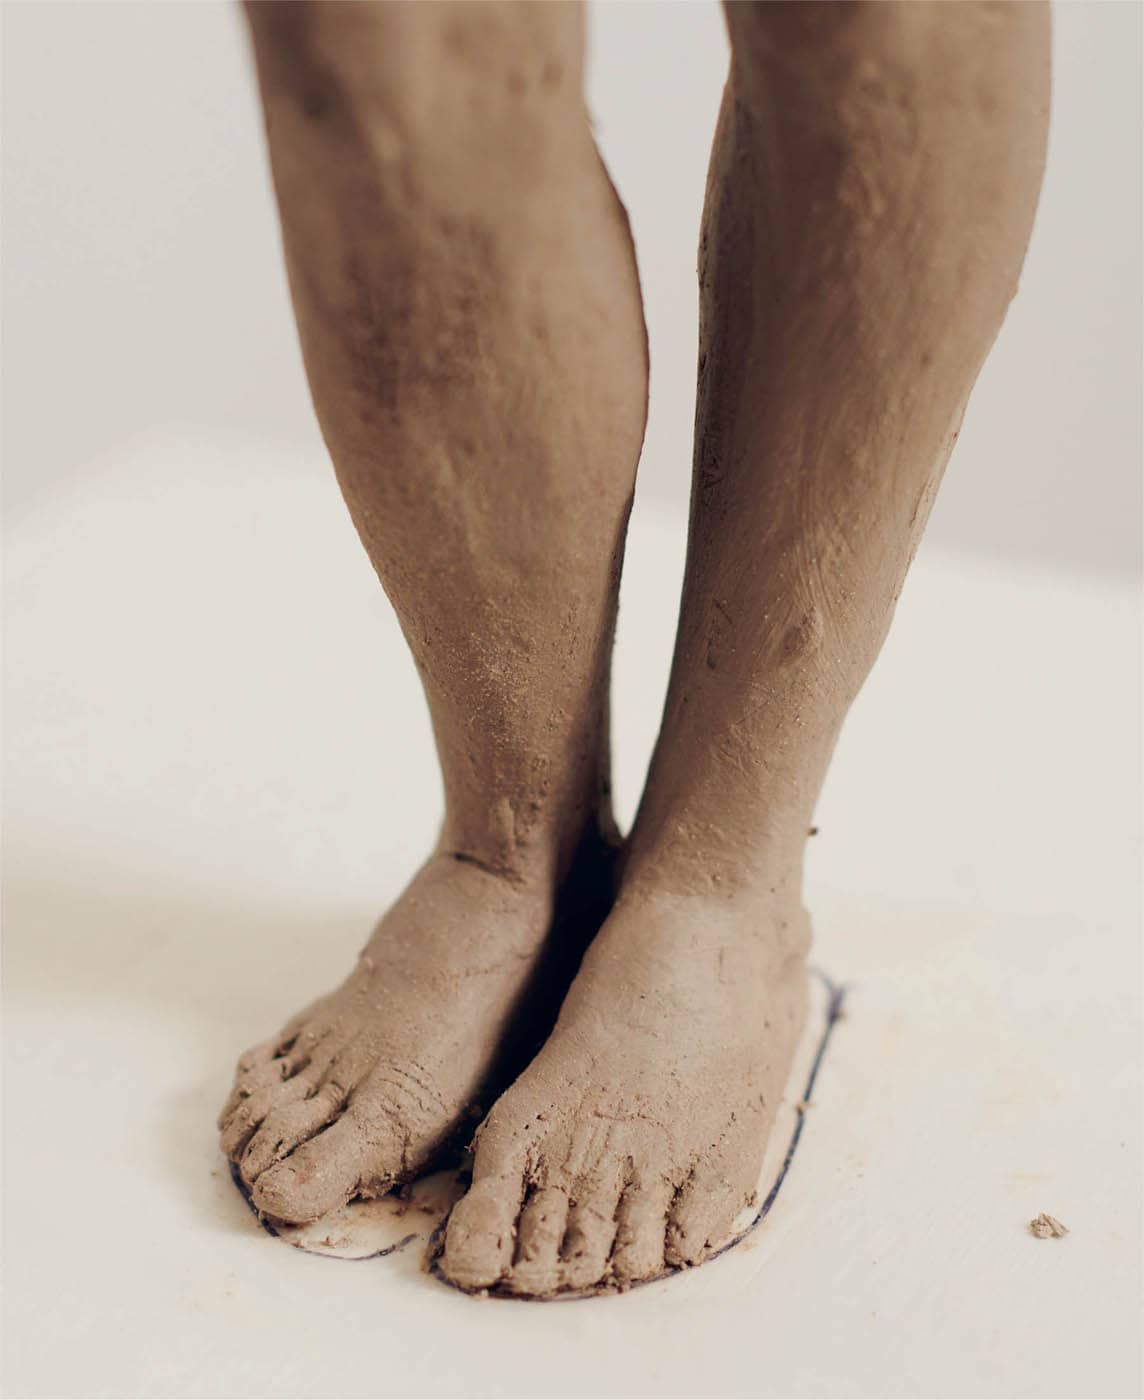
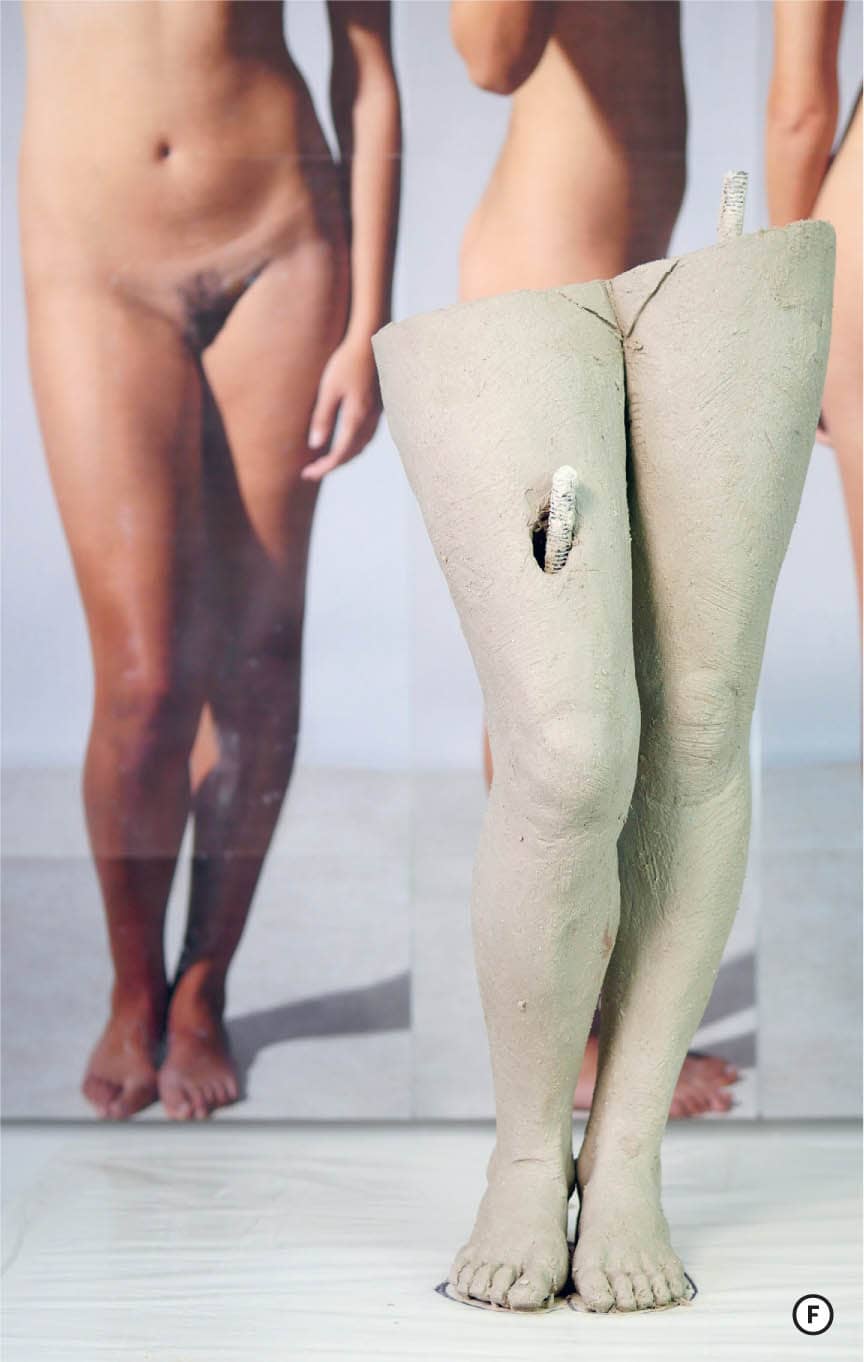
Once the lower leg cylinders have set enough to hold their shape against the pressure of your fingers without distorting, compare them with your photographic references by holding them up to your printouts at each cardinal view while making adjustments. Look at the relationship between the shin bone and the calf muscles, and make note of how the form narrows as it transitions to the knee. (This narrowing is even more pronounced at the ankle.) Add or remove bits of clay as needed to begin articulating the subtleties of these forms.
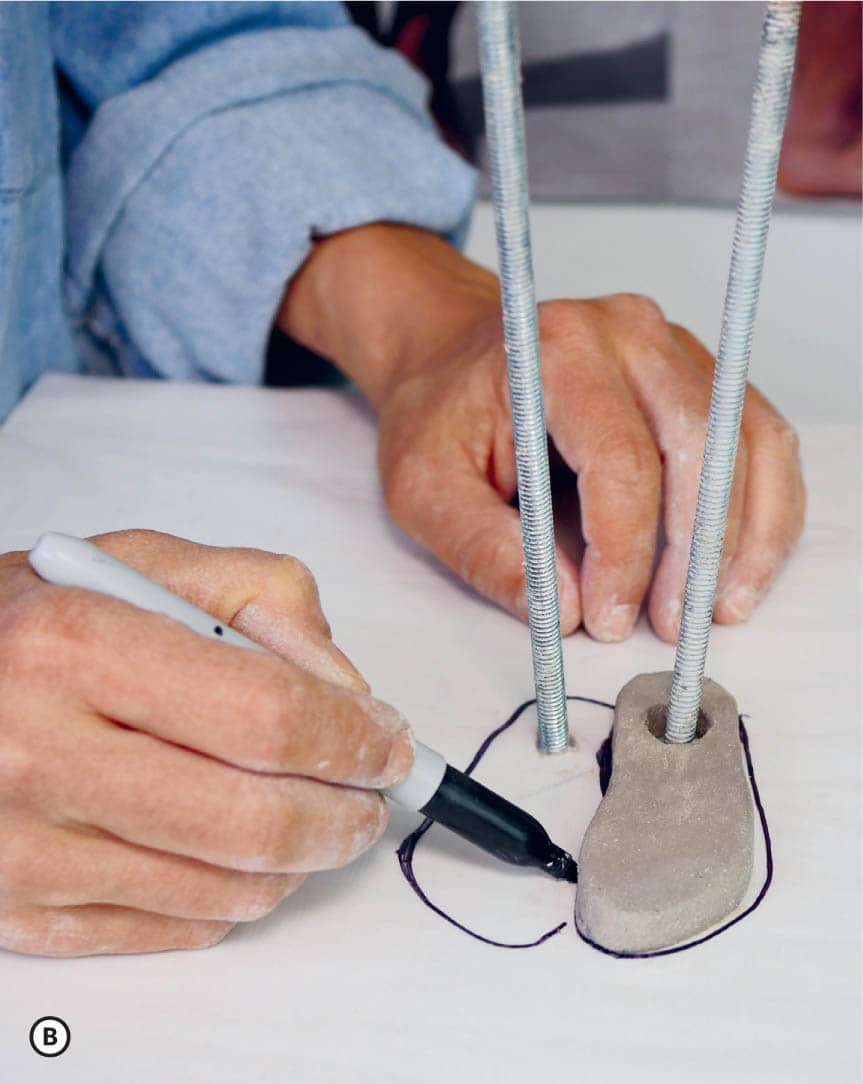
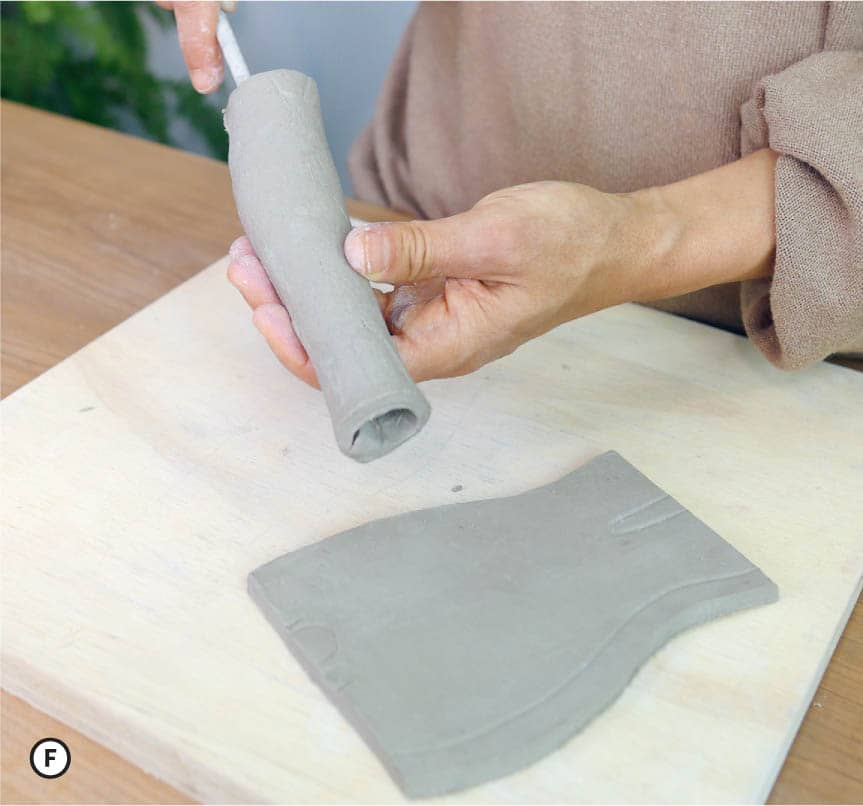
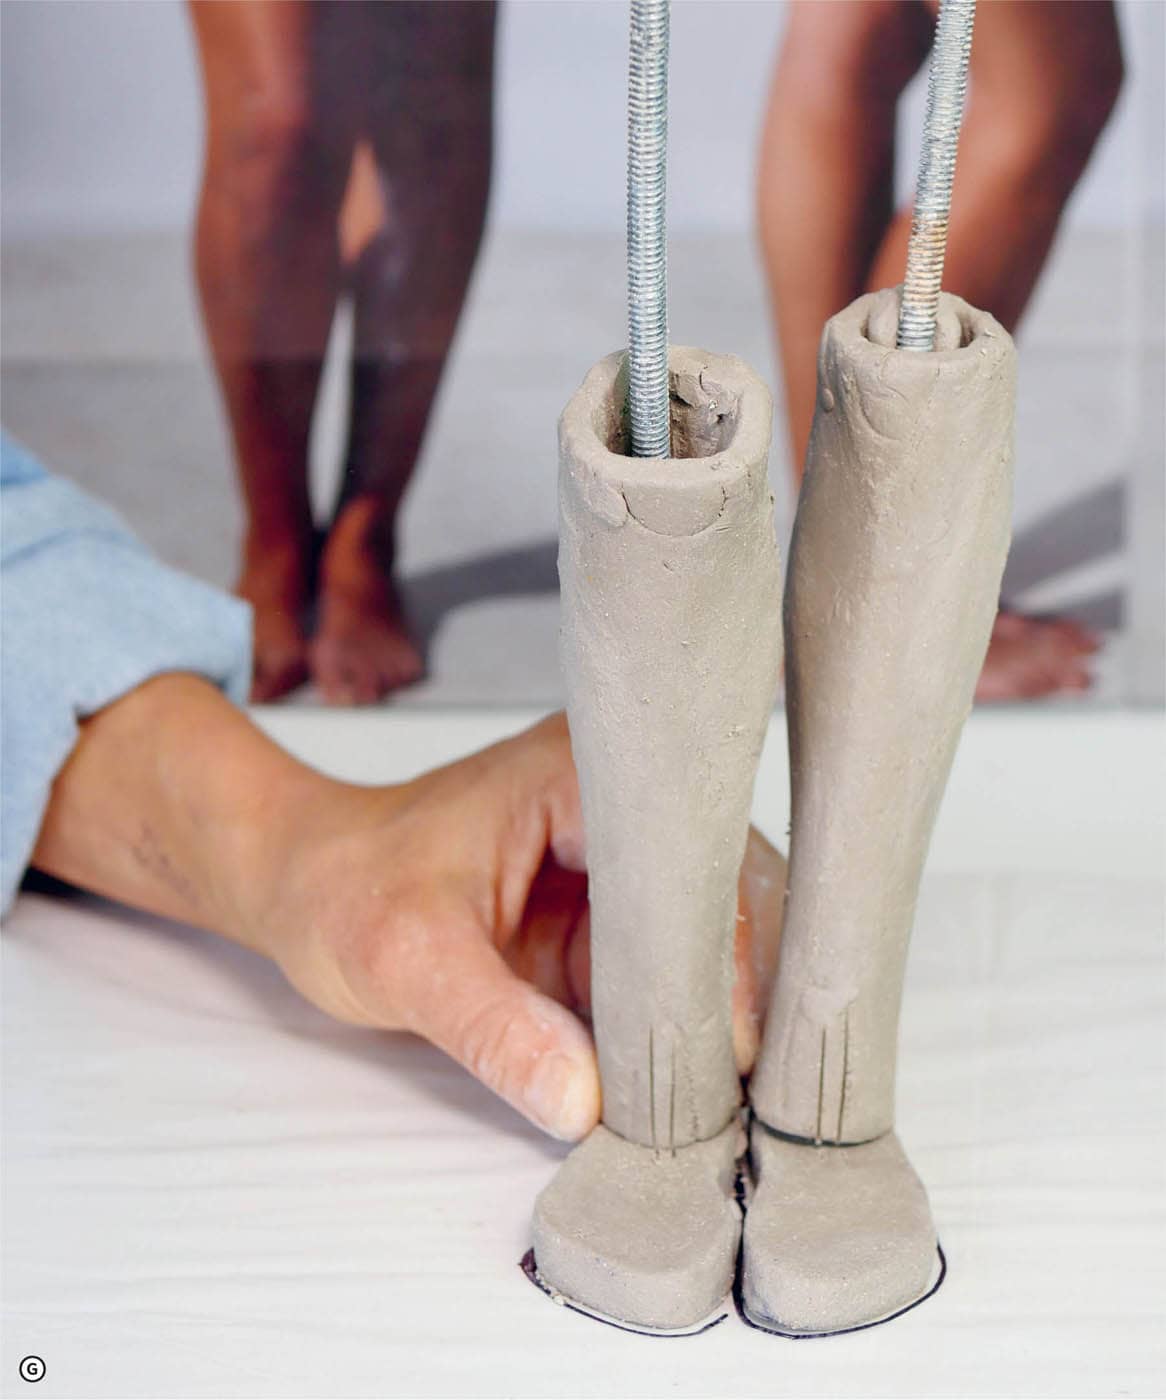
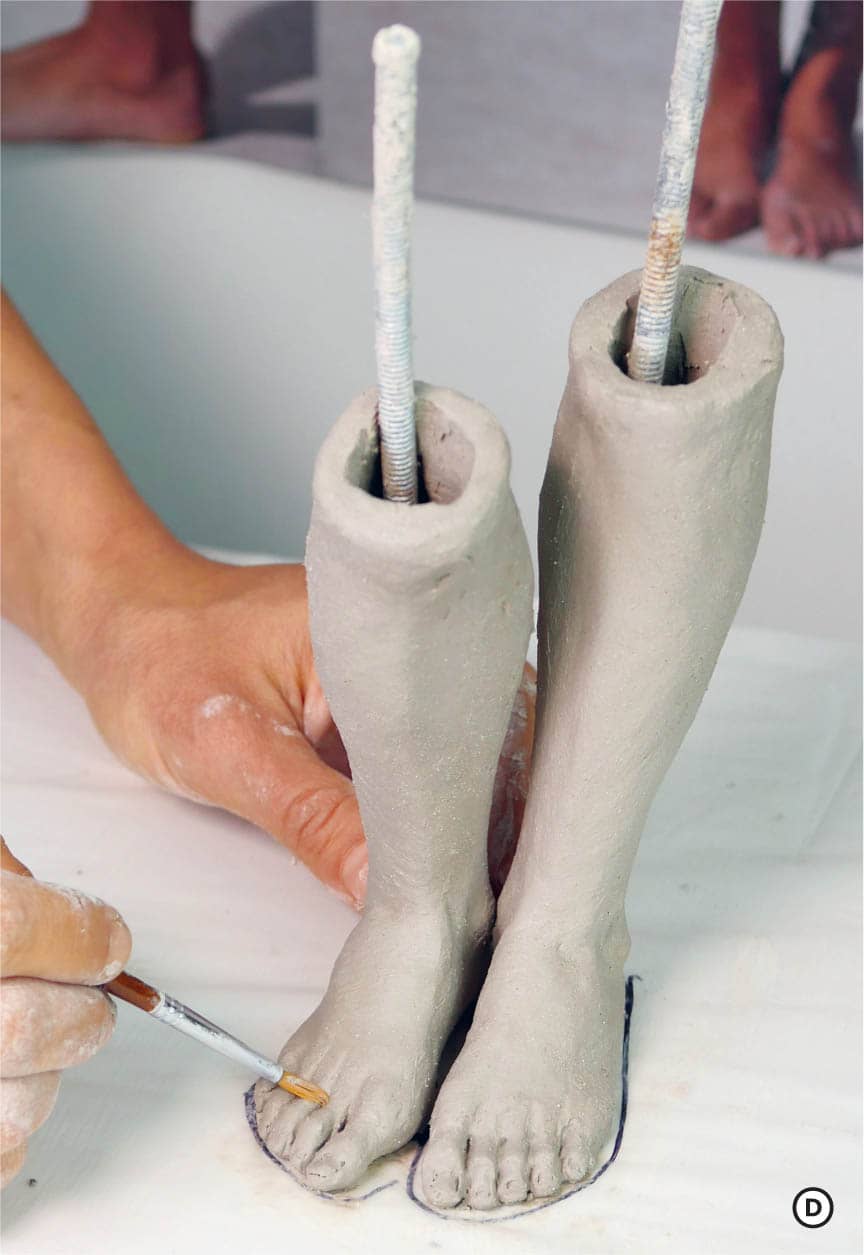
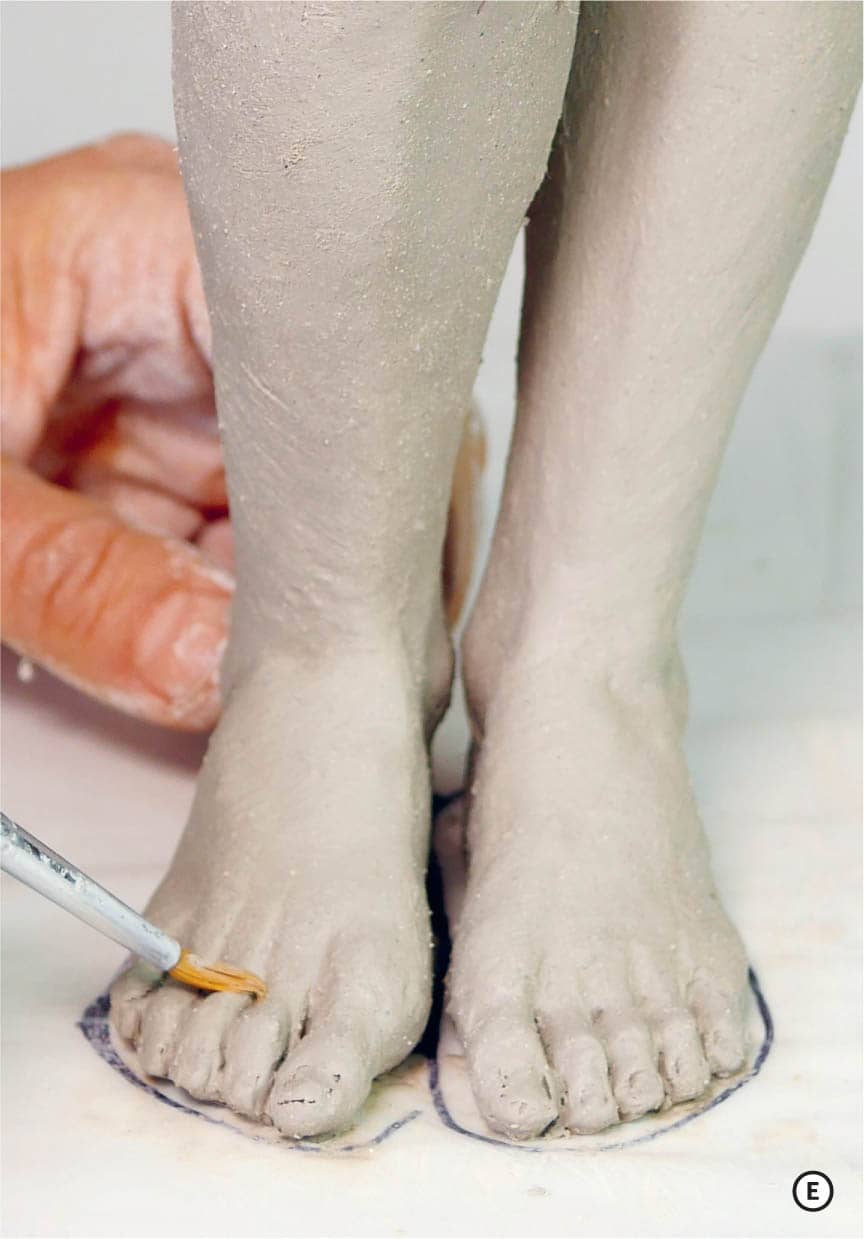
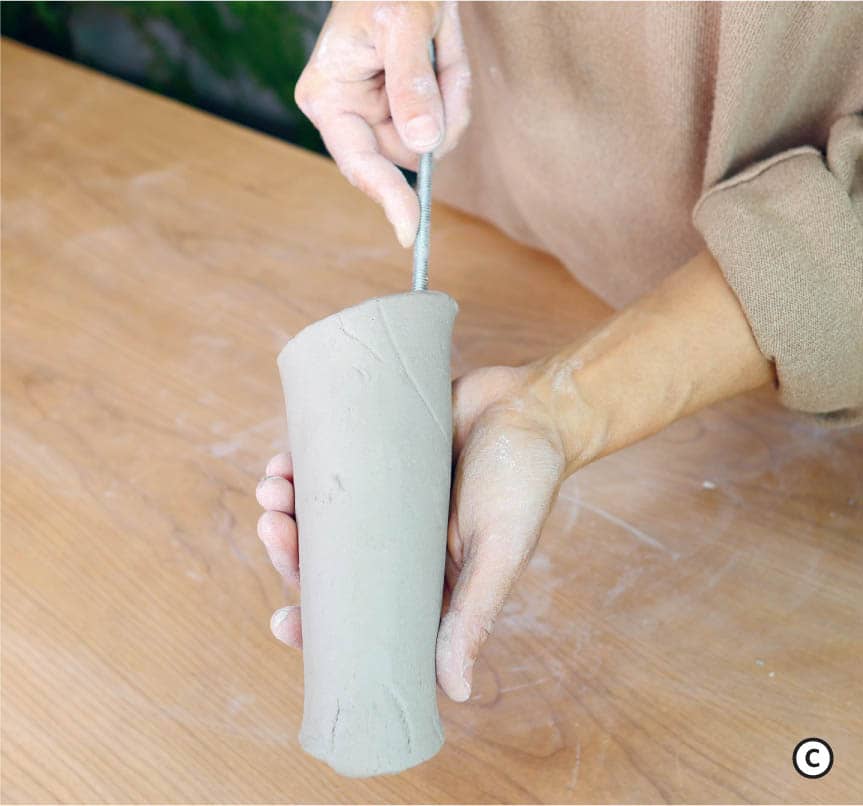
Slide the lower legs over the rods and bring them down to meet the footprints. Find the alignment of the lower legs by turning your sculpture to match each photograph’s orientation and make adjustments accordingly. Stabilize the legs with bits of clay to hold them in place as you turn your sculpture. Once you feel satisfied with the placement of the legs, trace around the outside of each leg onto the footprints and draw several vertical keys, or alignment marks, through both ankles and footprints to have a record of their alignment. ![]() Next, remove the legs to slip and score them before attaching them permanently. Once the lower legs are affixed to the footprints, slip, score, and pack fresh clay around the outside of this seam to enhance stability.
Next, remove the legs to slip and score them before attaching them permanently. Once the lower legs are affixed to the footprints, slip, score, and pack fresh clay around the outside of this seam to enhance stability.
Note: In larger pieces, the lower legs can compress under the weight of the subsequent layers before the clay fully sets. For this reason, I often make these slightly longer than the photographic references to account for that shortening due to compression.
THE FOOT
The widest part of the foot is just below the toes. It spans from the big toe’s first metatarsal phalangeal joint to the base of the pinky toe’s fifth metatarsal on the outer part of the foot. ![]() The outward facing diagonal drawn between these points mirrors the tilt in the ankle bones between the fibula and the tibia. The fibula is located on the outside of the ankle and is lower than the tibia, which rests on the inside of the ankle.
The outward facing diagonal drawn between these points mirrors the tilt in the ankle bones between the fibula and the tibia. The fibula is located on the outside of the ankle and is lower than the tibia, which rests on the inside of the ankle. ![]()
![]()
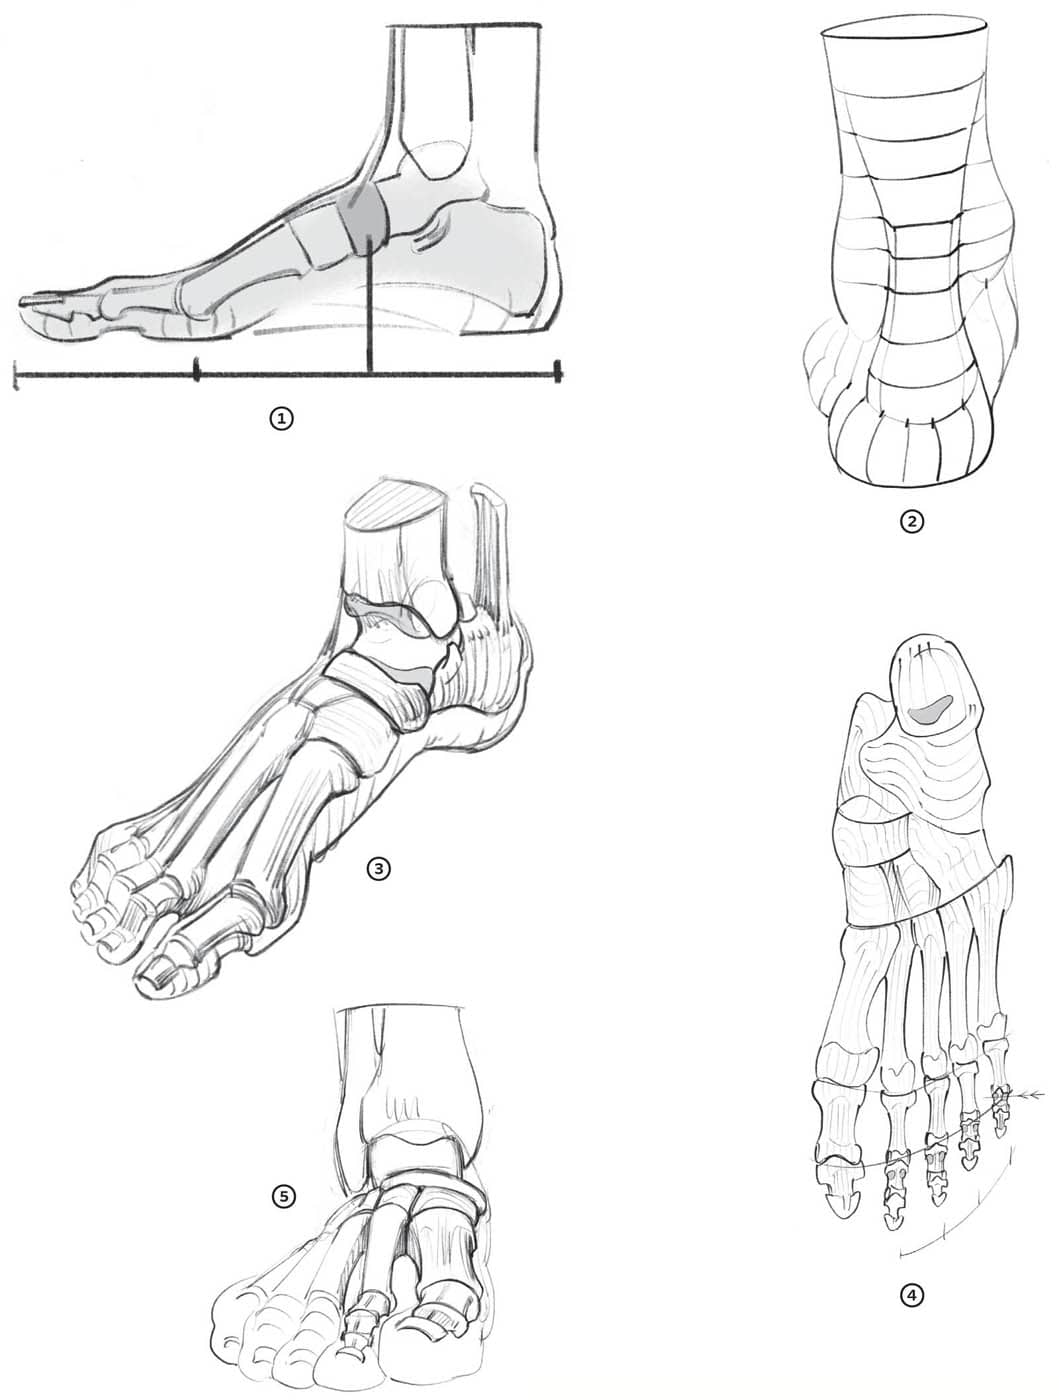
When seen from above, the foot appears like an elongated triangle. From its widest point at the knuckle line, the outer edges of the foot angle inwards to meet the ankle. Moving from the knuckle line forward, into the toes, there is an inverse angling inward along the side of the big toe and the pinky. Note that the arc of the toes follows the diagonal established by the widest part of the foot. ![]()
Tip: The size of the foot is roughly equivalent to the distance between the wrist and the elbow crease on the inside of the arm. When working without patterns, you can use calipers to capture that forearm distance and use it to plot the length of the foot, scaling it to match the overall size of the sculpture.
At their most basic level, the foot and leg can be understood as an assortment of acute and obtuse cones. Viewed from the side, the foot’s profile forms a squat triangle between the toes, the ankle bone, and the heel. Viewed from the front, you can see another triangle created by the widest part of the foot, right below the toes moving back on either side to meet the ankle. Viewed from the back, you’ll notice yet another triangle form created by the heel, where it connects to the Achilles tendon at the level of the ankle bones. ![]()
![]()
![]()
Once you have the basic size and shape of the footprint, continue to add bits of clay to articulate the preliminary volumes of the foot: the mound, adjacent to the ankle, and the platform from where the toes will be developed. The apex of the mound aligns with the break between the big toe and the rest of the toes, so go ahead and create a demarcation to separate your big toe from your other toes. ![]() To the inside of that dividing line, the mound slopes down sharply towards the inner part of the foot, leading into the arch. To the outside of that line, the mound slopes more gently towards the outer part of the foot where it meets the tail of the platform. The platform occupies about a third of the overall length of the foot toward the front, where the toes are, and moves in a sliver along the outer part of the foot and toward the heel.
To the inside of that dividing line, the mound slopes down sharply towards the inner part of the foot, leading into the arch. To the outside of that line, the mound slopes more gently towards the outer part of the foot where it meets the tail of the platform. The platform occupies about a third of the overall length of the foot toward the front, where the toes are, and moves in a sliver along the outer part of the foot and toward the heel.
It will move below the fibula, or the diamond-shaped outer ankle bone. The fibula is lower and slightly further back than the tibia, or inner ankle bone, which has a rounded shape.
Once you have established your mound and platform along with the demarcation of the big toe, you can mark the rest of the toes radially, following an outward curve that runs across the widest part of the foot. When the foot is in a standing position, the three middle toes shift planes at each joint to reveal a stair-step design. While the big toe has just two bones, the rest of the toes contain three each. ![]()
![]() Depending on how much pressure is being exerted on the phalanges, the three center toes will either point forward or downward. The big toe tends to point upwards while the pinky toe points down and inwards, burrowing under the fourth toe.
Depending on how much pressure is being exerted on the phalanges, the three center toes will either point forward or downward. The big toe tends to point upwards while the pinky toe points down and inwards, burrowing under the fourth toe.
UPPER LEG
Place your printed upper leg templates on top of a ⅜ inch (1 cm)–thick slab. Using a knife, score the guidelines and cut the perimeter of each template. ![]() Next, curl each slab until the two long edges come together and overlap along your guideline. Slip and score these edges where they will touch and compress the seam together thoroughly, moving your serrated rib across the outside of your seam in a cross-hatching motion just as you did with your lower leg cylinders.
Next, curl each slab until the two long edges come together and overlap along your guideline. Slip and score these edges where they will touch and compress the seam together thoroughly, moving your serrated rib across the outside of your seam in a cross-hatching motion just as you did with your lower leg cylinders. ![]() If you have trouble accessing the inside of this seam with your fingers, use a dowel or threaded rod to apply pressure from within.
If you have trouble accessing the inside of this seam with your fingers, use a dowel or threaded rod to apply pressure from within. ![]() Turn your rod gently, supporting from the outside with your hand. Apply enough pressure to secure the seam but not enough to distort the shape. Your goal is for the seams to become strong and integrated—compressed to a similar wall thickness as the rest of the upper leg cylinders, with superficial lines eliminated by the cross-hatching of your serrated rib.
Turn your rod gently, supporting from the outside with your hand. Apply enough pressure to secure the seam but not enough to distort the shape. Your goal is for the seams to become strong and integrated—compressed to a similar wall thickness as the rest of the upper leg cylinders, with superficial lines eliminated by the cross-hatching of your serrated rib.
Once the upper leg cylinders have set enough to retain their shape under the pressure of your fingers, hold them up to your printouts at each cardinal view and make adjustments. ![]() Add or remove bits of clay as needed to begin articulating the subtleties of these forms. Push out gently from the inside to develop the projection of the quadriceps muscles and hamstrings. Using your photographic views as blueprints, seek to echo the outer shape of the leg form from all perspectives. With your calipers, confirm the thickness and height in relation to your photographic references.
Add or remove bits of clay as needed to begin articulating the subtleties of these forms. Push out gently from the inside to develop the projection of the quadriceps muscles and hamstrings. Using your photographic views as blueprints, seek to echo the outer shape of the leg form from all perspectives. With your calipers, confirm the thickness and height in relation to your photographic references.
Once you are satisfied with this preliminary modeling, place your upper leg shapes onto the armature and begin finding their proper alignment.
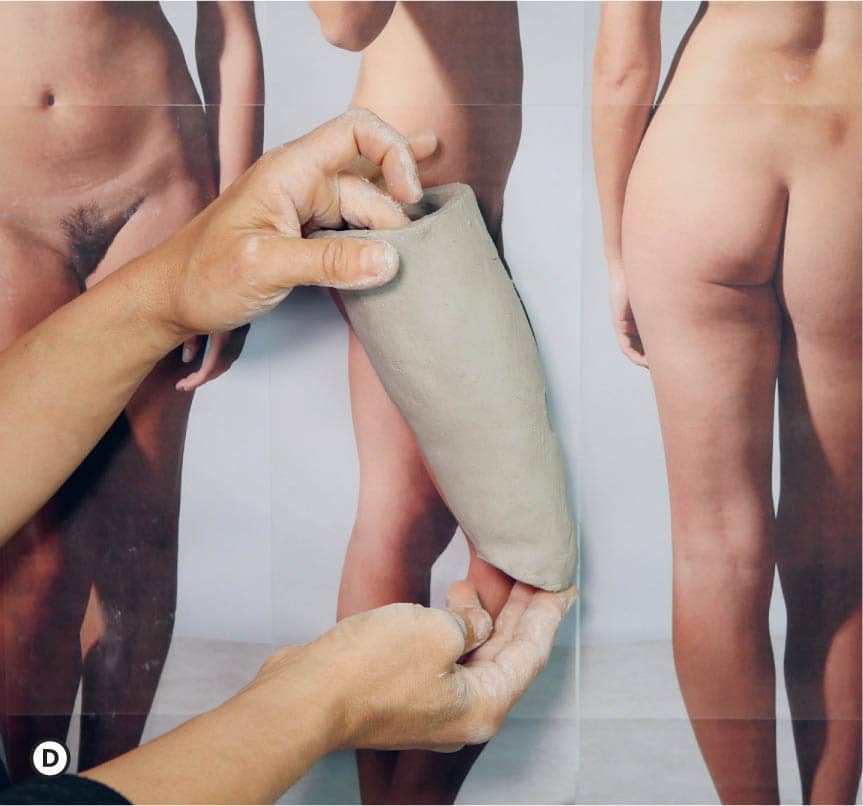
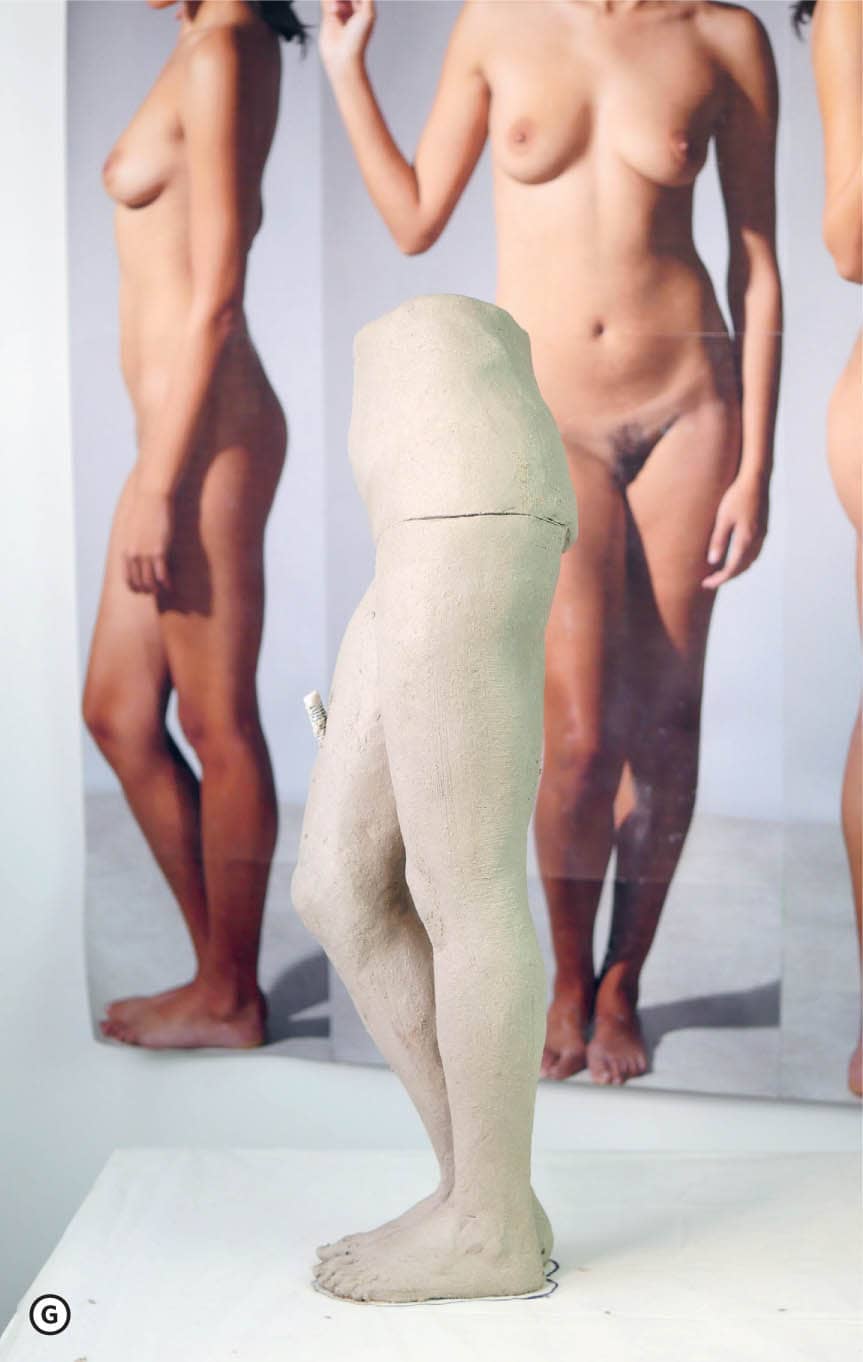
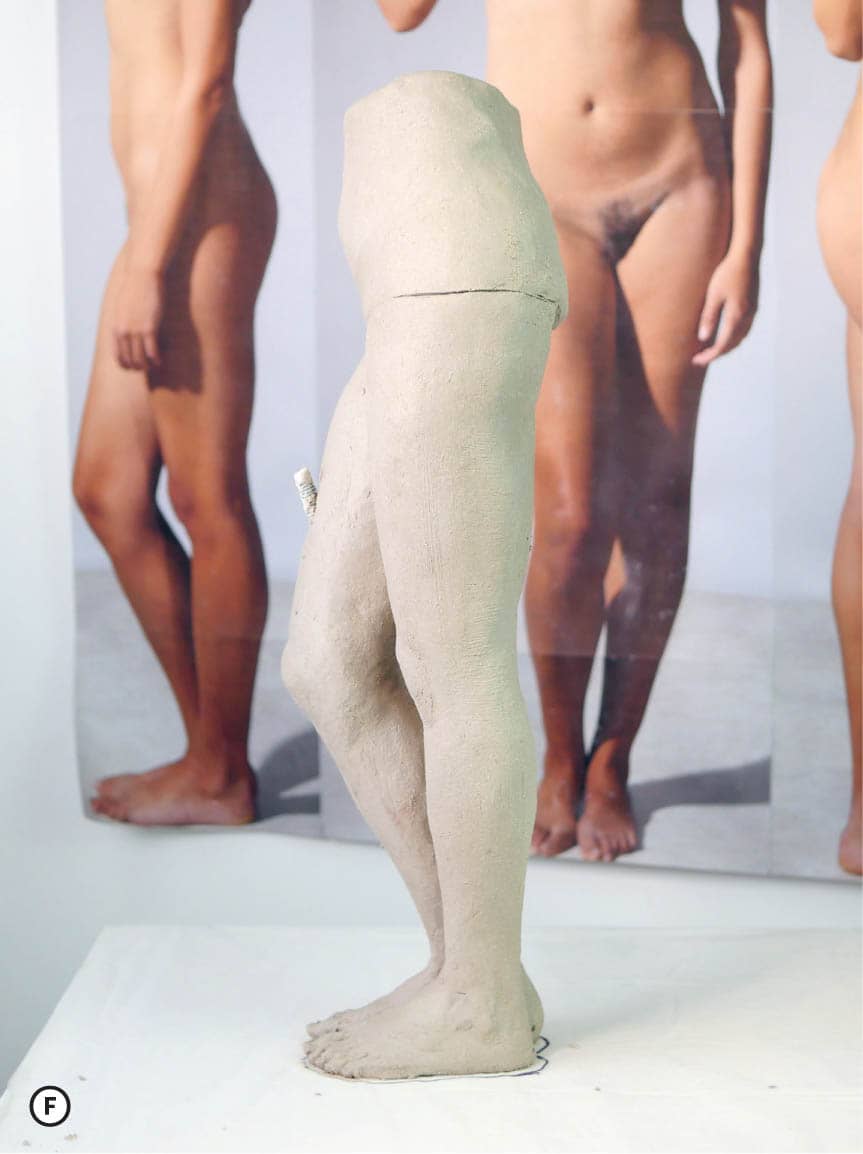
Because we are working with a contrapposto pose in which the left leg is mostly straight while the right knee is bent, only the left leg will thread over the armature through its central cavity. By contrast, the threaded rod on the right leg will shoot out through the lower thigh, so the upper right leg will be devoid of armature. This difference is structurally acceptable because the left leg bears much of the weight of the pose. ![]()
On the right side, hold the upper leg form up to the lower leg form and draw lines to find the angle at which these two forms connect. Trim the ends of each cylindrical form so that their angles match up in accordance with your reference images, and then temporarily affix the two forms. You will need to locate where the armature piece will emerge from the right thigh and cut a hole large enough to leave some space around the rod to ensure that your sculpture does not crack as it shrinks around the metal.
Repeat the same process with the left leg by fully sliding the upper leg over the lower leg and slightly trimming the edges to allow for the two shapes to come together, capturing the gentle forward incline of that upper leg.
Take your time, observing and adjusting the forms as you turn the piece to engage with each photographic perspective. Refrain from permanently scoring and slipping the upper and lower legs together at this point; you may still want access to the inside of these forms. Instead, add bits of clay to hold the forms in place as you visually integrate this new layer. You can also pinch the tops of the legs together to hold them in place as you continue to make adjustments.
Compare the overall gesture of the legs to what you see in your reference images. Use your calipers to capture information from your blueprints and verify heights and thicknesses in your sculpture. How do the large diagonals of the legs change angles from each of the four views? Consider the shape of the negative space between the legs. Next, note the s-shaped forms that run throughout the whole of the leg, creating subtle undulations that move from the inside towards the outside of the leg as well as front to back and vice versa. Find these undulating rhythms in each perspective. ![]()
![]()
Step back periodically to gauge your progress at a distance, making sure that your sculpture is turned to the same perspective as one of your reference images. Use the edge of the armature’s base in relation to the wall to ensure proper alignment. Moving away from your piece shifts your perception from the micro to the macro and helps you grasp the dynamics of the composition in a different way. Bounce your eyes back and forth from reference to sculpture to find inconsistencies.
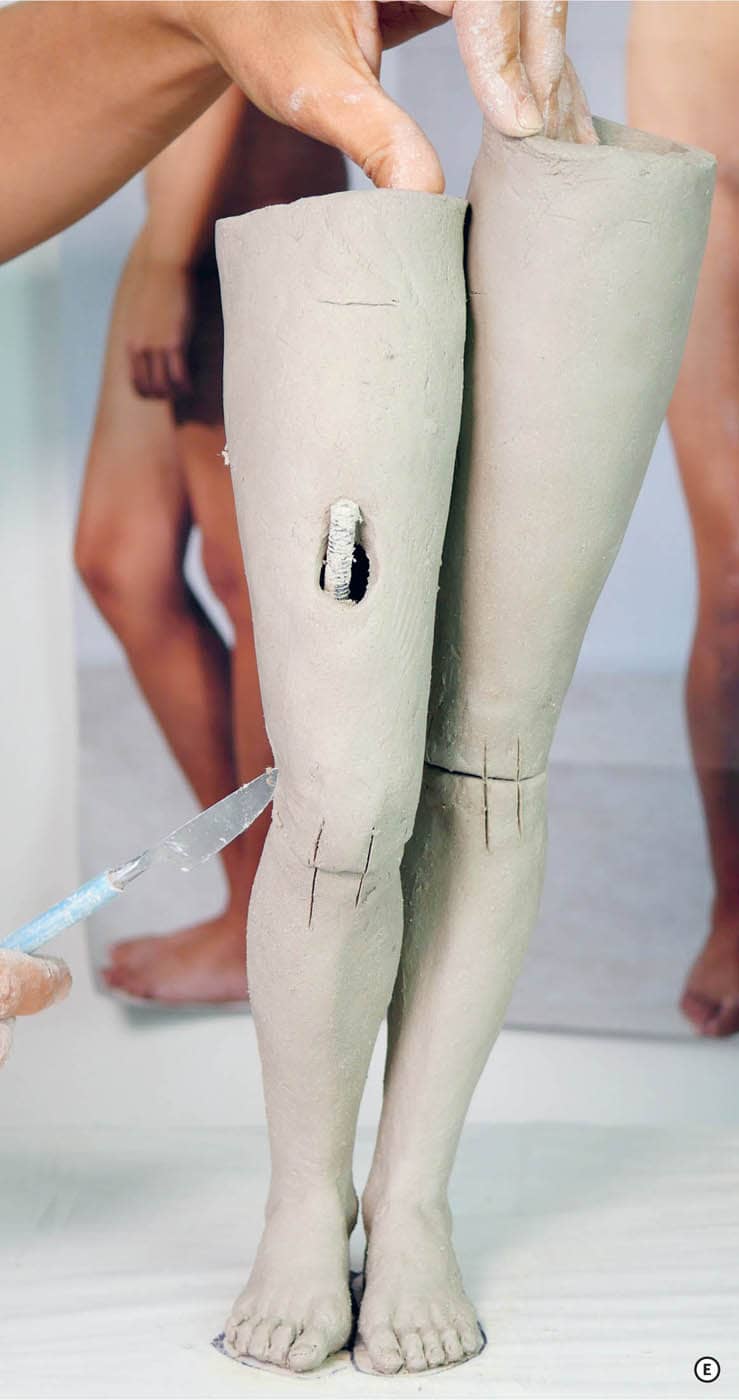
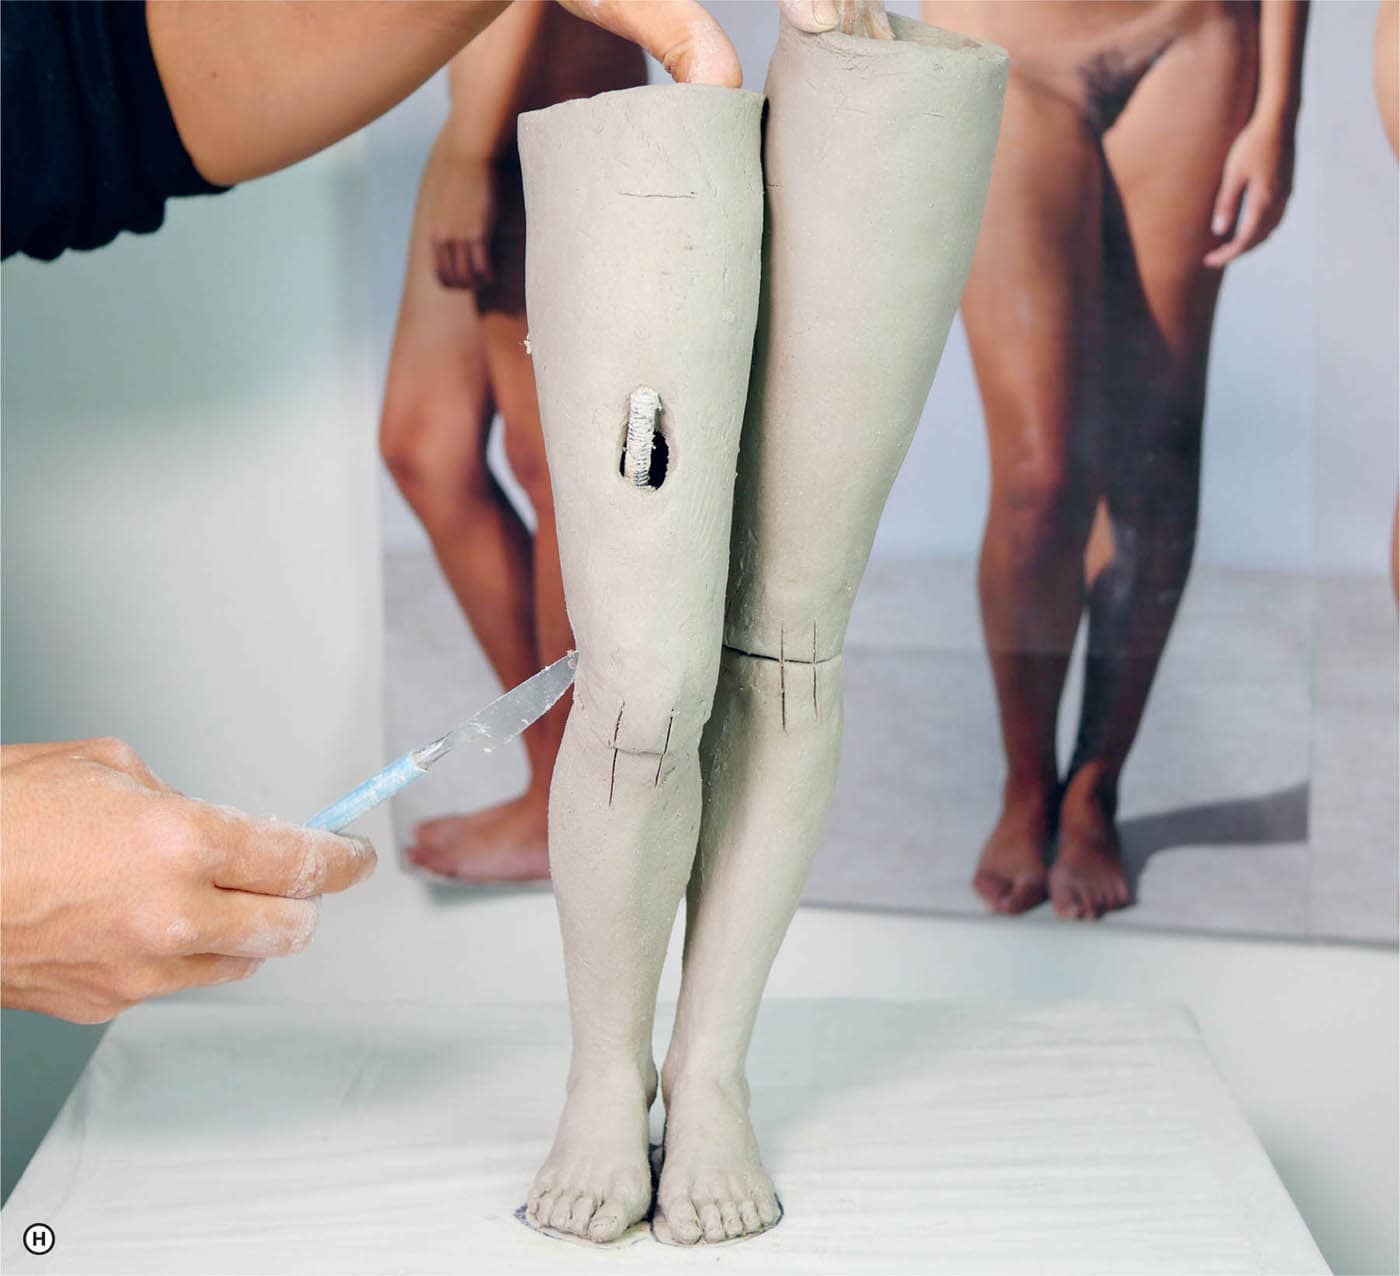
Next you will affix the upper legs. Draw two or three vertical keys across the horizontal seams between your upper and lower legs, marking their placement. Remove the upper legs and then slip and score both sides of each seam before reattaching. As you are applying downward pressure to the upper right leg, support the front of the knee area with your free hand to stabilize the lower leg. This support will both provide resistance to aid in compression and preserve the alignment of the leg parts. Because the left leg is straight, your downward pressure should not affect the position of the lower leg. Join the legs by slipping and scoring the inner thigh areas and pressing them together from within the upper leg cavities, helping to stabilize the posture. To further secure the form, you can add some clay on the inside of the upper left leg between the inner clay wall and the rod. Once your upper legs are fixed into place, slip and score the outside of your two horizontal seams and pack fresh clay into these joints to strengthen them, making small adjustments as needed. Check your alignments to ensure that everything remains consistent with your references before letting your seams set. ![]()
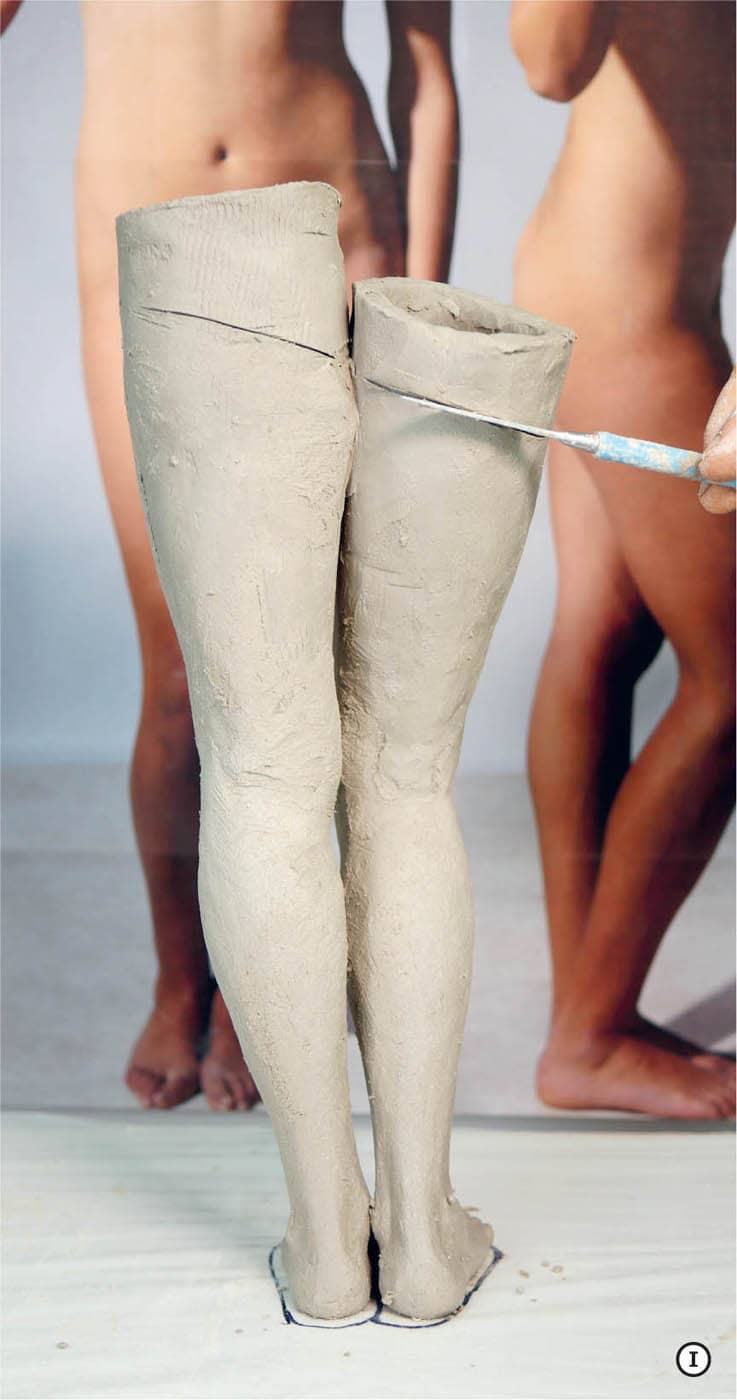
To prepare the legs to receive the pelvis, you will trim the tops of the leg forms to create a single angled plane. Because the pelvic tilt in this pose is most apparent from the front and back views, turn to your back photographic reference image. On either side, take a measurement from the bottom of the heel to just above the gluteal crease, towards the center of each leg. Mark those two points onto your sculpture front and back. Connect those two marks to form a diagonal line on both the front and the back. Continue these lines around the sides to establish your cut line, and then follow that line with your knife to trim away excess material from the tops of the legs. ![]()
![]()
PELVIS
Place your printed pelvis templates on top of a ⅜ inch (1 cm)–thick slab and use a knife to mark the guidelines and cut around the perimeter. ![]() Next, bend each slab into a cylindrical form until the two short edges come together and overlap along the guideline.
Next, bend each slab into a cylindrical form until the two short edges come together and overlap along the guideline. ![]() Slip and score these edges and compress the seam together. Move your serrated rib across the inside and the outside of your seam in a cross-hatching motion to interlace the clay particles and strengthen this connection point. Use enough pressure to gradually compress this seam without distorting the shape.
Slip and score these edges and compress the seam together. Move your serrated rib across the inside and the outside of your seam in a cross-hatching motion to interlace the clay particles and strengthen this connection point. Use enough pressure to gradually compress this seam without distorting the shape. ![]()
![]()
Bring the pelvis to your photographic references and compare it to your four cardinal perspectives, making adjustments by pushing in or out as needed. Using calipers, capture height and width measurements from your photographs and compare them to your form, paddling in or pushing out if necessary. Once you are satisfied, hold the pelvis over the legs to align the edges, reconciling any discrepancy by pushing out or tucking in to allow for good surface contact.
When the pelvis has dried enough to hold its shape without distorting when squeezed lightly, set it over the legs and the composition with each of your photographic references, using your calipers to compare heights and thicknesses. Because the pelvis will sit lower towards the front of the legs, you will have to trim some material to bring that front edge of the pelvis slightly down. Once the position matches the references, you can add bits of clay to even out the edges of the legs and pelvis, ensuring that they echo each other and are making good contact.
When you are satisfied with the tilt of your pelvis, draw your vertical keys, marking through the pelvis and the upper legs so that you can find the proper alignment after slipping and scoring all edges. Often, when working on larger forms where the insides of the forms are accessible to my hands, I will add coils of fresh clay to the insides of my seams, to facilitate a stronger connection. ![]()
![]() Compress the pelvis onto the legs with firm and careful pressure and then score the inside and outside of the seam, adding fresh clay to secure the connection and fill any gaps. There will be a small gap towards the front, in the pubic area, and another in the back, at underside of the intergluteal cleft. Slip and score these areas and pack fresh clay to fill the gaps, fully integrating your forms. In preparation to receive the torso, add a coil of fresh clay to the figure’s right side at the opening at the waist to bring the top of your sculpture to level. Be sure to slip and score before integrating this coil. Finally, return to your references. Turn your figure and compare it to your four photographic blueprints. Using both your eyes and your calipers, verify that all the forms and measurements remain consistent with the photographic material.
Compress the pelvis onto the legs with firm and careful pressure and then score the inside and outside of the seam, adding fresh clay to secure the connection and fill any gaps. There will be a small gap towards the front, in the pubic area, and another in the back, at underside of the intergluteal cleft. Slip and score these areas and pack fresh clay to fill the gaps, fully integrating your forms. In preparation to receive the torso, add a coil of fresh clay to the figure’s right side at the opening at the waist to bring the top of your sculpture to level. Be sure to slip and score before integrating this coil. Finally, return to your references. Turn your figure and compare it to your four photographic blueprints. Using both your eyes and your calipers, verify that all the forms and measurements remain consistent with the photographic material.

At this stage, you will need to let your sculpture dry in a strategic manner before moving on to the next layer. To encourage some parts to stiffen up more than others, you must carefully monitor the moisture throughout your composition, leaving some parts temporarily exposed to stiffen while applying plastic or moistened towels to safeguard or rehydrate other components. At this stage, you want to keep your feet, legs, and pelvis stiff without becoming bone-dry. Protect the edge of the pelvis that will be receiving the torso by covering it with an extra layer of plastic or a moistened shop towel if it needs extra hydration.
It is important to understand the specifics of your particular clay body. The more you work with a clay body, the more you will appreciate how dry it needs to be to hold weight, and how moist it needs to be to remain workable and receptive to further attunements. Small appendages such as feet, hands, and ears are important places to keep hydrated with moist shop rags under plastic, as they are more vulnerable to quick drying than larger areas of form.