
ONE KEY ELEMENT that sets figurative ceramics apart from the overall world of figurative sculpture is its innumerable options for surface treatment. Developing surface treatments has been one of the most challenging aspects of my career in ceramics. I remember spending many hours sculpting a form, only to feel insecure and lost when it came time to transition into the realm of surface development and glazing. It gradually dawned on me that glazing and pigmenting a ceramic surface are essentially re-sculpting through layers of color, texture, and light. Much more than a finishing afterthought, embracing this mindset will help you expand on what is set in motion through our rendered form, helping you complete the overall narrative of a piece. By understanding the possibilities offered by ceramic medium, you can open a limitless range of options to extend the reach of your sculpting and allow the form to coalesce with a surface in ways that amplify its impact.
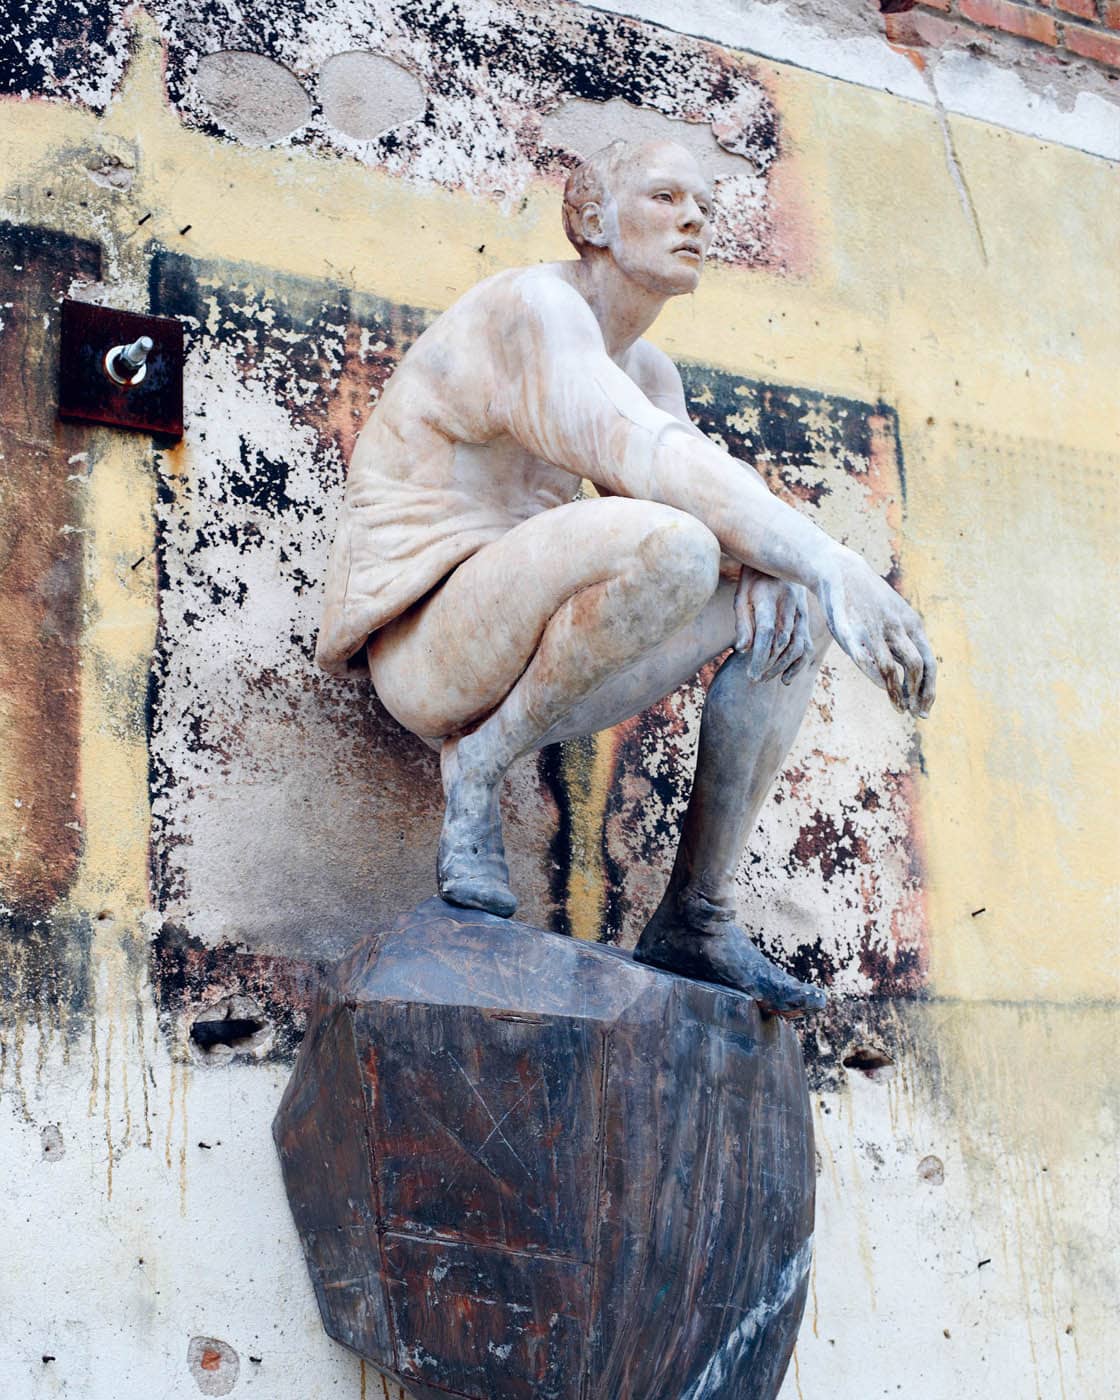
Cristina Córdova, Preludios y Partidas, part of the collection of the Mint Museum of Craft and Design.

SURFACE DEVELOPMENT
When thinking about the surface that will overlay the sculpting, I begin to make decisions before I start the form, considering the color of my clay body and the range of temperatures that it will fire to. For example, I have surface combinations that I will develop over red clay, capitalizing on the richness of the surface by covering it with glazes that will be in dialogue with that red, revealing it around the edges and allowing it to warm up the piece. Conversely, I have different options for white or buff-colored clays, which preserve the vibrancy of colors. These combinations also change depending on the temperature I will be firing to. I normally low fire my surfaces between cone 04 (1945°F [1062°C]) and cone 2 (2088°F [1142°C]), occasionally venturing into cone 5 (2167°F [1186°C]).
The key thing to understand is that in the realm of electric-kiln fired ceramics, the kiln environment offers no atmospheric impact other than heat. Therefore, the most interesting surfaces must be researched and staged—and usually involve layering and multiple firings.
In addition, it is important to keep in mind the dialogue with the dynamic figurative forms that comprise our sculpture. You never want the surface treatment to dull, confuse, or mute your form’s power. To this end, how you apply your surfaces, be it via brush or sprayed, thick or thin, will have a big impact on the results. These applications strategies may vary within the same piece to respond to the evolving volumes and to protect detail.
This might sound like a lot to figure out and to juggle, but surface development does not have to be intimidating. There are simple, straightforward ways to achieve great results. For example, when I first started working with the figure, I would finish most of my surfaces with oxides (mostly copper and red iron oxide washes), later introducing underglazes. I felt I could control these materials more easily. Eventually I entered fully into the realm of glazing through a process of trial and error that developed alongside my sculptural practice, with plenty of testing.
Testing is a very important part of your ongoing exploration into surface development. Because working with the figure is such a laborious undertaking, when combined with the many variables that could affect how a piece looks after firing, it is key to experiment with lower stakes. I recommend developing a series of tiles that you can use to try different surface combinations, informing how you’ll finish your sculptures and improving your chances of success.
When I test surfaces, I do it in several phases. First, I will use tiles that are simple, essentially a textured slab standing upright. Here I just want to get a sense of the color, the reflective quality of the glaze or surface, and how it flows with gravity when fired. After testing a large array of different recipes on these tiles, I will move to the second phase, which involves tiles that are a little bit more articulated, usually formed as an abstracted torso and face or just a face. These are generated through a plaster press mold that helps expedite the creation of multiple tiles. With these figurative tiles, I’m starting to introduce more depth in how I’m staging these surfaces, usually applying washes before layering glazes so that I can really begin to see the dynamics between the layers in the context of the figure. As I accumulate interesting possibilities, I start to discern which combinations will work best for skin and which ones could be used for clothing or other parts of the composition.
Javier Marin

Expressive, dynamic renderings, the use of various scales, and the orchestration of multiples within a space all play a role in the extraordinary impact of Marin’s sculptural interpretations in the world.
Marín’s figures speak to the shared reality of being human in bodies that, as vessels, accumulate the incessant marks of life.


Marín is a master at evoking a sense of pathos and power in his heroic renditions of the body. His potent manipulations of the human figure infuse his compositions with an energy that appears to be perceptive, invoking into the illusion of sentiency.
Cathartic textures add a patina that speaks of time, experience, and embattlement.
Grzegorz Gwiazda
The artist’s profound knowledge of the human form and its potential for expression brings forth a powerful body of work that walks a fine line between the exquisite and disturbing. I consider him one of the most important sculptors of our generation.


A master at gestural transmission, Gwiazda’s compositions speak across material and conceptual realms, revealing a vivid emotional range achieved through a profound attention to the dynamics of the body, captured and amplified by the clay.
In his work, forms appear and disappear, slipping in and out of focus, at times transgressing the natural logic of the figure and allowing the viewer space to decode the poetics of form.

DRYING AND FIRING
SHRINK SLABS
When working large, I build on top of a shrink slab, which is loaded in the kiln with the piece and fired underneath it. A shrink slab is a perforated clay waster slab that will buffer the friction between the bottom of a heavy piece and the kiln shelf to avert cracking and warping. It is made of the same clay body as the sculpture and will shrink at the same rate during the firing. To make one, I roll a slab about ½ inch (1.3 cm) thick and slightly larger than the footprint of my sculpture. Then I pierce or drill holes all over the slab spaced every 1 to 2 inches (2.5 to 5 cm), and let it stiffen some before building on top of it. I also put a layer of sand or grog between the shrink slab and the kiln shelf. This layer of sand is very helpful for sliding a sculpture off of a cart or work board and onto the kiln shelf, and it also helps the shrink slab contract easily during the firing. Silica sand, sold as “play sand” at hardware stores, is good for this purpose.
FIRING SUPPORTS
There are some sculptures that require the help of external supports during firing to prevent sagging or cracking. Primarily, these are pieces that have elements projecting off of the main form, such as a figure with an outstretched arm, or pieces that are carefully balanced with a lot of mass supported on a relatively small base, such as a standing figure. Even a standing figure that is fired laying down may require support, if the head, arm, or leg does not make contact with the kiln shelf. In these situations, the ideal supports are those made from the same clay body as the sculpture, because they will shrink at the exact same rate during the firing. You can use clay slabs to make standing cylinders, perforate them with holes for quick drying, and place them under cantilevered portions of the sculpture. For taller supports, another option is to stack soft kiln bricks into a tower and top it with a smaller clay support that makes contact with the sculpture. If a figure sculpture is laying down in the kiln and needs just a short support under an appendage, it is often possible to put just a small piece of kiln brick or a pile of sand under it.
Once a sculpture is glazed, it becomes harder to support during firing, since the glaze will stick to anything it touches. In this case, you can use the same kind of supports, but top them with commercially available firing stilts so that only their small metal prongs make contact with the glaze surface. If the piece has already been bisque fired at or above the glaze temperature, it won’t continue to shrink, so any kiln furniture can be used for support under the stilts. If the entire surface of a sculpture is glazed, the whole thing can be fired with stilts between it and the kiln shelf. Just remember if the piece is heavy, you may need many stilts spread out to support its weight.
DRYING
Most of my sculptures are loaded into the kiln when they are “leather-hard,” before they are completely dry. At this stage, the clay is strong and not yet brittle, so it is an ideal time to move the piece. Drying can continue after the sculpture is safely in the kiln. If you have time, you can allow the sculpture to air-dry completely before starting the kiln by leaving the lid open with a fan blowing across the top to help circulate air. You can also start the kiln immediately on a drying cycle if you need to speed up this process. Even if the clay is totally dry, it is important to use a kiln drying cycle before the true firing begins. The key is to raise the temperature gently and hold it as long as necessary at 180°F to 190°F (82°C to 88°C). This is safely below the 212°F (100°C) boiling point of water, at which point moisture in the clay can turn to steam and cause a crack or explosion as it escapes. How long you hold your sculpture at this temperature depends on how large and thick it is and how dry it is when you start the kiln. For my largest sculptures, if fairly wet to start, I may hold this preheat for up to 60 hours. For small, dry pieces it might be as little as 2 hours. A helpful way to gauge dryness is to hold a mirror or piece of glass to one of the kiln’s top peep holes and see if it fogs up with condensation. If it does, there is still moisture in the kiln, and you should probably continue the drying cycle. It never hurts to dry a sculpture too long, but rushing this stage can be disastrous! It pays to err on the side of caution after you have invested so much time in making your artwork.


FIRING
After the drying cycle, you will move into the real firing. If using a digitally controlled electric kiln, the initial drying at 180°F to 190°F (82°C to 88°C) is usually programmed along with the rest of the firing, so the kiln will continue straight into the firing after that period. For smaller sculptures, it can be okay to use a preset “Slow” program on most kilns, but for larger pieces, you will need to program a slower, gentler firing to keep your sculpture from cracking during the firing or cooling. The paper clay I use for large-scale sculptures can be fired all the way to cone 10, but I choose to fire only to cone 2, which gives it sufficient strength for a sculpture. Firing below the point of full vitrification (when clay particles fuse to become glass-like) puts less stress on the piece, keeps it from shrinking as much, and reduces the likelihood of cracks and warping. Here are my recommended firing schedules.
SLOW CONE 2 FIRING FOR MEDIUM-SIZED CLAY SCULPTURES
(Like the standing figure demonstrated in this book.)
EXTRA SLOW CONE 2 FIRING FOR VERY LARGE CLAY SCULPTURES