
I FIRST BEGAN sculpting with clay slabs as a means of building forms quickly and creating objects that could go straight into the kiln, with only minor adjustments at the end of the sculpting process. This system has enabled me to build sculptures with limitless forms at almost any scale.
This technique will allow you to turn flat planes—clay slabs—into complex, curvilinear forms that come together in dynamic ways. Working this way, everything starts with a block of clay that is turned into a slab through the use of a rolling pin or a slab roller. By using either formal paper patterns or intuitively cutting and darting slab-formed cylinders, you can quickly construct core shapes. Next, we’ll adjust these hollow core forms by pushing the walls in or out, which offers a dimension of engagement that is unavailable in solid building. After developing the forms on a musculoskeletal level, you’ll move toward the realm of fat pads and skin by adding pieces of fresh clay onto the stiffened core. As you hone your forms through incremental modifications based on a deep level of observation, the very breath of life can seem to enter this inert material. In this chapter, I’ll explore the initial steps in more depth, offering different ways to begin sculpting the figure.

HOW TO MAKE A SLAB
There are multiple ways to prepare a slab, depending on the tools you have at your disposal. The most expedient way to make slabs is with the use of a slab roller. I use a Bailey DRD/II 24 Direct Drive S/R with a 69 inch (175 cm) table. I highly recommend this tool as an addition to your studio if most of your work will use slabs, especially if you are interested in delving into large-scale compositions. However, you can also make perfectly good slabs with a sturdy rolling pin and some strips of wood. I will cover both methods in this section.

No matter which method you choose, the goal is to make a slab that is a consistent thickness. For the tutorials in this book, you will also need to make sure your slabs are large enough in length and width to fit your templates. Throughout the construction process, I recommend working with ⅜ inch (1 cm)–thick slabs.
MAKING A SLAB WITH A SLAB ROLLER
Much like a printing press, a slab roller consists of a large metal roller, or sometimes two rollers, depending on the style, centered over a flat surface. The roller can be raised and lowered with a crank to adjust the thickness of your slab. You will lay your clay between two pieces of canvas when it is going through the slab roller so that the clay does not stick to the roller and present a cleanup challenge. Your canvas should be slightly narrower than the roller, so it does not get bunched up when going through the press.
Set the gauge to ⅜ inch (1 cm) plus a little more to account for the thickness of your canvas. Next, lay the piece of canvas down on the slab roller table (feeder side, if applicable) and smooth out all the wrinkles.
If you are using pre-wedged clay straight from a fresh bag, use your wire cutter to take an even slice off of the long length of your clay cube and place that slice directly onto your canvas. If you would like, you may use rails—two pieces of wood of identical height, located on either side of your block of clay—to guide your wire cutter through your block of clay.
If you are using reclaimed clay, wedge your clay thoroughly and then whack it with a rubber mallet both horizontally and vertically to achieve a proto-slab of consistent thickness. Alternatively, you can throw your clay down in an angled motion onto a smooth concrete floor or canvas-covered table to generate this proto-slab. Your proto-slab needs to be thicker than ⅜ inch (1 cm) in all areas. I tend to aim for a slab roughly 1 to 1.5 inches (2.5 to 3.8 cm) thick.
To help the roller catch the clay, tamp down slightly on the edge of your proto-slab that will first make contact with the roller, creating a subtly tapered edge. Feed the front edges of both pieces of canvas beneath the roller and then pull gently on those canvas ends while turning the large wheel that rotates the roller. If any wrinkles emerge on the canvas as you are turning the roller, smooth them out before they go under the press, taking care not to let your fingers get too close to the roller. You never want to reduce the thickness of your slab by more than half of its initial thickness, so you may require more than one pass to get to ⅜ inch (1 cm).
Note: It takes more clay and more passes through the slab roller to generate larger slabs, but you can always use scoring, slipping, and compression to knit small slabs together at their edges into one large slab.
MAKING A SLAB WITH A ROLLING PIN AND THICKNESS STRIPS
To make a slab using a rolling pin, begin by cutting a slice of clay off your bag. You want your slice to exceed your target thickness, but if it starts out too thick, you risk overly displacing the vertical alignment of the clay molecules. Clay has “memory,” and such displacement could invite undesired warping or cracking later in the sculpting or firing process. For a ⅜ inch (1 cm) finished slab thickness, I try to start with a slice that is 1 to 1½ inches (2.5 to 3.8 cm) thick.
Cut another similarly sized slice off your clay block and use a fork to thoroughly score and slip an area of at least 1 inch (2.5 cm) along the long edge of each slice. Next, overlap the edges of the two slabs so that the scored areas meet.
Compress along this seam using first your palm, then a serrated rib and finally a rolling pin. Move the serrated rib in a cross-hatching motion to integrate the clay particles.
Flip your slab over carefully and use your serrated rib on the other side of the seam. Using a rubber mallet, start beating your clay with even, rhythmic hits. Go from one side to the other in vertical strokes, then turn your slab or reposition yourself to repeat the same process using perpendicular strokes. Your clay should start flattening and expanding.
As your clay approaches your target thickness, roll the rolling pin from various directions, applying more pressure to high points. If you have access to ⅜ inch (1 cm) wooden “thickness strips,” you can place these strips on either side of your slab to create a track for your rolling pin to roll on and make your thickness uniform. Once you meet your target thickness, you can trim the organic edges into straight lines and add additional sections to create a larger slab.
Working with patterns expedites the construction of basic forms and creates a consistent starting point for different figurative compositions. Inherently pliable, clay allows us to plot dimensions onto a flat slab and then configure that slab into a three-dimensional form that can be repeated and adjusted for endless applications. The beauty of a pattern within the context of figurative ceramics is that it holds anatomical information yet is not overly prescriptive; one can generate myriad compositions from the same set of templates. Patterns also help mediate shifts in scale. By enlarging a template extracted from a small sculpture, one can resolve artistic decisions at a manageable scale before embarking on projects that involve a significant investment of time and resources.

USING PATTERNS
This book contains a set of general patterns for all the parts of the body to construct a figure and explore this hollow building technique. When working in conjunction with photographic references, templates allow us to create well-proportioned, generic forms onto which you can then model more specific features and gestures using photographic references. We will use them to build a 25 inch (63.5 cm) standing figure on a basic rod armature. You will need to enlarge each template page by the indicated percentage before using. Note that throughout this book, I will use the terms pattern or template interchangeably to indicate a flat paper guide with markings used to support the cutting of a slab to generate hollow clay forms.
Although these templates offer a great starting point, you can also develop your own shapes through simple observations, opening a world of compositional possibilities.
HOW TO CREATE YOUR OWN PATTERNS
There are innumerable ways to generate a shape that could serve as a template. In my practice, I either extract measurements directly from a model or photoset or base my patterns on sketches drawn at my target scale. The precision of the former method can be grounding, yet the freedom with which I am able to express anatomical information in my drawings lets me capture gestures that are less focused on naturalism. Let’s explore pattern making in the context of a head and show you how to easily generate your own set of forms to integrate into your practice.
MAKING A HEAD SHAPE PATTERN WITHOUT UTILIZING PHOTOGRAPHIC REFERENCES
Entering the realm of figurative sculpting without any references is a bit like entering into a jungle. Guided by your own intuition and aesthetic compass, you may discover a rich landscape of possibilities, but there is also the chance to get lost and untethered amidst so many creative prospects. For this reason, even if you are not using photographic references or a model, I recommend beginning every project with a session of two-dimensional or three-dimensional sketching (see Chapter 1) that you can photograph and print out to scale. In this case, we will be building a head using a quick clay sketch printed to scale with two views, leaving plenty of space for discovery.
To start, you will need to determine the dimensions of the slab from which you will build your head. Begin with either scaled sketches or printed images of a small clay study digitally adjusted to your target size. Make versions of these references in both front and profile views. Your references should be the size of the head you are hoping to sculpt. First, turn to your profile sketch and measure the distance from the front to the back of the head along two horizontal lines: Once across the midline, below the nose, and once from the top of the chin to the back of the neck. Then, measure the vertical distance between these two points and record these three measurements on a piece of paper. Next, use your front view sketch to measure the width of the head at the same vertical levels you used when taking your profile measurements: right below the nose and above the chin. Multiply these values by 2 and add these to the first horizontal measurements to establish the widths of your slab (front width × 2 + side width = total width). Because we are not measuring a cube, these measurements will be “soft” (as opposed to absolute), meaning they will need to be adjusted to describe the dynamics of a curvilinear plane and to allow extra material for overlapping vertical seams. As a rule of thumb, I select the narrowest and the widest points throughout the shape I am trying to recreate to extract measurements, multiplying the front measurements by 2 before adding the side measurement just once.
To determine height, I measure from the base of my printed sketch to the top of the head and add about 30 percent (15 percent in each direction) to that dimension. This tolerance will both provide extra material to support the head under the chin and enable you to articulate the dome of the head. With these five values, sketch a diagram of your starting shape to know how big your slab will need to be. The width of the top line will be the same as that of the below nose line and the width of the bottom line will be the same as the above chin line. Once all measurements have been established on paper, you can connect the outer edges and create your cutting guide. Roll a slab that is ⅜ inch (1 cm) thick, plot your starting shape onto the surface, and cut accordingly. ![]()


Note: Because clay objects used to create patterns are essentially throwaways, I recommend working at a modest scale, no larger than 5 to 7 inches (12.7 to 17.8 cm) in height. This economy of scale will both save clay and help you resolve forms more quickly as you generate an assortment of templates to enlarge or reduce digitally.
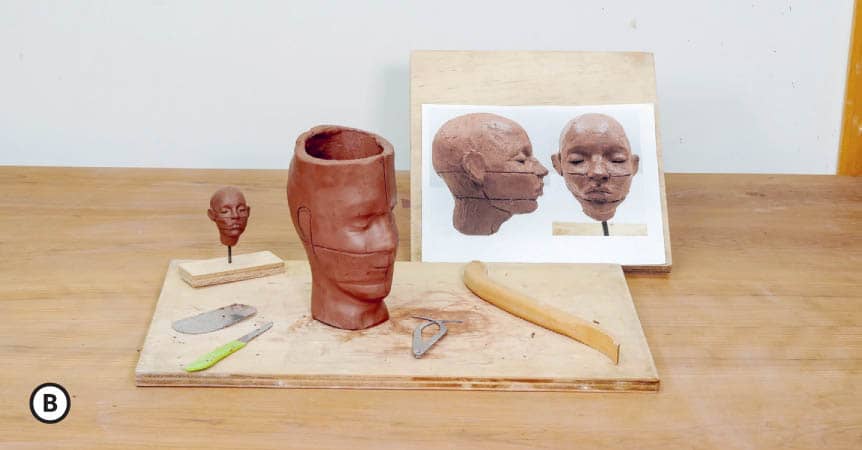
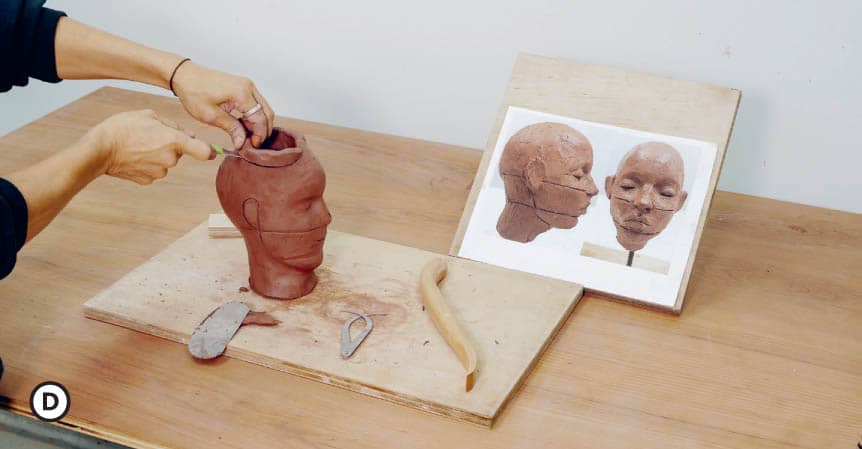
Once the slab is at the proper state of dryness, able to hold its weight on edge but still pliable, stand it on its side to make a tapered cylinder. Adjust, cutting away and resetting the proportions, until you feel satisfied with the feel of this preliminary form. Next, make additional adjustments by pushing in and out, articulating soft shapes to begin to describe primary features before capping the form to complete the shape. Finally, make additional notes around the key landmarks on your piece by drawing onto the surface noting the placement of the eyes, brow, nose, mouth, jawline, chin, and ears. ![]()
![]()
![]()
![]() Wait for your piece to set—it should be beyond a “sticky” stage, but still pliable—then begin to cut the form apart and flatten the shape in order extract your pattern.
Wait for your piece to set—it should be beyond a “sticky” stage, but still pliable—then begin to cut the form apart and flatten the shape in order extract your pattern. ![]()
![]()

CUTTING A HEAD SHAPE TO CREATE A PATTERN USING ANY HOLLOW FORM THAT IS STILL PLIABLE
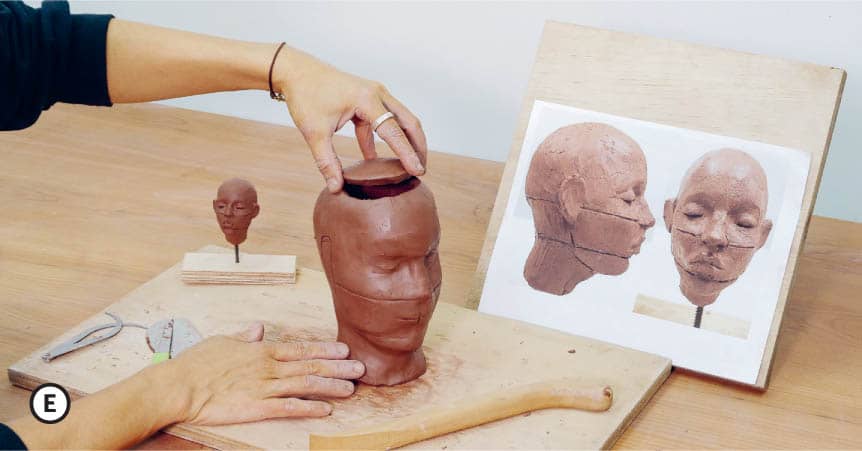
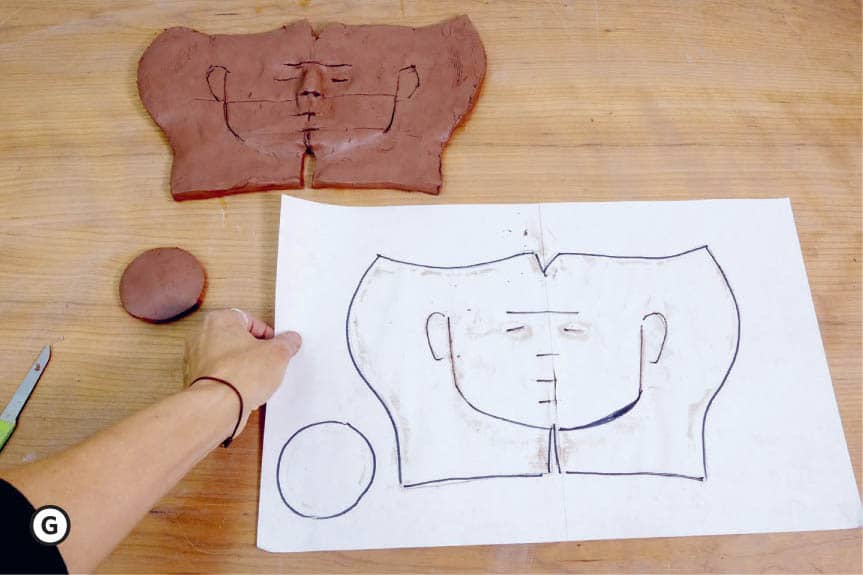
If you have a sculpted head that you'd like to make a template from, start by cutting a small circle out of the very top of the head. (In our model, this step is done.) Set this clay disc on a piece of paper and trace around it with a pencil. Next, find the vertical centerline of the back of the head and cut down this line from top to bottom. The head is now open on top with a slit running down the back. Gently open the head at this back seam and uncurl the clay, laying it down on a piece of paper with the face up. The areas with the most curvature, the upper part of the head and the chin, will not want to lay flat easily. If the head is small, I will simply press these areas flat. If it is a larger head, cut short slits at the places with the most curvature to help these areas lay flat. These slits will open and create triangular darts in the eventual paper template. When the clay head is lying flat, I trace all the way around the edge. Next, take a needle tool or thin knife and cut through the flattened clay face to transfer key features to the paper underneath.
Cut slits to mark the eyeline, the bottom of the nose, the mouth, the mandible, the brow line, and the chin. When the clay is lifted off the paper, you’ll have the rough draft of your head template. This paper will be stained, damp, and wrinkled from contact with the clay. The lines drawn with pencil and cut with the knife may be faint. To create a more durable, clear template, let the paper dry and then cut out the traced head shape. Using an X-ACTO knife, cut through the lines that mark the facial features. Next, lay the rough paper template on a clean piece of paper or plastic sheeting and trace around the perimeter with a fine-point marker before drawing through the slits in the paper to transfer the facial feature marks. Add about ¼ to ½ inch (0.64 to 1.3 cm) to one side of the seam at the back of the head so the slab can overlap there for a strong connection. You now have completed your pattern! You can use this template to reproduce multiple small heads at the scale of the maquette shown here, or you can enlarge it to use the captured information at different sizes.
This approach can be used to make shape patterns for any form where you have a scaled front and side view. ![]()
Judy Fox
How do you research and ground yourself around a subject before committing to the long process of making a new piece?
The process of making a figure begins in my mind. As I would look at cross-cultural art or read the newspaper, I would always be on the lookout for images. I want an iconic gesture that might be read, or even misinterpreted, in an interesting way by a contemporary gaze. From a striking historical character or image, I’d start to imagine a figure and tinker with it. I would then find a model of the same ethnicity as the prototype and take many photos from all angles. Working from the photos and with my knowledge of anatomy, I put together a portrait of the model in the predetermined pose. My rendering was specific and concentrated so that the spirit of the individual would be channeled, creating a sometimes awkward drama as they balanced in a contrived position. Superimposition of individual and type was reinforced by styling a historically sourced hairdo atop an otherwise naked body. The impact of the piece that emerged from its conflicted elements can be a surprise. Are we seeing an actor or a victim of projected meaning?
Could you talk briefly about your process as it relates to clay?
Clay is the most versatile material I know as far as creating form straight from the mind. Each piece is hand built gradually to its general shape from the bottom up and then maintained at leather-hard. There are removable metal rods in the legs. The rigid clay is carved with plaster rasps so that the form is controlled and the surface has a firm look. I add details in soft clay as I work and carve them when they firm up. Larger works are carved and fired in pieces and glued together after firing. I then fill the seams with plaster so they are not visible after the surface is painted with casein.

