
In this chapter, you'll start looking at Visual Basic for Applications' tools for creating custom dialog boxes that interact with the user. Dialog boxes are one of the most powerful and complex features of VBA. This chapter covers the more straightforward dialog box elements and how to manipulate them. The next chapter shows you how to create more elaborate dialog boxes, such as those that contain a number of tabbed pages and those that update themselves when the user clicks a control.
In this chapter you will learn to do the following:
Understand what you can do with a custom dialog box
Create a custom dialog box
Add controls to a dialog box
Link dialog boxes to procedures
Retrieve the user's choices from a dialog box
You'll often want to use a custom dialog box when simpler methods of interacting with the user fall short. Sometimes, because of the limited selection, the buttons provided in message boxes are insufficient for getting needed information from the user. Similarly, the single text box available in an input box would be inadequate if you need the user to fill out a form (name, address, phone number, and so on).
You'll also need to use a custom dialog box when you need the user to choose nonexclusive options by selecting or clearing check boxes, to choose among mutually exclusive choices via option buttons (also called radio buttons), or to select an item within a list displayed in a list box. Or perhaps you need to show users a picture. In other words, simple message boxes or input boxes cannot handle complex user input.
Custom dialog boxes provide the full range of interface elements the user is probably familiar with from working with Windows applications. You can create custom dialog boxes that look and function almost exactly like built-in dialog boxes or even larger constructions that approach the sophistication of typical application windows.
You'll use custom dialog boxes often to drive your procedures. For example, when the user starts a procedure, you can have the procedure display a dialog box presenting options—such as choosing the files for the procedure to manipulate. The user's choice determines what the procedure will then do. You can also create dialog boxes that VBA triggers in response to events in the computer system: for example, an event that runs at a specific time or runs when the user takes a specific action (such as creating, opening, or closing a document).
Because creating dialog boxes is not the simplest programming job, it's wise to consider any practical alternatives to using them. You've already looked at message boxes and input boxes, which provide a simple alternative for some of the easier tasks for which you might want to create a custom dialog box. Some applications, such as Word and Excel, even let you borrow their built-in dialog boxes for your own purposes. If users are familiar with the application, they're probably familiar with these built-in dialog boxes and can immediately use them to perform standard actions—for example, to open or save files. These are called common dialog boxes. Common dialog boxes are demonstrated in the Real World Scenario titled "Control a For... Next Loop with User Input via a Dialog Box" in Chapter 12.
VBA uses visual objects called user forms to implement dialog boxes or windows. A user form (also sometimes referred to as a form) is a blank sheet on which you can place controls (such as check boxes and buttons) to create a dialog box.
The user form contains a code sheet that holds code attached to the controls in the form. You can attach code to any of the controls and to the user form itself and that code is stored in the user form's code sheet. You can display the user form's code sheet in the Code window of the Visual Basic Editor and work with it as you would any other code. You can run the user form as you would a procedure (for example, by pressing F5 with the user form selected) and the VBA Editor will execute the code behind it.
Each user form becomes part of the application's user interface. In practical terms, this means that you can display a user form (a dialog box) for the user to interact with, and you can then retrieve information from the user form and manipulate it with VBA.
Each user form is itself one object and contains a number of other objects that you can manipulate separately. For example, you could create a simple dialog box with two option buttons, an OK button, and a Cancel button. Each option button would be an object, the OK button would be a third object, and the Cancel button would be a fourth object. You could set properties individually for each object—such as the action to take when the Cancel button was clicked or the ScreenTip (also called a tooltip) to display when the user moved the mouse pointer over one of the option buttons—to make the dialog box as comprehensible, straightforward, and useful as possible.
You can set most properties for an object either at design time (when you're creating the user form) or at runtime (while the code is executing, either before or when you display the user form). For example, you can set the Value property of a check box control to True to display the check box in its selected state or to False to display the check box in its cleared state. You can set the Value property either when creating the user form (so that it will be set each time you run the user form) or when preparing to display the user form. Note that the objects the prorammer can place on a dialog box—buttons, list boxes, text boxes and so on—are called controls.
The next sections explain the process of creating a dialog box. At the end of the chapter, you'll find examples that step through creating a procedure and adding a dialog box to it.
It's possible to whip together a half-decent dialog box without much planning. Some programmers like to just "sketch" the user interface in a dialog box by dragging and dropping controls onto it, then positioning them and modifying their properties. Other programmers prefer to adopt a more methodical approach and plan what they need to include in the dialog box before they start creating it. If you fall into this latter category, state the intended function of the dialog box and list the elements it will need in order to perform this function. Then sketch on paper a rough diagram of the dialog box to get an approximate idea of where you'll fit in each of the elements.
Once you have a design in mind, the first step in creating a custom dialog box is to insert a user form in the appropriate template or document:
Press Alt+11 to display the Visual Basic Editor if it's not already open.
In the Project Explorer window, right-click the appropriate project and choose Insert

Other Ways to Add a User Form
You can also insert a user form by clicking the Insert button on the Standard toolbar and then choosing UserForm form the drop-down list. (If the button is already displaying its Insert UserForm face, just click the button rather than bothering with the drop-down list.) Or you can choose Insert
The Visual Basic Editor opens a new user form like that shown in Figure 14.1, named UserForm1 (or the next available number if the project already contains other user forms). The Visual Basic Editor also displays the Toolbox. (If you've previously hidden the Toolbox while working on a user form, the Visual Basic Editor doesn't display it. Choose View
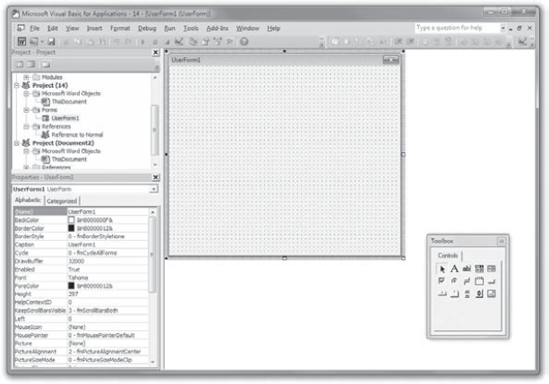
Figure 14.1. The first step in creating a new dialog box is to start a new user form. The Visual Basic Editor displays the Toolbox when a user form is the active window.
VBA automatically inserts the user form in the Forms object (the collection of forms) for the project. If the project you chose didn't already contain a Forms collection, VBA adds one to contain the new user form. You'll see the Forms object displayed in the Project Explorer.
The Visual Basic Editor displays a grid in each user form to help you place controls relative to the dialog box and to align controls relative to each other. To switch off the display of this grid or to switch off the Visual Basic Editor's automatic alignment of controls to the grid, follow these steps:
Choose Tools
Click the General tab to display the General page (see Figure 14.2).
Choose the settings you want:
Clear the Show Grid check box if you want to turn off the display of the grid. (The grid continues to function, but the dots are not displayed.)
Clear the Align Controls To Grid check box if you want to stop using the grid whether it's visible or not. This feature is usually a timesaver, but if the grid is too coarse for the layout you're trying to achieve, just reduce the sizing of the grid from the default 6 to perhaps 3 or 4.
Change the number of points in the Width and Height text boxes to adjust the sizing of the grid's units.
Click the OK button to close the Options dialog box and apply your choices.

Figure 14.2. The General page of the Options dialog box includes options for toggling the display of the grid, resizing the grid, and toggling whether VBA aligns the controls to the grid.
Naming Conventions in Visual Basic for Applications
Naming objects in VBA is similar to naming variables. Names for objects can be up to 40 characters long, must begin with a letter, and after that can be any combination of letters, numbers, and underscores. You can't use spaces or symbols in the names, and each name must be unique in its context—for example, each user form must have a unique name within a project, but within any user form or dialog box, an object can have the same name as an object in another dialog box.
Those are the rules; you can also use conventions to make the names of your VBA objects as consistent and easy to understand as possible. Recall the conventions you've used in previous chapters for identifying the variable type with a prefix: str, lng, int, and so on. The prefixes widely used when naming controls identify the control. For example, by using the convention of prefixing a text box control's name with txt, you can be sure that anyone else reading your code will immediately identify the name as belonging to a text box—and that you yourself will easily identify the name when you revisit old code you've written after a long interval.
Some popular naming conventions for the most-used VBA objects are shown in the following list. You'll encounter the naming conventions for other VBA objects later in the book. This list includes the control's name, the standard prefix, and finally an example showing how the control can be named in code:
- Check box
The standard prefix is
chk, as inchkReturnToPreviousPosition.- Command button
The standard prefix is
cmd, as incmdOK.- Form (user form)
The standard prefix is frm, as in frmMoveParagraph.
- Frame
The standard prefix is
fra, as infraMovement.- List box
The standard prefix is
lst, as inlstConferenceAttendees.- Combo box
The standard prefix
is cmb, as incmbColor.- Menu
The standard prefix is
mnu, as inmnuProcedures.- Option button
The standard prefix is
opt, as inoptSpecialDelivery.- Label
The standard prefix is
lbl, as inlblUserName.Text boxThe standard prefix is
txt, as intxtUserDescription.
Just as with variable names, the naming convention for controls begins with three lowercase letters and then starts the rest of the object's name with an uppercase letter to make it a little easier to read. For example, a text box in which the users are to type their last names might be named txtLastName.
Naming conventions tend to seem awkwardly formal at first, and there's a strong temptation to use any name that suits you for the objects in your VBA user forms. But if you plan to distribute your VBA modules or have others work with them, it's usually worth the time, effort, and formality to follow the naming conventions.
Next, change the user form's name from the default (UserForm1) to a more descriptive name. The following steps show how to do this. (For advice on choosing names, refer to the sidebar "Naming Conventions in Visual Basic for Applications" in this chapter.)
If the Properties window isn't displayed, press F4 to display it. Figure 14.3 shows the two pages of the Properties window: Alphabetic and Categorized. Alphabetic displays an alphabetical listing of the properties of the currently selected object; Categorized displays a listing broken down into categories, such as Appearance, Behavior, Font, Misc., Picture, and Position. (Some controls have more categories than those listed here.) You can expand a category by clicking the plus (+) sign beside it to display the properties it contains and collapse it by clicking the resulting minus (–) sign. If the Alphabetic tab isn't selected, click it to select it.
The Categorized option is not, in my view, very helpful because the controls are simply too difficult to fit into categories that make sense. The
Captionproperty, for example, is assigned to the Appearance category, but the(Name)property is contained in the Misc. collection. The very existence of a "miscellaneous" category demonstrates that the categorization has broken down. I suggest you use the Alphabetic option instead.Make sure the drop-down list (at the top of the Properties window) is displaying the default name of the user form. If it isn't, select the user form from the drop-down list.
Select the user form's default name (such as
UserForm1orUserForm2) in the cell to the right of the Name cell (you can double-click the name to select it quickly). Now type a new, more descriptive name for the user form. This name can be anything you want, with the standard VBA limitations:It must start with a letter.
It can contain letters, numbers, and underscores but no spaces or symbols.
It can be up to 40 characters long.
Click the Caption cell to select the user form's default name and type the caption for the user form—that is, the text label that you want the user to see in the title bar of the dialog box. This name has no restrictions beyond the constraints imposed by the length of the title bar. You can enter a name longer than will fit in the title bar, but VBA truncates it with an ellipsis at its maximum displayable length. As you type, the name appears in the user form title bar as well, so it's easy to see what's an appropriate length—at least, for the current size of the user form.
Press Enter or click elsewhere in the Properties window (or elsewhere in the Visual Basic Editor) to set the user form's name. (Naming controls works the same way as naming forms, described here.)
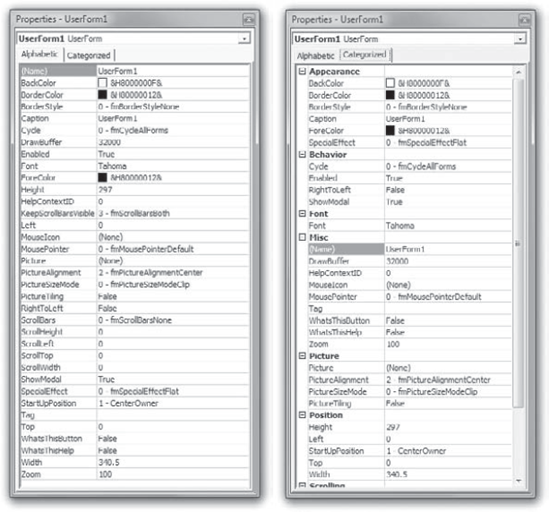
Figure 14.3. You can work on either the Alphabetic tab or the Categorized tab of the Properties window.
Dealing with the "Name Conflicts with Existing Module" Error
If you run into the "Name conflicts with existing module, project, or object library" error (shown here), chances are you've just tried to give a user form the same name that you've already assigned to a procedure. This is surprisingly easy to do when you don't use a formal naming convention.
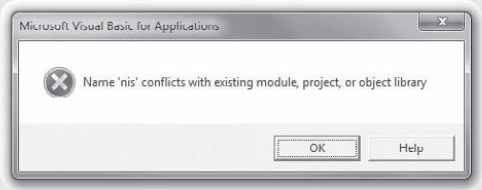
This error may also mean that you've reused the name of a VBA project or object library, but you're less likely to do this than to use a name that you yourself have already assigned.
Now that you've renamed the user form, you're ready to add controls to it from the Toolbox, shown in Figure 14.4. VBA automatically displays the Toolbox when a user form is active, but you can also display the Toolbox when no user form is active by choosing View
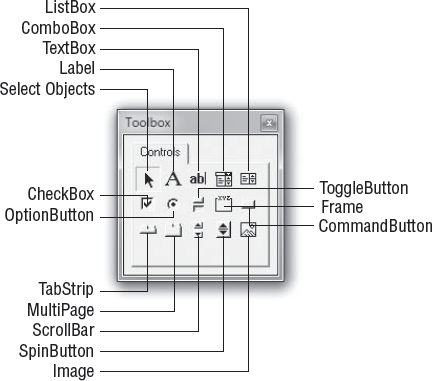
Here's what the buttons on the Toolbox do:
- Select Objects
This is rarely used. It's not an ordinary control (it doesn't appear on a form). It restores the mouse pointer to selection mode. The mouse pointer automatically returns to selection mode once you've placed an object, so usually you'll need to click the Select Objects button only when you've selected another button and then decided not to use it. Or, if you've double-clicked another button (such as the check box), then every time you click in the form, a new check box is added to it. To stop this behavior, click the Select Objects button.
- Label
Creates a label, which is text used to identify a part of the dialog box or to explain information the user needs to know in order to use the dialog box effectively.
- TextBox
Creates a text box (also known as an edit box), a box into which the user can type text. You can also use a text box to display text to the user or to provide text for the user to copy and paste elsewhere. A text box can contain either one line (the default) or multiple lines and can display a horizontal scroll bar, a vertical scroll bar, or both horizontal and vertical scroll bars.
- ComboBox
Creates a combo box, a control that combines a text box with a list box. The user can either choose a value from the list box or enter a new value in the text box.
- ListBox
Creates a list box, a control that lists a number of values. Users can pick one value from the list but can't enter a new value of their own (unlike with a combo box). The list box is good for presenting closed sets of data.
- CheckBox
Creates a check box and an accompanying label. The user can select or clear the check box to turn the associated action on or off.
- OptionButton
Creates an option button (also known as a radio button) and an accompanying label. This button is usually a circle that contains a black dot when the option is selected. The user can select only one option button out of any group of option buttons. (The name radio button comes from radios with push buttons for stations; you can select only one button at a time.)
- ToggleButton
Creates a toggle button, a button that shows whether or not an item is selected. A toggle button can be defined with any two settings, such as On/Off or Yes/No. You can add a picture to a toggle button, which provides a graphical way of letting a user choose between options.
- Frame
Creates a frame, an area of a user form or dialog box surrounded by a thin line, and an accompanying label. Use a frame (also known as a group box) to group related elements in your dialog boxes. As well as cordoning off elements visually, frames can separate them logically. For example, VBA treats a group of option buttons contained within a frame as separate from option buttons in other frames or option buttons loose in the dialog box. This separation makes it easier to use multiple sets of option buttons in a custom dialog box.
- CommandButton
Creates a command button. This is the typical, ordinary Windows button that users click to communicate their wishes. Most dialog boxes contain command buttons such as OK and Cancel, or Open and Cancel, or Save, or Apply and Close.
- TabStrip
Creates a tab strip for displaying multiple sets of data in the same set of controls. Tab strips are especially useful for presenting records in a database for review or modification: Each record in the database contains the same fields for information, so they can be displayed in the same group of controls. The tab strip provides an easy way of navigating between records.
- MultiPage
Creates a multipage control for displaying multipage dialog boxes that have different layouts on each of their tabs. An example of a multipage dialog box is the Options dialog box (Tools
- ScrollBar
Creates a stand-alone scroll bar. Stand-alone scroll bars are of relatively little use in dialog boxes. Combo boxes and list boxes have built-in scroll bars.
- SpinButton
Creates a spin button control for attaching to another control. Spin buttons (also known as spinners) are typically small, rectangular buttons with one arrow pointing up and one down (or one arrow pointing left and the other pointing right). Spin buttons are useful for presenting sequential values with consistent intervals within an understood range, such as times or dates. For example, if you want the user to increment or decrement a price in a text box in 25-cent steps, you could use a spinner to adjust the price rather than letting the user type directly into the text box.
- Image
Creates an image control for displaying a picture within the user form. For example, you might use an image control to place a corporate logo or a picture in a dialog box. (If you want to display a photo, texture, or other graphic on the background of the form itself, set the form's Picture property.
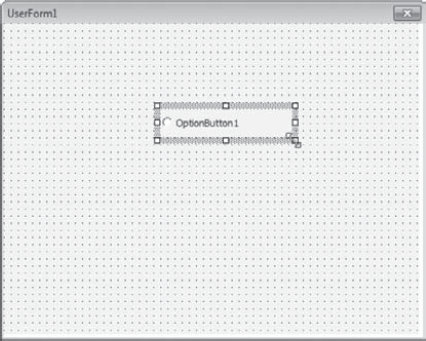
Click one of the controls in the Toolbox to select it. Then click in the user form to insert the control on the form, as illustrated in Figure 14.5. VBA places the top-left corner of the control where you click. As you place a control, it snaps to the grid on the user form (unless you've turned off the Align Controls to Grid feature as described in "Choosing User Form Grid Settings," earlier in this chapter).

Figure 14.5. When you click in the user form, VBA places a standard-size control of the type you chose. If the Align Controls To Grid feature is switched on (as it is by default), VBA automatically aligns the control with the grid on the user form.
You can resize the control as desired by selecting it and then clicking and dragging one of the selection handles (the white squares) that appear around it, as shown in Figure 14.6. The mouse pointer changes to a double-arrow icon when you've correctly positioned it to drag. When you drag a corner handle, VBA resizes the control on both sides of the corner; when you drag the handle at the midpoint of one of the control's sides, VBA resizes the control only in that dimension. In either case, VBA displays a dotted outline indicating the size that the control will be when you release the mouse button.
To resize the user form itself, click its title bar, or click in any blank space in the form, except not in a control. This selects the user form. Then click and drag one of the selection handles that appear around it.
To delete a control, right-click it in the user form and choose Delete from the context menu. Alternatively, click it to select it and then press the Delete key or choose Edit
To delete multiple controls, select them as a group, and then delete them by using the methods just described. Here's how to group controls:
To select multiple contiguous controls, click the first control, hold down Shift, and then click the last control in the sequence.
To select multiple noncontiguous controls—or to add additional controls to a group after you've selected multiple contiguous controls by using the Shift key—hold down the Ctrl key as you click each additional control. (With the Ctrl key pressed, you can deselect any control in a group by clicking it a second time.)
To select multiple controls in the same area of the user form, click in the form outside the controls and drag the resulting selection box until it encompasses at least part of each control. When you release the mouse button, the Visual Basic Editor selects the controls.
As with user forms, VBA automatically gives each control that you add to a form a default name consisting of the type of control plus a sequential number. When you add the first text box in a user form, VBA names it TextBox1; when you add another text box, VBA names it TextBox2; and so on. (Each control in a dialog box must have a unique name so that you can refer to it in code.)
You'll usually want to change the controls' default names to names that describe their purpose so you can remember what they do. For example, if TextBox2 is used for entering the user's organization name, you might want to rename it txtOrganizationName, txtOrgName, txtO_Name, or something similar.
To rename a control, follow these steps:
Click the control in the user form to select it and thereby display its properties in the Properties window.
If the Properties window is already displayed, you can, if you prefer, select the control from the drop-down list at the top of the Properties window instead of selecting it in the user form. VBA then visually highlights (selects) the control in the user form, which helps you make sure that you've selected the control you want to affect.
If the Properties window isn't displayed, you can quickly display it with the properties for the appropriate control by right-clicking the control in the user form and choosing Properties from the context menu.
In the Properties window, double-click to select the default name in the cell to the right of the
Nameproperty.Type the new name for the control.
Press Enter to set the control name, or click elsewhere in the Properties window or in the user form.
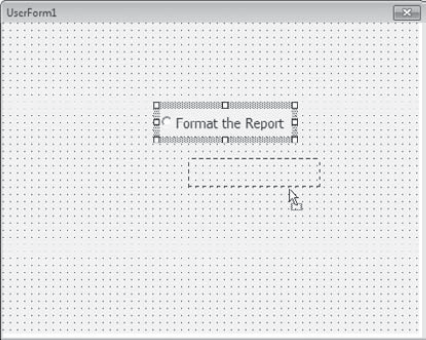
To move a control that isn't currently selected, click anywhere in it to select it, and then drag it to where you want it to appear, as shown in Figure 14.7.
To move a selected control, move the mouse pointer over the selection border around it so that the mouse pointer turns into a four-headed arrow (as shown in Figure 14.8), and then click and drag the control to where you want it to appear.

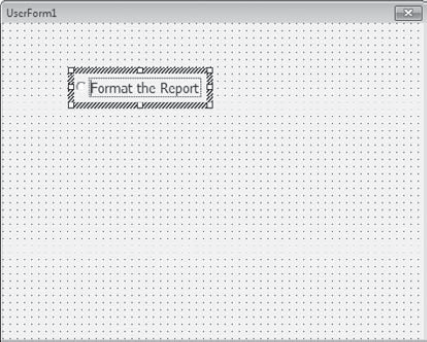
Some controls—such as option buttons and check boxes—have built-in text captions to let the user understand their purpose. You can change these captions like this:
Click the control to select it.
Click the caption itself to select it. VBA displays the blinking insertion cursor and a faint dotted border around the text, as shown in Figure 14.9.
Double-Clicking Opens the Code Window Rather Than Selecting a Control
When you click a label to select it and click again to position the insertion point, make sure you click slowly enough that Windows doesn't interpret them as a double-click. A double-click displays the code sheet for the user form and automatically adds a procedure for the
Clickevent of the control. If this happens, you can easily get back to viewing the form (it's called Design view, as opposed to Code view). Just press Shift+F7, double-click the module's name in the Project Explorer, or choose ViewNow click in the label to position the insertion point for editing it, or drag through the label to select all of it.
Edit the text of the label as desired.
Press Enter or click elsewhere in the user form to effect the change to the label. (You can alternatively change the label by changing its
Captionproperty in the Properties window.)
The following sections discuss the key properties of the controls in the default Toolbox.
First, I'll explain the common properties used to manipulate many of the controls effectively. After that, I'll go through the controls one by one, listing the properties particular to each control.
If you're new to VBA and find this section heavy going, skip it for the time being and return to it when you need to reference information about the properties of the controls.
Table 14.1 lists the properties shared by all or most controls, grouped by category.
Table 14.1. Properties common to most or all controls
Property Information | Applies To | Explanation |
|---|---|---|
| All controls except Frame, Image, and Label | Contains the value of the control when the control receives the focus in the user form. |
| All controls except Image and Label | Returns the context identifier of the Help file topic associated with the control. |
| Contains the name for the control. | |
| All controls | Enables you to assign to a control a custom property or method that uses the same name as a standard property or method. |
| All controls | Returns the name of the user form that contains the control. |
| All controls | Used for assigning extra information to the control. This is rarely used. |
| CheckBox, ComboBox, CommandButton, ListBox, MultiPage, OptionButton, ScrollBar, SpinButton, TabStrip, TextBox, ToggleButton | One of the most varied properties, |
Size and Position | ||
| All controls | The height of the control, measured in points. |
| All controls except Image | Indicates whether a control was moved when the layout of the form was changed. |
| All controls | The distance of the left border of the control in pixels from the left edge of the form or frame that contains it. |
| All controls | The previous height of the control, measured in pixels. |
| All controls | The previous position of the left border of the control, measured in pixels. |
| All controls | The previous position of the top border of the control, measured in pixels. |
| The previous width of the control, measured in points. | |
| All controls | The distance of the top border of the control in pixels from the top edge of the form or frame that contains it. |
| All controls | The width of the control, measured in points. |
Appearance | ||
| CheckBox, OptionButton, ToggleButton | Specifies how the caption is aligned to the control. |
| CheckBox, ComboBox, CommandButton, Image, Label, OptionButton, TextBox, ToggleButton | A Boolean ( |
| All controls | The background color of the control. This property contains a number representing the color. |
| CheckBox, ComboBox, CommandButton, Frame, Image, Label, OptionButton, TextBox, ToggleButton | Specifies whether the background of the object is transparent ( |
| ComboBox, Image, Label, TextBox, ListBox | Specifies the color of the control's border. You can choose a border color from the System drop-down list or the palette or enter |
| ComboBox, Frame, Image, Label, ListBox, TextBox, UserForm | Specifies the style of border on the control or user form. Use |
| CheckBox, CommandButton, Label, OptionButton, ToggleButton | A text string containing the description that appears for a control—the text that appears in a label, on a command button or toggle button, or next to a check box or option button. |
|
| |
| All controls except Image | The foreground color of the control (often the text on the control). This property contains a number representing the color. |
| CheckBox, ComboBox, CommandButton, ListBox, OptionButton, TextBox, ToggleButton | A Boolean property that specifies whether the user can change the control. When |
| All controls except MultiPage | Specifies the image to display when the user moves the mouse pointer over the control. To use the |
| All controls except MultiPage | Specifies the type of mouse pointer to display when the user moves the mouse pointer over the control. |
| CheckBox, CommandButton, Frame, Image, Label, OptionButton, Page, ToggleButton, UserForm | Specifies the picture to display on the control. By using the |
| CheckBox, CommandButton, Label, OptionButton, ToggleButton | Specifies how the picture is aligned with its caption. |
| CheckBox, ComboBox, Frame, Image, Label, ListBox, OptionButton, TextBox, ToggleButton | Specifies the visual effect to use for the control. For a CheckBox, OptionButton, or ToggleButton, the visual effect can be flat ( |
| All controls | Indicates whether the control is visible; expressed as a Boolean value. |
| CheckBox, CommandButton, Label, OptionButton, TextBox, ToggleButton | A Boolean property that specifies whether the text in or on a control wraps at the end of a line. For most controls, |
Behavior | ||
| CheckBox, CommandButton, Label, OptionButton, Page, Tab, ToggleButton | The accelerator key (or access key, or mnemonic) for the control—the key the user presses (typically in combination with Alt) to access the control. For example, in many dialog boxes, the user can access the Cancel button by pressing Alt+C. The accelerator key for a label applies to the next control in the tab order rather than to the label itself. The accelerator character must be one of the characters in the control's text caption, usually the first (The C in Cancel, for example). Once you specify the accelerator character, VBA automatically underlines that character in the caption to cue the user that they can press, for example, Alt+C to select the Cancel button. For additional information on tab order, see the section titled "Adjusting the Tab Order of the Dialog Box" later in this chapter. |
| CheckBox, ComboBox, ListBox, OptionButton, ScrollBar, SpinButton, TextBox, ToggleButton | The cell or field used to set or store the |
| All controls | The text of the ScreenTip displayed when the user holds the mouse pointer over the control. The default value of |
| All controls | A Boolean value that determines whether the control can be accessed (either interactively or programmatically). |
| All controls except Image | The position of the control in the tab order of the user form, expressed as an integer from 0 (the first position) through the number of controls on the user form. |
| All controls except Image and Label | A Boolean value establishing whether the user can select the control by pressing the Tab key. If |
The Label control simply displays text on the screen. This is most often employed to identify the purpose of another control, so you frequently see a label control to the left of a textbox whose purpose the label describes. Use the Caption property to type in the text that you want the label to display. Use the TextAlign property as shown in Table 14.2 to align the text of the label with the borders of the label control.
The TextBox is one of the most common controls. It can be a single-line control (often employed to display a form the user must fill in) or a multiline control, for displaying lots of text, as in a diary program where the user determines how much they want to write. Adjust this with the MultiLine property. Also, the default text size for a TextBox is 8 pt. (too small usually) and a sans-serif font called Tahoma (sans-serif type is more appropriate to headlines than body text). So you'll usually find yourself employing the Font property to choose a larger font size and more readable font (such as Times New Roman).
Table 14.3 lists the key properties for the TextBox control.
Table 14.3. Key properties for the TextBox control
Property | Description |
|---|---|
| A Boolean property that determines whether VBA automatically moves to the next field when the user has entered the maximum number of characters in the text box or combo box. |
| A Boolean property that determines whether VBA automatically selects a whole word when the user drags the mouse through text in a text box or a combo box. |
| Enables or disables drag-and-drop for a text box or combo box: |
| Determines whether VBA selects the contents of the edit area of the text box or combo box when the user moves the focus to the text box or combo box: |
| A Boolean property that determines what VBA does when the user presses Enter with the focus on a text box. If |
| A Boolean property that determines whether VBA displays any selected text in a text box or combo box. If |
| Determines the default runtime mode of the Input Method Editor (IME). This property is used only in Far Eastern applications (for example, those using Japanese hiragana or katakana, or Korean hangul). |
| A Boolean property that determines whether a list box or a text box resizes itself vertically to display any rows that are too tall to fit into it at its current height ( |
| A Boolean property that determines whether the text box can contain multiple lines of text ( |
| Specifies the placeholder character to display in place of the characters the user types (so somebody peeping won't see the actual password). The common password character is the asterisk*. This property is normally used for entering passwords and other information that needs to be obscured so that it cannot be read. |
| Specifies which scroll bars to display on the text box. Usually, you'll do best to set the |
| A Boolean property that determines whether the user can select a line of text in the text box or combo box by clicking in the selection bar to the left of the line. |
| Determines when to display the drop-down button for a combo box or a text box. |
| A Boolean property that specifies whether the user can enter tabs in the text box. If |
From the user's point of view, a key distinction is that a list box simply provides a list of options the user can choose from, whereas a combo box offers that list and also includes a field where the user can type in items.
Table 14.4 shows the key properties for the ComboBox control and the ListBox control. These two controls are similar and share many properties. They do, however, differ somewhat in behavior and features; these differences are described in the entries marked "List box only" and "Combo box only" in the table.
Table 14.4. Key properties for the ComboBox and ListBox controls
Property | Description |
|---|---|
| See Table 14.3. |
| See Table 14.3. |
| A Variant property that determines the source of data in a combo box or a list box that has multiple columns. The default setting is |
| A Long (data type) property that sets or returns the number of columns displayed in the combo box or list box. If the data source is unbound, you can specify up to 10 columns. To display all available columns in the data source, set |
| A Boolean property that determines whether the combo box or list box displays headings on the columns ( |
| A String (data type) property that sets or returns the width of each column in a multicolumn combo box or list box. |
| (Combo box only.) A Long (data type) property that sets or returns the number of rows displayed in the combo box. If the number of items in the list is greater than the value of |
| Determines the visual effect the list uses. For both a combo box and a list box, |
| (Combo box only.) A Variant property that sets or returns the width of the list in a combo box. The default value is |
| Determines which type of matching the combo box or list box uses when the user types characters with the focus on the combo box or list box. |
| (Combo box only.) A Boolean property determining whether the user must select an entry from the combo box before leaving the control ( |
| (List box only.) Controls whether the user can make a single selection in the list or multiple selections. |
| A String property that specifies the source of a list to be displayed in a combo box or a list box. |
| See Table 14.3. |
| See Table 14.3. |
Check boxes are similar to option buttons—a set of options presented to the user. However, option buttons permit the user to select only one from among the displayed options. The user can select as many check boxes as desired.
Most of the properties for the CheckBox control have been discussed already. The key property of the CheckBox that you haven't examined yet is TripleState, which is a feature of the OptionButton and ToggleButton controls as well.
TripleState is a Boolean property that determines whether the check box, option button, or toggle button can have a null state as well as True and False states. When the check box is in the null state, it appears with its box selected but grayed out (the traditional Windows indication that an option is disabled).
For example, you get this effect in the Font dialog box in Word when one of the check-box-controlled properties—such as the Shadow check box in Figure 14.10—is on for part of the current selection but not for the whole selection. For example, select a word (or any amount of selected text) that is only partly struck through and you trigger the null state for the Strikethrough check box, as shown in Figure 14.10. Normally, a check box is either checked or not, but when in a null state, it's filled with gray or black.
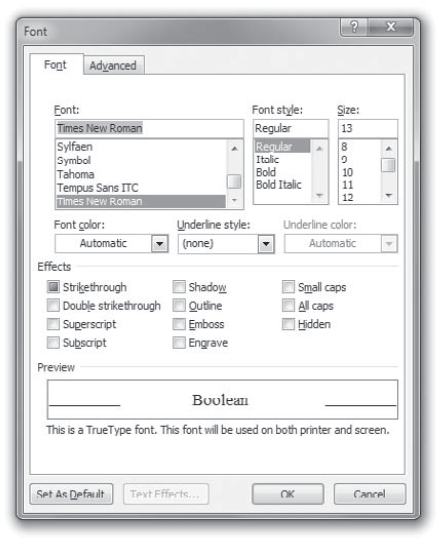
Figure 14.10. By setting the TripleState property of a check box to True, you can display a check box in a null state. Here Word's Font dialog box shows the Strikethrough check box in a null state (filled in, but not checked).
A couple of properties described briefly in the context of other controls deserve more detail here:
The
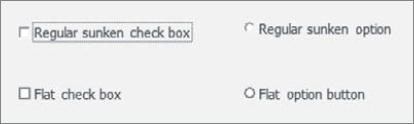
SpecialEffectproperty controls the visual appearance of the check box. The default value isfmButtonEffectSunken (2), which displays a sunken box—the norm for 3D Windows dialog boxes. You can also choosefmButtonEffectFlat(0)to display a box with a flat effect, but why? It doesn't look as good as the default 3D. Figure 14.11 shows a sunken check box and a flat check box. TheValueproperty, which indicates whether the check box is selected (True) or cleared (False), is the default property of the check box. Recall that the default property need not be specified in code; it's assumed. Thus, you can either writeCheckBox1.Valueor justCheckBox. The following three statements have the same effect:If CheckBox1.Value = True Then If CheckBox1 = True Then If CheckBox1 Then
The
Acceleratorproperty provides quick access to the check box. Assign a unique accelerator key to check boxes so that the user can swiftly toggle them on and off from the keyboard.
A group of OptionButtons provides a set of mutually exclusive options from which the user can choose. Only one of the buttons in a group can be selected. For instance, you could have two OptionButtons under the heading Sex: Male and Female. (A set of CheckBoxes permits multiple options. Under the heading Typeface, you could have Italic, Bold, Underlined options, all of which could be selected simultaneously.)
Like the CheckBox, the OptionButton control has a straightforward set of properties, almost all of which you've seen already in this chapter. This section shows you the GroupName property, which is unique to the OptionButton, and some of the key properties for working with option buttons.
The GroupName property is a string data type that assigns the option button to a group of option buttons. Alternatively, you can create a group by placing a set of option buttons on a Frame control. The key idea here is that, once grouped, the buttons become mutually exclusive. However, there can be more than one group (or set) on a form—as long as you employ a Frame control or the GroupName property to isolate the various groups of buttons.
The default setting for GroupName is a blank string (""), which means that an option button isn't assigned to a group until you explicitly assign it. When you enter the group name, the group is created. By using the GroupName property, you can have multiple groups of option buttons on the same form without using frames to specify groups, but you must somehow distinguish the logical groups of option buttons from each other so that the user can tell which option buttons constitute a group. Using a Frame control is the easiest way of segregating groups of option buttons both visually and logically—but it's useful to have the flexibility that GroupName provides when you need it. Also, a Frame has a built-in Caption property you can use to describe the group's purpose.
These are the other key properties for the OptionButton control:
The
Valueproperty, which indicates whether the option button is selected (True) or cleared (False), is the default property of the option button. So you can set or return the state of the option button by setting either theOptionButtonobject or itsValuetoTrueorFalse, as appropriate. Setting theValueof one OptionButton toTruesets theValueof all other OptionButton controls in the same group or frame toFalse.The
Acceleratorproperty provides quick access to the option button. Assign a unique accelerator key to each option button so that the user can toggle it on and off from the keyboard.The
SpecialEffectproperty controls the visual appearance of the option button. The default value offmButtonEffectSunken(2) displays a sunken button, whilefmButtonEffectFlat(0) displays a flattened button. Figure 14.11 shows a sunken option button and a flat option button.The
TripleStateproperty (discussed in the previous section, "CheckBox") lets you create an option button that has three states: selected (True), cleared (False), and null (which appears selected but grayed out). TheTripleStateproperty is disabled so that the user can't set the null state interactively, but you can set it programmatically as needed.
When it's not selected, the ToggleButton control appears raised, but it looks pushed in when it's selected. The key properties for the ToggleButton control are the same as those for the CheckBox and CommandButton:
The
Valueproperty is the default property of the ToggleButton.The
TripleStateproperty lets you create a ToggleButton that has three states: selected (True), cleared (False), and null (which appears selected but grayed out). The user can set a triple-state ToggleButton to its null state by clicking it. In its null state, a ToggleButton appears grayed out.The
Acceleratorproperty provides quick access to the toggle button.
The Frame control is relatively straightforward, but it has several properties worth mentioning; they're shown in Table 14.5. The Frame control shares a couple of these properties with the Page object.
Table 14.5. Properties of the Frame control
Property | Description |
|---|---|
| Determines the action taken when the user leaves the last control in the frame or on the page. |
| A read-only property that returns the height (measured in points) of the area inside the frame, not including the height of any horizontal scroll bar displayed. This property applies to the |
| A read-only property that returns the width (in points) of the area inside the frame, not including the width of any vertical scroll bar displayed. This property applies to the |
| A property that determines whether the frame or page displays horizontal and vertical scroll bars when they aren't required for the user to be able to navigate the frame or the page. |
| A Boolean property that determines whether a picture displayed on the control is tiled ( |
| Determines how to display the background picture. |
| Determines where a picture is located. |
The CommandButton is used quite often. This control has three unique properties, listed in Table 14.6.
Table 14.6. Unique properties of the CommandButton control
Property | Description |
|---|---|
| A Boolean property that determines whether the command button is the Cancel button for the user form ( |
| A Boolean property that determines whether the command button is the default button for the user form ( |
| A Boolean property that determines whether the command button takes the focus when the user clicks it ( |
Note that it's useful to set the Accelerator property for each command button on a form. This way, the user can quickly access it from the keyboard.
TabStrip controls allow you to create a multipage dialog box. Click the Home tab in Word, then click the small arrow icon in the lower-right corner of the Font area on the Ribbon. Word's Font dialog box will open and you'll see a two-tab dialog box. One tab is labeled Font and the other tab is labeled Advanced. This is a good way to organize a dialog box when you have quite a few options to present to the user.
The TabStrip control has several unique properties and a number of properties that it shares with the MultiPage control. Table 14.7 lists these properties.
Table 14.7. Properties of the TabStrip and MultiPage controls
Property | Description |
|---|---|
| (Tab strip only.) A Single (data type) property that sets or returns the height of the display area of the tab strip, measured in points. |
| (Tab strip only.) A Single property that returns the distance, measured in points, between the left border of the tab strip and the left border of the control inside it. |
| (Tab strip only.) A Single property that returns the distance, measured in points, between the top border of the tab strip and the top border of the control inside it. |
| (Tab strip only.) A Single property that sets or returns the width of the display area of the tab strip, measured in points. |
| Sets or returns the tab currently selected in a tab strip or the page currently selected in a MultiPage control. |
| A Single property that sets or returns the fixed height of the tabs, measured in points. Set |
| A Single property that sets or returns the fixed width of the tabs, measured in points. Set |
| Determines the location of the tabs in the tab strip or multipage. |
A SpinButton allows the user to easily increment or decrement numbers, dates, and so on. The ScrollBar and SpinButton share a number of properties that you haven't yet met. Table 14.8 lists these properties.
Table 14.8. Properties of the ScrollBar and SpinButton controls
Property | Description |
|---|---|
| A Long (data type) property that sets the delay in milliseconds between clicks registered on the control when the user clicks and holds down the mouse button. The default delay is 50 milliseconds. The control registers the first click immediately, the second click after |
| (Scroll bar only.) A Long property that determines how much the item is scrolled when the user clicks in the scroll bar between the thumb (the scroll box) and the scroll bar's arrow. Set the |
| A Long property that determines how much movement occurs when the user clicks a scroll arrow in a scroll bar or spin button. |
| A Long property that specifies the maximum value for the |
| A Long property that specifies the minimum value for the |
| (Scroll bar only.) A Boolean property that determines whether the thumb (the scroll box) is a fixed size ( |
By now, you've met all the properties of the Image control. Most of the time when you use an Image control, you'll want to adjust the following properties:
Use the
Pictureproperty to assign the picture file you want to appear in the Image control. Click in the Picture row in the Properties window, and then click the ellipsis button (...) that the text box displays. In the Load Picture dialog box, select the picture and click the OK button to add it. The Image control can display.BMP, .CUR(cursor),.GIF, .ICO(icon),.JPG, and.WMFfiles, but not other graphics files, such as.TIF. Most graphics applications, however, can easily convert one graphics file type into another.Use the
PictureAlignmentproperty to set the alignment of the picture.Use the
PictureSizeModeproperty to set whether the picture is clipped, stretched, or zoomed to fill the Image control. Adjust the height and width of the Image control as necessary.Use the
PictureTilingproperty if you need to tile the image to take up the full space in the control.
The Page object is one of the pages contained within a MultiPage object. You've already met all its properties (in the context of other controls) except for the Index property, which it shares with the Tab object.
The Index property is an Integer data type that determines the position of the Page object in the Pages collection in a MultiPage control or the position of a Tab object in the Tabs collection in a TabStrip. The first Page object or Tab object is numbered 0 (zero); the second Page or Tab object is numbered 1; and so on. You can change the Index property of a tab or page to change the position in which the tab or page appears in the collection.
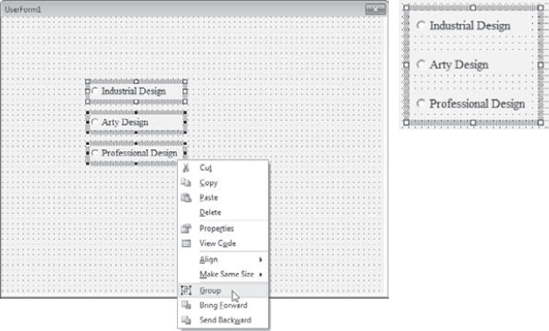
When designing a form, it's often handy to group controls. By grouping two or more controls, you can work with them as a single unit to size, reposition, format, or delete them.
To group controls, select them by Shift+clicking, Ctrl+clicking, or dragging around them, and then right-click and choose Group from the context menu. Alternatively, select the controls, and then click the Group button on the UserForm toolbar (you'll need to display this toolbar—it's not displayed by default) or choose Format
To ungroup controls, right-click any of the controls contained in the group and then choose Ungroup from the context menu. Alternatively, select the group of controls by clicking in any control in the group and then click the Ungroup button on the UserForm toolbar, or choose Format
You can quickly size all controls in a group by selecting the group and then dragging the sizing handles on the surrounding border. For example, you could select the middle handle on the right side and drag it inward to shorten the controls, as shown in Figure 14.13. The controls will be resized proportionately to the change in the group outline.
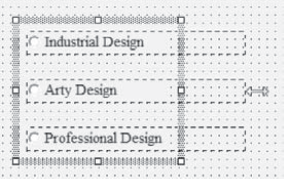
Figure 14.13. You can resize all the controls in a group by dragging a sizing handle on the surrounding border.
When the controls are grouped, you can then use the Properties window to quickly modify any properties they have in common (such as Font). But resizing a group can present problems—the results can be ugly. Generally speaking, resizing works fine when you've grouped a number of controls of the same type, as in Figure 14.13. For example, sizing a group that consists of several command buttons or option buttons works well, whereas sizing a group that consists of a text box, a command button, and a combo box is seldom a good idea.
You can quickly delete a whole group of controls by right-clicking any of them and choosing Delete from the context menu or by selecting the group and pressing the Delete key.
Even after you've grouped a number of controls, you can still work with them individually if necessary. To do so, first click any control in the group to select the group, as shown on the left in Figure 14.14. Then click the control you want to work with. As shown on the right in Figure 14.14, VBA displays a dark shaded border around the group (indicating that the group still exists) and displays the lighter shaded border around the individual control, indicating that that control is selected.
You can then work with the individual control as if it were not grouped. When you've finished working with it, click another control in the group to work with it, or click elsewhere in the user form to deselect the individual control.
Even if you use the Snap To Grid feature, you'll often need to align controls manually. They must be ungrouped for this feature to work. The easiest way to align controls is to select two or more, then right-click in any one of them and choose an option from the Align submenu: Lefts, Centers, Rights, Tops, Middles, Bottoms, or To Grid. These options work as follows:
- Lefts
- Centers
aligns the horizontal midpoints of the controls.
- Rights
aligns the right borders of the controls.
- Tops
aligns the tops of the controls.
- Middles
aligns the vertical midpoints of the controls.
- Bottoms
aligns the bottoms of the controls.
- To Grid
aligns the controls to the grid.
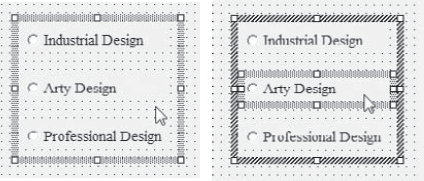
Figure 14.14. To work with one control in a group, start by selecting the group (as shown on the left) and then select the control (as shown on the right).
VBA aligns the borders or midpoints to the current position of that border or midpoint on the dominant control—the control that has white sizing handles around it rather than black sizing handles. After selecting the controls you want to align, make dominant the one that is already in the correct position by clicking it so that it takes on the white sizing handles. Then choose the alignment option you want.
The VBA Editor offers several placement commands on the Format menu:
On the Format
Use the Format
Use the Format
On the Format
On the Format
On the Format
The tab order of a user form (or of a frame control within a dialog box) is the order in which VBA selects controls in the dialog box or frame when you move through them by pressing the Tab key (to move forward) or the Shift+Tab key combination (to move backward). Put another way, it's a Windows convention that when the user presses the Tab key, the focus moves to the next control in a window. Only one control at a time can have the focus. The control with the focus is the one that will respond to typing on the keyboard. For example, if a form has five text boxes, only the text box with the focus will display characters as the user types. However, a set of buttons can also have the focus, and when the user presses the Enter key, the button with the focus will be triggered.
VBA displays a visual cue to indicate which control currently has the focus. You'll see a dotted frame around a button or option button and a blinking insertion cursor in a text box.
Each frame you add to a user form has a separate tab order for the controls it contains: The frame itself appears in the tab order for the dialog box, and the controls within the frame appear in the tab order for the frame.
Set the tab order for a dialog box or a frame to make it as easy as possible to use. Generally, for English-speaking users, it's best to arrange the tab order from left to right and from top to bottom in the dialog box or frame. For international users, you may want to arrange the tab order from right to left. You may also need to arrange the tab order to move from one control to a related control that would not normally be next in the tab order.
This kind of tabbing is particularly useful when the user is asked to fill in several fields by typing into text boxes (such as Name, Address, Phone, and so on). As soon as users finish filling in one field, they can press Tab to move on to the next. (Even easier, pressing the Enter key while in a text box moves users to the next control in the tab order.) At the end, after they've filled in the last field, they can quickly close the dialog box if you make the OK button the next control in the tab order.
VBA assigns the tab order to the controls in a dialog box or frame on a first-come, first-served basis as you add the controls. Unless you add all the controls in perfect order, this default order will seldom produce the optimal tab order for a dialog box, so usually you'll want to adjust the tab order—or at least check that it's right. You're likely to place fewer controls on a frame, so you have a better chance of adding them in a suitable order, but you should check this too before unleashing the dialog box on users. Just press F5 and then repeatedly press the Tab key to examine the tab order. Alternatively, you can open a Tab Order dialog box by right-clicking in the open space in the user form or frame and choosing Tab Order from the context menu, as shown in Figure 14.15. Or select the user form or frame and then choose View

Figure 14.15. Use the Tab Order dialog box to arrange the controls in your user form or frame into a logical order for the user.
Here's how to change the tab order in a dialog box or frame:
Rearrange the controls into the order in which you want them to appear by selecting them in the Tab Order list box and clicking the Move Up button or Move Down button as appropriate. You can Shift+click or drag to select a range of controls or Ctrl+click to select two or more noncontiguous controls. (Or just change the controls' TabIndex properties in the Properties window.)
Click the OK button to close the Tab Order dialog box.
Designing a custom dialog box is only the first step in getting it to work in a procedure. The other step is writing the code to display the dialog box to the user and make it perform its tasks.
Typically, the code for a dialog box consists of the following:
A macro procedure that displays the dialog box by loading it and using the
Showmethod. Usually, this procedure can be assigned to a Quick Access Toolbar button or to a shortcut key combination so that the user can invoke it. However, a procedure can also run automatically in response to a system event (such as running at a specified time).The user form that contains the dialog box and its controls.
The code attached to the user form. This code consists of procedures for designated controls. For example, for a simple dialog box containing two option buttons and two command buttons (an OK button and a Cancel button), you'd typically employ one procedure for the OK button and one for the Cancel button. The procedure for the OK button is executed when the user either clicks the button with the mouse or presses the Enter key while the focus is on the button. Either of these user actions triggers the button's
Clickevent, and whatever code you, the programmer, has written within this event is then executed. Remember that the easiest way to create an event (procedure) for a control is to just double-click the control on the form. The editor then switches to Code view and writes the necessarySub...End Subenvelope for that event, like this—using theNameproperty of the control and the name of the event as the procedure's name:Private Sub
btnOK_Click() End Sub
Once the code attached to a button has run, execution returns to the dialog box (if it's still displayed) or to the procedure that called the dialog box.
Note that code that runs directly in response to an event is called an event procedure or event handler. An event procedure can call other procedures as necessary, so multiple procedures can be run indirectly by a single event.
You load a dialog box by using the Load statement and unload it by using the Unload statement. The Load statement loads the dialog box into memory so that it's available to the program but doesn't display the dialog box; for that you use the Show method (discussed in the next section). The Unload statement unloads the dialog box from memory and releases any memory associated with that object. If the dialog box is displayed when the Unload statement runs, VBA removes the dialog box from the screen.
The syntax for the Load and Unload statements is straightforward:
LoadDialog_BoxUnloadDialog_Box
Here, Dialog_Box is the name of the user form or dialog box. For example, the following statement loads the dialog box named frmMyDialog:
Load frmMyDialog
To display a dialog box, you use the Show method; to hide a dialog box, you use the Hide method. For example, the following statement displays the dialog box named frmMyDialog:
frmMyDialog.Show
If you execute a procedure containing this line, the frmMyDialog dialog box appears onscreen, where the user can interact with it: enter text in its text boxes, select or clear its check boxes, use its drop-down lists, click its buttons, and so on. When the user closes the dialog box (by clicking the Close button on its title bar or by clicking a command button that dismisses the it), the dialog box disappears from the screen and the procedure continues to run. But until you retrieve settings from the dialog box and take action on them, the dialog box has no effect beyond its graphical display.
You can display a dialog box by using the Show method without explicitly loading the dialog box with a Load command first; VBA takes care of the implied Load command for you. There's no particular advantage to including the Load command, but it might make your code easier to read and to debug. For example, the two procedures shown here have the same effect:
Sub Display_Dialog()
    Load frmMyDialog   'loads the dialog box into memory
    frmMyDialog.Show   'displays the dialog box
End Sub

Sub Display_Dialog()
    frmMyDialog.Show   'loads the dialog box into memory and displays it
End Sub
If you run a Hide method without having loaded the dialog box into memory by using the Load statement or the Show method, VBA loads the dialog box but does not display it on screen.
Once you've displayed the dialog box, take a moment to check its tab order by pressing F5 and then moving through it using the Tab key. When you first open the dialog box, is the focus on the appropriate control, the control the user is most likely to want to interact with first? When you move forward from that control, is the next control that is selected the next control that the user will typically need to use? Adjust the tab order as necessary, as described in "Adjusting the Tab Order of the Dialog Box" earlier in this chapter.
To set a default command button in a dialog box, set that command button's Default property to True. VBA selects the default button when it displays the dialog box so that if the user simply presses the Enter key to dismiss the dialog box, this button receives the keystroke.
Only one button can be the default button at any given time. If you set the Default property of any button to True, VBA automatically changes to False the Default property of any other button previously set to True.
To make a dialog box take an action, your code must usually respond to the user's input. The following sections first show you the VBA commands for retrieving information from a dialog box. They then go through an example of retrieving the user's choices from a relatively simple dialog box and then from a more complex one.
To return (retrieve) a string from a text box, check its Value property or Text property after the user has clicked an OK or Cancel button or otherwise dismissed the dialog box. For example, if you have a text box named txtMyText, you could return its value and display it in a message box by using the following line:
MsgBox txtMyText.ValueRecall that VBA supports both one-line and multiline text boxes. To create a multiline text box, select the text box in the user form or in the drop-down list in the Properties window and set its MultiLine property to True. The user can then enter multiple lines in the text box and start new lines by pressing Shift+Enter.
To add a horizontal or vertical scroll bar to a text box, set its ScrollBars property to 1 − fmScrollBarsHorizontal (for a horizontal scroll bar), 2 − fmScrollBarsVertical (for a vertical scroll bar, which is usually more useful), or 3 − fmScrollBarsBoth (for both).
A regular option button is a binary control, so it can have only two values: True and False. True indicates that the button is selected, False that it's unselected. You can check an option button's value with a simple If... Then structure. For example, if you have two option buttons, named optSearchForFile and optUseThisFile, you can check their values and find out which was selected by using the following code:
If optSearchForFile = True Then
  'optSearchForFile was selected; take action on this
Else   'optSearchForFile was not selected, so optUseThisFile was
  'take action for optUseThisFile
End If
Remember that Value is the default property of the OptionButton control. The previous code actually checks the value of the default property of the control. The first line of code could be written out more fully as If optSearchForFile.Value = True Then. But in the code example, I chose to write it more succinctly, with = True implied: If optSearchForFile Then.
With more than two option buttons, use an If... Then... ElseIf condition or a Select Case statement to determine which option button is selected.
Like an option button, a regular check box can only be either True or False, so you can use an If... Then structure to check its value. Here's an example:
If chkDisplayProgress = True Then
   'take actions for chkDisplayProgress
End If
Again, you're checking the default property of the control here—the Value property. The first line of code could also be written as If chkDisplayProgress.Value = True Then.
Sometimes you'll need to take an action if the check box was cleared rather than selected. For example, if the user clears the check box, you may need to turn off a configuration option.
Before you can ask the user to choose an item in a list box, you must fill the box—tell VBA which items to display. To do so, you create a procedure to initialize (prepare) the user form and add the items to the list box before displaying it:
Right-click the name of the user form in the Project Explorer and choose View Code from the context menu to display (in the Code window) the code for the controls assigned to the dialog box. Or you can just double-click somewhere in the background on the user form to go to code view. Recall that you can toggle between the Code window (press F7) and the form design window (Shift+F7).
In the Object drop-down list (on the top left of the Code window), make sure UserForm is selected.
Choose Initialize from the Procedure drop-down list (on the top right of the Code window). The Visual Basic Editor creates a new procedure named
Private SubUserForm_Initializefor you, at the end of the procedures currently contained on the code sheet:Private Sub UserForm_Initialize() End Sub
Here's a tip: VBA runs a
UserForm_Initializeprocedure every time the user form is invoked. This procedure is a good place to add items to a list box or combo box or to set properties for other controls on the user form. In other words, this event is where you write code to do any necessary preliminary housekeeping before displaying the form to the user.To add items to the list box, you can use the
AddItemmethod for the list box object (here the box is namedlstBatteries) with a text string in double quotation marks to specify each item in the list box:lstBatteries.AddItem "Battery #A4601" lstBatteries.AddItem "Battery #A4602" lstBatteries.AddItem "Battery #A4603" lstBatteries.AddItem "Battery #A4604"
To retrieve the user's choice from a single-select list box, check the Value property in your code, as in this example:
MsgBox "You chose this entry from the list box: " & lstBattery.Value
When you use the MultiSelect property to create a list box capable of multiple selections, you can no longer use the Value property to return the items selected in the list box. When MultiSelect is True, Value always returns a null value. Instead, you use the Selected property to determine which rows in the list box were selected and the List property (it's an array) to return the contents of each selected row. The following statements use a For... Next loop to build a string named strMsg containing the entries selected from a multiselect list box:
strMsg = "You chose the following entries from the list box: " & vbCr
For i = 1 To lstBatteries.ListCount
  If lstBatteries.Selected(i − 1) = True Then
    strMsg = strMsg & lstBatteries.List(i − 1) & vbCr
  End If
Next i
MsgBox strMsgTo return a value from a combo box (a combination list box and text box), you add items to the combo box list in an Initialize procedure and then check the Value of the combo box after the user has dismissed the dialog box. (The combo box control doesn't offer multiple-selection capabilities, so Value is the property to check.)
For example, to add items to a combo box named cmbColor:
Private Sub UserForm_Initialize()
  cmbColor.AddItem "Red"
  cmbColor.AddItem "Blue"
  cmbColor.AddItem "Yellow"
End Sub
To return the item the user chose in the combo box, retrieve the Value property:
Result = cmbColor.Value
The item retrieved from the combo box can be either one of the items assigned in the Initialize procedure or one that the user has typed into the text-box portion of the combo box.
The following sections show you two examples of how you can create a procedure and then build a dialog box that works with it to make the procedure more useful and powerful. In the first example, you'll record a macro in Word and then link a dialog box to it. In the second example, which will work with any VBA-enabled application, you'll create a user form and its code from scratch.
This first example moves the current paragraph up or down within the document by one or two paragraphs in Word.
Start by recording a procedure in Word to move the current paragraph. In the procedure, you need to record the commands for the following actions:
We want our finished procedure to display a dialog box with option buttons for moving the current paragraph up one paragraph, up two paragraphs, down one paragraph, or down two paragraphs. The dialog box should also include a check box that indicates the user wants the insertion point returned to its original position at the end of the procedure. Because this is presumably desirable default behavior for the procedure, this check box is selected by default. Users can clear the check box if they don't want to return the insertion point to its original position.
First, start Word and create a new, blank, scratch document (press Ctrl+N), and enter three or four paragraphs of text—just about anything will do, but it'll be easier to have recognizable text so that you can make sure the procedure is moving paragraphs as it should. Then place the insertion point in one of the paragraphs you've just entered and start recording a macro as discussed in Chapter 1, "Recording and Running Macros in the Office Applications":
Click the record macro icon on the status bar or the record macro icon in the code section of the Ribbon's Developer tab. Either way, you see the Record Macro dialog box.
Type the name for the macro,
Move_Paragraph, in the Macro Name text box and a description in the Description text box.Choose a template or document, if necessary, in the Store Macro In drop-down list. (You probably don't want to add this to the global
NewMacrosmodule in theNormal.dotmfile. Why clutter it up with practice macros?)If you want, use the Button or Keyboard button to create a Quick Access Toolbar button, or keyboard shortcut, for the macro.
Click the OK button to start recording the macro.
Record the following actions in the macro:
Insert a bookmark at the current position of the insertion point by clicking the Bookmark icon in the Links section of the Ribbon's Insert tab. This displays the Bookmarks dialog box. Enter a name for the bookmark, and click the Add button. In this example, the bookmark is named
Move_Paragraph_Tempto indicate that it's a temporary bookmark used for theMove_Paragraphprocedure.Select the current paragraph by pressing F8 four times. The first press of F8 activates Extend mode, the second selects the current word, the third selects the current sentence, and the fourth selects the current paragraph. Press the Esc key to turn off Extend mode once the paragraph is selected.
Cut the selected paragraph by using one of the variations of the Cut command (for example, press either Ctrl+X or Shift+Delete, or click the Cut icon in the Ribbon's Clipboard section).
Move the insertion point up one paragraph by pressing Ctrl+↓.
Paste the cut paragraph back in by using a Paste command (for example, press Ctrl+V, click the Paste button on the Home tab of the Ribbon, or press Shift+Insert).
Move the insertion point down one paragraph by pressing Ctrl+↓.
Move the insertion point up two paragraphs by pressing Ctrl+ ↑ twice.
Note that if you started with the insertion point at the beginning of the first paragraph in the document, you'll only be able to move the insertion point up one paragraph. This doesn't matter—press the keystroke anyway to record it. If Word beeps at you, ignore it.
Move the insertion point down two paragraphs by pressing Ctrl+↓ twice. (If in doing so you hit the end of the document after the first keystroke, don't worry—perform the second keystroke anyway to record it. Again, Word may beep.)
Open the Bookmarks dialog box again (click the Bookmark icon in the Links section of the Ribbon's Insert tab), select the Move_Paragraph_Temp bookmark, and click the Go To button to go to it. Then click the Delete button to delete the Move_Paragraph_Temp bookmark. Click the Close button to close the Bookmarks dialog box.
Stop the Macro Recorder by clicking the Stop Recording icon on the status bar or the Stop Recording icon in the code section of Ribbon's Developer tab.
Open the recorded macro in the Visual Basic Editor by pressing Alt+F8, selecting the macro's name in the Macros dialog box, and clicking the Edit button.
You should see a macro that looks something like this:
1.  Sub Move_Paragraph()
 2.  '
 3.  ' Move_Paragraph Macro
 4.  ' Move a paragraph up or down
 5.  '
 6.      With ActiveDocument.Bookmarks
 7.          .Add Range:=Selection.Range, Name:="Move_Paragraph_Temp"
 8.          .DefaultSorting = wdSortByName
 9.          .ShowHidden = False
10.      End With
11.      Selection.Extend
12.      Selection.Extend
13.      Selection.Extend
14.      Selection.Extend
15.      Selection.EscapeKey
16.      Selection.Cut
17.      Selection.MoveUp Unit:=wdParagraph, Count:=1
18.      Selection.Paste
19.      Selection.MoveDown Unit:=wdParagraph, Count:=1
20.      Selection.MoveUp Unit:=wdParagraph, Count:=2
21.      Selection.MoveDown Unit:=wdParagraph, Count:=2
22.      Selection.GoTo What:=wdGoToBookmark, Name:="Move_Paragraph_Temp"
23.      ActiveDocument.Bookmarks("Move_Paragraph_Temp").Delete
24.      With ActiveDocument.Bookmarks
25.          .DefaultSorting = wdSortByName
26.          .ShowHidden = False
27.      End With
28.  End Sub
You can probably read this macro code easily enough by now:
Line 1 starts the macro, and line 28 ends it. Lines 2 and 5 are blank comment lines around the comment lines showing the macro's name (line 3) and description (line 4).
Lines 6 through 10 contain a
Withstatement that adds theMove_Paragraph_Tempbookmark. Lines 7 and 8 are unnecessary here, but the Macro Recorder records all the settings in the Bookmark dialog box, including the setting for the Sort By option button and the Hidden Bookmarks check box.Lines 11 through 15 use the Extend Selection feature to select the current paragraph.
Lines 17, 19, 20, and 21 record the syntax for moving the insertion point up and down one paragraph and two paragraphs, respectively.
Line 16 records the Cut command and Line 18 the Paste command.
Line 22 moves the insertion point to the
Move_Paragraph_Tempbookmark, and line 23 deletes the bookmark. Lines 24 through 27 again record the settings in the Bookmark dialog box, which you don't need here either.
You can quickly delete unnecessary lines, and collapse the first With structure, to give a more succinct version of the code:
1.  Sub Move_Paragraph()
 2.      ActiveDocument.Bookmarks.Add Range:=Selection.Range, _
             Name:="Move_Paragraph_Temp"
 3.      Selection.Extend
 4.      Selection.Extend
 5.      Selection.Extend
 6.      Selection.Extend
 7.      Selection.EscapeKey
 8.      Selection.Cut
 9.      Selection.MoveUp Unit:=wdParagraph, Count:=1
10.      Selection.Paste
11.      Selection.MoveDown Unit:=wdParagraph, Count:=1
12.      Selection.MoveUp Unit:=wdParagraph, Count:=2
13.      Selection.MoveDown Unit:=wdParagraph, Count:=2
14.      Selection.GoTo What:=wdGoToBookmark, _
   Name:="Move_Paragraph_Temp"
15. End SubNext, create the dialog box for the procedure (see Figure 14.16):
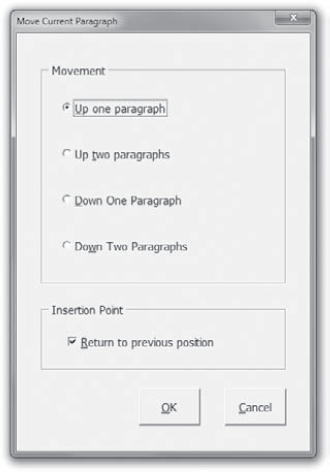
Figure 14.16. The Move Current Paragraph dialog box that you will connect to the Move_Paragraph macro
Start a user form in the Visual Basic Editor by clicking the Insert button's drop-down list and choosing UserForm (or just click the Insert button if it's already showing the UserForm icon) or by choosing Insert
Use the Properties window for the user form to set its
NameandCaptionproperties. Click in the cell next to theNamecell and enter theNameproperty there, and then click in the cell next to theCaptioncell and enter theCaptionproperty. The example user form is namedfrmMoveParagraphand has the captionMove Current Paragraphso that the name of the form is closely related to the text the user will see in the title bar of the dialog box but different from the procedure name (Move_Current_Paragraph).Place two frames in the user form, as shown in Figure 14.17, to act as group containers in the dialog box:
Double-click the Frame tool in the Toolbox, and then click and drag in the user form to place each frame.
Align the frames by selecting them both and choosing Format
With the frames still selected, verify that they are the same width by choosing Format
Caption the top frame
Movementand the bottom frameInsertion Pointby selecting each in turn and then setting theCaptionproperty in the Properties window. Then name the top framefraMovementand the bottom framefraInsertionPoint.
Place four option buttons in the Movement frame, as shown in Figure 14.18:
Double-click the OptionButton tool in the Toolbox, and then click in the Movement frame to place each option button. This time, don't click and drag—just click to place a normal-width option button.
When you've placed the four option buttons, click the Select Objects button in the Toolbox to restore the selection pointer. Then select the four option buttons and align them with each other by choosing Format
Change the caption for each option button by setting the
Captionproperty in the Properties window. Caption them as illustrated in Figure 14.18:Up one paragraph,Up two paragraphs,Down one paragraph, andDown two paragraphs. These option buttons will control the number of paragraphs the procedure moves the current paragraph.If you need to resize the option buttons to make all the text in the captions visible, select them and group them by right-clicking and choosing Group from the context menu, by choosing Format
Name the option buttons
optUpOne,optUpTwo,optDownOne, andoptDownTwo, respectively, by changing theNameproperty of each in turn in the Properties window.Next, set the first option button's
Valueproperty toTrueby selecting the defaultFalsevalue in the Properties window and enteringTrueinstead. Doing so will select the option button in the user form you're designing, and when the dialog box is displayed, that option button will be selected as the default choice for the option group. Set its accelerator key to U by enteringUas itsAcceleratorproperty. Set theAcceleratorproperty of the second option button to t, the third to D, and the fourth to w. TheAcceleratorproperty is case sensitive only when the caption for the control contains both the uppercase and lowercase versions of the same letter.
Place a check box in the Insertion Point frame, as shown in Figure 14.19:
Click the CheckBox tool in the Toolbox and then click in the Insertion Point frame in the user form to place a check box of the default size.
In the Properties window, set the name of the check box to
chkReturnToPreviousPosition(a long name but a descriptive one). Then set itsCaptionproperty toReturn to previous position. Set its accelerator key to R by enteringRas itsAcceleratorproperty. Finally, set the check box to be selected by default by enteringTrueas itsValueproperty.
Next, insert the command buttons for the form (see Figure 14.20):
Double-click the CommandButton tool on the Toolbox and click to place the first command button at the bottom of the user form. Click to place the second command button, and then click the Select Objects button to restore the selection mouse pointer.
Size and place the command buttons by using the commands on the Format menu. For example, group the buttons, and then use the Format
Set properties for the command buttons as follows: For the left-hand button (which will become the OK button), set the
Nameproperty tocmdOK, theCaptionproperty toOK, theAcceleratorproperty toO(that's O as in OK, not a zero), and theDefaultproperty toTrue. For the right-hand button (which will become the Cancel button), set theNameproperty tocmdCancel, theAcceleratorproperty toA, theCaptionproperty toCancel, and theCancelproperty toTrue. Leave theDefaultproperty set toFalse.
Now dive down into the Code window by double-clicking the Cancel button to display the code associated with it:
Private Sub cmdCancel_Click()

End Sub
Type an
Endstatement between the lines:Private Sub cmdCancel_Click() End End SubThis
Endstatement removes the dialog box from the screen and ends the current procedure—in this case, theMove_Current_Paragraphprocedure.Now you'll set the OK button, which is where things get interesting. When the user clicks the OK button, the procedure needs to continue executing and do all of the following:
Remove the dialog box from display by hiding it or by unloading it (or, preferably, both). As discussed earlier in the chapter, the choice is yours, but using both commands is usually clearest.
Check the
Valueproperty of the check box to see whether it was selected or cleared.Check the
Valueproperty of each option button in turn to see which of them was selected when the OK button was clicked.
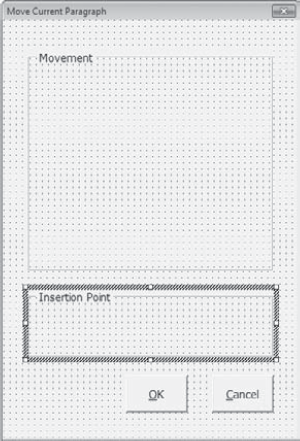
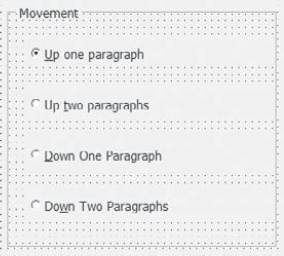
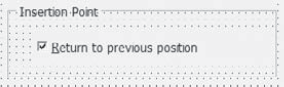
Now continue creating the Move Current Paragraph dialog box:
Double-click the OK button to display the code attached to it. (If you're still working in the Code window, select cmdOK in the Object dropdown list (on the top left of the Code window). The editor automatically creates the Click event procedure for this button.
First, enter the following two lines between the
Private SubandEnd Sublines:frmMoveParagraph.Hide Unload frmMoveParagraph
The
frmMoveParagraph.Hideline activates theHidemethod for thefrmMoveParagraphuser form, hiding it from display on the screen. TheUnload frmMoveParagraphline unloads the dialog box from memory.Next, the procedure needs to check the
Valueproperty of thechkReturnToPreviousPositioncheck box to find out whether to insert a bookmark in the document to mark the current position of the insertion point. To do this, enter a straightforwardIf... Thenstatement:If chkReturnToPreviousPosition = True Then End If
If the
chkReturnToPreviousPositionstatement is set toTrue—that is, if the check box is selected—the code in the lines following theThenstatement runs. TheThenstatement consists of the lines for inserting a bookmark that you recorded earlier. Cut these lines from the procedure and paste them into theIf... Thenstatement like this:If chkReturnToPreviousPosition = True Then With ActiveDocument.Bookmarks .Add Range:=Selection.Range, Name:=" Move_Paragraph_Temp" End With End IfIf the check box is selected, the procedure inserts a bookmark; if the check box is cleared, the procedure passes over these lines.
Next, right after the
End If, paste in the code for selecting the current paragraph and cutting it to the Clipboard:Selection.Extend Selection.Extend
Selection.Extend Selection.Extend Selection.Cut
After this, you need to retrieve the
Valueproperties from the option buttons to see which one was selected when the user chose the OK button in the dialog box. For this, you can again use anIfcondition—this time, anIf... Then ElseIf... Elsecondition, with the relevant insertion-point-movement lines from the recorded procedure pasted in:If optUpOne = True Then Selection.MoveUp Unit:=wdParagraph, Count:=1 ElseIf optUpTwo = True Then Selection.MoveUp Unit:=wdParagraph, Count:=2 ElseIf optDownOne = True Then Selection.MoveDown Unit:=wdParagraph, Count:=1 Else Selection.MoveDown Unit:=wdParagraph, Count:=2 End If Selection.PasteHere,
optUpOne, optUpTwo, optDownOne, andoptDownTwo(which uses theElsestatement here and therefore isn't specified by name in the listing) are the four option buttons from the dialog box, representing the choice to move the current paragraph up one paragraph, up two paragraphs, down one paragraph, or down two paragraphs, respectively. The condition is straightforward: IfoptUpOneisTrue(that is, if the option button is selected), the firstThencondition runs, moving the insertion point up one paragraph from its current position (after the current paragraph is cut, the insertion point will be at the beginning of the paragraph that was after the current one). IfoptUpOneisFalse, the firstElseIfcondition is evaluated; if it isTrue, the secondThencondition runs; and if it isFalse, the nextElseIfcondition is evaluated. If that too isFalse, theElsecode is run. In this case, theElsestatement means that theoptDownTwooption button was selected in the dialog box, so theElsecode moves the insertion point down two paragraphs.Wherever the insertion point ends based on which option button the user chose, the next line of code (
Selection.Paste) pastes in the cut paragraph from the Clipboard.Finally, the procedure must return the insertion point to where it was originally if the
chkReturnToPreviousPositioncheck box is selected. Again, you can test for this with a simpleIf... Thencondition that incorporates the go-to-bookmark and delete-bookmark lines from the recorded procedure:If chkReturnToPreviousPosition = True Then Selection.GoTo What:=wdGoToBookmark, _ Name:=" Move_Paragraph_Temp" ActiveDocument.Bookmarks("Move_Paragraph_Temp").Delete End If
If the chkReturnToPreviousPosition check box is selected, VBA moves the insertion point to the temporary bookmark and then deletes that bookmark.
Listing 14.1 shows the full listing for the cmdOK button.
Example 14.1. The Full Listing
1.  Private Sub cmdOK_Click()
 2.      frmMoveParagraph.Hide
 3.      Unload frmMoveParagraph
 4.      If chkReturnToPreviousPosition = True Then
 5.          With ActiveDocument.Bookmarks
 6.              .Add Range:=Selection.Range, _
                     Name:="Move_Paragraph_Temp"
 7.          End With
 8.      End If
 9.      Selection.Extend
10.      Selection.Extend
11.      Selection.Extend
12.      Selection.Extend
13.      Selection.Cut
14.      If optUpOne = True Then
15.          Selection.MoveUp Unit:=wdParagraph, Count:=1
16.      ElseIf optUpTwo = True Then
17.      Selection.MoveUp Unit:=wdParagraph, Count:=2
18.      ElseIf optDownOne = True Then
19.          Selection.MoveDown Unit:=wdParagraph, Count:=1
20.      Else
21.          Selection.MoveDown Unit:=wdParagraph, Count:=2
22.      End If
23.      Selection.Paste
24.      If chkReturnToPreviousPosition = True Then
25.          Selection.GoTo What:=wdGoToBookmark, _
                 Name:="Move_Paragraph_Temp"
26.          ActiveDocument.Bookmarks("Move_Paragraph_Temp").Delete
27.      End If
28.  End Sub
Go ahead and try it. To test this example properly, you should remove the bookmark you previously inserted while recording the macro earlier in this chapter. To remove it, click the Bookmark item in the Links section in the Insert tab on Word's Ribbon. In the Bookmarks dialog box that opens, select Move_Paragraph_Temp and click the Delete button.
Now open the scratch document in Word that you created earlier in this chapter and filled with several paragraphs of text. Now press Alt+F11 to open the Visual Basic Editor. Double-click frmMoveParagraph in the Project Explorer to display the user form. Press F5. Click the OK button in your user form and observe that the paragraphs were rearranged in the document.
This example displays a user form that employs a list box from which the user can select a file to open. The user form is simple, as is its code. The macro includes a loop and an array to gather the names of the files in a folder and then displays the filenames in the list box. The user gets to select a file and click the Open button to open it. Figure 14.21 shows the user form in action, displaying Excel files.
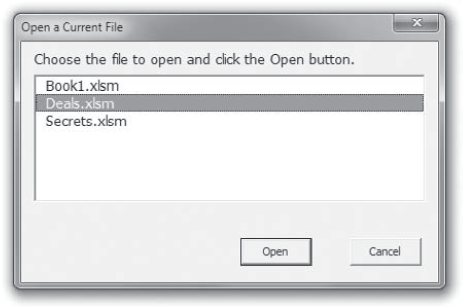
Figure 14.21. The user form you'll build in this example contains a list box that gives the user quick access to all current files.
You can adapt this example to any of the Office 2007 applications discussed in this book by changing the filename to an appropriate type for that application and also modifying a couple of the key statements. The example shows you how to create the code in Excel, but you can then adapt it for the application you want to use.
Follow these steps to build the user form:
Start the application you want to work in. The example uses Excel.
Display the Visual Basic Editor by pressing the Alt+F11 key or by clicking the Visual Basic icon in the Ribbon's Developer tab.
In the Project Explorer, right-click the project to which you want to add the user form and choose Insert
Drag the handle at the lower-right corner of the user form to the right to make the user form a bit wider.
Set the
Nameproperty of the form tofrmOpen_a_Current_Fileand itsCaptiontoOpen a Current File. Check theWidthproperty. You want it to be about 350 pixels wide.Click the Label button in the Toolbox, and then click in the upper-left corner of the user form to place a default-size label there. Activate the Properties window and set the properties for the label as shown in Table 14.9:
Click the ListBox button in the Toolbox, and then click below the label in the user form to place a default-size list box there. Set its properties as shown in Table 14.10:
Double-click the CommandButton button in the Toolbox, and then click twice at the bottom of the user form to place two default-size command buttons there. Set their properties as shown in Table 14.11:
Arrange the command buttons as follows:
Click the
cmdCancelbutton to select it, and then drag it close to the cmdOK button.With the cmdCancel button still selected, Ctrl+click the cmdOK button to add it to the selection.
Choose Format
Choose Format
Drag the group up or down as necessary.
(Or just drag them around and eyeball them into a pleasing position, as shown in Figure 14.21.)
Follow these steps to create the code for the user form:
With the user form selected, press the F7 key to display the user form's code sheet.
In the declarations portion of the code sheet (just hold down the up-arrow key until you move to the very top of the Code window), enter an
Option Base 1statement to make the array numbering start at1instead of at0:Option Base 1
Make sure that UserForm is selected in the Object drop-down list, and then pull down the Procedure drop-down list and choose Initialize from it. The Visual Basic Editor enters the stub of an
Initializeprocedure in the code sheet, like this:Private Sub UserForm_Initialize() End Sub
Enter the statements for the
Initializeprocedure shown in Listing 14.2.In the Object drop-down list, select cmdCancel. The Visual Basic Editor enters the stub of a
Clickprocedure, as shown here. (Clickis the default event for the CommandButton control, so the Visual Basic Editor assumes that you want to create aClickprocedure.)Private Sub cmdCancel_Click() End Sub
Enter the statements for the
cmdCancel_Clickprocedure shown in Listing 14.2.In the Object drop-down list, select cmdOpen. The Visual Basic Editor enters the stub of a
Clickprocedure.Enter the statements for the
cmdOpen_Clickprocedure shown in Listing 14.2.Customize line 9 (in the
Initializeprocedure) and line 32 (in thecmdOpen_Clickprocedure) so that the code will work with the application you're using, as shown in the following list. The procedure as shown is set up to run for Excel, but you'll probably need to change the path to reflect where the target files are on your computer.For Word, change the
Workbooks.Openstatement toDocuments.Open:If lstFiles.Value <> "" Then Documents.Open _ Filename:="z: ransfer" & lstFiles.ValueFor PowerPoint, change the
Workbooks.Openstatement toPresentations.Open:If lstFiles.Value <> "" Then Presentations.Open _ Filename:="z: ransfer" & lstFiles.Value
Listing 14.2 shows the full version of the code behind the user form.
Example 14.2. Using a ListBox to open a file
1.  Option Base 1
 2.
 3.  Private Sub UserForm_Initialize()
 4.
 5.      Dim strFileArray() As String
 6.      Dim strFFile As String
 7.      Dim intCount As Integer
 8.
 9.      strFFile = Dir("z:	ransferspreads*.xlsm")
10.      intCount = 1
11.
12.      Do While strFFile <> ""
13.          If strFFile <> "." And strFFile <> ".." Then
14.              ReDim Preserve strFileArray(intCount)
15.              strFileArray(intCount) = strFFile
16.              intCount = intCount + 1
17.              strFFile = Dir()
18. End If
19. Loop
20.
21. lstFiles.List() = strFileArray
22.
23. End Sub
24.
25. Private Sub cmdCancel_Click()
26. Me.Hide
27. Unload Me
28. End Sub
29.
30. Private Sub cmdOpen_Click()
31. Me.Hide
32. If lstFiles.Value <> "" Then Workbooks.Open _
Name:="z: ransferspreads" & lstFiles.Value
33. Unload Me
34. End SubListing 14.2 contains all the code that appears on the code sheet for the frmOpen_a_Current_File user form: a declarations section and three event procedures.
In the declarations section, line 1 contains the Option Base 1 statement, which makes any array used on the code sheet begin at 1 rather than at 0. Line 2 is a spacer.
Here's what happens in the UserForm_Initialize procedure (lines 3 to 23):
Line 3 begins the
Initializeprocedure for the user form. Line 4 is a spacer.Line 5 declares the String array variable
strFileArray. Line 6 declares the String variablestrFFile. Line 7 declares the Integer variableintCount. Line 8 is a spacer.Line 9 assigns to
strFFilethe result of a directory operation on the designated folder (here,z: ransferspreads,) but substitute your own path to a folder on your computer that contains files with an.xlsmfilename extension. Enter your own path in line 32 as well.Line 10 sets the
intCountcounter to1. Note that if you don't use theOption Base 1declaration for this procedure, you need to setCountto0(or the corresponding value for a different option base that you use). The first call toDir, which specifies the pathname in an argument, returns the first file it finds in the folder (assuming it finds at least one file). Each subsequent call without the argument returns the next file in the folder, untilDirfinds no more files.Line 11 is a spacer. Lines 12 through 19 contain a
Do While...Looploop that runs whilestrFFileisn't an empty string (""):Line 13 makes sure that
strFFileisn't a folder by comparing it to the single period and double period used to denote folders. IfstrFFileisn't a folder, line 14 uses aReDim Preservestatement to increase the dimensions of thestrFileArrayarray to the number inintCountwhile retaining the current information in the array, thus building the list of files in the folder.Line 15 assigns to the
intCountindex of thestrFileArrayarray the current contents ofstrFFile.Line 16 then adds
1tointCount, and Line 17 setsstrFFileto the result of theDirfunction (the first filename matching the*.xlsmpattern in the designated folder).Line 18 ends the
Ifcondition. Line 19 contains theLoopkeyword that will continue the loop as long as theDo Whilestatement isTrue. Line 20 is a spacer.
When the loop ends, line 21 sets the
Listproperty of thelstFileslist box in the dialog box to the contents ofstrFileArray, which now contains a list of all the files in the folder.Line 22 is a spacer, line 23 ends the procedure, and line 24 is another spacer.
Here's what happens in the cmdCancel_Click procedure (lines 25 through 28):
Line 25 starts the
cmdCancel_Clickprocedure, and line 28 ends it.Line 26 hides the user form, using the
Mekeyword to reference it.Line 27 unloads the user form from memory.
Here's what happens in the cmdOpen_Click procedure (lines 30 through 34):
Line 30 starts the
cmdOpen_Clickprocedure, and line 34 ends it.Line 31 hides the user form, again by using the
Mekeyword.Line 32 checks to make sure the
Valueproperty of thelstFileslist box is not an empty string ("") and, if it is not, uses theOpenmethod of theDocumentscollection to open the file selected in the list box. The statement adds to the path (z: ransferspreads) theValueproperty of the list box to produce the full filename. Substitute your own path forz: ransferspreads.Line 33 unloads the user form from memory.
Remember that to test this example, you'll need to adjust lines 9 and 32 to include a file path on your machine where some XLSM files are stored.
Some applications, such as Word and Excel, let you use their built-in dialog boxes via VBA. If a built-in dialog box offers the functionality you need, using it can be a great solution: You don't have to build a custom dialog box, just reference the built-in dialog box in your code. You shouldn't even need to debug the dialog box, and users of your procedures will probably be familiar with the dialog box from their work in the application. These built-in dialog boxes are called common dialog boxes and we explored them briefly in the section titled "Control a For...Next Loop with User Input via a Dialog Box" in Chapter 12.
To display a built-in dialog box, you need to know its name and constant. You also must decide which method to use to display the dialog box.
Although Office 2010 no longer uses menus (with some exceptions such as the Visual Basic Editor), built-in dialog boxes (in Word and other applications) are still identified by constants derived from the older, pre-Ribbon menu/toolbar-style interface. These constants start with the letters wdDialog (as in Word Dialog), followed by the name of the dialog box. The name of the dialog box is derived from the pre–Office 2010 menu commands that displayed the dialog box prior to the introduction of the Ribbon interface (with Office 2007). For example, to refer to the Open dialog box, you use the constant wdDialogFileOpen, because in previous versions of Word, you would have chosen File
So, although the user interface has evolved beyond classic menus, the menu structure itself remains as part of the classification system for internal objects—such as these constants used to identify various dialog boxes.
Excel follows a similar but less rigid taxonomic convention. Built-in Excel dialog boxes are identified by constants starting with the letters xlDialog followed by the name of the dialog box. The name of the dialog box is derived either from the classic menu commands that were required to display it or from the dialog box's title. For example, to refer to the Open dialog box, you use the constant xlDialogOpen (rather than xlDialogFileOpen).
The easiest way to find the name for the built-in dialog box you need is to search the Visual Basic Editor's Help system for "Built-in Dialog Box Argument Lists" in Word or Excel. (Access employs a whole different system, requiring the importation of object libraries using its Visual Basic Editor's Tools
You can also view a list of Word or Excel built-in dialog boxes by displaying the Object Browser and typing wddialog or xldialog (as appropriate) in the Search textbox.
You use these constants with the Dialogs property, which returns the Dialogs collection object, which contains all the built-in dialog boxes in the host application. For example, to return Word's Save As dialog box and display it using the Show method, you'd use the following statement:
Dialogs(wdDialogFileSaveAs).Show
VBA provides two methods of displaying built-in dialog boxes onscreen: Show and Display:
The
Showmethod shows the specifiedDialogobject and then uses functions built into theDialogobject to carry out the user's requests. You don't need to write code of your own. For example, if you use theShowmethod to display thewdDialogFileSaveAsdialog box and the user enters a name for the file in the File Name box and clicks the Save button, VBA saves the file with the given name in the specified folder (and with any options the user chose). You didn't write any programming to save this file.The
Displaymethod merely displays the dialog box onscreen, but it does not execute the actions the user requests in the dialog box. Instead, it allows you to get the settings (the user's requests and selections) from the dialog box once the user dismisses it, but then you must write your own code to carry out what the user requested.
The Show method displays the specified dialog box and automatically responds to whatever actions the user takes in it. Show is useful when you need to have the user perform a conventional interactive action. As a simple example, in a procedure that's supposed to perform certain formatting tasks on the current document, you could check to make sure a document was open before attempting to perform the formatting; then, if no document was open, you could display the built-in Open dialog box so that the user could open a file. (You might precede the Open dialog box with a message box explaining the problem.) Listing 14.3 shows the code for this part of the procedure.
Example 14.3. Using a common dialog box
1.  If Documents.Count = 0 Then
 2.      Proceed = MsgBox("There is no document open." _
             & vbCr & vbCr & _
             "Please open a document for the procedure to work on.", _
             vbOKCancel + vbExclamation, "Format Report")
 3.      If Proceed = vbOK Then
 4.          Dialogs(wdDialogFileOpen).Show
 5.          If Documents.Count = 0 Then End
 6.      Else
 7.          End
 8.      End If
 9.  End If
10.  'rest of procedure here
Here's how the code works:
Line 1 checks the
Countproperty of theDocumentscollection to see if no documents are open; if that's the case, the statements in lines 2 through 8 run.Line 2 displays a message box informing users that no document is open and asking them to open one for the procedure to work on. The message box has OK and Cancel buttons and stores the button chosen in the variable
Proceed.Line 3 checks to see if the OK button was chosen; if it was, line 4 displays the Open dialog box so that users can select the file, which VBA will open when they click the Open button in the Open dialog box.
Users can cancel the procedure at this point by clicking the Cancel button in the Open dialog box, so line 5 checks the
Countproperty of theDocumentscollection again and uses anEndstatement to terminate execution of the procedure if there is still no document open.If the OK button was not chosen, execution moves from line 3 to the
Elsestatement in line 6, and theEndstatement in line 7 ends execution of the procedure.Line 8 contains the
End Ifstatement for the nestedIfstatement, and line 9 contains theEnd Ifstatement for the outerIfstatement.Line 10 contains a comment to indicate that you'd write more code here—the rest of the procedure would run from this point, which is reached only if a document is open.
Unlike the Show method, the Display method displays a built-in dialog box but doesn't respond to any actions the user takes in the dialog box. Instead, you write code if you want to return the settings that the user made in the dialog box and respond to them as you want in your procedures. The user gets to work with familiar dialog boxes, but you totally control the behavior that results from that interaction.
For example, you'll often need to find out which folder a procedure should be working in, such as when you need the location of a number of documents that the user wants to manipulate. To get the folder, you could display a straightforward input box and prompt the user to type in the correct path to the folder—if the user knows the path and can type it in correctly. Another possible solution is to display a list box containing the tree of drives, folders, and files on the user's hard drive, but to do this you need to dimension an array and fill it with the folders and filenames, and you need to refresh the display every time the user moves up or down the tree—quite a lot of work. Why not borrow this functionality from a common dialog box? It's already built into Office applications. You can achieve the same result much more easily by using a built-in dialog box that has the tree built in (for example, the Open dialog box) and then retrieving the user's responses for your own purposes.
If you need to execute the settings in a built-in dialog box that you've displayed using the Display method, you can use the Execute method. For example, you might want to check the user's selection in the dialog box before implementing them.
Most of the built-in Word and Excel dialog boxes have arguments that you can use for retrieving or setting values in the dialog box. For example, the Open dialog box in Word has arguments for Name, ConfirmConversions, ReadOnly, LinkToSource, AddToMru (adding the document to the Most Recently Used document list on the Recent section of the File tab on the Ribbon), PasswordDoc, and more. Some of these are options that you'll see in the Open dialog box itself; others are associated options that you'll find on the various tabs of the Options dialog box. You can guess some argument names from the names of the corresponding controls in the dialog box, but other names aren't directly related. Use the "Built-in Dialog Box Argument Lists" topic in VBA Help to learn the names.
For example, the following statements set the contents of the File Name text box in the Save As dialog box in Word and then display the dialog box:
With Dialogs(wdDialogFileSaveAs)
    .Name = "Yellow Paint Primer"
    .Show
End With
Be aware that some arguments that applied to dialog boxes displayed by Office 2003 no longer apply to Office 2007 or Office 2010 dialog boxes. So you may need to experiment a bit to see if a particular argument is still useful in the Office 2010 interface.
If you change the settings in a dialog box that uses sticky (persistent) settings, it's a good idea to change them back so that users don't get unexpected results the next time they use the dialog box.
To find out which button the user clicked in a dialog box, check the return value of the Show method or the Display method. The return values are shown in Table 14.12.
Table 14.12. Click return values
Return Value | Button Clicked |
|---|---|
| Close |
| OK |
| Cancel |
| The first command button |
| The second command button |
| Subsequent command buttons |
For example, you might want to cancel your whole procedure if the user clicks the Cancel button in a dialog box, like this:
If Dialogs(wdDialogFileOpen).Show = 0 Then End
In some applications, including Word, you can display some built-in dialog boxes for a specified time rather than having them stay open until the user dismisses them by clicking OK or Cancel or some other button. To do so, you use the TimeOut Variant argument with the Show method or the Display method. You specify TimeOut as a number of units, each of which is approximately a thousandth of a second. (If the system is busy with many other tasks, the actual result might be a longer delay.) So you could display the General page of the Word Options dialog box for about 10 seconds—long enough for the user to check the Name setting and change it if necessary—by using the following statements:
With Dialogs(wdDialogToolsOptions)
    .DefaultTab = wdDialogToolsOptionsTabUserInfo
    .Show (10000)
End WithTiming out a dialog box is especially useful for noncritical information like the username in this example because it allows the procedure to continue even if the user has left the computer. Likewise, you might want to timeout a Save As dialog box in which the procedure suggested a viable filename but allowed users to override it if they were present. However, for a procedure in which the user's input is essential, you won't want to use the TimeOut argument. You want to compel the user to respond by at least clicking a button; in this context, the dialog box should not disappear all by itself.
- Understand what you can do with a custom dialog box
Custom dialog boxes—user interfaces you design in the Visual Basic Editor—are often necessary in macros and other kinds of Office automation. You might, for example, want to display a dialog box that allows the user to specify whether to let a macro continue beyond a certain point in its code or cease execution. Perhaps your macro is searching through a document for a particular phrase; then when it finds that phrase, it displays a dialog box to users asking if they want to continue further.
- Master It
Which VBA statement would you use to stop a macro from continuing execution?
- Create a custom dialog box
You use the Visual Basic Editor to both design a custom dialog box and write code for macros. You can attach the various controls on a dialog box to code behind the dialog box.
- Master It
How do you switch between the form design window (sometimes called the object window) and the Code window in the Visual Basic Editor?
- Add controls to a dialog box
It's easy in the Visual Basic Editor to add various controls—such as command buttons and text boxes—to a user form (a custom dialog box).
- Master It
How do you add a command button to a custom dialog box?
- Link dialog boxes to procedures
Buttons, check boxes, option buttons—displaying various controls to the user is fine, but unless you write some code behind these various user-interface objects, what's the point? Dialog boxes often display objects with which users can communicate their wishes to your code. Therefore, you write code that explores the values the user enters into controls and responds to whatever buttons the user might click.
- Master It
Create a small custom dialog box that displays a message in a label control saying, "Would you like to know the current date and time?" Put an OK button and a Cancel button on this form. Write code that simply ends the procedure if the user presses the Cancel button but that displays the date and time in the label if the user clicks the OK button. If the user clicks OK a second time, end the procedure.
- Retrieve the user's choices from a dialog box
A major task of most dialog boxes is retrieving values that the user has specified in various controls by selecting check boxes and so on. Then you write code to carry out the user's wishes. This interaction via dialog box is the typical way that a user communicates with your procedures, and vice versa.
- Master It
Create a new dialog box that contains three option buttons captioned Small, Medium, and Large and named optSmall, optMedium, and optLarge. Write code in each option button's
Clickprocedure to change the button's caption to boldface when the button is clicked.