
In the last chapter, we created a live web-based API using an Azure Function App and updated our app to use it instead of static, hardcoded data. When we created the API, we made it available anonymously, which means anyone can access the data within it. Most web-based APIs require some level of authentication. In some cases, it may be an API key you are provided by the API owner. In other cases, you may be required to sign in with credentials, in order to obtain an authorization token. Whether you are provided a key or granted a token through an authorization process, that key or token can then be used to authenticate all access to the API. In this chapter, we are going to update our API to require authorization, and update our app to allow users to sign in to access the API.
In this chapter, we'll cover the following topics:
- Adding authentication to the Azure Function App
- Using the Xamarin.Auth library to easily perform OAuth and securely communicate with the API
- Updating the TripLog app with a sign-in page and the ability to sign out
We'll start by enabling authentication on the Azure Function App we created in the last chapter.
Adding authentication to Azure Functions
In the previous chapter, we set up a new, live backend using an Azure Function App. The service contains a single table named entry, which houses all log entries for our TripLog app and makes them available via an entry endpoint. Currently, the entry endpoint is available anonymously.
In this section, we'll change the permissions on the Azure Function App to require each request to contain an access token associated with an authenticated user.
Setting up an identity provider
There are a couple of approaches you can use to handle identity and authentication in Azure. You can set up the Azure Function App to use Facebook, Twitter, a Microsoft Account, Google, or even Azure Active Directory as a trusted identity provider. You can also create your own custom identity provider if you want to use account data stored in your database, instead of one of the social providers. You can use one of these options or a combination of several of them—they will all provide an access token that can be used by your mobile app to communicate with your API on behalf of your users. In this section, we'll only use one provider, Facebook. If you want to use a different provider you can still follow the steps in this section, since they're the same for all providers.
In order to use a third-party identity provider, you will need to have an app/client ID and app secret. These keys can be obtained directly from the identity provider by setting up an app for OAuth, typically in their developer portal. Once you've obtained the app/client ID and secret, you can configure the authentication settings for the backend service, as shown in the following steps:
- Select your Function App in the Azure portal.
- Go to the Platform features tab and click on Authentication / Authorization, as shown in the following screenshot:
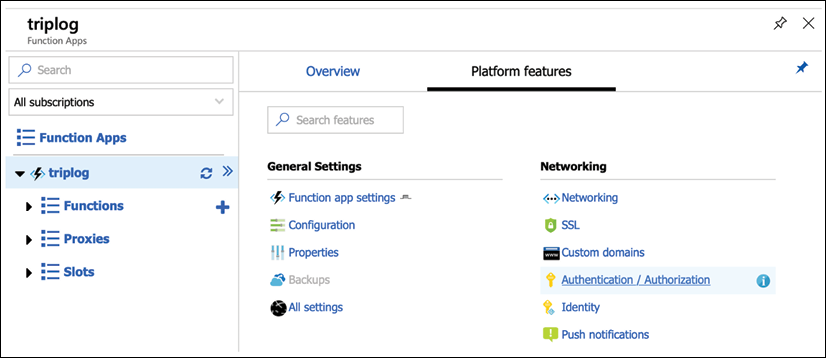
Figure 1: Setting up Authentication / Authorization for an Azure Function App (step 1 of 2)
- Switch the App Service Authentication toggle to On and select Log in with Facebook in the Action to take when request is not authenticated dropdown, as shown in the following screenshot:
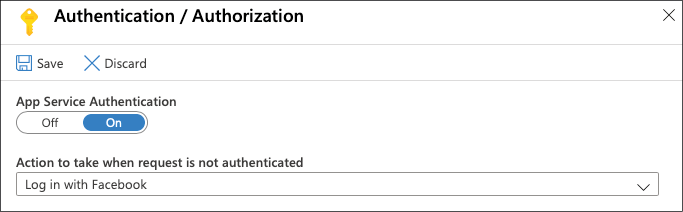
Figure 2: Azure Function App Authentication / Authorization setup (step 2 of 2)
- Click on the Save button at the top of the Authentication / Authorization pane.
At this point, any attempt to call the API endpoints, as we did in the previous chapter, will result in an unauthorized response. For example, using either a REST console or the command line, issue a GET request to the API endpoint using the following URL and you should get back a 401 response:
https://<your-function-name>.azurewebsites.net/api/entry
Next, we'll set up Facebook as an identity provider for our Function App so that we can obtain a user-specific access token that can be used in the request header, allowing us to get back a successful response:
- Return to the Platform features tab of your Function App and click on Authentication / Authorization.
- Select Facebook.
- Provide your Facebook authentication settings (App ID and App Secret) and click on the OK button at the bottom of the pane, as shown in the following screenshot:
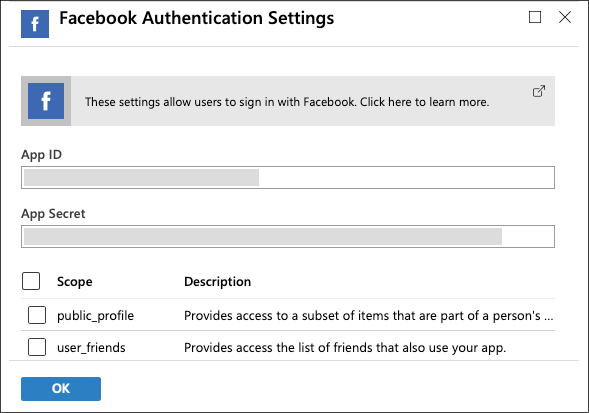
Figure 3: Facebook Authentication Settings for an Azure Function App
- Click on the Save button at the top of the Authentication / Authorization pane.
- Finally, you will need to add the OAuth redirect Uniform Resource Identifier (URI) for your service within the app settings of the identity provider. The redirect URI will depend on the identity provider, using the following format:
https://<your-function-name>.azurewebsites.net/.auth/login/<identity-provider>/callback. Replace<your-function-name>with the name of your Function App, and replace<identity-provider>withfacebook,twitter,microsoftaccount,google, oraad, depending on which identity provider you are using.
Setting up an app for OAuth is different for each provider, and the Azure App Service documentation outlines the steps in detail for each, as follows:
Facebook: https://docs.microsoft.com/en-us/azure/app-service/configure-authentication-provider-facebook
Twitter: https://docs.microsoft.com/en-us/azure/app-service/configure-authentication-provider-twitter
Microsoft Account: https://docs.microsoft.com/en-us/azure/app-service/configure-authentication-provider-microsoft
Google: https://docs.microsoft.com/en-us/azure/app-service/configure-authentication-provider-google
Azure Active Directory: https://docs.microsoft.com/en-us/azure/app-service/configure-authentication-provider-aad
For more details on Azure App Service authentication and authorization, visit https://docs.microsoft.com/en-us/azure/app-service/overview-authentication-authorization
Once you have set everything up on the identity provider side and provided the keys in the Azure portal, you can test it out in your internet browser by navigating to https://<your-function-name>.azurewebsites.net/.auth/login/facebook.
If everything is set up correctly, you should see the login prompt for the identity provider, as shown in the following screenshot:

Figure 4: Facebook log in page for API authorization
If you observe the URL in the browser address bar after authenticating with the identity provider, you should see the redirected URL appended with a token value in the form of a URL-encoded JSON object. We can then take the value of the authenticationToken key in that JSON object and use it in a request to our API to confirm that we get back a successful response.
In either a REST console or the command line, issue the same GET request as we did in the previous section, but this time, add a new header named x-zumo-auth and use the value from authenticationToken in the JSON object returned in the redirect URI as the x-zumo-auth header value:
https://<your-function-name>.azurewebsites.net/tables/entry
    --header "x-zumo-auth:<your-authentication-token>"
If everything has been set up correctly, you should get back a response containing all of the Entry objects in the Azure backend service.
In the next section, we will update the TripLog app with a Facebook authentication page to get an access token that can be stored and used by the app to communicate with the API.
Creating an authentication service
Now that we have enabled our backend service with Facebook authentication, the app as it is from the previous chapter will fail to load content. In this section, we will update the app to authenticate users with Facebook via OAuth and obtain an access token from Azure that can be used in subsequent API calls by the TripLogApiDataService.
As in the previous chapter, instead of using the identity provider's SDK, we will directly call the API endpoints behind the SDK, to better understand the approach to authenticate to an API in a more generic way. In order to do this, we first make an OAuth call to Facebook, obtaining a Facebook token. We then pass that token to an Azure App Service authentication endpoint, where it is validated using the Facebook app ID and the secret that was added to the service's configuration in Azure, to finally receive the access token needed to make calls to the Function App endpoints.
Performing OAuth in a mobile app requires a certain set of platform-specific capabilities. Fortunately, Xamarin has abstracted this into a cross-platform library, available as a NuGet package, called Xamarin.Auth. We will use the Xamarin.Auth library to perform OAuth in our app. However, we do not want to put this particular implementation detail directly in a ViewModel, because it puts an external dependency on the ViewModel, making it less testable, as discussed in Chapter 4, Platform-Specific Services and Dependency Injection. So, instead of a ViewModel calling the Xamarin.Auth library directly, we will create and use an authentication service, following the inversion of control pattern introduced in Chapter 4, Platform-Specific Services and Dependency Injection. We will start by creating an authentication service interface, as shown in the following steps:
- First, create a new interface named
IAuthServicein theServicesfolder in the core library:public interface IAuthService { } - Update the
IAuthServiceinterface with a single method that takes in all the key components of a standard OAuth call as its parameters:public interface IAuthService { void SignInAsync(string clientId, Uri authUrl, Uri callbackUrl, Action<string> tokenCallback, Action<string> errorCallback); }
The two callback Action parameters provide a way to handle both success and failure OAuth responses.
Next, we'll need to create an implementation of this interface that will leverage the Xamarin.Auth library to perform the actual OAuth prompts and requests, as shown in the following steps:
- Add the Xamarin.Auth NuGet package to the core library project and each of the platform projects.
- Next, initialize the Xamarin.Auth library in each platform-specific startup class as follows:
// in iOS AppDelegate global::Xamarin.Forms.Forms.Init(); global::Xamarin.Auth.Presenters.XamarinIOS.AuthenticationConfiguration.Init(); Xamarin.FormsMaps.Init(); LoadApplication(new App(new TripLogPlatformModule())); // in Android MainActivity global::Xamarin.Forms.Forms.Init(this, savedInstanceState); global::Xamarin.Auth.Presenters.XamarinAndroid.AuthenticationConfiguration.Init(this, savedInstanceState); Xamarin.FormsMaps.Init(this, savedInstanceState); LoadApplication(new App(new TripLogPlatformModule())); - Next, create a new class that implements
IAuthService, namedAuthService, in theServicesfolder in the core library project:public class AuthService : IAuthService { } - Next, provide the implementation for the
SignInAsyncmethod fromIAuthService:public class AuthService : IAuthService { public void SignInAsync(string clientId, Uri authUrl, Uri callbackUrl, Action<string> tokenCallback, Action<string> errorCallback) { var presenter = new OAuthLoginPresenter(); var authenticator = new OAuth2Authenticator(clientId, "", authUrl, callbackUrl); authenticator.Completed += (sender, args) => { if (args.Account != null && args.IsAuthenticated) { tokenCallback?.Invoke(args.Account.Properties["access_token"]); } else { errorCallback?.Invoke("Not authenticated"); } }; authenticator.Error += (sender, args) => { errorCallback?.Invoke(args.Message); }; presenter.Login(authenticator); } } - Finally, update the
TripLogCoreModuleNinject module in the core library to register theIAuthServiceimplementation in the IoC:public class TripLogCoreModule : NinjectModule { public override void Load() { // ... Bind<IAuthService>().To<AuthService>().InSingletonScope(); } }
The IAuthService interface provides a way to perform OAuth against Facebook, which gives us a Facebook authentication token, but we still need a way to pass that Facebook-specific token to our API, to get back an Azure-authenticated access token that we can use in our API requests. Azure App Service authentication provides an endpoint that takes an identity provider-specific token, and in return, provides an Azure-specific access token. In order to use this endpoint, we just need to update our TripLog data service with a new method, as follows:
- First, create a new model class named
TripLogApiAuthToken. As we saw in the preceding section, the response from the/.auth/login/facebookendpoint is a JSON object, containing auserIdobject and anauthenticationTokenobject; so, thisTripLogApiAuthTokenmodel will represent that structure, so that we can deserialize the response and use the access token for future calls to the TripLog backend service:public class TripLogApiUser { public string UserId { get; set; } } public class TripLogApiAuthToken { public TripLogApiUser User { get; set; } public string AuthenticationToken { get; set; } } - Next, add a new method to the
ITripLogDataServiceinterface namedAuthenticateAsync:public interface ITripLogDataService { Task AuthenticateAsync(string idProvider, string idProviderToken); Task<IList<TripLogEntry>> GetEntriesAsync(); Task<TripLogEntry> AddEntryAsync(TripLogEntry entry); }Notice the
idProviderparameter, which allows this method to be used for Azure identity providers other than just Facebook. - Next, add a new
Action<string>property to theITripLogDataServiceinterface namedAuthorizedDelegate. This delegate will allow callers to take action whenever the app has been authorized to access the data service:public interface ITripLogDataService { Action<string> AuthorizedDelegate { get; set; } Task AuthenticateAsync(string idProvider, string idProviderToken); Task<IList<TripLogEntry>> GetEntriesAsync(); Task<TripLogEntry> AddEntryAsync(TripLogEntry entry); } - Next, update the
TripLogApiDataServiceto include theAuthorizedDelegateproperty and the implementation of theAuthenticateAsyncmethod that we just added to theITripLogDataService. The method needs to make aPOSTcall to the/.auth/login/facebookendpoint, with the access token received from the OAuth response in the request body. The service endpoint expects the token in the body to be associated with a key namedaccess_token. Since our base HTTP service handles serializing the message body data for us, we can simply create astructto house the token that will be passed to the endpoint:public class TripLogApiDataService : BaseHttpService, ITripLogDataService { readonly Uri _baseUri; readonly IDictionary<string, string> _headers; public Action<string> AuthorizedDelegate { get; set; } struct IdProviderToken { [JsonProperty("access_token")] public string AccessToken { get; set; } } public async Task AuthenticateAsync(string idProvider, string idProviderToken) { var token = new IdProviderToken { AccessToken = idProviderToken }; var url = new Uri(_baseUri, string.Format(".auth/login/{0}", idProvider)); var response = await SendRequestAsync<TripLogApiAuthToken>(url, HttpMethod.Post, requestData: token); if (!string.IsNullOrWhiteSpace(response?.AuthenticationToken)) { var authToken = response.AuthenticationToken; // Update this service with the new auth token _headers["x-zumo-auth"] = authToken; AuthorizedDelegate?.Invoke(authToken); } } // ... }Notice how the
AuthorizedDelegateis invoked (if defined) when an auth token is successfully received from the API. This allows other areas of the app to take action when the authentication has successfully completed, as we will see later in this chapter. - Finally, we'll need to update the
TripLogApiDataServiceconstructor with a string parameter namedauthToken. In theAuthenticateAsyncmethod, we update the_headersproperty with the token we received from the backend. However, we also need to be able to set the_headersproperty from the constructor, so that we can initialize the service with a token if one already exists (for instance, if a token was persisted in the app's settings after signing in), as shown in the following code:public TripLogApiDataService(Uri baseUri, string authToken) { _baseUri = baseUri; _headers = new Dictionary<string, string>(); _headers.Add("x-zumo-auth", authToken); }
Now that we've created an authentication service, and have the ability to authorize access to our backend service, we need to update our app to leverage it. In the next section, we'll create a new page and ViewModel, which uses our authentication service to allow users to sign in and access the data from our API.
Adding a sign-in page
In order to add sign-in capabilities to our app, we need to create a new Page and a new ViewModel. The ViewModel will be pretty straightforward, containing just a single command that handles signing into Facebook via the IAuthService interface, and passing the received Facebook token to the Azure backend service through the ITripLogDataService, as shown in the following steps:
- Create a new class that inherits from
BaseViewModel, namedSignInViewModel, in theViewModelsfolder in the core library project:public class SignInViewModel : BaseViewModel { } - Update the
SignInViewModelwith a constructor that takes inINavService,IAuthService, andITripLogDataServiceparameters:public class SignInViewModel : BaseViewModel { readonly IAuthService _authService; readonly ITripLogDataService _tripLogService; public SignInViewModel(INavService navService, IAuthService authService, ITripLogDataService tripLogService) :base(navService) { _authService = authService; _tripLogService = tripLogService; } } - Next, add a new
Commandproperty namedSignInCommandto theSignInViewModelalong with its executeAction:public class SignInViewModel : BaseViewModel { // ... Command _signInCommand; public Command SignInCommand => _signInCommand ?? (_signInCommand = new Command(SignIn)); void SignIn() { // TODO: Update with your Facebook App Id and Function App name _authService.SignInAsync("YOUR_FACEBOOK_APPID", new Uri("https://m.facebook.com/dialog/oauth"), new Uri("https://<your-function-name>.azurewebsites.net/.auth/login/facebook/callback"), tokenCallback: async token => { // Use Facebook token to get Azure auth token await _tripLogService.AuthenticateAsync("facebook", token); }, errorCallback: e => { // TODO: Handle invalid authentication here }); } } - Update the
TripLogCoreModuleNinject module to addSignInViewModelto the IoC container:public class TripLogCoreModule : NinjectModule { public override void Load() { // ViewModels Bind<SignInViewModel>().ToSelf(); Bind<MainViewModel>().ToSelf(); Bind<DetailViewModel>().ToSelf(); Bind<NewEntryViewModel>().ToSelf(); // ... } }
- Update the
TripLogCoreModuleto account for the updatedTripLogApiDataServiceconstructor and pass in the auth token stored in local settings:public class TripLogCoreModule : Ninject.Modules.NinjectModule { public override void Load() { // ... var apiAuthToken = Preferences.Get("apitoken", ""); var tripLogService = new TripLogApiDataService(new Uri("https://<your-function-name>.azurewebsites.net"), apiAuthToken); // ... } }
We now have a ViewModel that handles the authentication flow for our app. Next, we will create the actual sign-in page, which will use the SignInViewModel as its data context:
- Create a new XAML page in the
Viewsfolder in the core library namedSignInPage. - Update the XAML of the
SignInPageto add a button that is bound to theSignInCommandofSignInViewModel:<ContentPage.Content> <Button Text="Sign in with Facebook" Command="{Binding SignInCommand}" BackgroundColor="#455c9f" TextColor="White" Margin="20" VerticalOptions="Center" /> </ContentPage.Content>
- Next, register the
SignInPageandSignInViewModelmappings in the navigation service in theTripLogNavModuleNinject module:public class TripLogNavModule : NinjectModule { // ... public override void Load() { var navService = new XamarinFormsNavService(); // Register view mappings navService.RegisterViewMapping(typeof(SignInViewModel), typeof(SignInPage)); navService.RegisterViewMapping(typeof(MainViewModel), typeof(MainPage)); navService.RegisterViewMapping(typeof(DetailViewModel), typeof(DetailPage)); navService.RegisterViewMapping(typeof(NewEntryViewModel), typeof(NewEntryPage)); Bind<INavService>() .ToMethod(x => navService) .InSingletonScope(); } }
Now that we've created a sign-in page, we need to make a few minor adjustments to the app so that users will go directly to the SignInPage if an auth token does not exist in local settings, and then go to the MainPage after successfully signing in.
There are a couple of ways to tap into the platform-specific APIs to store and retrieve local settings. One way is to roll your own service, similar to the way we did with the geolocation service: creating a core interface that is implemented uniquely per platform. Another alternative is to leverage a plugin, or other third-party library, that has already been created and published.
In this section, we'll use the Preferences API from the Xamarin.Essentials library to get and retrieve the API auth token:
- First, add a
boolproperty to theAppclass inApp.xaml.csthat indicates whether an auth token is present by checking the Xamarin.Essentials Preferences API:public partial class App : Application { bool IsSignedIn => !string.IsNullOrWhiteSpace(Preferences.Get("apitoken", "")); // ... } - Next, update the
SetMainPagemethod in theAppclass to setMainPageto theSignInPageifIsSignedInisfalse:public partial class App : Application { // ... void SetMainPage() { var mainPage = IsSignedIn ? new NavigationPage(new MainPage()) { BindingContext = Kernel.Get<MainViewModel>() } : new NavigationPage(new SignInPage()) { BindingContext = Kernel.Get<SignInViewModel>() }; var navService = Kernel.Get<INavService>() as XamarinFormsNavService; navService.XamarinFormsNav = mainPage.Navigation; MainPage = mainPage; } // ... } - Lastly, set the data service's
AuthorizedDelegateto a method that saves the token returned from the successful API authorization and then resets the app'sMainPageproperty:public partial class App : Application { public App(params INinjectModule[] platformModules) { // ... Kernel.Load(platformModules); // Setup data service authentication delegates var dataService = Kernel.Get<ITripLogDataService>(); dataService.AuthorizedDelegate = OnSignIn; SetMainPage(); } void SetMainPage() { // ... } void OnSignIn(string accessToken) { Preferences.Set("apitoken", accessToken); SetMainPage(); } // ... }
Now, when the app is launched for the first time and an auth token is not present in the local settings, you will see the sign-in page. Clicking on the sign-in button will launch the Xamarin.Auth dialog, prompting for Facebook credentials and permission to grant access to the TripLog app, as shown in the following screenshots:

Figure 5: The sign in and authorization pages
Upon successfully authenticating with Facebook, you should be automatically brought to the MainPage, and the list of the Entry objects will be loaded from the API. In the next section, we'll add the ability for users to sign out of the app.
Adding a sign-out button
Now that we've added a sign-in feature to our app, we need to give our users a way to sign out as well. Most apps that deal with authenticating users will put a sign-out button somewhere in an account settings or profile screen. Since our app does not have an account settings or profile screen, we'll simply add a Sign out button to the navigation bar on the main page. In addition to allowing the user to sign out, the app should also automatically sign the user out if it receives any 401 (unauthorized) responses from the API.
We'll add support for automatic sign-out first, because we'll be able to repurpose it when we add the sign-out button:
- First, add a new
Actionproperty to theITripLogDataServiceinterface namedUnauthorizedDelegate. This delegate will work like theAuthorizedDelegatewe added earlier in the chapter, except this one will allow callers to take action whenever the app's access to the data service is unauthorized:public interface ITripLogDataService { Action<string> AuthorizedDelegate { get; set; } Action UnauthorizedDelegate { get; set; } Task AuthenticateAsync(string idProvider, string idProviderToken); Task<IList<TripLogEntry>> GetEntriesAsync(); Task<TripLogEntry> AddEntryAsync(TripLogEntry entry); } - Next, update the
TripLogApiDataServiceto include theUnauthorizedDelegateproperty that we just added toITripLogDataService:public class TripLogApiDataService : BaseHttpService, ITripLogDataService { readonly Uri _baseUri; readonly IDictionary<string, string> _headers; public Action<string> AuthorizedDelegate { get; set; } public Action UnauthorizedDelegate { get; set; } // ... } - Next, update the
GetEntriesAsyncandAddEntryAsyncmethods to invoke theUnauthorizedDelegate(if defined) anytime anUnauthorizedAccessExceptionis caught:public class TripLogApiDataService : BaseHttpService, ITripLogDataService { // ... public async Task<IList<TripLogEntry>> GetEntriesAsync() { try { var url = new Uri(_baseUri, "/api/entry"); var response = await SendRequestAsync<TripLogEntry[]>(url, HttpMethod.Get, _headers); return response; } catch (UnauthorizedAccessException) { UnauthorizedDelegate?.Invoke(); throw; } } public async Task<TripLogEntry> AddEntryAsync(TripLogEntry entry) { try { var url = new Uri(_baseUri, "/api/entry"); var response = await SendRequestAsync<TripLogEntry>(url, HttpMethod.Post, _headers, entry); return response; } catch (UnauthorizedAccessException) { UnauthorizedDelegate?.Invoke(); throw; } } } - Next, update the
BaseHttpServiceSendRequestAsyncmethod to throw a newUnauthorizedAccessExceptionif the API response's HTTP status code is a401:public abstract class BaseHttpService { protected async Task<T> SendRequestAsync<T>(Uri url, HttpMethod httpMethod = null, IDictionary<string, string> headers = null, object requestData = null) { // ... using (var response = await client.SendAsync(request, HttpCompletionOption.ResponseContentRead)) { var content = response.Content == null ? null : await response.Content.ReadAsStringAsync(); if (response.IsSuccessStatusCode) { result = JsonConvert.DeserializeObject<T>(content); } else { if (response.StatusCode == HttpStatusCode.Unauthorized) { throw new UnauthorizedAccessException(); } } } // ... } } - Finally, in the
Appclass, set the data service'sUnauthorizedDelegateto a method that removes the stored token and then resets the app'sMainPageproperty:public partial class App : Application { public App(params INinjectModule[] platformModules) { // ... Kernel.Load(platformModules); // Setup data service authentication delegates var dataService = Kernel.Get<ITripLogDataService>(); dataService.AuthorizedDelegate = OnSignIn; dataService.UnauthorizedDelegate = SignOut; SetMainPage(); } void SetMainPage() { // ... } void OnSignIn(string accessToken) { // ... } void SignOut() { Preferences.Remove("apitoken"); SetMainPage(); } // ... }
Now, anytime the app receives a 401 response from the API, it will automatically sign the user out, and return them to the SignInPage. Next, we'll add the ability for the user to sign out on their own:
- First, add a new method to
ITropLogDataService, namedUnauthenticate:public interface ITripLogDataService { Action<string> AuthorizedDelegate { get; set; } Action UnauthorizedDelegate { get; set; } Task AuthenticateAsync(string idProvider, string idProviderToken); void Unauthenticate(); Task<IList<TripLogEntry>> GetEntriesAsync(); Task<TripLogEntry> AddEntryAsync(TripLogEntry entry); }
- Next, update
TripLogDataServiceto include the implementation for theUnauthenticatemethod we just added to theITripLogDataServiceinterface, which simply invokes theUnauthorizedDelegate:public class TripLogApiDataService : BaseHttpService, ITripLogDataService { // ... public Action<string> AuthorizedDelegate { get; set; } public Action UnauthorizedDelegate { get; set; } // ... public void Unauthenticate() => UnauthorizedDelegate?.Invoke(); // ... }
Now anytime the user wants to sign out we can call this Unauthenticate method, which will invoke the UnauthorizedDelegate, and therefore execute the same code as when a 401 is received and we automatically sign the user out. Now all we need to do is add a sign-out button that calls this Unauthenticate method.
As with the other buttons or components in the user interface, the sign-out button should be data bound to a ViewModel Command property, so, we'll start by adding that:
- Add a new
Commandproperty namedSignOutCommandtoMainViewModelthat simply calls theUnauthenticatemethod in the data service:public class MainViewModel : BaseViewModel { readonly ITripLogDataService _tripLogService; // ... public Command SignOutCommand => new Command(_tripLogService.Unauthenticate); // ... }
- Next, add a sign-out button to the
MainPagenavigation bar that is bound to theSignOutCommandwe just added:<ContentPage ... > <ContentPage.ToolbarItems> <ToolbarItem Text="New" Command="{Binding NewCommand}" /> <ToolbarItem Text="Sign out" Command="{Binding SignOutCommand}" /> </ContentPage.ToolbarItems> <ContentPage.Content> <!-- ... --> </ContentPage.Content> </ContentPage>
Now, when the app is run, there'll be a Sign out button on the navigation bar of its main page, as shown in the following screenshot. When the user clicks on the Sign out button, the stored auth token will be cleared and they will be routed back to the sign-in page.

Figure 6: The TripLog main page with a Sign Out button
Summary
In this chapter, we updated the Azure backend service we created in the previous chapter with Facebook-provided authentication. We also updated the API data service in the TripLog app, to authenticate its HTTP API requests with a user-specific auth token provided by Azure App Service authentication, given a valid Facebook access token. Finally, we added a sign-in page, the ability to sign out, and updated the app to automatically route the user to the sign-in page if an auth token isn't found in local settings, or if a 401 response is ever received from the API. In the next chapter, we'll create unit tests for our TripLog app.