
In this chapter, we will take a look at the Model-View-ViewModel (MVVM) pattern, the MVVM elements that are offered with the Xamarin.Forms toolkit, and how we can expand on them to truly take advantage of the power of the pattern. As we dig into these topics, we will apply what we have learned to the TripLog app that we started building in Chapter 1, Getting Started.
In this chapter, we will cover the following topics:
- Understanding the MVVM pattern and data binding
- Adding the MVVM pattern and data binding to the Xamarin.Forms mobile app created in Chapter 1, Getting Started
- Adding client-side validation to the Xamarin.Forms mobile app created in Chapter 1, Getting Started
Before we start applying the MVVM pattern to our app we will review the basics of the pattern in the following section.
Understanding the MVVM pattern
At its core, MVVM is a presentation pattern designed to control the separation between user interfaces and the rest of an application. The key elements of the MVVM pattern are as follows:
- Models: Models represent the business entities of an application. When responses come back from an API, they are typically deserialized to Models.
- Views: Views represent the actual pages or screens of an application, along with all of the elements that make them up, including custom controls. Views are very platform-specific and depend heavily on platform APIs to render the application's user interface (UI).
- ViewModels: ViewModels control and manipulate the Views by serving as their data context. ViewModels are made up of a series of properties represented by Models. These properties are part of what is bound to the Views to provide the data that is displayed to users, or to collect the data that is entered or selected by users. In addition to Model-backed properties, ViewModels can also contain commands, which are action-backed properties that bind the actual functionality and execution to events that occur in the Views, such as button taps or list item selections.
- Data binding: Data binding is the concept of connecting data properties and actions in a ViewModel with the UI elements in a View. The actual implementation of how data binding happens can vary and, in most cases, is provided by a framework, toolkit, or library. In Windows app development, data binding is provided declaratively in XAML. In traditional (non-Xamarin.Forms) Xamarin app development, data binding is either a manual process or dependent on a third-party framework. Data binding in Xamarin.Forms follows a very similar approach to Windows app development.
Now that we have an understanding of the key pieces of the MVVM pattern and how those pieces relate to one another we can start updating our app architecture to follow the pattern. In the next section we will add ViewModels for each of the pages we added in the previous chapter and refactor those pages with data bindings.
Adding MVVM to the app
The first step of introducing MVVM into an app is to set up the structure by adding folders that will represent the core tenants of the pattern, such as Models, ViewModels, and Views. Traditionally, the Models and ViewModels live in a core library (usually, a portable class library or .NET standard library), whereas the Views live in a platform-specific library.
Thanks to the power of the Xamarin.Forms toolkit and its abstraction of platform-specific UI APIs, the Views in a Xamarin.Forms app can also live in the core library.
Just because the Views can live in the core library with the ViewModels and Models doesn't mean that separation between the UI and the app logic isn't important. As we will see in this chapter and throughout the rest of the book, the separation between the UI and app logic is instrumental in keeping the codebase maintainable, testable, and shareable.
When implementing a specific structure to support a design pattern, it is helpful to have your application namespaces organized in a similar structure. This is not a requirement, but it is something that can be useful. By default, Visual Studio for Mac will associate namespaces with directory names, as shown in the following screenshot:

Figure 1: .NET Naming Policies settings in Visual Studio
Setting up the app structure
For the TripLog app, we will let the Views, ViewModels, and Models all live in the same core .NET standard library project. In our solution, this is the project called TripLog. We have already added the Views and Models folders in Chapter 1, Getting Started, so we just need to add a ViewModels folder to the project to complete the MVVM structure:
- Add a new folder named
ViewModelsto the root of the TripLog project.
Once the MVVM structure has been added, the folder structure in the solution should look similar to the following screenshot:
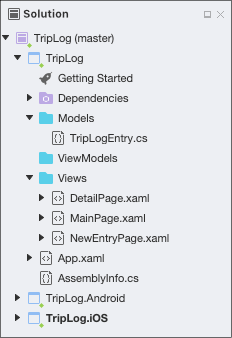
Figure 2: The TripLog solution in Visual Studio
In MVVM, the term View is used to describe a screen. Xamarin.Forms uses the term View to describe controls, such as buttons or labels, and uses the term Page to describe a screen. In order to avoid confusion, I will stick with the Xamarin.Forms terminology and refer to screens as Pages, and will only use the term Views in reference to screens for the folder where the Pages will live, in order to stick with the MVVM pattern.
Adding ViewModels
In most cases, Views (Pages) and ViewModels have a one-to-one relationship. However, it is possible for a View (Page) to contain multiple ViewModels or for a ViewModel to be used by multiple Views (Pages). For now, we will simply have a single ViewModel for each Page. Before we create our ViewModels, we will start by creating a base ViewModel class, which will contain the basic functionality that each of our ViewModels will inherit. Initially, the base ViewModel class will only contain a couple of members and will implement INotifyPropertyChanged, but we will add to this class as we continue to build upon the TripLog app throughout this book.
In order to create a base ViewModel, perform the following steps:
- Create a new class named
BaseViewModelin theViewModelsfolder using the following code:public class BaseViewModel { protected BaseViewModel() { } } - Update
BaseViewModelto implementINotifyPropertyChanged:using System.ComponentModel; using System.Runtime.CompilerServices; public class BaseViewModel : INotifyPropertyChanged { public event PropertyChangedEventHandler PropertyChanged; protected BaseViewModel() { } protected virtual void OnPropertyChanged([CallerMemberName] string propertyName = null) { PropertyChanged?.Invoke(this, new PropertyChangedEventArgs(propertyName)); } }
The implementation of INotifyPropertyChanged is key to the behavior and role of the ViewModels and data binding. It allows a Page to be notified when the properties of its ViewModel have changed.
Now that we have created a base ViewModel, we can start adding the actual ViewModels that will serve as the data context for each of our Pages. We will start by creating a ViewModel for MainPage.
Adding MainViewModel
The main purpose of a ViewModel is to separate the business logic, for example, data access and data manipulation, from the UI logic. Right now, our MainPage directly defines the list of data that it is displaying. This data will eventually be dynamically loaded from an API but for now, we will move this initial static data definition to its ViewModel so that it can be data bound to the UI.
In order to create the ViewModel for MainPage, perform the following steps:
- Create a new class file in the
ViewModelsfolder and name itMainViewModel. - Update the
MainViewModelclass to inherit fromBaseViewModel:public class MainViewModel : BaseViewModel { // ... } - Add an
ObservableCollection<T>property to theMainViewModelclass and name itLogEntries. This property will be used to bind to theItemsSourceproperty of theCollectionViewelement onMainPage.xaml:using System.Collections.ObjectModel; using TripLog.Models; public class MainViewModel : BaseViewModel { ObservableCollection<TripLogEntry> _logEntries; public ObservableCollection<TripLogEntry> LogEntries { get => _logEntries; set { _logEntries = value; OnPropertyChanged(); } } // ... } - Next, remove the code in
MainPage.xaml.csthat creates theList<TripLogEntry>that populates theCollectionViewelement onMainPage.xamland repurpose that logic in theMainViewModel– we will put it in the constructor for now:public MainViewModel() { LogEntries = new ObservableCollection<TripLogEntry> { new TripLogEntry { Title = "Washington Monument", Notes = "Amazing!", Rating = 3, Date = new DateTime(2019, 2, 5), Latitude = 38.8895, Longitude = -77.0352 }, new TripLogEntry { Title = "Statue of Liberty", Notes = "Inspiring!", Rating = 4, Date = new DateTime(2019, 4, 13), Latitude = 40.6892, Longitude = -74.0444 }, new TripLogEntry { Title = "Golden Gate Bridge", Notes = "Foggy, but beautiful.", Rating = 5, Date = new DateTime(2019, 4, 26), Latitude = 37.8268, Longitude = -122.4798 } }; } - Set
MainViewModelas theBindingContextforMainPage. Do this by simply setting theBindingContextproperty ofMainPagein its code-behind file to a new instance ofMainViewModel. TheBindingContextproperty comes from theXamarin.Forms.ContentPagebase class:using System; using Xamarin.Forms; using TripLog.Models; using TripLog.ViewModels; public partial class MainPage : ContentPage { public MainPage() { InitializeComponent(); BindingContext = new MainViewModel(); } // ... } - Finally, update how the
CollectionViewelement onMainPage.xamlgets its items. Currently, itsItemsSourceproperty is being set directly in the Page's code behind, which we removed in step four. Now update theCollectionViewelement's tag inMainPage.xamlto bind to theMainViewModel LogEntriesproperty:<CollectionView x:Name="trips" SelectionMode="Single" ItemsSource="{Binding LogEntries}" SelectionChanged="Trips_SelectionChanged">
The Main Page is now all setup with a ViewModel and data binding. Next, we will add a ViewModel for the Detail Page.
Adding DetailViewModel
Now we will add another ViewModel to serve as the data context for DetailPage, as follows:
- Create a new class file in the
ViewModelsfolder and name itDetailViewModel. - Update the
DetailViewModelclass to inherit from theBaseViewModelclass:public class DetailViewModel : BaseViewModel { // ... } - Add a
TripLogEntryproperty to the class and name itEntry. This property will be used to bind details about an entry to the various labels onDetailPage:using TripLog.Models; public class DetailViewModel : BaseViewModel { TripLogEntry _entry; public TripLogEntry Entry { get => _entry; set { _entry = value; OnPropertyChanged(); } } // ... } - Update the
DetailViewModelconstructor to take aTripLogEntryparameter namedentry. Use this constructor property to populate the publicEntryproperty created in the previous step:public class DetailViewModel : BaseViewModel { // ... public DetailViewModel(TripLogEntry entry) { Entry = entry; } } - Set
DetailViewModelas theBindingContextforDetailPageand pass in theTripLogEntryproperty that is being passed toDetailPage:using System; using Xamarin.Forms; using TripLog.Models; using TripLog.ViewModels; public partial class DetailPage : ContentPage { public DetailPage(TripLogEntry entry) { InitializeComponent(); BindingContext = new DetailViewModel(entry); // ... } // ... }In Chapter 3, Navigation, we will refactor how we are passing the entry parameter to
DetailViewModel. - Next, remove the code at the end of the
DetailPageconstructor that directly sets theTextproperties of theLabelelements:public DetailPage(TripLogEntry entry) { // ... // Remove these lines of code: //title.Text = entry.Title; //date.Text = entry.Date.ToString("M"); //rating.Text = $"{entry.Rating} star rating"; //notes.Text = entry.Notes; } - Next, update the
Labelelement tags inDetailPage.xamlto bind theirTextproperties to theDetailViewModel Entryproperty:<Label ... Text="{Binding Entry.Title}" /> <Label ... Text="{Binding Entry.Date, StringFormat='{0:M}'}" /> <Label ... Text="{Binding Entry.Rating, StringFormat='{0} star rating'}" /> <Label ... Text="{Binding Entry.Notes}" /> - Finally, update the map to get the values it is plotting from the ViewModel. Since the Xamarin.Forms
Mapcontrol does not have bindable properties, the values have to be set directly to the ViewModel properties. The easiest way to do this is to add a private field to the Page that returns the value of the page'sBindingContextand then use that field to set the values on the map:public partial class DetailPage : ContentPage { DetailViewModel ViewModel => BindingContext as DetailViewModel; public DetailPage(TripLogEntry entry) { InitializeComponent(); BindingContext = new DetailViewModel(entry); map.MoveToRegion(MapSpan.FromCenterAndRadius( new Position( ViewModel.Entry.Latitude, ViewModel.Entry.Longitude), Distance.FromMiles(.5))); map.Pins.Add(new Pin { Type = PinType.Place, Label = ViewModel.Entry.Title, Position = new Position(ViewModel.Entry.Latitude, ViewModel.Entry.Longitude) }); } }
With the Main Page and Detail Page updated with ViewModels and data binding we just need to update the New Entry Page. In the next section we will create a ViewModel to bind to the user's input on the New Entry Page.
Adding NewEntryViewModel
Finally, we will need to add a ViewModel for NewEntryPage, as follows:
- Create a new class file in the
ViewModelsfolder and name itNewEntryViewModel. - Update the
NewEntryViewModelclass to inherit fromBaseViewModel:public class NewEntryViewModel : BaseViewModel { // ... } - Add public properties to the
NewEntryViewModelclass that will be used to bind it to the values entered into theEntryCellelements inNewEntryPage.xaml:public class NewEntryViewModel : BaseViewModel { string _title; public string Title { get => _title; set { _title = value; OnPropertyChanged(); } } double _latitude; public double Latitude { get => _latitude; set { _latitude = value; OnPropertyChanged(); } } double _longitude; public double Longitude { get => _longitude; set { _longitude = value; OnPropertyChanged(); } } DateTime _date; public DateTime Date { get => _date; set { _date = value; OnPropertyChanged(); } } int _rating; public int Rating { get => _rating; set { _rating = value; OnPropertyChanged(); } } string _notes; public string Notes { get => _notes; set { _notes = value; OnPropertyChanged(); } } // ... } - Update the
NewEntryViewModelconstructor to initialize theDateandRatingproperties:public NewEntryViewModel() { Date = DateTime.Today; Rating = 1; } - Add a public
Commandproperty toNewEntryViewModeland name itSaveCommand. This property will be used to bind to the SaveToolbarIteminNewEntryPage.xaml. The Xamarin.FormsCommandtype implementsSystem.Windows.Input.ICommandto provide anActionto run when the command is executed, and aFuncto determine whether the command can be executed:public class NewEntryViewModel : BaseViewModel { // ... Command _saveCommand; public Command SaveCommand => _saveCommand ?? (_saveCommand = new Command(Save, CanSave)); void Save() { var newItem = new TripLogEntry { Title = Title, Latitude = Latitude, Longitude = Longitude, Date = Date, Rating = Rating, Notes = Notes }; // TODO: Persist entry in a later chapter } bool CanSave() => !string.IsNullOrWhiteSpace(Title); } - In order to keep the
CanExecutefunction of theSaveCommandup to date, we will need to call theSaveCommand.ChangeCanExecute()method in any property setters that impact the results of thatCanExecutefunction. In our case, this is only theTitleproperty:public string Title { get => _title; set { _title = value; OnPropertyChanged(); SaveCommand.ChangeCanExecute(); } }The
CanExecutefunction is not required, but by providing it, you can automatically manipulate the state of the control in the UI that is bound to theCommandso that it is disabled until all of the required criteria are met, at which point it becomes enabled. - Next, set
NewEntryViewModelas theBindingContextforNewEntryPage:using System; using Xamarin.Forms; using TripLog.ViewModels; public NewEntryPage() { InitializeComponent(); BindingContext = new NewEntryViewModel(); // ... } - Next, update the
EntryCellelements inNewEntryPage.xamlto bind to theNewEntryViewModelproperties:<EntryCell Label="Title" Text="{Binding Title}" /> <EntryCell Label="Latitude" Keyboard="Numeric" Text="{Binding Latitude}" /> <EntryCell Label="Longitude" Keyboard="Numeric" Text="{Binding Longitude}" /> <EntryCell Label="Date" Text="{Binding Date, StringFormat='{0:d}'}" /> <EntryCell Label="Rating" Keyboard="Numeric" Text="{Binding Rating}" /> <EntryCell Label="Notes" Text="{Binding Notes}" /> - Finally, we will need to update the Save
ToolbarItemelement inNewEntryPage.xamlto bind to theNewEntryViewModel SaveCommandproperty:<ToolbarItem Text="Save" Command="{Binding SaveCommand}" />
Now, when we run the app and navigate to the New Entry Page, we can see the data binding in action, as shown in the following screenshots. Notice how the Save button is disabled in the first set of screenshots until the title field contains a value, as shown in the second set of screenshots:
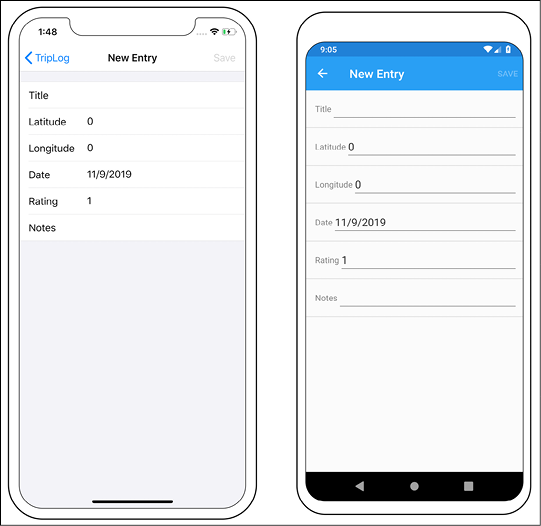
Figure 3: The TripLog new entry page with Save button disabled

Figure 4: The TripLog new entry page with Save button enabled
Validation
In software, data validation is a process that ensures the validity and integrity of user input and usually involves checking that data is in the correct format and contains an acceptable value. There are typically two types of validation when building apps: server-side and client-side. Both play an important role in the lifecycle of an app's data. Server-side validation is critical when it comes to security, making sure malicious data or code doesn't make its way into the server or backend infrastructure. Client-side validation is usually more about user experience than security. A mobile app should always validate its data before sending it to a backend (such as a web API) for a number of reasons, including the following:
- To provide real-time feedback to the user about any issues instead of waiting on a response from the backend
- To support saving data in offline scenarios where the backend is not available
- To prevent encoding issues when sending the data to the backend
Just as a backend server should never assume all incoming data has been validated by the client side before being received, a mobile app should also never assume the backend will do its own server-side validation, even though it's a good security practice. For this reason, mobile apps should perform as much client-side validation as possible.
When adding validation to a mobile app the actual validation logic can go in a few areas of the app architecture. It could go directly in the UI code (the View layer of an MVVM architecture), it could go in the business logic or controller code (the ViewModel layer of an MVVM architecture), or it could even go in the HTTP code. In most cases when implementing the MVVM pattern it will make the most sense to include validation in the ViewModels for the following reasons:
- The validation rules can be checked as the individual properties of the ViewModel are changed.
- The validation rules are often part of or dependent on some business logic that exists in the ViewModel.
- Most importantly, having the validation rules implemented in the ViewModel makes them easy to test.
Adding a base validation ViewModel
As discussed earlier in this section, validation makes the most sense in the ViewModel. To do this we will start by creating a new base ViewModel that will provide some base-level methods, properties, and events for subclassed ViewModels to leverage. This new base ViewModel will be called BaseValidationViewModel and will subclass the BaseViewModel we created earlier in the chapter. It will also implement an interface called INotifyDataErrorInfo from the System.ComponentModel namespace. INotifyDataErrorInfo works a lot like INotifyPropertyChanged – it specifies some properties about what errors have occurred and as well as an event for when the error state of particular property changes:
- Create a new class in the
ViewModelsfolder namedBaseValidationViewModelthat subclassesBaseViewModel:public class BaseValidationViewModel : BaseViewModel { public BaseValidationViewModel() { } } - Update
BaseValidationViewModelto implementINotifyDataErrorInfoas follows:public class BaseValidationViewModel : BaseViewModel, INotifyDataErrorInfo { readonly IDictionary<string, List<string>> _errors = new Dictionary<string, List<string>>(); public BaseValidationViewModel() { } public event EventHandler<DataErrorsChangedEventArgs> ErrorsChanged; public bool HasErrors => _errors?.Any(x => x.Value?.Any() == true) == true; public IEnumerable GetErrors(string propertyName) { if (string.IsNullOrWhiteSpace(propertyName)) { return _errors.SelectMany(x => x.Value); } if (_errors.ContainsKey(propertyName) && _errors[propertyName].Any()) { return _errors[propertyName]; } return new List<string>(); } } - In addition to implementing the required members of
INotifyDataErrorInfo–ErrorsChanged,HasErrors, andGetErrors()– we also need to add a method that actually handles validating ViewModel properties.This method needs a validation rule parameter in the form of a
Func<bool>and an error message to be used if the validation rule fails. Add a protected method namedValidatetoBaseValidationViewModelas follows:public class BaseValidationViewModel : BaseViewModel, INotifyDataErrorInfo { // ... protected void Validate(Func<bool> rule, string error, [CallerMemberName] string propertyName = "") { if (string.IsNullOrWhiteSpace(propertyName)) return; if (_errors.ContainsKey(propertyName)) { _errors.Remove(propertyName); } if (rule() == false) { _errors.Add(propertyName, new List<string> { error }); } OnPropertyChanged(nameof(HasErrors)); ErrorsChanged?.Invoke(this, new DataErrorsChangedEventArgs(propertyName)); } }If the validation rule
Func<bool>returnsfalse, the error message that is provided is added to a private list of errors – used byHasErrorsandGetErrors()– mapped to the specific property that called into thisValidate()method. Lastly, theValidate()method invokes theErrorsChangedevent with the caller property's name included in the event arguments.
Now any ViewModel that needs to perform validation can subclass BaseValidationViewModel and call the Validate() method to check if individual properties are valid.
In the next section we will use BaseValidationViewModel to add validation to the New Entry Page and its supporting ViewModel.
Adding validation to the New Entry Page
In this section we will add some simple client-side validation to a couple of the entry fields on the New Entry Page.
- First, update
NewEntryViewModelto subclassBaseValidationViewModelinstead ofBaseViewModel:public class NewEntryViewModel : BaseValidationViewModel { // ... }Because
BaseValidationViewModelsubclassesBaseViewModel,NewEntryViewModelis still able to leverage everything inBaseViewModelas well. - Next, add a call to
Validate()in theTitleproperty setter that includes a validation rule specifying that the field cannot be left blank:public string Title { get => _title; set { _title = value; Validate(() => !string.IsNullOrWhiteSpace(_title), "Title must be provided."); OnPropertyChanged(); SaveCommand.ChangeCanExecute(); } } - Next, add a call to
Validate()in theRatingproperty setter that includes a validation rule specifying that the field's value must be between 1 and 5:public int Rating { get => _rating; set { _rating = value; Validate(() => _rating >= 1 && _rating <= 5, "Rating must be between 1 and 5."); OnPropertyChanged(); SaveCommand.ChangeCanExecute(); } }Notice we also added
SaveCommand.ChangeCanExecute()to the setter as well. This is because we want to update theSaveCommand'scanExecutevalue when this value is changed since it will now impact the return value ofCanSave(), which we will update in the next step. - Next, update
CanSave()– the method used for theSaveCommand'scanExecutefunction – to prevent saving if the ViewModel has any errors:bool CanSave() => !string.IsNullOrWhitespace(Title) && !HasErrors; - Finally, update the New Entry Page to reflect any errors by highlighting the field's text color in red:
// NewEntryPage.xaml:
<EntryCell x:Name="title" Label="Title" Text="{Binding Title}" />
// ...
<EntryCell x:Name="rating" Label="Rating" Keyboard="Numeric"
           Text="{Binding Rating}" />
// NewEntryPage.xaml.cs:
using System;
using System.Collections.Generic;
using System.ComponentModel;
using System.Linq;
using Xamarin.Forms;
using TripLog.ViewModels;
public partial class NewEntryPage : ContentPage
{
    NewEntryViewModel ViewModel =>
        BindingContext as NewEntryViewModel;
    public NewEntryPage()
    {
        InitializeComponent();
        BindingContextChanged += Page_BindingContextChanged;
        BindingContext = new NewEntryViewModel();
    }
    void Page_BindingContextChanged(object sender, EventArgs e)
    {
        ViewModel.ErrorsChanged += ViewModel_ErrorsChanged;
    }
    void ViewModel_ErrorsChanged(object sender,
        DataErrorsChangedEventArgs e)
    {
        var propHasErrors = (ViewModel.GetErrors(e.PropertyName)
            as List<string>)?.Any() == true;
        switch (e.PropertyName)
        {
            case nameof(ViewModel.Title):
                title.LabelColor = propHasErrors
                    ? Color.Red : Color.Black;
                break;
            case nameof(ViewModel.Rating):
                rating.LabelColor = propHasErrors
                    ? Color.Red : Color.Black;
                break;
            default:
                break;
        }
    }
}
Now when we run the app and navigate to the New Entry Page and enter an invalid value in either the Title or Rating field, we will see the field label turn red and the Save button will be disabled, as shown in the following screenshots. Once the error has been corrected the field label color returns to black and the Save button is re-enabled.

Figure 5: The TripLog new entry page with client side validation
Summary
In this chapter, we updated the app that we started creating in Chapter 1, Getting Started, by removing data and data-related logic from the Pages, offloading it to a series of ViewModels, and then binding the Pages to those ViewModels. In the next chapter, we will expand on the Xamarin.Forms navigation service so that we can also move navigation code from the Pages to the ViewModels.