
RECALLING A CUSTOM PROFILE
To activate one of the seven saved custom profiles, select SHOOTING MENU 3 > SELECT CUSTOM SETTING and chose your desired profile.
The Q button can also save you some time here: tap the Q button to bring up the Quick Menu and then select from C1 to C7 in the setting field in the top left. The shooting settings associated with each profile will display in the Quick Menu so you can get an overview of the definitions for each setting.
The third option to switch between custom profiles quickly is to program the Fn button to serve this purpose. Hold the Fn button until the configuration menu appears and then assign SELECT CUSTOM SETTING.
EXAMPLES OF CUSTOM PROFILES
Which profiles should you save? Only you can answer this question for yourself—photographers not only have individual requirements and aims, but they also have their own stylistic preferences. This is exactly why the X-Pro1 has so many different programming possibilities. If there were one “optimal” universal setting, FUJIFILM could have done away with the various options. Nevertheless, here are a few recommendations for potentially useful custom profiles:
• All-around profile: In this profile, I save the settings that generally apply to everyday situations and quick snapshots. My typical settings for my all-around profile are automatic white balance, auto ISO, auto DR, Astia, and occasionally a decreased noise reduction set at medium low.
• DR100% profile: This is a variation of the all-around profile with the dynamic range setting fixed at DR100%. This profile allows me to use the live histogram for correcting the exposure and target the brighter areas of my image more accurately when defining the exposure settings.
• Black-and-white profile: Any time I imagine an image would look good in black-and-white, I use this profile, which includes the black-and-white film simulation and increased contrast settings. The electronic viewfinder gives me a practical (black-and-white) preview of my subject.
• Special profile: I generally reserve one profile for special situations, such as shooting in a studio or taking infrared images, when it is practical to shoot with a color temperature setting predefined in Kelvin.
• “RAW shooter” profile: I use this profile when I know in advance that I will probably want to expose the image very carefully so that I can develop and edit it with an external RAW converter.
A JPEG PROFILE FOR RAW SHOOTERS
No, the idea of a JPEG profile for RAW shooters is not a joke. While JPEG settings have no effect on RAW files, they do affect what image you can see in the electronic viewfinder (EVF) and on the LCD display. Moreover, the data for the live histogram is derived from the image that appears in the live view—in other words, it too is affected by your current JPEG settings.
What does this mean concretely? If you select VELVIA as your film simulation, for example, not only will you have a brightly colored JPEG; you’ll also have a brightly colored live view preview with pronounced contrast. This image preview is reflected in the live histogram as well, and the Velvia simulation will cause the peaks of exposure to shift to either the left or the right limits quicker than if Provia were used instead.
The same goes for the contrast settings (HIGHLIGHT TONE and SHADOW TONE): if both parameters are set to HARD then the highlights and shadows will shift beyond the right and left limits of the histogram faster than they would if both were set to SOFT.
As I’ve already said, the RAW file itself isn’t affected by any of this—it collects all of the image information that the sensor is capable of capturing. Conversely, JPEGs rely on only a portion of the RAW data.
Do you see where this is going? The objective here is setting the JPEG parameters in a way that allows you to see the largest possible portion of the RAW data—because this is the information that interests us as RAW shooters. We want to squeeze everything possible out of our camera and its sensor—to get the absolute maximum and to leave nothing behind. We want to explore the limits of the dynamic range and expose as close as possible to its borders. And we want the live histogram to inform us of where these limits are as precisely as possible.
The JPEG settings influence how we expose and adjust our images because we make our decisions about exposure using the information we can gather from the histogram and the live image. We therefore want JPEG settings that produce the softest contrast in order to obtain a histogram that reveals the most useful information about dynamic range for RAW files. Here are my recommendations for this JPEG profile:
• DYNAMIC RANGE > DR100%. The live histogram supplies meaningful information only with this DR setting.
• FILM SIMULATION > PROVIA. This is the most neutral film simulation and also has the softest contrast. This setting will prevent highlights and shadows from unnecessarily being cropped at either end of the histogram.
• HIGHLIGHT TONE > (–2) SOFT. The RAW format of the sensor has an exposure reserve of approximately 0.4 EV in comparison to the processed JPEG format. You can access this reserve with an external RAW converter. The live histogram should be set to SOFT at its edges to prevent RAW shooters from exposing their images too conservatively.
• SHADOW TONE > (–2) SOFT. When you use DR100% with high-contrast subjects in order to use the live histogram to base your exposure on the bright areas of your image, the dark areas often end up appearing as blocked-up black areas. This SHADOW TONE setting of (–2) SOFT counteracts this problem, since it brightens the dark tonal values in the viewfinder (and in the live histogram).
The ETTR exposure technique is popular among RAW shooters because it takes into account the technical characteristics of the camera’s sensor. The ETTR rule suggests that you should expose every image (regardless of its dynamic range) as far to the right of the histogram as possible without allowing any valuable highlight areas to become overexposed. The reasoning behind this is technical: since the X-Pro1 is a 12-bit camera, it can differentiate 4,094 (= 212) tonal values that it must pack into some 9 exposure values. Since the brightness gets cut in half for each exposure value, the brightest exposure value contains 2,048 (=4.096/2) tonal values, the second brightest only has 1,024, and so on. The lowest exposure value of the camera can only record eight different tones.
If you expose your images as brightly as possible, you will be relying on a greater number of tonal values. This will give you more tolerance when editing your images, especially since you can easily take an image that’s been exposed to the right and “shift it back to the left” when developing the RAW file (and using a software program’s exposure control feature). The noise behavior of the sensor provides an additional reason for following the ETTR line of thinking. Noise is much more of a problem in the shadows because the signal-noise ratio is much worse for darker tonal values. For subjects that are very dark and have a very weak contrast (e.g., a black cat on a black street), it makes sense to forgo attempting to expose your image realistically as black, and instead to brighten it up and expose it as gray—knowing that you can correct the exposure later with the RAW conversion. This method allows you to have more tone values and less noise.
ETTR is often misunderstood. It does not suggest that you should expose your images in such a way that you end up with overexposed areas and lost tonal values above the sensor’s upper limit. Correctly applying ETTR methodology actually often requires that you shift the image left to make sure that any significant highlights are located directly at the right limit of the histogram. The highlights should just touch the right border; they shouldn’t go beyond it!
Finally, keep in mind that shifting a dark and low-contrast image to the right inevitably leads to slower shutter speeds and/or smaller f-numbers. ETTR only makes sense when the subject is well-suited to adjustments in the exposure parameters. It’s no good, for example, if you need to raise the ISO, or if you allow your camera to do so with auto ISO, in order to expose to the right. You’re only making extra work for yourself, because any benefits will be counterbalanced by the cost of needing a stronger signal amplification.
INTERNAL VS. EXTERNAL RAW CONVERSION
The X-Pro1 makes a RAW shooter out of everyone to some degree. This is because the camera’s internal RAW converter allows even the most dedicated JPEG photographers to develop new and improved JPEGs from already-exposed images with just a few simple steps.
As a user of the X-Pro1, you can be a relaxed spectator to the fervid wars fought in Internet forums on the subject of “RAW or JPEG.” By using the recommended FINE+RAW setting, you’re always on the right side and have all of your options available:
• You can hold onto the JPEG that the camera produces immediately after exposure when you are satisfied with the JPEG settings that were used.
• You can use the X-Pro1’s internal RAW converter to develop the RAW file into alternate versions of the original JPEG file.
• You can transfer the RAW file to a computer and use an external RAW converter such as Lightroom, Silkypix, or Raw Photo Processor (RPP) to develop and edit JPEGs.
• You can also transfer the JPEGs you produce from the first two options to your computer and then continue to edit them there. The robust JPEGs that the X-Pro1 produces are intended to allow for post-processing. With that said, though, the compressed 8-bit image format (256 different tonal values) does have certain technical limits, putting it at an obvious disadvantage in comparison to the 16-bit files of external RAW converters.
When should you develop RAW files internally and when should you rely on an external RAW converter? Ultimately, this is a question of purpose and quality. Just to be clear: the X-Pro1’s internal RAW converter produces excellent results as well as the much-loved Fuji colors. For most situations, the internal converter is more than adequate. Configuring your camera in the manner I’ve just discussed will allow the X-Pro1 to develop robust, attractive JPEGs that you can optimize on your computer without any trouble.
If you are interested in pushing the camera to its quality and resolution limits, though, I recommend that you use an external RAW converter. With the right settings, RPP and Silkypix in particular are capable of producing fantastic results. However, these programs are a science unto themselves and could be the subject of entire books.

Image 107: External RAW Conversion:
When shooting with the X-Pro1, you can attain maximum sharpness, detail resolution, and control over colors and contrast with the help of an external RAW workflow. This example benefited from the use of RPP 64, Adobe Lightroom, Apple Aperture, and VSCO Film. Exposure parameters: XF60mmF2.4 R Macro, ISO 200, f/8, 0.4 second, automatic white balance.
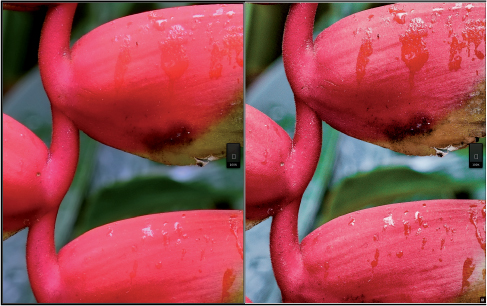
Image 108: RAW (Internal) vs. RAW (External): Comparing Callouts:
To get the maximum performance from the camera sensor, you need not only competent post-processing, but also proper exposure technique. This means that exposing your images perfectly with ISO 200 and ETTR isn’t enough if you want to explore the limits of the X-Trans sensor: you also need to shoot without any camera shake by using a stable tripod as well as a remote trigger or timer release, and you need to use an aperture that falls in the “sweet spot” for the lens (usually between f/5.6 and f/11). With this setup, there are noticeable differences between images created with the internal RAW converter and with a thorough external RAW development process. You can simply get more from the RAW data with an external converter—just set aside one or two hours for it. This illustration shows two callouts from the previous image: the left is a Velvia image produced directly by the camera; the right is the product of an external RAW workflow.
OPTICAL CORRECTIONS
When the X-Pro1 produces a JPEG file for you to review immediately after snapping an exposure, it applies several corrections based on the optics of the lens (distortion, vignetting, chromatic aberrations) and saves information about these corrections as metadata in the RAW file. External RAW converters such as Silkypix or Lightroom can access these metadata and apply the necessary corrections automatically when developing an image. The corrections applied by external RAW converters aren’t always identical to those applied by the camera itself, however. The RAW conversion program RPP lacks the ability to apply any optical corrections.
You can think about the optical correction information saved in the RAW files as stage directions that different actors interpret in different ways. In the case of RPP, there simply aren’t any actors available.
COLOR SPACE
One other—and final—JPEG setting for the X-Pro1 is COLOR SPACE. This JPEG setting is something of an anomaly because you won’t find it in the shooting menu: it’s located in SETUP MENU 3. It also isn’t located in the Quick Menu and you can’t assign it to the Fn button or save it in the custom shooting profiles.
The X-Pro1 allows you to save JPEGs in two different color spaces: sRGB or Adobe RGB. Both color spaces have the same number of colors, but those colors aren’t the same.
• sRGB is based on the technology of standard computer screens and is accordingly suitable for any images that you plan to post on the web (e.g., Flickr) or in social networks (e.g., Facebook), or to view on a desktop computer, laptop, iPad, or smartphone.
• Adobe RGB offers a larger range of colors than sRGB (with larger gaps between each individual color) and includes colors that can be represented in four-color printing (CMYK).
Which color space you should use depends entirely on what you intend to do with your images. For most applications sRGB will be the better choice (for compatibility reasons). sRGB is the color space that the LCD monitor and EVF use, and it is also the color space of most computer screens, laptops, and smartphones. If you do decide to use Adobe RGB, you should definitely use a wide gamut monitor, which offers an extended color space display, to edit your images. Only with a special monitor of this sort can you actually display the colors in the extended range that are not available in the sRGB color space. Without such a monitor designed for this purpose, editing Adobe RGB images would be similar to flying blind.
In addition to sRGB and Adobe RGB there are several other extended color spaces. Modern image-editing programs often support more than a half dozen varieties. If you take your images to a service provider for printing, you should ask ahead of time what color space it prefers (usually it is sRGB). Anyone who works with laptops or “normal” monitors or plans to present his or her images online or in a digital format is best served by sRGB. I personally save all of my images exclusively in sRGB format.
This question about color space doesn’t affect just the JPEGs that the camera produces; it also has implications for external RAW conversion. While RAW files themselves aren’t saved in a specific color space, eventually you will have to save the converted RAW file, and then you will need to make a decision.
The X-Pro1 adds an additional underscore to the file name of any JPEG file saved in Adobe RGB format. For example, if the file DSCF4064.JPG were saved in Adobe RGB, it would be saved as _DSF4064.JPG. This also goes for the RAW file associated with a JPEG, as long as the camera was set in Adobe RGB when the image was exposed (e.g., _DSF4064. RAF). This convention isn’t specific to Fuji products; it’s an industry standard. For every JPEG you develop from a RAW file using the X-Pro1’s internal RAW converter, you can select a color space anew. The X-Pro1 then uses the file naming convention described here.
WORKING WITH THE INTERNAL RAW CONVERTER
As you already know, the X-Pro1 has its own internal RAW converter for developing JPEGs from RAW files at any time. This converter gives you complete control over the various JPEG parameters, the white balance, and the color space of the end product. The internal converter not only delivers the famous Fuji colors; it allows you to operate independent of external software that may be either difficult to use or not (yet) compatible with the X-Pro1’s cutting-edge RAW format.
When in playback mode, you can go to PLAYBACK MENU 1 > RAW CONVERSION to bring up the internal RAW converter and use it to develop the selected RAW file. You will then have the following options available:
• With PUSH/PULL PROCESSING you can retroactively correct the exposure upward or downward in steps of 1/3 EV. This function is analogous to the exposure control feature of an external RAW conversion program.
• DYNAMIC RANGE allows you to reduce the highlights in an image that was exposed at DR200% or DR400% by one or two aperture stops, for example, in order to raise its contrast.
• FILM SIMULATION allows you to choose from the camera’s ten different color and black-and-white film modes.
• WHITE BALANCE allows you to access the various white balance presets and define a color temperature in Kelvin (K) manually.
• WB SHIFT brings up the color shift matrix for the white balance, where you can use the selector keys to tweak the color tone within the selected white balance setting.
• COLOR controls the color saturation of the conversion.
• With SHARPNESS you can choose from five levels that will affect the degree of sharpness processing that the conversion will include.
• HIGHLIGHT TONE and SHADOW TONE independently determine the contrast settings (tone curve) for the bright and dark areas of an image, respectively.
• NOISE REDUCTION regulates the strength of the noise suppression that the converter uses when producing a JPEG.
• With COLOR SPACE you can decide on the color space for the finished JPEG.
The options available in the RAW converter correspond to those in the shooting menu. Unfortunately, however, some of the descriptions vary slightly: for example, the option (–1) MEDIUM SOFT is called M-SOFT in the RAW converter.
If you’d like to develop a JPEG using exactly the same settings that you had in place when you exposed the image, simply press REFLECT SHOOTING COND.
What should you do if you want to develop a RAW file that is no longer saved on your camera’s memory card?
No problem: you can copy RAW files created with an X-Pro1 (they don’t have to be from your own camera) back onto an SD card at any time and then use the X-Pro1’s internal converter to develop them.
Simply copy the RAW file (complete with the recognizable file ending .RAF) into a subfolder on your memory card to which your camera currently saves new image files. The directory path could be, for example: MEMORY CARD > DCIM > 104_FUJI. The number preceding the word FUJI is variable and dependent on the number of exposures that you have created with your camera.
If you have recently formatted your memory card and it doesn’t yet have the proper file architecture, simply take a new exposure first and the X-Pro1 will automatically create the appropriate directories. Then you can insert the memory card into your computer’s reader and save the RAW file that you would like to develop later in the appropriate image folder.
Transferring images from a computer to your camera is not possible with the included USB cable. You need to treat the memory card as an external drive and connect it directly to your computer. Then you can copy the desired images to the image folder (as though it were an external hard drive).
2.8 CONTINUOUS SHOOTING, PANORAMAS, MOVIES, DOUBLE EXPOSURES, AND THE SELF-TIMER
The DRIVE button allows you to set the X-Pro1 in several different exposure modes. You’re already well acquainted with STILL IMAGE, the camera’s standard setting. In this mode, the camera captures one single frame when you press the shutter-release button all the way down.
As long as the X-Pro1’s cache doesn’t fill up, you can snap several frames in STILL IMAGE mode in quick succession. The buffer memory can hold about 11 exposures shot at the FINE+RAW quality setting. Since the image data is written to the memory card in the background, the X-Pro1 is always ready to shoot.
The camera’s various bracketing options should also be familiar from earlier in the book. A quick review:
• AE BKT produces three images at different levels of exposure. The corresponding RAW files are saved in this mode, as long as the image quality setting dictates they should be (see section 2.3 under “Metering”).
• ISO BKT produces three JPEG files at different ISO values from one exposure. No RAW files are saved (see section 2.5).
• FILM SIMULATION BKT produces three JPEGs with different film simulations from one exposure. Here too, the X-Pro1 does not save any RAW files (see section 2.7 under “Film Simulation”).
• DYNAMIC RANGE BKT creates three exposures at different DR settings and similarly saves no RAW files (see section 2.6).
IMPORTANT
One unfortunate quality of the exposure bracketing function is that the X-Pro1 disables the shutter-release button until all of the image data for the three images are completely saved to the memory card (firmware version 1.11).
The DRIVE button is also home to a few other handy features:
• CONTINUOUS shooting
• MOTION PANORAMA
• MOVIE
Furthermore, the X-Pro1 allows you to meld two images exposed directly after one another into a single double-exposure with the MULTIPLE EXPOSURE feature. Inexplicably, you can’t access this feature by pressing the DRIVE button—you need to go to SHOOTING MENU 4.
CONTINUOUS SHOOTING (BURST MODE)
When the CONTINUOUS mode is selected from the DRIVE-button options, the X-Pro1 takes several exposures in a burst. You can choose between three and six images per second. The camera will snap images at the rate you determine for as long as you keep the shutter-release button fully depressed—or until the buffer memory reaches its limit. If you’re saving RAW files, this cache reaches its limit at about 11 exposures, but if you’re only saving JPEGs, you can shoot up to about 19. Once the buffer memory fills up, the camera will still (sporadically) capture additional images depending on when older exposures are successfully transferred from the buffer to the memory card.
IMPORTANT
When using the CONTINUOUS mode, the camera applies the exposure, autofocus, and white balance settings that are in place for the initial exposure to the entire series. These settings are not reconfigured for each individual capture.
The CONTINUOUS mode has some characteristics typical of Fuji:
• The file naming convention for the images captured in this mode is different from “regular” exposures: the file names for images in a continuous burst start with the letter S, for example: S0063422.RAF. If you import photos that are alphabetically sorted according to file name into your computer’s image management software, any images belonging to a continuous series will pop up at the bottom of the list.
• Images that are part of a continuous series are treated differently from still images in the X-Pro1’s playback mode: only the first image of the series is shown at the full frame of the display. The rest of the exposures are displayed in a small window in the manner of a flip book. To examine the individual images in a series, you must press the down selector key. Then you can browse the series’ images as you normally would, using the selector keys or the command dial.

Image 109: Continuous Shooting Mode:
Even when saving RAW files, the X-Pro1 can shoot up to six frames per second. The buffer memory, which can hold 11 RAW exposures, accordingly fills up in about 2 seconds. This means that good timing is critical for starting a series, because the actual window of time that the burst mode is fully functional is quite short. Also make sure to note the different file naming convention for images in a series: in contrast to other still images, the file names of images that are part of a series start with the letter S.

Image 110: Playback of Images in a Series:
When displaying a series of images in the playback mode, the camera presents the initial frame large and the others in a small flip-book preview. To examine the other images of the series more closely, you can use the down selector key and then browse through them as usual by using the selector keys or the command dial.
TIPS FOR WORKING IN BURST MODE
Since the X-Pro1 does not refocus or adjust the exposure or white balance after the first image in CONTINUOUS mode, it’s a good idea to make sure you have these settings configured as accurately as possible before starting. Using the flash in burst mode is not possible.
• When you’re using the X-Pro1’s burst mode to track a moving object, it’s possible for the exposure situation to change drastically during the series. The first frame may be backlit, for example, while the remaining images in the series could be exposed with side light or reflected light. As another example, your moving object may move from a shadowy area into direct sunlight. When you’re trying to deal with circumstances such as these, opt for exposure settings that are a workable compromise for the entire series. You can set the exposure at an average setting by using AE lock (AE-L), by pressing the shutter-release button halfway, or by shooting in manual mode (![]() ). The DR function also offers protection from blown-out highlights. If your subject exhibits a large dynamic range, consider using the DR200% or DR400% to protect against overexposure.
). The DR function also offers protection from blown-out highlights. If your subject exhibits a large dynamic range, consider using the DR200% or DR400% to protect against overexposure.
• When using burst mode, set your focus in advance of the action and make sure to press the shutter-release button right before your subject reaches your desired focus point. You can also stop down the aperture to get a focus zone with a larger depth of field and then press the shutter-release button as soon as the subject moves into this focus zone. To avoid trigger lags owing to the autofocus, make sure to use the AF lock (AF-L) to store the focus by pressing the shutter-release button halfway, or focus manually.
• Since the X-Pro1’s cache can hold only 11 exposures, you have just a brief two seconds for continuous shooting. This means your timing needs to be impeccable. You’ll want to make sure that you have the shutter-release button pressed halfway down for at least a few fractions of a second before you actually want to start the burst; otherwise you run the risk of trigger lag ruining your shot.
• Rely principally on the optical viewfinder (OVF) for fast-moving subjects, because it will allow you to perceive your subject without any time delay—this isn’t true of the electronic viewfinder (EVF).
PANORAMA IMAGES
With the DRIVE-button option MOTION PANORAMA, you can create panorama exposures with dimensions of up to 7680 x 2160 pixels. The camera does most of the work, assembling the panorama image automatically from a series of still images. Your job as the photographer is to press the shutter-release button and evenly swivel the camera vertically or horizontally until the preset image angle is complete.
You can choose between two image angles, M and L, which correspond to 120 and 180 degrees, respectively, and can be applied either horizontally or vertically. In size L, the final size of the exposure in horizontal mode is 7680 x 1440 pixels, and in the vertical mode, 7680 x 2160 pixels. Size M ends up being 5120 x 1440 pixels with the horizontal setup and 5120 x 2160 pixels with the vertical. You can also use the vertical option to create a horizontal panorama—you’ll just need to hold the camera on its side as you pivot it.
After pressing the DRIVE button and selecting MOTION PANORAMA, you can define the direction you intend to move your camera with DIRECTION and the size of the panorama with ANGLE (M or L).
IMPORTANT
Using the MOTION PANORAMA option will not produce any RAW data; it only creates a large JPEG file. This means that you’ll need to decide on a FILM SIMULATION and a WHITE BALANCE before you take the exposure. Neither setting can be changed afterward. Since panoramic images usually cover a large amount of subject matter with varying light conditions, you should set the white balance based on the most important area of your shot.
In a similar vein, the camera sets the exposure and the focus based on the first exposure in the series for panoramic images, so it also makes sense to set the X-Pro1’s focus and exposure in advance based on the most important part of your image—by using the AF-L or AE-L button, by focusing manually, or by storing the focus and exposure settings temporarily by pressing the shutter-release button halfway before you move the camera to its initial position and start to record the actual panorama.
Since panoramic images also tend to have a large dynamic range, it’s usually wise to avail yourself of the camera’s DR function and select DR200% or DR400%. Since MOTION PANORAMA doesn’t produce any RAW data and saves only a large JPEG file, ETTR (see page 212) won’t do you any good. The camera doesn’t provide you with any RAW file for you to map the tones afterward.
As soon as you press the shutter-release button to start the MOTION PANORAMA, the X-Pro1 will capture the still images it needs, as long as you evenly pivot the camera in the predetermined direction (indicated with an arrow in the viewfinder). You don’t need to continue to hold the shutter-release button.
When the camera captures all of the images it needs to compose the panorama, it automatically stops. When creating a size M panorama, it can be somewhat irritating that the X-Pro1 sometimes takes more images than are necessary. If that’s the case, simply continue to pivot the camera until it ends the process by itself.
TIPS FOR USING THE PANORAMA FUNCTION
• Avoid scenes with moving objects, which will lead to undesirable ghosting artifacts when the feature creates the composite image. For example, a person who walks through a scene while you’re capturing it in a panorama could appear several times as fragments in the finished JPEG.
• Shoot with a sufficiently large distance between your camera and your subject. One reason to do this is you want to be sure that your entire subject will fall into your predetermined depth of field. Another is to avoid unsightly distortions.
• Determine and set the focus, exposure, white balance, DR function, and film simulation settings before you capture a panorama—and be sure to base them all on the area of your image that you deem most important. Only in rare cases will the center of attention in a panorama fall within the initial frame. Make use of the AE-L, AF-L, or the half-depressed shutter-release button to establish the focus and exposure settings based on the focal point of your image, and then move the camera to its appropriate starting position. The X-Pro1 uses the same focus, exposure, and white balance settings for the entire panorama. Don’t forget that the exposure compensation dial also functions with panoramic images—you can use it to set the “perfect” exposure for your subject before you start to record the panorama.

This image shows a horizontal panorama of the larger size (L). The JPEG file has a size of 7680 x 1440 pixels. At first glance everything here looks to be in order, but upon closer inspection you’ll discover a few ghosting artifacts (double images) of people who moved during the exposure window that lasted several seconds. Exposure parameters: XF18mmF2 R, ISO 400, f/10, 1/240 second.
• Pivot the camera with your eye to the EVF—not with outstretched arms on the LCD monitor. The OVF is not usable while shooting panoramas.
• Try to find a level ground for your panoramic exposures and align your body so it is parallel with the middle of your planned exposure—not with the starting point of the panorama. This will help you avoid having to make unpleasant contortions, especially when creating L panoramas.
• When the X-Pro1 is exposing a panorama, there’s an increasing time lag between what you will see in the viewfinder and the subject matter that is actually being captured. Don’t let this bother you. It’s also best to ignore the warning that pops up in the viewfinder telling you that you have deviated from the ideal line of horizon. When you see this warning, it is already too late for a correction (on account of the time lag). Trying to correct the problem would actually lead to more problems anyway. It’s best to get used to pivoting the camera smoothly, in a straight line, and not allow anything to break your concentration.
• Using fast shutter speeds with the X100 in panorama mode often led to unsightly vertical lines in the finished image. Fortunately I have not had this experience with the X-Pro1 and have produced good results with quite short exposure times (even 1/500 second). Fast shutter speeds minimize the chance that individual images of a panorama will suffer from unwanted motion blur that can derive from the uniform pivoting of the camera. I should mention, however, that I’ve seen a few comments in Internet forums warning users to be cautious using short exposure times when creating panoramas with the X-Pro1 on account of these unpleasant vertical lines. Since I can’t exclude the possibility that the X-Pro1 will exhibit this behavior under certain circumstances, you should at least keep this warning in mind. In other words, in the event that your finished panorama image ends up with vertical bands exhibiting differences in exposure, you can probably solve the problem by using a slower shutter speed.
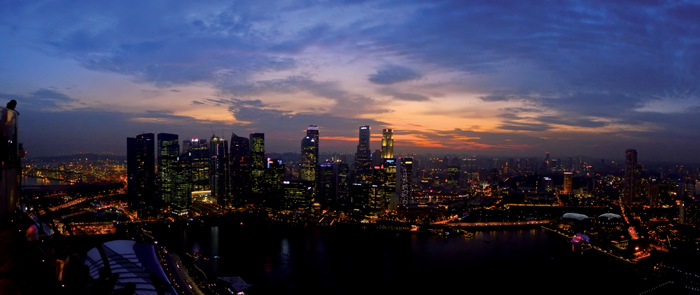
Image 112: Night Panorama at ISO 6400:
This picture was shot at ISO 6400 with an exposure time of 1/500 second as a vertical size M panorama (5120 x 2160 pixels). While panning this image, I simply held the camera upright. Exposure parameters: XF18mmF2 R, ISO 6400, f/2, 1/500 second.
• If you would like to create a horizontal panorama with a higher resolution, select the vertical pan direction and hold your camera sideways as you pivot it horizontally.
• When you are using a tripod to create your panorama (which is generally advisable), you should align the camera in parallel with the horizon before exposing your image. Since the electronic level is not available in panorama mode, you can temporarily switch into another mode to do this.
• In general, use short focal lengths (e.g., 18mm or 35mm) with sufficiently large depths of field. The longer the focal length, the harder it is to create a panorama by hand that is free from distortions and camera shake.
• Immediately after finishing your panorama, you should inspect it in playback mode and look for any compositing errors or ghosting artifacts. You can use both zoom buttons (the alternate functions of the AE and DRIVE buttons) or press the command dial to enlarge your panorama while viewing it on your camera. It’s very frustrating to discover flaws in your panorama after you go home! In most cases you can repeat the shot to improve your results if you are aware of the problem at the scene.
MOVIES
The X-Pro1 is a thoroughbred still-image camera. Its video capturing capability (DRIVE button > MOVIE) should be thought of as nothing more than a bonus, and little should be expected from it. In fact, it’s best not to expect anything at all!
Nevertheless, in contrast to the X100 the X-Pro1 offers real “Full-HD” (1080p) with 1920 x 1280 pixels. You can adjust this resolution in the video mode’s shooting menu (MENU/OK button), which you can find under the submenu VIDEO MODE. Here you can alternatively select “normal” HD (720p) with 1280 x 720 pixels. The refresh rate in both cases is 24 frames per second.
Other settings that you can define in the video menu before you start filming are FILM SIMULATION and WHITE BALANCE. The custom-defined white balance option (see “Manual White Balance” in section 2.7) is not available in this mode.
Even when its focus mode is set as AF-S, the X-Pro1 always functions in AF-C mode when capturing movies and thus constantly tries to refine its focus. In practice, this is often more bad than it is good, because the contrast-driven autofocus is clearly not intended to be used this way. For this reason, I recommend you set the focus selector to M and manually focus with the AE-L/AF-L button and focus ring before filming. After you’ve already started recording, the AE-L/AF-L button is functionless, but you can continue to adjust the focus with the focus ring.
Since the X-Pro1 lacks an external microphone jack, you’re stuck using the integrated stereo microphone for sound capture. This unfortunately picks up the clicks, whirring sounds, and hums that the mechanical parts of the camera and lens make. Using manual lenses from third parties tends to reduce this concert of distracting noise.
With the appropriate lens adapter, you can also attach high-end video lenses to the X-Pro1. Capturing the video entirely by manual means isn’t possible, though, because the X-Pro1 constantly attempts to adjust the exposure by itself. You can choose the aperture with the aperture ring in advance, but not the exposure time: the shutter-speed dial does not work in MOVIE mode.
TIP
The X-Pro1 doesn’t feature a quick-start button that allows you to start and end a video easily. To begin recording a movie, you need to first activate the video mode (DRIVE button > MOVIE) and then use the shutter-release button to start and end the capture. If this is too inconvenient for you, assigning the movie mode to the Fn button is also an option. This allows you to jump back and forth between the still image and movie mode with the touch of a button.
The exposure compensation dial is functional in MOVIE mode, but you have to set it before you start recording a movie.
DOUBLE EXPOSURES
The double exposures function should belong in the menu options for the DRIVE menu, but it is instead located under SHOOTING MENU 4 > MULTIPLE EXPOSURES > ON. I interpret this as an indication that the feature was added relatively late in the design of the X-Pro1. You won’t find it in the X100 (or in other FUJIFILM cameras with which I’m familiar).
This function is quite simple. While several DSLR cameras offer various types of compositing, the X-Pro1 only offers one.
In MULTIPLE EXPOSURE mode, the upper limit for the automatic ISO feature is 1600 and the DR function can only be set manually at DR100%, DR200%, or DR400%. This is a bit onerous if you usually shoot with the auto DR and auto ISO 3200, for example. When activating the multiple exposure mode, the camera will automatically set the ISO value to 1600 and the dynamic range to DR100%, which is probably not your ideal setup.
If you plan to use this feature frequently, it is a good idea to create a specific custom shooting profile (section 2.7) with more practical settings (such as auto ISO 1600). Then after you’re finished with this function, you can revert back to your standard profile by accessing the Quick Menu. You can also assign the MULTIPLE EXPOSURE function to the Fn button, if that is desirable to you.
The operation of this feature is foolproof: take the first exposure and then follow the instructions on the display. One benefit of this feature is that it saves not only a JPEG of the finished double exposure, but also a corresponding RAW file (if the camera is currently programmed to save RAW files). Do note, however, that the composite image is the only one that the camera writes to the memory card—the two individual images will be available to you neither as JPEGs nor as RAW files.

The MULTIPLE EXPOSURE feature allows the photographer to combine two consecutive shots by laying one on top of the other—something familiar from older film cameras.
SELF-TIMER
The X-Pro1 also has a self-timer that can be set to ten or two seconds. To select your duration of choice, go to SHOOTING MENU 1 > SELF-TIMER. You can also use the Quick Menu or assign this function to the Fn button.
238 2 Shooting with the X-Pro1
• The ten-second option is intended to allow photographers enough time to move from behind the camera to be a part of the exposure (as with self-portraits or group shots).
• The shorter duration of two seconds is principally intended for situations when you are using a tripod and want to avoid camera shake due to long exposure times. This method allows the camera settle before it actually captures an image.
The self-timer remains active until you (or the camera) turn it off—it can be active for several consecutive exposures, in other words.
2.9 FLASH PHOTOGRAPHY WITH THE X-PRO1
As the time of writing, the X-Pro1 is the only camera from FUJIFILM that does not feature an integrated flash. So flash photography with this camera requires the use of an external flash. The X-Pro1 does feature a TTL shoe mount and a traditional sync connector for external (studio) flash units.
As long as you’re comfortable modulating everything manually, you can use nearly every available flash unit on the market as well as most studio flash devices and remote flash systems with the X-Pro1. If you are looking for experience about a specific solution or combination of devices, a quick Internet search at one of the sources listed at the end of this book can be a good place to start.
In this book I’ll concentrate on the three system flash units that are compatible with the X-Pro1: the EF-X20, EF-20, and EF-42 (see section 1.3). These flash units support the camera’s TTL auto flash, whereby the X-Pro1 automatically modulates the amount of light that is emitted by the flash unit.
TTL stands for “through the lens” and means that the camera bases the flash exposure on the amount of light that shines through the lens and lands on the sensor. The camera sends a small preflash, meters the amount of reflected light, and then regulates the optimal flash output based on the results. The goal of this process is to create a natural balance between the ambient light and the light from the camera’s flash.
If you attach a FUJIFILM system flash unit to the X-Pro1 and turn it on, there will be five flash modes available under SHOOTING MENU 5 > FLASH MODE. These flash modes are not all available in every exposure mode (![]() ,
, ![]() ,
, ![]() , and
, and ![]() ; see also section 2.3). Here’s a quick overview:
; see also section 2.3). Here’s a quick overview:
• automatic flash (AUTO) / ![]()
• forced flash (FORCED FLASH) / ![]() ,
, ![]() ,
, ![]() ,
, ![]()
• slow sync (SLOW SYNCHRO) / ![]() ,
, ![]()
• synchronization to the second shutter curtain (2ND CURTAIN SYNC.) / ![]() ,
, ![]() ,
, ![]() ,
, ![]()
• suppressed flash (SUPPRESSED FLASH) / ![]() ,
, ![]() ,
, ![]() ,
, ![]()
You can also access these flash modes in the Quick Menu by pressing the Q button.
AUTOMATIC FLASH
In the AUTO flash mode, which is only available in the program automatic exposure mode, ![]() , the X-Pro1 determines when to the flash will fire. You can tell that the camera has decided to use the flash for an exposure by the small flash symbol that appears in the viewfinder or on the LCD display as soon as you press the shutter-release button halfway.
, the X-Pro1 determines when to the flash will fire. You can tell that the camera has decided to use the flash for an exposure by the small flash symbol that appears in the viewfinder or on the LCD display as soon as you press the shutter-release button halfway.
When the camera uses the flash, the minimum shutter speed is determined by the well-known formula 1/(focal length x 1.5). If you are using the 35mm lens, the X-Pro1 always uses an exposure time of 1/52 second or less in AUTO flash mode—independent of the selected ISO setting.
This means that if you have the ISO set at a low value (perhaps ISO 200) and you’re shooting in dim lighting conditions, the camera cannot adequately incorporate the natural light. You should either use a higher ISO value (or use the auto ISO feature) or you should switch the flash mode to SLOW SYNCHRO (see below).
FORCED FLASH
FORCED FLASH functions exactly as the AUTO mode does except that it’s available in all four exposure modes (![]() ,
, ![]() ,
, ![]() ,
, ![]() ) and the flash always fires regardless of the lighting conditions. In the program automatic and aperture priority modes (
) and the flash always fires regardless of the lighting conditions. In the program automatic and aperture priority modes (![]() ,
, ![]() ), the minimum shutter speed rule still applies: 1/(focal length x 1.5) or shorter—in
), the minimum shutter speed rule still applies: 1/(focal length x 1.5) or shorter—in ![]() it applies regardless of the aperture you have selected. Pay attention to the ISO setting in relation to the ambient light here or switch the flash mode over to SLOW SYNCHRO.
it applies regardless of the aperture you have selected. Pay attention to the ISO setting in relation to the ambient light here or switch the flash mode over to SLOW SYNCHRO.
In the ![]() and
and ![]() exposure modes you have control over the shutter speed and can incorporate more of the ambient light into your shot by choosing a longer exposure window. Don’t overlook the risk of camera shake or unwanted motion blur with these slower shutter speeds.
exposure modes you have control over the shutter speed and can incorporate more of the ambient light into your shot by choosing a longer exposure window. Don’t overlook the risk of camera shake or unwanted motion blur with these slower shutter speeds.
In exposure mode ![]() , you have complete control over how much natural lighting affects your image. The TTL system contributes the appropriate amount of light from the flash wholly automatically.
, you have complete control over how much natural lighting affects your image. The TTL system contributes the appropriate amount of light from the flash wholly automatically.
SLOW SYNCHRO
The flash mode SLOW SYNCHRO is available in the exposure modes ![]() and
and ![]() . This mode does away with the rule of thumb for the minimum shutter speed. Depending on the brightness of the subject, the X-Pro1 uses an exposure window of up to 1/8 second (regardless of the focal length). If you want longer exposure windows, you need to use the
. This mode does away with the rule of thumb for the minimum shutter speed. Depending on the brightness of the subject, the X-Pro1 uses an exposure window of up to 1/8 second (regardless of the focal length). If you want longer exposure windows, you need to use the ![]() and
and ![]() exposure modes.
exposure modes.
In the event that you don’t want the parts of your image that are illuminated by the natural lighting to blur, you should use a tripod. Also keep in mind that the flash always fires immediately at the start of the exposure, just as the camera opens the shutter. In other words: the camera synchronizes the flash to the first shutter curtain. If you are trying to photograph a car driving by at night with a slow shutter speed, the light traces of the headlights will be recorded as ambient light, while the car, which is much darker, will be illuminated by the light from the flash and appear to be more or less frozen in place.
The problem is, when the flash is synchronized to the first curtain, the light traces will continue forward in the direction of the car’s travel. This creates an irritating impression because it looks as though the car were traveling in reverse. The solution? Synchronize the flash to the second shutter curtain!
SYNCHRONIZATION TO THE SECOND SHUTTER CURTAIN
The flash mode 2ND CURTAIN SYNC. functions identically to the forced flash, except it delays firing the flash until the end of the exposure window, just before the shutter closes. This method is known as synchronizing to the second curtain.
This flash mode is available in all four exposure modes (![]() ,
, ![]() ,
, ![]() ,
, ![]() ) and the flash will fire regardless of the ambient lighting conditions. In the
) and the flash will fire regardless of the ambient lighting conditions. In the ![]() and
and ![]() modes the general rule once again applies: minimum shutter speed = 1/(focal length x 1.5) or shorter. Again in aperture priority (
modes the general rule once again applies: minimum shutter speed = 1/(focal length x 1.5) or shorter. Again in aperture priority (![]() ) this rule applies independent of the aperture you have selected.
) this rule applies independent of the aperture you have selected.
In order to get the most from this feature, you should use this flash mode in combination with either the ![]() or
or ![]() exposure modes so you can make use of longer exposure times.
exposure modes so you can make use of longer exposure times.

Image 114: Synchronizing to the Second Curtain:
Intentionally achieving motion blur can be an effective stylistic decision, but certain aspects of the image should often still appear mostly in focus. The use of light from a flash to complement the otherwise sufficient natural lighting conditions can be valuable, because it adds a second, brief flash during longer exposure windows. This method is not unlike a double exposure in that way. If you’re photographing motor vehicles or other moving objects it’s advisable to synchronize the flash to the second shutter. Exposure parameters: XF18mmF2 R, ISO 200, f/16, 1/30 second, EF-20.
SUPPRESSED FLASH
The SUPPRESSED FLASH setting disables the flash function entirely. It prevents any flash that is connected to your camera, turned on, and ready to fire from discharging.
Please note that when SILENT MODE is activated, all flash functions are also completely suppressed. To turn SILENT MODE on and off, press and hold the DISP/BACK button for a few seconds.
RED-EYE CORRECTION
All of the X-pro1’s TTL flash modes can be used in combination with a red-eye removal feature. The problem of red-eye comes up frequently in portraiture as a result of the light from the flash reflecting off the retina. These reflections occur when the light from the flash discharges close to the optical axis. Put another way, you’re likely to get red eyes if your shot is set up in a way that requires you to fire the flash directly in front of your subject, which is usually the case with most integrated and shoe-mount flash units. If you illuminate your subject indirectly from above or from the side, this problem never or only rarely comes up.
To turn the red-eye correction feature on for all exposure modes, go to SHOOTING MENU 5 > RED EYE REMOVAL > ON. The X-pro1 addresses this phenomenon in two ways:
• The camera prompts the flash unit to emit a preflash, which causes your subject’s pupils, which normally would be dilated in the dim lighting conditions, to constrict. This minimizes the amount of reflected light from the retina.
• The X-pro1 detects the presence of a face in an exposure and removes any remaining red-eye problems when it creates the JPEG file.

Image 115: Red-Eye Correction:
When this function is activated, the camera emits a preflash and subsequently removes any remaining red-eye problems in the JPEG file. This process prevents reflections from the retina from showing up in your images or takes steps to remove them after the exposure.
TIP
When the red-eye removal tool is active, you can program the camera to save the untouched JPEG in addition to the edited version. To do this, go to SHOOTING MENU 5 > SAVE ORG IMAGE > ON.
You can also use the X-Pro1’s red-eye correction feature retroactively on images that have already been exposed. Find the problematic image in playback mode and then go to PLAYBACK MENU 1 > RED EYE REMOVAL.
FASTEST FLASH SYNC SPEED
The official shortest exposure time that the X-Pro1 can use with a flash unit is 1/180 second. In practice, however, flash exposures free from problematic shadowing effects are often successful at 1/250 second. Nevertheless, this technology-related restriction (the camera has a focal plane shutter) is a blow to people used to the X100 or other central shutter cameras that have very brief flash sync speeds. For DSLR converts, this limitation should be “business as usual.”
In the exposure mode ![]() and
and ![]() the camera limits the exposure time to 1/180 second when the flash is activated—anything shorter is not possible. In the
the camera limits the exposure time to 1/180 second when the flash is activated—anything shorter is not possible. In the ![]() and
and ![]() exposure modes, conversely, you can set your own shutter speed, but at your own risk. The camera will obey, but for exposures that are shorter than 1/250 second, you may end up with visible shadowing effects and an uneven illumination of the exposure.
exposure modes, conversely, you can set your own shutter speed, but at your own risk. The camera will obey, but for exposures that are shorter than 1/250 second, you may end up with visible shadowing effects and an uneven illumination of the exposure.
FLASH EXPOSURE CORRECTION
As mentioned, the TTL logic establishes the ideal flash output for the camera based on a specific subject. This is wishful thinking, though, and you will need to adjust the flash manually—just as you would with regular exposures—to attain a level of exposure that looks optimal to you. The camera and the photographer don’t always see eye to eye, and ultimately the photographer is always right.
One method of correcting flash exposure is to regulate the output of TTL flash units directly: the EF-20 allows you to adjust its output by ±1 EV in steps of 1/2 EV; with the EF-X20, it’s also ±1 EV, but in steps of 1/3 EV. Another method is to control the flash through the X-Pro1. To do this, go to SHOOTING MENU 5 > FLASH. There you have access to a correction range of ±2/3 EV in steps of 1/3 EV.
How do the two methods of controlling flash output interact? Quite simply: they add up. In combination, you can adjust the TTL flash output up or down by a maximum of ±1 2/3 EV (±1.66 EV).
CONTROLLING THE AMBIENT LIGHT
You can control the flash output with the flash exposure compensation techniques discussed above. At the same time, you can continue to control the parts of your image that are not affected by the flash in exposure modes ![]() ,
, ![]() , and
, and ![]() with the exposure compensation dial. This dial has no direct effect on the amount of light fired by the flash. The interplay between the flash exposure compensation and the normal exposure compensation gives you a lot of control to reach your desired balance of artificial and natural light.
with the exposure compensation dial. This dial has no direct effect on the amount of light fired by the flash. The interplay between the flash exposure compensation and the normal exposure compensation gives you a lot of control to reach your desired balance of artificial and natural light.

Image 116: Considering Ambient Light When Using Flash:
With many successful flash exposures, you don’t even realize at first glance that flash was used. In this photo, the cat’s eyes betray the use of a flash. Fuji’s automatic TTL flash system is one of best in the world and consistently delivers results that users of other brands can only dream of. Since there’s always room for improvement, though, be sure to make regular use of the compensation functions for both flash and ambient light. Exposure parameters: XF35mmF1.4 R, ISO 400, f/2.2, 1/125 second, EF-20.
TIPS FOR EXPOSING WITH FLASH
• When you attempt to meter a CUSTOM WHITE BALANCE (see “Manual White Balance” in section 2.7) with a flash that is attached and ready to fire, the flash will go off, thereby affecting the camera’s white balance measure. Since different flash units exhibit different color temperatures (and since photographers often modify a neutral flash with color filters), this feature can be very useful.
• You can strike the right balance of flash light and ambient light by using flash exposure compensation to adjust the flash (go to SHOOTING MENU 5 in the X-Pro1 and/or adjust the flash unit output directly on the device) and by using the exposure compensation dial to regulate the ambient light.
• If you want to depict the background sharply when using long exposure times, you should use a tripod despite using a flash. Sometimes, however, you may intentionally want a blurry background. In this case, the flash will help to ensure that the subject in your exposure is still in focus and stands out against what’s behind it.

Image 117: Foreground and Background:
I intentionally took this night exposure by hand with a long exposure window of 1/15 second to capture some of the movement that was critical to this scene on the street. The illuminated toys and the other ambient light contrast with the person in the foreground, who is illuminated with a modest flash (and is subsequently in better focus). The flash was also synchronized to the second curtain here, and to prevent the scene from looking too cool, I chose a white balance that was on the warmer side. Exposure parameters: XF18mmF2 R, ISO 3200, f/2, 1/15 second, EF-20.
• As I mentioned above, the X-Pro1’s official flash sync speed is 1/180 second, but in reality you can often get away with 1/250 second. Sometimes that’s not enough, though—for example, if you are shooting a portrait in broad daylight and want to use a wide-open aperture to establish a shallow depth of field that will isolate your subject from the background. Before you reach for the last resort of ISO 100 (which probably wouldn’t take care of this problem and would end up reducing the dynamic range), you should attach a neutral gray filter (ND gray filter) to the lens to reduce the incident light by the equivalent of a few aperture stops.
• When shooting moving objects with long exposure times, synchronize the flash to the second curtain. You can select the appropriate shutter speed for your purpose by using the ![]() or
or ![]() exposure modes.
exposure modes.
• The X-Pro1 is a marvel at high ISO settings. This makes using the flash unnecessary in many cases and allows you to rely on the ambient light, which may end up producing a better look in your final image. Don’t flash your subjects to death—less is more. It’s true that in the studio you need to compose the light for the entire scene, but the small flash units EF-20 and EF-X20 are first and foremost intended to be artificial brighteners, not the only sources of light for a scene.
• With the aid of a pin-compatible Canon TTL extension cord (see section 1.3) you can expose remotely when using the X-Pro1 with FUJIFILM system flash units. In other words, you can use the flash in TTL mode even when it is removed from the camera. Important: You can also then use flash units from Canon, but not in TTL mode—you’ll need to control them manually.
• The EF-X20 comes equipped with a slave mode that allows it to be optically triggered by another flash. This slave mode doesn’t operate based on TTL control; you will need to configure it manually by defining the desired flash output directly on the flash unit. There are seven different levels of output ranging from maximum (1/1) to 1/64 of the full power. The EF-X20 also reacts to a preflash from the master flash unit intended to reduce red-eye effects. If your shot will feature a preflash, adjust the slide switch on the bottom of the EF-X20 that is serving as the slave to P-Mode; if no such preflash will occur, adjust it to N-mode. To return the flash back to its normal TTL operation controlled by the camera, set the switch back to X.
Image 118: The EF-X20 in Slave Mode:
The small EF-X20 system flash can be controlled wirelessly by another flash unit. When using it in this manner, you will need to set its output manually. In this illustration the EF-X20 was triggered by a flash from a FUJIFILM X100, which in turn captured the response.
• When using a wide-angle lens, remember to flick on your flash unit’s wide-angle diffuser to make sure that your flash uniformly and completely illumines your entire scene.
• Lens hoods are a good thing, but when using the EF-20 or EF-X20—especially for closeup and macro shots—they can lead to unwanted shadows. It’s best to remove the hood for these particular situations or make use of a remote flash.
IMPORTANT
Exposures taken in poorly lit circumstances with the auto ISO function active (e.g., at dusk) often end up being more than adequately illuminated or even overexposed. Adding extra light from a flash won’t improve the image at all. In these cases, make sure to regulate the ambient light with the exposure compensation dial, so that your flash can produce the effect you desire.
Also keep in mind that the TTL flash system works well with the dynamic range options DR200% and DR400%. But be careful: the DR function’s requirement for a higher ISO setting can lead to shorter exposure times and/or larger f-numbers. Neither of these are desirable for flash photography, especially because the official limit for the shortest flash sync speed for the X-Pro1 is 1/180 second.
2.10 USING THIRD-PARTY LENSES
One highlight of the X-Pro1 is undoubtedly the small flange-back distance of the X-Mount lens connector at only 17.7mm. This means you can attach practically any third-party lens from other camera systems—with the appropriate adapters—to the X-Pro1. The Chinese manufacturer Kipon has already announced X-Mount-compatible adapters for 42 third-party systems, and the high-quality German manufacturer Novoflex has also dutifully added X-Mount adapters for some 13 established third-party systems.
Does this make the X-Pro1 a veritable Leica killer? Is this the camera that Leica has failed to bring to the market for years?
FUJIFILM has no objection to this view and is happy to stand in the shadow of the iconic brand from Solms. It’s also fitting that Fuji developed its own adapter specifically for Leica’s M-system. When connected to the X-Pro1, this adapter unlocks various exclusive corrective features for vignetting, color shifts, and lens distortion.
This doesn’t make the many comparisons with Leica any more sensible, however. The X-Pro1 is not a rangefinder camera. It’s a pure-bred autofocus camera (Leica’s M-series only features manual focusing) and as such—despite its hybrid viewfinder—is only marginally equipped to work in combination with manual focus lenses: the only tool that the X-Pro1 features to assist with manual focusing is a magnified digital viewfinder. Your search for focus peaking and other comparable tools to help with manual focusing in the X-Pro1 will be in vain.
In other regards as well, the X-Pro1 is poorly equipped for working with third-party lenses, owing to its firmware (version 1.11). When a lens is attached to the X-Pro1 via an adapter, the auto ISO operates with a minimum shutter speed of 1/30 second independently of the actual focal length and what is defined in the adapter menu. This is too fast for many wide-angle lenses and too slow for most normal and telephoto lenses.
The X-Pro1 sets the minimum flash sync speed at 1/15 second when a third-party lens is attached, which is largely useless for lenses with longer focal lengths. To add to this, the camera has an adapter menu where you can input the focal length of the lens currently attached. In other words, the X-Pro1 “knows” exactly what the current focal length is, but doesn’t do anything with this information.
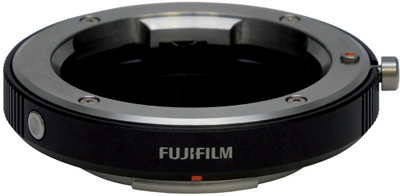
Image 119: FUJIFILM M-Mount Adapter:
Fuji’s own adapter for lenses that feature Leica’s M connector includes X-Mount signal contacts as well as a function button on the adapter ring that brings up the adapter menu on the monitor or in the viewfinder. Furthermore, this adapter unlocks extra camera functions that allow you to correct several optical errors such as vignetting, distortions, or color shifts at the border of an image.
Still, the display frame for the OVF uses the selected focal length setting in the adapter menu (SHOOTING MENU 3 > MOUNT ADAPTER SETTINGS), as long as it’s between 18 and 60 millimeters. Focal lengths less than 18mm are indicated in the optical viewfinder with yellow arrows in the corners; focal lengths of greater than 60mm, with a red frame calibrated to 60mm. Within the acceptable range of focal lengths for the OVF—18mm to 60mm—two frame indicators will appear in the viewfinder: one white, one blue. The white frame is corrected for parallax for objects at infinity and the blue frame, for objects at about two yards.
IMPORTANT
Third-party lenses attached to the X-Pro1 over a specific adapter can only be focused manually. The only exposure modes that are available are the aperture-priority ![]() and manual exposure
and manual exposure ![]() modes. Other functions such as auto ISO, TTL flash, and DR extension, however, are still available.
modes. Other functions such as auto ISO, TTL flash, and DR extension, however, are still available.
CONNECTING AND RECOGNIZING THIRD-PARTY LENSES
After you have mechanically attached a third-party lens to your camera via an adapter, you should first make sure that SHOOTING MENU 3 > SHOOT WITHOUT LENS > ON is selected—otherwise your X-Pro1 won’t take any pictures.
Next go to SHOOTING MENU 3 > MOUNT ADAPTER SETTINGS. Here you will have six lens settings to choose from: four focal length presets (21mm, 24mm, 28mm, and 35mm) as well as LENS 5 and LENS 6—two focal lengths that you can set manually.
If you happen to be using an M-adapter from FUJIFILM, you will also have a number of correction settings available, which I’ll cover below.
FOCUSING WITH THIRD-PARTY LENSES
The only way to focus precisely when using a third-party lens is to use the magnified display of the electronic viewfinder (EVF) or the LCD monitor. Your camera will need to be in manual focus (MF) mode, so turn the focus mode selector on the front of the camera to M. As usual, you can magnify the digital displays by pressing the command dial.
To focus as exactly as possible, you’ll want to open the aperture as wide as possible. The reduced depth of field will help you to find the correct focus point. After you’ve found it, you can then reset the aperture to your desired setting. The focus point should not move, but the depth of field should become larger. You can observe this effect in the EVF. The viewfinder’s distance and depth of field indicators will be nonfunctional.
To refine your focus at any time you can always reactivate the magnified digital display. Well, almost at any time: the magnified display will not be available while the camera is transferring data from the buffer memory to the memory card. As soon as that finishes, you can activate it again. Let’s hope that Fuji takes care of this weird quirk in future firmware updates. In the meantime you can make do with a bit of patience and a super-fast memory card.
EXPOSING CORRECTLY WITH THIRD-PARTY LENSES
When a third-party lens is attached, the X-Pro1 works exclusively in the aperture-priority (![]() ) or the manual (
) or the manual (![]() ) exposure modes. However, neither of these modes functions exactly as they do with Fuji’s own XF lenses: while X-Mount lenses don’t set the aperture until the shutter button is pressed halfway in
) exposure modes. However, neither of these modes functions exactly as they do with Fuji’s own XF lenses: while X-Mount lenses don’t set the aperture until the shutter button is pressed halfway in ![]() and
and ![]() modes, third-party lenses reduce the aperture immediately after setting a larger f-number. This not only causes the depth of field to increase in the EVF display; it also causes the live view image to get darker, since less light is able to enter the lens and reach the sensor.
modes, third-party lenses reduce the aperture immediately after setting a larger f-number. This not only causes the depth of field to increase in the EVF display; it also causes the live view image to get darker, since less light is able to enter the lens and reach the sensor.

Image 120: Voigtländer Heliar F1.8/75mm with M Adapter:
Numerous adapters make it possible to attach nearly any new or old third-party lens to your X-Pro1. Especially popular are lenses that feature Leica’s M connection, which for a while now have been available from more brands than Leica itself, including Carl Zeiss and Voigtländer. This image was shot with a high-aperture 75mm Heliar and a Kipon M adapter—a lightweight telephoto lens for portraits with character. Exposure parameters: Voigtländer Heliar F1.8/75mm, ISO 200, ca. f/2, 1/45 second.
The camera attempts to counteract this loss of light and enhances the display in the viewfinder. This works, but only up to a point.
We’ve already discovered several times that the live histogram doesn’t relay any useful information in ![]() mode. With a very dark subject, however, the live histogram also can’t deliver any useful information in the other exposure modes (
mode. With a very dark subject, however, the live histogram also can’t deliver any useful information in the other exposure modes (![]() ,
, ![]() , and
, and ![]() ). Using a third-party lens with a narrow aperture is similar to creating “a very dark subject,” because we’ve reduced the amount of light that reaches the sensor and darkened the effective viewfinder display. This causes dusk to become night quickly in the live image, which in turn renders the live histogram useless because it relies on the live image for its data.
). Using a third-party lens with a narrow aperture is similar to creating “a very dark subject,” because we’ve reduced the amount of light that reaches the sensor and darkened the effective viewfinder display. This causes dusk to become night quickly in the live image, which in turn renders the live histogram useless because it relies on the live image for its data.
Keep these relationships in mind when you want to expose precisely with third-party lenses in combination in aperture priority mode, ![]() , with the help of the histogram. A simple solution for this problem is to use a very large aperture when setting the exposure for your shot. Then you can use the histogram and the exposure compensation dial to optimize your exposure settings. Finally, you can stop the aperture down once you’re satisfied—this will change the aperture and the shutter speed, but won’t change the overall exposure of your image.
, with the help of the histogram. A simple solution for this problem is to use a very large aperture when setting the exposure for your shot. Then you can use the histogram and the exposure compensation dial to optimize your exposure settings. Finally, you can stop the aperture down once you’re satisfied—this will change the aperture and the shutter speed, but won’t change the overall exposure of your image.
TIP
You can get the best exposure preview of your image in poor lighting conditions in the EVF or on the LCD monitor by pressing the shutter button halfway. The camera then enhances the live image display as much as possible.
SPECIAL FEATURES OF THE FUJIFILM M ADAPTER
FUJIFILM’s own M adapter functions in principle in the same way as other third-party adapters. But it offers a few additional functions that are contained in the camera’s firmware and unlocked only when you attach Fuji’s adapter to the camera.
Since Fuji’s M adapter features X-Mount signal contacts, it’s not compatible with some M lenses for reasons of space. You can find a list of compatible lenses at ![]() www.fujifilm.com/products/digital_cameras/accessories/lens/mount/fujifilm_m_mount_adapter/compatibility_chart/
www.fujifilm.com/products/digital_cameras/accessories/lens/mount/fujifilm_m_mount_adapter/compatibility_chart/
FUJIFILM also includes a small template that you can use to determine if your M lens will fit mechanically or not.
When you use the Fuji M adapter with your X-Pro1, the adapter menu for each of the six lenses expands to include three additional settings:
• DISTORTION CORRECTION corrects pincushion or barrel distortions caused by the lens. There are three correction levels available for each of these distortion types.
• COLOR SHADING CORRECTION counteracts color shifts near the edges of an image, which occur most often with wide-angle lenses. Each of the four image corners can be independently corrected.
• PERIPHERAL ILLUMINATION CORRECTION reduces (or increases) vignetting. There are five levels available to decrease or amplify vignetting effects.
You can set correction values separately for each of the six focal lengths available in the adapter menu (SHOOTING MENU 3 > MOUNT ADAPTER SETTINGS). You’ll need to handle all of these corrections manually—they aren’t automatically applied. Also, you have to set the correction settings for each lens individually, which will require you to take test shots and compare the results.
The corrections you apply in the adapter menu are made during the RAW conversion. In other words, the JPEGs will be corrected according to your inputs.
Furthermore, the external RAW converters Silkypix, RAW File Converter EX, Adobe Lightroom, and Adobe Camera RAW can recognize the correction settings in the RAW file’s metadata. For technical reasons, however, they are only able to apply the distortion and the vignetting corrections when developing the RAW file. The correction for the color shading unfortunately gets left by the wayside, which means you’ll need to refer back to the camera’s JPEGs.
2.11 SOURCES AND LINKS
I hope this book has answered your questions, solved a few concrete problems, and provided a slew of useful information. Since even a wide-ranging book can’t cover every possible topic, however, I’d like to share some useful links for online sources and discussion forums where you can gather more information about the X-Pro1 system.
FORUMS
DETAILED REVIEW
![]() www.dpreview.com/reviews/fujifilm-x-pro1
www.dpreview.com/reviews/fujifilm-x-pro1
OFFICIAL SOURCES
![]() www.fujifilm.com/products/digital_cameras/x/fujifilm_x_pro1
www.fujifilm.com/products/digital_cameras/x/fujifilm_x_pro1
VIDEOS FROM THE FUJI GUYS
ACCESSING EXIF DATA AND MAKER NOTES
The X-Pro1 saves a wealth of information in your RAW and JPEG files about your exposure settings as EXIF information (Exchangeable Image File Format). To access these metadata as well as a lot of information specific to individual vendors (i.e., Maker Notes), such as the camera serial number, date of manufacture, dynamic range extension, film simulation, etc., and to read this information to your computer, it’s advisable to use an image viewing or editing program that relies on the utility ExifTool.
In Windows, for example, the program ExifTool GUI enables this, and on MacOS, GraphicConverter.
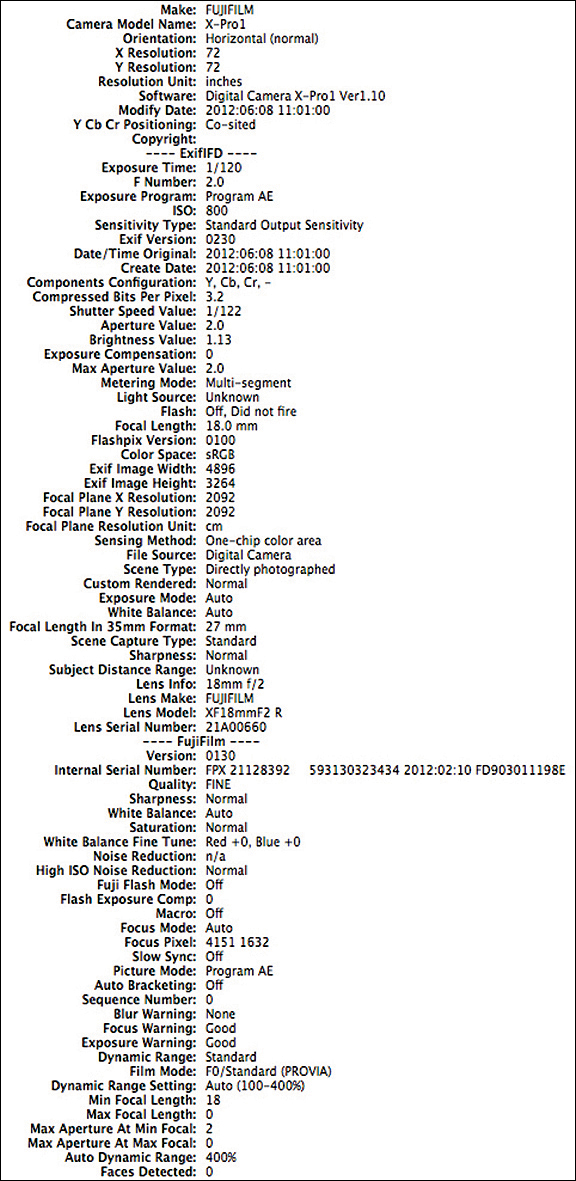
Image 121: EXIF Data with Maker Notes:
This screen grab of the MacOS program GraphicConverter shows a snippet of the EXIF data for an image taken with the X-Pro1. You can see that in addition to a vast amount of information about the exposure parameters, there are also general details such as the camera’s serial number, its date of manufacture, and the serial number for the lens used to take the shot.
2.12 Firmware Version 2.00
Just in time for Photokina 2012, FUJIFILM released a new firmware version 2.00. And here are the new features and improvements:
• Improved AF (autofocus) speed and accuracy in very dark or bright light.
• A more accurate Distance Scale.
• Manual focusing using the focus ring and the “Focus by Wire“-System feels more natural than before.
• The X-Pro1 now uses the maximum aperture of the attached Fujifilm lens showing a rather shallow depth of field to provide a “safe basis“ for your focusing and DOF decisions.
• Now, the Electronic Viewfinder allows for 3x magnification besides the 10x magnification to help with manual focusing. To activate magnification in MF-mode, press the command dial; to switch between 3x and 10x, turn the command dial to the right (10x) or left (3x).
• The Auto ISO function can now be extended all the way to AUTO (6400).
• The improved Multi Metering mode of the camera is now supposed to analyze exposure “even more intelligently.” For example, the black iPad case in the upper left corner of image 61 is now rendered significantly darker than the piece of paper in the upper right corner. Firmware 2.00 improvements to the metering process will also allow for more natural rendering of difficult lighting situations, especially in night and low light photography. Exposure results seem to be “more conservative” overall (exposing slightly to the left) which results in a less frequent use of the DR200% and DR400% options when the camera operates in Automatic DR.
• The problem that I described earlier — memory cards that were not ejected properly on a Mac or iPad causing long start-up times of the camera — is now fixed.
The new Firmware-Version 2.00 is now working with a new naming scheme for the update process. As before, the name of the firmware file that updates your camera body is FPUPDATE.DAT. The update files for the three (at the time of this writing) lenses have different names: XFUP0001.DAT (18 mm), XFUP0002.DAT (35 mm) and XFUP0003.DAT (60 mm).
Therefore, you can copy all the update files you need on one SD card and update your system (camera and lenses) in one run without risking naming conflicts.
However, please note that you have to first update the camera body to version 2.00 and then your lenses (in any order you like)!