
1 AN OVERVIEW OF THE X-PRO1 SYSTEM
The FUJIFILM X-Pro1 system comprises the camera itself as well as a host of additional components available from Fuji and several third-party vendors.
INTERCHANGEABLE LENSES
In addition to a variety of Fuji X-Mount autofocus lenses, you can also attach current and older lenses from manufacturers such as Canon, Nikon, Contax, and Leica with the help of adapters. A FUJIFILM adapter will enable you to use the Leica M-system, and those from other manufacturers like Kipon or Novoflex expand your options for lens mounts even further.
FLASH UNITS
The X-Pro1 unfortunately doesn’t come equipped with a built-in flash, but you can choose from three different system flash units designed for the X-Pro1 (and other Fuji camera models) that feature automatic TTL flash exposure capabilities. Or you can avail yourself of flash equipment from other manufacturers while shooting in manual mode.
ACCESSORIES
Do you wear glasses? If so, a diopter ring could make a big difference for you. With its help, you’ll be able to get the most from the X-Pro1’s unique hybrid viewfinder without needing your glasses.
Do you plan on traveling with your X-Pro1? Then you’ll need replacement batteries and a handy power adapter. And how about an additional handgrip that allows you to get a better hold of your camera while shooting?
There’s more: Which memory cards should you use? Which filters should you affix to your lenses? How do you update the firmware for your camera and X-Mount lenses? And how do you keep troublesome dust and dirt particles from compromising your camera’s X-Trans sensor?
As you can see, there are many questions to answer.
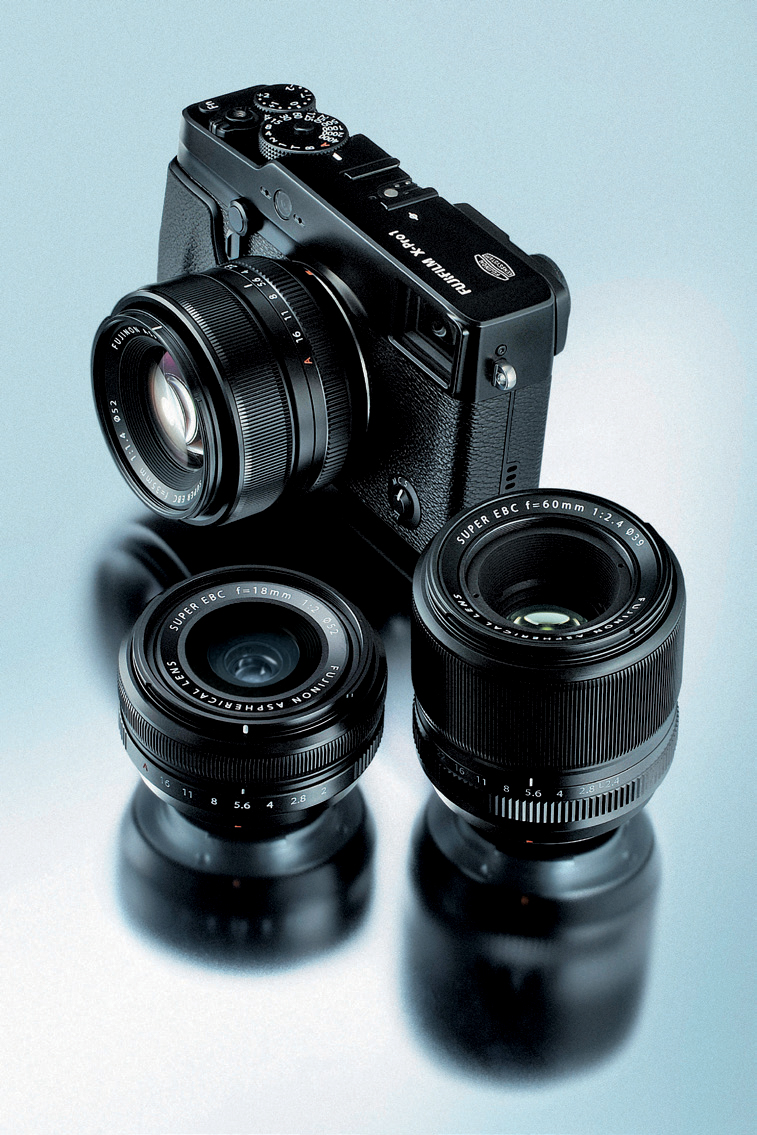
Image 1: The FUJIFILM X-Pro1 with the XF35mmF1.4 R standard focal length lens as well as the XF18mmF2 R wide-angle and XF60mmF2.4 R tele-macro lenses.
1.1 THE CAMERA
Before we get started with the actual operation of the X-Pro1, we should take a quick look at the camera’s buttons, dials, menus, and connections—not because I think that you haven’t done this already, but to be sure that we’re speaking the same language and using the same terminology.
OVERVIEW OF THE CONTROLS
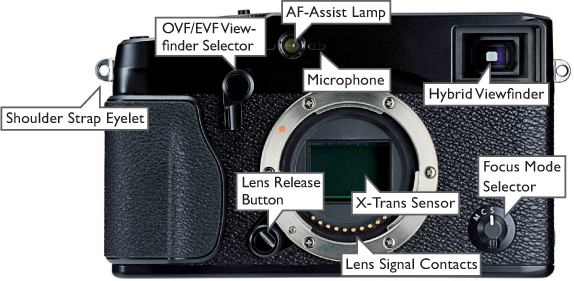
Image 2: X-Pro1 Front View: hybrid viewfinder, shoulder strap eyelet, focus mode selector, lens release button, lens signal contacts, X-Trans sensor, OVF/EVF viewfinder selector, AF-assist lamp, microphone (left/right).

Image 3: X-Pro1 Top View: ON/OFF switch, shutter button, Fn button, exposure compensation dial, shutter-speed dial with dial release, hot shoe.
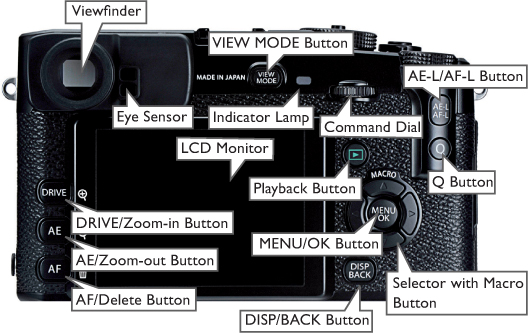
Image 4: X-Pro1 Back and Left Side View: viewfinder with diopter ring, eye sensor, LCD monitor, VIEW MODE button, indicator lamp, command dial, AE-L/AF-L button, Quick Menu (Q) button, playback button, selector with macro button, MENU/OK button, DISP/BACK button, AF/delete button, AE/playback zoom-out button, DRIVE/playback zoom-in button, flash sync terminal, speaker.

The selector enables you to navigate through the camera’s menus and to control various features such as the selection of the autofocus frame. You can confirm your selections either by pressing the MENU/OK button or by pressing the shutter button halfway down.

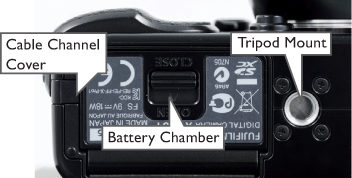
Image 5: X-Pro1 Bottom View: tripod mount, battery and memory card chamber, cable channel cover.

Image 6: X-Pro1 Right Side View (with 35mm f/1.4 lens): USB/HDMI connector cover, handgrip, aperture ring, focus ring, mount for lens hood and filters.

Image 7: X-Pro1 Right Side View: open connector cover revealing HDMI and USB ports.
COLOR CODES FOR THE LED INDICATOR LAMP
The indicator lamp next to the VIEW MODE button conveys the following information:
|
The autofocus has identified a target and has it in focus. |
|
Warning—the image might be blurry, out of focus, or poorly exposed. You can, however, still snap the exposure. |
|
The camera is saving images, but you can continue to shoot. |
|
The camera is saving images, and you are not able to take additional shots. |
|
There is a lens or memory error. |


CAMERA MENUS
By pressing the MENU/OK button you can view the camera’s menus on the monitor or in the viewfinder. The X-Pro1 has three types of menus:
• SHOOTING MENU
The shooting menu—characterized by the color red—consists of five pages and contains functions that directly affect how you will capture images. These include ISO settings, dynamic range, various image settings (white balance, color, focus, contrast, etc.), AF mode, button assignments, and several photographic assistance features (grid lines, AF-assist lamp, AF-field correction frames, etc.).
• SETUP MENU
The blue setup menu has three screens and is where you will define the general configurations for your camera. From this menu, for example, you can select your preferred language, set the date and time, adjust various settings, clean the sensor, and format your memory card.
• PLAYBACK MENU
The green playback menu is the shortest of the three at only two pages. Its purpose is to allow you to manage your saved exposures. Since most photographers prefer to take care of this on a computer, this menu may be of limited use to you.
Press the MENU/OK button to access the X-Pro1’s menus. All three menus will never be displayed at the same time. The shooting menu and the setup menu are accessible while in shooting mode. In playback mode (after you’ve pressed the playback button on the camera’s back), you will be able to access both the playback and the setup menus. To switch back to shooting mode while in playback, simply press the shutter-release button halfway.
The selector keys allow you to navigate through the various menu options by moving up, down, left, and right. In addition, the numbered tabs along the left side of the menu make it easy to jump quickly from one page of the menu to another.
TIP
By pressing the MENU/OK button and holding it down for a few seconds, you can lock the four selector keys. To unlock the keys, simply press and hold the MENU/OK button again. Unfortunately this trick doesn’t lock other buttons that users sometimes inadvertently press, such as the AE-L/AF-L and Q buttons. This oversight may be remedied in a future firmware update.
HIGHLIGHTED VS. SELECTED
When I refer to a highlighted menu option in this book, I am describing the process of navigating to a particular entry, but not actually selecting it or activating the particular setting or feature. A menu option that has already been selected is indicated with a bar next to the active feature.

Image 8: Highlighted vs. Selected:
In this illustration, the menu option CONTINUOUS is highlighted. The setting that is actually selected and active, however, is 1.5 SEC. You can use the MENU/OK button or the left selector key to activate a highlighted entry.
THE QUICK MENU (Q BUTTON)
The X-Pro1 has yet a fourth menu—the so-called Quick Menu. This menu is FUJIFILM’s response to complaints issued by users of the X100, who said that accessing important functions in the camera’s nested menus was in some cases inconvenient.
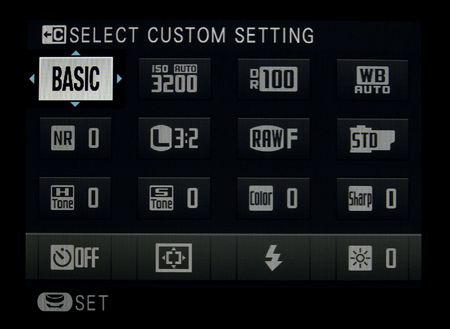
Image 9: While in shooting mode, you can open the Quick Menu by pressing the Q button. This menu allows you direct access to 16 of the most commonly used camera features: select custom settings, ISO definition, dynamic range, white balance, noise reduction, image size, image quality, film simulation, highlight tone, shadow tone, color, sharpness, self-timer, AF mode, flash mode, and viewfinder/LCD brightness.
Use the selector keys to navigate to any of the 16 functions and then use the command dial to change the settings for the function of your choice. You can apply any changes you make in the Quick Menu using one of three buttons: you can press the Q button once again, you can press the MENU/OK button, or you can depress the shutter-release button halfway.
The X-Pro1 allows you to create up to seven custom shooting profiles, which you can bring up in no time with the help of the Quick Menu. To create a new shooting profile or change the settings of an existing one, hold down the Q button for a few seconds. This will bring you directly to the menu option EDIT/SAVE CUSTOM SETTING in the shooting menu, where you can either save your current camera settings as one of the seven profiles (SAVE CURRENT SETTINGS) or manually set and save values for ISO, dynamic range, film simulation, white balance, color, sharpness, highlights, shadows, and noise reduction for each profile.
While in the Quick Menu, you can use the command dial to shuffle rapidly through the seven shooting profiles. As you do this, you will be able to see a live image on the camera’s display depicting the settings of each profile. In other words, you not only see which of the seven profiles is currently active, you also see all of the settings that are associated with that profile. You can also just use the predefined profiles as a starting point and then use the Quick Menu to make further adjustments to the settings. Any changes you make to the profile’s baseline settings will be indicated with a red dot.

Image 10: Shooting Profiles in the Quick Menu: In this illustration the first shooting profile is selected (C1), but the values for the dynamic range (DR100) and color (−2) have been manually adjusted. The camera indicates these changes with a red dot. These changes won’t be saved with the shooting profile; they are only active until you overwrite them or select another shooting profile. To make permanent changes to a shooting profile, hold down the Q button for a few seconds or select EDIT/SAVE CUSTOM SETTING from the shooting menu.
Have no fear; I will go over the various settings and features that I glossed over in the previous paragraph in greater detail in the coming chapters. I’ll discuss ISO settings in section 2.5, dynamic range functions in section 2.6, and white balance and various JPEG settings in section 2.7.
Here I only wanted to emphasize that you can access the 16 most-used functions with the Q button and the Quick Menu instead of finding them in the traditional menus. All 16 features—and many more—can also be found on the conventional shooting and setup menus.
UPDATING FIRMWARE
The X-Pro1 is a novel camera in many ways, but it also features a few peculiarities (typical Fuji!). Accordingly, users have many recommendations and wishes, and they would like to see the firmware (aka the control software) of the camera and lenses further improved, the range of functions expanded, and the kinks debugged.
Since FUJIFILM has heard a number of these requests, there should gradually be a series of firmware updates for the X-Pro1 and its lenses that you will be able to install on your own. You can determine the status of the firmware in your camera (and whichever lens you have attached at the time) by holding down the DISP/BACK button while turning the camera on.
By following photography news sources or consulting appropriate Internet forums, you can find out if there is a newer firmware version than what is currently installed on your camera. A small selection of these appear at the end of this book, and you can download the actual firmware updates directly from FUJIFILM at the following website address:
![]() www.fujifilm.com/support/digital_cameras/software/#firmware
www.fujifilm.com/support/digital_cameras/software/#firmware
When downloading new firmware updates to your computer, make sure you don’t have older firmware updates either for the X-Pro1 or for other Fuji cameras in your destination folder when saving. File naming conflicts may cause your computer to save the file under a different name, which your camera won’t recognize and won’t be able to install. Currently, firmware files for cameras are called FPUPDATE.DAT and updates for lenses are called XFUPDATE.DAT. Additionally, if you happen to own multiple X-Mount lenses, which may well be the case, and you would like to update all of them, you must take care not to mix anything up.
When installing firmware updates for your camera or lens, all of the camera functions and user settings will revert to the default setup. In other words, after every update, you will need to reconfigure your camera to the settings of your choice. This is cumbersome—not to mention annoying—and I hope this won’t always be necessary in the future. Until then, however, it’s a good idea to write down your custom settings before performing a firmware update.
Follow these steps when updating your firmware:
• Locate the latest firmware for your camera or your specific lens on the FUJIFILM website and download it to your personal computer. Unzip the file if necessary and then double-check that your computer hasn’t given the downloaded file a name other than FPUPDATE.DAT or XFUPDATE.DAT. If the file name was changed to something else, you could rename it back (and delete or move the old firmware file). Or do whatever you need to do to ensure the file has the name the camera wants (like downloading it again elsewhere).
• Make sure that you have a fully charged battery in your camera.
• Connect an SD memory card to your computer. The card must have been formatted in your camera (SETUP MENU > FORMAT). If your computer has one, you can use an integrated card reader; otherwise you will need an external card reader.
• Copy the FPUPDATE.DAT file (if you’re updating your camera) or the XFUPDATE.DAT file (if you’re updating a specific lens) to the top level of the SD card.
• Disconnect the SD card from your computer (using your operating system to unmount it). Make sure your camera is turned off, and insert the card into the appropriate port on your camera.
• If you are updating a specific lens, make sure this lens (and no other one) is affixed to the camera. Even though every firmware update file for lenses has the same file name (XFUPDATE.DAT), you must be careful to download and install the firmware update file that is specifically designed for the lens you are using (e.g., 35mm f/1.4).
• Turn your camera on while holding down the DISP/BACK button.
• Follow the directions on the LCD monitor and do not interrupt the update process. Do not turn the camera off before you receive confirmation that the process has completed!
IMPORTANT
The updating process can take several minutes, so it is important that your battery be fully charged. You wouldn’t want your camera to shut down during the update because if it did, you might need to have a professional service your camera. This is also a potential outcome if you were to mistakenly update a lens (e.g., 50mm f/1.4) with a firmware update designed for a different lens (e.g., 18mm f/2.0).
Lenses and camera bodies must be updated together (at least that’s the case now). If you attach an updated lens to a camera body that has not yet been updated, the camera will detect this after you turn it on by indicating that a firmware update for the camera is needed.
Conversely, the camera will also indicate that a lens firmware update is needed if you attach a lens that hasn’t been updated to a camera body with a newer firmware version.
HINT
The basis for this book is firmware version 1.11 for the camera, version 1.01 for the 35mm f/1.4 and 18mm f/2.0 lenses, and version 1.02 for the 60mm f/2.4 lens.
RESTORING THE FRAME COUNTER
Updating your camera’s firmware could cause its internal frame counter to reset to zero. If you would like to restore it to its previous position, follow these steps:
• Insert your SD card into your computer and rename a picture that is saved on the card with your desired image number. For example, name the file DSCF2725. JPG instead of DSCF0001.JPG.
• Return the SD card to your camera and take a new exposure. This image will automatically be saved with the subsequent number in its filename—DSCF2726.JPG in the example. Bingo!

Image 11: What’s in a name? Well, whatever you want! Simply by renaming an image file on your memory card using your computer, you can trick the X-Pro1 into resuming its internal frame counter where you want it to start.
This little trick obviously works for any situation in which you want to avoid unwanted or conflicting image numbers—for example, if you shoot with multiple cameras or you are using a camera that you normally don’t use.
In these cases, reset the image counter by going to SETUP MENU 1 > FRAME NO. > RENEW and then format the memory card by going to SETUP MENU 3 > FORMAT. Next, take a picture and change its filename (DSCF0001) on your computer to the number you prefer by using the steps described above. Then take a new exposure with this memory card.
While in the heat of the moment, don’t forget to set the frame counter back to a continuous progression by selecting SETUP MENU 1 > FRAME NO. > CONTINUOUS; otherwise the frame counter will start numbering images again from scratch after you format your card the next time.
SD MEMORY CARDS
The X-Pro1 is compatible with SD, SDHC, and SDXD memory cards. You can safely ignore that FUJIFILM only guarantees the functional capabilities of SanDisk and (of course) FUJIFILM brand memory cards—the camera also works fine with the products of other manufacturers.
Fuji’s recommendation that you should use memory cards in speed class four or higher is also something short of realistic. The X-Pro1 writes RAW files in excess of 26 MB and JPEGs in excess of 3—5 MB, or in other words around 30 MB per RAW+JPEG exposure. When shooting continuously and producing six exposures per second that adds up to 180 MB of data that can occur within the span of a second!
The camera’s buffer memory can fill up remarkably quickly—and it should be emptied (read: the data should be written to the memory card) just as quickly, so you can take additional exposures. I recommend at least a speed class 10 memory card; if you use anything less, you’re saving money in the wrong place.
As a matter of fact, many of my colleagues and I go a step further. We only use the fastest SD cards available on the market today. Why? Because the cameras in the X series can actually put this extra speed to use—our own and other tests have shown this repeatedly. This advantage comes into play especially with the X-Pro1’s automatic exposure bracketing function, during which the camera is completely blocked (unnecessarily, in my opinion) until all three bracketed shots are saved.
What it all comes down to is the write speed of the memory card. Watch out for deceptive marketing that advertises exceptionally fast speeds but really only describes the read speed of the cards.
As of July 2012, the fastest available SD cards read and write data with a nominal speed of 95 MB/s. I personally have had good experiences with models from Panasonic and SanDisk. Since these exceptionally fast cards aren’t cheap, I generally use smaller capacity versions with 8 or 16 GB for my X-series cameras and make a habit of transferring my exposures to my computer regularly. When shooting with the maximum RAW+JPEG quality settings on your X-Pro1, a 16 GB card is good for 500 exposures.
In addition to one or two of these superfast memory cards, I usually also carry a few more affordable class 10 cards that have a larger capacity (32 or 64 GB), which I use for data backup (things can even happen to laptops) or in situations in which I have a greater need for capacity than I do for speed.

Image 12: The Need for Speed: SD memory cards such as the SanDisk Extreme Pro with a nominal read and write speed of 95 MB/s are part of the basic equipment for many X-Pro1 users, according to an American camera forum.
LONG START-UP TIMES?
Again and again photographers who shoot with FUJI-FILM’s X-series complain about the start-up times of their cameras. Usually these complaints mention a wait time of at least 10 seconds between turning the camera on and the moment when the camera is ready to use. The culprit for these delays is actually always an SD memory card that has been used in other devices (a PC, iPad, or something else) to transfer pictures. This problem arises from the widespread bad habit among computer users of failing to unmount the memory card from the device using the computer’s operating system and instead simply popping the card out. The X-Pro1 owner’s manual points out that users should actually format their SD memory cards anew after each use in another device (SETUP MENU 3 > FORMAT).
This is surely good advice (although many Fuji camera owners obviously don’t follow it), but it is not especially feasible in practice—for example, if you don’t want to delete the images from the memory card but do want to transfer them to another device in the meantime. I recommend the following practices to avoid problems with the start-up time of your camera:
• Leave your SD card in your X-Pro1 and transfer your images to another device with the USB cable that comes with the camera. No additional files that could affect the camera start-up time are written to the memory card when you use this method.
• Use the read-only lock on your SD memory card before inserting it into other devices. This will also prevent unwanted files from being written to the card. You will need to remember, of course, to turn the lock off before using the card in your camera again. If you happen to forget to do this, your X-Pro1 will remind you with a warning the next time you turn it on.
BATTERIES AND CHARGERS
The X-Pro1 uses a rechargeable lithiumion battery, model NP-W126, which you can purchase independently at camera retailers—but at a stiff price. Many photographers opt instead for (largely) identical and markedly less expensive alternatives from third-party manufacturers. You can find compatible models for about $12, but these bargain batteries don’t always match the endurance of the original battery.
A fully charged battery is good for about 300 exposures. Consider this a ballpark estimate, though, because the actual charge-life of a battery depends on your personal settings and your habits as a photographer. If you shoot with the optical viewfinder (and switch off the LCD display on the back of the camera), for example, the range of exposures per battery charge jumps up to 1000.
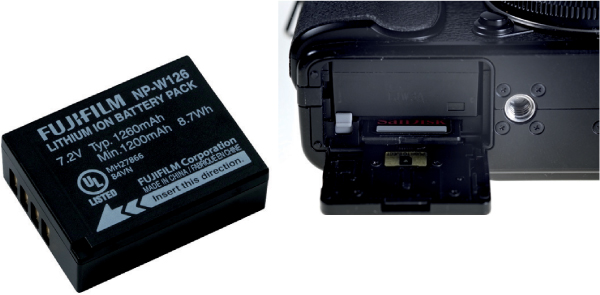
Image 13: A FUJIFILM original battery, model NP-W126, with a rated capacity of 1260 mAh. Compatible and less-expensive models are available from other manufacturers in on- and offline markets. Not all models feature the practical gray arrow, however, that indicates the correct orientation for inserting the battery (but you can solve the problem with a marker easily enough). Take care to match up the gray arrow with the gray battery latch and make sure to test whether the battery is in correctly by turning your camera on each time you replace it.
Don’t become a slave to your camera battery—it’s better to get yourself a few spare batteries. This will allow you to concentrate on your photography instead of worrying about how many exposures you can squeeze out of the remaining charge in your battery.
The X-Pro1 also features an energy conservation mode, which can be activated and deactivated by navigating to SETUP MENU 2 > POWER SAVE MODE. Do yourself and your images a favor, however, and use this mode only in the most dire of emergencies. This mode not only reduces the power consumption of your camera; it also limits the camera’s capabilities. The autofocus works slower in power save mode, and the live histogram won’t be available to you in the optical viewfinder. You’re better off taking a second, third, or even a fourth battery with you instead of limiting your camera’s ability to perform.
On the other hand, it does make sense to use the camera’s quick start mode, which you can toggle on and off at SETUP MENU 2 > QUICK START MODE. The automatic turn-off feature is also advisable. With this option activated, the camera will automatically power down after a period of not being used. You can determine the length of time before the camera shuts off at SETUP MENU 2 > AUTO POWER OFF.
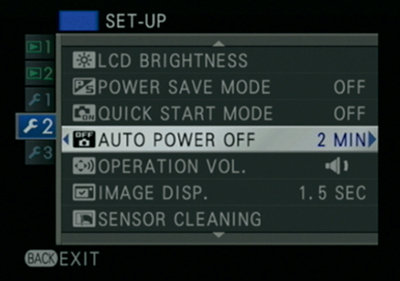
Image 14: The power save mode, quick start mode, and auto power off features can all be found in SETUP MENU 2.
I personally set the auto power off feature to two minutes. My camera powers down after two minutes of not being used and accordingly saves energy from being wasted. You can bring your sleeping X-Pro1 back to life by pressing the shutter-release button halfway down. Alternatively, you can press the ON/OFF button to turn your camera off and then (after a quick moment) turn it back on.

The NP-W126 and its compatible brethren are not intelligent batteries, which is why you should take the camera’s battery indicator with a grain of salt. As long as all three bars fill up the battery symbol, you don’t have anything to worry about. When there are only two bars, the battery is already below half of its total charge, and when there’s only one bar (the symbol will turn red at this point) it’s time to swap out the battery as soon as possible. The battery charger that comes with the camera, model BC-W126, includes a conventional cable connection. When you are travelling, this means that in addition to the included power cable, you can also use other cables that fit into local power outlets. One useful travel option is the Apple World Travel Adapter Kit. While this kit is actually designed for users with iPods, iPhones, iPads, and laptops from Apple, you can also attach the small adapter to the Fuji power supply unit and then plug your charger into a foreign power outlet.
TIP
While saving energy is in, it only makes sense to do so with the X-Pro1 when it doesn’t come at the expense of performance. For this reason, avoid using the camera’s power save mode and opt instead to use the quick start mode and the automatic off feature.
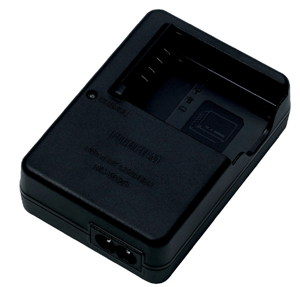
Image 15: The original power charger, model BC-W126, features a standard power cable connection, which allows you to use the plug from the Apple World Travel Adapter Kit, among many others—a feature that’s especially convenient for foreign travel.
As is the case with batteries, it’s wise to purchase a second charger. In addition to the original charger, there are various third-party offerings for this unit.
The BC-W126 includes a status lamp that glows green as long as the battery is charging. When the light goes out, it means that the battery is fully charged. A blinking status indicator is a bad sign—it indicates a battery failure. When this occurs, unplug the charger from the wall and remove the battery. Insert another battery and check to see if the light continues to blink after you plug the charger in. If it does, your charger may be the source of the problem.
DIOPTER
Retro cameras like the X-Pro1 are in some ways intended for an older crowd, which is why countless retailers and prospective buyers find it all the more incomprehensible that the camera’s viewfinder doesn’t feature an integrated multilevel optical adjustment for photographers who wear glasses (unlike the X100, X10, and S-S1). Anyone who wears glasses to read or drive will need to either wear his or her glasses while photographing or purchase a diopter correction lens with 19mm threads.
The first surprise: FUJIFILM didn’t offer its own diopter lens as part of its accessories for the X-Pro1 for several months, instead pointing users toward Cosina as a third-party manufacturer.
The second surprise: aside from this tip, the owner’s manual doesn’t have anything else to offer on this important subject. In the English language FAQs on FUJIFILM’s global website you can at least find that the X-Pro1’s viewfinder features an internal setting of −1D. But what exactly does this information mean in practice?
The factory-provided diopter on the viewfinder is neutral—it is a simple piece of glass with no corrective optical effects. You could in principal remove the glass entirely, but that would allow dirt and dust to accumulate in your viewfinder more easily.
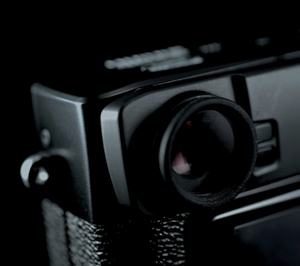
Image 16: The diopter lens that comes with your camera is an optically neutral piece of glass. Its rubber mount should protect eyeglasses from getting scratched if photographers press them up against it. Some X-Pro1 users have lost the factory-installed, neutral diopter lens after just a few days. To make sure this doesn’t happen to you, check that the ring is screwed in tightly to the viewfinder on your camera so that it won’t come undone by, for example, rubbing against your clothing when your camera is hanging around your neck.
Since camera viewfinders are designed for photographers with standard eyesight, we can assume that the neutral diopter lens (i.e., 0D) that comes with the X-Pro1 represents the normal case for people with normal vision.
Experience shows that on this basis farsighted people who wear glasses to read should use a diopter lens with the same correction value as they use for help reading. For example, if you use a pair of reading glasses with a correction of +1D, you would be best off attaching a +1D diopter lens to your viewfinder.
You can attach FUJIFILM’s own corrective lenses to your X-Pro1, along with other offerings from Cosina and Carl Zeiss, as well as various Nikon diopter lenses for its film F System. The threads are standard; the only thing you’ll need to do is make sure the lens has a 19mm thread diameter.
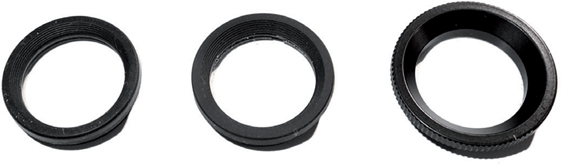
Image 17: A Comparison of 19mm Diopter Lenses: Left, a neutral diopter provided by the factory; middle, a +2D diopter lens from Carl Zeiss (also with a protective rubber ring); and right, a somewhat larger +1D diopter lens from Nikon without a rubber ring.
Diopter lenses from Fuji, Cosina, and Zeiss all have rubber rings around them, which is practical if you want or have to wear a pair of glasses while you use the lenses. Various Nikon diopter lenses are constructed entirely of metal. The upside of this, however, is that they feature a slightly larger inlet view, which many photographers will find beneficial.
People who wear gradient lenses or have complicated vision correction requirements should visit an optometrist with their cameras to discuss and try out different corrective lenses. You can purchase diopter lenses from FUJIFILM, Cosina, Carl Zeiss, and Nikon at most specialized retailers.
IMPORTANT
The X-Pro1’s optical and digital viewfinder displays are located at different virtual levels of distance. This makes it important for you to use a corrective lens that allows you to see the images provided by both the digital and the optical viewfinder sharply. The standardization of corrective values for Nikon diopter lenses is slightly different from other manufacturers. With Nikon’s lenses you need to purchase a lens that has an advertised corrective value of 1D less than you actually need. For instance, if you need an effective correction of +1D, then you should purchase a neutral Nikon diopter lens. To achieve a correction of +2D, get a Nikon diopter with a marketed value of +1D. This complication only applies to lenses manufactured by Nikon. With lenses from FUJIFILM, Cosina, and Zeiss, the marketed and effective corrective values are the same.
THE X-TRANS-SENSOR
The X-Pro1’s sensor is anything but ordinary. Though on paper it may not sound like anything earthshaking, behind its somewhat middling specs—an APS-C format and 16-megapixel resolution—lies a special quality that FUJIFILM developed in order to bring the X-Pro1’s image quality on par with the performance of larger full-format sensors.
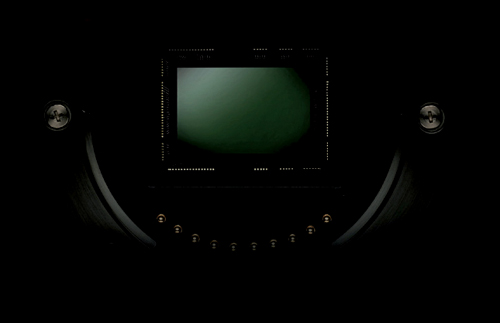
Image 18: The Heart of Any X-Pro1—The X-Trans-Sensor: Since dirt and dust particles can settle on the sensor with time, it should be cleaned occasionally.
The innovation lies in the structure of the color filter over the sensor pixels. While conventional sensors employ a simple self-repeating 2x2-color matrix in the so-called Bayer array, the X-Pro1 features a complex pattern of 6x6 color pixels. The advantage of this seemingly random pixel array is the way in which it suppresses moiré effects, which have the potential to noticeably disturb the appearance of an image.
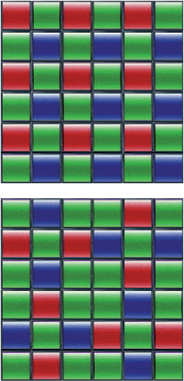
Image 19: Top, Bayer sensor; bottom, X-Trans sensor. While traditional Bayer sensors require a low-pass filter to suppress undesirable moiré effects, the X-Pro1’s complex color array means no such filter is needed. This benefits the camera’s resolution and amounts to an excellent image quality for the sensor’s size.
Camera manufacturers usually attempt to ward off moiré effects by installing a low-pass filter in front of the Bayer sensor. The disadvantage of this method is that the filter causes a noticeable loss of resolution. Fuji’s alternative approach, the X-Trans sensor, combines both approaches: by doing away with the need for the low-pass filter, it achieves a remarkably high resolution, while the unusual pixel array effectively suppresses the appearance of moiré effects so that such problems occur only in rare instances.
One disadvantage of the unconventional sensor array is that external RAW converters aren’t capable of interpreting its data without additional decoding. This requires both extra resources and money. As of now, the X-Pro1’s RAW format files are supported by relatively few RAW converter programs.
CLEANING THE SENSOR
The settling of dust and dirt particles on the sensor is a fundamental problem for all digital cameras with interchangeable lenses. These particles can mar images by showing up as distracting spots in the light areas of an image (e.g., sky, clouds, walls).
To minimize the effect of this problem, the X-Pro1 offers an integrated cleaning mechanism that runs when you turn your camera on or off. Navigate to SETUP MENU 2 > SENSOR CLEANING to control this setting. You can choose to run the cleaning manually, by selecting OK, or you can choose to have the cleaning process run when you turn your camera on and/or off.
I have my camera set to clean the sensor both when I switch it on and when I turn it off—it’s best to shake the sensor up a bit as often as possible. And this is actually all this function does: with the help of high-frequency vibrations, the dust particles loosen from the sensor preventing them from becoming permanently attached. Don’t put too much stock in the sensor cleaning function. If any dirt particles have settled on the sensor, they’re likely to remain stubbornly attached even after running the cleaning mechanism.
Accordingly, the most important strategy for maintaining a clean sensor is the active and passive avoidance of dust:
• Don’t leave your camera unnecessarily open without protective housing covers.
• As much as possible, avoid changing your lenses in dusty or dirty environments.
• When changing your lens, hold your camera pointed downward, not upward.
• When attaching a lens, make sure that the rear lens opening and the optics are clean and free of dust to prevent transferring dust to the sensor inadvertently.
• Don’t touch the sensor!
Despite diligent preventative measures, it’s an unavoidable fact that the sensor of your X-Pro1 will collect dirt or dust over time if you use it regularly. Don’t deceive yourself—the question is not if, but when!
You can run the following test to check whether dust has already settled on your sensor. Take an exposure of a blue or white sky, a bright wall, or a white piece of paper with a fully dimmed lens (the highest f-stop possible). It’s best to use the camera’s automatic exposure bracketing feature (DRIVE button > AE BKT) and to manually set the lens to be out of focus—for the sky, set the focus for a short-range shot, and for a piece of paper, set the focus to infinity. If you then transfer your images to your computer and maximize the contrast, any flecks on your sensor should be readily visible.

Image 20: Taking a Look at Flecks on the Sensor: This is how the sensor of my preproduction X-Pro1 looked after three weeks of use in Asia. This exposure of a piece of white paper reveals (with the help of stark contrast settings on my PC) over a dozen flecks on the image sensor. Something no amount of shaking and vibrating will remedy.
Using a cleaning bellows is one safe method to remove dust particles from the lens and sensor. Photographers are particularly fond of the Rocket-air Blower from the manufacturer Giottos. This product features an air valve, which prevents dust from entering its bellows—the last thing you want to do is blow additional dust into the camera’s chamber. The goal is to loosen and remove the existing blemishes with a clean stream of air. For the best results with this tool, blow from below into the sensor chamber of your open camera.
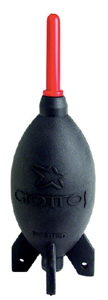
Image 21: The Super Rocket-air Blower from Giottos may look comical, but it effectively removes dust from cameras and lenses.
Don’t use compressed air from a gas duster! These products contain propellants, whose particles can end up sticking to the image sensor, causing exactly the opposite effect of your intended result. Additionally, the stream of compressed air can harm the sensor by turning these particles into tiny and harmful projectiles.
If you’ve read through the owner’s manual for your X-Pro1, you’ll know there’s an official decision on this matter. FUJIFILM advises that you should not use a brush (or any other item) to clean the sensor, and threatens that any resulting damages from doing so will void the warranty.
What about when the flecks on the sensor simply won’t go away? My colleague Michael J. Hussmann, who’s a legend when it comes to photo technology, recommends a “fruit snack on a stick.” This is the nickname for Pentax’s Sensor Cleaning Kit—and you’ll see why people call it that at first sight.
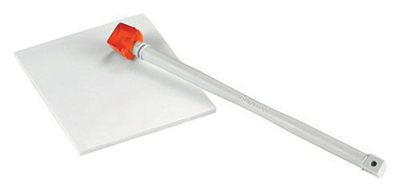
Image 22: Pentax’s Sensor Cleaning Kit includes a specially coated cleaning head that collects dust from the sensor. After every time you dab dust off of the sensor, you’ll need to clean the head with a special piece of sticky paper that comes in the kit. To clean the entire area of the X-Pro1’s sensor, you’ll need to blot off the cleaning head approximately six times.
I can’t introduce you to all of the methods and means of cleaning a sensor in this book, but I did ask Torben Hondong, the service manager for FUJIFILM in Germany, how he handles dust removal from the X-Pro1’s sensors.
FUJIFILM depends (as do countless other camera manufacturers) on the products from the U.S. company Photographic Solutions. The basis of every damp cleaning is the so-called Sensor Swabs that are soaked in a cleaning solution called Eclipse and then wiped like a windshield wiper across the sensor—one side of the swab from left to right, and the other side from right to left. It’s important that the swabs (which aren’t cheap, to say the least) are used only one time and that each side of each swab is wiped across the sensor only once. Otherwise the dirt and dust collected on the first pass can scratch the sensor on the way back.


Image 23: A wet Cleaning of the Sensor à la FUJIFILM with products from Photographic Solutions: Sensor Swabs (for the X-Pro1 you’ll need size 2) are moistened in Eclipse cleaning solution and wiped over the sensor one time.
Specialist Torben Hondong doesn’t rely on just this standard solution (available for anyone to purchase in camera stores). More commonly, he replaces the original cloth on the swaps with special “Cleaning Wiper” cloths from Japan, which he finds work better because they smear less. In particularly difficult cases, he treats the affected area of the sensor with a drop of Zeiss Optical Cleaning Mixture. Hondong cautions, however, that this relatively aggressive solution is not recommended for home use.
That being said, it is usually possible to take care of the normal dirt and dust buildup on the X-Pro1’s sensor by yourself with products for DSLR cameras that are readily available in retail stores. The Canadian company Visible Dust offers a similar, and in fact more sophisticated, line of products, such as swabs and cleaning solutions, at prices that aren’t any higher than those of Photographic Solutions.
As a last resort for particularly stubborn sensor dirt that won’t come out, you can always send your camera in to be serviced.
1.2 THE LENSES
The optical standard equipment for the X-Pro1 consists of three high-aperture fixed focal length lenses with X-Mount connections and autofocus (AF): the 18mm f/2.0, the 35mm f/1.4, and the 60mm f/2.4. In the traditional 35mm format, this is tantamount to focal lengths of 27mm (wide-angle), 53mm (standard focal length), and 91mm (modest tele-macro).
This is by no means all, because by the middle of 2013 four additional fixed focal length lenses (14mm f/2.8, 23mm f/1.4, 27mm f/2.8 pancake, and 56mm f/1.4) and three image-stabilized zoom lenses (10—24mm f/4, 18—55mm f/2.8—4, 55—200mm f/3.5—4.8) are supposed to be available to flesh out the range of options.
The camera’s slim flange-back distance makes it possible to connect countless lenses from third parties. Manufacturers such as Kipon and Novoflex offer adapters that enable you to use lenses from dozens of other systems with the X-Pro1. Additionally, FUJIFILM offers its own adapter for the Leica M-system lenses, which allows for adjustments to correct distortions, vignetting, and color shifts (see section 2.10).
Information between the camera and the X-Mount lenses travels over electronic contacts. Even manual focusing (MF) is ultimately electronic. This “focus by wire” method is often criticized since it operates with a small delay and does not provide the photographer with immediate feedback—unlike true mechanical MF lenses. However, Fuji didn’t actually design the AF lenses to have pure manual focusing capabilities. The intention was—and is—much more to use the autofocus even in MF mode (by using the AF-L button) and to use the lens’s focus ring for fine adjustments (with the help of the magnified electronic viewfinder). This concept has already led to many misunderstandings with the X100. Fuji offers the three X-Mount lenses that make up the basic equipment for the X-Pro1 with fitting lens hoods, which you’d be wise to employ. Protective filters with a 52mm thread diameter fit on the 18mm and 35mm lenses. The 60mm lens, however, features threads with only a 39mm diameter.
As is the case with the camera body itself, all three lenses are truly lightweight in relation to their size and construction, making them a real joy to bring along.
FUJINON XF18mmF2 R
The 18mm f/2.0 wide-angle lens for the X-Pro1 is often considered a tool for reporting, partly because its upper aperture limit is quite large for its focal length, allowing photographers to capture people and moments even in adverse circumstances with relative ease.
Due to a diminished sharpness around the edges and a need for electronic distortion corrections by the camera or by your RAW converter program, this lens is sometimes considered less ideal for architecture and landscape photography.

Image 24: The Fujinon XF18mmF2 R wide-angle lens weighs in at just 100 grams despite an aperture of f/2.0.
This opinion must be qualified, though. The image on page 37 shows a landscape shot with the 18mm f/2.0 lens on March 21, 2012 in Bali. The RAW file was developed using a beta version of the free RAW converter RPP 64 with the V50 film simulation preset and was polished off with Apple Aperture 3.2.
No automatic or manual lens corrections were undertaken during the RAW conversion or during the finishing.
FUJINON XF35mmF1.4 R
The 35mm lens is the standard for the X-Pro1. If you would like to buy only one lens (initially) for your camera, this would be it in nearly every case—and for good reason, because with an aperture of f/1.4, this lens excels in low-light situations and offers excellent performance if you want to isolate a subject.
Even at full aperture this lens produces extraordinarily sharp and high-resolution images, and the value it brings for its price is exceptional. Owing to its 35mm equivalent focal length of 53mm, this lens functions as a great all-around lens but is sometimes considered not ideal for portrait photography.

Exposure parameters: X-Pro1 preproduction camera, XF18mmF2 R preproduction lens, ISO 200, f/8.0, 1/400 second, automatic white balance.

Image 26: In terms of resolution and sharpness, the Fujinon XF35mmF1.4 R competes with more expensive lenses. And despite offering a large aperture, its 187 grams makes it a true lightweight.
I also have some reservations about this criticism. The following image shows a portrait snapped on February 16, 2012 at the Warsaw Railway Museum with the preproduction 35mm lens. The RAW file was developed with Silkypix 4, and the image was finished with Apple Aperture 3.2.
The lighting in this exposure is a mixture of natural daylight (from the window on the right) and artificial light (from a studio floodlight in the back and on the left). The camera’s auto DR setting settled on the extended dynamic range of DR400%. In other words, it “underexposed” the RAW file by two f-stops (see section 2.6).
FUJINON XF60mmF2.4 R MACRO
This modest telephoto lens, with its 35mm equivalent focal length of 90mm, is actually better suited for portraiture, but Fuji sells it as a macro lens for closeup photography. With a minimum distance of nearly 11 inches between subject and lens, however, one can’t really speak of this as a bona fide macro lens.

Image 27: Lady in Warsaw: Exposure parameters: X-Pro1 preproduction camera, XF35mmF1.4 R preproduction lens, ISO 800, f/1.8, 1/1000 second, automatic white balance.
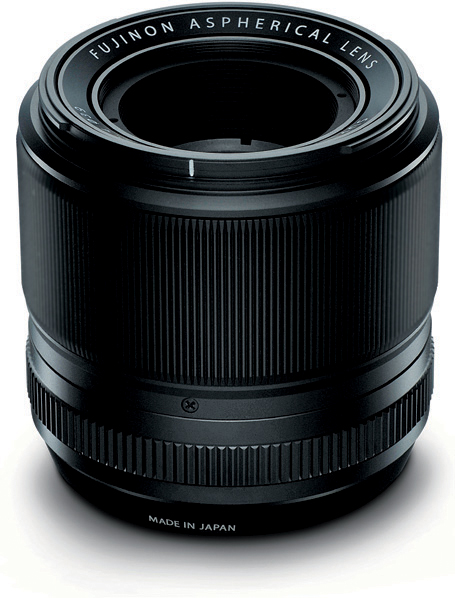
Image 28: The Fujinon XF60mmF2.4 R Macro is the largest of the three basic lenses for the X-Pro1, but it still only weighs just over 200 grams. Since its inner tube extends and retracts when focusing, the lens has only a 39mm diameter filter connection. It comes complete with a sizeable lens hood.
Nevertheless, the 60mm lens is ideal for closeups. Even at its full aperture, it produces sharp and high-resolution images. It is often criticized for its slow autofocus (AF), which can be a hindrance for someone working quickly.
As you may suspect, I also don’t agree entirely with this judgment. I’ve successfully photographed nimble surfers on man-made waves as well as lively butterflies that alight on a blossom for no more than a second or two with this lens. In every instance, the lens acts quickly and precisely. You can learn more about using the AF in section 2.4.
The following photograph shows a closeup from March 26, 2012 taken on the island of Sentosa in Singapore with a 90mm-equivalent focal length. The RAW file was developed with Silkypix 4 and finished with Aperture 3.2. This was a freehand snapshot using autofocus (with the smallest autofocus frame) on the head of a butterfly that landed for a moment on my companion’s hand. The auto DR again opted to shoot at an extended dynamic range of DR400% (see section 2.6 for more on dynamic range).
TIP
To use filters with a 52mm diameter on the XF60mmF2.4 R Macro (which has a 39mm connection), you can purchase a relatively inexpensive 39-to-52mm step-up ring. To be able to attach this ring to the lens, you’ll need to attach a spacer ring with a diameter of 39mm between the lens and the step-up ring. An easy solution for this is to find any old inexpensive 39mm filter from which you can remove the actual filter and just use the ring.
Image 29: Trusting Butterfly: Exposure parameters: X-Pro1 preproduction camera, XF60mmF2.4 R Macro preproduction lens, ISO 800, f/4.5, 1/125 second, automatic white balance.

You should avail yourself of the lens hoods that come with the three lenses as much as possible. They not only shield your optics from unwanted stray light; they also protect them from damage.

Image 30: The included lens hoods belong on your lenses and not in a drawer.
If that’s not enough for you, you can also attach neutral protective filters to your lenses to protect them from damage. Fuji offers such filters for the different X-Mount lens sizes. Keep in mind, however, that every additional lens through which the camera captures an image has the potential to have a negative effect on the image’s quality. For this reason, you should only use a protective filter when you actually need it.
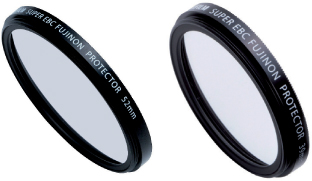
Image 31: FUJIFILM protective filters with 52mm and 39mm thread diameters. The 39mm small filter also lends itself well to function as a spacer ring for a 39-to-52mm step-up ring.
The X-Pro1 doesn’t need other filters, such as the skylight or UV filters that were familiar from the days of film photography.
1.3 SYSTEM FLASH UNITS AND PRACTICAL ACCESSORIES
In contrast to the other current cameras available from FUJIFILM, the X-Pro1 does not include an integrated flash. In principle, you can attach and use any flash unit available on the market to the hot shoe or to an external flash connector (including studio flash units and remote triggers), but the automatic flash exposure metering and flash control features only work with TTL flash units from FUJIFILM (TTL means that light is metered “through the lens”).
As of this writing, Fuji offers three units: the EF-42, EF-20, and EF-X20. The models EF-42 and EF-20 have been around longer and were not specifically designed for use with the X-Pro1 or other cameras in the X series. In fact, these two flash units weren’t developed by FUJI-FILM—they are essentially versions of the models PZ-42X and RD2000 from the Japanese company Sunpak that were manufactured for Fuji.
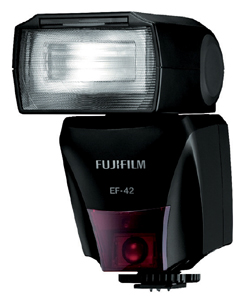
Image 32: The EF-42 is the most powerful and versatile flash in Fuji’s offerings, but its ungainly dimensions and conventional shape don’t fit the X-Pro1 particularly well.
The EF-42 design isn’t ideal for the X-Pro1; it is better suited for bridge cameras such as the X-S1 because of its size. Aside from its powerful performance (its output ranges from a guide number of 24 to 42 depending on focal length), its construction, which enables you to tilt and swivel the lamp, is a real advantage.
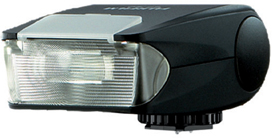
Image 33: The relatively affordable EF-20 is a well-liked and valued compromise of performance, size, and design. It is probably Fuji’s most popular automatic flash.
The EF-20 is considerably more handy than its bigger brother and its design fits much better with the X-Pro1. The flash lamp can be adjusted up and down but not from side to side. With a guide number of 20, this flash unit is well equipped to handle most everyday situations.
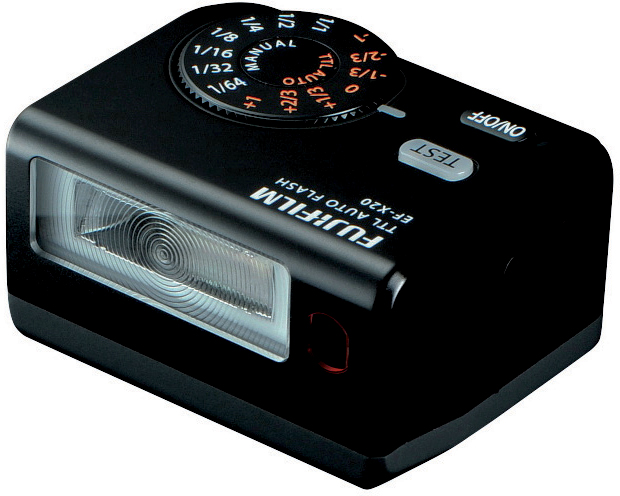
Image 34: The compact EF-X20 was specifically developed for the X-Pro1 and is an ideal hot-shoe flash that can be mounted and removed in a matter of seconds thanks to its quick clasp. It is unfortunately not cheap, and it can’t be pivoted.
The EF-X20 was developed as a retro flash for the X-Pro1, but it works with many other FUJIFILM cameras, including the others in the X series. Its design brings to mind the TLA200 flash for the Contax G2 film camera. The flash’s lamp can neither be turned sideways nor pivoted up and down, which makes this compact shoe-mount flash around half as large as the EF-20 that features a comparable power output. The EF-X20 can also act as a wireless slave flash. When used in this manner, its output setting must be controlled manually—it is triggered optically by the camera’s flash. The slave flash also takes into account any preflash intended to reduce red-eye and ignores it.
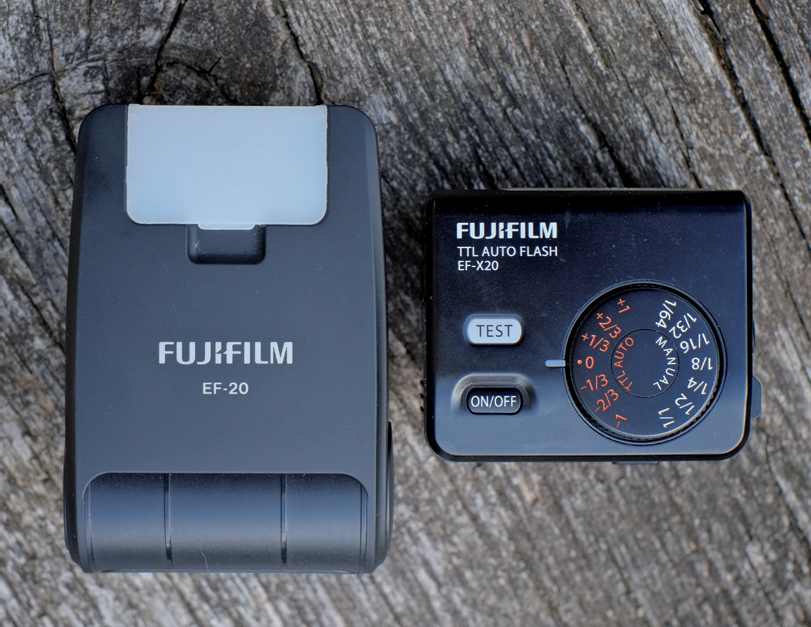
Image 35: The EF-20 and the EF-X20 in a direct comparison of size.
REMOTE FLASH
All three of the FUJIFILM flash units can be used remotely, but Fuji surprisingly doesn’t offer an appropriate cable that would enable the automatic flash exposure metering and control to work when doing so. Canon offers calculated help here in the form of the relatively pricy OC-E3 flash cable, whose contacts are compatible with Fuji’s system.
But be careful: this doesn’t mean that you can shoot in automatic mode using Canon flash guns with the X-Pro1 or other Fuji cameras. Fuji and Canon use compatible hardware contacts but different software protocols.

Image 36: Canon’s OC-E3 TTL flash extension cord with Fuji-compatible contacts.
If you don’t want to spend the money on an original OC-E3 cable from Canon, you can use an inexpensive, compatible knockoff from China, which you should be able to find on the market. Exercise caution, however, and look for decent quality so you don’t end up having problems with your contacts due to unregulated manufacturing tolerances.
I recommend using rechargeable Ni-MH batteries from Sanyo Eneloop for your flash units. These are superior to conventional batteries because of their slow self-discharge, among other reasons.
ADDITIONAL HANDGRIP
The range of bags and cases, lens hoods, protective filters, thumb supports, shutter-release buttons, and various other toys for the X-Pro1 is limitless, but I would like to call your attention to one specific extra accessory: the HG-XPro1 handgrip.
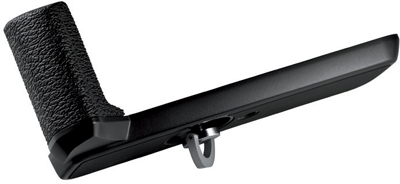
Image 37: Many X-Pro1 users prefer to shoot with the HG-XPro1 handgrip.
Sure, it’s not cheap, it makes the camera somewhat larger, and it covers up the battery chamber cover and the memory card port, but this additional handgrip makes the camera noticeably easier to handle for many users. It also shifts the camera’s tripod mount to be centered on the X-Pro1’s optical axis. Test it out at your retailer of choice!
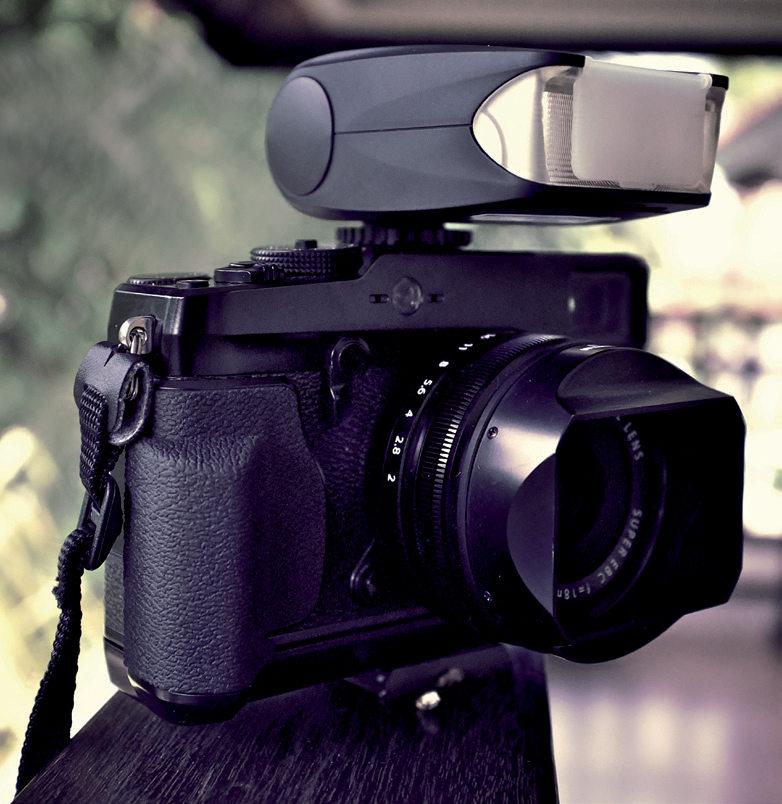
Image 38: The X-Pro1 with the additional handgrip, the EF-20 flash unit, and the 18mm f/2.0 lens.
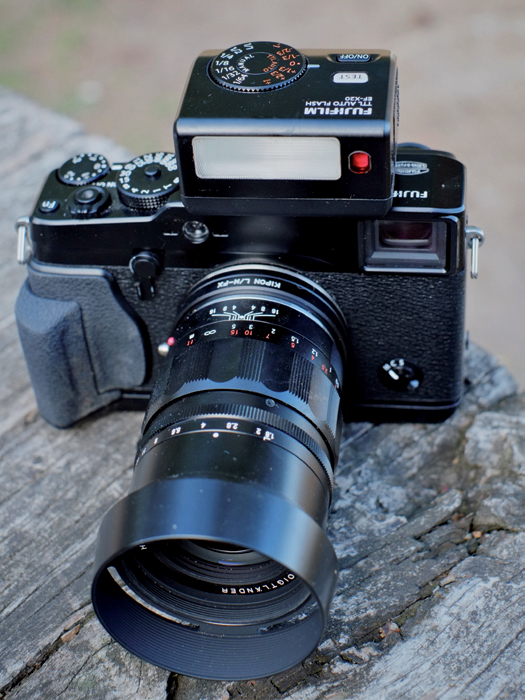
Image 39: The X-Pro1 with the additional handgrip, the EF-X20 flash unit, and an adapted 75mm f/1.8 Voigtländer Heliar lens.