
2.6 EXTENDING THE DYNAMIC RANGE
Does the following scenario sound familiar? You take a picture of a landscape that looks wonderfully beautiful to the naked eye only to find out later that the blue sky no longer looks blue and the fascinating cloud formations are just white blobs. The reason for this and similar disappointments is that the scene captured in the image has a larger dynamic range than the camera.
Every camera sensor is capable of capturing only a certain range of contrast—that is, a limited range between the brightest and the darkest parts of an image. The X-Pro1’s range covers about 9.5 f-stops or exposure values (EVs). In other words, there are 9.5 EV between the minimum amount of light required for the sensor to depict something more than black pixels and the maximum quantity of light beyond which the sensor registers white pixels. This is the dynamic range of the camera. Within this range, the X-Pro1 can depict levels of brightness between pure black and pure white.
Unfortunately the world doesn’t abide by these limits, and many subjects exhibit a larger dynamic range than the X-Pro1 is capable of capturing. We see these limitations, for example, in backlit situations and when people are standing in the shadow of an entrance. Professional photographers (and film directors) reduce the dynamic range of their subjects by using additional light. That’s why you’ll see an entire arsenal of floodlights and reflectors on large film sets even on bright days.
Only the luckiest photographers have the luxury of elaborate lighting equipment. Most of us have to make do with natural lighting, which often produces contrast in our subjects that exceeds a range of 9.5 EV. When you try to photograph these subjects with your X-Pro1, your images will either have blown-out white areas or blocked-up shadows, regardless of the combination of aperture and shutter speed you use. They may even have both! Contrasts that the human eye (or more accurately, the human brain) seems to process without any trouble pose near-impossible challenges for even the best cameras.
This section could end here on a frustrating note, but there are several approaches for dealing with this common problem. I already discussed one solution in section 2.3 under “Metering”: high dynamic range (HDR). With this method, you take several shots of the same subject at different exposure settings. Then you (or your camera) can work to composite this series of exposures into one image, taking the dark areas (shadows) from the overexposed images and the bright areas (highlights) from the underexposed ones.
The X-Pro1 unfortunately does not offer an HDR mode (in contrast to many other cameras and even cell phones), so you will need to patch together your images on your computer using a software program designed for this purpose, such as HDR Efex Pro or Photomatix Pro.
HDR technology doesn’t lend itself to all high-contrast subjects, though. For this reason, many photographers instead opt for a compromise: they base the exposure on the brightest element in their frame and accept the ensuing underexposure in darker areas. While it’s impossible to restore information to blown-out highlights, effective post-processing can generally rescue blocked-up shadows.
This method is called tone mapping, and it consists of a reassignment of brightness values. Tone mapping is the same function as the “fill-light” slider in our modern image-editing programs for external RAW development: it brightens the shadows and dark midtones of images that we consciously exposed too conservatively until the relative levels of brightness throughout the image appear balanced. The drawback of this method is increased image noise in the shadows as well as a reduction of brightness levels in these darker areas. But generally this cost is well worth the gain: you can retain detail in the bright areas of your image that otherwise would be lost.
Extending the dynamic range is actually a method of “dynamic range compression”: when you intentionally underexpose an image (i.e., basing the exposure settings on the brightest part of the frame), the middle and dark tones in the image are shifted further to the left and piled up there on the histogram. The “decompression” happens when you map the tones in your images, bringing the dark and middle tones to lighter and more appropriate levels of brightness. And voilà: the results suggest that you extended your camera’s dynamic range. And technically that’s exactly what happened—admittedly at the expense of a bit more noise and less nuance in the dark areas.
If you go to SHOOTING MENU 1 > DYNAMIC RANGE and select AUTO to switch on the camera’s automatic DR function, the X-Pro1 takes care of this process for you with the following steps:
1. The camera analyzes the subject and determines if its range of contrast exceeds the sensor’s dynamic range.
2. If it does, the X-Pro1 exposes the image one (DR200%) or two (DR400%) f-stops more conservatively than normal in order to retain detail in the bright areas of the image (highlights). This is why it is necessary to have an ISO setting of at least 400 for DR200% and an ISO setting of at least 800 for DR400%.
3. The camera develops the JPEG by remapping the tones in the RAW data that was intentionally exposed too conservatively to bring the shadows and middle tones back to “normal.” In turn, the amplification of the sensor signal is reduced by one (DR200%) or two (DR400%) exposure values.
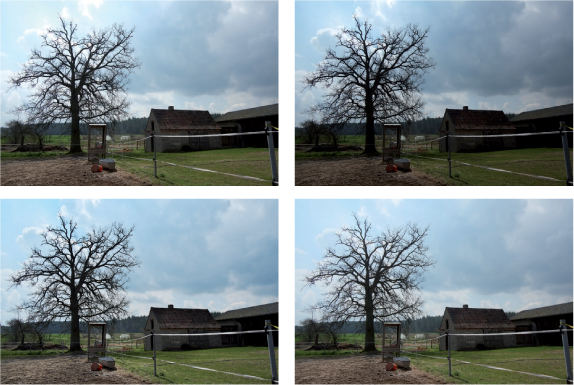
Image 86: Extending the Dynamic Range of the X-Pro1
This example illustrates how to rescue the bright areas of an image (highlights) that are beyond the sensor’s dynamic range. Normally this would require a manual process in which the photographer would purposefully underexpose an image and then make the appropriate adjustments when developing the image in a RAW converter. The X-Pro1’s DR function automates this process.
Figure 1 (left, above) is a JPEG of the test subject taken with the camera’s standard settings (DR100%) and without an extended dynamic range. Here you can see that the shadows and dark midtones are correctly exposed, but the sky has lost its color and the bright parts of the clouds have lost all of their detail. The sensor’s blue channel has been overwhelmed: during the exposure, it was bombarded with more photons than it was capable of absorbing.
Figure 2 (right, above) has been manually underexposed by one aperture stop. The sky and the clouds now look OK—they’ve been “rescued,” because the more conservative exposure meant that less photons hit the sensor and its capacity was sufficient for the bright parts of the image. This also has the effect of making the dark areas of the image look underexposed—and that’s exactly what they are. We’ve shifted the problem from the bright to the dark areas of the image.
Figure 3 (left, below) shows the image after the shadows have been restored. I’ve taken the RAW file for Figure 2 and used Silkypix to edit it, using fill light to conduct tone mapping. The highlights retain their detail, while the shadows now look as they did in Figure 1 (left, above). The dynamic range has effectively been extended.
Figure 4 (right, below) shows the results of allowing the X-Pro1 to rescue the highlights of the image by itself using the DR function. With auto DR activated, the camera selected DR400%, exposed the RAW file two aperture stops (exposure values) dimmer than normal, and remapped the brightness tones appropriately when developing the JPEG file. Measured in exposure values, the X-Pro1’s dynamic range effectively increased from approximately 9.5 EV to 11.5 EV.
Above all, the X-Pro1’s DR function is practical and simple. It automatically handles nontrivial work that photographers would otherwise have to do themselves in order to prevent the loss of detail in bright areas.
For photographers who don’t work with RAW files and instead demand that their camera produce finished JPEGs, the DR function is essential. While the camera can capture images with 12 bits or 4,096 brightness levels, a finished JPEG is in 8-bit format with only 256 brightness levels. An intentionally underexposed JPEG (i.e., an exposure based on highlights) is much more difficult to correct with tone mapping than a RAW file that was exposed in the same manner. In particular, JPEGs may only have a handful of brightness levels available in the darker regions of an image, meaning the tone mapping process of raising and spreading out these levels can lead to undesirable results.
For JPEG photographers, the DR function is a real advantage, because when the camera conducts the dynamic compression and decompression by itself, it works with the RAW data captured by the sensor—all 4,096 brightness levels. Only after the X-Pro1 maps the tones does it convert the image to 8-bit format and produce a JPEG with 256 brightness levels.
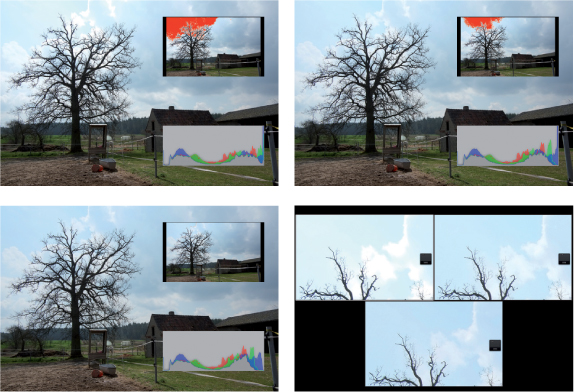
Image 87: The X-Pro1’s DR Function in Action
The three JPEGs here illustrate the effect of the DR function on a high-contrast subject. At the top left is the baseline image with the extended DR disabled (DR100%). Next to this image, on the right, is the result of shooting in DR200%, and at the bottom left, DR400%. You can see how the piled-up highlights at the right edge of the histogram are rescued from one image to the next—something you can also tell by the successively decreasing size of the red area indicating an exposure warning. The details in the image at the bottom right clearly illustrate the process’s positive effect on the image’s highlights—in this example, the sky and clouds.
QUESTIONS AND ANSWERS ABOUT THE DR FUNCTION
The DR function unfortunately tends to lead to some confusion. That’s why I’ve included a few of the most common questions and my attempts to answer them.
When should I use the dynamic range function?
The DR function is ideal for circumstances in which the subject of an image exhibits a larger range of contrast than the camera sensor is capable of capturing. When AUTO is set for the DR function, the camera will extend the dynamic range as needed based on the detected range of contrast in the subject. It will choose either DR200% (an extension of the dynamic range by one exposure value) or DR400% (an extension by two exposure values). You can alternatively select both of these options manually. The automatic function tends to operate rather liberally—it often selects a higher DR setting than is actually necessary.
Why shouldn’t I always leave DR200% or DR400% active?
The DR function is a compromise: it extends the dynamic range at the cost of a bit more noise and a reduced tonal range in the shadow areas of your images. You should only turn it on when the benefits outweigh the costs and when you really need an extended range.
How can I tell if the range of contrast in my subject will overwhelm the camera’s sensor?
If you see cropped mountains piled up at the right edge of the histogram, it’s a good indication that the bright parts of your image will lose their detail. If those parts of the frame are important to your image, you should attempt to rescue them—either by purposefully underexposing the shot (perhaps with the help of the exposure compensation dial) and then mapping the tones when developing the RAW file or by entrusting this work to the camera by availing yourself of the DR function.
What is meant by “important parts of an image”?
Sometimes you want to intentionally play with extreme contrasts or allow portions of your image to be blown out. In these cases, you shouldn’t rely on the camera’s automatic dynamic range extension. The camera is “unthinking” and doesn’t know what makes for a good image. It simply measures the exposure mechanically and uses this value to make its decisions. Don’t let the camera dictate what your images look like; create them yourself! If you want a stark contrast, set the camera to DR100% and expose the image according to the elements in your image that are important to you.
How do the DR function and the ISO value mesh together?
For the camera to underexpose the RAW file by 1 EV (DR200%) or 2 EV (DR400%), it must also use ISO settings of at least 400 or 800, respectively. Normally when these ISO settings are used, the camera amplifies the sensor signal. This boost is left out, however, when the DR function is enabled. In its place, the process of tone mapping must be used in the development of the RAW file. So make sure you set your camera to at least ISO 400 or 800—or better yet, to AUTO (800) or higher.
If you manually program an ISO value that won’t work with the selected DR setting, the camera will automatically bring the DR setting down. If you have set the dynamic range to DR400% and the ISO to 400, for example, the camera will adjust the dynamic range setting down to DR200%. If you were to set ISO 200, it would go to DR100%. When this happens, the DR setting appears yellow and remains so until you bump up the ISO to an operative level. In other words, your manually selected ISO value has priority over the DR setting. But the DR settings do have priority over automatically selected ISO values. This is why I recommend that you use the DR function in tandem with AUTO (800) or higher.
How does the DR function affect RAW files?
It should be clear by now that the DR function can help produce attractive JPEGs for high-contrast subjects. But what about RAW files? The image data in these files are underexposed by one exposure value with DR200% and two exposure values with DR400%. If you develop your RAW files with your camera, the X-Pro1 will compensate for this condition automatically. If you use external RAW converters, it depends on the specific program: Silkypix as well as Lightroom, or more specifically Adobe Camera RAW (ACR), also automatically detect the DR function and adjust the exposure settings accordingly. The results will vary from those produced by the camera, which isn’t to say that one is better than the other. With RAW converters, you also have the opportunity to tackle the task yourself and manage the editing based on your specific preferences.
Should I use the DR function if I plan on working with the RAW files?
This is a tricky one, because the answer depends on your personal habits. If you plan to exclusively use RAWs and you don’t plan on using the JPEGs prepared by the camera at all, then I recommend not using the DR function (i.e., set it to DR100%). Instead, use the live histogram to monitor your exposure levels while shooting and to make sure that no important elements in your image are crammed up against its right border. The benefits of this manual method are that your work can be more precise than the camera’s automatic methods and you can control the tone mapping with all of your personal tricks and preferences in an external RAW converter.
Conversely, if you are interested in the camera’s JPEGs (keyword: “Fuji colors”), you’ll want to enable the DR function to make them as attractive as possible. The RAW files will then be exposed one or two exposure values more conservatively. Silkypix (including the free version of RAW File Converter EX) and Lightroom/ACR can balance this underexposure automatically when reading the RAW files.
You can undoubtedly underexpose your images much more precisely in manual mode than the X-Pro1 can on its own. The automatic procedure is limited to crude steps of 1 EV and 2 EV. Experienced RAW shooters who prefer to have as much control over the photographic process as possible generally turn the automatic dynamic range off (DR100%).
What do I personally do? It depends on the day and my intentions for my images. In most cases, the negative effects on quality that the automatic DR function causes are insignificant for the size of images that I work with. If I want to squeeze every last drop of quality out of my camera and sensor, however, then I work exclusively with an external RAW workflow, shoot at DR100%, and expose as precisely as possible.
IMPORTANT
The X-Pro1’s live histogram always works independent of any settings for the DR function and is not influenced by the dynamic range. Please remember to only rely on the live histogram when using DR100%.

This image was shot at DR400%, developed from the RAW file with Silkypix 4, and polished with Apple Aperture. Exposure parameters: XF35mmF1.4 R, DR400%, ISO 800, f/14, 1/400 second.
TIPS FOR HANDLING THE DR FUNCTION
There are four ways to change the DR settings of your camera:
• Go to SHOOTING MENU 1 > DYNAMIC RANGE, where you can select from AUTO, DR100%, DR200%, or DR400%. If AUTO is selected, the camera will choose from the three other options: DR100% turns the dynamic range off; DR200% extends the dynamic range by one exposure value; DR400%, by two exposure values.
• Press the Q button and select the dynamic range directly from the Quick Menu.
• DR function is one of the variables that you can save in your custom shooting profiles. Therefore you can indirectly adjust the DR settings by choosing a different shooting profile. As a reminder, you can select or edit these profiles by pressing the Q button until the desired menu comes up on the camera’s display.
• Assign the Fn button to control the DR setting. Remember, to change the purpose of the Fn button, hold it down until the menu for assigning its function pops up.
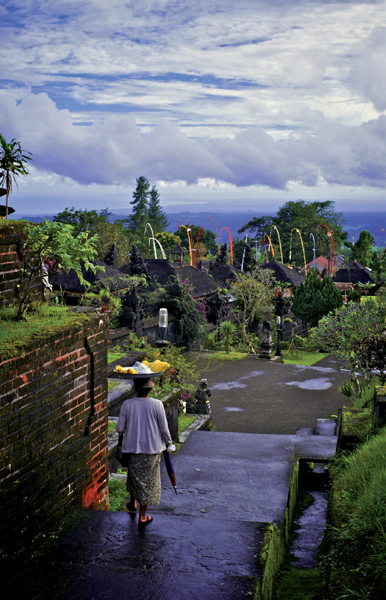
Exposure parameters: XF35mmF1.4 R, DR400%, ISO 800, f/13, 1/400 second. Developed from the RAW file with Silkypix 4; finished with Aperture.
Remember that DR200% will only be available if your ISO is set to at least 400, and for DR400% the minimum ISO is 800. For this reason, I recommend selecting AUTO (800) or higher for the ISO when you plan to use the DR function.
The camera prioritizes your manually defined ISO values over the DR. When using the variable auto ISO feature, the camera can and will adjust the ISO to the level needed for the DR function to work properly.
Which DR setting should you use? Pay attention to the live histogram. If there are cropped peaks crammed in at the right side of the histogram, you have areas in your image frame that are overexposed. If this is something you don’t want, then definitely use the DR function—either DR200% or DR400%, based on the contrast range of your subject. When in doubt, opt for AUTO and leave the decision making up to the camera.
DR BRACKETING
If you would like to see three different dynamic range versions of the same subject, press the DRIVE button and select DYNAMIC RANGE BKT. The X-Pro1 will then capture three images when you press the shutter-release button: one at DR100%, DR200%, and DR400%.
The drawback of this method is that the camera only writes JPEGs to the memory card—it doesn’t save any RAW files. Moreover, the JPEGs will only be captured at the lowest possible ISO setting (i.e., the best possible quality) if you’ve turned on auto ISO. For photographers who value RAW files, this function doesn’t have much to offer. In any case, it’s useful to test how the three different DR settings look with different subjects. You can get the same effect by exposing an image at DR400% and then developing the RAW file with the internal RAW converter into two more versions: one at DR200% and one at DR100%. To use the RAW converter, go to PLAYBACK MENU 1 > RAW CONVERSION.

The X-Pro1’s internal RAW converter developed this JPEG, which (aside from cropping) is unedited. Exposure parameters: XF60mmF2.4 R Macro, DR400%, ISO 800, f/4, 1/800 second. JPEG conversion parameters that deviate from the default settings: white balance 5300K, Push/Pull processing +1/3 EV, film simulation PRO Neg. Hi, color m-high, sharpness m-hard, shadow tone m-hard, noise reduction m-low.
2.7 WHITE BALANCE AND JPEG SETTINGS
The X-Pro1 offers a practical feature regarding white balance, film simulation, contrast settings, color saturation, image sharpness, noise reduction, and the selection of a color space: not only can you define these settings before you capture an image; you can also change them afterward! The only requirement is that you must save the RAW file in addition to the JPEG so the X-Pro1’s internal RAW converter has something to work with. This is another reason to choose SHOOTING MENU 1 > IMAGE QUALITY > FINE+RAW as your default image quality setting.
This is great news for photographers who are interested in getting finished JPEGs from their X-Pro1. Instead of agonizing over the perfect settings before every exposure—the X-Pro1 offers more than 33 billion(!) combinations of settings for converting a RAW file to a JPEG—you can concentrate on your subject, the focus, and the actual exposure while shooting. You can try out different variations to optimize your images with the aforementioned parameters later. That sounds like exciting and stress-free photography to me.
White balance and the various JPEG settings control how the camera interprets the RAW data collected during an exposure. The RAW file—the digital negative—remains unchanged during this conversion process. This section focuses on settings that can influence the “prints” that the camera develops from these negatives. It also explains how the X-Pro1 can continue to make new and different JPEGs from the same RAW files, just as you can with real negatives. In fact, you could produce more than 33 billion JPEGs from a single exposure that would differ in at least one setting.
SETTING THE WHITE BALANCE
Light exhibits certain color temperatures that give objects a hue. Without taking a proper white balance, a gray object shown in a warm light (e.g., an incandescent bulb) will appear orange and in a cold light (e.g., a camera flash), bluish. The color of the object itself is actually neither orange nor blue—it’s plain gray.
To ensure that gray objects appear gray in all lighting conditions, the camera needs to measure the color temperature of the light for each exposure and compensate for any detectable hues. The camera does this not only automatically, but very precisely and with remarkably few errors.
Some problems arise for the automatic white balance when a scene features multiple light sources, each producing a different color temperature. Which color temperature should the camera use as the baseline in such a case? It has no choice but to settle on a compromise—one that likely won’t work for every situation and won’t satisfy every viewer.
This isn’t the end of the world, though, because you always have the option of adjusting the white balance—even afterward—using the internal RAW converter or a software program on your PC.
To change the X-Pro1’s white balance, go to SHOOTING MENU 2 > WHITE BALANCE and choose from the menu options there. As is the case with the DR function and the ISO setting, you can also set the white balance by accessing the Quick Menu (Q button), by changing the custom shooting profile, or by programming the Fn button accordingly.
Any setting you select from the WHITE BALANCE shooting menu will apply only to the JPEGs that the camera produces, so it won’t affect the data of the RAW files. The white balance is, however, stored in the so-called metadata of the RAW file, so that a RAW converter can detect how the camera (or photographer) set the white balance at the time of exposure. When developing the RAW file later, the RAW converter will start with the stored white balance information as a baseline.
HINT
As with most settings that affect how the JPEGs are produced, the effect of your white balance setting will be visible in the live image displayed on the camera’s LCD monitor or in the electronic viewfinder. This practical benefit means you won’t have to make a complete stab in the dark when choosing the white balance—you can get a rough impression of how your selection or adjustments to the white balance (or any other JPEG settings) will affect your shot.
AUTOMATIC WHITE BALANCE
The default setting for the white balance is SHOOTING MENU 2 > WHITE BALANCE > AUTO. With this option set, the camera will measure the ambient color temperature automatically before each exposure and adjust itself accordingly. This process functions so well that many of you will rarely use a setting other than AUTO—especially because you can continue to make additional changes and adjustments to the RAW file afterward.

Image 91: Automatic White Balance: The X-Pro1’s default white balance setting delivers excellent results even in complex lighting conditions. This example image featured a blend of natural light from the right as well as artificial light from the upper left. The JPEG you see here came directly from the camera—it didn’t receive any post-processing at all.
WHITE BALANCE PRESETS
When you plan to shoot a series of exposures under constant lighting conditions (e.g., sunny or overcast skies), it can be practical to use an appropriate preset. This reduces the chance of misinterpreting the color temperature. It also ensures that different JPEGs in the series will be exposed with the exact same (predefined) color temperature setting.
The following seven presets are available in the WHITE BALANCE menu:
• DIRECT SUNLIGHT: for subjects in sunlight
• SHADE: for subjects in shadows
• DAYLIGHT FLOURESCENT: for exposures under “daylight” fluorescents
• WARM WHITE FLOURESCENT: for warm white light
• COOL WHITE FLOURESCENT: for cool white light
• INCANDESCENT: for use with traditional incandescent bulbs
• UNDERWATER: for underwater exposures or pictures of fish in large aquarium tanks and oceanariums

Image 92: White Balance Presets:
This illustration shows the same exposure with two different white balance settings: the left shows the image with the automatic white balance (AUTO) and the right shows what the SHADE preset looks like. The camera-selected setting may produce a more realistic result, but some viewers would find the warmer feel more attractive. These JPEGs are also directly from the camera’s internal RAW converter without any post-processing treatment.
MANUAL WHITE BALANCE
With the X-Pro1 you are able to measure the current color temperature on your own, or if it is already known, you may directly enter the value in Kelvin (K).
The X-Pro1 also allows you to measure the ambient color temperature manually or—if known—to directly input a value in Kelvin (K).
To measure color temperature yourself, go to SHOOTING MENU 2 > WHITE BALANCE > CUSTOM WHITE BALANCE and point the camera at a neutral white or gray object. Then press the shutter-release button all the way. If the measurement is successful, the message COMPLETED! will appear on the display and you can then use the OK button to confirm. If you see UNDER! or OVER! displayed on the monitor, first adjust the exposure and then try again.
The ideal neutral object for measuring white balance is a gray card, which you can buy in most photography stores. You can also get by with other color-neutral objects; just make sure that whatever you use is uniformly illuminated and not reflective. Get very close to whichever object you choose, because the camera does not need to focus on the object it uses to measure white balance.
By selecting SHOOTING MENU 2 > WHITE BALANCE > COLOR TEMPERATURE, you can set your desired color temperature directly in Kelvin (K). This menu offers a list of values between 2,500K and 10,000K. After you have highlighted your choice, press the OK button to select it.
This feature is particularly useful when you’re shooting in a studio and already know the color temperature of your light. It is also practical when you want to create a distinctive warm or cold look in your JPEGs (by selecting a higher or lower color temperature setting than the actual environs, respectively).
The X-Pro1 shows particular promise with infrared photography (as does the X100)—for example, in combination with an R72 infrared filter (e.g., from Hoya) that can be screwed onto the lens. For this purpose, use the lowest possible color temperature setting of 2500K for reasonably usable JPEGs and as a basis for external RAW development later.

WHITE BALANCE COLOR SHIFT
After you set the white balance in shooting mode, the display offers yet another option called WB SHIFT. This feature allows you to alter the coloration of your JPEGs along the horizontal green-red axis and the vertical yellow-blue axis by using the selector keys. You’ll be able to see the results of these adjustments on the LCD display or in the EVF.
You can set an additional color shift with every possible white balance option (AUTO, all the presets, and both manual methods). The camera remembers this setting individually for each white balance option.
You can also apply a white balance shift (along with any other white balance settings) after you capture your image, when you develop your RAW files. Select the image you are interested in from the playback menu and then choose PLAYBACK MENU 1 > RAW CONVERSION > WB SHIFT.

Image 93: White Balance Color Shift:
You can alter the look of your JPEGs even after you expose them by programming the X-Pro1’s internal RAW converter in various ways, including adjusting the white balance to cause a shift in color. To do this, use the selector keys to move the white dot around the color coordinate grid. The grid here illustrates a color shift of five steps in the direction of red and blue (R 5, B 5). The two sample images demonstrate the actual results of a shift in the white balance: in the middle, you can see an exposure taken with standard settings, and below you can see the effect of shifting the color two steps toward red and yellow (R 2, B —2). I also changed the film simulation from Provia to Astia and adjusted the color saturation to m-high and the highlight tone to m-hard.
FILM SIMULATION
If you recall the days of film photography, you’ll remember that different films often produce different results. A roll of Fujichrome Velvia 50 slide film is miles apart from Fujicolor Pro 160C in terms of colors, saturation, and contrast.
Digital cameras, on the other hand, only have one sensor, which doesn’t vary in character. FUJIFILM, however, offers various film simulations so that you can bring the look of analog color films into the world of digital photography. You can set these either in the shooting menu or when using the RAW converter in the playback menu. Alternatively, you can change the film simulation by accessing the Quick Menu, changing the custom shooting profile, or programming the Fn button accordingly.
In addition to the five color film choices, the X-Pro1 is able to create sepia as well as black-and-white digital images with various virtual color filters (red, yellow, green, neutral).
COLOR FILMS
The X-Pro1 allows you to choose from three slide films (PROVIA, ASTIA, VELVIA) and two color negative films (PRO NEG. STD and PRO NEG. HI).
• PROVIA exhibits the weakest contrast and is the most neutral of the film simulations. It’s also the camera’s default setting. Its color saturation is understated and therefore sometimes appears “flat.”
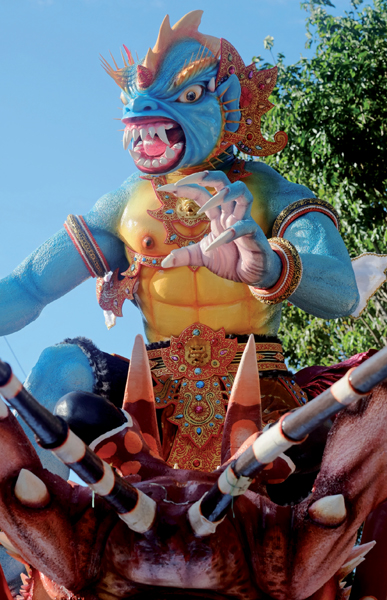
Image 94: Film Simulation ASTIA: This JPEG of the Ogoh-Ogoh festival in Bali was developed internally by the X-Pro1. Exposure parameters: XF60mmF2.4 R Macro, DR200%, ISO 400, f/7.1, 1/420 second. Development settings: film simulation ASTIA, color high, sharpness m-hard, highlight tone m-soft, shadow tone hard, noise reduction m-low.
• ASTIA offers softer looking highlights and noticeably more contrast in the shadows than Provia. The colors are more lively and produce the typical look of “Fuji Colors” with pleasant skin tones. Astia is one of the most popular film simulations among photographers.
• VELVIA delivers very saturated and striking colors with stronger contrast yet. This option is less suited for portraiture but is great for nature and landscape photography.
• PRO NEG. STD is an excellent choice for neutral portraits, because it exhibits soft contrast, modest color saturation, and excellent skin tones. This is a logical choice for situations with controlled light, such as in a studio.
• PRO NEG. HI is the contrast-rich version of PRO Neg. Std, with stronger colors and more pep. The strength of this setting is also in accurate and attractive skin tones.
Remember that the selected film simulation affects the live image display when in shooting mode. It also affects the live histogram in the EVF or on the LCD monitor. This applies to all other JPEG settings described in this chapter too. The viewfinder, monitor, and histogram all reflect your current JPEG settings. Independent of the settings you use when you expose an image, you can also adjust the JPEG parameters afterward in playback mode by using the RAW converter—as long as you save the RAW file.

Image 95: Simulation of Color Slide Film: The digital film simulations are not intended to imitate the traditional analog films of Provia, Astia, and Velvia exactly. They rather take distinguishing characteristics from their namesakes: Provia (above) is a good all-around choice and functions as the camera’s default setting. Astia (middle) has a bit more pep and delivers subtle highlights. Velvia (below) delivers striking—sometimes exaggerated—colors and harsh transitions at the highlights. You can find larger versions of these illustrations at: ![]() www.dpunkt.de/XPro1/Abbildungen
www.dpunkt.de/XPro1/Abbildungen
After white balance, the selection of a film simulation will have the greatest effect on the look of your image. Before you devote any thought to the contrast or color settings of your image, you’ll want to decide on a film simulation, and then make the other JPEG settings accordingly.

Image 96: Comparing Color Slide and Color Negative Simulations (1): For portraits and other shots of people, it’s generally desirable to have an accurate and attractive reproduction of skin tones. The color negative simulations PRO Neg. Std (below left) and PRO Neg. Hi (below right) excel at exactly this quality. In the top row, you can see the comparison of the slide film simulations Provia (left) and Astia (right). In theory, all four of these simulations are designed for portraits. Provia and PRO Neg. Std have more neutral colors and softer contrast, however, while Astia and PRO Neg. Hi bump up the contrast and color saturation. Velvia isn’t represented in this comparison because it’s not particularly well suited for this type of subject. You can find larger versions of these illustrations at: ![]() www.dpunkt.de/XPro1/Abbildungen
www.dpunkt.de/XPro1/Abbildungen
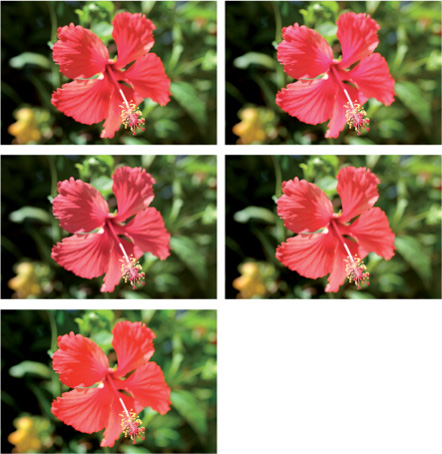
Image 97: Comparing Color Slide and Color Negative Simulations (2):
Provia (top left) exhibits a conventional and realistic look. Astia (top right) is bolder and leans toward purple a bit. PRO Neg. Std (middle left) is generally unsaturated and stays away from bright colors. PRO Neg. Hi (middle right) is a bit more daring in this regard, but less so than the three slide film simulations. As expected, Velvia (bottom left) takes the cake here—its colors almost appear overloaded. Again, you can find larger versions of these and many of the following illustrations at:![]() www.dpunkt.de/XPro1/Abbildungen
www.dpunkt.de/XPro1/Abbildungen
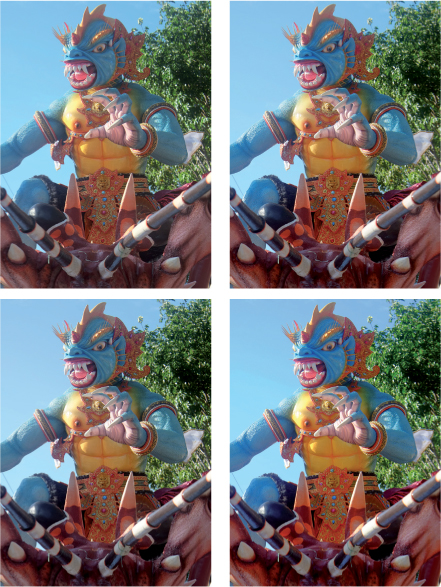
Image 98: Comparing Color Slide and Color Negative Simulations (3):
Provia (top left) looks a little flat and colorless with this subject. Astia (top right) pulls back the veil somewhat and delivers a bit more pep. PRO Neg. Hi (bottom left) is an alternative to Astia; however, here you would probably need to increase the color saturation. With Velvia (bottom right) that is altogether unnecessary. PRO Neg. Std isn’t shown in this comparison, because while it is excellent for studio work, it’s less ideal for a subject like this.
BLACK-AND-WHITE CONVERSION
In addition to the five color film modes, the X-Pro1 can produce black-and-white JPEGs. You can create conventional black-and-white images or pair them with virtual color filters (when shooting black-and-white images with film you’d have to screw these filters to the end of the lens). Conventional conversions of color tones to gray values based on their luminosity (brightness) often produce boring results. A pronounced contrast between a dark red and a dark blue area in the original image could quickly become a gray mush with an unfiltered black-and-white conversion.
Color filters are used in black-and-white photography to retain these pronounced contrasts of color during the conversion process. A red filter darkens a blue sky so that it will appear dark gray or nearly black in contrast to the bright white clouds. Without this filter, you would end up with bright gray clouds on a bright gray sky. The X-Pro1 simulates this effect by running the RAW file (which is always in color) through a virtual color filter when it develops a JPEG. You have five black-and-white options available:
• MONOCHROME executes a conventional black-and-white conversion of the color RAW file.
• MONOCHROME + Ye FILTER produces a general boost in contrast for many subjects and is accordingly a good compromise.
• MONOCHROME + R FILTER darkens blue tones (e.g., a blue sky) and brightens faces and red lips.
• MONOCHROME + G FILTER differentiates green tones in images of natural settings, darkens faces and red lips, and emphasizes any blemishes of the skin.
• SEPIA tints the black-and-white conversion with sepia, giving the image an antiquated feel.

Image 99: Using Filters with Black-and-White Conversions:
The conventional MONOCHROME conversion (top left) is markedly different from a conversion that employed the G FILTER (top right): the filter darkened the red petals drastically. The Ye FILTER (middle left) produced a general increase in contrast, and the R FILTER (middle right) brightened up the naturally red blossom. The SEPIA (bottom left) conversion recalls the early days of film photography, and on the bottom right you can see the color source for these conversions, depicted with the Provia film simulation.
Unlike the color film simulations, the black-and-white conversions do not have the unique contrast curves typical of film. The conversion tends to be much more flat and unobtrusive so that the black-and-white images produced by the camera can still withstand a manual contrast adjustment on your PC.

Image 100: Manual Contrast Enhancement in Black-and-White Conversions: The X-Pro1 converted the JPEG here with the MONOCHROME + R FILTER. I then edited the image in Apple Aperture 3 by applying a contrast curve typical for black-and-white film.
The X-Pro1 is not a black-and-white camera. As with nearly every other digital camera, it captures subjects in color, saves this data as color RAW files, and then later develops the images in black-and-white during the RAW conversion. Along with the usual suspects of Adobe Lightroom, Adobe Photoshop, and Apple Aperture, there are also highly specialized programs such as NIK Silver Efex Pro and Topaz BW Effects that offer many more possibilities than the X-Pro1’s comparatively rudimentary internal black-and-white options.
Nevertheless, it can still be useful for experienced black-and-white photographers to use the black-and-white film simulation mode. If nothing else, it will provide you with a preview image in the EVF and on the LCD monitor that can inform your later decisions and methods. In addition, it can be useful to save the JPEG produced by the camera as a reference when executing the external RAW conversion.
You lose nothing by switching your camera into black-and-white mode, because at any time you can always go in and reconvert the RAW data files into color versions with one of the five color film simulations.
FILM SIMULATION BRACKETING
If you would like to get a quick overview of what the different film simulations would look like with a given subject, you can press the DRIVE button and select the option FILM SIMULATION BKT. When this feature is active, the camera will produce three JPEGs each time you release the shutter. You can control which three simulations the camera uses by going to SHOOTING MENU 1 > FILM SIMULATION BKT.
In principle this is a practical option for anyone who can’t decide which simulation to use, or who would like to have more than one result from which to choose. However, the camera does not save any RAW files when this mode is activated. Selecting this option means foregoing the opportunity to develop and optimize your exposures again later with either the internal or an external RAW converter.
For this reason, I recommend that you generally avoid this mode and instead shoot with the FINE+RAW image quality setting so you will always have access to the RAW files. Snap your exposures with the film simulation that you are most likely to prefer—then, if needed, use the internal RAW converter to produces alternate options (PLAYBACK MENU 1 > RAW CONVERSION).
COLOR
The color setting allows you to control the color saturation of your JPEGs. The intensity of the colors can be either dialed up or toned down. To do this, go to SHOOTING MENU 2 > COLOR and select one of the five available levels from (—2) LOW to (+2) HIGH.
As with most other JPEG settings, you can change the COLOR setting by pressing the Q button or switching the custom shooting profile. This setting cannot be assigned to the Fn button, however.
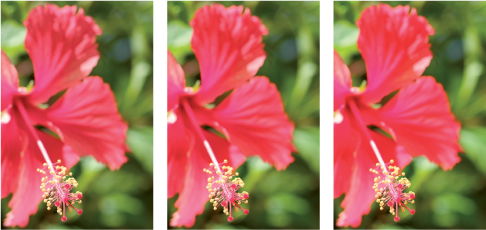
Image 101: Color Saturation: The JPEG setting COLOR regulates the intensity of color reproduction. The setting you choose works in combination with the color profile for whichever film simulation you are using. Using Provia in combination with (+2) HIGH for the COLOR still produces less saturated colors than Velvia does with a neutral COLOR setting. This illustration shows the film simulation Astia at three different color levels: COLOR (—2) LOW (left); COLOR (0) STANDARD (middle); and COLOR (+2) HIGH (right).
The color setting—as with most other JPEG settings—is really something you don’t need to think about until after your exposure. With the help of the internal RAW converter (PLAYBACK MENU 1 > RAW CONVERSION) you can increase or decrease the saturation as needed. Finally, color is a matter of taste, but you should make sure that dialing up the color saturation doesn’t result in an overflow of a particular color channel (and the ensuing loss of tone values).
CONTRAST
Every image has three rough areas of tonal values: shadows, midtones, and highlights. When you increase the brightness of the highlights while decreasing the brightness of the shadows, you are increasing the contrast of the exposure.
When working in an image-editing program you can adjust the contrast control or apply an appropriate gradation curve to achieve this effect. Image 100 illustrates an example of such a curve, which was used to optimize the contrast of a black-and-white JPEG produced internally by the camera.
CONTROLLING THE HIGHLIGHTS
By going to SHOOTING MENU 2 > HIGHLIGHT TONE you can control the areas of bright tonal values in your images. Here also you have five levels at your disposal, ranging from (—2) SOFT to (+2) HARD. You can also adjust this setting by opening up the Quick Menu (Q button) or changing the custom shooting profile.
Settings on the SOFT side will darken your highlights and settings on the HARD side will brighten them. STANDARD produces a neutral result.
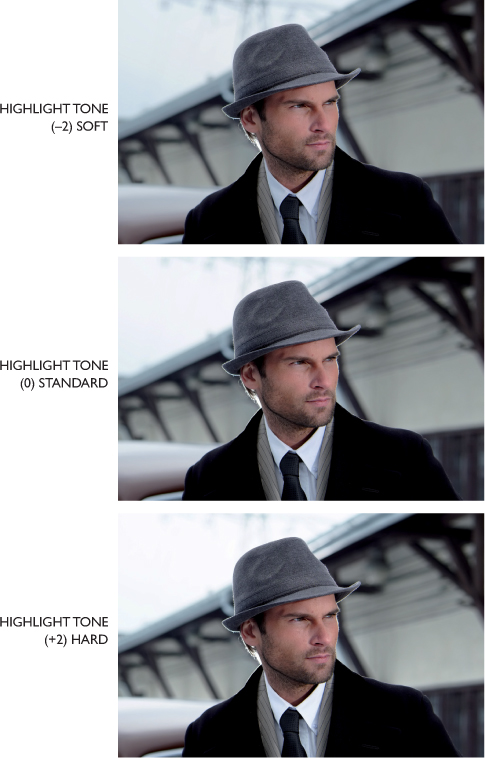
Image 102: The HIGHLIGHT TONE Setting:
This contrast setting regulates the reproduction in the bright areas of your images: SOFT darkens the highlights, STANDARD keeps their normal brightness, and HARD makes them even brighter. In this illustration, you can see the effect of the highlight tone setting clearly on the roof of the car, on the bright collar of the shirt, and in the sky. As you can see, you should adjust this setting with caution. Increasing the contrast too much can cause the highlights to blow out, resulting in a loss of image detail. Conversely, images for which the contrast is too soft appear unattractively flat. As with other settings, it’s best to adjust the highlight tone with the internal RAW converter afterward to try out different options.
CONTROLLING THE SHADOWS
The counterparts to the highlights in an image can be controlled by going to SHOOTING MENU 2 > SHADOW TONE. This setting controls the contrast in the dark parts of your images. Here too five levels are available, from (—2) SOFT to (+2) HARD. Adjusting your image with values on the SOFT end of the scale will result in brighter shadows, and values on the HARD side will result in darker shadows. You can also change this setting by pressing the Q button or changing the shooting profile.

Image 103: The SHADOW TONE Setting:
This setting controls the reproduction of shadows when the X-Pro1 produces JPEG files. SOFT brightens the shadows and HARD darkens them. This effect can be seen clearly in the overcoat depicted in this photo. The coat’s different levels of brightness are much easier to see when the shadow tone is set to SOFT. The coat and the tie are blocked up when the shadow tone is set to HARD. This again is a reason to err on the side of setting this parameter conservatively to avoid the unwanted loss of tonal values.
Being able to regulate the highlights and the shadows separately gives you more flexibility than a conventional contrast control does. You can, for example, brighten the dark areas of an image without blowing out the highlights.
You can also use these contrast controls to simulate a traditional contrast control by adjusting the highlights and shadows in the same direction. Setting the tonal values in both areas to SOFT, for example, will reduce the contrast in your image, and setting them both to HARD will increase it.
Since these contrast settings greatly affect the appearance of your images, it’s generally best to play it safe and avoid the extreme settings when exposing your image. You can always experiment with less conservative settings afterward by using the internal RAW converter to redevelop your images.
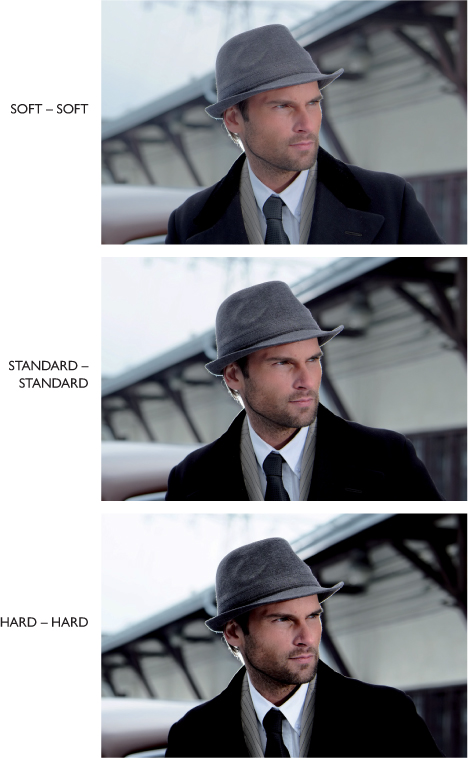
Image 104: Traditional Contrast Control:
By adjusting the highlight tone and shadow tone in parallel, you can adjust the contrast of your exposures by conventional means. To do this, simply set the parameters identically for both areas of tonal values. The illustration shows the same exposure three times, with both the shadow and highlight tone set at SOFT, then at STANDARD, and finally at HARD.
SHARPNESS
If you ask a layperson whether he or she prefers images that are more sharp or less sharp, the answer is likely to be, “more sharp, of course!” In regard to image sharpness, or better yet, the resharpening of an image, though, the answer isn’t so simple.
Resharpening an image actually makes it easier to discern detail. The details are accentuated and thus sharper. At the same time, however, the process causes the smallest details to be lost. This is why it’s best to apply the sharpness setting in a measured fashion. Fortunately, this setting is available when using the internal RAW converter, so you can try out several different settings and choose the best after capturing your image.
In addition to bringing up the sharpness options when using the RAW converter, you can also do so by going to SHOOTING MENU 2 > SHARPNESS when in the shooting mode. The camera again offers five steps of intensity, ranging from (—2) SOFT to (+2) HARD. You can also open the menu to adjust the sharpness with the Q button or program varying sharpness levels into the different custom shooting profiles.

This illustration demonstrates the effect of the SHARPNESS setting, when programmed to SOFT, STANDARD, and HARD. With increasing hardness, the setting accentuates the contours of individual details, thereby giving the impression of a greater overall sharpness.
Different contrast settings can often give the impression of increased (or decreased) image sharpness. The stronger the contrast, the stronger the subjective impression of sharpness. A popular method of achieving this effect is to increase the microcontrast in the midtones of an image. The much-loved “clarity” slider in Adobe Lightroom is capable of doing this. Many photographers like to set their sharpness to a softer level, preferring to adjust it on their PC, perhaps by using an unsharp masking filter or a specific software program such as NIK RAW Sharpener Pro. The truth is, you can resharpen an image at any time—but it’s much more difficult to remove sharpness after the fact without sacrificing detail.
NOISE REDUCTION
Image noise most commonly arises when using very high ISO values. One way to keep image noise in check is by using the noise reduction function when converting your JPEGs. This method has a catch, though: the stronger you apply this setting, the more image details are lost. Applying noise reduction is a balance of retaining details while doing away with visual interference.
The X-Pro1 excels at this function, and SHOOTING MENU 2 > NOISE REDUCTION offers five different settings—ranging again from (—2) LOW to (+2) HIGH—to help you strike the optimal balance. This is another instance when you should delay worrying about the perfect setting until after you’ve exposed your image and are ready to process it with the camera’s internal RAW converter.
As with most of the other JPEG parameters, you can define the noise reduction setting in the Quick Menu as well as in the custom shooting profiles.
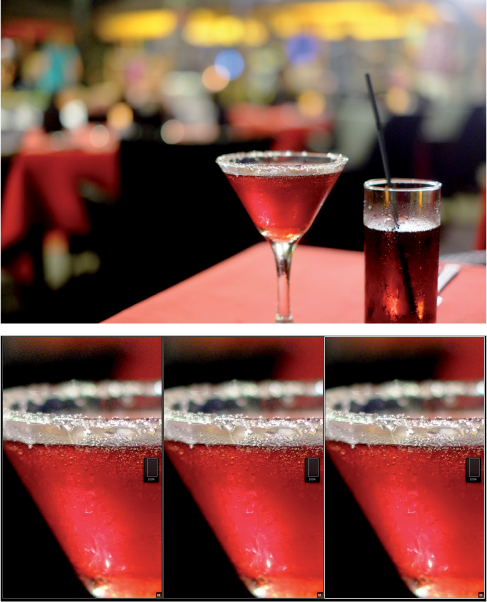
Image 106: Noise Reduction Setting:
This image, snapped at ISO 3200, shows just how effective the X-Pro1 is at eliminating disturbing image noise while retaining desirable details when creating JPEGs. The three enlarged portions of the image show the results of applying the LOW, STANDARD, and HIGH noise reduction settings. Even in the lowest setting (left) you can see that the color noise is in no way bothersome. The standard setting in the middle is a decent compromise, but the HIGH setting (right) washes out a few details and is thus not ideal for this situation.
Many photographers prefer to carry out their own noise reduction using an image-editing software on their PCs, rather than trust the X-Pro1 to do the job. In this case, set the NOISE REDUCTION to LOW. Since noise reduction is a setting that affects only JPEG files, you would need to attend to noise reduction anyway when developing your images in an external RAW conversion program or when using a specialized program such as NIK Dfine or Topaz DeNoise. The X-Pro1’s X-Trans sensor captures images with so little noise, however, that distracting image noise is likely to surface only when using very high ISO settings above ISO 3200.
The STANDARD (0) setting is in most cases a decent compromise. The X-Pro1’s noise reduction technology is so good, actually, that some external editing programs can’t hold a candle to it. But this too is a matter of personal taste and ultimately depends on your subject. In particular, when using the black-and-white conversion feature, you can almost always set the noise reduction to LOW (—2).
CUSTOM SHOOTING PROFILES
As we’ve seen, the X-Pro1 has a plethora of settings options: ISO, DR function, white balance, film simulation, color, contrast (highlights and shadows), sharpness, noise reduction. You may be wondering, “How am I supposed to define all of these settings quickly when I’m ready to snap an image? I want to take pictures; I don’t want to stand around fumbling with my camera!”
Here is where the X-Pro1’s seven custom shooting profiles come into play. They allow you to program each variable independently and then save them together in a bundle. Then you can switch back and forth quickly among your predefined profiles.
DEFINING AND CHANGING CUSTOM PROFILES
To set up or change a custom profile, go to SHOOTING MENU 3 > EDIT/SAVE CUSTOM SETTING and select one of the seven profiles (CUSTOM 1 to 7). You can either import your current camera settings to one of the profiles (SAVE CURRENT SETTINGS) or input new definitions for ISO, DYNAMIC RANGE, FILM SIMULATION, WHITE BALANCE, COLOR, SHARPNESS, HIGHLIGHT TONE, SHADOW TONE, and NOISE REDUCTION.
You can also use a combination of the two methods by first saving the current settings and then adjusting them accordingly. When you’re finished and you press the DISP/BACK button, the camera will ask if you’d like to save your settings. When yes, select OK; if you’d like to continue editing the selected custom profile, select CANCEL.
TIP
The Q button offers a shortcut to editing or changing your shooting profile. Press and hold the Q button until the EDIT/SAVE CUSTOM SETTING menu appears on the camera’s active display.