Vibration Reduction Modes
There are two VR modes available, along with Off (no VR). Let’s examine what each mode is designed to accomplish:
- On Normal: This mode is designed for shooting static subjects. If you are handholding the camera, or it is on a wobbly tripod or on a monopod, this is the best mode to use. Do not use VR when on a solid tripod or unexpected results might occur (e.g., odd-looking background effects).
- SPT Sport: This mode is designed for shooting sports where subjects are moving rapidly and unpredictably. Use this mode for panning. The camera will detect when you are panning with your subject and turn off VR for horizontal movement. It will correct for vertical movement only when panning. When the subject stops moving and panning ceases, VR will again work for both horizontal and vertical vibration reduction.
- Off: The camera disables the VR system for the camera and Z-mount lenses.
The Vibration reduction menu item on the Photo Shooting Menu and in the i Menu will become grayed out and unavailable when an AF-S Nikkor lens with VR is mounted on the camera with the FTZ adapter. To control VR in that case, simply use the VR On/Off switch found on the side of Nikkor VR lenses. The VR On/Off switch will enable in-lens and in-body image stabilization at the same time. When a Nikkor lens having no VR (e.g., AF-S Nikkor 50mm f/1.4G) is mounted, the Vibration reduction menus become available again.
Now, let’s see how to choose an IBIS VR mode from the Shooting Menu and the i Menu.

Figure 7.29B: Selecting an IBIS VR mode from the Photo Shooting Menu
Use the following steps to choose a Vibration reduction mode from the camera’s Photo Shooting Menu:
- 1.Choose Vibration reduction (figure 7.27B, image 1).
- 2.Referring to the previous list, highlight a Vibration reduction mode and press OK or touch the mode to select it (figure 7.27B, image 2).
Next, let’s examine how to select the same Vibration reduction modes from the i Menu.
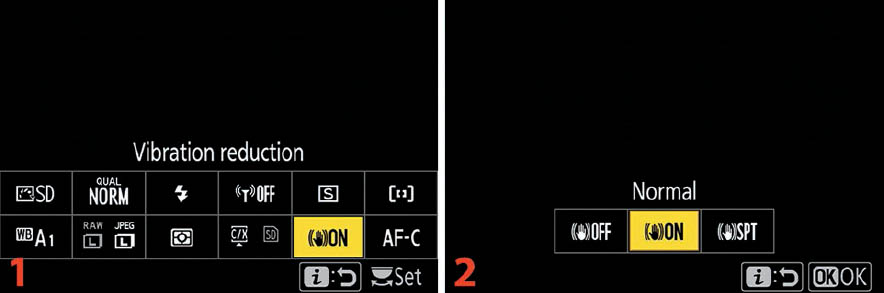
Figure 7.29C: Selecting an IBIS VR mode from the i Menu
Use the following steps to select a Vibration reduction mode from the i Menu:
- 1.Press the i button to open the i Menu. Choose a Vibration reduction mode by highlighting its symbol and pressing OK or by touching the symbol (figure 7.29C, image 1). The secondary screen will open.
- 2.Referring to the previous list, choose one of the Vibration reduction modes by highlighting its symbol and pressing or touching OK (figure 7.29C, image 2).
Settings Recommendation: In my experience with my cameras, I can regularly get sharp images of static subjects at 1/6 second. With a little bracing against something, I have created sharp images in the 1- to 2-second range.
Another of the marvelous things about VR in a Nikon Z camera is that it will work for virtually any lens mounted on the camera or on an adapter. Even older F-mount, manual focus AI and AI-S lens favorites, along with non-VR autofocus lenses, will have vibration reduction.
Auto Bracketing
Auto bracketing set lets you choose how bracketing works for each of the camera’s bracketing methods. You can set up bracketing for the exposure system (AE), flash, White balance (WB), and Active D-Lighting (ADL).
Let’s start by reviewing the five types of bracketing on the camera. I’ll explain how to use bracketing in an upcoming subsection:
- AE & flash bracketing: When you set up a session for bracketing, the camera will cause any type of normal pictures you take to be bracketed, whether they are standard exposures or you are using flash. See how to bracket in the next subsection.
- AE bracketing: Your bracketing settings will affect only the camera exposure system and not the flash.
- Flash bracketing: Your bracketing settings will affect only the flash system and not the camera exposure.
- WB bracketing: White balance bracketing works the same as exposure and flash bracketing, except it is designed for bracketing color in mired values, instead of bracketing light in EV step values. WB bracketing is not available with image quality settings of NEF (RAW) or NEF (RAW) + JPEG.
- ADL bracketing: In this case, you are bracketing Active D-Lighting (ADL) in up to five separate exposures. The next higher level of ADL is used on each selected exposure.
AE & Flash Bracketing (Includes AE Only and Flash Only)
AE & flash bracketing (exposure bracketing) allows you to bracket a series of images using ambient light and/or a Speedlight flash unit. You can later combine these images into a high dynamic range (HDR) image with greater than normal dynamic range, as seen in figure 7.30A.

Figure 7.30A: Five-image bracket combined in Photomatix Pro to create a single HDR image
In figure 7.30A you will find a sample five-image bracket with 1.0 EV step between each exposure. I combined the five images using Photomatix Pro software (www.hdrsoft.com) and was pleased with the final result. The main image was created with a bracketed series of five shots (the pictures underneath the main image) using the same settings shown on the Information display screen in figure 7.30C, image 1, as discussed in step 4 of the bracketing step-by-step method.
AE & flash bracketing, AE bracketing, and Flash bracketing all use bracketing in exactly the same manner and are all considered in this one section.

Figure 7.30B: AE and flash bracketing (top three types in screen 3)
Here are the steps to configure AE and flash bracketing for results similar to what is seen in figure 7.30A:
- 1.Select Auto bracketing (figure 7.30B, image 1).
- 2.Highlight Auto bracketing set and scroll to the right (figure 7.30B, image 2). We will return to this screen for further adjustments after we have selected the type of bracketing we want to do.
- 3.Choose AE & flash bracketing, AE bracketing, or Flash bracketing and press OK or touch the item to choose it (figure 7.30B, image 3).
- 4.The camera will return to the screen shown in figure 7.30B, image 2. We will now make adjustments to the Number of shots and Increment (or Amount for ADL) subsettings (figure 7.30B, image 4).

Figure 7.30C: Auto bracketing (AE & flash)
- 5.Figure 7.30C continues where figure 7.30B ends. We will now adjust the Number of shots and Increment subsettings. Highlight the item you want to change and scroll left or right with the Multi selector pad or touch the left/right arrows to change the value. The symbols will initially be Number of shots: 0F and Increment: 1.0 (if not previously changed), and there may be no lines hanging below the −/+ scale. You will set both of those values as you create the bracket. The number of shots in the bracket appears at the end of the Number of shots line (e.g., 5F, −2F, and +3F) as shown in each screen in figure 7.30C. The amount of exposure difference appears at the end of the Increment line (e.g., 1.0, 0.3, and 2.0). Number of shots can be set to as many as 9 frames (9F) in an AE & flash bracketing, AE bracketing, or Flash bracketing bracket, and the Increment of exposure difference can range from 0.3 EV to 3.0 EV steps between frames. The number of small vertical lines hanging below the –…… 0 ……+ scale equals the number of shots in the bracket. The position of those lines represents the EV spread of the shots in the bracket. In figure 7.30C, image 1, for instance, you can count five lines hanging below the −/+ scale, and there is one stop of exposure between each line. Those five shots are represented by the 5F in image 1, and the 1.0 after Increment represents the 1 EV step (1 stop) exposure differential between each frame.
- 6.The Number of shots value can have a no sign (5F), minus sign (−2F), or plus sign (+3F) next to it (figure 7.30C). Select a number with a plus sign if you want the bracket to take only normal and overexposed shots. Select a number with a minus sign if you want the bracket to take only normal and underexposed shots. If you want the bracket to take exposures that are evenly distributed on both sides of the scale, select a number that has no plus or minus sign in front of it.
- 7.As previously mentioned, the Increment value controls the EV steps between each exposure in the bracket. This value appears at the right of Increment on each screen in figure 7.30C as 1.0, 0.3, and 2.0. You can select an EV step value between each image in the bracket, in steps of 1/3, and 1/2 EV. (The EV step value is set in Custom Setting Menu > b Metering/exposure > b1 EV steps for exposure cntrl. You can use Custom Setting Menu > e Bracketing/flash > e7 Bracketing order to set the order of the exposures. Once you have entered all the values you want to change, press or touch OK to lock in the values. We’ll discuss this in the Custom Setting Menu chapter, in the section titled Custom Setting e7: Bracketing Order (page 433). (The default order is normal > underexposed > overexposed. You can change it to underexposed > normal > overexposed if you’d like.) Following are detailed explanations of the values on images 1, 2, and 3 of figure 7.30C:
- Figure 7.30C, image 1, shows a five-shot bracket with 1.0 EV step between each image. You can tell there are five shots by the 5F at the top center along with the number of lines hanging below the scale. The 1.0 means that there is 1.0 EV step (1 stop) between each exposure in the bracket. The fact that the 5F has no plus or minus sign in front of it tells us that the bracket uses exposures that are normal, overexposed, and underexposed.
- Figure 7.30C, image 2, shows a two-image bracket with 0.3 EV steps (1/3 stop) between each exposure. Notice the minus sign before the 2F symbol (−2F). This means that the bracket is configured to take only normal and underexposed shots—no overexposed ones. The bracketed images are on the minus side of the −/+ scale.
- Figure 7.30C, image 3, represents a three-image bracket with 2.0 EV steps between each exposure. The bracket is configured to take only normal and overexposed shots as indicated by the plus sign (+3F).
- 8.Figure 7.30D shows the camera’s screen with the symbols for AE & Flash bracketing [AE BKT] (upper red arrow) and the +/– scale (lower red arrow). The +/– scale looks like a normal exposure scale; however, it is actually a bracketing scale in this instance. Once you have configured your bracket, press the Shutter-release button to take each bracketed picture in the series. Figure 7.30D’s symbols (5 lines sticking out from the left of the +/– scale) show that this bracket is for 5 frames (5F), with both two overexposed (+) images, one normal exposure (0), and two underexposed (–) images in the bracket. As you take each image, one of the lines that stick out to the left of the –/+ scale will disappear and the first number in the 5/5 next to AE BKT will reduce by one until all the frames are captured. When they are all gone (0/5), your bracket is complete. If you have your camera set to Continuous L or Continuous H release mode, you can shoot all of the frames in your bracket by holding down the Shutter-release button. Once the bracket is complete (all the lines are gone), the camera will stop firing.
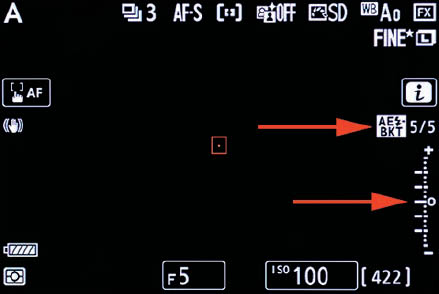
Figure 7.30D: Capturing the bracketed images
Note about flash bracketing: If you are using a Speedlight flash unit to light the bracketed series, it may or may not be able to keep up with bracketed shots taken in Continuous-release mode. If you fully dump the flash power between shots, you’ll have to wait for the next shot.
Settings Recommendation: I normally bracket with a 1 EV step value (1 stop) so I can get a good spread of light values in high dynamic range (HDR) images. In most cases, I will do a three- to five-image bracket, with one or two images overexposed and one or two images underexposed by 1 stop. This type of bracketing allows me to combine detail from the highlight and dark areas in-computer for the HDR exposures everyone is experimenting with these days.
WB Bracketing
The process for WB bracketing (white balance bracketing) is similar to the process for flash or exposure bracketing; you even use the same controls. No form of AE or flash bracketing will work during the time that Auto bracketing set is set to WB bracketing.
WB bracketing does not work when your camera is in NEF (RAW) and NEF (RAW) + JPEG modes. In fact, the bracketing controls will not even respond unless you are using a JPEG only mode because White balance information is stored with the RAW image but is not directly applied to the image. You can change the White balance after the fact when you are shooting RAW, so bracketing a RAW image does not make sense.
Now let’s examine how to select WB bracketing, and then bracket the white balance.

Figure 7.30E: Auto bracketing set – WB bracketing
Here are the steps to configure WB bracketing:
- 1.Choose Auto bracketing (figure 7.30E, image 1).
- 2.Highlight Auto bracketing set and scroll to the right (figure 7.30E, image 2). We will return to this screen for further adjustments after we have selected the type of bracketing we want to do.
- 3.Select WB bracketing and press OK or touch the option to choose it (figure 7.30E, image 3).
- 4.The camera will return to the screen previously seen in figure 7.30E, image 2. We will now make adjustments to the Number of shots and Increment (or Amount for ADL) subsettings (figure 7.30E, image 4).

Figure 7.30F: WB bracketing (White balance)
- 5.Choose the number of shots in the bracket, examples of which are 3F, A3F, or B3F, as seen in figure 7.30F at the end of the Number of shots line. Press left or right on the yellow arrows, or scroll with the Multi selector pad, to select the number of shots, up to nine shots total (9F). In figure 7.30F, the 3F, A3F, and B3F symbols show the number of images (3), as do the lines hanging below the +/+ scale. Table 7.2 and step 6 describe what these mean.

Table 7.2: Camera display symbols, number of shots, amber/blue changes, and bracketing order
- 6.You control the white balance color differences by bracketing toward amber or blue (A or B), using the symbols on the screen, as described in table 7.2. Each increment of color difference is called a mired and is controlled by the number displayed at the end of the Increment line, in figure 7.30F (i.e., 1, 3, 2). Change the mired Increment number by touching the left or right yellow arrows or by scrolling with the Multi selector pad. Each number represents multiple mired. Choose 1, 2, or 3, where 1=5 mired, 2=10 mired, and 3=15 mired. Figure 7.30F, image 1, shows a 5 mired difference (1), image 2 shows a 15 mired difference (3), and image 3 shows a 10 mired difference (2). Once you have entered all the values you want to change, press or touch OK to lock in the values. Following are detailed explanations of the values on images 1, 2, and 3 of figure 7.30F:
- Figure 7.30F, image 1, shows a three-image bracket, with a 5 mired difference (1) in color between each image. One has more amber, one is normal, and one has more blue (3F).
- Figure 7.30F, image 2, shows a three-image bracket with a 15 mired difference (3) between each image, in the amber direction only (A3F).
- Figure 7.30F, image 3, shows a three-image bracket with a 10 mired color difference (2) in the blue direction only (B3F). If you do not see an A (A3F) or B (B3F) in the Number of shots position (e.g., 3F), it simply means that the bracket goes in both directions, such as amber > normal > blue or normal > amber > blue, according to how you have Custom Setting Menu > e Bracketing/flash > e7 Bracketing order set.
- 7.Press the Shutter-release button to take the bracketed picture series. Interestingly, you do this by taking just one picture. The camera takes that picture, reapplies the color filtration for each image in the bracket, and then saves each image as a separate image file with a new consecutive file number and bracketed color value. This works very differently from AE or flash bracketing, where you have to fire off each individual frame of the bracket. WB bracketing is very easy because you only have to set up the bracket and take one picture. The series of images in the bracket (up to nine) simply appears on your memory card. Nikons are fun!
How Does Mired Work While Bracketing?
Changes to mired simply modify the color of your image, in this case toward amber (reddish) or blue. In effect, changing mired toward amber or blue warms or cools the image. The color changes are applied directly to the image by the camera when shooting JPEGs or are saved as markers when shooting RAW images. You don’t have to worry about mired values unless you are a color scientist.
You can just determine whether you like the image the way it is or would prefer that it be warmer or cooler and bracket accordingly. WB bracketing toward the A direction warms the image, whereas the B direction cools it. Technically, a mired is calculated by multiplying the inverse of the color temperature by 106.
I’d rather let my camera figure mired values and then judge them with my eye, wouldn’t you? Remember, if you shoot in RAW, you can modify color values later in your computer. Otherwise, they are applied permanently to JPEG files.
ADL Bracketing
ADL bracketing (ADL stands for Active D-Lighting) is designed to let you shoot a normal image and then a series of up to four additional images with Active D-Lighting applied to each at progressively higher levels.
As you set ADL bracketing from two to five shots, you are setting the camera to switch to a higher ADL level for each consecutive shot. The progressive levels are Off, L Low, N Normal, H High, and H* Extra High.

Figure 7.30G: Auto bracketing set – ADL bracketing
Here are the steps to use ADL bracketing:
- 1.Select Auto bracketing (figure 7.30G, image 1).
- 2.Highlight Auto bracketing set and scroll to the right (figure 7.30G, image 2). We will return to this screen for further adjustments after we have selected the type of bracketing we want to do.
- 3.Choose ADL bracketing and press OK or touch the option to choose it (figure 7.30G, image 3).
- 4.The camera will return to the screen shown in figure 7.30G, image 2. We will now make adjustments to the Number of shots and Amount subsettings.
- 5.Figure 7.30G, image 4, shows a bracket of five frames (5F), which means the camera will use all five available levels of Active D-Lighting (Off, L Low, N Normal, H High, and H* Extra high) as the five images are taken (Auto Active D-Lighting is ignored). You will also see the Amount field, which shows the full progression of the ADL bracket (OFF L N H H*), which stands for Off (OFF), Low (L), Normal (N), High (H), and Extra high (H*). Once you have entered all the values you want to change, press or touch OK to lock in the values.
- 6.Press the Shutter-release button to take each shot in the bracketed series. If you have your camera set to one of the Continuous-release modes (CL or CH), and are using AE & Flash bracketing, AE bracketing, Flash bracketing, or ADL bracketing—but not WB bracketing—you can shoot all frames in your bracket by holding down the Shutter-release button. Once the bracket is complete, the camera will stop firing.
Settings Recommendation: This is a great way to capture important shots and try to get extra shadow detail and highlight protection in some of them. You may not need ADL bracketing on all shots, but on important images where you are slightly off on your exposure selection, ADL will help to open shadows and mildly protect the highlights. Of course, if you shoot in RAW mode, you can apply ADL in-computer. I don’t bracket ADL very often, but I’m glad to know it’s there when I need it.
Note concerning all bracketing types: One final note about bracketing of any type: Turn it off when you’re done by setting Number of shots to 0F. I often forget and then wonder why my camera keeps under- and overexposing a series of images. Only after wasting several images do I realize I left bracketing turned on. You’ll see what I mean if you use AE & flash bracketing often, as I do.
Multiple Exposure
Multiple exposure is the process whereby you take more than one exposure on a single frame, or picture. Multiple exposure normally requires you to figure out the exposure values carefully for each exposure segment so that in the final picture, all the combined exposures equal one normal exposure. In other words, if you are going to create a non-masked double exposure, your background will need two exposures at half the normal exposure value to equal one normal exposure.
The camera allows you to figure out your own exposure settings and input them manually, or you can use the Overlay mode to help with exposure calculations.
There are five steps to setting up a Multiple-exposure session, which we will examine in detail. The basic steps are as follows:
- Choose whether you are shooting one multiple-exposure image or a series of images.
- Select the number of individual shots you want to take, which will be combined into a multiple-exposure image.
- Select an Overlay mode to determine how you want to control exposure.
- Decide whether to keep the intermediate images that are combined to create the single multiple-exposure image, or delete the intermediate images and keep only the single multiple-exposure image.
- Optional step: You can choose a previously taken image as the first image in the multiple-exposure series.
- Shoot the pictures that the camera will combine into one multiple-exposure image.
Let’s discuss how to implement these steps. First, we will examine a simple double-exposure combination (figure 7.31A).
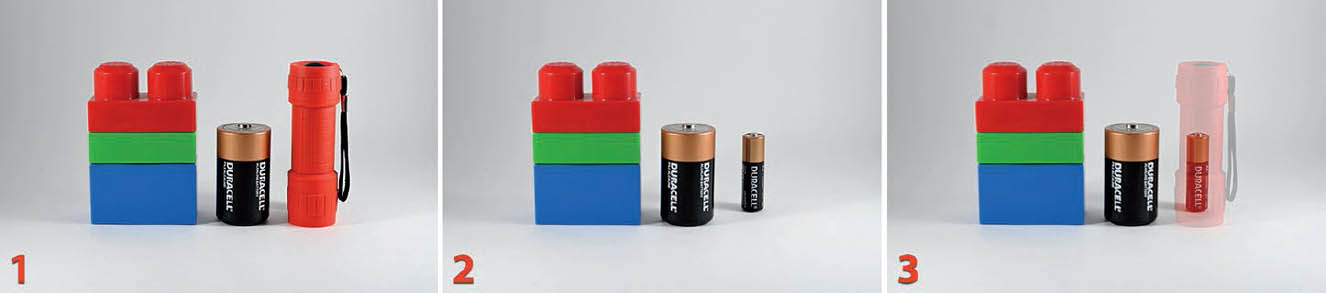
Figure 7.31A: Double-exposure image
In figure 7.31A, image 1, you see the first of two pictures that will be combined to create the third picture. The first picture received 1/2 of a normal exposure. The tall red flashlight was placed in front of the small battery and the picture was taken. The second image also received 1/2 of a normal exposure with the red flashlight removed. Image 3 is images 1 and 2 combined. Since the blocks and large battery received 1/2 exposure twice (1/2 exposure in two images), they are recorded with one full exposure in the combined picture. However, the red flashlight was in the first image only and received only 1/2 exposure, so it is somewhat transparent in the third image, allowing you to see the small battery through the flashlight.
Note: For my Multiple exposure sequence, I used Multiple exposure mode: On (single photo), Number of shots: 2, Overlay mode: Average (AVG), Keep all exposures: On, and Overlay shooting: On. If you choose to enable Overlay mode: Average (AVG), the individual intermediate exposures will be fully exposed, but will be combined at some fraction of their normal exposure value to create the single multiple-exposure image. The two source images (figure 7.31A, images 1 and 2) do not look underexposed because the camera is using only half of the available full exposure from each source image in the destination image (figure 7.31A, image 3).
Now let’s discuss the multiple-exposure settings.

Figure 7.31B: Setting up Multiple exposure basics
Use the following steps to configure one or a series of multiple exposures:
- 1.Select Multiple exposure (figure 7.31B, image 1).
- 2.Choose Multiple exposure mode and scroll to the right (figure 7.31B, image 2).
- 3.Now choose whether you want one multiple-exposure sequence or a series of multiple-exposure sequences (figure 7.31B, image 3). If you choose On (single photo) the camera will automatically set Multiple exposure mode to Off after you have created one multiple-exposure picture. If, instead, you choose On (series) the camera will stay in Multiple exposure mode, allowing you to create many multiple exposures, until you manually set it to Off with this setting (image 3). Press OK or touch the option to finish.

Figure 7.31C: Choosing the Number of shots in the multiple exposure
- 4.Select Number of shots and scroll to the right (figure 7.31C, image 1).
- 5.Use the up/down menu to choose the number of individual shots that will be combined into a final multiple-exposure picture (figure 7.31C, image 2). Select a number from 2 to 10 and then press or touch OK to save the setting.
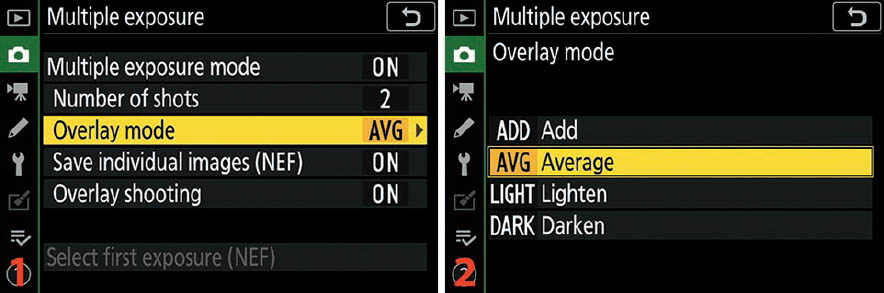
Figure 7.31D: Choosing an Overlay mode for proper exposure
- 6.Select Overlay mode and scroll to the right (figure 7.31D, image 1).
- 7.Select one of the Overlay modes, as discussed in table 7.3, and press OK or touch your selection (figure 7.31D, image 2).
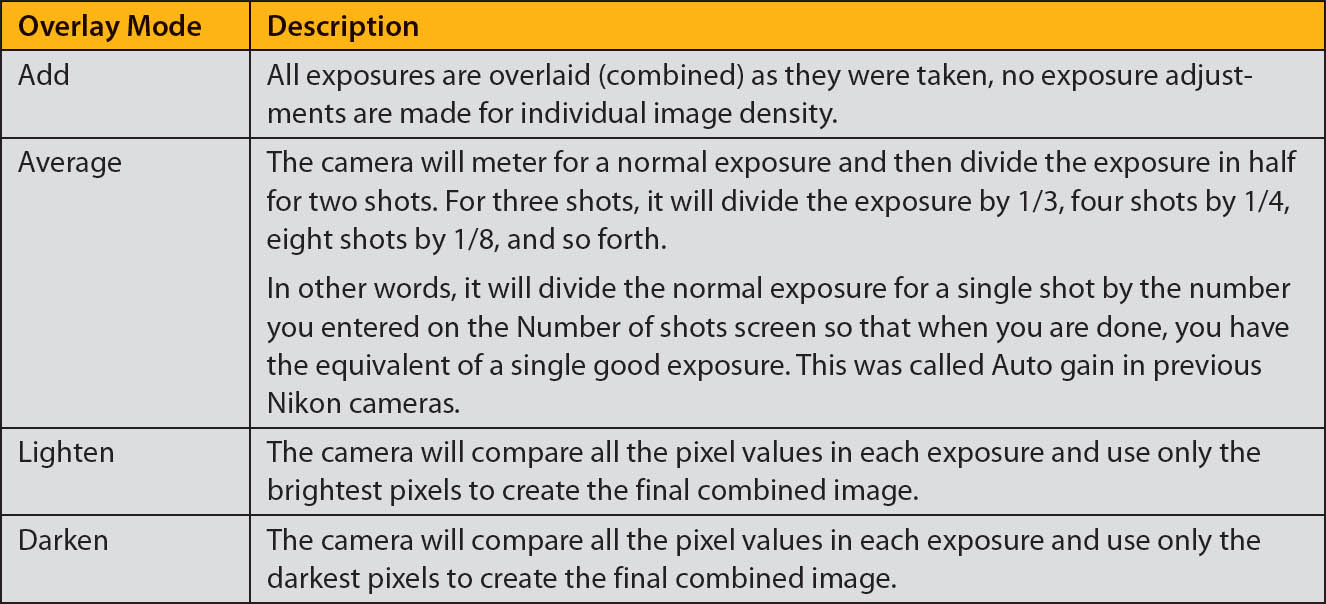
Table 7.3: Overlay mode choices and descriptions

Figure 7.31E: Keep (or not) the individual images that make up the multiple exposure
- 8.Choose Save individual images (NEF) from the menu and scroll to the right (figure 7.31E, image 1).
- 9.Select On if you want to keep each of the intermediate images that are combined into a final multiple-exposure picture as a NEF (RAW) image, along with the composite JPEG image. An example of these intermediate images is seen in figure 7.31A, images 1 and 2. If you do not have a use for the intermediate images, select Off and the camera will keep only the final combined multiple-exposure image. Press OK or touch the option to choose it.
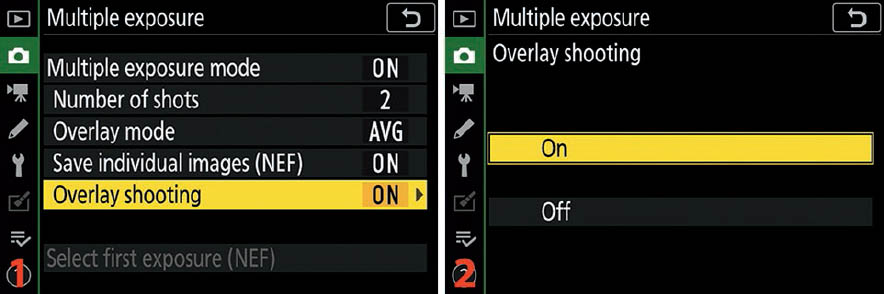
Figure 7.31F: Overlay shooting – see superimposed earlier images
- 10.Choose Overlay shooting from the Multiple exposure menu and scroll to the right (figure 7.31F, image 1).
- 11.If you want to see earlier images in the sequence superimposed over the view through the lens, select On. Otherwise, select Off. Press OK or touch the option to choose it (figure 7.31F, image 2).

Figure 7.31G: Select the first image included in a multiple-exposure picture (optional)
- 12.Please note: This is an optional step and is not required for normal multiple-exposure images. You may use this special setting to start with a previously taken primary image to which other intermediate images will be added. Highlight Select first exposure (NEF) and scroll to the right (figure 7.31G, image 1).
- 13.Choose a NEF (RAW) image to use as the first image in the group of intermediate images (figure 7.31G, image 2). Although other intermediate images can be JPEG images, this first one must be a NEF (RAW) image. Once you have selected a RAW image to use as a base, press or touch OK and the camera will return to the main Multiple exposure screen, ready to start the Multiple exposure sequence. If you are creating a fresh multiple-exposure picture, you can safely skip steps 12 and 13.
Once you’ve selected the basic values for Multiple exposure mode, the camera will remember your multiple-exposure settings, and you may reuse them for the next session.
Note: If you do a lot of multiple exposures, you can assign one of the camera’s programmable buttons to allow you to select Multiple exposure settings with external camera controls. We will consider how in the chapter Custom Setting Menu, under the subheading f2 Custom controls (page 436).
Changes During a Multiple-Exposure Session
Nikon has provided an i Menu with four action choices that allow you to modify a multiple-exposure session—one with at least three images in the sequence—that is in progress (figure 7.31H). Here is a description of each:
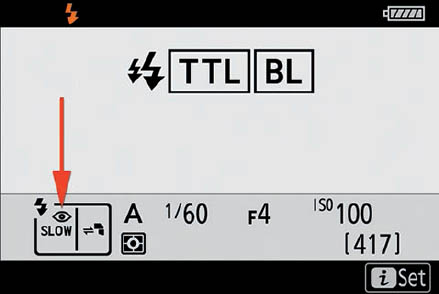
Figure 7.25E: Slow sync + red-eye
- View progress: Allows you to see a preview of the multiple exposure at the current point.
- Retake last exposure: If you are unhappy with the latest intermediate exposure, you can ask the camera to discard and retake the exposure.
- Save and exit: Stops the multiple-exposure session at the current point and assembles the final picture from images taken so far.
- Discard and exit: Exits the multiple-exposure session and throws away the current multiple-exposure picture. If you previously set Keep all exposures to On, the camera will not throw away the intermediate images.
Use the following steps to access and use the multiple-exposure i Menu:
- 1.While a multiple exposure is in session and you have taken at least two intermediate images, press the Playback button (
 ). This will open the last of the intermediate images so you can see it on the Monitor.
 - 2.Press the i button and the menu in figure 7.31H will display.
- 3.Make your selection and press OK to proceed with one of the self-explanatory actions, or press the i button again to cancel and return to the current multiple-exposure session.
Settings Recommendation: Multiple exposure images can be a lot of fun to create. I often shoot Multiple exposure images with two people in the frame. One person leaves after the first half of the exposure is taken, while the other carefully stays still. When finished, you will have a normal picture of one person and the background, but the person who left halfway through the Multiple exposure will be ghosted (figure 7.31I).
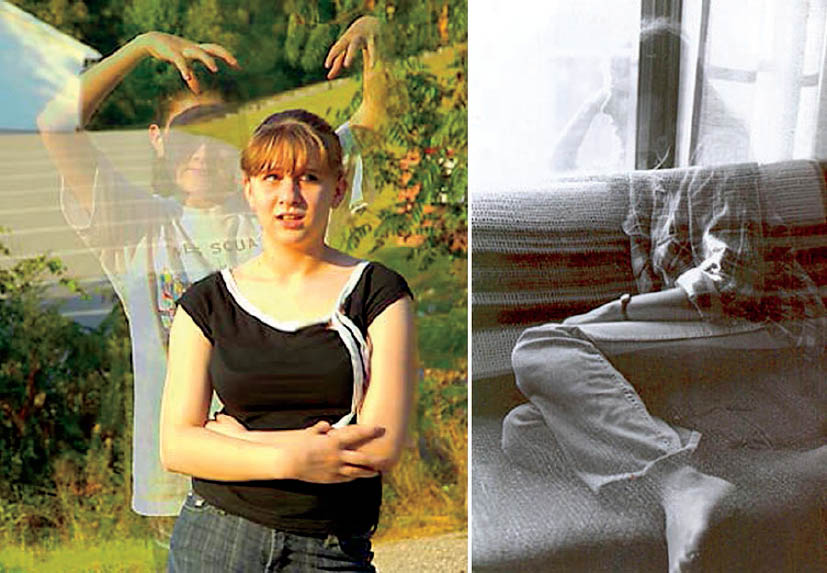
Figure 7.31I: Sample double-exposure images
That means you’ll be able to see the background right through them. It’s even more fun if you have the person who leaves touch the other person during the first half of the Multiple exposure. Maybe have them put a hand on the other person’s shoulder or wrap their arms around them.
If the person who stays for the entire exposure is very careful not to move at all, they will remain sharp and the image will certainly raise eyebrows later.
You can also do this with just one person, as the second picture in figure 7.31I shows. Just make sure they leave halfway through the Multiple exposure.
HDR (High Dynamic Range)
HDR (high dynamic range) directs the camera to combine two JPEG exposures into a single image. It is not available in NEF (RAW) modes.
HDR combines details from an underexposed shot and an overexposed shot into one well-exposed picture with much greater dynamic range than normal. In figure 7.32A, you can see a sample. The two images on the left were combined, in-camera, to create the third image.

Figure 7.32A: HDR combination sample
HDR (high dynamic range) is a form of bracketing that allows you to create an HDR image without setting up a bracketing series. There are three settings to choose from under HDR (high dynamic range):
- HDR mode: This setting has three options: On (series), On (single photo), and Off. When On (series) is selected, the camera will keep shooting its two-image HDR brackets until you set HDR mode to Off. When On (single photo) is chosen, the camera will make a single HDR bracket for one image (figure 7.32A). Off means the camera does not create an HDR image.
- Exposure differential: You can choose how many stops (EV) there will be between the two images that are later combined. The choices are 1 EV, 2 EV, 3 EV, and Auto. Use 1, 2, or 3 EV when you want to make the decision; choose Auto when you want to let the camera decide. If you control the amount of Exposure differential, be careful to choose only what is needed or you may experience under- or overexposure in the final combined image. If a two-image exposure bracket is insufficient, you may want to investigate the exposure bracketing system connected to the BKT button. (Note: We previously discussed how to use the camera’s bracketing system in this chapter under the heading Auto Bracketing [page 283]. With it you can do up to a nine-shot bracket.)
- Smoothing: This allows you to choose smoothing for the boundaries between the two images. Three choices are available: Low, Normal, and High. Each subject’s boundaries are different, so you may have to experiment with these settings. Higher values make a smoother combined image. Watch out for uneven shading with some subjects.
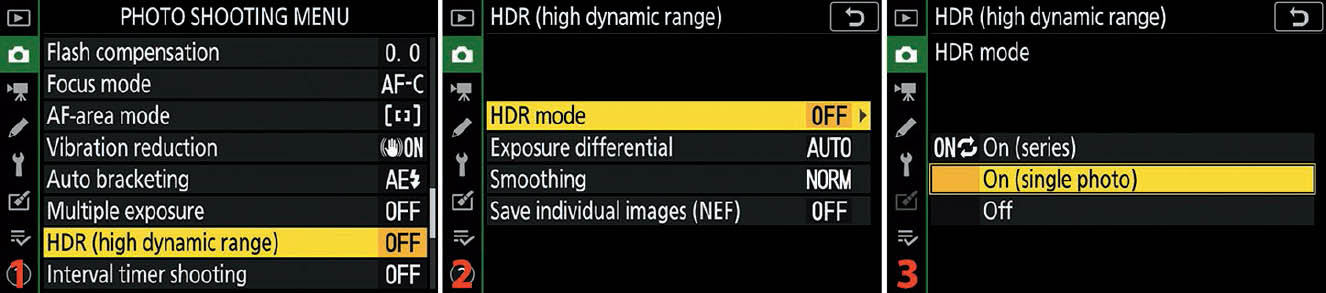
Figure 7.32B: Choosing an HDR mode
First, let’s examine how to configure the three settings and prepare for HDR imaging. Use these steps to enable HDR mode for a single picture or a series:
- 1.Follow the screen flow shown in figure 7.32B, images 1 and 2 (HDR (high dynamic range) > HDR mode) until you arrive at the third screen in the series.
- 2.Decide whether you want to make one or a series of HDR images and choose accordingly: On (series) for a series of images or On (single photo) for a single image (figure 7.32B, image 3).
- 3.Press OK or touch your selection to prepare the camera for shooting in HDR mode.
When the camera is set to HDR mode, you will see the acronym HDR displayed on the camera’s EVF and Monitor. It will go away when HDR mode is set to Off. Now let’s look into configuring the Exposure differential setting.

Figure 7.32C: Choosing an Exposure differential setting
Use the following steps to choose an Exposure differential setting:
- 1.Follow the screen flow shown in figure 7.32C, images 1 and 2 (HDR (high dynamic range) > Exposure differential) until you arrive at the third screen in the series.
- 2.Choose one of the four settings, according to how much exposure variance you want between the two images that will be combined into one (figure 7.32C, image 3). Use Auto to let the camera decide, or choose from 1 EV to 3 EV. If you have a high-contrast subject, you may want to try the 3 EV level first to see if it works best. For low- to medium-contrast subjects, choose 1 EV or 2 EV. Press OK or touch the option to finish.
Next, let’s see how to configure the Smoothing selection for the best image edge boundary control.

Figure 7.32D: Choosing a Smoothing setting
Use these steps to configure Smoothing for the HDR image combination:
- 1.Follow the screen flow shown in figure 7.32D, images 1 and 2 (HDR (high dynamic range) > Smoothing) until you arrive at the third screen in the series.
- 2.Select High, Normal, or Low (figure 7.32D, image 3). You will need to experiment and observe the differences in image boundaries when you vary this setting. Press OK or touch the option to choose it.
Finally, let’s see how to save intermediate images as NEF (RAW) files.
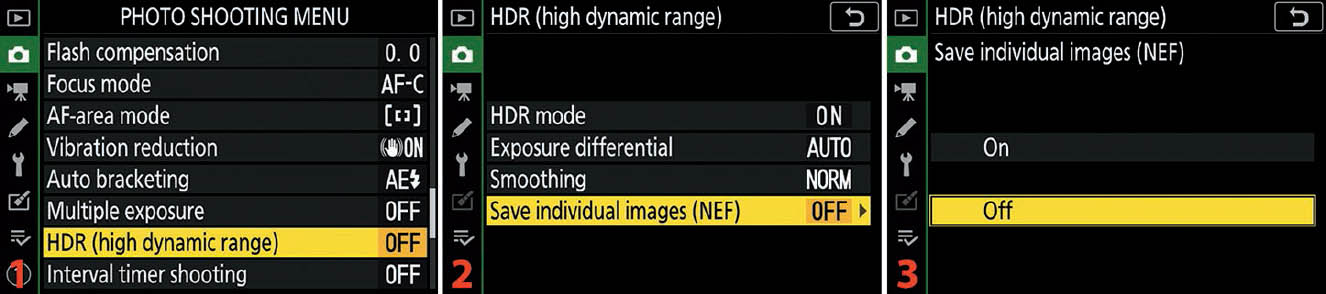
Figure 7.32E: Saving intermediate images as NEF files
Use the following steps to save the two intermediate files as Large NEF files, regardless of the camera’s current Image quality and Image size settings:
- 1.Follow the screen flow shown in figure 7.32E, images 1 and 2 (HDR (high dynamic range) > Save individual images (NEF)) until you arrive at the third screen in the series.
- 2.Select On or Off and press OK or touch the option to choose it (figure 7.32E, image 3).
If you do not use this setting, the camera will not keep the intermediate files at all. Instead, you will just have the one HDR image.
Now it’s time to take some HDR pictures. Here are some things you will need to know during and after the HDR process:
- The camera will take two exposures when you press the Shutter-release button all the way down once. It is a good idea to have the camera on a tripod during low-light HDR operations or you may have some nasty, blurry images as a result. If you do choose to handhold in low light, please brace yourself and do not allow camera movement. When light is very bright, the HDR process can be quite fast. It is much slower when light is low, taking several seconds to deliver a combined image.
- HDR will be displayed in the EVF and on the Monitor as soon as you enable HDR (high dynamic range).
- Job and HDR will flash on the small top Control panel during image combination.
- The edges of the image may be cropped, so do not allow important parts of the subject to touch the edges if possible.
- If you detect shadows around bright objects or halos around dark objects, you can reduce this effect by setting Smoothing to a lower level.
- You cannot select any form of NEF (RAW) shooting when HDR (high dynamic range) mode is enabled, only JPEG. Also, HDR (high dynamic range) mode is grayed out on the Photo Shooting Menu when you set Image quality using NEF (RAW).
Note: You can assign one of the camera’s programmable buttons to allow you to select HDR settings with external camera controls. See the section f2 Custom Controls (page 436).
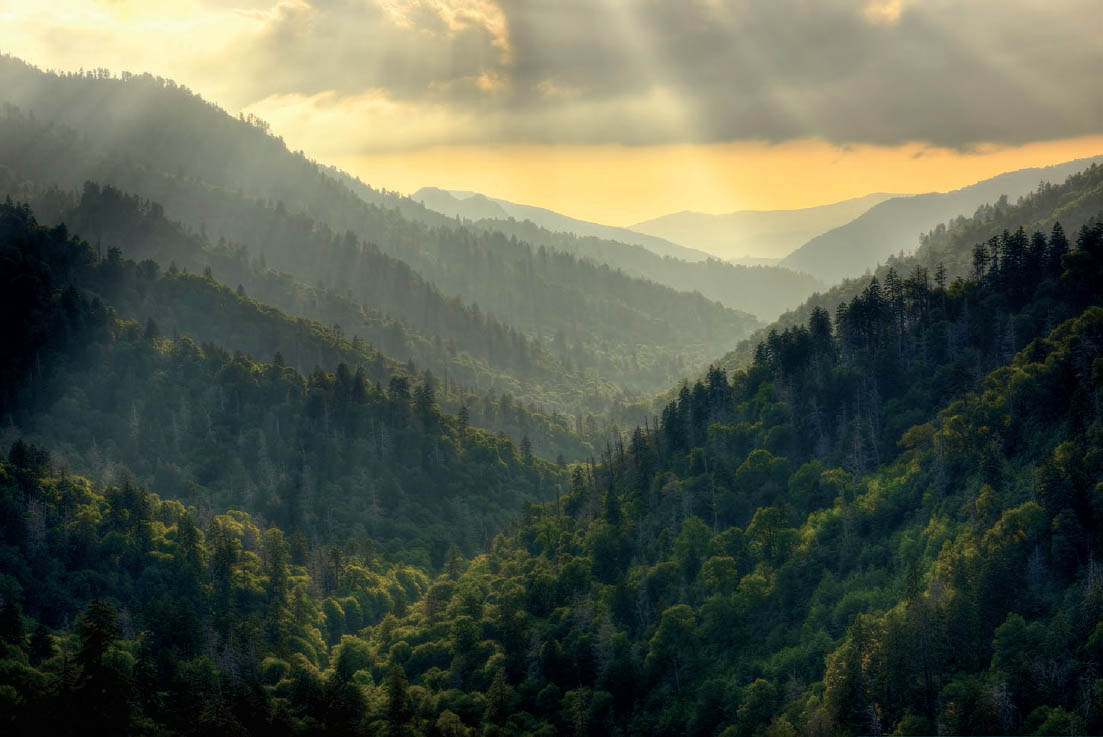
Figure 7.32F: Morton’s Overlook with sunbeams in the Great Smoky Mountains, Tennessee, near sunset. Five-image HDR with 1 stop EV difference between each image. Combined in Photomatix Pro 5.
Settings Recommendation: I am a big fan of bracketing and HDR. You’ll often find me on top of some Appalachian mountain shooting a five-bracket HDR shot of the valley below. Beautiful things can be done with HDR. I do not like the shadowless HDR images that some photographers shoot. To me they look fake and seem faddish. However, HDR, when used correctly, can help create images the camera could not normally take due to excessive light range.
Photoshop has built-in software for HDR, or you can buy a less costly dedicated package, such as Photomatix Pro by HDRsoft. I’ve been using Photomatix Pro for several years to combine my bracketed images into carefully tone-mapped HDR images.
There are some limitations to in-camera HDR, which is why people who are serious about it use the main bracketing system and combine their images using dedicated HDR software. However, HDR (high dynamic range) is an easy way to knock off a few quick HDR images for those times when only an HDR will do. Give it a try!
Interval Timer Shooting
Interval timer shooting allows you set up your camera to shoot a series of images over a long period of time so you can capture events such as flower petals opening. Interval timer shooting is somewhat different than Time-lapse movie (page 310) because an Interval timer shooting session is usually measured in hours or days, instead of minutes, and no automatic movie creation is done at the end. At the end of an Interval timer shooting session, you will have a large number of images that you can assemble into a movie in your computer or use individually. There are several steps to configuring an Interval timer shooting session. Let’s carefully consider each of them.
Configuring an Interval Timer Shooting Session
The series of screens we will now consider may look a little daunting at first; however, if you take the setup one step at a time, you will quickly learn to do Interval timer shooting. First, let’s see how to choose when the picture taking begins and ends.
Note: You can start the timer immediately by choosing the Start selection from the menu. However, we will save that step for last because we have configured nothing for the Interval timer. Therefore, we will skip Start at the top of the Interval timer shooting menu (figure 7.33A, image 2) and begin by setting up Choose start day/time.
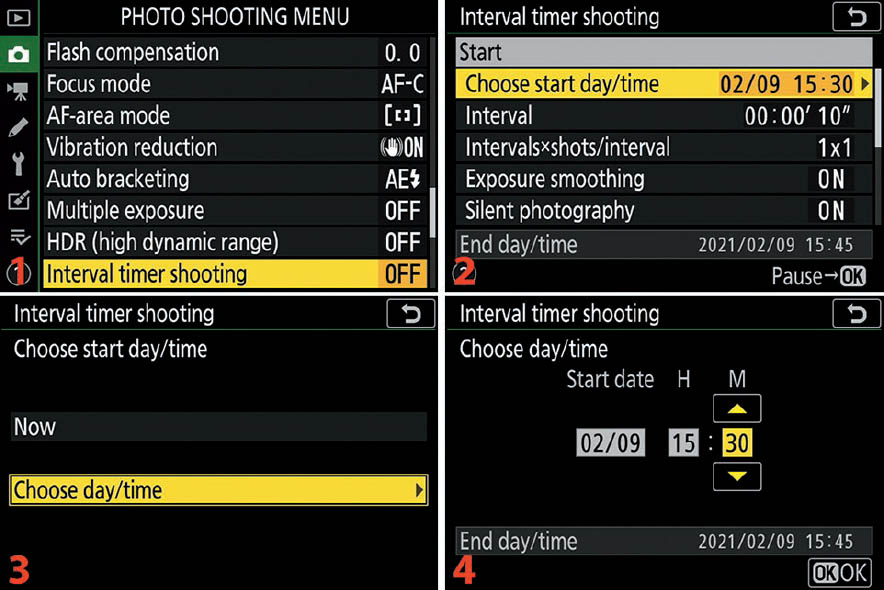
Figure 7.33A: Interval timer shooting configuration
Use the following steps to configure an Interval timer shooting session:
- 1.Select Interval timer shooting (figure 7.33A, image 1).
- 2.Skip over the Start selection for now because we have not configured any of the Interval timer settings yet (figure 7.33A, image 2). Later, after you have configured the Interval timer, you can simply come back and select Start to begin the timer. The camera will remember the settings from your last configuration of the Interval timer and you can use them again by selecting Start and pressing OK or by touching Start.
- 3.Highlight Choose start day/time and scroll to the right (figure 7.33A, image 2).
- 4.The Choose start day/time menu will display two choices, Now and Choose day/time (figure 7.33A, image 3). Choose Now if you want to start the timer three seconds after you select Start and then press OK. If you would rather select a specific date and time to start the timer, select Choose day/time from the menu and scroll to the right.
- 5.The Choose day/time screen will now appear (figure 7.33A, image 4). The Start date is always presented in the Month/Day (MM/DD) format, while the time is presented in a 24-hour (international time) format. If you are not using the Now selection from the previous step, move to the Start date field and use the up/down menu to enter a month and day, such as 02/09.
- 6.Next, scroll over to the H and M fields and enter an hour in international time format (e.g., 15 = 3 p.m.). Enter the time at which you want the intervals to begin. The selectable hour (H) range is from 00 (midnight) to 23 (11 p.m.). After you have entered an hour setting, enter a minute setting. The selectable minute (M) range is from 00 to 59. Once you’ve entered the time, press or touch OK to lock it in. In figure 7.33A, image 4, my camera reflects a start time of 02/09 15:30 (February 9 at 3:30 p.m.) in the adjustable settings, and an ending time of 02/09 15:45 (February 9 at 3:45 p.m.) in the informational display at the bottom of the screen. Now let’s choose an Interval that will elapse before more pictures are taken.

Figure 7.33B: Choosing an Interval
- 7.The camera will now return to the Interval timer shooting menu. Choose the Interval setting on the Interval timer shooting screen and scroll to the right (figure 7.33B, image 1).
- 8.You will now see the interval selection fields with selections representing Hours: Minutes' Seconds" in the following format (figure 7.33B, image 2): 00: 00' 00". The first two zeros represent the hours, the second set represents minutes, and the third set represents seconds. We will start out with an Interval of 10 seconds, so let’s set the screen to look like this: 00: 00' 10". Once you’ve entered the Interval, press or touch OK to lock it in. Now the camera will wait the length of time you set in the Interval field between each series of pictures.

Figure 7.33C: Choosing the number of intervals and number of shots per interval
- 9.Now we’ll choose the number of intervals and shots per interval by selecting Intervals×shots/interval and scrolling to the right (figure 7.33C, image 1).
- 10.You will be presented with a screen where you can select the number of intervals (Intervals) and the number of shots per interval (shots/interval), as seen in figure 7.33C, image 2. Number of intervals × number of shots = total shots. These values are gathered in this format: 0000 × 0 = 0000. You can set the number of intervals (0000) anywhere from 0001 to 9999. You can set the number of shots taken per interval anywhere from 1 to 9. If, for example, you want to shoot six Intervals, and take two pictures during each Interval, set your camera so that it looks like this: 0006 × 2 = 00012 (figure 7.33C, image 2). This means there will be six Intervals (0006) of 10 seconds each (set in step 7) and the camera will take two pictures for each interval (× 2), for a total of 12 pictures (00012). In other words, 2 pictures will be taken every 10 seconds over a period of 60 seconds, for a total of 12 images at the end of the series (0006 intervals × 10 seconds each = 60 seconds). Press or touch OK to lock in the Intervals×shots/interval value. Note: The maximum number of images that can be taken in one Interval timer session is 89991. Additionally, if you have the camera set to single frame release mode, the camera will instead use Continuous Low release mode. You can choose a frames-per-second (fps) rate for Continuous Low in Custom Setting d1 CL mode shooting speed, which defaults to 3 fps (page 409).

Figure 7.33D: Choosing an Exposure smoothing setting
- 11.Next, you may select Exposure smoothing (figure 7.33D, image 1), which allows the camera to adjust the exposure of an image so it matches the exposure of the previous image, when using P, S, and A modes on the Mode dial. If you use M mode, you must have Photo Shooting Menu > ISO sensitivity settings > Auto ISO sensitivity control set to On (page 203), or Exposure smoothing will not work. Choose Exposure smoothing from the Interval timer shooting screen and scroll to the right (figure 7.33D, image 1).
Note: If you have very long Intervals, and you are shooting outdoors, there may be such large changes in brightness that the camera cannot overcome it and smoothing will not work. In that case, you will need to shorten the Intervals or accept the brightness changes. - 12.Select On or Off for Exposure smoothing and press OK or touch the option to choose it (figure 7.33D, image 2).
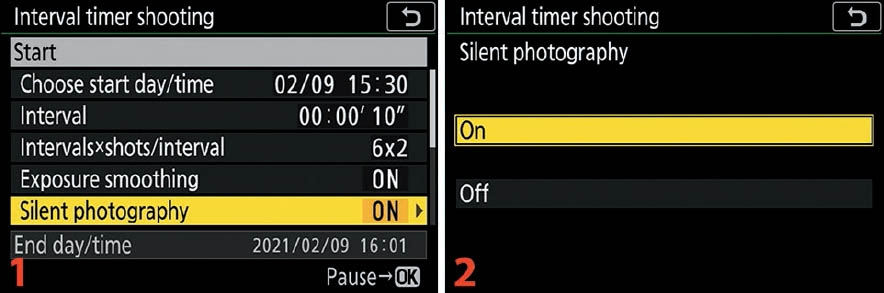
Figure 7.33E: Enabling or disabling Silent photography
- 13.Next, you may highlight Silent photography on the Interval timer shooting menu and scroll to the right (figure 7.33E, image 1).
- 14.Select On to use the camera’s electronic shutter instead of the mechanical shutter or select Off to cancel (figure 7.33E, image 2). If you select On, no sound will be heard during the Interval timer shooting session. Though the camera will be silent, it will display each image on the Monitor as it is captured.
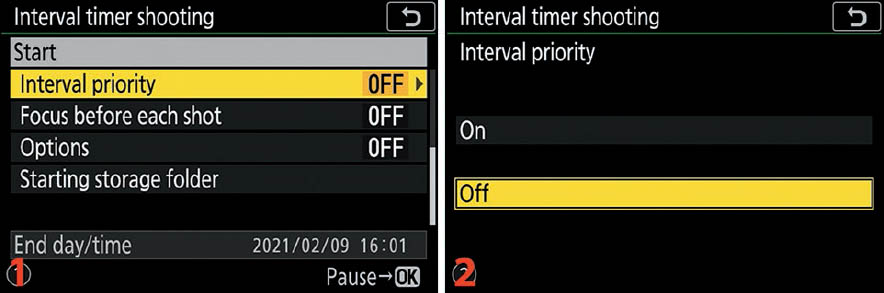
Figure 7.33F: Enabling or disabling Interval priority
- 15.In some Interval timer shooting situations you might find yourself in the unenviable position of needing an exposure time that is longer than the Interval time, leading to underexposed images if the Interval timing is obeyed. To remedy that problem, Nikon has provided the Interval priority setting, allowing you to set priority for the Interval timing or the exposure timing. Choose Interval priority from the Interval timer shooting menu and scroll to the right (figure 7.33F, image 1).
- 16.Select On and press OK or touch On with your fingertip to set the priority on the Interval timing for exposure modes P and A. This setting does not apply to the S or M exposure modes. Be aware that if you have selected On, the camera will not complete a good exposure when the exposure time is longer than the Interval time. The Interval timing will have priority. If you feel the exposure time is more critical than the Interval time, then set Interval priority to Off and press OK or touch Off with your fingertip. Note: If On is selected, be sure that the Minimum shutter speed under the Auto ISO sensitivity control settings is faster than the Interval setting (see: Photo Shooting Menu > ISO sensitivity settings > Auto ISO sensitivity control > Minimum shutter speed, on page 205). Also, you should use manual focus. However, if you do use autofocus, use Release priority under Custom Setting Menu > a Autofocus > a1 AF-C priority selection (page 377) or Custom Setting Menu > a Autofocus > a2 AF-S priority selection (page 378), according to whether you are using AF-C or AF-S Focus modes. The camera will not take a picture when it is not in focus unless Release priority is selected, which, of course, may be a good thing for most of us. Note: If Interval priority is enabled, Bracketing is disabled.
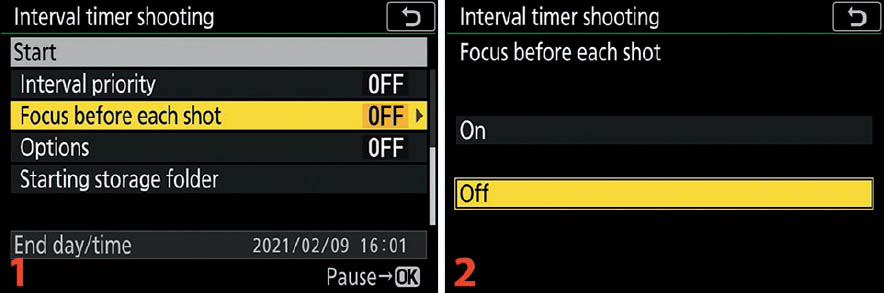
Figure 7.33G: Enabling or disabling Focus before each shot
- 17.If you want the camera to use autofocus for each subsequent shot after you focus the first image, select Focus before each shot and scroll to the right (figure 7.33G, image 1).
- 18.Choose On or Off and press OK, or touch the option (figure 7.33G, image 2). If you do use autofocus, use Release priority under Custom Setting Menu > a Autofocus > a1 AF-C priority selection (page 377) or Custom Setting Menu > a Autofocus > a2 AF-S priority selection (page 378), according to whether you are using AF-C or AF-S Focus modes. The camera won’t take a picture unless something is in focus, unless Release priority is selected, which, of course, may the best for most of us. Who wants out-of-focus images?
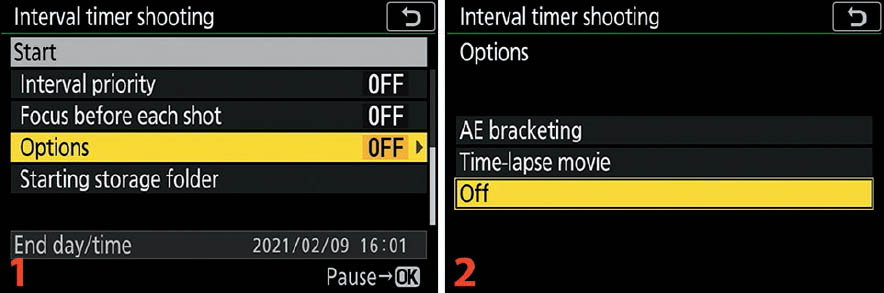
Figure 7.33H: Enabling or disabling AE bracketing or Time-lapse movie
- 19.Next, select the Options setting, which allows you to do autoexposure (AE) bracketing for each picture in the Interval series. Or, you can do a single Time-lapse movie for each Interval, in place of pictures. The following indented steps (A–I) provide information on how to use either.

Figure 7.33I: Enabling AE bracketing
- A.Figure 7.33I, image 1, continues where 7.33H ends. To bracket the pictures that are taken at each interval, choose AE bracketing and scroll to the right.
- B.Now you may choose the Number of shots in the bracket and the Increment of exposure difference between each shot (figure 7.33I, image 2). You may select up to nine images in a bracket for each Interval period. To understand how to use AE bracketing, please review the Auto Bracketing section discussed previously in this chapter (page 283). This bracketing method works the same, except that acquiring the images in the bracket will happen over and over, one bracketed series of pictures for each Interval (if more than 1 shot/interval is selected).
- C.Since the Number of shots may differ from the shots per interval (shots/interval) number set earlier (figure 7.33C, image 2), the camera will automatically set the shots/interval number in the Intervals×shots/interval setting to the number of images you just chose for the bracket. The camera will briefly display the warning, Intervals×shots/interval changed. Interval priority (page 304) also becomes disabled. (Next we will consider how to implement a Time-lapse movie for each Interval.)
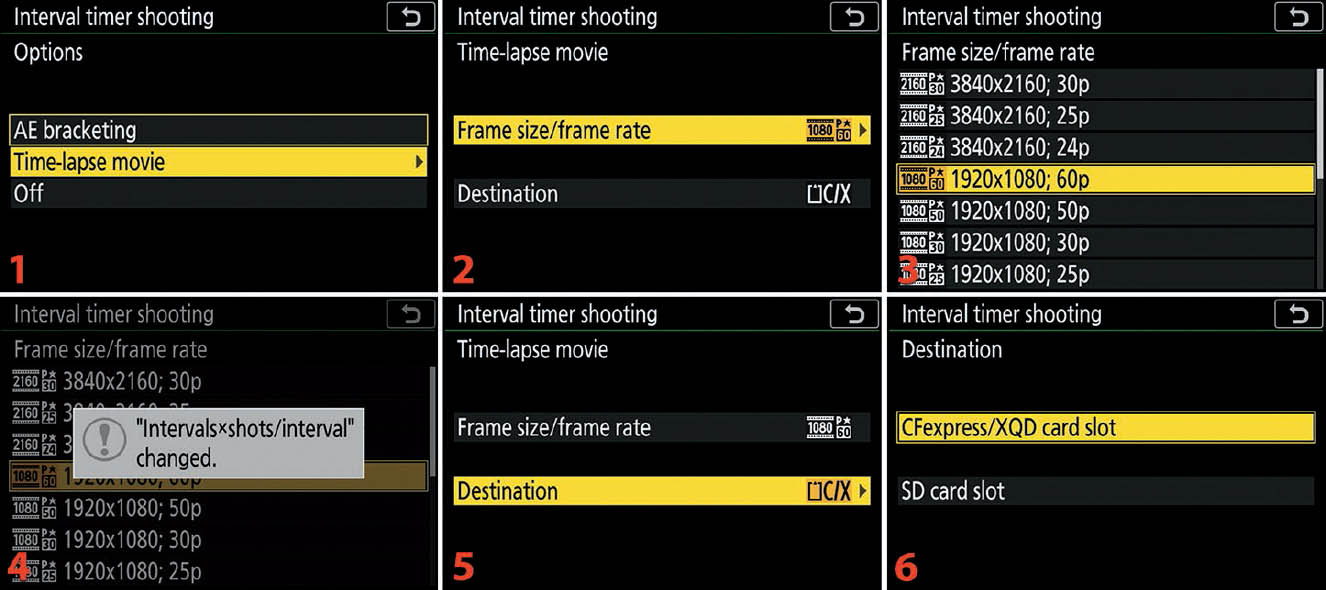
Figure 7.33J: Enabling Time-lapse movie
- D.Figure 7.33J, image 1, continues where 7.26H ends. Select Time-lapse movie and scroll to the right. Now the camera will make a Time-lapse movie at each Interval, instead of pictures.
- E.Pick Frame size/frame rate and scroll to the right (figure 7.33J, image 2).
- F.Choose a Frame size/frame rate value (e.g., 1920×1080; 60p) and press or touch OK (figure 7.33J, image 3).
- G.The camera allows only one Time-lapse movie per interval. Therefore Intervals×shots/interval (figure 7.33C, image 2) is automatically set to 1. The camera will briefly display the warning, Intervals×shots/interval changed (figure 7.33J, image 4). Interval priority (page 304) also becomes disabled.
- H.Next you should choose a destination folder for your Time-lapse movie(s). Select Destination and scroll to the right (figure 7.33J, image 5).
- I.Choose either memory card CFexpress/XQD card slot or SD card slot as a destination for the Time-lapse movie you will capture at each Interval (figure 7.33J, image 6). For more information on how Time-lapse movies work, consider the next section of this chapter, Time-Lapse Movie (page 310).
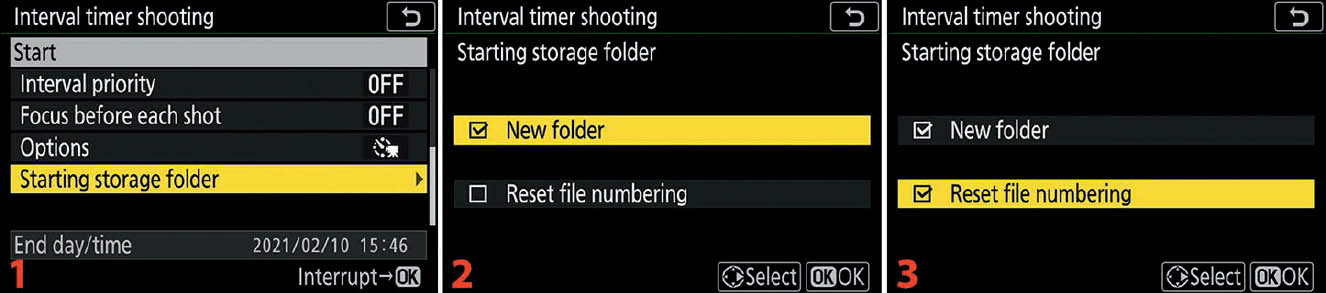
Figure 7.33K: Selecting a Starting folder and file numbering
- 20.You can choose to have the camera create a new folder for each Interval timer shooting session so each session is stored separately. You can also choose to set image numbering back to 0001 at the beginning of each session (e.g., DSC-0001.jpg). Choose Starting storage folder from the Interval timer shooting menu and scroll to the right (figure 7.33K, image 1).
- 21.If you want to use a separate new folder for each Interval timer shooting session, highlight New folder and scroll to the right, or touch the small box to the left of New folder to add a check mark (figure 7.33K, image 2). Now, when the camera starts a new Interval timer shooting session, it will first create a new folder. For instance, I was taking normal pictures using a folder named 200YOUNG. When I put a check mark next to New folder (enabled it) and started an Interval timer shooting session, the camera created a new folder named 201YOUNG and saved all the images from that session in the new folder. You can also choose to use continuous image numbering or start over with 0001 with each new session. If you prefer to use new image numbers for each session, go to the next step instead of selecting OK. Otherwise, to keep using current sequential image numbers, press or touch OK and skip step 22.
- 22.If you would like each Interval timer shooting session to have new file numbers starting at 0001, highlight Reset file numbering and scroll to the right or touch the small box to place a check mark in the box (figure 7.33K, image 3). Press or touch OK to finish.

Figure 7.33L: Starting the Interval timer shooting session
- 23.Now that you have all the previous options set, you are ready to Start the Interval timer using the settings displayed on the Interval timer shooting screen (figure 7.33L, image 1). When you select Start, as shown in image 1, and press OK, a Preparing message will appear briefly on your camera’s Monitor (figure 7.33L, image 2), and then the Interval timer shooting session will begin. The camera will start taking pictures when your chosen interval starts. Normally, the rear Monitor will be turned off during a session. However, if you press the Shutter-release button halfway, the Monitor will turn on and you will see Interval timer shooting appear briefly on the screen, then you will see the abbreviated word INTVL flashing. INTVL will continue to flash as long as the Interval timer is in operation. Additionally, the Memory card access lamp on back of the camera will flash approximately every three seconds while the Interval timer shooting session is active.
Pause, Cancel, or Restart an Interval Timer Shooting Session
You may need to pause or cancel the Interval timer while it is counting down to the start time you set in Shooting options, or when the timer is already active and taking pictures. The Interval timer will continue to function and count down even if you have switched the camera off. Therefore, once you have activated the timer you will need to use the screens shown in figure 7.33M to pause or cancel it. Let’s see how to do it.

Figure 7.33M: Pausing or canceling an Interval timer shooting session
Use these steps to pause or cancel an Interval timer shooting session:
- 1.Press the Menu button, select Interval timer shooting from the Photo Shooting Menu, and scroll to the right (figure 7.33M, image 1).
- 2.Choose Pause to temporarily stop the timer, or Off to cancel the session (figure 7.33M, image 2). Press OK or touch the option to finish.
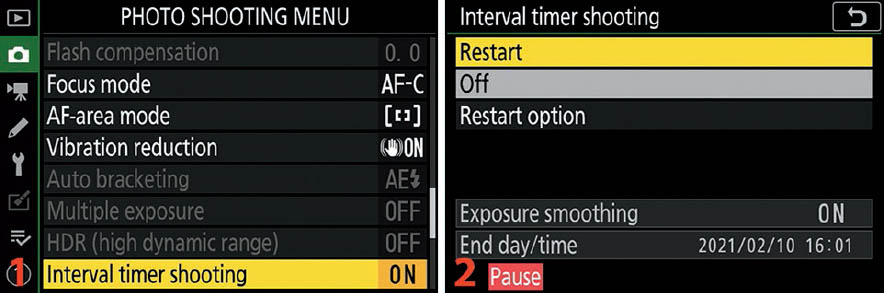
Figure 7.33N: Restarting or canceling an Interval timer shooting session
If you have previously paused the Interval timer and would like to restart or cancel it, use the following steps:
- 1.Press the Menu button, choose Interval timer shooting from the Photo Shooting Menu, and scroll to the right (figure 7.33N, image 1).
- 2.Select Restart, which allows you to continue your Interval timer session, or Off, which lets you cancel the session (figure 7.33N, image 2). Press OK or touch the option to finish.
Note: If the memory card fills up during a shooting session and has no more room for images, the timer will remain active, but the camera will stop taking pictures. You can resume shooting after you have either deleted some pictures or inserted another memory card.
Interval timer shooting will pause if you select the Self-timer. You must disable the Self-timer before you can restart the Interval timer.
During pauses, you can replace batteries and memory cards without ending the Interval timer session. To restart the session and continue where it left off, you must use the Photo Shooting Menu screens shown in figure 7.33N.
Please remember that pausing the session does not affect Interval timer settings. If, for any reason, the camera cannot continue Interval timer photography, it will display a warning on the Monitor.
Skipping Intervals: The camera will skip an interval if any of the following occurs for longer than eight seconds:
- Any photographs from the previous session are not yet taken
- The memory card is full
- Single-servo AF is active and the camera is unable to focus (if Focus before each shot is selected, the camera refocuses before each shot, see figure 7.33G).
The camera will then try again at the next interval. Following are some things you need to be aware of when using the Interval timer shooting system:
- User Settings and Auto Mode: Changing to a different User setting position, or selecting Auto mode, on the Mode dial (U1, U2, U3, AUTO) will interrupt the Interval timer and Shooting paused will display on the Monitor. You can restart the session when you have changed the settings (see figure 7.33N).
- Bracketing Info: Be sure to adjust any bracketing for the exposure, flash, or Active D-Lighting (ADL) before you start Interval timer shooting. Bracketing overrides the number of shots, so you may not get what you expected if any kind of bracketing is active. Also, according to Nikon, “If White balance bracketing is active during an Interval timer session, the camera will take one shot at each interval and process it to create the number of copies specified in the bracketing program.”
- Power adapter for long shooting sessions: If you are using an EN-EL15C battery, you can power the camera for the Interval shooting session by plugging a power source into the USB-C port under the rubber flap. It is recommended that you use a Nikon EH-7P AC power adapter for the most reliable compatibility.
Settings Recommendation: Please learn to use this function! It is complicated, but if you read this section carefully and practice using Interval timer shooting as you read, you’ll learn it quickly. This type of photography allows you to shoot things like flowers gradually opening or the sun moving across the sky. Have some fun with it!
Time-Lapse Movie
Time-lapse movie is a cousin of Interval timer shooting (see the previous section). The primary difference is that Time-lapse movie is designed to create a silent time-lapse movie when you are done shooting. During time-lapse creation, the camera automatically takes pictures at intervals you select during setup and later assembles them into a time-lapse movie.
Let’s examine how to set up a short time-lapse sequence using Time-lapse movie.

Figure 7.34A: Configuring a Time-lapse Interval
Here are the steps to set up a Time-lapse movie:
- 1.Choose Time-lapse movie (figure 7.34A, image 1).
- 2.We are skipping the Start selection at this time, until we have fully configured the Time-lapse movie settings. Select Interval from the Time-lapse movie screen and scroll to the right (figure 7.34A, image 2).
- 3.Set the picture Interval in minutes and seconds. You can choose from 1 second to 10 minutes (figure 7.34A, image 3). The hours column is not available to adjust from the Interval screen. I entered 00' 05" in image 3, which means I have selected a 5-second interval. The camera will take a picture every 5 seconds during the Shooting time period set in step 4. Press or touch OK to lock in your setting and return to the Time-lapse movie screen.

Figure 7.34B: Choosing a Shooting time
- 4.Select Shooting time from the Time-lapse movie screen and scroll to the right (figure 7.34B, image 1).
- 5.Choose a Shooting time over which the picture Interval will be executed (figure 7.34B, image 2). You can choose from 1 minute (00:01) to 7 hours 59 minutes (07:59). The seconds column is not available to adjust from the Shooting time screen. I entered 25 minutes (00: 25' 00") in image 2, which means the camera will take a picture every 5 seconds (the Interval set in step 3) over a 25-minute period (the Shooting time). Press or touch OK to lock in your setting and return to the Time-lapse movie screen.

Figure 7.34C: Selecting Exposure smoothing
- 6.Next, you may select Exposure smoothing, which prevents abrupt exposure changes between images when you are using P, S, and A exposure modes. If you use M mode, you must have Photo Shooting Menu > ISO sensitivity settings > Auto ISO sensitivity control set to On, or Exposure smoothing will not work. Choose Exposure smoothing from the Time-lapse movie screen and scroll to the right (figure 7.34C, image 1).
- 7.Select On or Off for Exposure smoothing (figure 7.34C, image 2) and press OK or touch your selection to lock in the value and return to the Time-lapse movie screen.

Figure 7.34D: Silencing the shutter
- 8.If you are capturing the Time-lapse movie in an area where it is important to be quiet, you may want to silence the camera’s shutter. Select Silent photography from the Time-lapse movie menu and scroll to the right (figure 7.34D, image 1).
- 9.Choose On to use the silent electronic shutter or Off to use the normal mechanical shutter. Press OK or touch your selection to lock in the value and return to the Time-lapse movie screen (figure 7.34D, image 2). Now, scroll down to find the final five Time-lapse movie settings.
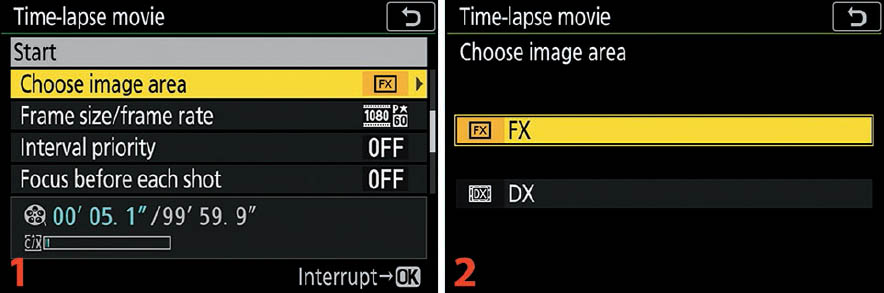
Figure 7.34E: Setting the Image area
- 10.Select Choose image area from the Time-lapse movie screen and scroll to the right (figure 7.34E, image 1).
- 11.Choose FX or DX as the Image area for this Time-lapse movie (figure 7.34E, image 2) and press OK or touch your selection to choose it.
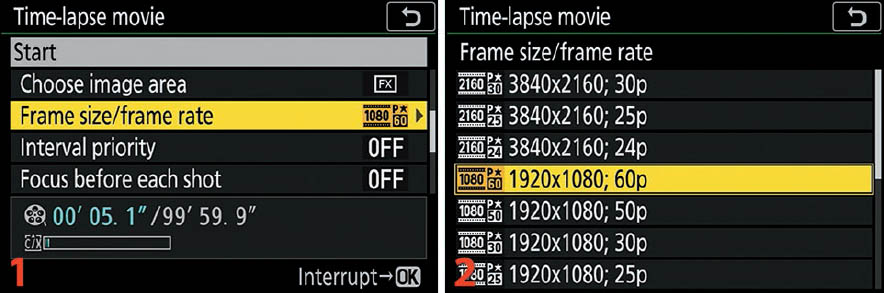
Figure 7.34F: Setting the Frame size/frame rate
- 12.Choose Frame size/frame rate from the Time-lapse movie screen and scroll to the right (figure 7.34F, image 1).
- 13.Choose one of the 10 Frame size/frame rate settings (figure 7.34F, image 2; there are no slow-motion settings) and press or touch OK to return to the main screen.
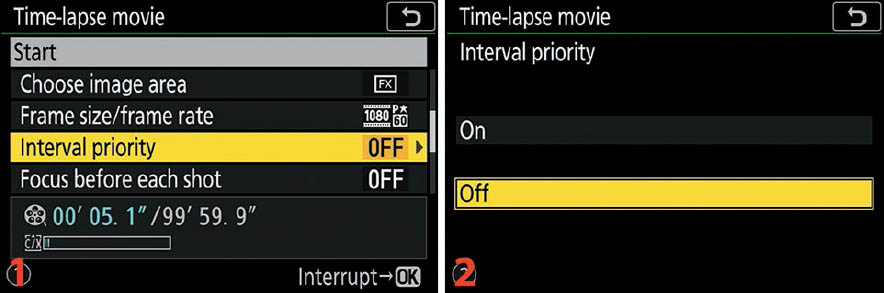
Figure 7.34G: Setting the Interval priority
- 14.When you are shooting time-lapse sequences with a short Interval time, you might run into a situation where the image exposure time on a dark night is longer than the Interval time, causing the camera to underexpose your images when the Interval expires and cuts the exposure short. Interval priority helps solve that problem. You can tell the camera whether the exposure of images is more important than the Interval (Off), or whether the Interval is more important than the exposure (On). If you choose On, make sure you are not consistently underexposing your images. This setting applies to P and A exposure modes only, S and M modes ignore this setting. Select Interval priority and scroll to the right (figure 7.34G, image 1).
- 15.Choose On to give priority to the Interval or select Off to give priority to the image exposure time. Press OK or touch the option to choose it and return to the main screen (figure 7.34G, image 2).
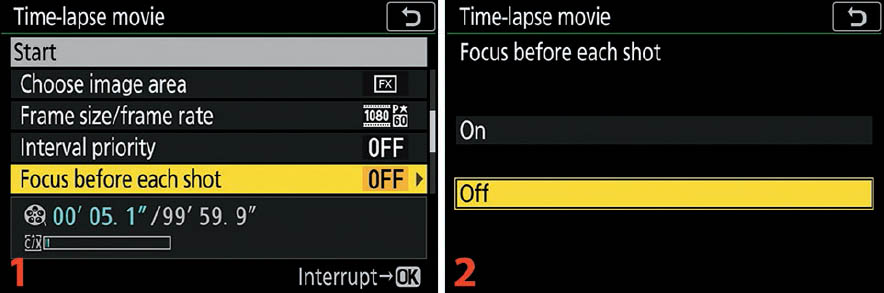
Figure 7.34H: Enabling or disabling Focus for each shot
- 16.If you want the camera to use autofocus for each subsequent shot after you focus the first image, select Focus before each shot and scroll to the right (figure 7.34H, image 1).
- 17.Choose On or Off and press OK, or touch the option (figure 7.34H, image 2). If you do use autofocus, use Release priority under Custom Setting Menu > a Autofocus > a1 AF-C priority selection (page 377) or Custom Setting Menu > a Autofocus > a2 AF-S priority selection (page 378), according to whether you are using AF-C or AF-S Focus modes. The camera won’t take a picture unless something is in focus, unless Release priority is selected.
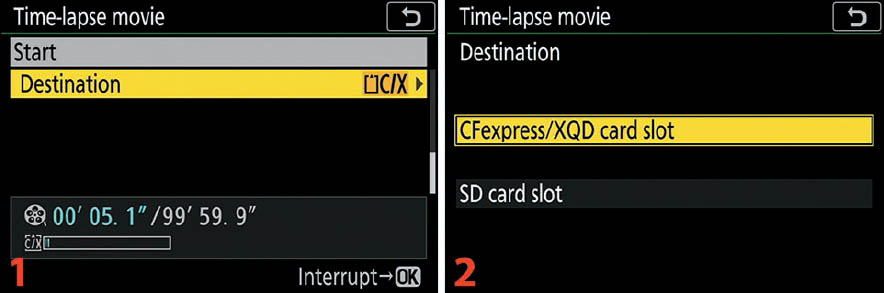
Figure 7.34I: Selecting a Destination memory card slot
- 18.Next you should choose a destination folder for your Time-lapse movie. Select Destination and scroll to the right (figure 7.34I, image 1).
- 19.Choose either the CFexpress/XQD card slot or SD card slot as a destination for the Time-lapse movie you will capture (figure 7.34I, image 2).

Figure 7.34J: Starting the Time-lapse movie sequence
- 20.Make sure your camera is on a tripod, or is otherwise stabilized, and is ready for shooting the time-lapse sequence, and then select Start from the Time-lapse movie menu (figure 7.34J, image 1).
- 21.The camera will display a screen that says, Preparing (figure 7.34J, image 2), for about three seconds and will begin shooting your sequence. During the time-lapse sequence you will see moving chevron (pointer) symbols where the image count normally appears on the upper Control panel, and the images will briefly appear on the Monitor as they are captured. If you choose to end the sequence early, simply press OK and the camera will stop taking pictures. Other than the fact that the camera stops taking pictures and the chevron symbol stops moving on the Control panel, there is nothing externally visible that lets you know the Time-lapse movie sequence stopped when you pressed the OK button.
Note: Before you start a time-lapse sequence, check the framing and exposure by taking a picture from the position you will use to capture the time-lapse movie. It is often best to shoot in Manual (M) exposure mode with everything preset to a particular aperture, shutter speed, and ISO sensitivity. When shooting in M mode, if you are worried about ambient light changes affecting the exposure during the time-lapse session, simply enable Photo Shooting Menu > ISO sensitivity settings > Auto ISO sensitivity control. Use the ISO-Auto setting from the Photo Shooting Menu because the Time-lapse movie function is just a series of still images joined together and is not a true video. Auto ISO allows the camera to vary the ISO sensitivity within a range you can set and will prevent inconsistencies in exposure during the sequence. Additionally, it is a good idea to choose a White balance setting other than Auto to keep the colors the same across all the images in the time-lapse movie.
If you have selected a long shooting time, and you are using an EN-EL15C battery, you may want to consider connecting the camera to an optional Nikon EH-7P USB-C AC adapter for continuous power.
Why is Time-lapse movie grayed out?: Time-lapse movie is not available (it’s grayed out) if Shutter speed is set to Bulb; when you are in the middle of a bracket sequence; if the camera is connected via an HDMI cable to an external device for movie recording; or when HDR, Multiple exposure, or Interval timer shooting is enabled.
Time-sequence length calculation: The total number of frames in the movie can be calculated by dividing the shooting time by the interval. Then you calculate the movie length by dividing the number of frames by the frame rate (e.g., 30p, 24p) you’ve selected in Time-lapse movie > Frame size/frame rate. Remember, the Time-lapse movie system makes short movies based on the Frame size/frame rate and Image area configured under the Time-lapse movie menu and not the same ones found on the Movie Shooting Menu.
What you will see while shooting: As previously mentioned, while you’re recording the time-lapse sequence, chevron symbols will move on the Control panel where the image count normally displays. The normal shutter speed and aperture settings will be displayed on the Control panel between frames (unless the frames are too loosely spaced in time), allowing you to make adjustments if needed (according to the exposure mode you are using). The exposure meter will not turn off during shooting. To stop the sequence outright, press OK or turn the camera off.
A movie is made: When the sequence is complete, the camera will automatically assemble a short, silent movie based on the frame rates you selected in the Movie Shooting Menu. You can identify the time-lapse movie by the fact that it shows a Play touch button on the screen with the first frame of the movie sequence.
Settings Recommendation: This function is convenient for those of us who would like to experiment with or shoot interesting time-lapse sequences. Try shooting some short sequences of an event and see how easy it is!
Focus Shift Shooting
Focus shift shooting allows the camera to vary its focus over a series of up to 300 images, with customizable intervals and focus steps. The resulting image series can later be combined in your computer into one image with very deep depth of field.
How Does Focus Shift Shooting Work?
To test the Focus shift shooting (known as focus stacking) function, I chose a red block as my closeup subject (figure 7.35A). I decided I wanted about 4 inches of sharp focus to fully cover my subject. I focused my camera on the 5-inch mark on the ruler and since I was using f/9, I knew there would be a little sharpness in front of the focus position due to depth of field.

Figure 7.35A: Beginning focus position at 4.5 inches, ending position at 8.5 inches
The two ruler pictures shown in figure 7.35A, images 1 and 2, are the first and last images of a nine-shot Focus shift shooting session. In the ruler picture shown in figure 7.35A, images 1, you can see that mostly sharp focus starts at about 4.5 inches and full sharpness begins at about 5 inches. The ruler picture shown in figure 7.35A, image 2, shows that the final zone of sharpness extends to about 8.5 inches; and is still mostly sharp out to about 9 inches.
After combining the nine images, the 3.5-inch zone of full sharpness covered my subject with room to spare. Using focus stacking was an elegant solution for what I needed to do.
Let’s examine how the focus stacking system handled my needs (figure 7.35B).

Figure 7.35B: Actual focus movement with No. of shots at 9 and Focus step width at 5
In the nine frames shown in figure 7.35B, the camera kept moving the focus from its starting position of 5 inches to its ending position of about 8.5 inches on the ruler. The most important settings were No. of shots set to 9 and Focus step width set to 5.
In figure 7.35B, image 1, I have the lens focused on the number 5 on the ruler, and at f/9 the depth of field extends some sharpness toward the camera as shown by the thin green line at 4.5 inches. I started the automatic Focus shift shooting function and the camera took 9 pictures (No. of shots) while automatically moving the focus forward by 5 steps (Focus steps width) for each frame. You do not need to take each picture individually; the camera will do it for you. As you examine figure 7.35B, images 1 to 9, note that the horizontal green line shows approximately where the primary focus position is on each frame. The camera moved the point of focus forward automatically for each new frame (starting at 5 inches and ending at 8.5 inches).
When the Focus shift shooting process was complete, I had the full subject covered with good focus, within a series of nine pictures that needed to be combined in the computer. The camera only takes the pictures; it will not assemble the final image. Let’s see how to configure the camera to do a Focus shift shooting session.
Configuring Focus Shift Shooting
There are seven configurable settings in the Focus shift shooting function, plus a Start setting to begin the automatic focus shifting process. First, let’s discuss what each setting does, and then we will configure each setting individually.
- Start: This setting starts the automatic shooting process. The camera will take the pictures without you having to press the Shutter release button. As soon as you select Start and press OK, the camera will start taking all the pictures in the series.
- No. of shots: This setting allows you to tell the camera how many shots you want it to take. You can choose a number from 1 to 300, for up to 300 images in the Focus shift shooting series. For figure 7.35B, I selected 9 shots.
- Focus step width: This setting controls how far forward the focus is shifted before the next shot is taken. You can see the action of this setting by examining the position of the green lines in figure 7.35B, images 1 to 9.
- Interval until next shot: This setting allows you to introduce a time delay, in seconds, between each picture in the Focus shift shooting series. If you select 00, the camera will not use a delay between frames and will attempt to shoot at about five frames-per-second. If you do not use the default of 00, you will need to select the number of seconds between each frame, from 01 to 30 seconds.
- First-frame exposure lock: If you set this to On, the camera will use the same exposure for each picture in the stack series. If set to Off, the camera will adjust exposure for each picture.
- Silent photography: This setting allows you to silence the camera’s shutter by switching from the mechanical shutter to the electronic shutter.
- Starting storage folder: This setting causes the camera to create a new folder for each Focus shift shooting series so that each series is separated from any previous series. You can also use this setting to start image numbering over at 0001 (e.g., DSC-0001.jpg) for each Focus shift shooting series.
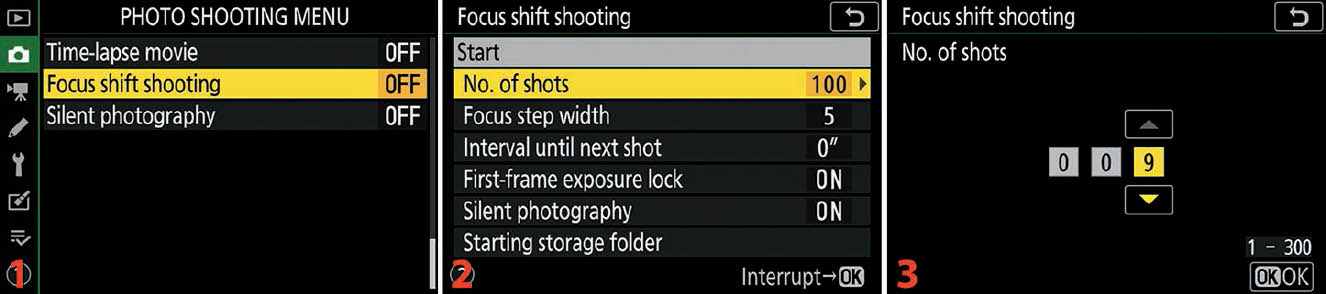
Figure 7.35C: Configuring a Focus shift shooting series
Use the following steps to configure a Focus shift shooting series:
- 1.Select Focus shift shooting (figure 7.35C, image 1).
- 2.We will skip the Start setting initially, beginning instead with No. of shots, so that we can configure the camera for our current needs (figure 7.35C, image 2). Choose No. of shots and scroll to the right.
- 3.The camera presents a series of three up/down menus, which can be used to create a No. of shots value from 001 to 300 (figure 7.35C, image 3). Choose the number of frames you want in your Focus shift shooting series and then press or touch OK.

Figure 7.35D: Configuring the Focus step width setting
- 4.Choose Focus step width from the menu and scroll to the right (figure 7.35D, image 1).
- 5.The camera presents you with a Focus step width selector bar (figure 7.35D, image 2). Touch the arrows on the left or right of the selector bar (or use the Multi selector pad) to move the yellow pointer toward 1 or 10. The default value is 5, as indicated by the yellow pointer at the red arrow in image 2. The Focus step width has no easily measurable value since the actual focus movements will be affected by how close you are to your subject and the zoom setting of your lens (field of view). You will need to experiment with this value by measuring the depth of focus you need for a macro subject, or by guesstimating with a larger subject like a landscape. If you need smaller focus steps, move the yellow pointer toward 1. If you need larger steps, move it toward 10. Press or touch OK after you have chosen a value.
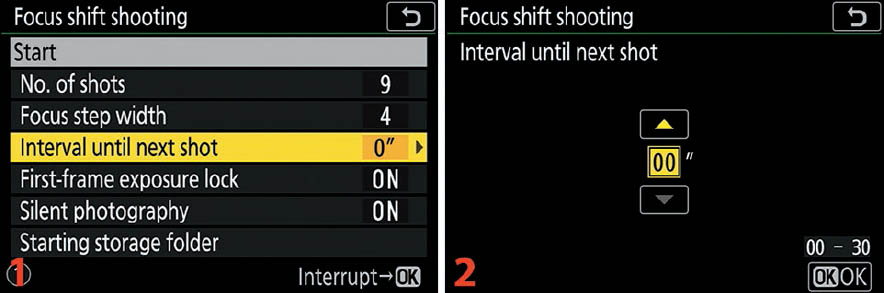
Figure 7.35E: Configuring Interval until next shot
- 6.Highlight Interval until next shot and scroll to the right (figure 7.35E, image 1).
- 7.Use the up/down menu to select a value from 00" to 30" (figure 7.35E, image 2). If you select 00", the camera will not use a delay between frames and will attempt to shoot a rapid succession of frames at ~5.5 frames per second. If you want more time between frames, choose from as low as 1 second (01") to as long as 30 seconds (30") between each frame of the Focus shift shooting series. Press or touch OK after you have chosen a value. Note: If you are using flash to light your subject, you may need to allow a second or two between frames for the flash to recycle. Experiment with this!

Figure 7.35F: Configuring First-frame exposure lock
- 8.Choose First-frame exposure lock and scroll to the right (figure 7.35F, image 1).
- 9.Highlight On or Off and press OK or touch your selection to choose it (figure 7.35F, image 2).
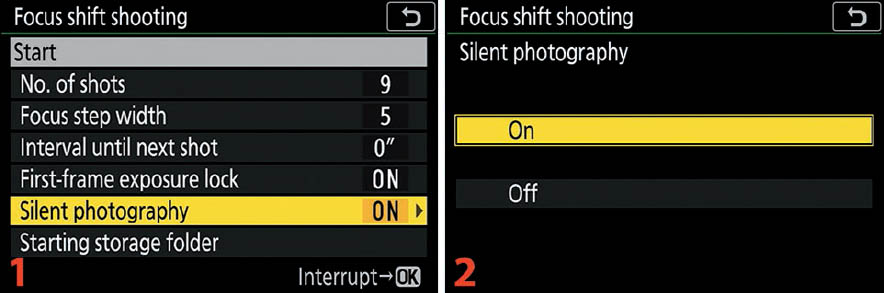
Figure 7.35G: Configuring Silent photography
- 10.To silence the camera, highlight Silent photography and scroll to the right (figure 7.35G, image 1).
- 11.Select On to silence the shutter by using the camera’s electronic shutter instead of its mechanical shutter (figure 7.35G, image 2). If On is selected, the entire Focus shift shooting series will be silent. Choose Off to continue using the normal mechanical shutter with its resulting sounds. Press OK or touch your selection to choose it.

Figure 7.35H: Configuring Starting storage folder
- 12.You can choose to have the camera create a new folder for each Focus shift shooting series so that each series is stored separately. You can also choose to set image numbering back to 0001 at the beginning of each session (e.g., DSC-0001.jpg). Choose Starting storage folder from the Focus shift shooting menu and scroll to the right (figure 7.35H, image 1).
- 13.If you want to use a separate new folder for each Focus shift shooting session, highlight New folder and scroll to the right (figure 7.35H, image 2) or touch the little box to the left of New folder to add a check mark. Now when the camera starts a new Focus shift shooting series, it will first create a new folder. For instance, I was taking normal pictures using a folder named 300YOUNG. When I put a check mark next to New folder (enabled it) and started a Focus shift shooting series, the camera created a new folder named 301YOUNG and saved all the session images in the new folder. You can also choose to keep using current sequential image numbering or start over with 0001 with each new series. If you would prefer to use new image numbers for each series, go to the next step instead of selecting OK. Otherwise, to keep using current sequential image numbers, press or touch OK and skip step 14.
- 14.If you would like each Focus shift shooting series to have brand-new file numbers starting at 0001, highlight Reset file numbering and scroll to the right or touch the box to place a check mark in it (figure 7.35H, image 3). Press or touch OK to lock in your choice.

Figure 7.35I: Starting a Focus shift shooting series
- 15.After you have completed choosing the settings above, it’s time to actually capture the Focus shift shooting series of images that will later be combined into a final image with deep depth of field. Before you execute the next step, be sure your camera is on a tripod, focused, in the exposure mode you want to use, and fully ready to take the focus-shifted (stacked) images. Scroll up to Start at the top of the menu and press OK (figure 7.35I, image 1).
- 16.A popup box with the word Preparing will show on the screen (figure 7.35I, image 2) and the camera will begin taking pictures without you having to press the Shutter-release button. The focus point will move forward for each image. When the process is complete you will have a series of images on your memory card that are ready to be combined in your computer. You can interrupt an active Focus shift shooting session by pressing OK or by touching Interrupt/OK in between pictures.
- 17.If you press the Menu button during the session, the In progress screen shown in figure 7.35I, image 3, will appear. You can press OK or touch Off with your fingertip to stop the Focus shift shooting session part of the way through its sequence without losing any of the images already captured.
Note: Assembling the stacked images into a final combined image with deep depth of field in your computer is beyond the scope of this book. However, there are good resources for learning about combining images.
Photoshop has a built-in utility to combine focus-stacked images through a process called focus blending. Do a YouTube search for “Photoshop focus blending,” and you will find some good video resources.
Many experienced focus stack shooters often recommend Helicon Focus software. You can review the software here: http://www.heliconsoft.com
Enjoy the new focus stacking capability found in your camera. Hopefully, in the future, Nikon will provide image combination within the camera so you don’t have to use a computer.
Silent Photography
Silent photography allows you to make the camera shoot silently. The camera will use its electronic shutter to make exposures with no noise. This mode is best used in environments where camera noise is not allowed or could draw unwanted attention to the photographer.
There are a couple of things to be aware of when using this mode:
- Rolling shutter effect: If the subject or photographer is moving quickly (e.g., panning), the subject might appear to lean in the direction of the motion in an odd fashion. This is caused by the fact that Silent shooting uses the camera’s electronic shutter only, and each row of the sensor is read in quick succession from top to bottom. As the camera or subject moves, the subject is shifted slightly for each row of the imaging sensor, as that row is read by the camera. This introduces a weird distortion that makes the subject appear to lean in the direction of the motion. Silent shooting might not be a good idea when the subject or the camera is moving at a higher than normal speed. For more information do a Google search on “rolling shutter versus global shutter.“
- Banding under certain types of lighting: Certain types of pulsed lighting (e.g., fluorescent, mercury-vapor, and sodium) can cause a banding or flickering effect as the light varies during the time of the exposure. It’s best to use the normal shutter when shooting under pulsed (non-continuous) lighting.
- Slower burst shooting: Using this mode when burst shooting can drop the frame rate (fps) by about 1 to 1.5 frames per second. There is a chart on pages 127–128 of the downloadable Nikon Z 7II/Z 6II Reference Manual that lists the frame rates in and out of Silent mode.
- No flash photography allowed: Short-duration flash photography will cause banding or bright spots in your subject. You must use continuous lighting of some form, or good ambient light, to take pictures in Silent photography mode.
Now let’s see how to select Silent photography.

Figure 7.36: Selecting Silent photography
Use the following steps to select Silent photography:
- 1.Choose Silent photography (figure 7.36, image 1).
- 2.Highlight On or Off on the Silent photography menu to enable or disable silent shooting (figure 7.36, image 2). Press OK or touch your choice to finish. Image 3 shows SL ON has been selected.
Note: Enabling Silent photography mode will automatically disable the following: the Speedlight flash unit (no flash is allowed), Beep sound, Long exposure NR, and the Electronic front-curtain shutter. If you are photographing flashing lights, such as an ambulance, there might be banding or bright spots in your images.
Settings Recommendation: Silent photography is great for environments such as outdoor weddings (no flash is available), photographing grizzly bears in Alaska, or sneaky pictures of family and friends—anywhere photographers do not want to call attention to themselves. Any time you want your camera to stop making noise while taking pictures, the camera or subject is not moving rapidly, and the lighting is continuous, true Silent shooting is a great feature to have.
Author’s Conclusion
Congratulations on configuring the camera for still image capture! If you save the current Photo Shooting Menu settings to one of the camera’s three User settings (U1, U2, or U3) with Setup Menu > Save user settings, you will have configured only one of the camera’s User settings. Now, configure the camera a different way and save it to one of the other User settings (U2 or U3).
Taking advantage of the camera’s three User settings gives you a great deal of flexibility in how your camera operates. You can switch between three different camera configurations very quickly.
Next, let’s examine the Movie Shooting Menu to learn how to set up the camera for capturing excellent video.