Custom Setting d6: Extended Shutter Speeds (M)
The Z6 II and Z7 II cameras enjoy new functionality for enthusiasts and professionals—the ability to shoot timed, long exposures by using the Extended shutter speeds (M) function. Whereas most previous Nikons were limited to a 30-second shutter speed for long exposures, the Z6 II and Z7 II allow you to select extended shutter-speed values between 30 and 900 seconds (15 minutes).
Let’s see how to enable extended shutter speeds first, and then we’ll examine how to select longer speeds. The camera must be set to Manual mode (M) on the Mode dial to use this new functionality.

Figure 9.30A: Enabling or disabling Extended shutter speeds for Manual (M) mode
Use these steps to enable or disable Extended shutter speeds (M) mode:
- 1.Choose d6 Extended shutter speeds (M) (figure 9.30A, image 1).
- 2.Select On or Off and press OK (figure 9.30A, image 2).
Let’s examine how to select a longer shutter speed.

Figure 9.30B: Extended shutter speeds in Manual (M) mode, 30 to 900 seconds (15 mins.)
Use these steps to select a shutter speed longer than 30 seconds:
- 1.Set the Mode dial to Manual (M) exposure mode (figure 9.30B, image 1).
- 2.Turn the rear Main command dial (figure 9.30B, image 2).
- 3.The shutter speed number will change to a value between 900 seconds and 1/8000 second (figure 9.30B, image 3). Take your pictures.
Settings Recommendation: This is a powerful new function for those of us who want to better control long exposures for things like nighttime images and blurring the movement of waterfalls and bodies of water. Now our cameras can precisely time very long single exposures for superior results.
Why not go out tonight and do some long exposures for fun, and learn how to use this new feature? Be sure to set the camera to Manual mode, select an aperture, and dial in your long shutter speed. You might also want to enable long-exposure noise reduction (Photo Shooting Menu > Long exposure NR, see page 238) to help prevent long-exposure noise.
Custom Setting d7: Limit Selectable Image Area
If you were to assign the Choose image area function to one of the 12 available slots on the i Menu (page 23), or to a camera button (e.g., Fn1, Fn2, page 436), you can use Limit selectable image area to limit which Image area modes appear as selections.
Normally, you will have five Image area modes for the Z7 II and four modes for the Z6 II for selection from an assigned camera control (figure 9.31, image 2). The camera will offer the checked Image area modes in screens like the one shown in figure 9.31, image 3. The screen in image 3 is the result of my using Custom Setting f2 Custom controls (page 436) to assign Choose image area to the Fn1 button. When I press the Fn1 button and rotate either of the camera’s Command dials, I can select from the displayed Image area modes.
If you uncheck any of the Image area modes listed in figure 9.31, image 2, the unchecked mode will not appear on screens like the Choose image area screen shown in image 3.
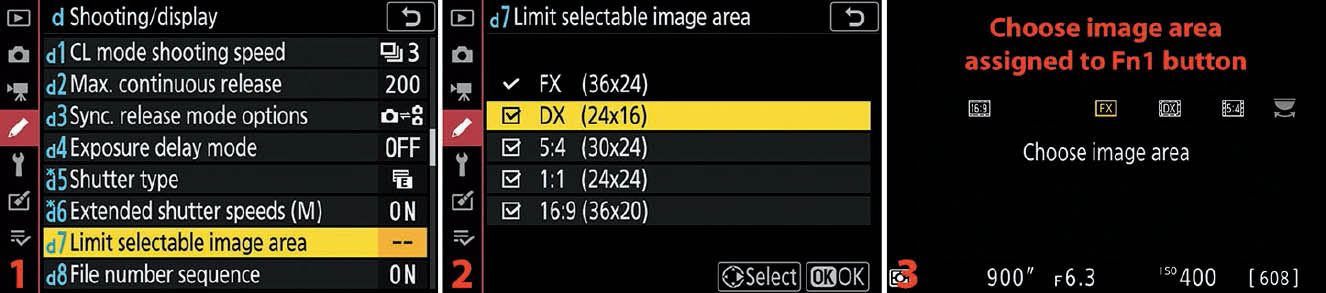
Figure 9.31: Limit the Image area mode selections for assignable controls
Use the following steps to limit the selection of Image area modes for assignable camera controls:
- 1.Choose d7 Limit selectable image area (figure 9.31, image 1).
- 2.Remove the check marks from the Image areas that you do not want to show up on an assignment to the i Menu (page 23) or an assignable button/dial arrangement (page 436). To add or remove a check mark, touch the little box next to the option, or highlight the option [e.g., DX (24×16)] and scroll to the right with the Multi selector pad. The FX (36×24) mode cannot be unchecked. When you have selected the Image area modes that you want to see on your camera screens for Assigned control/dial arrangements or an i Menu assignment, press or touch OK to finish.
Settings Recommendation: I enjoy having all the camera’s Image area modes available when I assign Choose image area to a button or the i Menu. However, there may be Image area modes that you will never use and would rather not have to scroll through. In that case, uncheck them and they will not appear. Most of us will leave this function set to factory default so as not to limit our choices.
Custom Setting d8: File Number Sequence
File number sequence allows your camera to keep count of the image file numbers for each picture you take, in a running sequence from 0001 to 9999. After 9999 pictures, it rolls back over to 0001. Or you can cause it to reset the image number to 0001 when you format or insert a new memory card. Here are the three settings, with an explanation of how each works:
- On: Image file numbers start at 0001 and continue running in a sequence until the image count exceeds 9999, at which point the camera creates a new folder and image numbers roll over to 0001 again. The File number sequence continues even if a new folder is created, a new memory card is inserted, or the current memory card is formatted. If you insert a different memory card that contains an image number in the current folder with a higher value than the previous memory card, the camera will adopt the new higher image number. In other words, file numbering continues from the last number used or the largest file number in the current folder, whichever is bigger, until 9999 images are reached, at which point the camera starts the numbering sequence over at 0001.
- Off: Whenever you format or insert a new a memory card, the number sequence starts over at 0001. If you exceed 5000 images in a single folder, the camera automatically creates a new folder and starts counting images at 0001 again (i.e., 5001 becomes 0001).
- Reset: This is similar to the On setting. However, it is not a true running total to 9999 because the image number is dependent on the folder in use. The camera simply takes the last number it finds in the current folder and adds 1 to it, up to 9999. If you switch to an empty folder, the numbering starts over at 0001. Each folder has its own number series and causes a File number sequence Reset.

Figure 9.32: File number sequence
Here are the steps used to configure File number sequence:
- 1.Choose d8 File number sequence (figure 9.32, image 1).
- 2.Choose one of the three choices on the list (figure 9.32, image 2). On is the best choice for most of us. Press OK or touch the option to finish.
Note: A strange event could possibly occur with Nikon’s image numbering system. If the current folder to which the camera is writing images is numbered 999 and it contains either 5000 pictures or a picture numbered 9999, the camera will disable its shutter and stop allowing pictures (or videos) to be taken. You will need to follow these two steps to reenable the camera’s shutter:
- 1.Use the screens shown in figure 9.32 to set d8 File number sequence to Reset.
- 2.Insert a new memory card or format the current card (Setup Menu > Format memory card). Be sure you’ve backed up your images before formatting the card!
Settings Recommendation: I heartily recommend that you set File number sequence to On, if it has been turned off. After much experience with Nikon DSLR and now Z cameras, and many years of storing thousands of files, I’ve found that the fewer number of files with similar image numbers, the better. Why take a chance on accidentally overwriting the last shooting session when copying files on your computer just because they have the same image numbers?
Custom Setting d9: Apply Settings to Live View
One of the benefits of using a mirrorless camera with an EVF is the ability to immediately see changes to settings reflected in the image preview in the EVF or on the Monitor. In effect, the camera previews the final image before you take it. Add in the live histogram for precise exposure control and you have an especially powerful ability to create beautiful, well-exposed images.
When the Apply settings to live view function is enabled, changes to image settings such as exposure, Picture Controls, White balance, and depth of field are updated immediately on the “live view” EVF or Monitor screens. In other words, the subject on the camera’s screens will appear too dark if underexposed and too light if overexposed, and just right if exposed correctly.
If you disable the Apply settings to live view function, the camera will use its EVF and Monitor to make sure you can see your subject well, regardless of the ambient light (unless too dark to use) or subject exposure. The EVF and Monitor will not reflect how the final image will look. In other words, with the Apply settings to live view function disabled you will have no automatic image preview; and, similar to a using a viewfinder on a DSLR, you will not know whether the image is exposed correctly until you review it after the fact.
Note: The camera offers live preview of the aperture setting down to f/5.6 only; however, you can overcome this limitation. Please review the side bar titled Previewing Depth of Field Accurately following this chapter section.
Let’s examine how to enable or disable the Apply settings to live view function.

Figure 9.33: Enabling or disabling Apply settings to live view
Use the following settings to enable or disable Apply settings to live view
- 1.Choose d9 Apply settings to live view (figure 9.33, image 1).
- 2.Select On to enable live final image preview, or Off to use the live view screens merely to view the subject well (figure 9.33, image 2). On is the best choice for most of us. Press OK or touch the option to finish.
Settings Recommendation: I leave the Apply settings to live view function set to On at all times. I love the automatic image preview with setting change updates. It is one of the unique benefits of investing in mirrorless camera technology. It makes me feel confident that my final image will look exactly the way I want it to look before I release the shutter.
However, if you want the live view screens to simply show you your subject well, even in low light, without reflecting changes to important settings (such as exposure or white balance), then set this function to Off.
Previewing Depth of Field Accurately
Depth of field is automatically previewed in the EVF and on the Monitor, but down to f/5.6 only. Limitations to the autofocus system prevent the camera from focusing well with apertures set to values below f/5.6 (too dark). Therefore, the camera limits depth of field in automatic image preview to f/5.6 and larger apertures. Even if you are using f/16 or f/22, the depth of field seen on the EVF or Monitor is from an f/5.6 aperture setting. If you need full depth of field preview, you will have to assign the Preview function to an assignable button, such as Fn1 or Fn2. Then you can press the Assigned control to stop down the lens fully and see the actual depth of field at any aperture. See Custom setting f2: Custom controls (page 436) for information on assigning functions to camera buttons.
Custom Setting d10: Framing Grid Display
The Framing grid display function allows you to have a grid overlay on the EVF and Monitor in all Image area modes. The grid (figure 9.34, image 3) allows you to keep the horizon level and to align your camera with objects, such as doors, windows, and buildings. The grid overlay does not appear in the captured image or video.
There are two settings in the Framing grid display function:
- On: Gridlines are displayed on the EVF and Monitor.
- Off: No gridlines are displayed.
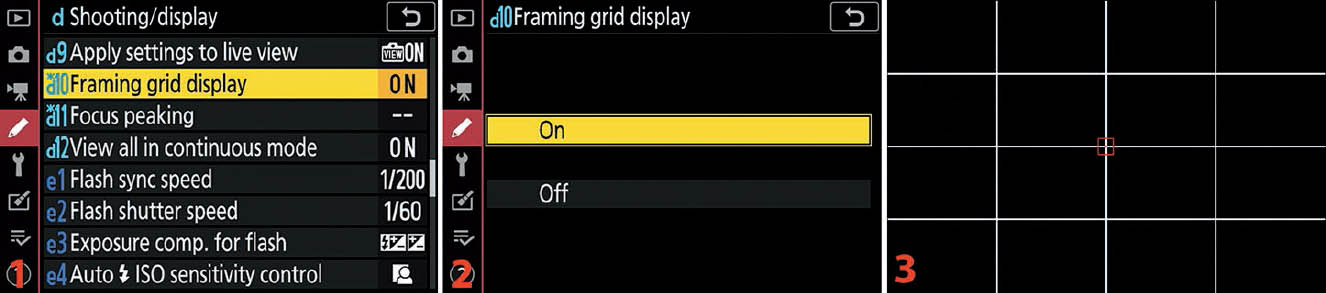
Figure 9.34: Framing grid display configuration
Here are the steps used to enable or disable the Framing grid display:
- 1.Choose d10 Framing grid display (figure 9.34, image 1).
- 2.Select On to enable the grid display, or Off to use normal screens, and press the OK button or touch the option to lock in your setting (figure 9.34, image 2).
Figure 9.34, image 3, shows the Framing grid display with the camera’s lens cap on for maximum contrast.
Settings Recommendation: I use these gridlines to line up things as I shoot so that I won’t have tilted horizons or buildings. Many of us tend to tilt the camera one way or another, and gridlines help us see that we’ve tilted the frame.
I especially enjoy shooting with gridlines enabled when I’m down at the beach. Who needs tilted ocean views? When you’re shooting architecture, the gridlines are invaluable for making sure buildings, walls, and doors are correctly oriented with the edge of the frame.
Custom Setting d11: Focus Peaking
Focus peaking allows you to control the color of the fringe you’ll see surrounding the areas of your subject that are in good focus (when Focus peaking is enabled). The camera offers four Focus peaking highlight colors so that you can adjust your camera to a color that contrasts with your subject and background.
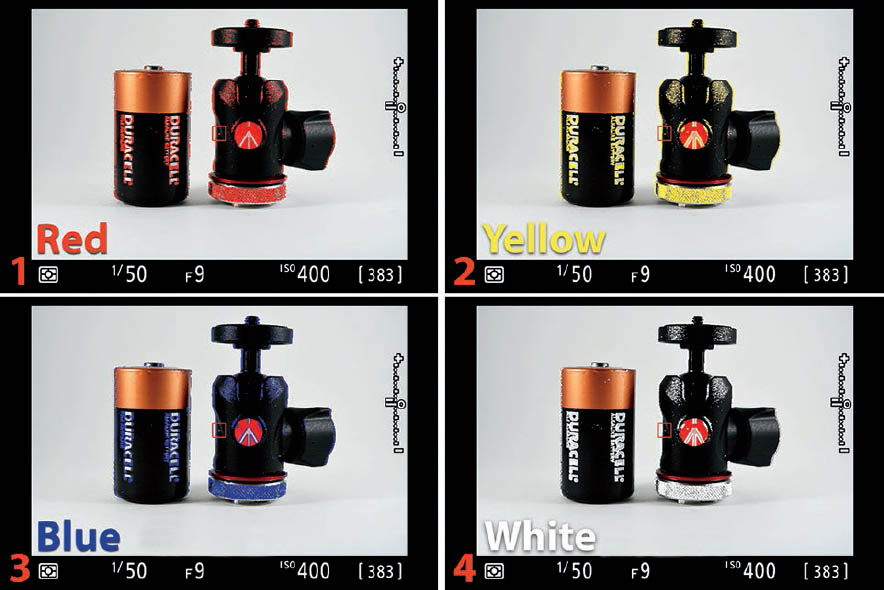
Figure 9.35A: Peaking highlights colors (Red, Yellow, Blue, and White)
Notice the four Peaking highlights colors in figure 9.35A, images 1–4. I focused manually on the Duracell words on the battery and the contour of the Manfrotto micro ball head. You can see clearly how the focus peaking color is highlighting the edges of the Duracell words and the contour of the micro ball head, signifying that the colored area is in good focus.
First let’s see how to select a peaking level (intensity of color fringe) and enable focus peaking, and then we will examine how to set the peaking highlights color.

Figure 9.35B: Choosing a Peaking level (edge color intensity) and enabling focus peaking
Use the following steps to choose a Focus peaking level and enable Focus peaking:
- 1.Choose d11 Focus peaking (figure 9.35B, image 1).
- 2.Highlight Peaking level and scroll to the right (figure 9.35B, image 2).
- 3.Choose a Peaking level from PEAK 1 (low sensitivity) to PEAK 3 (high sensitivity) (figure 9.35B, image 3). Press OK or touch the option to lock in the sensitivity and intensity level. The larger the Peaking level number, the higher the sensitivity and larger the focus peaking highlight fringe will be. My camera is set to PEAK 3 (high sensitivity). The four color choices can be seen in figure 9.35A, images 1–4. When you choose a Peaking level (anything but Off), you have also enabled focus peaking for manual focusing. There is no way to enable or disable focus peaking other than selecting a Peaking level or setting it to Off.
Note: Once focus peaking is enabled (step 3), you can focus manually and see when particular areas of your subject are in focus as the color fringe becomes very prominent on color-change edges and rough contours (figure 9.35A).
Settings Recommendation: I set the camera to PEAK 3 so that it would be easy to see the focus peaking highlight fringe in the graphics. PEAK 3 may be a little overkill for most uses. I use PEAK 2 most of the time.
Next let’s see how to select a highlight color.

Figure 9.35C: Selecting a Peaking highlight color
Use the following steps to choose a Peaking highlights color:
- 1.Choose d11 Focus peaking (figure 9.35C, image 1).
- 2.Select Peaking highlight color and scroll to the right (figure 9.35C, image 2).
- 3.Choose a color and press OK or touch the option (figure 9.35C, image 3).
Settings Recommendation: I generally choose the Red setting for the Peaking highlight color because red seems to contrast well with most other colors. Of course, some subjects will do better with other colors; therefore, you have a choice of three more when needed.
Custom Setting d12: View All in Continuous Mode
The View all in continuous mode function allows you to control whether the camera’s EVF and Monitor are active or disabled when you are burst shooting in one of the Continuous modes (CL or CH). If it is set to Off, both screens go dark during burst shooting and come back on afterward.
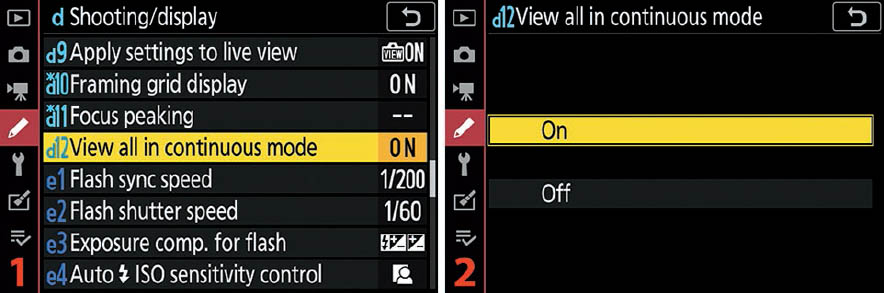
Figure 9.36: Enabling or disabling the camera’s screens during burst shooting
Use the following steps to turn the Monitor and EVF on or off when using CL or CH mode:
- 1.Choose d12 View all in continuous mode (figure 9.36, image 1).
- 2.Select On to leave screens active or Off to disable the screens during burst shooting. Press OK or touch an option to finish (figure 9.36, image 2).
Settings Recommendation: As a landscape photographer, I rarely use burst shooting and I cannot imagine a time when I would not want to see what my camera is capturing while shooting bursts of images. However, since Nikon gave us this function there must be reasons that some photographers will want the Monitor and EVF to turn off during burst shooting. Most of us will ignore this function.
SECTION 5: E BRACKETING/FLASH
Custom Settings e1 to e7
In the e Bracketing/flash section, there are seven functions to consider:
- e1: Flash sync speed
- e2: Flash shutter speed
- e3: Exposure comp. for flash
- e4: Auto [flash] ISO sensitivity control
- e5: Modeling flash
- e6: Auto bracketing (mode M)
- e7: Bracketing order
Each of these functions has something to do with bracketing or Speedlight flash use.
All seven “e” functions and their settings—discussed within the following sections—are found on the Custom Setting Menu under the e Bracketing/flash menu item (figure 9.37).

Figure 9.37: e Bracketing/flash
Custom Setting e1: Flash Sync Speed
Flash sync speed lets you select a basic flash synchronization speed from 1/200 s to 1/60 s (figure 9.38, image 2). Or, if you prefer, you can use the Auto FP mode–1/200 s (Auto FP).
Auto FP high-speed sync enables the use of fill flash even in bright daylight with wide aperture settings. It allows you to set your camera to the highest shutter speed available, up to 1/8000 s, and still use the external flash unit to fill in shadows. See the next section, Auto FP High-Speed Sync Review (page 426), where we discuss how this works.
The Auto FP mode is available only with certain external Nikon Speedlights. See the upcoming sidebar Which Flash Units for Auto FP High-Speed Sync Mode? (page 428) to see if your Nikon Speedlight(s) are compatible.
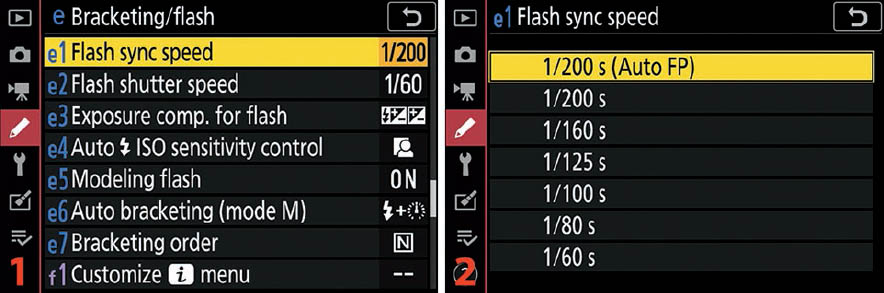
Figure 9.38: Flash sync speed
Here are the steps used to adjust your camera’s Flash sync speed:
- 1.Choose e1 Flash sync speed (figure 9.38, image 1).
- 2.Choose a Flash sync speed and press OK or touch the option (figure 9.38, image 2).
When you’re using Auto FP mode, the output of your flash is reduced but doesn’t cut off the frame for exposures using a shutter speed higher than the normal flash sync speed (X Sync). Why? Let’s review.
Auto FP High-Speed Sync Review
In a normal flash situation, with shutter speeds of 1/200 second and slower, the entire shutter is fully open and the flash can fire a single burst of light to expose the subject. It works like this: there are two shutter curtains in your camera. The first shutter curtain opens, exposing the sensor to your subject. The flash fires, providing correct exposure, and then the second shutter curtain closes. For a very brief period, the entire sensor is uncovered. The flash fires during the time when the sensor is fully uncovered.
However, when your camera’s shutter speed is set above 1/200 second, the shutter curtains are never fully open for the flash to expose the entire subject in one burst of light. The reason is that at higher shutter speeds, the first shutter curtain starts opening and the second shutter curtain quickly starts following it. In effect, a slit of light is scanning across the surface of your sensor, exposing the subject. If the flash fired normally, a flash of light would expose the width of that slit between the shutter curtains, but the rest of the sensor would be blocked by the curtains. You would have a band of correctly exposed image, and everything else would be underexposed.
What happens to your external Nikon Speedlight to allow it to follow that slit of light moving across the sensor? It changes from a normal flash unit into a pulsing strobe unit. Have you ever danced under a strobe light? A strobe works by firing a series of light pulses. Similarly, when your camera’s shutter speed is so high that the Speedlight cannot fire a single burst of light for correct exposure, it can use its Auto FP high-speed sync mode and fire a series of light bursts over and over as the shutter curtain slit travels in front of the image sensor. The Speedlight can fire thousands of bursts per second. To a photographer or subject, it still looks like one big flash of light, even though in reality it is hundreds or thousands of bursts of light, one right after the other.
When the camera is set to Auto FP mode, you’ll see something like this on the Speed-light’s LCD monitor:
- TTL FP
- TTL BL FP
The “FP” tells you that the camera and Speedlight are ready for you to use any shutter speed you’d like and still get a good exposure—even with wide-open apertures!
You can safely leave your camera set to 1/200 s (Auto FP) all the time because the high-speed sync mode does not kick in until you raise the shutter speed above the maximum setting of 1/200 s. Below that shutter speed, the flash works in normal mode and does not waste any power by pulsing the output.
This pulsing of light reduces the maximum output of your flash significantly but allows you to use any shutter speed you’d like while still firing your external Speedlight. The higher the shutter speed, the lower the flash output. In effect, your camera is depending on you to provide enough ambient light to offset the loss in power. I’ve found that even my powerful SB-5000 Speedlight can provide only enough power to light a subject out to about 8 feet (2.4 m) when using a 1/8000 s shutter speed. With shutter speeds that high, there needs to be enough ambient light to help the flash illuminate the subject, unless you are very close to the subject.
However, now you can use wide apertures to isolate your subject in direct sunlight—which requires high shutter speeds. The flash will adjust and provide great fill light if you’re using Auto FP high-speed sync mode.
Note: If your flash fires at full power in normal modes, it will blink the flash indicator in the Viewfinder (or Monitor) to let you know that all available flash power has been used and that you need to check to see if the image is underexposed. When the camera is firing in Auto FP high-speed sync mode, that doesn’t happen. You’ll get no warning if the image does not have enough light. Check the camera’s histogram often to validate your exposures when using Auto FP.
Special Shutter Speed Setting X + Flash Sync Speed
When using Manual (M) or Shutter-priority auto (S) exposure modes, there is still one more setting below the slowest shutter speed (30" or 900"), BULB, and TIME; it’s named X + Flash sync speed. This special setting allows you to set the camera to a known shutter speed and shoot away. You will see “x 200” in the top Control panel and “x 1/200” on the Information display if Custom Setting Menu > e1 Flash sync speed is set to 1/200 s. Whatever Flash sync speed you select will show up after the X. If you select a Flash sync speed of 1/125 s, then X 125 will show up as the next setting below BULB. Selecting a Flash sync speed of 1/60 s means that X 60 will show up below BULB and TIME.
When you select this setting, the shutter speed will not vary from your chosen setting. The camera will adjust the aperture and flash when in Shutter-priority auto (S) mode, or you can adjust the aperture while the flash controls exposure in Manual (M) mode.
This special X-Sync mode is not available in Aperture-priority auto (A) or Programmed auto (P) mode because the camera controls the shutter speed in those two settings. Primarily, you’ll use this setting when you are shooting in Manual or in Shutter-priority auto and want to use a known X-Sync speed.
Settings Recommendation: I leave my camera set to 1/200 s (Auto FP) as shown in figure 9.38, image 2, all the time. The camera causes the flash to work just as it normally would until one of its settings takes the shutter speed above 1/200 s, at which time the flash starts pulsing the light to match the shutter curtain travel.
Once again, you won’t be able to detect this high-frequency strobe effect because it happens so fast it seems like a single burst of light. Just remember that the flash loses significant power (or reach) at higher shutter speeds because it is forced to work so hard.
Be sure you experiment with this to get the best results. You can use a big aperture opening like f/1.4 to have very shallow depth of field in direct bright sunlight because you can use very high shutter speeds. This will allow you to make images that many others simply cannot create. Learn to balance the flash and ambient light in Auto FP high-speed sync mode. All this technical talk will make sense when you see the results. Pretty cool stuff!
Which Flash Units for Auto FP High-Speed Sync Mode?
At the time this book was being written, the following external Speedlights allow you to use any shutter speed and, if the flash exceeds the sync speed, the Speedlight will adjust (pulse) to match lighting needs: SB-5000, SB-910, SB-900, SB-800, SB-700, SB-600, SB-500, and SB-R200. With the larger Speedlights, you’ll need to learn how to balance ambient light with light from the flash when using shutter speeds higher than 1/200 s. Just remember that your flash unit’s range will be seriously reduced at higher shutter speeds.
Custom Setting e2: Flash Shutter Speed
Flash shutter speed controls the minimum shutter speed your camera can use in various flash modes. You can select from 1/60 second (1/60 s) to 30 seconds (30 s). Whereas the previous function, Flash sync speed, controls the fastest shutter speed available, Flash shutter speed controls the slowest shutter speed available in specific modes. Let’s consider each mode and its minimum shutter speed:
- Front-curtain sync (fill flash), Rear-curtain sync, or Red-eye reduction: In Programmed auto (P) mode or Aperture-priority auto (A) mode, the slowest shutter speed can be selected from the range of 1/60 second (1/60 s) to 30 seconds (30 s) (figure 9.39). Shutter-priority (S) mode and Manual (M) mode cause the camera to ignore Flash shutter speed, and the slowest shutter speed can be as slow as 30 seconds (30 s) if the photographer chooses a speed that slow.
- Slow sync, Red-eye reduction with slow sync, or Slow rear-curtain sync: These three modes ignore Flash shutter speed, and the slowest shutter speed can be as slow as 30 seconds (30 s) if the camera or photographer chooses a shutter speed that slow.
Let’s see how to adjust the Flash shutter speed.

Figure 9.39: Flash shutter speed
Here are the steps to set the Flash shutter speed minimum:
- 1.Choose e2 Flash shutter speed (figure 9.39, image 1).
- 2.Select a Flash shutter speed and press OK or touch the option (figure 9.39, image 2).
Remember that slower shutter speeds can cause subject ghosting when flash is used in high-ambient-light conditions. Press the OK button or touch the option to lock in the setting.
Note: Custom setting e2 is only partially used by the flash modes because the default is preset to as slow as 30 seconds in Shutter-priority and Manual modes.
Settings Recommendation: I normally use 1/60 s. Shutter speeds slower than 1/60 s can cause ghosting if the ambient light is too high. The subject can move after the flash fires but with the shutter still open and with enough ambient light to record a blurred ghost effect. You’ll have a well-exposed picture of the subject with a ghost of your subject also showing in the image. Use slower shutter speeds only when you are sure that you’ll be in dark conditions and the flash will provide the only lighting—unless you’re shooting special effects, like a blurred aftereffect following your subject to imply movement.
Custom Setting e3: Exposure Comp. for Flash
The Exposure comp. for flash function allows you to treat the subject and background differently when you use flash. You can separate the normal exposure compensation function (for the background) and the flash compensation function (for the subject). Exposure compensation can be applied to the background only, or to the background and subject (the entire frame) with flash. There are two available settings:
- Entire frame: Both the flash and the exposure compensation work normally.
- Background only: The nonflash exposure compensation (that you adjust with the Exposure compensation button) and the flash compensation (that you apply with the Flash compensation button) are separate. Flash compensation applies to the subject only, and nonflash exposure compensation applies to the background only.
Now, let’s see how to choose an exposure compensation setting for the flash unit.
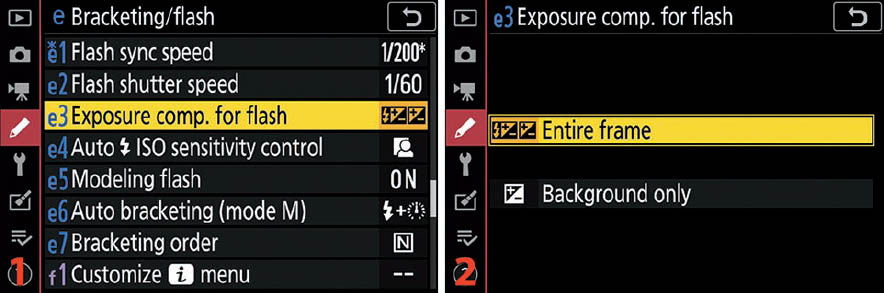
Figure 9.40: Exposure comp. for flash
Use the following steps to choose a flash and exposure compensation combination:
- 1.Choose e3 Exposure comp. for flash (figure 9.40, image 1).
- 2.Choose Entire frame or Background only (figure 9.40, image 2). If you choose Background only, the non-flash and flash compensation functions are applied separately. Press OK or touch the option to finish.
Settings Recommendation: I leave my camera set to Entire frame for most shooting. If I need to change the light level relationship between the subject and the background, I set the camera to Background only and experiment until I find the best compensation for balance or to emphasize one or the other. Why not spend some time experimenting and learning how to use this technology?
Custom Setting e4: Auto [Flash] ISO Sensitivity Control
Auto [Flash] ISO sensitivity control allows you to select whether the subject (only) or the subject and background is used for automatically adjusting exposure when you are using the Auto ISO sensitivity control and flash. The camera can isolate the subject because it has focus (distance) information from the lens. There are two settings in this function:
- Subject and background: The camera examines both the subject and the background when you are using a flash unit and will adjust ISO sensitivity so that both are exposed well (if possible).
- Subject only: The camera examines only your subject and adjusts the ISO setting to make sure it is exposed well, regardless of the background’s exposure.
Let’s adjust the Auto [Flash] ISO sensitivity control.

Figure 9.41: Choosing how flash works with ISO-AUTO
Use the following steps to configure how your flash unit works with ISO-AUTO:
- 1.Choose e4 Auto [flash] ISO sensitivity control (figure 9.41, image 1).
- 2.Make a selection and press OK or touch the option (figure 9.41, image 2).
Settings Recommendation: To effectively use this function, you will have to decide whether the subject is more important than the background or whether they have equal importance. Normally, I leave my camera set to the default of Subject and background, which can at times lead to higher ISO values as the camera tries to adjust for a larger range of lighting conditions. However, if I am shooting family portraits, I tend to focus more on the subject and may use the Subject only setting, ignoring the background.
Custom Setting e5: Modeling Flash
Modeling flash lets you fire a pulse of flashes to help you see how the light is wrapping around your subject. It works like modeling lights on studio flash units except it pulses instead of shines.
You can press any button to which Preview (depth-of-field preview) has been assigned to see the effect (see Custom setting f2 Custom controls, page 436).
This function works with Nikon’s better Speedlight flash units: SB-5000, SB-910, SB-900, SB-800, SB-700, SB-600, SB-500, and SB-R200. Here’s what each of the settings for Modeling flash accomplishes:
- On: This setting allows you to see (somewhat) how your flash will light the subject. If you have this setting turned On, you can press the button to which Preview has been assigned to strobe an attached/controlled external Speedlight unit, in a series of rapid pulses. These pulses are continuous and simulate the lighting that the primary flash burst will give your subject. The Modeling flash can be used for only a few seconds at a time to keep from overheating the flash unit, so look quickly.
- Off: This means that no Modeling flash will pulse when you press the button to which Preview has been assigned.
Next, we will select a Modeling flash setting.
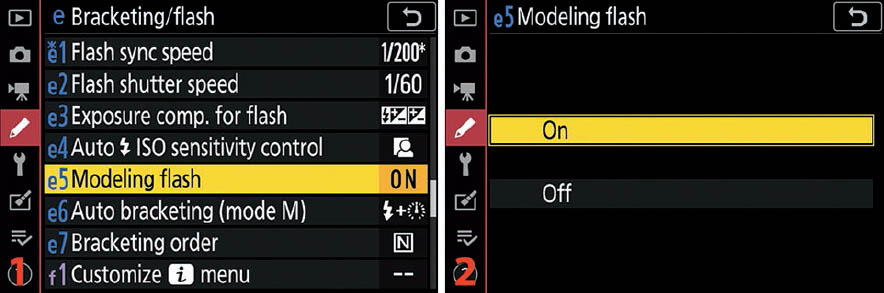
Figure 9.42: Modeling flash
Here are the steps used to configure Modeling flash:
- Choose e5 Modeling flash (figure 9.42, image 1).
- Choose On or Off and press OK or touch the option (figure 9.42, image 2).
Settings Recommendation: I used to forget that Modeling flash was turned on and when I checked my actual depth of field on a product shot by pressing the Preview button, I would get the modeling light instead of depth of field. I didn’t find this feature to be particularly useful, and it often startled me because of the buzzing noise the flash unit makes during the modeling flash cycle. I now leave it set to Off. However, you might like it if you do a lot of studio-style flash photography that requires a modeling light.
Custom Setting e6: Auto Bracketing (Mode M)
The Auto bracketing (mode M) function is a series of four settings that let you or the camera control the flash, shutter speed, and aperture in various ways during a bracketing operation, but only when the camera is set to Manual (M) exposure mode. This gives you a little finer control over manual camera settings while you are taking several exposures within a bracket of images.
Here is a list of the four settings under Auto bracketing (mode M) and what each does. The camera controls the selected setting when you are using Manual (M) exposure mode while bracketing. These functions are dependent on how Photo Shooting Menu > Auto bracketing > Auto bracketing set (page 285) is configured.
- Flash/speed: This setting allows you to control the aperture for best depth of field while still using bracketing. The camera will control the shutter speed. If Photo Shooting Menu > Auto bracketing > Auto bracketing set is configured to AE & flash bracketing, the camera will vary the shutter speed and flash level to expose the bracketed images while you control the aperture. If Photo Shooting Menu > Auto bracketing > Auto bracketing set is set to AE bracketing, the camera will vary only the shutter speed to get the exposures.
- Flash/speed/aperture: This setting is for those who want the camera to control the shutter speed, aperture, and flash while still using bracketing. If Photo Shooting Menu > Auto bracketing > Auto bracketing set is configured to AE & flash bracketing, the camera will vary the shutter speed, aperture, and flash level to expose the bracketed images. If Photo Shooting Menu > Auto bracketing > Auto bracketing set is set to AE bracketing, the camera will vary the shutter speed and aperture to get the exposures.
- Flash/aperture: This setting is for those who want to control the shutter speed for best action shots while still using bracketing. The camera will control the aperture and flash. If Photo Shooting Menu > Auto bracketing > Auto bracketing set is configured to AE & flash bracketing, the camera will vary the aperture and flash level to expose the bracketed images. If Photo Shooting Menu > Auto bracketing > Auto bracketing set is set to AE bracketing, the camera will vary only the aperture to get the exposures.
- Flash only: This setting is for those who want to control only the flash while using bracketing. The camera will vary the flash level only to get the bracketed exposures. AE bracketing obviously does not apply with this setting.
Note: Flash bracketing is performed only with i-TTL or AA (auto aperture) flash control. If any setting other than Flash only is selected and the flash is not used, the ISO sensitivity will be fixed at the value for the first shot regardless of the setting selected for Auto ISO sensitivity control.

Figure 9.43: Auto bracketing (mode M)
Here are the steps used to configure Auto bracketing (mode M):
- 1.Choose e6 Auto bracketing (mode M) (figure 9.43, image 1).
- 2.Pick a bracketing type and press OK or touch the option (figure 9.43, image 2).
Settings Recommendation: Because I am mostly a nature shooter, I often leave my camera set to Flash/speed so that the camera will control the shutter speed when I take a series of bracketed images, but I’ll control the aperture. That way I can choose how much depth of field I want to allow in my images.
If I were shooting important action shots and wanted to bracket, I’d select Flash/aperture so that the camera would control the aperture and flash while I controlled the shutter speed for action.
If I were letting only my Speedlight flash control the exposure, as with indoor shots, I might use Flash only during the bracket.
Finally, if I wanted to let the camera alone decide how to get the best exposure during the bracket, I might use Flash/speed/aperture. Then all I have to do is take pictures and let the camera do the rest. This seems to me to be a small violation of the principle of manual exposure, though.
Custom Setting e7: Bracketing Order
Bracketing order allows you to choose the order of your exposure settings (normal, overexposed, and underexposed) during a bracketing operation. There are two bracketing orders available in the camera. They allow you to control which images are taken first, second, and third in the bracketing series. Here are the three values in the bracket order and what they each mean:
- MTR = Metered value (normal exposure)
- Under = Underexposed
- Over = Overexposed
Next, let’s see how these are used during bracketing:
- MTR > under > over: With this setting, the normal exposure (MTR) is taken first, followed by the underexposed image, and then the overexposed image. If you are taking a group of five images in your bracket, the camera will take the images like this: normal exposure > most underexposed > least underexposed > least overexposed > most overexposed. For WB bracketing, the pattern is normal > amber > blue. This does not apply to ADL bracketing.
- Under > MTR > over: Using this order for bracketing means that a five-image bracket will be exposed in the following manner: most underexposed > least underexposed > normal exposure > least overexposed > most overexposed. For WB bracketing, the pattern is amber > normal > blue. This does not apply to ADL bracketing.

Figure 9.44: Bracketing order
Finally, let’s look at the steps to actually configure the Bracketing (BKT) order:
- 1.Choose e7 Bracketing order (figure 9.44, image 1).
- 2.Choose a BKT order and press OK or touch the option (figure 9.44, image 2).
Settings Recommendation: I leave Bracketing order set to MTR > under > over, so that when the images are displayed in series by the camera, I can see the normal exposure (MTR) first and then watch how it varies as I scroll through the bracketed images. It gets confusing to me if there are nine images in a bracket and I am trying to figure out which one is the MTR image, as I would with the other bracketing order.
If that doesn’t suit you, change it to the other direction, Under > MTR > over. The normal exposure will be in the middle of the bracket instead of at the beginning. Some prefer the more natural flow of that bracketing order (under to over).
SECTION 6: F CONTROLS
Custom Settings f1 to f9
There are seven functions in the f controls section:
- f1: Customize i menu
- f2: Custom controls
- f3: OK button
- f4: Shutter spd & aperture lock
- f5: Customize command dials
- f6: Release button to use dial
- f7: Reverse indicators
- f8: Reverse rings for focus
- f9: Assign MB-N11 Buttons
Each of these allows you to configure how certain physical controls on your camera work.
All seven “f” functions and their settings—discussed within the following sections—are found on the Custom Setting Menu under the f Controls menu item (figure 9.45).
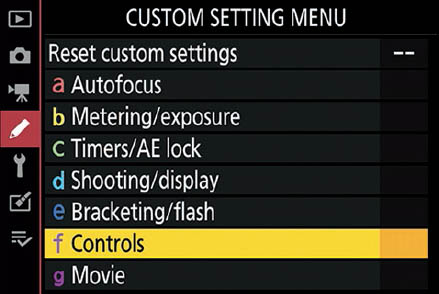
Figure 9.45: f Controls
Custom Setting f1: Customize i Menu
The i Menu for still photography is a grouping of 12 camera functions that can be set from a single screen (figure 9.46A). The i Menu can be found by pressing the i button on the back of the camera, just below the Sub-selector joystick, while the Photo/movie selector switch is set to still photography mode (switch in top position). The i Menu defaults to the functions most commonly used by photographers.
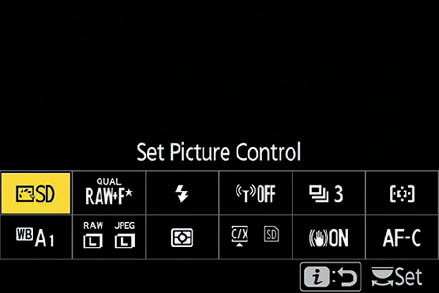
Figure 9.46A: The i Menu screen for still photography
The camera has a selection of 31 functions that can be assigned to those 12 function locations on the i Menu. Let’s examine how to assign a function to one of the 12 available i Menu slots.

Figure 9.46B: Assigning a function to an i Menu location
Use the following steps to assign a function to an i Menu location:
- 1.Choose f1 Customize i menu (figure 9.46B, image 1).
- 2.Highlight an i Menu location and press OK or touch the option to select it for assignment. The Set Picture Control location is selected for reassignment in figure 9.46B, image 2.
- 3.A scrollable list of 37 options will now appear (figure 9.46B, image 3). Scroll up or down in the list and highlight an option to replace Set Picture Control. Press OK or touch the option to assign it to the selected i Menu location, replacing Set Picture Control.
- 4.Repeat steps 2 and 3 for any other i Menu locations you want to change.
The i Menu is available for both still images and videos; however, it is separately configurable for the two. See Custom setting g1 Customize i menu (page 468) for information on customizing the i Menu for video.
Custom Setting f2: Custom controls
The camera has nine programmable controls for still photography, with 49 different functions that may be assigned to those controls. The Custom controls function presents a programming interface for all of the assignable controls on the camera body and a mounted Nikkor lens that has a programmable L-Fn or L-Fn2 button. Here is a list of the nine programmable controls (figure 9.47A, image 2):
- Fn1 button
- Fn2 button
- AF-ON button
- Sub-selector joystick directional movement
- Sub-selector joystick center press
- Movie record button
- Lens-Fn button (on a Nikkor lens that has an L-Fn button)
- Lens-Fn2 button (on a Nikkor lens that has an L-Fn2 button)
- Lens control ring (on a Nikkor lens that has a control ring)
Some options can be assigned to most of the camera’s programmable controls. However, not all options can be assigned to all controls. A few options can be assigned to particular controls only.
When programming the buttons for custom usage you can assign an option to a single button press (figure 9.47A, image 3: Press functions), or you can assign a different functionality to be executed when the button is held down while you turn a Command dial (figure 9.47A, image 4: Press + command dials functions).
Assigning a Function to a Control
In this subsection, we will consider the individual camera programmable controls and which functions can be assigned to each one (table 9.1). Then we will examine what each assignable function does.
Before we examine the list of functions that can be assigned to the camera’s programmable controls, let’s choose a sample control to work with. We’ll use the Fn1 button.
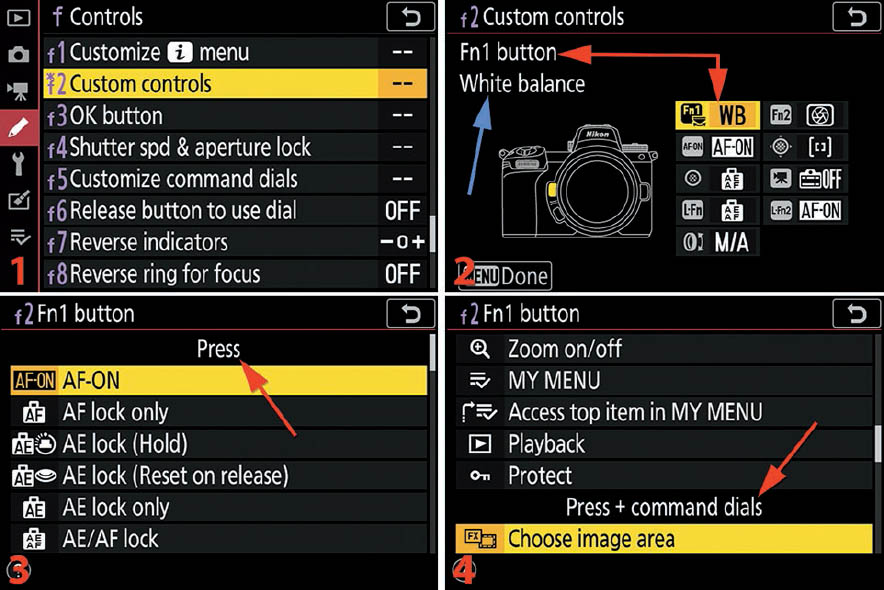
Figure 9.47A: Assigning a custom function to a camera control (sample: Fn1 button)
Use the following steps to assign a custom function to a camera control:
- 1.Choose f2 Custom controls (figure 9.47A, image 1).
- 2.Highlight a control and press OK or touch the control to select it (figure 9.47A, image 2). Each control name is listed in the top-left area of the screen when the control is highlighted, in case you are unsure which control is selected (Fn1 button). Just below the name of the control is the current function assignment for that control (White balance, blue arrow). As you scroll around the screen shown in figure 9.47A, image 2, you will see different control names (such as Fn1 highlighted in yellow) and function assignment names (e.g., White balance) appear in the top-left corner. Press OK or touch the highlighted yellow option to open the control assignment screen.
- 3.Figure 9.47A, image 3, shows a list of functions on the control assignment screen. You can choose one to activate when you press the Fn1 button (e.g., AF-ON, AF lock only). This list has an aptly titled heading: Press. If you scroll down on this same screen you will see another distinct list of functions under a new heading: Press + command dials (figure 9.47A, image 4). Each of the functions in this section (e.g., Choose image area) requires you to hold down the button and turn either of the Command dials. Highlight the function you want to assign to the control and press OK or touch the highlighted function option to finish.
Note: Some of the controls have no Press + command dials function list available, and have only Press items. The lens control ring and the Sub-selector joystick directional controls, not being buttons, have no Press items or Press + command dials items. Instead, each has a simple list of items you can assign.
Next, let’s consider a list of functions that can be assigned to controls.
Control Assignment Options List
Table 9.1 contains a list of 49 available functions and shows which controls each function can be assigned to. A “![]() ” means that function is available for assignment to that particular control, whereas a blank cell means it is not available for that control.
” means that function is available for assignment to that particular control, whereas a blank cell means it is not available for that control.
The Function Name column in table 9.1 lists the same items that are partially visible in figure 9.47A, images 3 and 4. Each programmable control is listed across the top of the table, in the order in which the camera presents them, with a check mark showing which functions can be used with that control.
The Lens ring has functions listed that can be used only with certain qualifications, as listed in the table caption (1 and 2).

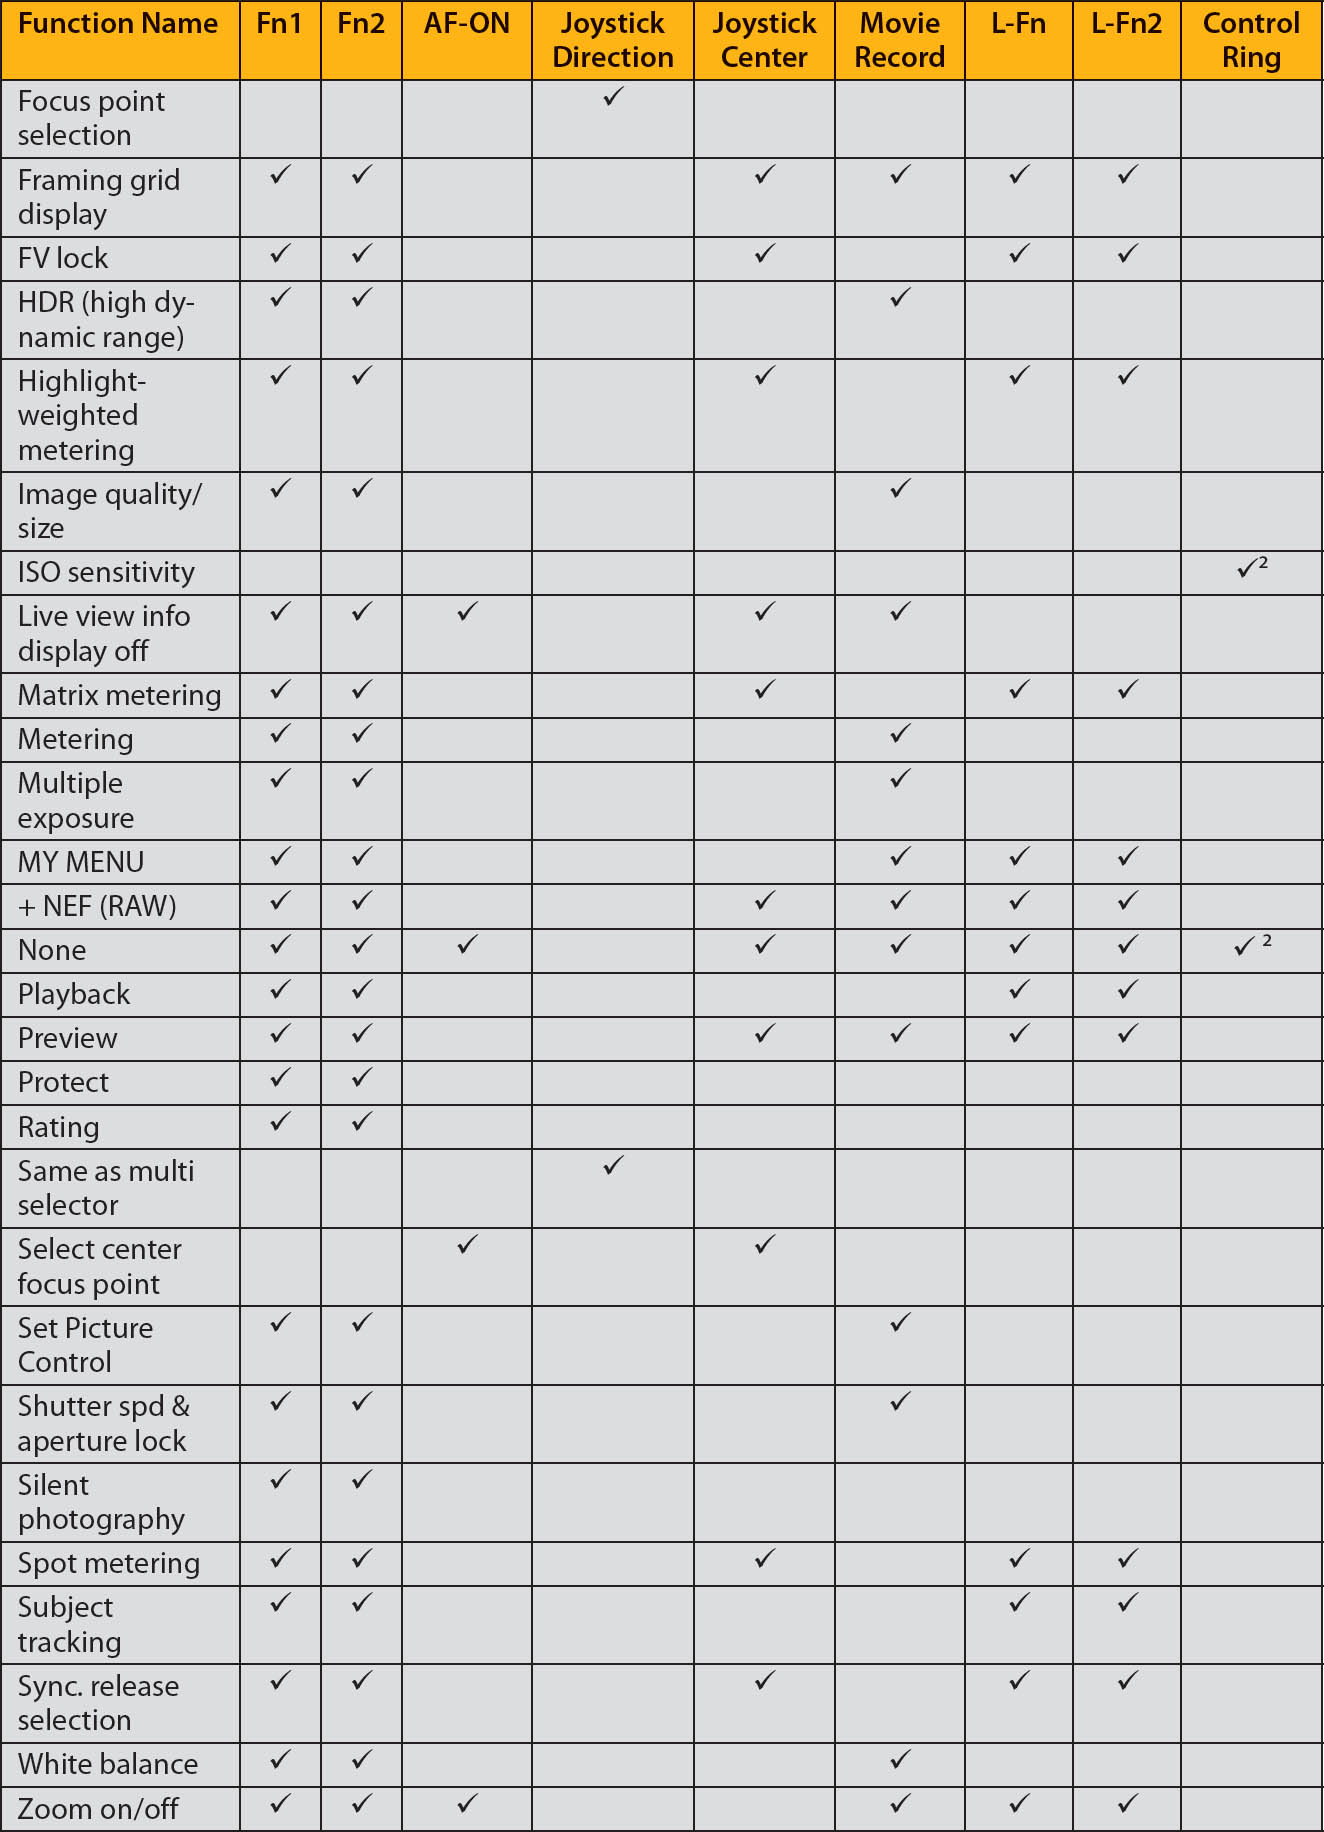
Table 9.1: Available functions and the controls to which they can be assigned, in alphabetical order (![]() = Yes; blank = No; 1 = Compatible lenses only; 2 = Regardless of options selected, in MF mode the control ring can be used to adjust focus only)
= Yes; blank = No; 1 = Compatible lenses only; 2 = Regardless of options selected, in MF mode the control ring can be used to adjust focus only)
Assignable Functions Explained
In this subsection you will find a descriptive list of each assignable function mentioned in table 9.1. Since the various functions can be assigned to different controls, I used the words Assigned control (in italics) as a replacement for specific button names. When you see Assigned control, substitute the control name to which you are going to assign the particular function. The Assignable Functions List explains how each function works when you use it.
Assignable Functions List
- Access top item in MY MENU: You can use the Assigned control to jump directly to the top item in My Menu. This allows you to quickly modify a frequently used menu item.
- Active D-Lighting (figure 9.47B): Press and hold the Assigned control and rotate either of the Command dials to adjust Active D-Lighting (ADL) to one of its six settings: Off (Off), Low (L), Normal (N), High (H), Extra high (H*), and Auto (A). You will see the symbols that represent the various settings—such as L and H—scroll by as you turn either of the Command dials.
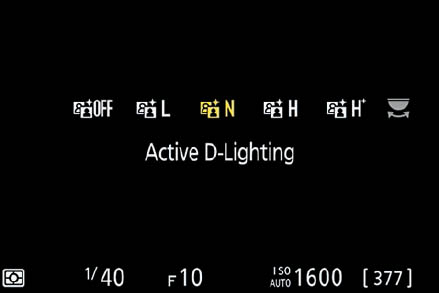
Figure 9.47B: Active D-Lighting
- AE/AF lock: This allows you to lock AE (exposure) and AF (focus) on the last meter and autofocus system readings when you hold down the Assigned control.
- AE lock (hold): Enabling this function causes AE (exposure) to lock on the last meter reading when the Assigned control is pressed once. It stays locked until you press the Assigned control again. In other words, the Assigned control toggles AE lock. This is similar to AE lock (Reset on release) except that releasing the shutter does not reset the AE lock hold. You must press the Assigned control again to release AE lock.
- AE lock only: This allows you to lock AE (exposure) on the last meter reading when you hold down the Assigned control.
- AE lock (reset on release): Enabling this function causes AE (exposure) to lock on the last meter reading when the Assigned control is pressed once. It stays locked until you press the Assigned control again or release the shutter. If the light meter goes off, it will also reset this function.
- AF lock only: This allows you to lock AF (focus) on the last autofocus reading when you hold down the Assigned control.
- AF-ON: Pressing the Assigned control causes the camera to autofocus. In other words, when you press the Assigned control it’s as if you had pressed the Shutter-release button halfway down or pressed the AF-ON button, starting autofocus only.
- Aperture: This function is assignable to the Lens ring only on a Nikkor lens that has one. When you rotate the Lens ring, the aperture changes. This works in a similar manner to the old days when we had aperture click-stop settings on a lens ring, except the Lens ring on S lenses does not have click stops but turns smoothly and silently.
- Auto bracketing (figure 9.47C): Press and hold the Assigned control and turn the rear Main command dial to select the number of shots in the bracketed series. Press the Assigned control and turn the front Sub-command dial to choose the exposure variation between each image. For more information on Auto bracketing and what the symbols on the screen mean, refer to the Auto Bracketing section in the Photo Shooting Menu chapter (page 283).
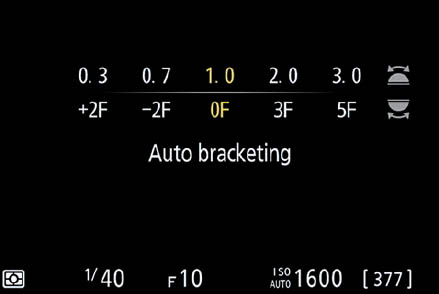
Figure 9.47C: Auto bracketing
- Bracketing burst: Normally, when you shoot a bracketing sequence, with the Release mode set to Single frame Release mode, you have to press the Shutter-release button once for each image in the bracket. The only way to shoot all the images in the bracketed series without letting up on the Shutter-release button is to use Continuous L or H Release mode. If you assign Bracketing burst to a button, you can hold down the Assigned control while also holding down the Shutter-release button and the camera will take all the images in the bracket without letup. This seems a bit redundant to me. I think I’d rather just set the Release mode to Continuous L or Continuous H Release mode and shoot the bracketed burst. This applies to AE, Flash, and ADL bracketing, which each take one image for each shutter release. WB bracketing is mentioned in the manual, too, but because WB bracketing normally causes the camera to take the entire bracket in one shutter release, I don’t see the point of using the Bracketing burst option. If you use this function for WB bracketing and hold down the Shutter-release button, you’ll create multiple groups of bracketed images on your memory card. Be careful with this function when using WB bracketing.
- Center-weighted metering: If you do not use Center-weighted metering (page 57) as your primary metering system but want to use it occasionally, you can turn on Center-weighted metering by holding down the Assigned control. When you release the button, the camera returns to your customary meter type, such as Spot, Matrix, or Highlight-weighted metering.
- Choose image area (figure 9.47D): You may press the Assigned control and rotate either of the Command dials to choose one of the camera’s four (Z6 II) or five (Z7 II) Image area formats. As you turn a Command dial, you can select from the following choices: FX (36×24), DX (24×16), 5:4 (30×24), 1:1 (24×24), 16:9 (36×20). The Z6 II does not have the 5:4 (30×24) image area. Refer to Choose image area under the Photo Shooting Menu (page 186) for more information.

Figure 9.47D: Choose image area
- Choose non-CPU lens number (figure 9.47E): If you have registered non-CPU lenses under Setup Menu > Non-CPU lens data, you’ll be able to hold down the Assigned control while rotating either Command dial to scroll through a list of up to 20 non-CPU lenses. As you rotate the Command dial, the screen will display the non-CPU lens focal length (200mm) and maximum aperture (F4), along with the number of the lens (No. 1 to No. 20). For example, when I mount my registered AI Nikkor 200mm f/4 non-CPU lens on my camera, with the FTZ adapter, I can press the Assigned control, rotate a Command dial, and watch the lenses scroll by until I see 200mm, F4, and No. 2. When you see the mounted lens appear on the camera displays, release the Assigned control, and the camera knows which non-CPU lens has been selected from the 20 available choices. Remember, you must have already registered at least one non-CPU lens in the camera for this function to be of benefit to you. See the Non-CPU Lens Data function in the Setup Menu (page 511) chapter for more information.
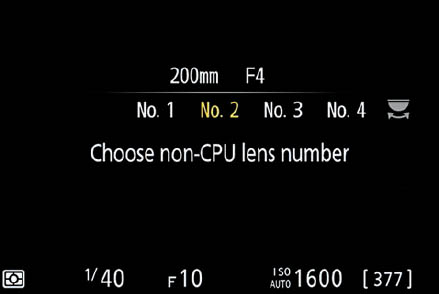
Figure 9.47E: Choose non-CPU lens number
- Exposure compensation: This function is assignable only to the Lens ring on a Nikkor lens that has one. When you turn the Lens ring you will see the +/– Exposure compensation symbol appear on your screen and you will immediately see the results of the compensation on your subject. This works the same way as using the +/– Exposure compensation button, except that you get no EV step readout on the screen (e.g., +0.3, −0.7 +1.0); you just see the results reflected in the brightening and darkening of your subject. This function is especially useful when the Live histogram is on the screen since it lets you adjust the exposure and watch the histogram instantly respond. If you see the +/– Exposure compensation symbol on your screen and have no idea what the actual value of the compensation is, just press the +/– Exposure compensation button to see a display of the EV compensation value (e.g., +0.3, +1.0)
- Exposure delay mode (figure 9.47F): Press the Assigned control and rotate either of the Command dials to choose an exposure delay in seconds. This is the same as setting an exposure delay with Custom Setting Menu > d Shooting/display > d4 Exposure delay mode (page 414). As you press the Assigned control and rotate a Command dial, the screen will show three characters signifying a delay (DLY) in seconds, as follows: Off, 0.2s, 0.5s, 1s, 2s, or 3s. For example, if you select 3s, the camera will wait (delay) three seconds before it fires the shutter. This allows photographer-induced vibrations to die down, resulting in a sharper picture.

Figure 9.47F: Exposure delay mode
- [Flash] Disable/enable: If you have a flash unit mounted on the camera and it is currently turned off, the camera will use Front-curtain sync while you hold the Assigned control down. If the flash is turned on, it will not fire while you hold the Assigned control down.
- Flash mode/compensation (figure 9.47G): With this function you can press and hold the Assigned control and turn the front Sub-command dial to add or subtract flash exposure compensation (e.g., +0.3, –0.7), or the rear Main command dial to choose a Flash mode (e.g., fill flash, red-eye reduction). For more information on the various flash modes, see the Flash Mode heading in the Photo Shooting Menu chapter (page 267).

Figure 9.47G: Flash mode/compensation
- Focus (M/A): This function can be assigned only to a Nikkor lens with a compatible control ring (e.g., Nikkor Z 24–70mm f/4 S lens). When you turn the control ring in manual focus (M) mode, you will have full control of focusing the camera. Be sure to enable Focus peaking (page 422) to help you obtain very accurate manual focus. When using autofocus (A), you can top off the focus by turning the control ring. If you have enabled Focus peaking and hold down the Shutter-release button halfway or press the AF-ON button while turning the Lens ring, Focus peaking will assist you with fine-tuning the camera’s autofocus choice. Note: This function is available for the Nikkor Z 24–70mm f/4 S lens (page 393) because it has a zoom ring and a lens control ring. However, this function does not appear on the menu when I mount a Nikkor Z 24–70mm f/2.8 S Pro lens (page 392) because it has a separate focus ring and lens control ring, along with a zoom ring. There is no need to assign Focus (M/A) to the lens control ring when the lens has a separate focus ring always in place.
- Focus mode/AF-area mode (figure 9.47H): Hold down the Assigned control and turn the rear Main command dial to change the Focus mode (e.g. AF-S, AF-C), or the front Sub-command dial to change the AF-area mode (e.g., Pinpoint AF, Single-point AF).

Figure 9.47H: Focus mode/AF-area mode
- Focus peaking (figure 9.47I): Pressing and holding the Assigned control while turning the rear Main command dial to any setting besides Off, enables the Peaking highlights function. Choose from PEAK OFF, PEAK 1, PEAK 2, and PEAK 3. The higher numbers increase the sensitivity and saturation of the Focus peaking highlights color. Pressing and holding the Assigned control while turning the front Sub-command dial allows you to select a Peaking highlights color: Red (R), Yellow (Y), Blue (B), or White (W). For more information on Focus peaking, see the Custom Setting d11: Focus peaking subheading earlier in this chapter (page 422).
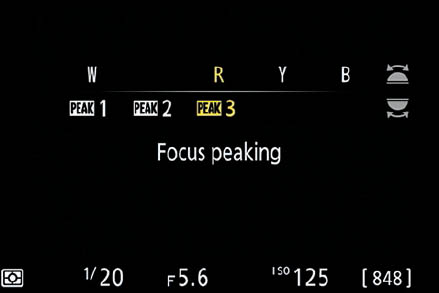
Figure 9.47I: Focus peaking
- Focus point selection: This function is assignable only to the Sub-selector joystick directional movement (left, right, up, down, and diagonal) capability. This is the default setting for the joystick. It allows you to use the joystick to move the AF point around in the grid of 273 AF points (Z6 II) or 493 AF points (Z7 II) so that you can select the best AF point for your subject.
- Framing grid display (figure 9.47J): Press the Assigned control to toggle on and off a convenient Framing grid to assist with leveling horizons and alignment with architectural features.
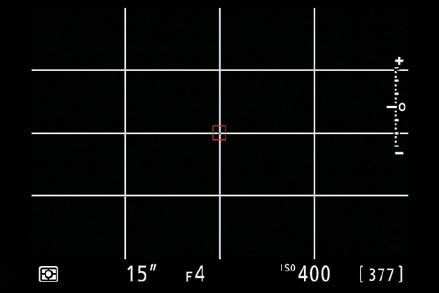
Figure 9.47J: Framing grid display
- FV lock: Pressing the Assigned control will cause the external Speedlight to emit a monitor preflash and lock the flash output to the level determined by the preflash. The flash output level will remain locked until you press the Assigned control a second time.
- HDR (high dynamic range) (figure 9.47K): Using this function is similar to using the Photo Shooting Menu > HDR (high dynamic range) function (page 297). Press the Assigned control and turn the rear Main command dial to select one of the following HDR modes: Off, On (single photo), or On (series). Press the Assigned control and turn the front Sub-command dial to select the Exposure differential: 1EV, 2EV, 3EV, and Auto. You cannot adjust the Smoothing (Low, Normal, or High) subsetting (not shown) unless you use the Photo Shooting Menu > HDR (high dynamic range) function directly. However, this function does obey the current Smoothing already set in the HDR (high dynamic range) function (page 299).
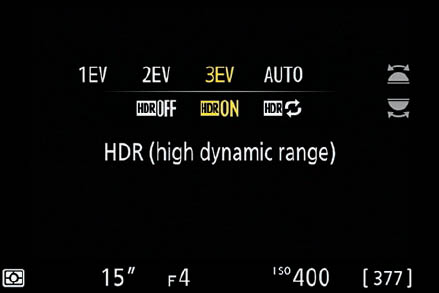
Figure 9.47K: HDR (high dynamic range)
- Highlight-weighted metering: If you do not use Highlight-weighted metering as your primary metering system but want to use it occasionally, you can turn on Highlight-weighted metering by holding down the Assigned control. When you release the button, the camera returns to your customary meter type, such as Center-weighted, Matrix, or Spot metering.
- Image quality/size (figure 9.47L): Press and hold the Assigned control while turning the front Sub-command dial to adjust the Image size (e.g., L, M, S), or the rear Main command dial to adjust the Image quality (e.g., RAW, FINE).
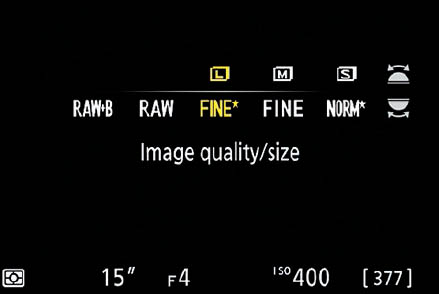
Figure 9.47L: Image quality/size
- ISO sensitivity: This function can be assigned only to the Control ring on compatible Nikkor Z lenses. When assigned it allows you to immediately adjust the camera’s ISO sensitivity by turning the Control ring on the lens.
- Live view info display off: By pressing the Assigned control, you can toggle the indicators in the Live view displays (EVF and Monitor) on and off.
- Matrix metering: If you do not use Matrix metering as your primary metering system but want to use it occasionally, you can turn on Matrix metering by holding down the Assigned control. When you release the Assigned control, the camera returns to your customary meter type, such as Spot, Center-weighted, or Highlight-weighted metering.
- Metering (figure 9.47M): When you press and hold the Assigned control and turn either of the camera’s Command dials, you can select from the following Metering modes: Matrix metering, Center-weighted metering, Spot metering, or Highlight-weighted metering. The camera will remain in the chosen Metering mode until you change it. This function is a shortcut method imitating the Photo Shooting Menu > Metering mode (page 245).
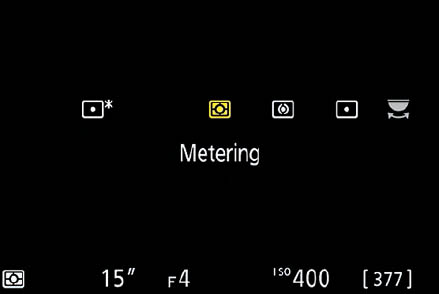
Figure 9.47M: Metering
- Multiple exposure (figure 9.47N): Using this function is the same as using the Photo Shooting Menu > Multiple exposure function (page 291). Press the Assigned control and turn the rear Main command dial to select one of the following Multiple exposure modes: Off, On (single photo), On (series). Press the Assigned control and turn the front Sub-command dial to select the Number of shots (2 to 10). You cannot adjust the Overlay mode, Keep all exposures, Overlay shooting, and Select first exposure (NEF) subsettings (not shown) without using the Photo Shooting Menu > Multiple exposure function directly. However, this function does obey the current Multiple exposure settings entered via the Photo Shooting Menu.
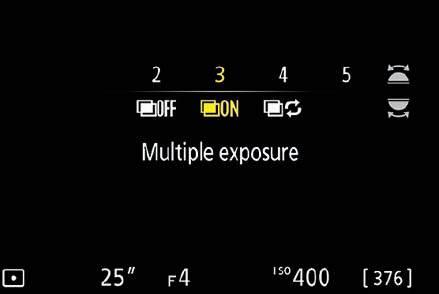
Figure 9.47N: Multiple exposure
- MY MENU (figure 9.47O): Pressing the Assigned control opens the MY MENU display with the first item highlighted. You can then access any of the other items on MY MENU by scrolling down or touching the menu item with your fingertip. This is a quick way to get to your favorite menu items without digging around in the camera’s regular menu system. There are only two items on my camera’s MY MENU currently (Auto bracketing and d4 Exposure delay mode), but you can have as many as 20 items available.
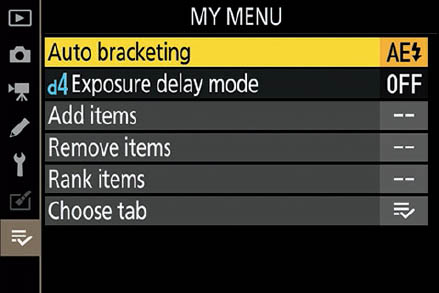
Figure 9.47O: MY MENU
- + NEF (RAW): If you are a regular JPEG shooter and have any form of JPEG selected as the Image quality setting, you can press the Assigned control once (do not hold) to temporarily add a NEF (RAW) image to your JPEG capture. The camera will take a JPEG and a NEF (RAW) picture when you press the Shutter-release button. Once you take the JPEG + NEF (RAW) combo picture, the camera switches back to JPEG. If you decide not to take the NEF (RAW) picture before you press the Shutter-release button, just press the Assigned control again to return to JPEG mode. This function does not work with NEF (RAW) Image quality modes, only JPEG mode.
- None: When this option is set, the Assigned control does nothing.
- Playback: This option causes the Assigned control to act as if you had pressed the Playback button. Nikon included this so that you could play back images when using a big telephoto lens that requires two hands to use.
- Preview: The camera normally shows accurate depth of field for the live view of your subject in the EVF and on the Monitor, but only down to f/5.6. The camera would have difficulty autofocusing if allowed to stop down more than that, so the camera limits its smallest aperture with live image preview to f/5.6. To overcome this limitation, the Preview function is available for assignment to a convenient camera control. Pressing the Assigned control will activate depth-of-field preview and stop the aperture all the way down to its actual setting (e.g., f/11, f/16, f/22), showing you the actual depth of field the current aperture offers.
- Protect (figure 9.47P): Display an important image you want to protect on the camera’s Monitor (or EVF). To prevent accidental deletion, press the Assigned control and the image will be locked from deletion. A protection key symbol will be displayed in the top-left corner of the image (red arrow). As you scroll through your images, the protected pictures will have this symbol. Press the Assigned control again when an image with the symbol is displayed and the image protection—and symbol—will be removed.
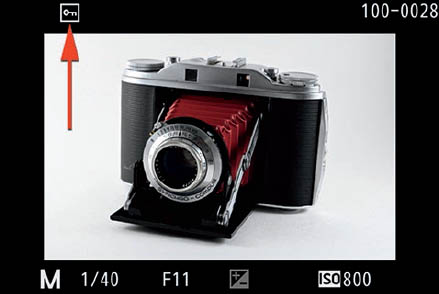
Figure 9.47P: Protect an image from accidental deletion
 Rating (figure 9.47Q): Display a picture to which you want to give a rating, then press and hold the Assigned control. The camera will present you with a 1–5 star rating scale ( to
  ) on the bottom-left corner of the screen (figure 9.47, bottom-left red arrow). Turn the rear Main command dial to add or subtract yellow stars. For example, if you rate an image as a four-star image, you will see four yellow stars in the lower-left area of the screen. When you later view the picture you will see the symbol displayed in the upper-right area (4, top-right arrow). This symbol is a reminder that the image was rated at 4 out of 5.
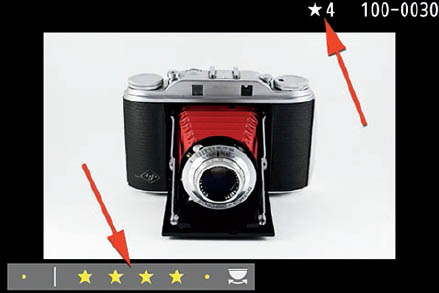
Figure 9.47Q: Rating an image
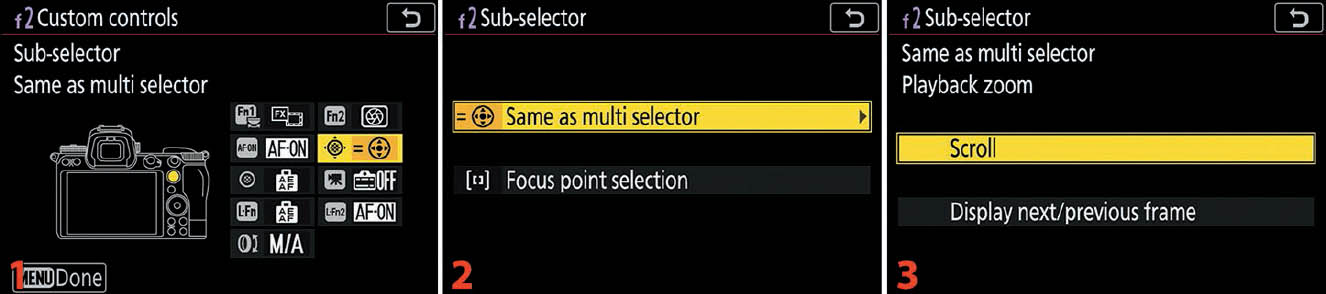
Figure 9.47R: Same as multi selector (scroll or display next/previous frame)
- Same as multi selector (figure 9.47R): Normally the Sub-selector joystick is set to Focus point selection, the factory default setting. However, the Sub-selector joystick’s left, right, up, and down motions can be programmed to duplicate the Multi selector pad’s motions by selecting Same as multi selector. This does not affect the Sub-selector’s center press, which is a separately assignable control. Once you have selected Same as multi selector, you must choose what happens when a zoomed-in image is displayed on the screen. Choose Same as multi selector and scroll to the right (image 2). The following screen (image 3) gives you two choices that affect what happens when you have a zoomed-in image on the display. If you move the joystick with Scroll selected, the camera will scroll around within the zoomed-in image. If you move the joystick with Display next/previous frame selected, the camera will change images, according to which direction you press the joystick, instead of scrolling around within the zoomed-in image. The camera will stay zoomed in when it changes to a previous or next image. (Settings Recommendation: Since I normally zoom into an image to check it out, I find that Scroll usually works best for me. However, if I want to quickly compare a certain point between two or three zoomed-in images, I can choose Display next/previous frame, and then scroll back and forth between the images with the joystick. Of course, remember that this assignment duplicates the functionality already present in the Multi selector, so you may just want to ignore this function.)
- Select center focus point: Pressing the Assigned control causes the camera to jump from whatever focus point (AF point) you were using to the center AF point instead.
- Set Picture Control (figure 9.47S): Press the Assigned control and rotate the rear Main command dial to change which Picture Control (page 213) the camera uses for JPEG images.
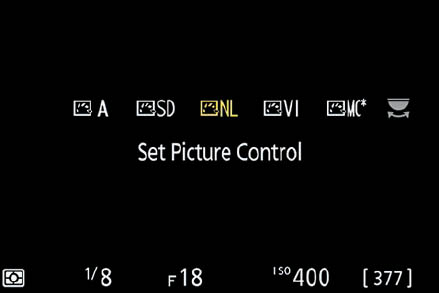
Figure 9.47S: Set Picture Control
- Shutter spd & aperture lock (figure 9.47T): Simply press the Assigned control and rotate the front Main command dial to lock the camera’s shutter speed when you are using Shutter-priority (S) and Manual (M) modes. Otherwise, press the Assigned control and turn the front Sub-command dial to lock the aperture setting when using Aperture-priority (A) and Manual (M) modes. A tiny “L” will appear next to the settings while they are locked (red arrows). Hold the Assigned control and turn the dial again to unlock a setting.

Figure 9.47T: Shutter spd & aperture lock
- Silent photography: Press the Assigned control to toggle Silent photography mode on and off. When Silent photography mode is selected, the camera will use its electronic shutter to take pictures without any shutter noise; otherwise, it will use the normal mechanical shutter and you’ll hear a shutter click with each picture.
- Spot metering: If you don’t use Spot metering as your primary metering system but want to use it occasionally, you can turn on Spot metering by holding down the Assigned control. When you release the button, the camera returns to your customary meter type, such as Matrix, Center-weighted, or Highlight-weighted metering.
- Subject tracking: If you have Auto-area AF, Auto-area AF (people), or Auto-area AF (animals) selected as the AF-area mode, you can press the Assigned control and the AF point will change to a targeting reticule that you can use to track your moving subject. Move the targeting reticule to your subject and press OK to start tracking. Pressing OK again will stop tracking but leaves the targeting reticule in place—moving it to screen’s center—so that you can start tracking again as needed. Press the Assigned control again to disable Subject tracking. This function does not work unless you have the camera set to one of the three AF-area modes mentioned previously.
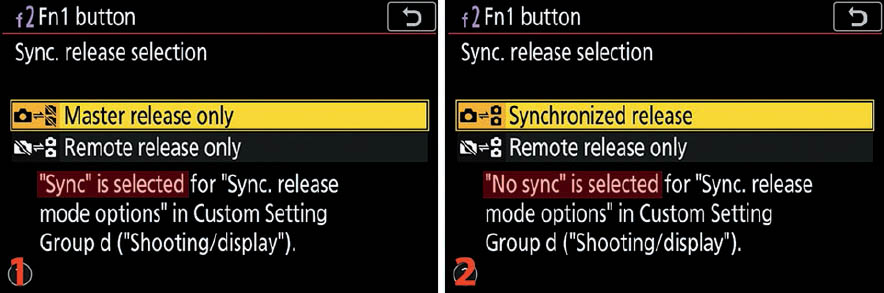
Figure 9.47U: Sync. release selection—you will see different choices depending on how Custom setting d3 Sync. release mode options is configured (page 412).
- Sync. release selection (figure 9.47U): When you are using a wireless transmitter—such as the WR-T10 transmitter found in the Nikon WR-10 Wireless Remote Controller kit—to control multiple remote cameras (Master/Remote relationship) for synchronized shutter release, you can press the Assigned control to take synchronized pictures with multiple cameras in different ways, as described in paragraphs A and B below. This function depends on how Custom Setting Menu > d Shooting/display > d3 Sync. release mode options is configured (page 412). You will need to make a Sync. release selection immediately upon assigning this function to a control. After that you will press and hold the Assigned control while firing the shutter to execute your choice. To choose a different Sync. release selection you will need to reuse Custom Setting Menu > f controls > f2 Custom controls > [Assigned control] > Sync. release selection and choose a new release style. Here are the selections and how they work:
- If you have chosen Sync in Custom setting d3, the following two items are available:
- A.Master release only: If you choose Master release only from the screen shown in figure 9.47U, image 1, you can keep the Assigned control pressed down to take pictures with the Master camera only.
- B.Remote release only: If you choose Remote release only from the screen found in figure 9.47U, image 1, you can keep the Assigned control pressed down to take pictures with the Remote camera(s) only.
- If you have selected No sync in Custom setting d3, the following two items are available:
- A. Synchronized release: If you choose Synchronized release from the screen found in figure 9.47U, image 2, you can keep the Assigned control pressed down to synchronize the shutter releases on both the Master and Remote cameras.
- B. Remote release: If you choose Remote release only from the screen found in figure 9.47U, image 2, you can keep the Assigned control pressed down to take pictures with the Remote camera(s) only.
- White balance (figure 9.47V): Press and hold the Assigned control while turning the rear Main command dial to select a White balance type (e.g., Auto, Direct sunlight, Cloudy). While still pressing the Assigned control, you can turn the front Sub-command dial to select a sub-option if that White balance type has any sub-options [e.g., for Auto, a sub-option is A0 Keep white (reduce warm colors)]. See White balance on page 121 for more information on options and sub-options.
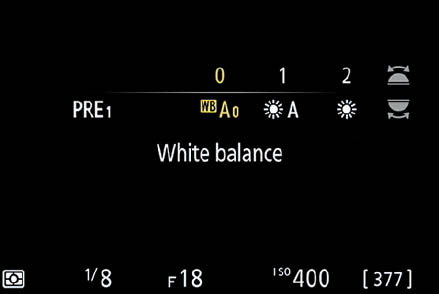
Figure 9.47V: White balance
- Zoom on/off (figure 9.47W): When you first assign this function to a control, you will be presented with a screen that asks you to choose a magnification level. Most of us will choose 1:1 (100%) because that is an accurate pixel-peeping level for viewing already taken images and for verifying focus or examining detail in a not-yet-captured subject. This function works for both. To use it, press the Assigned control and the image will immediately zoom in to the magnification level you assigned.
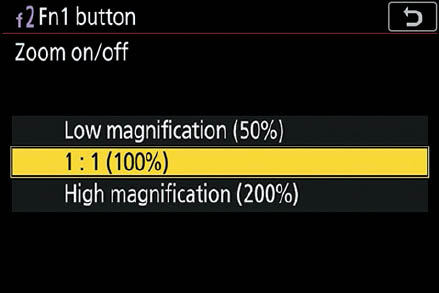
Figure 9.47W: Zoom on/off
Settings Recommendation: Here are the assignments I make for the controls on my camera:
- Fn1: Preview
- Fn2: Focus mode/AF area-mode
- AF-ON: AF-ON
- Sub-selector joystick directional control: Same as multi selector
- Sub-selector joystick button press: Select center focus point
- Movie record button: Zoom on/off (Movie mode has own settings)
- Lens Fn (L-Fn) button: AE lock only
- Lens Fn2 (L-Fn2) button: Spot metering
- Lens control ring: ISO sensitivity
Of course, you may desire a completely different configuration that works better for your style of photography. You have a large number of options available!
Custom Setting f3: OK Button
The OK button setting determines how the button in the center of the Multi selector pad works in two different camera modes:
- Shooting mode is in force when you are actually using the camera to take pictures through the Viewfinder.
- Playback mode is in use when you are examining pictures you’ve already taken on the rear Monitor.
Note: In this section we will discuss the Shooting and Playback modes; however, there are two things that we need to examine first:
- Shooting mode: When you are using Auto-area AF, Auto-area AF (people), or Auto-area AF (animals) mode, none of the functions discussed in the upcoming Shooting Mode section will work as described when you press the OK button. Instead, if one of these three AF-area modes is active, the OK button will initiate subject tracking (page 101) only.
- Playback mode: When you are examining images and videos in Playback mode and you have a video showing on the screen, if you press OK, the camera will play the video only. This overrides the upcoming descriptions of using the OK button in Playback mode.
Now, let’s examine each mode in detail to see how it works when none of the two previous overriding conditions are active.
Shooting Mode
Now we will examine the options available for the OK button (Multi selector center button) when you are actively taking pictures (Shooting mode), not viewing already taken pictures (Playback mode, see next subsection).

Figure 9.48A: OK button (Shooting mode)
Use these steps to begin configuration of the OK button for Shooting mode:
- 1.Follow the screen flow shown in figure 9.48A, images 1–2 (f Controls > f3 OK button > Shooting mode), until you arrive at the third screen in the series.
- 2.Choose an option, according to the upcoming descriptions of each selection and press OK or touch the option to finish (figure 9.48A, image 3).
The three Shooting mode options are as follows (figure 9.48A, image 3):
- Select center focus point: Often when shooting, you’ll be using the Multi selector pad with your thumb to move the selected focus point (AF point) around the Viewfinder to focus on the most appropriate area of your subject. When you are done, you have to scroll the AF point back to the center. However, if Select center focus point is chosen, you can press OK to make the focus point pop back to the center point of the screen. This is the default action of the button.

Figure 9.48B: OK button – Zoom on/off
- Zoom on/off: Figure 9.48B continues where figure 9.48A ends. If you choose Zoom on/off, you will need to select a magnification level (i.e., 50%, 100%, 200%), which will allow you to pixel-peep your subject for things like correct focus before taking the picture. You can preview your subject with the Monitor or EVF by pressing OK to zoom in to a magnified view and then pressing OK again to zoom back out to a normal view. While zoomed in, you can scroll around the screen with the Multi selector pad, make any adjustments (such as fine-tuning focus), and then zoom back out. You can take the picture while zoomed in or out.
- None: Nothing happens when you press OK in Shooting mode.
Playback Mode
Now let’s examine how the OK button can be used in Playback mode. Playback mode is used when you are examining images on the camera’s Monitor after you have taken them.
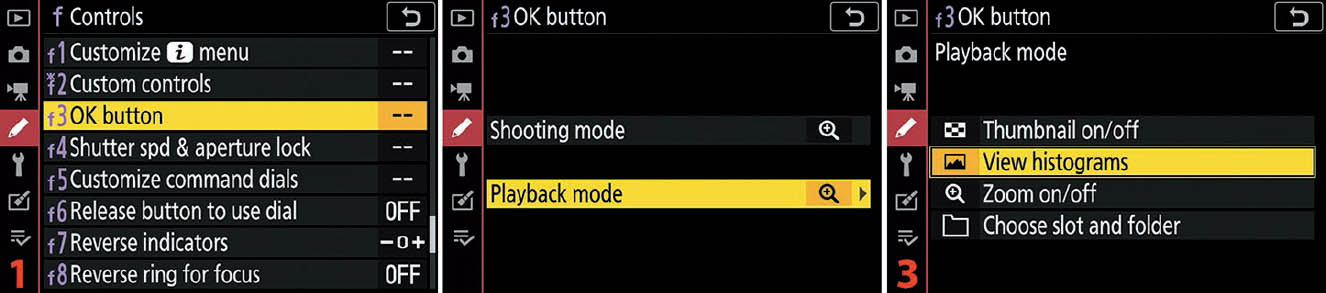
Figure 9.48C: OK button (Playback mode)
Use these steps to configure the OK button for Playback mode:
- 1.Follow the screen flow shown in figure 9.48C, images 1–2 (f Controls > f3 OK button > Playback mode), until you arrive at the third screen in the series.
- 2.Choose one of the four options on the list, according to the upcoming descriptions (figure 9.48C, image 3). If you choose Zoom on/off, you’ll need to scroll to the right and select one of the three subsettings (use figure 9.48F in the upcoming subsection called Zoom on/off). If you select Choose folder, you’ll also need to be aware of some additional screens your camera will present you with (use figure 9.48G in the upcoming subsection called Choose folder). Press OK or touch the option to finish.
There are four selections in Playback mode (figure 9.48C, image 3), which are described in the following subsections.
Thumbnail On/Off
This feature allows you to switch from viewing one image on your camera’s screen to viewing multiple thumbnails instead. It’s a toggle, so you can press OK to turn thumbnail view on and off. In figure 9.48D, image 1, Thumbnail on/off has been selected.
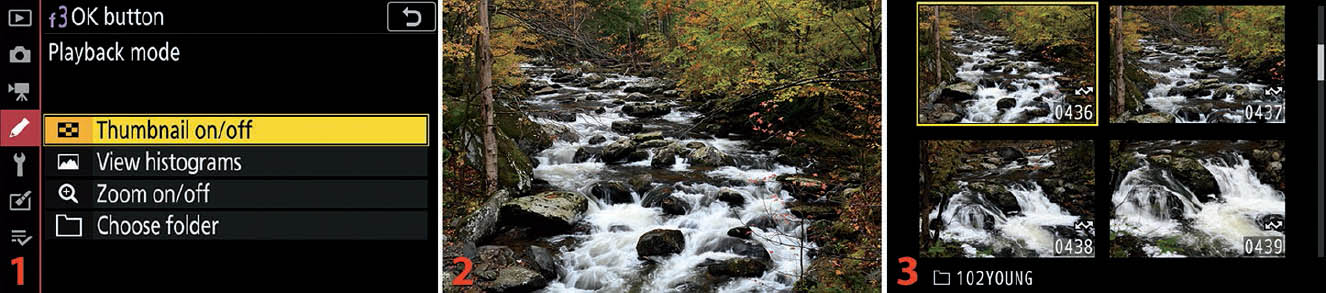
Figure 9.48D: OK button (Playback mode – Thumbnail on/off)
Use the following steps to configure and use Thumbnail on/off:
- 1.Figure 9.48D continues where figure 9.48C ends. Select Thumbnail on/off and press the OK button or touch the option to select it (figure 9.48D, image 1).
- 2.Now when you press the Playback button and view a picture on the Monitor, like the river cascades picture in figure 9.48D, image 2, you can then press OK to get a thumbnail view of that image along with the three subsequent images (figure 9.48D, image 3). If you press OK repeatedly, the camera will toggle between normal view and thumbnail view with each button press.
View Histograms
I discovered the View histograms feature while I was writing a previous Nikon book, and now I immediately switch my new Nikons to this setting when I get one. Even though the camera has a live histogram and I use it, I still like to easily view the histogram after I’ve taken an image.
When the OK button function is set to View histograms, I can have an image open on the Monitor, and then press and hold the OK button to view a luminance histogram. This saves a lot of scrolling around through the data, RGB histograms, and information screens. It’s a quick histogram view that disappears when the OK button is released. Great feature! Let’s see how to configure and use it.
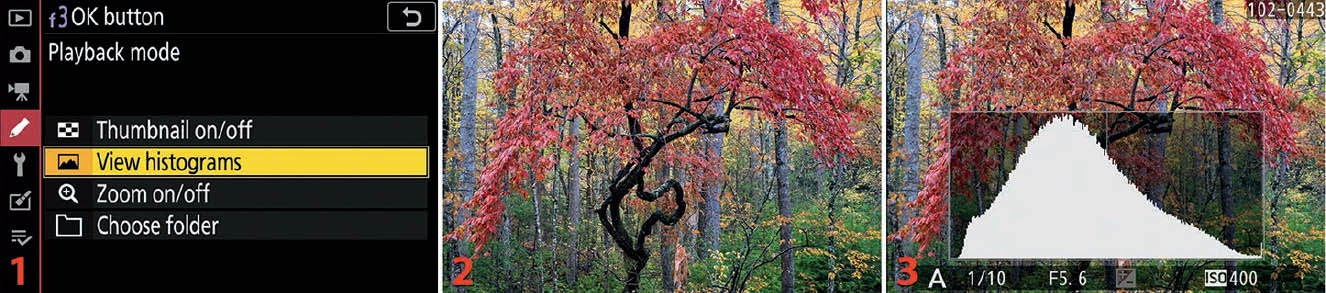
Figure 9.48E: OK button (Playback mode – View histograms)
Use the following steps to configure and use View histograms:
- 1.Figure 9.48E continues where figure 9.48C ends. Select View histograms and press OK or touch the option (figure 9.48E, image 1).
- 2.Now when you press the Playback button and view a picture on the Monitor, like this lovely tree in the Great Smoky Mountains (figure 9.48E, image 2), you can then press and hold the OK button to see a luminance histogram for that image (figure 9.48E, image 3). This is an extremely convenient setting for those who use the histogram regularly.
Zoom On/Off
If you want to zoom into your image on the Monitor without using the normal zoom in and out buttons, this is a good feature for you. If you have an image showing on the Monitor and Zoom on/off is selected, you can press the OK button to jump immediately to one of three levels of zoom. It works like a toggle switch—pressing the OK button a second time takes you back to a normal full-screen view.
Here is a description of the three levels of zoom available under this setting (Low to High):
- Low magnification seems to be the same as viewing the image at about 50 percent pixel-peeping level. Pressing the Zoom in button three times brings you to the same 50 percent level.
- Medium magnification (1:1) is for viewing the image at about 100 percent. This is like pressing the Zoom in button five times.
- High magnification is around the 200 percent viewing level. This is like pressing the Zoom in button six times.

Figure 9.48F: OK button (Playback mode – Zoom on/off settings)
Use the following steps to configure and use Zoom on/off:
- 1.Figure 9.48F continues where figure 9.48C ends. Select Zoom on/off and scroll to the right (figure 9.48F, image 1).
- 2.Select Low magnification (50%), 1:1 (100%), or High magnification (200%) and press OK or touch the option (figure 9.48F, image 2).
- 3.Press the Playback button to display a picture on the Monitor (as shown in figure 9.48F, image 3, where you see cascades and a small waterfall in the Great Smoky Mountains).
- 4.Now press the OK button and the camera will immediately zoom in to view the picture on the Monitor (or EVF) at whatever magnification level you chose in step 2. The zoom display centers on the focus point used to take the image (figure 9.48F, image 3, red arrow). Images 4, 5, and 6 in figure 9.48F match the zoom levels selectable in figure 9.48F, image 2: Low magnification (50%), 1:1 (100%), and High magnification (200%).
Note: If you are using Thumbnail view, you can select from a series of images on the Monitor. When you have one of the images selected, even though it is not full size, you can press OK and the image will be enlarged to whatever magnification level you previously selected. When you press the button again, the camera will switch back to Thumbnail view.
Choose Folder
When you select Choose folder, you will have a folder selection screen available while you are examining an image in Playback mode. To open the folder selection screen, press OK.
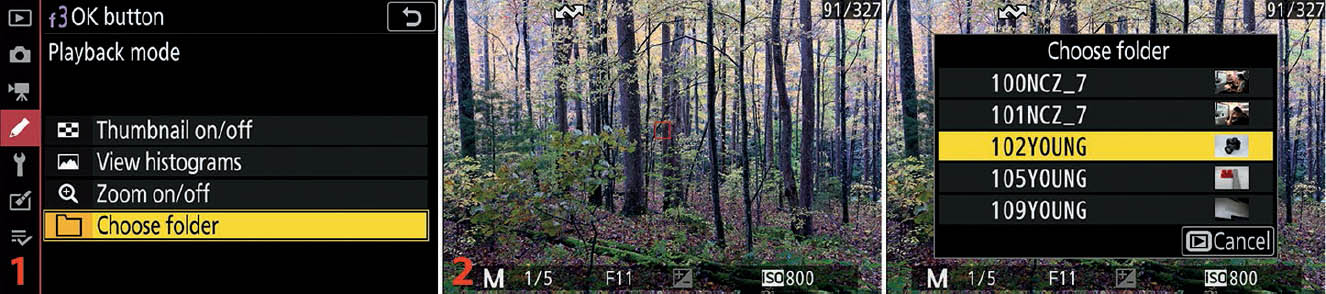
Figure 9.48G: OK button (Playback mode – Choose folder)
Use the following steps to configure and use Choose folder. (Note: The camera will now show images from the folder you have selected. If you have Playback Menu > Playback folder set to All or NZ6_2 or NZ7_2, the camera will switch folders, and even memory cards, when it gets to the end of the current folder):
- 1.Figure 9.48G continues where figure 9.48C ends. Select Choose folder and press OK or touch the option (figure 9.48G, image 1).
- 2.Press the Playback button to display a picture on the Monitor (figure 9.48G, image 2). When you press OK, you will be presented with the screen shown in figure 9.48G, image 3. Highlight a folder name and press OK or touch the folder name to use that folder until you change to a different one later.
If Playback Menu > Playback folder is set to Current, the camera will show only the images in the current folder and will display no other images from any other folder or card.
Settings Recommendation: I have my camera set so that when I press OK in Shooting mode, it jumps to the center AF point. This saves me time because I don’t have to scroll back manually.
When I press OK in Playback mode, I have the camera show me a luminance histogram. I absolutely adore being able to see a histogram for an image I just took by pressing OK instead of scrolling to the histogram screen. This saves time by letting me see my camera’s histogram when I need it most, right after taking the picture.