Chapter 4. Infrastructure Pipeline
When you adopt the Microservices style, your application code becomes smaller, simpler and easier to understand. That’s one of the main benefits of a Microservices architecture. Breaking a complex application into smaller, easier to digest parts can feel like a breath of fresh air for teams writing application code. But, the downside of this approach is that it makes the underlying system much more complicated and difficult to manage. It takes a lot of work to make all those smaller services work together. That’s why it’s difficult to succeed with a Microservices project if you don’t start with a strong infrastructure foundation.
A good Microservices infrastructure needs to have three key goals:
-
Improve the resiliency, scalability, availability and safety of the system as a whole
-
Reduce the work effort needed to write, deploy and manage individual Microservices
-
Reduce the work effort needed to build and improve the infrastructure itself
Improving the overall quality of the system is an important driver for our work. We want to build an infrastructure that continues running when things start going wrong or when there are unexpected spikes of demand. Building our solution on a Cloud infrastructure will help us bring these qualities out, along with a purposeful infrastructure design.
In order to reduce the work that our microservices teams need to do, we’ll need to make it easy for teams to move their code from local workstations onto the infrastructure. That means, we’ll need to lower the barrier for teams to be able to provision environments and deploy their services into a hosted system. We’ll need to make it cheap and easy to create a new environment and provide the right kit to make releases safe and easy.
In practice, achieving those goals is difficult if you don’t have a good way of improving the way you make changes to the infrastructure itself. That’s why our last goal is a critical one. If we can reduce the effort cost of building and changing the infrastructure, we’ll be able to deliver new environments more easily and put more focus on improving the infrastructure to meet our system goals.
In this chapter, we’ll focus on how to build a foundation that will make changing the infrastructure easier. Then, in the next chapter we’ll implement a Microservices infrastructure using the solution and method that we’ve put together.
Thankfully, we don’t have to invent a solution for infrastructure changes by ourselves. We have the luxury of being able to draw on the principles and philosophies of DevOps. In particular, using the DevOps practices of Infrastructure as Code, Continuous Integration and Continuous Delivery will help us achieve our objectives. We’ll be able to make infrastructure changes faster, cheaper and safer. That means we’ll be able to scale the work of building environment across our Microservices teams.
DevOps and Microservices
The goal of DevOps is the pursuit of improvements to the way that software is developed, released and supported. Working towards that goal can span the domains of organizational design, culture, process and tooling. The Microservices style of architecture shares a similar overall goal, but adds the additional characteristic of bounded services and independent deployment and management. Microservices and DevOps go hand in hand - in fact, it would be extremely challenging to build applications in the Microservices style without adopting DevOps practices.
Adopting DevOps practices means that we get to take advantage of a bountiful ecosystem of tools for code management, build management and release. Using these tools will greatly reduce the time it takes to get our infrastructure solution up and running. By the end of this chapter, we’ll have setup a cloud-based toolchain that we can use to build a Microservices infrastructure. We’ll have an Infrastructure as Code repository, a starter file for the infrastructure code, a pipeline for testing and building and a cloud foundation that we can build environments within.
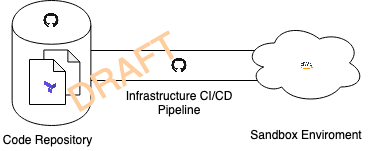
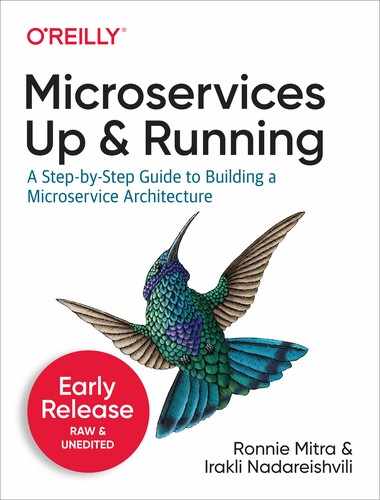
Figure 4-1. The target pipeline
But, before we start building the pipeline, let’s take a look at the DevOps based principles and practices we’ve used to inform the design.
DevOps Principles and Practices
Building software in the DevOps way helps you reduce the time it takes to make changes your applications, without introducing additional risk. When you do it right, it gives you both change speed and change safety. But, just like Microservices, no-one owns the definition of DevOps and no-one can tell you if you are doing it right or wrong. The important thing is to continuously optimise and improve your system towards the overall goal.
That’s exactly what we want to do with our infrastructure toolchain. If we can improve the speed and safety of our infrastructure changes, we’ll be able to reduce some of the complexity of the work we need to do to build the Microservices system. To get there, we’ll borrow key principles and practices from the DevOps world in order to make three pivotal decisions:
| ID | Decision |
|---|---|
INF1 |
Adopt the principle of immutable infrastructure |
INF2 |
Implement infrastructure as code |
INF3 |
Apply Continuous Integration and Continuous Delivery practices |
/* 1. Immutable Infrastructure 2. Infrastructure as Code 3. Continuous Integration and Continuous Delivery */
Let’s take a look at each of these decisions to understand what that impact will be and the principles behind them, starting with immutable infrastructure.
Immutable Infrastructure
In technology, an object is immutable if it can’t be changed after it’s created. The only way to update an immutable object is to destroy it and create a new one. Things that are immutable contain behaviour and structures that are easier to predict and reproduce because they don’t change. This can make activities like testing and replication of these objects easier.
The immutable infrastructure principle is an application of the immutability property to infrastructure components. For example, suppose we were to setup and install a network load balancer with a set of defined routes. Subscribing to the property of immutability means that once it’s created, we can’t change the routes that have been setup. Instead, we’ll need to destroy the load balancer and create a new one.
The main advantage of adhering to the immutability principle for our infrastructure design is to create predicable and reproducible infrastructures that are easy to stand up. Years ago, it was common place for operators to mutate or patch systems in order to make deployed applications work. Servers and devices would be kept continually running and alive. The operator’s job was to shape the environment of a server to create a state that an application could safely run in. As long as all the servers had the same running state, the application should run the same across all of them.
But, over time, as more changes are applied (often inconsistently) the state of these systems drift. It becomes increasingly difficult to keep all of the servers running in the same state. It also becomes increasingly difficult to introduce new servers or make changes as it becomes increasingly challenging to predict how the environment actually work. Instead, we can use an immutable infrastructure to ensure that all of our environments are easy to replicate and change, because we know exactly how they have been created and the configuration required to create their run-time state.
Our decision to build our Microservices architecture in the cloud is what makes it possible for us to embrace this principle. In the past, the cost of hardware acquisition, server management and software procurement would make this approach unfeasible. But, a cloud deployment means that we don’t need to perform these activities ourselves. Instead, all of our infrastructure components are virtual. Virtuality means we can treat the infrastructure the same way we treat software. It gives us the freedom to create and destroy servers and devices in the same way as we might do with a software component or an object in a object oriented system.
Immutable infrastructure will help us avoid server drift and improve our ability to replicate and instantiate new environments with a production-like state. But we’ll still need a way of defining all of our infrastructure with a manageable set of configurations. That’s where the principle of Infrastructure as Code can help.
Infrastructure as Code
The principle of Infrastructure as Code (or IaC) is based on one powerful constraint: all of the changes you want to make to your infrastructure must be managed as a set of machine-readable files (or code). Teams that embrace IaC can point to a group of files that define the target state for their infrastructure. That means they can re-create an environment by re-applying the code that created it. Managing the infrastructure code becomes a way of managing the infrastructure state. Ultimately adopting the principle of Infrastructure as Code means we can manage changes to our environments by managing the way we write, test and deploy our infrastructure code.
The great thing about implementing an IaC practice is that we get to apply the practices we use for managing application changes to our infrastructure. This is important for the Microservices solution we are building. Managing changes to infrastructure components is difficult work. You need to deal with a diverse collection of management consoles, products, configuration formats, hardware connectors and estate planning. But, if we can treat all of those components as if they are parts of a software system, we can minimize the complexity of our change management work.
Adopting an Infrastructure as Code practice can also help us deploy a smaller team to manage the system. Turning the task of infrastructure management into a software-like discipline radically changes the skill-set requirements for operations work. There is still a need to understand the complexities of network design, server and resource management and security. But, by removing the operational complexities of managing a diverse set of devices and machines, that job can be performed by people in our team who understand both software development. It becomes another software based domain for an engineer to add to their repertoire.
To get going with an IaC approach, we’ll need a tool that will allow us to define the changes we want to make as machine readable code files. That tool wil also need to interpret our infrastructure as code files and apply them to a target environment. Years ago, we might have had to build this tooling ourselves, but now there are lots of tools available that can do this work for us. For our example project, we are going to use Hashicorp’s Terraform to define our changes and apply them to our cloud-based environment.
An Introduction to Terraform
Terraform is a popular tool for teams that are employing infrastructure as code principles and managing their infrastructure in an automated, repeatable way. We’ve had success using terraform in our own projects and a ‘straw poll’ of other practitioners showed that it’s a popular choice amongst other Microservices implementers as well. As always, there are plenty of tools available that can help you with automated configuration and deployment of infrastructure components.
Some tools are platform specific such as Amazon’s CloudFormation product which is designed for management of Amazon Web Services resources. Other popular tools such as Chef, Ansible and Puppet originated in the configuration management domain. These tools let you define a linear sequence of changes that are executed whenever you run them. Just like you would in a shell script.
But, Terraform is a bit different. One of the reasons this tool has grown in popularity is that it takes a declarative approach to infrastructure management. We’ll be using configuration files to declare the target state of our infrastructure and will rely on terraform to generate that state in our target infrastructure. When we are starting with a brand new AWS environment, Terraform will create new resources for us as we’ve defined. But, when we apply a changed configuration to an existing infrastructure configuration the real magic happens - Terraform will only make the changes we need to produce the end state that we have declaratively defined.
To make that happen, Terraform needs to keep track of the current state of the environment so that it can come up with a plan to produce the end state that we’ve defined. That state needs to be managed carefully and needs to be shared by everyone who will be managing the infrastructure to avoid “drifting” from the actual state of the environment. Effective management of a terraform solution means managing the state, configuration files and the quality, safety and maintainability of the entire solution. Just like we would for a software application.
Continuous Integration and Continuous Delivery
Immutability and Infrastructure as Code give us a powerful way of reducing uncertainty in our environment builds. But, they don’t specifically address the problems of managing the risks that we will break the environment with a bad change. For example, what happens if a small change to our network inadvertently brings down a load balancer in production and our Microservices are no longer available? Or a change intended only for development accidentally makes its way to production and causes an outage?
One way to mitigate these risks is to do a lot of checking (and double-checking) of every change that we want to make in production. But, the problem with this approach is that it slows down our rate of change because of all the validation work we’d need to do. It can also lead to the late discovery of problems that we should have found a lot earlier in our infrastructure design and development work. We end up spending a lot of time in a testing phase where we need to fix a large batch of problems that could fundamentally alter our infrastructure plan.
Instead, we can apply the DevOps software practices of Continuous Integration and Continuous Delivery. Instead of scheduling a big testing effort right before we change production, we’ll continuously integrate our changes into our repository, test that those changes work and automatically deliver safe changes to a target environment. Ideally, we should get into a cadence of releasing small, testable changes instead of a big batch at once.
Understanding CI/CD
While we are going to apply Continuous Improvement and Continuous Delivery, we won’t be going into any depth on the philosophies, strategies and practices that you’ll need to understand. We recommend the books “Continuous Integration” by Paul M Duvall and “Continuous Delivery” by Jez Humble and David Farley to get the best perspective. Not only are these books the definitive reference books for this subject matter, they are also immensely readable and will give you a strong foundation for understanding DevOps practices in general.
CI/CD practices rely heavily on tooling and automation - that’s because automation allows teams to run tests against their code faster, better and safer than doing it by hand (or by eyeballing). Teams that deliver software applications typically use lots of different tools across the domains of code management, testing, security, issue tracking, release management and workflow management. There are lots of different activities that can take place as part of a CI/CD process. These activities are typically defined as steps, within a “pipeline” that is triggered when a code change is made. Most teams use a CI/CD tool to define, manage and monitor their pipelines.
We’ll be defining a CI/CD pipeline for our infrastructure build. Later in Chapter {X} we’ll also define a CI/CD pipeline for our Microservices. For this book, we’ve chose to use Github’s Actions as our CI/CD pipeline. We’ve chosen to use Github as a platform because it’s a popular choice for open source projects and most developers already have a github account. Github’s “Actions” feature is relatively new and are not as feature rich as more established options such as Jenkins or Gitlab’s. But, being able to use a single tool to manage our code and setup our CI/CD pipeline is an attractive feature - especially when we are constrained by the real estate of a printed page.
When we build our Infrastructure as Code Pipeline, we’ll need to automate the work of testing our Terraform based “code” before we apply it to an environment. We’ll be using a Terraform’s in-built testing features to validate and test our Terraform files before we apply them. We can use these tools to progressively increase our test coverage as we move through the IaC Pipeline. Terraform will allow us to automatically validate the format, syntax and grammar of a proposed change. These tests are relatively quick and will not require us to make any changes to an environment.
Note
We’ll only be using the features that Terraform bundles in with their product. But, an ecosystem of linting, testing and code development tooling has evolved around Terraform. As your architecture evolves, you may want to incorporates some of those additional tools into your infrastructure as code workflow.
Once we’ve applied the Terraform tests, our code changes will be ready to be deployed into a real Cloud environment. The final step in our IaC Pipeline will be to release a new version of our Microservices environment. By the end of this chapter, we’ll have setup an IaC pipeline that can spin up a simple Terraform-based “sandbox” environment in the Cloud. But, the first step will be to install Terraform and the other tools we’ll need for infrastructure as code development.
Setting up the Infrastructure as Code Environment
When you write application code, you need a development environment with tools that let you write, manage, test and run your code. It’s the same for infrastructure code. In this section, we’ll setup a local environment and Cloud environment that we’ll be using to write, test and publish infrastructure code.
Set up Github
The first thing we’ll need is a way to manage and release our code. We’ll be using git for code management and Github as a host. There are plenty of great options available for git hosting, GitLab being one of the most popular alternatives. We’re using Github for our up and running solution so that we can also take advantage of Github’s bundled DevOps pipeline called Actions. But, as always, we strongly encourage you to choose the tools that make sense for you when you build your own Microservices architecture.
In order to work with our examples, you’ll need to register for a Github account and you’ll also need a local copy of a Git client. Git is an incredibly popular source control tool, so chances are that you already have it installed in your machine and you are familiar with how to use it.
But, just in case Git is new to you, we recommend that you start by taking a look at Scott Chacon and Ben Straub’s book called “Pro Git” which they’ve graciously made available to read for free on the web. You can also visit Github’s “Git Handbook” if you are just looking for quick overview of what Git is and why it’s useful.
If you don’t have the Git client installed, visit https://git-scm.com/downloads and follow the instructions to download the appropriate version.
In addition to the Git client, you’ll also need to register for an account at Github if you don’t already have one. Github is one of many Git hosting providers who provide a place to store Git repositories as well as a lot of additional functions to manage Git based projects and releases. As we mentioned earlier, we’ll be using Github to host our code repositories and also as our CI/CD tool.
If you don’t have a Github account already, you can register for a free account at https://github.com/join.
We’ll be using Git repositories to manage our infrastructure as code, just like we manage code for an application. We’ll be writing our code in a language that Hashicorp’s Terraform tool will understand. So, we’ll need to install a copy of the Terraform client in our workspace.
Install Terraform
Terraform and its declarative way of describing changes gives us an effective way of achieving our principles of infrastructure as code. We’ll be using Terraform from inside of a Github Action pipeline, so technically, you don’t need a local copy of terraform running on your machine. In theory you could just let Github run terraform whenever you commit a new infrastructure file into the repository.
But, in practice this is a difficult way to write good code and troubleshoot problems. The feedback loop for doing a commit and waiting for a pipeline to automatically test your changes is too long. Ideally, you should be able to create and perform early testing of your Terraform code before you commit it into the repository and continuous integration pipeline. So, its worthwhile installing a local copy of Terraform for your local environment.
At the time of writing, Terraform is available to run on the following platforms: * OS/X * FreeBSD * Linux * OpenBSD * Solaris * Windows
Visit https://www.terraform.io to download the client of your choice and install it on your machine. We used version 0.12.20 for all of the examples in this book. We’ll leave it to you to follow the instructions for the platform you’ve chosen.
Once you have completed the installation, run the following command to make sure Terraform is setup correctly:
$ terraform version
You should see something like the following:
Terraform v0.12.20
We’ll be using Terraform based code to provision resource in a Cloud infrastructure. In particular, we’ll be creating resources in an Amazon Web Services (AWS) cloud instance. But, before we can do that, we’ll need to create an AWS account.
Configure Amazon Web Services
There are quite a few cloud providers available to use at the time we wrote this book. The three that are the most popular amongst large organizations that are implementing microservices seem to be: Microsoft Azure, Google Cloud Platform (GCP) and Amazon Web Services (AWS). We’ve had success using all three of these cloud platforms as a base for Microservices applications and have even worked with organizations who’ve embraced all of them as part of a “multi-cloud” strategy.
Ultimately, for this book we needed to choose one of them and we’ve decided to use Amazon’s AWS as it was the platform with the biggest user base at the time of writing. But, when you build your own Microservices architecture be sure to use the cloud platform that makes the most sense for you particular organization and needs. We’ve done our best to use tools that should work well in any of these cloud environments with a bit of tweaking.
Since we’ve chosen to use AWS as our cloud platform, you’ll need to have an AWS account to follow along with the examples in this book. If you don’t have one already, you can register for an account at https://aws.amazon.com. Keep in mind that you’ll need a credit card in order to activate your account.
Keep an Eye on your Billing
Although AWS offers a free account tier, the examples in this book use resources that aren’t included in the scope of free services.
In addition to setting up an account, you’ll also need to setup an “operator” account so that the tools we are setting up will have access to your AWS instance.
Set up an AWS Operations Account
By the end of this chapter, we’ll have a pipeline that can deploy infrastructure into AWS automatically. Sticking to our principles of automation and immutability, we should never have to manage our AWS infrastructure by making changes directly through the browser. But, to start off with, we’ll need to perform a few steps manually to get our automation system up and running. We need to configure a set of credentials and permissions to allow our tools to work with our AWS objects.
In AWS, users, groups and permissions are all managed within the Identity and Access Management (IAM) service. We’ll need to create a special user that represents our tooling and define a set of permissions for what our tools can do. We’ll use this user identity whenever we are making calls from our CI/CD pipeline platform. As we mentioned earlier, we’ll be using Terraform as our primary IaC tool. Follow the steps in this section to create a Terraform user in AWS that will allow us to make the kinds of changes we’ll need for our Microservices environment.
Login to your AWS management console at http://aws.amazon.com. Once you’ve logged in, you should be presented with a list of AWS services. Find and select the IAM service - it’s usually found in the Security, Identity & Compliance section.

Figure 4-2. Select IAM
Select the Users link from the IAM navigation menu on the left-hand side of the screen. Click the “Add user” button to start the IAM user creation process.
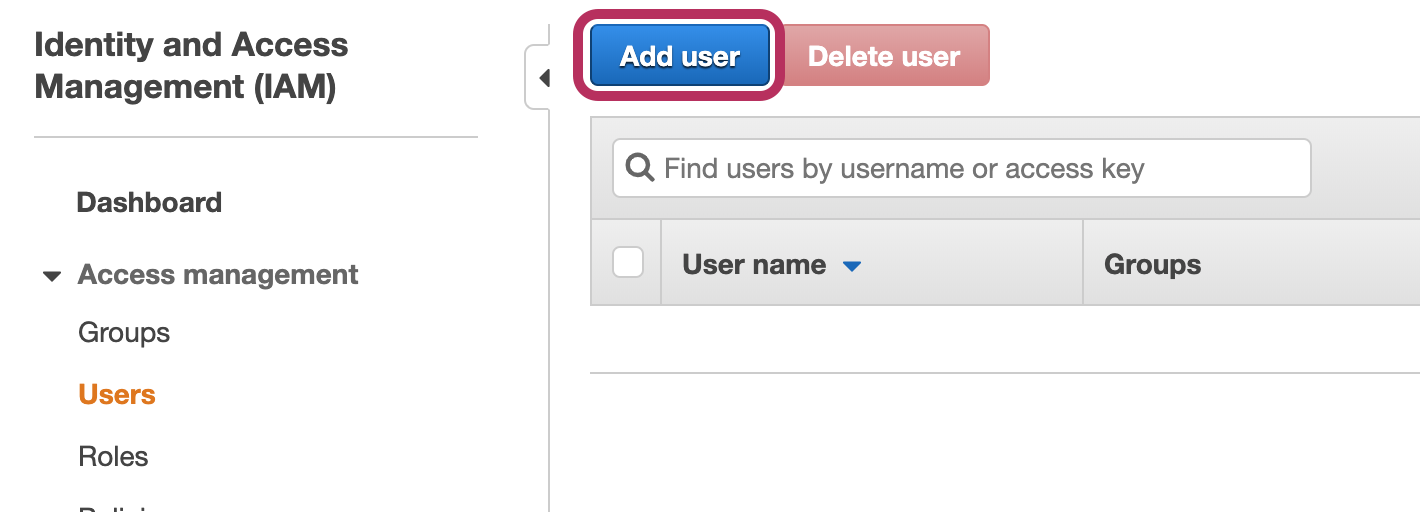
Figure 4-3. Add User
Enter ops-account as the AIM user name in the User name field. We want our tools to access AWS through the platofrm’s management API, so select Programmatic Access as the AWS Access type. When you are done, click the Next: Permissions button to start defining access permissions.

Figure 4-4. Enter User Details
Click the Next: Tags button and then click the Next: Review button (we don’t need to define any tags at the moment.) On the review screen if everything looks OK, click the Create user button.
If everything has gone correctly, you should now see a screen that looks something like this:

Figure 4-5. Review User
Before we do anything else, we’ll need to make a note of our new user’s secret access key. Click the Show link and copy and paste both the “Access key ID” and the “Secret access key” into a temporary file. We’ll use both of these later in this section with our automated pipeline. Be careful with this key material as it will give whoever has it an opportunity to create resources in your AWS environment at your expense.
Note
Make sure you take note of the Access Key ID and the Secret Access Key that were generated before you leave this screen. You’ll need them later in this chapter.
We have now created a user called ops-account with permission to make IAM changes. That gives us all that we need to transition from using the browser based console over to the AWS CLI application that we installed earlier. The first thing we’ll need to do is configure the CLI to use the Ops user we’ve just created.
Configure The AWS CLI
There are three ways to manage major cloud provider configurations: web browser, web based APIs and a command line interface. We’ve already used the web browser to create our operator account, later we’ll be using Terraform to configure changes via the AWS APIs. But, we’ll need to make some more changes before Terraform can make AWS API calls on our behalf. For that we’ll use the AWS command line interface (or CLI).
Using the CLI makes it a lot easier for us to describe the changes you need to make. It’s also less prone to the changes that user interfaces go through. But, to use the CLI, the first thing we’ll need to do is install it into our local working environment. Navigate to https://aws.amazon.com/cli/ and follow the instructions on the page to install the CLI onto your local system.
Once it’s ready, the first thing we’ll do is configure the CLI so it can access our instance. Run the aws configure command as shown in Example 4-1. You can replace the default region name with an AWS region that is closer to you. A full list of AWS regions is available at https://docs.aws.amazon.com/general/latest/gr/rande.html.
Example 4-1. Configure the AWS CLI
$aws configure AWS Access Key ID[****************AMCK]: AMIB3IIUDHKPENIBWUVGR AWS Secret Access Key[****************t+ND]: /xd5QWmsqRsM1Lj4ISUmKoqV7/qr4u4ZrpP0KOLK Default region name[None]: eu-west-2 Default output format[None]: json
You can test that you’ve configured the CLI correctly by listing the user accounts that have been created. Run the iam list-users command to test your setup:
$ aws iam list-users
{
    "Users": [
        {
            "Path": "/",
            "UserName": "admin",
            "UserId": "AYURIGDYE7PXW3QCYYEWM",
            "Arn": "arn:aws:iam::842218941332:user/admin",
            "CreateDate": "2019-03-21T14:01:03+00:00"
        },
        {
            "Path": "/",
            "UserName": "ops-account",
            "UserId": "AYUR4IGBHKZTE3YVBO2OB",
            "Arn": "arn:aws:iam::842218941332:user/ops-account",
            "CreateDate": "2020-07-06T15:15:31+00:00"
        }
    ]
}
If you’ve done everything correctly you should see a list of your AWS user accounts. That means AWS CLI is working properly and has access to your instance. Now, we can move on to setting up the permissions that our operations account will need.
Setup AWS Permissions
When we created our ops-account user we attached an IAM policy to it that only gives it permission to modify IAM settings. But, our ops account will need a lot more permissions than that to manage the AWS resources we’ll need for our infrastructure build. In this section, we’ll use the AWS command line tool to create and attach additional permission policies to the ops account.
The first thing we’ll do is make the ops-account part of a new group called Ops-Accounts. That way we’ll be able to assign new users to the group if we want them to have the same permissions. Use the following command to create a new group called Ops-Accounts
$ aws iam create-group --group-name Ops-Accounts
On success, the AWS CLI will display the group that has been created:
{

    "Group": {
        "Path": "/",
        "GroupName": "Ops-Accounts",
        "GroupId": "AGPA4IGBHKZTGWGQWW67X",
        "Arn": "arn:aws:iam::842218941332:group/Ops-Accounts",
        "CreateDate": "2020-07-06T15:29:14+00:00"
    }
}
Now, we just need to add our user to the new group. Use the following command to do that:
$ aws iam add-user-to-group --user-name ops-account --group-name Ops-Accounts
Next, we need to associate a set of permissions with our Ops Account group so that our user will be able to work with AWS resources in the way we expect. In practice, you’d likely need to change permissions for your Ops user as you go through the process of designing your infrastructure. In this book, we’ve already done the design work ahead of time, so we know exactly which policies we’ll need to set.
Run the following command to attach all the policies we’ll need to the Ops-Accounts group:
$ aws iam attach-group-policy --group-name Ops-Accounts
 --policy-arn arn:aws:iam::aws:policy/IAMFullAccess &&
aws iam attach-group-policy --group-name Ops-Accounts
 --policy-arn arn:aws:iam::aws:policy/AmazonEC2FullAccess &&
aws iam attach-group-policy --group-name Ops-Accounts
 --policy-arn arn:aws:iam::aws:policy/AmazonEC2ContainerRegistryFullAccess &&
aws iam attach-group-policy --group-name Ops-Accounts
 --policy-arn arn:aws:iam::aws:policy/AmazonEKSClusterPolicy &&
aws iam attach-group-policy --group-name Ops-Accounts
 --policy-arn arn:aws:iam::aws:policy/AmazonEKSServicePolicy &&
aws iam attach-group-policy --group-name Ops-Accounts
 --policy-arn arn:aws:iam::aws:policy/AmazonVPCFullAccess &&
aws iam attach-group-policy --group-name Ops-Accounts
 --policy-arn arn:aws:iam::aws:policy/AmazonS3FullAccess &&
Note
We could have automated these IAM commands using Terraform or a shell script. However, since this is a one time setup in our build, we’ve decided to create these IAM permissions manually for simplicity and brevity.
In addition to the out of the box policies that AWS provides, we’ll also need some special permissions to work with the AWS Kubernetes service called EKS. There isn’t an existing policy that we can attach for the permissions we need, so we’ll need to create our own customer policy and attach it to our user group.
To do this, create a file called custom-eks-policy.json and populate it with the code in listing Example 4-2.
Example 4-2. Custom JSON Policy for EKS
{
  "Version": "2012-10-17",
  "Statement": [
    {
      "Effect": "Allow",
      "Action": [
        "eks:DescribeNodegroup",
        "eks:DeleteNodegroup",
        "eks:ListClusters",
        "eks:CreateCluster"
      ],
      "Resource": "*"
    },
    {
      "Effect": "Allow",
      "Action": "eks:*",
      "Resource": "arn:aws:eks:*:*:cluster/*"
    }
  ]
}
Now, run the following command to create a new policy named “EKS-Managment” based on the JSON we’ve just created:
$ aws iam create-policy --policy-name EKS-Management
 --policy-document file://custom-eks-policy.json
If the command was succesfull, you’ll see a JSON representation of the new policy:
{
    "Policy": {
        "PolicyName": "EKS-Management",
        "PolicyId": "ANPA4IGBHKZTP3CFK4FAW",
        "Arn": "arn:aws:iam::[some_number]:policy/EKS-Management",
        "Path": "/",
        "DefaultVersionId": "v1",
        "AttachmentCount": 0,
        "PermissionsBoundaryUsageCount": 0,
        "IsAttachable": true,
        "CreateDate": "2020-07-06T15:50:26+00:00",
        "UpdateDate": "2020-07-06T15:50:26+00:00"
    }
}
Note
The string of digits in the ARN of the policy you’ve created will be unique to you and your AWS instance. You’ll need to make note of the ARN string so that you can use and attach this policy.
With the new policy created, all that’s left is to attach it to our user group. Run the following command, substituting your new policy’s ARN for the token we’ve called {YOUR_POLICY_ARN}:
$ aws iam attach-group-policy --group-name Ops-Accounts --policy-arn {YOUR_POLICY_ARN}
You now have an ops-account user that has the permissions needed to automatically create AWS infrastructure resources for us. We’ll be using this user account when we write our Terraform code and when we configure the infrastructure pipeline. Make sure you keep the access key and secret somewhere handy (and safe) as we’ll need it later.
We have one last bit of setup to take care of before we can get to work building the pipeline: the creation of an AWS S3 storage bucket for Terraform to store state.
Create an S3 Backend for Terraform
Terraform is powerful because it allows us to declare what an infrastructure should look like, rather than defining the specific steps needed to reach that state. Terraform works it’s magic by making the right changes to an environment to make it look the way we’ve described. But, in order to do that, Terraform needs to keep track of what the environment looks like and the last operations it’s performed. Terraform keeps track of all that information in a JSON based state file that is read and updated every time it is run.
By default, Terraform will keep this state file in your local filesystem. But, in practice storing the state file locally is problematic. State often needs to be shared across machines and users so that an environment can be managed in multiple places. However, local state files are difficult to share and you can easily find yourself dealing with state conflicts and synchronisation issues.
Instead, we’ll use the AWS S3 service to store the Terraform state file. Terraform comes with out of the box support for using S3 as a state backend. All we’ll need to do is create a new “bucket” for the data and make sure we have the correct permissions set for our ops user account.
Note
Like most cloud providers, AWS provides lots of different data storage options. S3 is Amazon’s “Simple Storage Service” and lets you create data objects that can be referenced by a key. The data objects are just blobs to Amazon and can be in any format you like. In this case, Terraform will be storing environment state as JSON objects.
To create a bucket, you’ll need to come up with a unique name for it and pick the region that it should reside in. You should have already selected a default region when you configured the AWS CLI and we suggest that you use the same region for the S3 bucket. You can find more information about S3 bucket regions in the AWS documentation at https://docs.aws.amazon.com/AmazonS3/latest/dev/UsingBucket.html#access-bucket-intro.
S3 Bucket Names Must Be Unique
Amazon S3 buckets can be referenced by their names. That means that the name you pick has to be unique across the entire AWS region that you select. There is a good chance you won’t be able to use a generic name like “test” or “microservices”. Instead, you’ll need to come up with something unique. Usually, appending your name to the bucket name works. Throughout this book, whenever we refer to this S3 bucket, we’ll use the token +{YOUR_S3_BUCKET_NAME}+ and leave it to you to replace it with your bucket name. tructions.
Once you’ve decide on a name and region, run the following command (replacing the tokenized parameters with your values):
Note
This is a long command so it’s been split up into three lines for readability using the bash multi-line operator: “”.
$ aws s3api create-bucket --bucket {YOUR_S3_BUCKET_NAME}
> --region {YOUR_AWS_REGION} --create-bucket-configuration
>  LocationConstraint={YOUR_AWS_REGION}
If everything has gone well, you should see something that looks like this indicating that the bucket has been created:
{
    "Location": "http://my-msur-test-bucket.s3.amazonaws.com/"
}
This means the bucket has been successfully created and it’s been assigned it’s own unique URL. By default, S3 buckets aren’t publicly accessible. That’s a good thing because we don’t want just anyone to be able to see and change our Terraform state file. However, we’ve already given our ops account user full permissions to the S3 service, so it is ready for use.
With this final step complete, we now have an AWS user called ops-account configured to create, edit and delete resources in AWS. We’ve also given it permissions to store objects in a special S3 bucket we’ve created just for managing Terraform state. This should be the last time we make manual operator changes to our AWS instance - from here on out we’ll only make changes through code and with an automated pipeline!
Build an Infrastructure as Code Pipeline
With the accounts, permissions and tools ready to go, we can now get on with the real focus of this chapter. By the end of this section, we’ll have an infrastructure as code pipeline implemented and ready to use. Remember, the infrastructure pipeline is incredibly important because it gives us a safe and easy way to provision environments quickly. Without a pipeline, we’d end up with lots of manual steps and Microservices environments that have drifted apart in the way they work.
Instead, we’ll have a stable declarative definition of the infrastructure for our services. Our development and operations teams will be able to use those definitions to create their own environments to perform testing, make changes and release services into production. We won’t be implementing any of the actual AWS infrastructure in this chapter, but we will be implementing a foundation that we’ll use in the next chapter. In this section we’ll build the following components:
-
A Github hosted Git repository for a sandbox testing environment
-
A Terraform root module that defines the sandbox
-
A Gihub Actions CI/CD pipeline that can create a sandbox environment
The sandbox testing environment we’re building is just a test environment that will give us a chance to try out our infrastructure as code modules and pipelines. We’ll build it out in the next chapter and then throw it away when we’re happy that everything works. Later, we’ll use all of these assets to build a test environment for the Microservices that we’ll be designing and building.
But, our first step will be to establish a repository for the code and pipeline, so let’s get started with creating the repository.
Create the Sandbox Repository
We’ve already mentioned in the beginning of this chapter that we’ll be using Git and Github to manage our infrastructure code. If you’ve been following along, you’ll already have a local copy of Git installed and a Github account ready to be used. We’re going to use both of those tools to create a new repository for our Sandbox environment.
We’ve made a decision to give each environment is its own repository with the code and pipeline bundled within it. We like this approach because it gives teams more independence in how they manage the environments they want to create, while still keeping the pipeline configuration and code together for easier management.
Tip
Some practitioners like to keep all of the environment configurations together in a single “monorepo”. This makes it easier to share libraries, components and actions between all the environments and helps keep things consistent. Most practitioners also use specialised CI/CD tooling (Jenkins being one of the most popular), rather than building inside of Github. This is an important decision, so you’ll need to consider the tradeoffs when you build your next Microservices architecture based on the observations you make from the one we’re building together.
We’ll use Github’s browser based interface to create the sandbox repository. Although there is a Github CLI application available, It will be quicker and easier to use the web based interface to create our new repository. Later, we’ll also be using Github’s browser interface to run and monitor the pipeline.
To create the repository, open your browser and navigate to https//github.com/new. If you haven’t already logged in to your Github account, you’ll be prompted to enter your login credentials. Once that is done, you’ll be presented with a form to create a new repository. Give your new repository the name env-sandbox and make sure to choose “Terraform” from the “Add .gitignore” drop down at the bottom of the screen, as shown in Figure 4-6.

Figure 4-6. Create Github Sandbox Repository
It’s important that we ask Github to add a .gitignore for Terraform to the module because it will make sure we don’t accidentally commit Terraform’s hidden working files to our module. If you’ve missed this step you can always add this file later by copying the source from https://raw.githubusercontent.com/github/gitignore/master/Terraform.gitignore.
It’s possible to write code using Github’s browser based text editor, but it’s not a great idea if you are doing real work. Instead, we’ll clone this repository into a local development environment so we can use our own tools. We’ll leave it to you to create a clone of your env-sandbox repository in your own local development environment.
Tip
If you’ve never worked with Git and Github before, you can find helpful instructions on clone a Github repository in the official documentation here: https://docs.github.com/en/github/creating-cloning-and-archiving-repositories/cloning-a-repository
Thats all we need to do with Github for now. We’ll need to come back to this browser based interface later when we work on the pipeline activities. But with the local clone you’ve created, we can move on to working the Terraform code that belongs inside of it.
Understanding Terraform
We mentioned earlier that we’ll be using Terraform as our tool of choice for declaratively coding our infrastructure foundation. The terraform does a lot of complicated work to make changes that match a declared state. But, it’s surprisingly easy to get started with and the language it uses is fairly intuitive. That makes it a great fit for our architecture and our goal of getting a system running as quickly as possible.
Terraform files are configured in a data format called HCL, which was invented by HashiCorp (the company that created Terraform). HCL is similar to JSON, with a few adaptations and improvements. If you’re used to JSON, the biggest difference you’ll notice is that HCL doesn’t use a “:” delimiter between key and value pairs. Instead, key and values are just separated by a white space or an “=”, depending on the context. There are some other minor improvements such as comments and multi-line strings as well. In our experience, it’s an easy language with a very low learning curve if you’ve used JSON or YAML format in the past.
In addition to understanding HCL, it’s useful to understand four of the key Terraform concepts: backends, providers, resources and modules:
- Backend
-
Terraform needs to maintain a state file so that it knows what kinds of changes to make to the infrastructure environment. A backend is the location of that state file. By default this is located in the local file system. But, we’ll be using an AWS S3 bucket which we configured earlier.
- Resource
-
A resource is an object that represents a thing that you are declaring a state for. Terraform does the work of making the changes to bring the resource to that state.
- Provider
-
A Terraform provider is a packaged library of resources that you can use in your code. We’ll be using Terraform’s AWS provider for most of our work. The nice thing about Terraform is that you can use it for lots of different cloud platforms and infrastructure environments - you just need to specify the provider you plan to use.
- Module
-
Terraform modules are similar to functions or procedures in a regular programming language. They give you a nice way of encapsulating your HCL code in a reusable, modular way.
There’s a lot more to Terraform that what we’ve described here, but this is enough knowledge for us to get started with our environment build work. If you want to go deeper, the Terraform’s documentation is a great place to start.
Our next step is to write some Terraform code that will help us build a Sandbox environment.
Writing the Sandbox Code
Our goal in this chapter is to setup the tooling and infrastructure for our environment build, so we won’t be writing a complete Terraform file that defines our infrastructure until the next chapter. For now, we’ll need to create a simple, “starter” file to test our Terraform based tool chain.
The Terraform CLI tool works by looking for files it recognizes in the working directory where it’s run. In particular, it looks for a file called main.tf and will parse that file and apply changes based on it’s contents. You can only have one main.tf file in a single directory, so that means we’ll need to have a directory dedicated to our sandbox environment and we’ll need to create a Terraform main.tf file that will describe its target state.
We’ve already created a Git repository for the sandbox environment, so that’s the directory we’ll use for the Terraform code. Let’s get started by creating a new file called main.tf in the local Sandbox git repository. Populate it with the HCL code in Example 4-3.
Note
You’ll need to replace the tokens {YOUR_S3_BUCKET_NAME} and {YOUR_AWS_REGION} with the S3 bucket name you created earlier and the AWS region you’ve been using.
Example 4-3. sandbox-starter-code
terraform {
  backend "s3" {
    bucket = "{YOUR_S3_BUCKET_NAME}"
    key    = "terraform/backend"
    region = "{YOUR_AWS_REGION}"
  }
}

locals {
  env_name         = "sandbox"
  aws_region       = "<strong>region code</strong>"
  k8s_cluster_name = "ms-cluster"
}
The HCL snippet you’ve just written let’s Terraform know that we are using an S3 bucket to store our backend state. It also defines a set of local variables using a Terraform construct called locals. These are values we’ll be using a lot as we start defining the actual infrastructure in the next chapter.
With our first Terraform code file written, we’re ready to try running some Terraform commands to make sure it works as expected. The Terraform CLI tool includes a lot of helpful features to improve the quality and safety of your infrastructure code. You can use it to format (or “lint”) the HCL that you’ve written, validate the syntax and do a “dry-run” of the changes that Terraform would run against your provider.
If you’ve followed the instructions earlier in this chapter, you should have a local copy of Terraform available in your working environment. Make sure you are in the same working directory as your main.tf file and try running the fmt command to format your code:
env-sandbox msur$ terraform fmt
main.tf
The fmt command is a formatter that will examine your HCL file and make changes to improve its consistency and readability. If any changes were made it will output the name of the file that it changed.
Next, we’ll validate that the syntax of the HCL we’ve written is valid. But, before we do that we’ll need to install the providers we’re using, otherwise Terraform will complain that it can’t do the syntax check. Run the following command to install the providers:
env-sandbox msur$ terraform init

Successfully configured the backend "s3"! Terraform will automatically
use this backend unless the backend configuration changes.

Terraform has been successfully initialized!

You may now begin working with Terraform. Try running "terraform plan" to see
any changes that are required for your infrastructure. All Terraform commands
should now work.

If you ever set or change modules or backend configuration for Terraform,
rerun this command to reinitialize your working directory. If you forget, other
commands will detect it and remind you to do so if necessary.
Tip
If you get an error related to AWS credentials, make sure you’ve followed the instructions at the beginning of this chapter to configure access to an AWS environment first.
Now, we can run a validate command to ensure that we haven’t introduced any syntax errors:
env-sandbox msur$ terraform validate
Success! The configuration is valid.
Finally, we can run a plan to see what changes Terraform would make to create the environment we’ve specfied:
$ terraform plan

Refreshing Terraform state in-memory prior to plan...
The refreshed state will be used to calculate this plan, but will not be
persisted to local or remote state storage.


------------------------------------------------------------------------

No changes. Infrastructure is up-to-date.

This means that Terraform did not detect any differences between your
configuration and real physical resources that exist. As a result, no
actions need to be performed.
Notice that our plan isn’t very interesting: “No changes.”. That’s because we haven’t actually defined any resources to create. But, the good new is that we now have a syntactically valid Terraform file to start building our Sandbox environment. This is a good time to commit and push the file into the Github repository so that the file is available for use:
$ git add .
$ git commit -m "The sandbox starter file"
$ git push origin
With our Terraform file working and ready to be used, we can shift our focus over to the pipeline that we’ll use to automatically apply it.
Build the Pipeline
In this section we’ll setup an automated CI/CD pipeline that will automatically apply the Terraform file that we’ve just created. We’ll be using Github’s built in DevOps tool called Github Actions to configure the pipeline activities. The nice thing about using Github Actions is that we can put our pipeline configuration in the same place as our infrastructure code.
The easiest way to use Github Actions is to configure it through the browser interface. So, go back to your browser and navigate to the sandbox repository you created in Github earlier.
Our plan is to create resources in the AWS account that we created earlier in this chapter. That means we’ll need to make sure that Github is able to use the AWS access key and secret that we provisioned when we created the operator account. There are lots of ways to manage secrets in a microservices architecture, but for our DevOps tooling, we’ll just use Github’s built-in secrets storage function.
Navigate to the Github secrets storage area by selecting Settings from the top navigation of your repository. Select Secrets from the menu of settings options on the left hand side of the screen as shown in Figure 4-7.

Figure 4-7. Github Secrets
Select Add a new secret and create a secret called AWS_ACCESS_KEY_ID. Enter the access key ID that you tucked away earlier in this chapter when you created your operator user. Repeat the process and create a secret named AWS_SECRET_ACCESS_KEY with the secret access key you generated earlier. When you are done you should have something that looks like Figure 4-8.

Figure 4-8. Add Your AWK ID and Key
Now that the secrets have been added, we can start working on the workflow for the pipeline. A workflow is the set of steps that we want to run whenever a pipeline is triggered. For our Microservices infrastructure pipeline, we’ll want a workflow that validates Terraform files and then applies them to our sandbox environment. But, in addition to testing and applying infrastructure changes, we’ll need to add a few steps before and after our Terraform apply.
The workflow will need to start with a trigger that lets Github know when the workflow should start. Github Actions gives us a few different options for triggers, but we’ll use Git’s tag mechanism as the trigger for our infrastructure builds. A tag is a way of giving a name or labelling a particular point in a Git repoisitory history. Using tagging as a trigger gives us a nice versioning history for the changes we are making to the environment. It also gives us a way of committing files to the repository without triggering a build.
When our pipeline workflow is triggered it will need to operate on the Terraform files that we’ve commited to the repository. But, we’ll need some setup steps to prepare the build environment. That means we’ll need to install Terraform and AWS just like we did in our local environment. Although we are running this in Github Actions, the actual build takes place in a virutal machine, so we’ll also need to grab a copy of the code from our code repository.
Finally, when the changes are applied to our sandbox environment, we’ll have a chance to do any cleanup or post-provisioning activities. In our case, we’ll be making a special configuration file available for download so that we can connect to the AWS based microservices environment from a local machine.
When it’s complete, the pipeline will look like Figure 4-9.

Figure 4-9. Infrastructure Pipeline Steps
We’ll be defining the step of the pipeline using the YAML language and Github Actions’ set of workflow commands. You can find the full documentation for Github Actions at https://docs.github.com/en/actions. Let’s dig into the YAML configuration by navigating to the Github Actions page for your repository. You should be able to do this by selecting Actions from the top navigation bar in your sandbox’s Github repository page. When you get there you should see a screen that looks similar to Figure 4-10.

Figure 4-10. Create a Github Action Workflow
Github Actions provides you with templates you can use to quickly get started with a workflow. But, we’re going to ignore the templates and setup a workflow ourselves from scratch. Click the Set up a workflow yourself button in the top right corner of the screen (or wherever it is in the latest version of the interface).
You’ll now find yourself editing a newly created YAML file for your workflow. Github keeps the Actions files in a hidden directory called /.github/workflows. When you clone a Github repository, you can edit these files in whatever editor you like, or create new Yaml files to define new Github Action workflows. But, the advantage of editing Actions on the Github website is that you can search for plug-ins from the marketplace. So, we’ll stick to the browser based editor for our initial workflow editing work.
The first thing we’ll do is configure a trigger for the workflow and setup a container environment to do the infrastructure build.
Note
To help you understand what is happening, we’re only going to the workflow in parts. We’ll explain each part as we go along, but the actual workflow is all contained in a single file. You can see an example of the completed workflow file at https://github.com/mitraman/env-sandbox/blob/master/.github/workflows/main.yml
Configure the Trigger and Setup
One of the most important steps in our workflow is the trigger step that initiates it. As we mentioned, earlier we’ll use a simple trigger based on Git’s tagging mechanism. We’ll configure our pipeline so that it runs whenever infrastructure is tagged with a label that starts with a “v”. That way we can keep a history of versions of our infrastructure that we’ve built. For example, our first infrastructure build could be tagged with “v1.0”.
Replace the YAML in your workflow editor with the code in Example 4-4 to get started.
Example 4-4. Workflow Trigger and Job Setup
name: Sandbox Environment Build

on:
  create:
    tags:
      - v*
jobs:
  build:
    runs-on: ubuntu-latest
    env:
        AWS_ACCESS_KEY_ID: ${{ secrets.AWS_ACCESS_KEY_ID }}
        AWS_SECRET_ACCESS_KEY: ${{ secrets.AWS_SECRET_ACCESS_KEY }}

    steps:
    - uses: actions/checkout@v2
In the snippet above, on is a Github Action command that specifies the trigger for the workflow. We’ve configured our workflow to run when a new tag that matches the pattern v* is created. In addition, we’ve added a jobs collection which specifies the work that Github should do when it is triggered. Jobs need to be run in a machine or a container. The runs-on property indicates that we want to run this build in an Ubuntu Linux VM. We’re also adding the AWS secrets that we configured earlier in the build environment.
The steps collection indicates the specific workflow steps that the workflow will perform within the environment we have setup. But, before we do anything else we need to get the code. So, the first step we’ve defined is to checkout our Terraform code from git using the Github actions/checkout@v2 action. This creates a copy of the code inside of the Ubuntu build environment for the rest of the job steps to act upon.
Tip
Actions are modularised libraries of code that can be called form a Github Actions workflow. Actions are the heart of the Github Actions system and give it a richness of features and integration. There is a large catalogue of actions available in the Github Action marketplace that you can use in your workflow files. But, be selective when choosing them as anyone can create and publish new actions, so support, security and quality are not guaranteed.
We have enough in our workflow to be able to run it, but it would only be able to do anything useful beyond grabbing a copy of our code. What we really want to do is start working with the Terraform, but before we can do that we need to get the environment setup so that our tooling can be run. That means we need to add some dependency installation instructions.
Install Dependencies
When we setup our local infrastructure development environment, we needed to install the git, AWS and Terraform command line tools. We’ll need to do something similar in our build environment, but since we know the specific operations we’ll be running, we can setup a slightly leaner set of dependencies.
The good news is that we get git for free when we use Github Actions, so we won’t need to worry about installing it. Also, Hashicorp provides a ready to go Github Action for Terraform, so we won’t need to worry about installing the Terraform client. The only thing that’s left to deal with is our AWS configuration.
Earlier in this chapter we used the AWS CLI to make changes to our AWS account. But, in our pipeline environment, we want to use Terraform to make changes. In fact, we don’t want to make any changes to the environment outside of what we’ve specified in our Terraform code. So, that means we don’t really need to install the AWS CLI.
What all of that means is that we don’t need to install any dependencies to make a pipeline that can create AWS resources for us. But, as we start building out our infrastructure in the next chapter, we’ll find out that our infrastructure needs some special dependencies to deal with some of the complexities of installing a Kubernetes based microservices architecture.
Note
Because this is a book, we’ve identified the dependencies you’ll need for the pipeline before you know you need them. That’s because books are easier to read when they are linear, so we’ve done the work to give you a linear set of instructions to follow. In practice, you’ll go through several iterations of editing your pipeline actions as you test and learn and develop your infrastructure and microservices pipelines.
Specifically, we’ll be installing an AWS authenticator tool and an installer for the Istio service mesh. The AWS authenticator is a command line tool that other tools can use to authenticate and access an AWS environment. This will come in handy later, when we are working with Kubernetes and need to configure access to an AWS hosted Kubernetes cluster. Istio is a service mesh tool. We’ll introduce Istio in the next chapter, for now we just need to make sure we’ve installed the CLI tool.
Add the code in Example 4-5 to your workflow file to setup those dependencies in the build environment. These steps need to be added after the checkout step that we wrote earlier. Be careful with the indenting and make sure you are lined up with the -uses step from earlier as YAML is very particular about whitespace.
Example 4-5. Installing Dependencies
[...]

    steps:
    - uses: actions/checkout@v2 (TK use colour or italics to indicate this is already in the file)

	- name: Install aws-iam-authenticator
      run: |
        echo Installing aws-iam-authenticator...
        mkdir ~/aws
        curl -o ~/aws/aws-iam-authenticator
        https://amazon-eks.s3.us-west-2.amazonaws.com/1.16.8/2020-04-16/bin/linux/amd64/aws-iam-authenticator
        chmod +x ~/aws/aws-iam-authenticator
        echo "::add-path::~/aws"

    - name: Install Istio CLI
      run: |
        curl -L https://istio.io/downloadIstio | ISTIO_VERSION=1.6.3 sh -
        echo "::add-path::./istio-1.6.3/bin"

	- uses: hashicorp/setup-terraform@v1
      with:
        terraform_version: 0.12.19
The run commands in the YAML you’ve just added will run shell commands in the Ubuntu build environment. We’ve added instructions to install the AWS IAM Authenticator based on the AWS documentation as well as the Istio CLI tool. Keep in mind that this virtual machine will be created at the start of every pipeline run and destroyed when it’s finished. So, these tools will get installed every time we trigger our pipeline job.
The last part of our YAML code uses Hashicorp’s terraform setup action. As you can see, this is much cleaner and easier to read and understand than the command line installations we included for the AWS authenticator and Istio. Github Actions is better when you have actions to use, so it’s a good idea to take advantage of them when they fit your needs.
With our dependencies setup and Terraform ready to go, we can add the steps to make changes to the environment.
Apply Terraform Files
Our Terraform activities will be mostly the same as the steps we did in our local environment, with the addition of an apply step that will make real changes. Add the YAML code in Example 4-6 to your workflow file to implement the format, validate, plan and apply steps
Example 4-6. Terraform Workflow
[...]
	- uses: hashicorp/setup-terraform@v1
      with:
        terraform_version: 0.12.19

    - name: Terraform fmt
      run: terraform fmt

    - name: Terraform Init
      run: terraform init

    - name: Terraform Validate
      run: terraform validate -no-color

    - name: Terraform Plan
      run: terraform plan -no-color

    - name: Terraform Apply
      run: terraform apply -no-color -auto-approve
As you can see from your YAML, we’re using the run action to call the Terraform CLI from the Ubuntu shell. This is largely the same as what you did in your local environment with the addition of the apply step at the end that will make real changes in the AWS infrastructure. Notice that we’ve added the -auto-approve flag to the apply command so that there won’t be any need for human interaction.
We’re almost done with the pipeline. The final step is to publish any files that we want to keep from our run.
Publish Assets and Commit Changes
When a Github Action workflow completes, the virtual machine that we used for our build is destroyed. But, sometimes we want to keep some of the state, files or results for later use. To help with that Github provides an upload-artifact action that gives us an easy way to make files available for us to download later.
In the next chapter, we’ll be setting up a Kubernetes cluster on AWS. When you work with Kubernetes, its useful to connect to the cluster from your remote machine. But, to do that you need a lot of connection and authentication details. So, to make that easier, we’ll introduce a final step that provisions a Kubernetes configuration file that can be downloaded to make it easy for us to connect to the cluster once it is created.
Add the code in Example 4-7 to the end of the workflow file to implement the final step of our job.
Example 4-7. Upload kubeconfig
    - name: Terraform Apply
      run: terraform apply -no-color -auto-approve


    - name: Upload kubeconfig file
      uses: actions/upload-artifact@v2
      with:
        name: kubeconfig
        path: kubeconfig
This action uploads a file called kubeconfig from the local working directory of the build environment to your Github Actions repository. It assumes that the file exists, so we’ll need to create that file in the next chapter when we get into the details of buildling our Sandbox infrastructure.
With this final addition, you now have a complete infrastructure pipeline for your sandbox environment. Github manages the workflow files the same way it manages code. So, we’ll need to commit our changes to save them. Click the Start commit button, give the commit a description and click the Commit changes button to finish commiting the change.

Figure 4-11. Commit Github Action
Taking your Pipeline Further
We couldn’t fit in all of the things that a production CI/CD IaC pipeline would have in this chapter. In particular, we had to omit integration testing from our pipeline activities. But, we highly recommend that you investigate and implement an integration test step for your Terraform code.The go based tool Terratest from Gruntworks.io is worth taking a look at when you start introducing this kind of functionality.
All that’s left is to try out our workflow to make sure that it runs correctly.
Test the Pipeline
To test the pipeline that we’ve created, we’ll need to fire the trigger for the job we defined. In our case that means we need to create a git tag in our repository with a label that starts with the letter “v”. We could do this in the browser based UI by using Github’s Releases feature. But, since we’ll be doing most of our work outside of Github on our local workstation, we’ll create the tag there instead.
The first thing we need to do is get the local clone of the repository up to date with the changes we’ve made. To do that, open a shell in your workstation and run the command git pull in your env-sandbox directory. You should see get a result that looks something like Example 4-8 indicating that we’ve pulled the new .github/workflows/main.yml file into the local repo.
Example 4-8. Pull changes into the local repo
env-sandbox msur$ git pull
remote: Enumerating objects: 6, done.
remote: Counting objects: 100% (6/6), done.
remote: Compressing objects: 100% (3/3), done.
remote: Total 5 (delta 0), reused 0 (delta 0), pack-reused 0
Unpacking objects: 100% (5/5), done.
From https://github.com/msur/env-sandbox
   a6b706f..9923863  master     -> origin/master
Updating a6b706f..9923863
Fast-forward
 .github/workflows/main.yml | 54 ++++++++++++++++++++++++++++++++++++++++++++++++++++++
 1 file changed, 54 insertions(+)
 create mode 100644 .github/workflows/main.yml
Now, that we are up to date with the Github hosted repository, we can create a tag. Since this is just a test, we’ll label our release “v0.1”. Use the git tag command as shown in Example 4-9 to create the new tag with a label.
Example 4-9. Create a v0.1 tag
env-sandbox msur$ git tag -a v0.1
Although we’ve created a tag, it only exists locally in our workstation clone of the repository. In order to trigger our workflow, we’ll need to push this tag to our Github hosted repo. Use the git push command with the name of the tag as shown in Example 4-10 to do this.
Example 4-10. Push the tag to Github
env-sandbox testuser$ git push origin v0.1
Enumerating objects: 1, done.
Counting objects: 100% (1/1), done.
Writing objects: 100% (1/1), 165 bytes | 165.00 KiB/s, done.
Total 1 (delta 0), reused 0 (delta 0)
To https://github.com/mitraman/env-sandbox.git
 * [new tag]         v0.1 -> v0.1
We’ll be doing this sequence of tagging and pushing a tag whenever we want the pipeline to run. Pushing the tag should have triggered the workflow we’ve created in Github Actions, all we need to do now is check to make sure it has run successfully.
To see the status of the run, go back to the browser based Github interface and navigate to Actions just like we did before. You should see something like Figure 4-12, indicating that our workflow job has completed successfully.

Figure 4-12. A successful run of the pipeline
You can also see more details of the job that has been run. This can be useful if your job hasn’t run as expected and you need to do some troubleshooting. To see job details, select the workflow you want more details on(ours is called Sandbox Environment Build), then select the job (in our case the job is called build.) In the detail screen you’ll be able to see what happened at each step of the job when the pipeline ran.
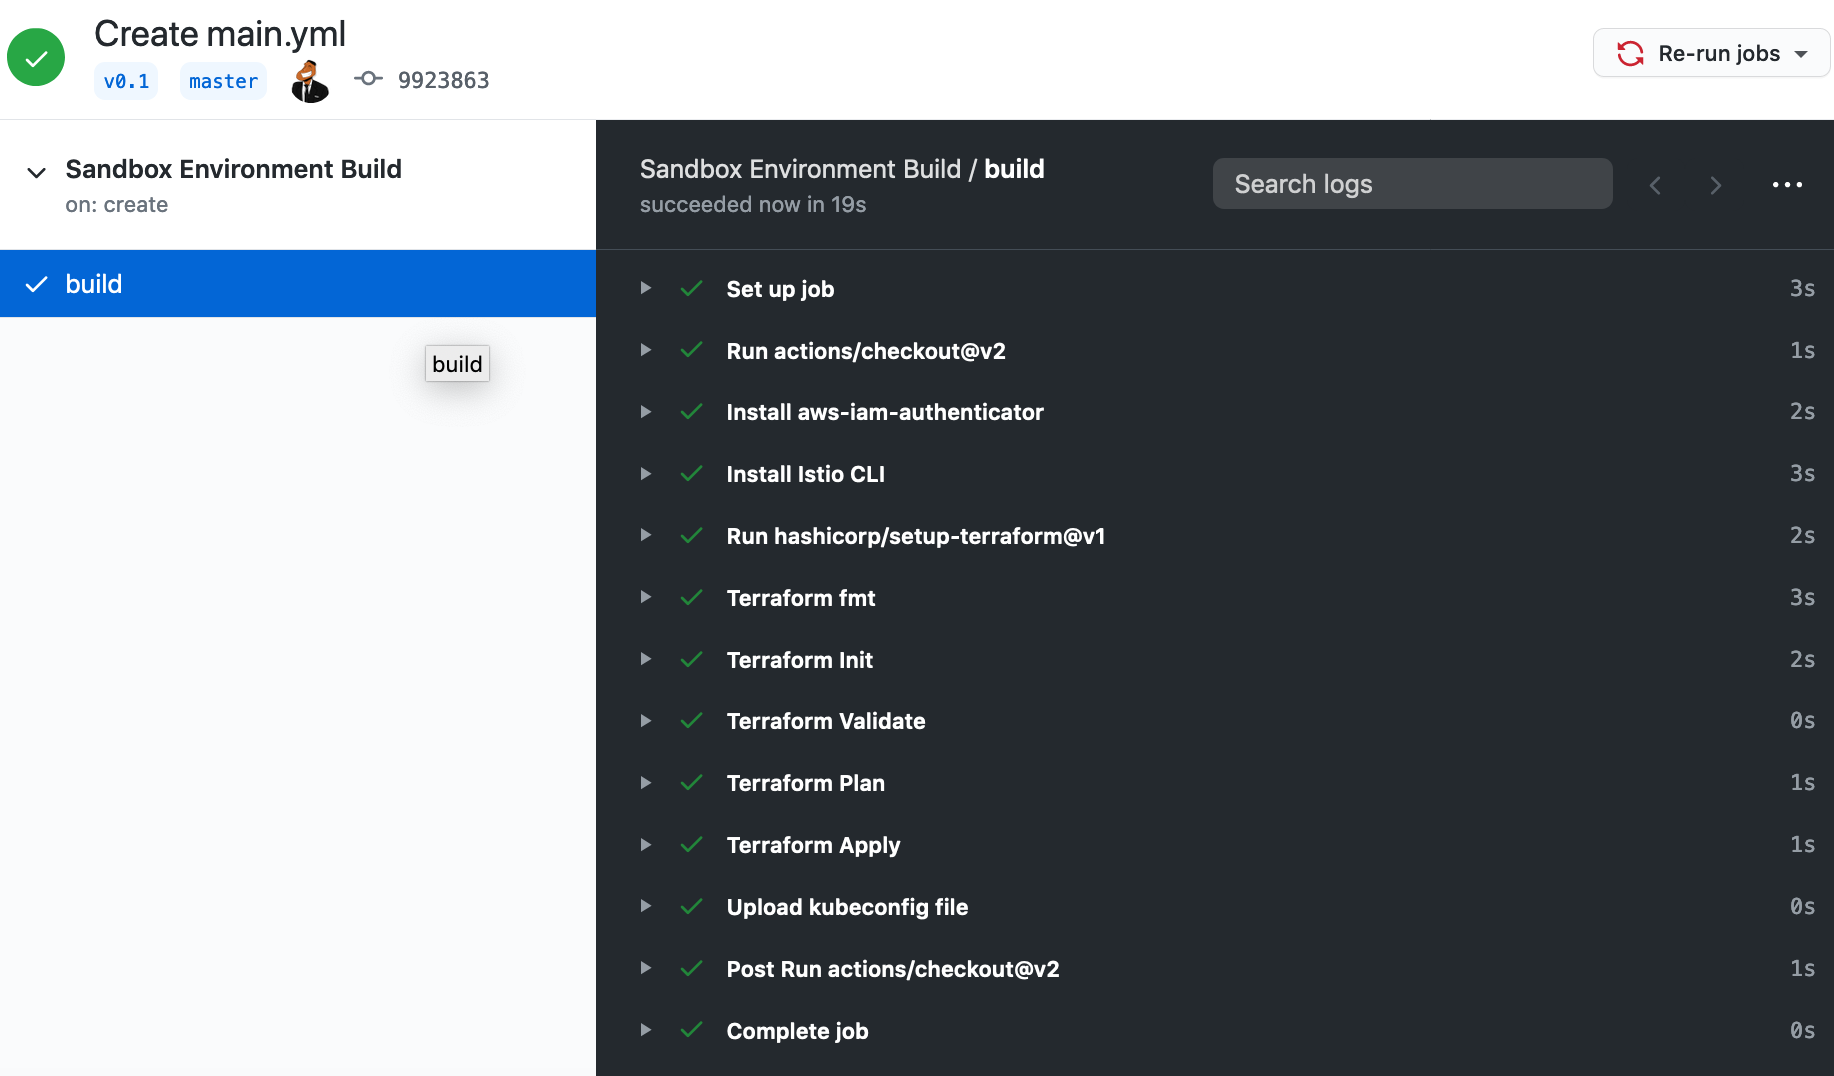
Figure 4-13. Details of a job
Github Actions is a relatively new product and Github changes the user interface frequently, so the exact steps to get to this screen may have changed by the time you read this. If you are having trouble getting to the steps of your job, refer to the documentation at https://docs.github.com/en/actions/configuring-and-managing-workflows/managing-a-workflow-run.
With our pipeline successfully tested, we’ve finished setting up the tooling we need to declaratively build our infrastructure.
Architecture Decision Record: Infrastructure Pipeline
We made a few significant decisions in this chapter that are worth documenting:
-
Using Terraform
-
Using Github
-
Using AWS
-
We’ve made a decision to give each environment is its own repository with the code (multi-repo)
Summary
In this chapter we setup a simple, but powerful infrastructure as code pipeline based on some important DevOps principles and practices. We installed and used Terraform as our tool for implementing the principles of infrastructure as code and immutable infrastructure. We setup a Github based code repository to manage that code. Finally, we created a Github Action workflow as a CI/CD pipeline with automated testing to improve the safety and speed of our infrastructure changes.
We didn’t actually create any infrastructure resources, but we did walk through the steps of making an infrastructure change. We created and edited a terraform file, tested and ran it locally, committed it to the repository and tagged it to kick of a build and apply pipeline process. This sequence of steps is going to be our method for immutable infrastructure development and we’ll be using it often in the next chapter where we design and build our Microserivces infrastructure.