Installing SQL Clustering
To install SQL Server 2000's SQL clustering you must install a new SQL Server “within” the cluster. SQL Server is not something that is moved from a non-clustered configuration to a clustered configuration. With all resources running and in the online state, run the SQL Server setup program from the node that is online (like COLTST1). Figure 5.10 shows the SQL Server setup wizard and the initial dialog box where you will be able to specify the creation of a new “virtual” server (named VSQLDBARCH).

CAUTION Installing SQL clustering is only available with SQL Server 2000 Enterprise Edition. It is not available on Standard Edition. Sorry, but this may require an upgrade of your license with Microsoft. This small upgrade cost will pay for itself over and over.
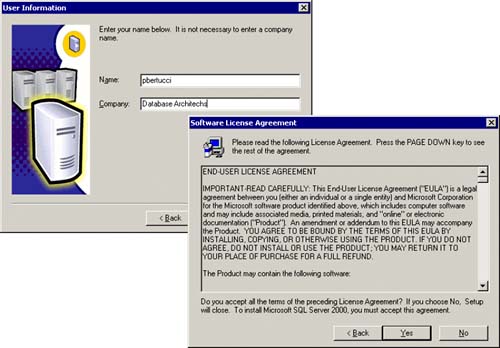
It is this virtual server that the client applications will see and to which they will connect. When an application attempts to connect to an instance of SQL Server 2000 that is running on a fail-over cluster, the application must specify both the virtual server name and the instance name, such as VSQLDBARCHVSQLSRV1. The application does not have to specify an instance name if the instance associated with the virtual server is a default instance because it has no name. Additionally, you cannot access the SQL Server by specifying the machine name (COLTST1) and instance name (VSQLSRV1) because the SQL Server is not listening on the IP address of this local server. It is listening on the clustered IP addresses created during the setup of a virtual server. Figure 5.11 shows the dialog boxes for the user information and the licensing agreement with Microsoft.
The next thing that must be done for this new virtual server specification will be to identify an IP address and which network it should use. In our example, we had reserved an IP address for this purpose and had defined the “AccessToPublic” network for the general access. As you can see in Figure 5.12, you simply type in the IP address (for example: 10.0.111.10) that is to be the IP address for this virtual SQL Server and identify which network to use (for example, “AccessToPublic”). Then you click on the Add button. This specification now should appear in the lower window of this dialog box. If the IP address that is being specified is already in use, an error will occur (Figure 5.12 also shows the error message box that will appear for this error).
Figure 5.12. Specifying the virtual SQL Server IP address and the dialog box if this IP address is already in use.

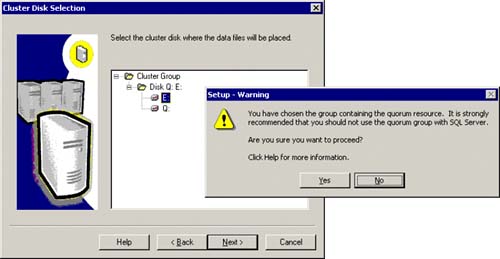
Next, you will identify the cluster-managed disk(s) for the database files for SQL Server. For this current example, Figure 5.13 shows the cluster group disk that is available. It contains an E: drive (that we want SQL Server to use) and a Q: drive that is being used for the quorum files (do not select the Q: drive!). Simply select the available drive(s) that you want to put your SQL database files on (E: drive in this example). If the quorum resource is in the cluster group that you have selected, a warning message will be issued (as also shown in Figure 5.13) that informs you of this fact. A general rule of thumb is to isolate the quorum resource to a separate cluster group if it is possible.
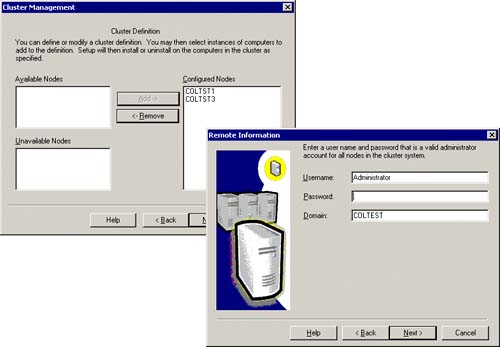
Identify the nodes available to run SQL Server. This allows any identified node to take over in the event of a hardware failure. The dialog box in the left of Figure 5.14 shows the configured nodes that will be part of this SQL cluster (COLTST1 and COLTST3). As you can see in the dialog box on the right of this same figure, you must also be ready to specify a domain account that is an administrator account for all nodes in the cluster. If you are not sure, use “Administrator” to be safe.
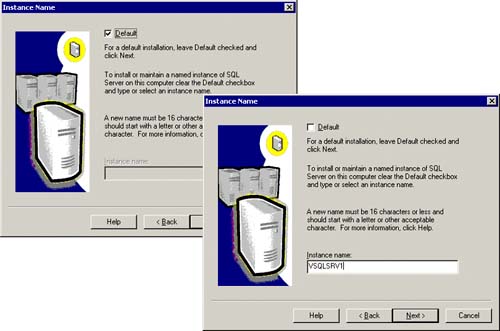
You will then be prompted to specify a SQL Server instance name or use no instance name (the default). I always specify an instance name because I might choose to add another SQL Server instance to the cluster (since a single cluster can have up to 16 SQL Server instances). This also helps to see the instance name in the Cluster Administrator. Figure 5.15 shows this SQL Server instance name of VSQLSRV1.
Figure 5.15. Identify a SQL Server instance name (or default with no instance name).
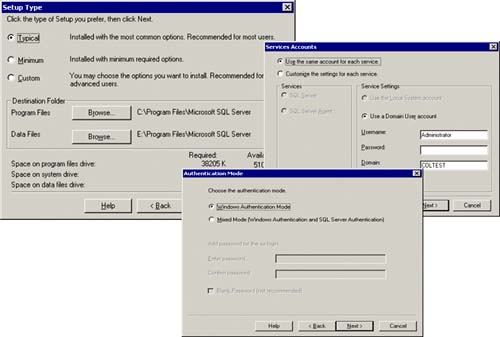
Specify the destination folders for both the SQL Server program files (binaries) and the database file (for Master DB, so on). Figure 5.16 shows this specification. Basically, the setup process will install SQL Server binaries locally on each node in the cluster (in this case, in C:Program FilesMicrosoft SQL Server directory). The database files for Master DB, Model DB, Temp DB, and MSDB will be placed on the E: drive (in this example). This is the shared disk location that must be available to all nodes in the SQL cluster. In addition, you must be prepared to identify the user account that will be starting the services associated with SQL Server (SQL Server itself, SQL Agent, SQL Full Text Search service). We have specified that this be the same administrator account within this domain. You can use Administrator or better yet, a designated account (like “Cluster” or “ClusterAdmin”) that has administrator rights within the domain and on each server (member of the Administrators local group on any node in the cluster). You will also have to specify the type of authentication mode you want for SQL Server access, Windows authentication for mixed mode (Windows Authentication and SQL Server Authentication).
Figure 5.16. Indicate the destination folders for SQL Server, the user account for the new services, and the authentication mode for SQL Server access.
And, lastly, you will be prompted for the SQL Server licensing option information. The SQL Setup wizard now has enough information to do the complete installation of the SQL cluster with the identified nodes. Figure 5.17 shows this intermediate dialog box indicating that the setup is being done on the cluster nodes. This can take a while because quite a lot of things are being done. In particular, binaries are being installed locally, databases are being created on the shared disks, services are being created on each node for SQL Server, and SQL resources are being created and brought online within the cluster group. Eventually, you will see the dialog box indicating that the virtual server resources have been installed (Setup is complete).

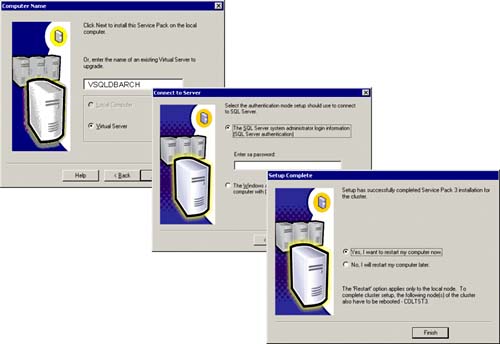
WAIT! You aren't done yet. You now need to apply the latest SQL Server service pack to this installation. Do it now. This is important because any time you take to apply this service pack application in the future counts against you for planned downtime and lowers your high availability percentage. If you haven't done so already, download this service pack from Microsoft and run the setup program. As of this book writing, we downloaded Service Pack 3 and installed it without a hitch. Figure 5.18 shows these steps. Remember, you must specify the virtual SQL Server name here, not a physical SQL Server name.
As you can see from Figure 5.19, SQL Server has been successfully installed on the cluster, and Cluster Administrator is showing these newly added “active” resources within the cluster group.
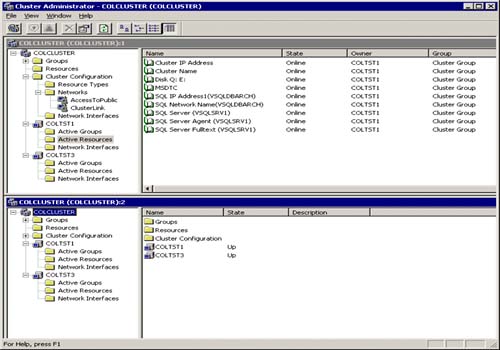
The SQL Server resource entries are
SQL Server Virtual IP Address (for VSQLDBARCH SQL Server)
SQL Server Virtual Name (of VSQLDBARCH)
SQL Server (VSQLSRV1 instance)
SQL Agent (for the VSQLSRV1 instance)
SQL Fulltext Service (for the VSQLSRV1 instance)
Each should show that they are ONLINE and owned by the same node (COLTST1 in this example).
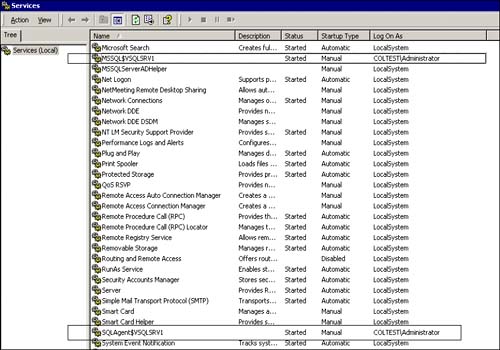
You should now verify that the correct services were set up by displaying the services selection (via control panel: administrative tools) for the current node that you are on (COLTST1). Figure 5.20 shows the SQL Server service entry for the new SQL Server instance (MSSQL$VSQLSRV1) and the SQL Agent entry (SQLAgent$VSQLSRV1) for this new instance. Both also have startup type of “manual” because Cluster Service is what is used to start them up.
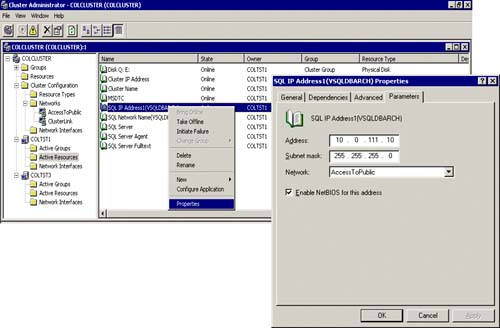
From the Cluster Administrator, you can easily view the properties of each of the new SQL resources by right-clicking on a particular SQL resource and selecting Properties. Figure 5.21 shows the properties of the SQL IP Address resource for the new created virtual SQL Server. The Parameters tab indicates the IP address (10.0.111.10) that it will have on the network, the subnet mask (255.255.255.0), and the network that it will use (“AccessToPublic” network). It is here where you will change these parameters if and when you need to.
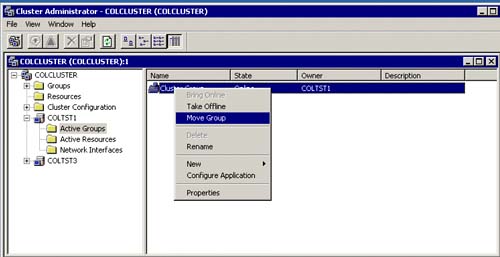
As you can also see in Figure 5.21, you can also take the resource “offline” or “initiate a failure” as well. This must be done sometimes when trying to fix or test a SQL clustering configuration. However, when initiating full SQL Server fail-over to another node (like from COLTST1 to COLTST3), you will typically use the “Move” cluster group technique since you want all of the resources for the cluster group to fail-over and not just one resource. Figure 5.22 shows how you can do this easily from the Active Groups item in Cluster Administrator.
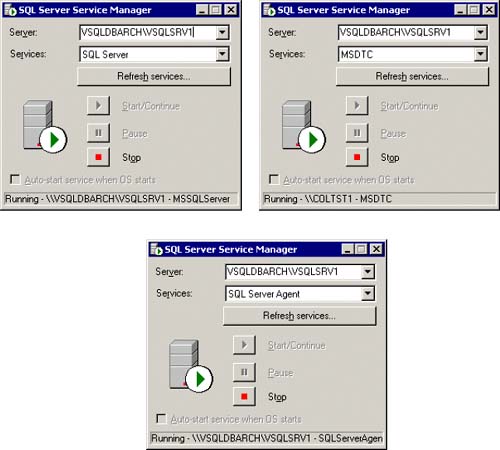
Many SQL Server 2000 installations still like to use the SQL Server service manager to see the state of SQL Server, MS DTC, and SQL Agent. Microsoft has been told to not install the service manager in the future. This was considered to be too evasive. So, starting with Yukon (SQL Server 2005), the SQL Server service manager will not be automatically installed. As you can see from Figure 5.23, the service manager entries reflect the virtual SQL Server instance names (as they should).
Figure 5.23. SQL Server service manager showing the virtual SQL Server instance, MS DTC, and SQL Agent.