
As you develop a database and it grows in size, it can contain an enormous amount of interrelated information about your company. Different departments might need to view different parts of this information. For example, The Garden Company’s management group might need to see financial information, the marketing and sales groups might need to see order information, and the human resources group might need to see employee and timekeeping information. Although representatives of each group might need access to some of the information in the database, it is not appropriate for everyone to be able to see everything. In fact, it might not be appropriate for some employees to open the database at all.
You can control the access of individuals or groups to the entire database or to specific objects in it by implementing user-level security. The Access user-level security model is based on the following four elements:
Objects: The tables, queries, forms, reports, and so on that make up the structure of a database.
Permissions: A set of attributes that specify the kind of access a user has to data or objects in a database.
Users: The individual people authorized to access a database. You can assign each user a unique user name and password and grant explicit permission to view or change specific objects in the database.
Groups: Sets of users authorized to access a database. If multiple users require the same permissions, you can create a group, assign permissions to it, and add the users to the group. After users are added, they "inherit" the permissions of the group.
Information about these four elements is stored in a workgroup information file (WIF). When you install Access, the setup program creates a default workgroup and sets up two groups, Admins and Users, within that workgroup. Until you take over management of database security, Access assigns everyone to both groups, with a default user name of Admin and a blank password. Because of the blank password, nobody has to log in, and everyone has permission to open, view, and modify all data and objects in any new database created while the default workgroup is active. All information about the security setup of the default workgroup is stored in the default WIF.
If you want to set up some kind of security for a database, you could modify the default WIF to change the default setup, but it is wiser to create a new workgroup by creating a new WIF. If you need many groups and permission levels, setting up a user-level security system by hand can be quite a chore. But if your needs are relatively simple, the Security Wizard will guide you through the process and set up a system that you can later modify.
Tip
Access user-level security is conceptually similar to the security systems that can be set up for Microsoft Windows servers. If you have any experience with those systems, implementing security for a database will be relatively easy.
In this exercise, you will use the Security Wizard to secure the GardenCo database by creating a new workgroup and adding groups, users, passwords, and permissions.
USE the GardenCo database in the practice file folder for this topic and the next one. This practice file is located in the My DocumentsMicrosoft PressAccess 2003 SBSSecureMulti folder and can also be accessed by clicking Start/All Programs/Microsoft Press/Access 2003 Step by Step.
OPEN the GardenCo database and acknowledge the safety warning, if necessary.
On the Tools menu, point to Security, and then click User-Level Security Wizard to display the first page of the wizard.
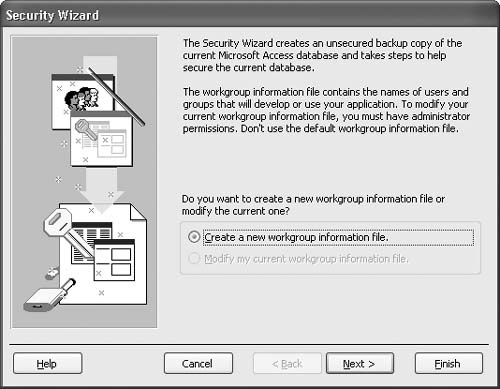
Click Next to create a new workgroup information file (WIF).
A new workgroup is created, to which you can assign the users or groups you want to be able to use this database.
Replace the text in the WID box by selecting it and typing
sbsTGC1234.In the Your name (optional) box, replace Microsoft Access with
Karen Berg(the owner of The Garden Company).In the Company (optional) box, type
The Garden Company.Accept the default selection to create a shortcut to open the security-enhanced database, and click Next.
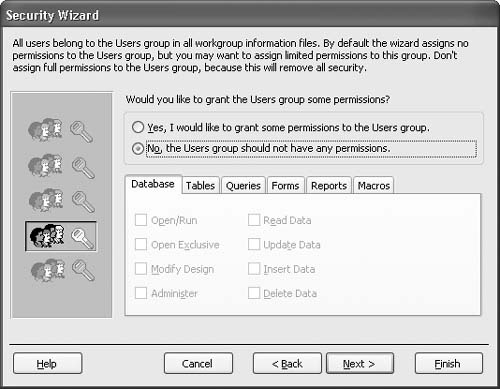
Click Next to accept the default selections and secure all objects.
Select the check boxes for Full Data Users and New Data Users, and then click Next.
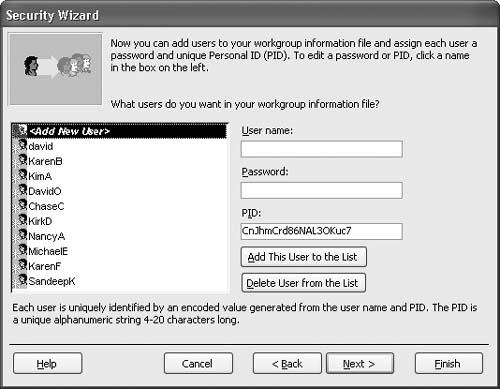
In the User name box, type
KarenB, in the Password box, typepw0, and then click Add This User to the List.KarenB is added to the list of users.
Repeat step 10 to add the following users:
Name
Password
KimApw1DavidOpw2ChaseCpw3KirkDpw4NancyApw5MichaelEpw6KarenFpw7SandeepKpw8The new users appear in the list.
Select the Select a group and assign users to the group option, click the down arrow to the right of the Group or User name box, and click Admins.
Existing groups can be selected from the "Group or user name" list, and all users are listed in the large area below it.
Click the down arrow to the right of the Group or user name box, click New Data Users, and then select the check box for NancyA.
Click the down arrow to the right of the Group or user name box, click Full Data Users, add KimA, DavidO, MichaelE, KarenF, and SandeepK to this group, and then click Next.
Click Finish in the wizard’s final page to accept the default name for the backup copy of your unsecured database.
Access displays a report listing all the settings you have made. You can print the report, or export it to a text file and store it in a secure location.
Close the report, declining the offer to save it.
The Security Wizard encrypts and closes the database.
In a message informing you that you must close and reopen Access to use the new workgroup, click OK.
Quit Access.
On the desktop, double-click the new GardenCo.mdb shortcut icon.
The properties of the shortcut icon include information that starts Access with the database’s workgroup active.
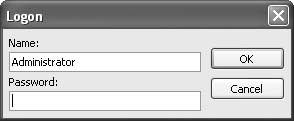
The Logon dialog box appears.
Your user name might appear in the Name box.
In the Name box, type
KarenB, and in the Password box, typepw0. Then click OK.The database opens as usual. As long as you use the shortcut icon, you will be able to open this database.
Tip
If you move a secured database and want to continue using the desktop shortcut to open it, you can edit the shortcut’s properties. Right-click the shortcut icon, and click Properties. Press the
 key to move the insertion point to the left end of the Target box, and then hold down the
  key to scroll through the target setting, which consists of three sections. The first starts Access, the second specifies the path of the database Access should open, and the third specifies the path of the WIF. To update this target, change the second and third paths to point to the current locations of the database file and the WIF. (The latter has an extension of .mdw.) Then change the path in the "Start in" box, and click OK.


CLOSE the GardenCo database.