
Let’s begin with a bit of history so that you can understand why and how the Microsoft SharePoint app model came about. It was back with SharePoint 2007 that Microsoft first invested to transform SharePoint technologies into a true development platform by introducing features and farm solutions. With the release of SharePoint 2010, Microsoft extended the options available to developers by introducing sandboxed-solution deployment as an alternative to farm-solution deployment. With SharePoint 2013, Microsoft has now added a third option for SharePoint developer with the introduction of SharePoint apps.
When developing for SharePoint 2013, you must learn how to decide between using a farm solution, a sandboxed solution, or a SharePoint app. To make this decision in an informed manner, you must learn what’s different about developing SharePoint apps. As you will see in this chapter, SharePoint app development has several important strengths and a few noteworthy constraints when compared to the “old school” approach of developing SharePoint solutions for SharePoint 2010.
As you begin to get your head around what the new SharePoint app model is all about, it’s helpful to understand one of Microsoft’s key motivations behind it. SharePoint 2007 and SharePoint 2010 have gained large-scale adoption worldwide and have generated billions of dollars in revenue primarily due to companies and organizations that have installed SharePoint on their own hardware in an on-premises farm. And, whereas previous versions of SharePoint have been very successful products with respect to all these on-premises farms, Microsoft’s success and adoption rate in hosted environments such as Microsoft Office 365 have been far more modest.
The release of SharePoint 2013 represents a significant shift in Microsoft’s strategy for evolving the product. Microsoft’s focus is now concerned with improving how SharePoint works in the cloud, especially with Office 365. Microsoft’s primary investment in SharePoint 2013 has been to add features and functionality that work equally well in the cloud as they do in on-premises farms.
The move from SharePoint solutions development to SharePoint app development represents a significant change in development technique and perspective. However, Microsoft is not making this change just for the sake of making a change; there are very valid technical reasons that warrant such a drastic shift in the future of the SharePoint development platform.
To fully understand Microsoft’s motivation for beginning to transition away from SharePoint solutions to the new SharePoint app model, you must first understand the problems and pain points of SharePoint solutions development. Therefore, this section will begin by describing the limitations and constraints imposed by SharePoint solution development. After that, the discussion turns to the design goals and architecture of the new SharePoint app model and addresses how this architecture improves upon the limitations and constraints imposed by SharePoint solution development.
The first problem with SharePoint solutions development is that most of the custom code written by developers runs within the SharePoint host environment. For example, managed code deployed in a farm solution runs within the main SharePoint worker process (w3wp.exe). Managed code deployed by using a sandboxed solution runs within the SharePoint sandboxed worker process (SPUCWorkerProcess.exe).
There are two primary reasons why Microsoft wants to get rid of custom code that runs within the SharePoint environment. The first reason has to do with increasing the stability of SharePoint farms. This one should be pretty obvious. Eliminating any type of custom code that runs within the SharePoint environment results in lower risk, fewer problems, and greater stability for the hosting farm.
The second reason has to do with the ability to upgrade an on-premises farm to newer versions of SharePoint. SharePoint solutions are often developed with full trust and perform complex operations. These solutions are often tightly bound to a particular feature set, which means that they might not move gracefully to the next version of SharePoint. Fearing a complete rewrite of dozens of solutions, many customers delay upgrading their SharePoint farms.
Microsoft has witnessed many of their biggest SharePoint customers postponing the upgrade of their production on-premises farms for months and sometimes years until they have had time to update their SharePoint solution code and test it against the new version of Microsoft.SharePoint.dll. Because this is a problem that negatively affects SharePoint sales revenue, you can bet it was pretty high on the priority list of problems to fix when Microsoft began to design SharePoint 2013.
Another significant problem with SharePoint solution development has to do with security and permissions. The root problem is that code always runs under the identity and with the permissions of a specific user. As an example, think about the common scenario in which a site administrator activates a feature from a SharePoint solution that has a feature receiver. There is a security issue in that a SharePoint solution with a feature receiver is able to execute code that can do anything that the site administrator can do. There really isn’t a practical way to constrain the SharePoint solution code so that it runs with a lesser set of permissions than the user that has activated the feature.
Most SharePoint professionals are under the impression that code inside a sandboxed solution is constrained from being able to perform attacks. This is only partially true. The sandbox protects the farm and other site collections within the farm, but it does not really protect the content of the site collections in which a sandboxed solution is activated. For example, there isn’t any type of enforcement to prohibit the feature activation code in a sandboxed solution from deleting every item and every document in the current site collection.
Another issue with sandboxed solutions is that there’s no ability to perform impersonation. Therefore, custom code in a sandboxed solution always runs as the current user. This can be very limiting when the current user is a low-privileged user such as a contributor or a visitor. There is no way to elevate privileges so that your code can do more than the current user.
Farm solutions, on the other hand, allow for impersonation. This means a developer can elevate privileges so that farm solution code can perform actions even when the current user does not possess the required permissions. However, this simply replaces one problem with another.
A farm solution developer can call SPSecurity.RunWithElevatedPrivileges, which allows custom code to impersonate the all-powerful SHAREPOINTSYSTEM account. When code runs under this identity, it executes with no security constraints whatsoever. The code can then essentially do whatever it wants on a farm-wide basis. This type of impersonation represents the Pandora’s Box of the SharePoint development platform because a farm solution could perform an attack on any part of a farm in which it’s deployed, and it must be trusted not to do so. As you can imagine, this can cause anxiety with SharePoint farm administrators who are much fonder of security enforcement than they are of trust.
In a nutshell, the security problems with SharePoint solutions stem from the fact that you cannot effectively configure permissions for a specific SharePoint solution. This limitation cannot be overcome, because the SharePoint solution development model provides no way to establish the identity of SharePoint solution code independent of user identity. Because there is no ability to establish the identity of code from a SharePoint solution, there is no way to configure permissions for it.
The last important pain point of SharePoint solution development centers around installation and upgrade. The installation of farm solutions is problematic because it requires a farm administrator, and it often requires restarting Internet Information Services (IIS) on all the front-end web servers, causing an interruption in service. Although the deployment of a SharePoint solution doesn’t involve these problems, it raises other concerns. Business users often have trouble with the process of finding and uploading sandboxed solutions in order to activate them. Furthermore, a business user has very little to indicate whether or not to trust a sandboxed solution before activating it and giving its code access to all the content within the current site collection.
Of all the issues surrounding SharePoint solution development, nothing is more prone to error and less understood than the support for upgrading code from one version of a SharePoint solution to another. Even though Microsoft added support for feature upgrade and assembly version redirection in SharePoint 2010, almost no one is using it. The required steps and the underlying semantics of the feature upgrade process have proved to be too tricky for most developers to deal with. Furthermore, the vast majority of professional SharePoint developers have made the decision never to change the assembly version number of the assembly dynamic-link library (DLL) deployed with a SharePoint solution. That’s because creating and managing the required assembly redirection entries across a growing set of web.config files is just too painful and error prone.
You have just read about the most significant pain points with respect to SharePoint solution development. Here is a summary of these points.
Custom code running inside the SharePoint host environment poses risks and compromises scalability.
Custom code with dependencies on in-process DLLs causes problems when migrating from one version of SharePoint to the next.
A permissions model for custom code based entirely on the identity of the current user is inflexible.
User impersonation solves the too-little-permissions problem but replaces it with the too-many-permissions problem, which is even worse.
SharePoint solutions lack effective support and easily understood semantics for distribution, installation, and upgrade.
The SharePoint app model was designed from the ground up to remedy the problems with SharePoint solutions that were discussed in the previous section. This means that the architecture of the SharePoint app model is very different from that of SharePoint solutions, which represent SharePoint’s original development platform. This new architecture was built based on the following design goals.
Apps must be supported in Office 365 and in on-premises farms.
App code never runs within the SharePoint host environment.
App code programs against SharePoint sites by using web service entry points to minimize version-specific dependencies.
App code is authenticated and runs under a distinct identity.
App permissions can be configured independently of user permissions.
Apps are deployed by using a publishing scheme based on app catalogs.
Apps that are published in a catalog are easier to discover, install, and upgrade.
You have now seen the design goals for the new SharePoint app model, and you understand the motivating factors behind them. This should provide you with greater insight and a better appreciation as to why Microsoft designed the SharePoint app model the way it did. Now, it’s time to dive into the details of the SharePoint app model and its underlying architecture.
Microsoft designed the SharePoint app model to work in the Office 365 environment as well as within on-premises farms. However, developing for Office 365 introduces a few important new concepts that will be unfamiliar to many experienced SharePoint developers. One of the new concepts that is essential to the development of SharePoint apps is a SharePoint tenancy.
A SharePoint tenancy is a set of site collections that are configured and administrated as a unit. When a new customer establishes an Office 365 account to host its SharePoint sites, the Office 365 environment creates a new tenancy. The customer’s business users that access the tenancy are known (not surprisingly) as tenants.
When the Office 365 environment creates a new tenancy for a customer, it creates an administrative site collection which is accessible to users who have been configured to play the role of a tenant administrator. A tenant administrator can create additional site collections and configure the set of services that are available to all the sites running within the tenancy.
The concept of tenancies was first introduced in SharePoint 2010 to support hosting environments such as Office 365. Although the creation and use of tenancies is essential to the Office 365 environment, their use has not been widely adopted in on-premises farms. This is primarily due to the fact that SharePoint farm administrators can create site collections and configure the services available to users within the scope of a web application.
The architecture of the SharePoint app model requires that apps are always installed and run within the context of a specific tenancy. This can be a bit confusing for scenarios in which you want to install SharePoint apps in an on-premises farm that doesn’t involve the explicit creation of tenancies. However, SharePoint 2013 is able to support installing and running SharePoint apps in on-premises farms by transparently creating a farm-wide tenancy behind the scenes that is known as the default tenancy.
SharePoint 2013 relies on two service applications to manage the environment that supports SharePoint apps. The first service application is the App Management Service, which is new to SharePoint 2013. The second service application is the Site Subscriptions Settings Service, which was introduced in SharePoint 2010. A high-level view of a SharePoint 2013 farm running these two service applications is shown in Figure 1-1.
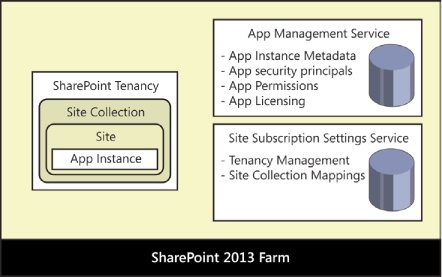
Figure 1-1. A SharePoint Farm that supports apps requires an instance of the App Management Service and the Site Subscription service to be running.
The App Management Service has its own database that is used to store the configuration details for apps as they are installed and configured. The App Management Service is also responsible for tracking other types of app-specific configuration data that deals with app security principals, app permissions, and app licensing.
The Site Subscription Settings Service takes on the responsibility of managing tenancies. Each time a new tenancy is created, this service adds configuration data for it in its own database. The Site Subscription Settings Service is particularly important to the SharePoint app model due to the requirement that SharePoint apps must always be installed and run within the context of a specific tenancy.
When you are working within the Office 365 environment, you never have to worry about creating or configuring these two service applications, because they are entirely managed behind the scenes. However, things are different when you want to configure support for SharePoint apps in an on-premises farm. In particular, you must explicitly create an instance of both the App Management Service and the Site Subscription Settings Service.
Creating an instance of App Management Service is easier because it can be done by hand via the Central Administration or by using the Farm Creation Wizard. Creating an instance of Site Subscription Settings Service is a bit trickier because it must be done by using Windows PowerShell. However, when you create an instance of the Site Subscription Settings Service by using Windows PowerShell, it automatically creates the default tenancy which then makes it possible to install SharePoint apps in sites throughout the farm.
A SharePoint app must be installed before it can be made available to users. When you install a SharePoint app, you must install it within the context of a target web. Once the app has been installed, users can then launch the app and begin to use it. The site from which an app has been launched is known as the host web.
There are two different scopes in which you can install and configure a SharePoint app. The scenario that is easier to understand is when an app is installed at site scope. In this scenario, the app is installed and launched within the scope of the same SharePoint site. In this scenario, the host web will always be the same site where the app has been installed.
SharePoint apps can also be installed and configured at tenancy scope. In this scenario, an app is installed in a special type of SharePoint site known as an app catalog site. Once the app has been installed in an app catalog site, the app can then be configured so that users can launch it from other sites. In this scenario, the host web will not be the same site where the app has been installed.
The ability to install and configure apps at tenancy scope is especially valuable for scenarios in which a single app is going to be used by many different users across multiple sites within an Office 365 tenancy or an on-premises farm. A single administrative user can configure app permissions and manage licensing in one place, which prevents the need to install and configure the app on a site-by-site basis. The topic of installing apps will be revisited in greater detail at the end of this chapter.
This book discusses many different scenarios in which SharePoint apps behave the same way, regardless of whether they have been installed in an Office 365 tenancy or in an on-premises farm. Therefore, the book frequently uses the generic term SharePoint host environment when talking about scenarios that work the same across either environment.
When you develop a SharePoint app, you obviously need to write custom code to implement your business logic, and that code must run some place other than on the web servers in the hosting SharePoint farm. The SharePoint app model provides you with two places to run your custom code. First, a SharePoint app can contain client-side code that runs inside the browser on the user’s computer. Second, a SharePoint app can contain server-side code that runs in an external website that is implemented and deployed as part of the app itself.
There are many different ways in which you can design and implement a SharePoint app. For example, you could create a SharePoint app that contains only client-side resources such as web pages and client-side JavaScript code that are served up by the SharePoint host environment. This type of app is known as a SharePoint-hosted app because it is contained entirely within the app web. You could write a SharePoint-hosted app that uses Microsoft Silverlight, Microsoft VBScript, Flash, or whatever client-side technology you prefer.
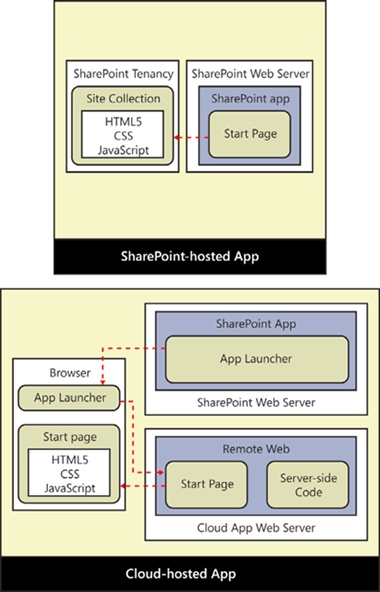
Now, imagine that you want to create a second SharePoint app in which you want to write server-side code in a language such as C#. This type of SharePoint app will require its own external website so that your server-side code has a place to execute outside of the SharePoint host environment. In SharePoint 2013 terminology, a SharePoint app with its own external website is known as a cloud-hosted app, and the external website is known as the remote web. The diagram in Figure 1-2 shows the key architectural difference between a SharePoint-hosted app and a cloud-hosted app.
From the diagram in Figure 1-2, you can see that both SharePoint-hosted apps and cloud-hosted apps have a start page that represents the app’s primary entry point. With a SharePoint-hosted app, the app’s start page is served up by the SharePoint host; however, with a cloud-hosted app, the start page is served up from the remote web. Therefore, the SharePoint host environment must track the remote web URL for each cloud-hosted app that has been installed so that it can redirect users to the app’s start page.
There is infrastructure in the SharePoint host environment that creates a client-side JavaScript component known as an app launcher that is used to redirect the user from a page served up by the SharePoint host environment over to the remote web.
When you decide to develop a cloud-hosted SharePoint app, you must often take on the responsibility of hosting the app’s remote web. However, this responsibility of creating and deploying a remote web along with a SharePoint app also comes with a degree of flexibility. You can implement the remote web associated with a SharePoint app by using any existing web-based development platform.
For example, the remote web for a cloud-hosted SharePoint app could be implemented by using a non-Microsoft platform such as Java, LAMP, or PHP. However, the easiest and the most common approach for SharePoint developers is to design and implement the remote web for cloud-hosted apps by using ASP.NET web forms or MVC4. Chapter 4, discusses several patterns that use these technologies.
Thus far, this chapter has discussed how a SharePoint app can be categorized as either a SharePoint-hosted app or a cloud-hosted app. However, the SharePoint app model actually defines three app hosting models, not just two. Any time you create a new SharePoint app project in Microsoft Visual Studio 2012 you must pick from one of the following three app hosting models.
SharePoint-hosted
Provider-hosted
Autohosted
This chapter has already explained SharePoint-hosted apps. As you recall, a SharePoint-hosted app is simply an app that adds its start page and all its other resources into the SharePoint host environment during installation. Now, it’s time to explain the differences between the other two app hosting models.
A provider-hosted app and an autohosted app are just two variations of the hosting model for a cloud-hosted app. Both types of apps have an associated remote web that is capable of hosting the app’s start page and any other resources the app requires. Furthermore, both provider-hosted apps and autohosted apps can and often will host their own custom databases to store app-specific data. The difference between these two different app hosting models involves how the remote web and its associated database are created when an app is deployed and installed.
It makes sense to begin by first examining the hosting model for a provider-hosted app. Imagine a scenario in which a developer has just finished testing and debugging a provider-hosted app that has a remote web with its own custom database. Before the app can be installed in a SharePoint host environment, the developer or some other party must first deploy the website for the remote web to make it accessible across the Internet or on a private network.
The custom database used by the remote web must also be created on a database server and made accessible to the remote web as part of the deployment process. Once the remote web and its custom database are up and running, the provider-hosted app can then be installed in a SharePoint tenancy and made available to the customer’s users, as demonstrated in Figure 1-3.

Figure 1-3. Provider-hosted apps are deployed in their own infrastructure including any required databases.
Once a provider-hosted app has been deployed, the company that developed the app usually assumes the responsibility for its ongoing maintenance. For example, if a company develops a provider-hosted app and deploys its remote web on one or more of its local web servers, it must ensure that those web servers remain healthy and accessible. If it deploys the remote app for its provider-hosted in a hosting environment such as Windows Azure, it must pay a monthly fee for the hosting services. Furthermore, it will be responsible for backing up the app’s database and then restoring it if data becomes lost or corrupt.
Keep in mind that a provider-hosted app can be installed in more than one SharePoint site. Furthermore, a provider-hosted app can be installed in many different SharePoint sites that span across multiple customers and multiple SharePoint host environments. This is a common scenario which is known as multi-tenancy. What is critical to acknowledge is that multi-tenancy introduces several noteworthy design issues and deployment concerns. Let’s look at an example.
Think about a scenario involving multi-tenancy in which a provider-hosted app has been installed by many different customers and the number of users is continually growing larger. All these users will be accessing the same remote web through a single entry point, which is the app’s start page, as shown in Figure 1-4.
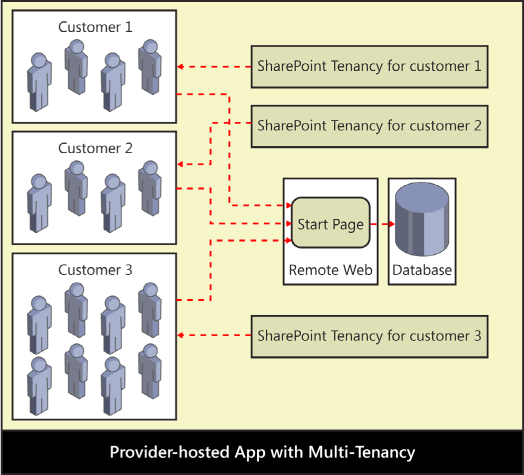
Figure 1-4. A provider-hosted app in a multi-tenant environment must be designed to scale and to isolate data on a customer-by-customer basis.
As you can imagine, a provider-hosted app in this type of multitenant scenario must have a way to scale up as the number of users increases. Furthermore, this type of app should generally be designed to isolate the data for each customer to keep it separate from the data belonging to other customers—you would never want one customer accessing another customer’s data. Depending on the customers’ industry, there could even be government regulations or privacy concerns that prevent the app from storing data for different customers within the same set of tables or even within the same database.
The important takeaway is that multi-tenancy introduces complexity. The development of a provider-hosted app that will be used in a multi-tenant scenario typically requires a design that isolates data on a customer-by-customer basis. As you can imagine, this increases both the time and the cost associated with developing a provider-hosted app.
Now that you have seen some of the inherit design issues that arise due to multi-tenancy, you will be able to more fully appreciate the benefits of the hosting model for autohosted apps. Autohosted apps offer value because they prevent the developer from having to worry about many of the issues involved with app deployment, scalability, and data isolation.
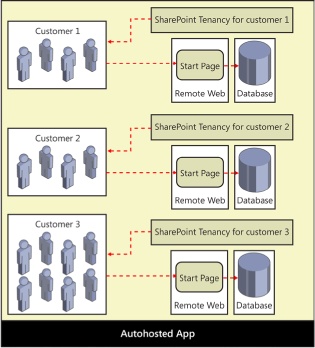
The first thing to understand about autohosted apps is that they are only supported in the Office 365 environment. Although this constraint might change in future releases, with SharePoint 2013 you cannot install an autohosted app in an on-premises farm. The reason for this is that the hosting model for autohosted apps is based on a private infrastructure that integrates the Office 365 environment with Windows Azure and its ability to provision websites and databases on demand.
The central idea behind the hosting model for autohosted apps is that the Office 365 environment can deploy the remote web on demand when an app is installed. You can also configure an autohosted app so that it creates its own private database during app installation. Once again, the Office 365 environment and its integration with Windows Azure is able to create a SQL Azure database on demand and then make it accessible to the remote web.
Autohosted apps offer value over provider-hosted apps because the Office 365 environment transparently handles the deployment of the remote web and potentially the creation of a custom database, as well. Autohosted apps also transfer the ongoing cost of ownership of the remote web and its database from the developer over to the customer who owns the Office 365 tenancy where the app has been installed. Therefore, the app developer doesn’t have to worry about babysitting web servers, backing up databases, or coming up with a strategy scaling up the remote web as the number of users increases.
The benefits of an autohosted app over a provider-hosted app also extend into app design, which can serve to lower development costs. That’s because each customer receives its own private database whenever installing an autohosted app, as illustrated in Figure 1-5. The benefit is that the developer isn’t required to add complexity to the app’s design and implementation to provide isolation because each customer’s data is isolated automatically.
Every SharePoint app requires an XML file called AppManifest.xml, which is known as the app manifest. The app manifest contains essential metadata for the app that is read and tracked by the SharePoint host environment when an app is installed. Example 1-1 presents a simple example of what the app manifest looks like for a SharePoint-hosted app.
Example 1-1. An app manifest
<App xmlns=http://schemas.microsoft.com/sharepoint/2012/app/manifest
     Name="MySharePointApp"
     ProductID="{b93e8f64-4d14-4c72-be47-3b89f7f5fdf6}"
     Version="1.0.0.0"
     SharePointMinVersion="15.0.0.0" >

  <Properties>
    <Title>My SharePoint App</Title>
    <StartPage>~appWebUrl/Pages/Default.aspx?{StandardTokens}</StartPage>
  </Properties>

  <AppPrincipal>
    <Internal />
  </AppPrincipal>

</App>
The app manifest contains a top-level <App> element which requires a set of attributes such as Name, ProductID, and Version. Within the <App> element there is an inner <Properties> element that contains important child elements such as <Title> and <StartPage>. The <Title> element contains human-readable text that is displayed to the user in the app launcher. The <StartPage> element contains the URL that the SharePoint host environment uses in the app launcher to redirect the user to the app’s start page.
Example 1-1 shows the minimal amount of metadata required in an app manifest; however, the app manifest for most real-world apps will contain a good deal more. The app manifest often contains addition metadata to configure other essential aspects of an app, such as app-level events, authentication, permissions, and the SharePoint services that an app requires from the SharePoint host environment. Table 1-1 lists the most common elements you might be required to add to an app manifest.
Table 1-1. The elements used in the App Manifest file
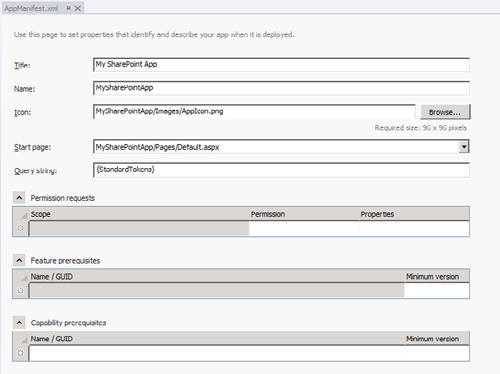
When you are working with the app manifest in a SharePoint app project, Visual Studio 2012 provides the visual designer shown in Figure 1-6. This visual designer eliminates the need to edit the XML in the AppManifest.xml file by hand. The designer provides drop-down lists that makes editing more convenient and adds a valuable degree of validation as you are selecting the app start page or configuring permission requests, feature prerequisites, and capability perquisites.
Although you should take advantage of the visual designer whenever you can to edit the app manifest, it is important to understand that it cannot make certain types of modifications that you might require. Therefore, you should also become accustomed to opening the AppManifest.xml file in code view and making changes to the XML within by hand. Fortunately, in times when you need to manually edit the AppManifest.xml file, Visual Studio 2012 is able to provide IntelliSense, based on the XML schema behind the app manifest.
Every app has a start page whose URL must be configured by using the <StartPage> element within the app manifest. The SharePoint host environment uses this URL when creating app launchers that redirect the user to the app’s start page. For a SharePoint-hosted app, the start page must be located in a child site known as the app web that will be discussed in more detail later in this chapter. For a cloud-hosted app, the start page will usually be located in the remote web.
When you are configuring the URL within the <StartPage> element for a SharePoint-hosted app you must use a dynamic token named ~appWebUrl, as demonstrated in the following:
~appWebUrl/Pages/Default.aspx
This use of the ~appWebUrl token is required because the actual URL to the app’s start page will not be known until the app has been installed. The SharePoint host environment is able to recognize the ~appWebUrl token during app installation and it replaces it with the absolute URL to the app web.
In the case of a provider-hosted app whose start page exists within the remote web, the <StartPage> element can be configured with the actual URL that is used to access the start page where the remote web has been deployed, such as in the following:
https://RemoteWebServer.wingtip.com/MyAppsRemoteWeb/Pages/Default.aspx
When you are debugging provider-hosted apps and autohosted apps, you can use a convenient dynamic token named ~remoteAppUrl that eliminates the need to hardcode the path to the remote web during the development phase. For example, you can configure the <StartPage> element with the following value:
~remoteAppUrl/Pages/Default.aspx
The reason this works during debugging is due to some extra support in Visual Studio 2012. When you create a new SharePoint app project and select the option for a provider-hosted app or an autohosted app, Visual Studio 2012 automatically creates a second project for the remote web that is configured as the Web Project. Whenever you debug the Visual Studio solution containing these two projects, Visual Studio 2012 performs a substitution to replace ~remoteAppUrl with the current URL of the Web Project. After the substitution, the app manifest contains a start page URL that looks like this:
https://localhost:44300/Pages/Default.aspx
The key point is that Visual Studio 2012 replaces the ~remoteAppUrl token during a debugging session before the app manifest is installed into the SharePoint host environment. This provides you with a convenience in the debugging phase of a SharePoint app project.
Now, think about what happens after you have finished testing and debugging an app and its remote web. Visual Studio 2012 provides a Publish command with which you can build a final version of the AppManifest.xml file that will be distributed along with your app. In this case, what will Visual Studio 2012 do with the ~remoteAppUrl token? The answer is different depending on whether the app is an autohosted app or a provider-hosted app.
When you use the Publish command with an autohosted app, Visual Studio 2012 builds a final version of the AppManifest.xml in which the ~remoteAppUrl token remains within the <StartPage> element. This is done because the actual URL to the remote web of an autohosted app will not be known until the app installation process has started and the Office 365 environment has created the remote web. You can see that the ~remoteAppUrl token is replaced by Visual Studio 2012 in some scenarios and by the Office 365 environment in other scenarios.
When you use the Publish command with a provider-hosted app, the final version of the AppManifest.xml cannot contain the ~remoteAppUrl token. You must know the URL to the remote web ahead of time. Therefore, when it is used with a provider-hosted app, the Publish command prompts you for several pieces of information including the actual URL where the remote web will be deployed.
When creating the URL for the <StartPage> element, it is a standard practice to include a query string that contains another dynamic token named {StandardTokens}, as demonstrated in the following example:
~remoteAppUrl/Pages/Default.aspx?{StandardTokens}
The {StandardTokens} token is never replaced by Visual Studio 2012. Instead, this dynamic token remains inside the final version of the app manifest that is installed in the SharePoint host environment. The SharePoint host environment performs a substitution on {StandardTokens} token whenever it creates the URL for an app launcher. This substitution involves replacing the {StandardTokens} token with a standard set of query string parameters that are frequently used in SharePoint app development such as the SPHostUrl parameter and the SPLangauge parameter, as shown in the following:
default.aspx?SPHostUrl=http%3A%2F%2Fwingtipserver&SPLanguage=en%2DUS
When you implement the code behind the start page of a SharePoint app, you can generally expect that the page will be passed the two query string parameters named SPLanguage and SPHostUrl, which are used to determine the language in use and the URL that points back to the host web. In some scenarios, the SharePoint host environment will add additional query string parameters.
Each time you install a SharePoint app, you must install it on a specific target site. A SharePoint app has the ability to add its own files to the SharePoint host environment during installation. For example, a SharePoint-hosted app must add a start page and will typically add other resources, as well, such as a CSS file and a JavaScript file to implement the app’s user experience. The SharePoint host environment stores these files in the standard fashion by adding them to the content database associated with the site in which the app is being installed.
Beyond adding basic files such as a start page and a JavaScript file, a SharePoint app also has the ability to create other SharePoint-specific site elements in the SharePoint host during installation such as lists and document libraries. Let’s look at an example.
Imagine that you want to create a simple SharePoint app to manage customers. During installation, the app can be designed to create a customer list using the standard Contacts list type along with a set of pages designed to provide a snazzy user experience for adding and finding customers. Your app could additionally be designed to create a document library upon installation so that the app can store customer contracts as Microsoft Word documents, whereby each Word document would reference a specific customer item in the customers list.
So, where does the SharePoint host environment store the content added by an app during installation? The answer is inside a special child site that the SharePoint host environment creates under the site where the app has been installed. This child site is known as the app web.
The app web is an essential part of the SharePoint app model because it represents the isolated storage that is owned by an installed instance of a SharePoint app. The app web provides a scope for the app’s private implementation details. Note that an app by default has full permissions to read and write content within its own app web. However, SharePoint app has no other default permissions to access content from any other location in the SharePoint host environment. The app web is the only place where an app can access content without requesting permissions that then must be granted by a user.
There is a valuable aspect of the SharePoint app model that deals with uninstalling an app and ensuring that all the app-specific storage is deleted automatically. In particular, the SharePoint host environment will automatically delete the app web for an app whenever the app is uninstalled. This provides a set of cleanup semantics for SharePoint apps that is entirely missing from the development model for SharePoint solutions; when an app is uninstalled, it doesn’t leave a bunch of junk behind.
Now, it’s time to focus on the start page for a SharePoint-hosted app. As you have seen, the start page for a SharePoint-hosted app is added to the app web during installation. Consider a scenario in which you have installed a SharePoint app with the name of MyFirstApp in a SharePoint team site, which is accessible through the following URL:
https://intranet.wingtip.com.
During app installation, the SharePoint host environment creates the app web as a child site under the site where the app is being installed. The SharePoint host environment creates a relative URL for the app web based on the app’s Name property. Therefore, in this example, the app web is created with a relative path of MyFirstApp. If the app’s start page named default.aspx is located in the app web within the Pages folder, the relative path to the start page is MyFirstApp/Pages/default.aspx. Your intuition might tell you that the app’s start page will be accessible through a URL that combines the URL of the host web together with the relative path to the app’s start page, as in the following:
https://intranet.wingtip.com/MyFirstApp/Pages/default.aspx
However, this is not the case. The SharePoint host environment does not make the app web or any of its pages accessible through the same domain as the host web that is used to launch the app. Instead, the SharePoint host environment creates a new unique domain on the fly each time it creates a new app web as part of the app installation process. By doing so, the SharePoint host environment can isolate all the pages from an app web in its own private domain. The start page for a SharePoint-hosted app is made accessible through a URL that looks like this:
https://wingtiptenant-ee060af276f95a.apps.wingtip.com/MyFirstApp/Pages/Default.aspx
At this point, it should be clear why you are required to configure the <StartPage> element for a SharePoint-hosted app by using the ~appWebUrl token. The URL to the app web is not known until the SharePoint host environment creates the new domain for the app web during installation. After creating the domain for an app web, the SharePoint host environment can replace the ~appWebUrl token with an actual URL.
Let’s examine the URL that is used to access the app web in greater detail. Consider the following URL, which is used to access an app web in an on-premises farm:
wingtiptenant-ee060af276f95a.apps.wingtip.com/MyFirstApp
The first part of the app web URL (wingtiptenant) is based on the name of the tenancy where the app has been installed. This value is configurable in an on-premises farm. In the Office 365 environment, the tenancy name is established when the customer creates a new account, and it cannot be changed afterward.
The second part of the app web URL (ee060af276f95a) is known as an APPUID. This is a unique 14-character identifier created by the SharePoint host environment when the app is installed. Remember that the APPUID is really an identifier for an installed instance of an app, as opposed to an identifier for the app itself.
The third part of the app web URL (apps.wingtip.com) is the app web hosting domain. You have the ability to configure this in an on-premises farm to whatever value you would like. Just ensure that you have also configured the proper DNS setting for this domain so that it resolves to an IP address pointing to the web server(s) of your on-premises farms. In Office 365 the app web-hosting domain is always sharepoint.com.
Now, ask yourself this fundamental question: why doesn’t the SharePoint host environment serve up pages from the app web by using the same domain as the host web from which the app has been launched? The reasons why the SharePoint host environment serves up pages from the app web in their own isolated domain might not be obvious. There are two primary reasons why the SharePoint app model does this. Both of these reasons are related to security and the enforcement of permissions granted to an app.
The first reason for isolating an app web in its own private domain has to do with preventing direct JavaScript calls from pages in the app web back to the host web. This security protection of the SharePoint app model builds on the browser’s built-in support for prohibiting cross-site scripting (XSS). Because JavaScript code running on pages from an app web originates from a different domain, this code cannot directly call back to the host web. More specifically, calls from JavaScript running on app web pages do not run with the same established user identity as JavaScript code-behind pages in the host web. Therefore, the JavaScript code running on app web pages doesn’t automatically receive the same set of permissions as JavaScript code running on pages from the host web.
The second reason for creating an isolated domain for each app web has to do with processing of JavaScript callbacks that occur on the web server of the SharePoint host environment. Because the SharePoint host environment creates a new unique domain for each app web, it can determine exactly which app is calling when it sees a JavaScript callback originating from a page in an app web.
The key point is that the SharePoint host environment is able to use an internal mechanism to authenticate an app that uses JavaScript callbacks originating from its app web. As a result, the SharePoint host environment can enforce a security policy based on the permissions that have been granted to the app.
Remember that a SharePoint app has a default set of permissions by which it can access its app web but has no other permissions by default to access any other site. The ability of the SharePoint host environment to authenticate an app by inspecting the URL of incoming calls originating from the app web hosting domain is essential to enforcing this default permissions scheme.
Every SharePoint app requires a start page. As you know, the URL to the start pages is used within an app launcher to redirect the user from the host web to the start page. This type of entry into the user interface of the app is known as a full immersion experience because the app takes over the user interface of the browser with a full-page view.
The user interface guidelines of SharePoint app development require the app start page to provide a link back to the host web. This requirement exists so that a user can always return to the host web from which the app has been launched. When you are developing a SharePoint-hosted app, there is a standard master page used in app webs named app.master that automatically adds the required link back to the host web for you.
When developing a cloud-based app with the start page in the remote web, you cannot rely on a SharePoint master page to automatically provide the link on the start page which redirects the user back to the host web. Instead, you must use a technique that involves reading the SPHostUrl parameter which is passed to the start page in the query string. This is one of the key reasons why you always want to follow the practice of adding the {StandardTokens} token to the start page URL of a cloud-hosted app.
There are several different techniques that you can use in the code behind a start page in the remote web to read the SPHostUrl parameter value from the query string and use it to configure the required link back to the host web. For example, you can accomplish this task with server-side C# code or with client-side JavaScript code. In Chapter 4, you can see how to accomplish this task by using a client-side JavaScript component known as the chrome control.
In addition to the required start page, a SharePoint app can optionally provide two other types of entry points known as app parts and UI custom actions. Unlike the start page, you use app parts and UI custom actions to extend the user interface of the host web.
An app part is a user interface element that is surfaced on pages in the host web by using an IFrame. Once an app with an app part has been installed, a user can then add an app part to pages in the host web by using the same user interface experience that is used to add standard web parts.
You implement an app part in Visual Studio 2012 by using a client web part. This makes most developers ask, “What’s the different between an app part and a client web part?” The best way to think about this is that the term “app part” is meant for SharePoint users, whereas the term “client web part” is used by developers to describe the implementation of an app part.
Despite having similar names, client web parts are very different from the standard web parts that are familiar to most SharePoint developers. In particular, a client web part cannot have any server-side code that runs within the SharePoint host environment. The implementation of a client web part must follow the rules of SharePoint app development.
Client web parts are supported under each of the three app hosting models. You implement a client web part in a SharePoint-hosted app by using HTML, CSS, and JavaScript. In a cloud-hosted app, you also have the option of implementing the behavior for a client web part by using server-side code in the remote web.
At first, many developers assume that a client web part is nothing more than an IFrame wrapper around an external web page. However, the client web part provides significant value beyond that. When you configure the URL within a client web part, you can use the same tokens as with the start page, such as ~appWebUrl, ~remoteAppUrl, and {StandardTokens}. Client web parts also support adding custom properties, as well. Furthermore, the page behind a client web part is often passed contextual security information that allows it to call back into the SharePoint host environment with an established app identity. You can think of the client web part as an IFrame on steroids.
When you want to add a new client web part to a SharePoint app project, you use the Add New Item command. The Add New Item dialog box in Visual Studio 2012 provides a Client Web Part item template, as shown in Figure 1-7.
When you add a new project item for a client web part, Visual Studio 2012 adds an elements.xml file to the SharePoint app project that contains a ClientWebPart element. The following code is a simple example of the XML definition for a client web part in a SharePoint-hosted app project that is implemented by using a page inside the app web:
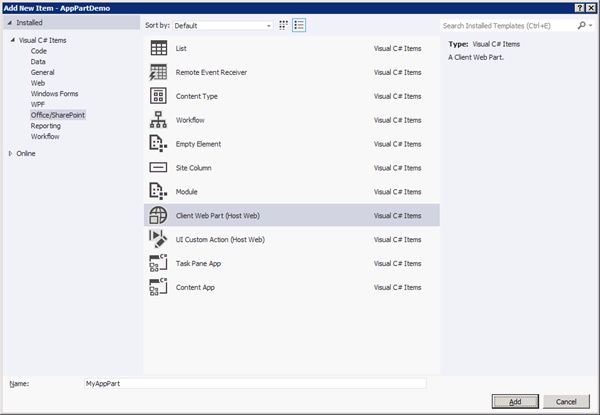
Figure 1-7. The Add New Item dialog provides templates for adding client web parts and UI custom actions to app projects.
<ClientWebPart Name="MyAppPart" Title="My App Part" Description="My description"
               DefaultWidth="300" DefaultHeight="200" >

  <Content Type="html" Src="~appWebUrl/Pages/AppPart1.aspx" />

</ClientWebPart>
As you can see from this example, the content displayed in a client web part is configured by assigning a URL to the Src attribute of the <Content> element. The web page that is referenced by this URL is usually added to either the app web or to the remote web. However, you can even reference a web page on the Internet that is neither in an app web nor in a remote web. The only important restriction is that the web page cannot be returned with the X-Frame-Options header in the HTTP response. This is a header used by some websites to prevent its pages from being used inside an IFrame with a type of attack known as clickjacking.
Here is something that can catch you off guard when creating a client web part in a SharePoint-hosted app: the default behavior of SharePoint 2013 is to add the X-Frame-Options header with a value of SAMEORIGIN in the HTTP response when it serves up pages from a SharePoint site. The result of this is that a page served up from the app web will not work when you attempt to use it as the page behind a client web part. The way to deal with this problem is to add the following directive to the top of any page in the app web referenced by a client web part to suppress the default behavior of adding the X-Frame-Options header:
<WebPartPages:AllowFraming ID="AllowFraming" runat="server" />
When you develop client web parts, you can add custom properties. The real value of custom properties is that they can be tailored by the user in the browser in the same fashion as a user customizes the properties of standard web parts. You define a custom property by adding a <Properties> element into the <ClientWebPart> element and then adding a <Property> element within that, as illustrated in Example 1-2.
Example 1-2. Client Web Part properties
<Properties>
  <Property
    Name="MyProperty"
    Type="string"
    WebBrowsable="true"
    WebDisplayName="My Custom Property"
    WebDescription="Insightful property description"
    WebCategory="Custom Properties"
    DefaultValue="Some default value"
    RequiresDesignerPermission="true" />
</Properties>
Once you have added a custom property, you must then modify the query string at the end of the URL that is assigned to the Src attribute in the <Content> element. You do this by adding a query string parameter and assigning a value based on a pattern by which the property name is given an underscore before it and after it. Thus, for a property named MyProperty, you should create a query string parameter and assign it a value of _MyProperty_. This would result in XML within the <Content> element that looks like the following:
<Content
  Type="html"
  Src="~appWebUrl/Pages/AppPart1.aspx?MyPropertyParameter=_MyProperty_"
/>
Note that you can use any name you want for the query string parameter itself. It’s when you assign a value to the parameter that you have to use actual property name and follow the pattern of adding the underscores both before and after.
A UI custom action is a developer extension in the SharePoint app model with which you can add custom commands to the host site. The command for a UI custom action is surfaced in the user interface of the host site by using either a button on the ribbon or a menu command in the menu associated with items in a list or documents in a document library that is known as the Edit Control Block (ECB) menu. It is the act of installing an app with UI custom actions that automatically extends the user interface of the host site with ribbon buttons and ECB menu commands.
As in the case of the client web part, UI custom actions are supported in each of the three app hosting models. However, a UI custom action is different than the client web part because its purpose is not to display content in the host web. Instead, it provides an executable command for business users with which they can display a page supplied by the app. The page that is referenced by a UI custom action can be in either the app web or the remote web.
As a developer, you have control over what is passed in the query string for a UI custom action. This makes it possible to pass contextual information about the item or the document on which the command was executed. This in turn makes it possible for code inside the app to discover information such as the URL that can be used to access the item or document by using either the Client-Side Object Model (CSOM) or the new Representational State Transfer (REST) API, which is discussed in Chapter 2.
Keep in mind that an app will require additional permissions beyond the default permission set in order to access content in the host web. This topic is discussed in Chapter 3. This current chapter will only discuss how to create a UI custom action that passes contextual information to a page supplied by the app. Chapter 3 also covers what’s required to actually use this information to call back into the SharePoint host environment.
In the dialog box shown earlier in Figure 1-6, you can see that Visual Studio 2012 provides a project item template named UI Custom Action. When you use this item template to create a new UI custom action, Visual Studio 2012 adds a new elements.xml file to your SharePoint app project. When you look inside the elements.xml file you find a <CustomAction> element that you can modify to define either an ECB menu item or a button on the ribbon.
Many SharePoint developers already have experience working with custom actions in SharePoint 2007 and SharePoint 2010. The good news is that the manner in which you edit the XML within the <CustomAction> element for a SharePoint app project works the same way as it does for a SharePoint solution project. The bad news is that many of the custom actions available when developing farm solutions are not available when developing a SharePoint app.
In particular, a SharePoint app only allows for UI custom actions that create ECB menu commands and ribbon buttons. The SharePoint app model imposes this restriction to provide a balance between functionality and security concerns. Furthermore, you are prohibited from adding any custom JavaScript code when you configure the URL for a UI custom action in a SharePoint app. If this restriction were not enforced, JavaScript code from the app could call into the host site without being granted the proper permissions.
Suppose that you want to create a UI custom action to add a custom ECB menu item to all the items in every Contacts list within the host site. You can structure the <CustomAction> element to look like that presented in Example 1-3.
Once you install an app with this UI custom action, it registers an ECB menu command for every item in lists that have a list type ID of 105. This is the ID for the Contacts list type. Once the app is installed, the host web will provide a custom menu item on the ECB menu for each item in any Contacts list. An example of what the ECM menu command looks like is shown in Figure 1-8.

The default action of a UI custom action is to redirect the user to the page referenced by the URL configured within the <UrlAction> element. This makes sense for a scenario in which you want to move the user from the host web into the full immersion experience of the app in order to do some work. However, this default behavior will provide a distracting user interface experience for a scenario in which a user wishes to return to the host web immediately after seeing the page displayed by the app. For these scenarios, you can modify the UI custom action to display the page from the app as a dialog box in the context of the host web. The user interface experience is much better because the user can see a page from the app without ever leaving the host web.
Example 1-4 demonstrates the technique to display the page referenced by a UI custom action as a dialog box, which involves adding three attributes to the <CustomAction> element. First, you add the HostWebDialog attribute and assign it a value of true. Next, you add the HostWebDialogWidth attribute and the HostWebDialogHeight attribute and assign them values to set the width and height of the dialog box.
Example 1-4. Displaying a referenced page
<CustomAction
  Id="CustomAction1"
  RegistrationType="List"
  RegistrationId="105"
  Location="EditControlBlock"
  Sequence="100"
  Title="Display more information about this contact"
  HostWebDialog="TRUE"
  HostWebDialogWidth="480"
  HostWebDialogHeight="240" >

    <UrlAction Url="~appWebUrl/Pages/Action1.aspx" />

  </CustomAction>
</Elements>
Now, let’s go into more detail about configuring the Url attribute of the <UrlAction> element. When you configure the URL you can use the same familiar tokens that you use with the start page and with client web parts such as ~appWebUrl, ~remoteAppUrl, and {StandardTokens}, as shown in the following code:
<UrlAction Url="~appWebUrl/Pages/Action1.aspx" />
However, UI custom actions support several additional tokens beyond what is available for start pages and client web parts. These are the tokens that make it possible to pass contextual information about the item or document on which the command was executed. For example, you can pass the site-relative URL to the item or document by using the {ItemURL} token.
<UrlAction Url="~appWebUrl/Pages/Action1.aspx?ItemUrl={ItemURL}" />In most scenarios, you will also need the absolute URL to the root of the host web, which can be passed by using the {HostUrl} token. Note that the Url is configured by using an XML attribute, so you cannot use the “&” character when combining two or more parameters together. Instead, you must use the XML encoded value, which is &, as shown in the following example:
<UrlAction Url="~appWebUrl/Pages/Action1.aspx?HostUrl={HostUrl}&ItemURL={ItemUrl}" />Note that the SharePoint host environment substitutes values into these tokens by using standard URL encoding. This means that you must write code in the app to use a URL decoding technique before you can use these values to construct a URL that can be used to access the item or document.
Table 1-2 lists the tokens that can be used in UI custom actions, beyond those that are also supported in start pages and client web parts. Note that some of the tokens work equally well regardless of whether the UI custom action is used to create an ECB menu item or a button in the ribbon. However, the {ListID} token and the {ItemID} token work with ECB menu items but not with buttons on the ribbon. Conversely, the {SelectedListId} token and the {SelectedItemId} token work with buttons on the ribbon but not with ECB menu items.
Table 1-2. The extra tokens available when configuring the URL for a UI custom action
The final section of this chapter examines how SharePoint apps are distributed and deployed into production as well as how apps are managed over time. First, you will learn about the details of how apps are packaged into redistributable files. After that, you will see how these files are published and installed to make SharePoint apps available to users. As you will see, the SharePoint app model provides valuable support for managing apps in a production environment and upgrading to newer versions.
A SharePoint app is packaged up for deployment by using a distributable file known as an app package. An app package is a file built by using the zip archive file format and it requires an extension of .app. For example, if you create a new SharePoint-hosted app project named MySharePointApp, the project will generate an app package named MySharePointApp.app as its output.
Note that the zip file format for creating an app package is based on the Open Package Convention (OPC). This is the same file format that Microsoft Office began using with the release of Office 2007 for creating Word documents (.docx) and Microsoft Excel workbooks (.xslx).
The primary requirement for an app package is that it contains the app manifest as a top-level file named AppManifest.xml. As discussed earlier in this chapter, the SharePoint host environment relies on metadata contained in the app manifest so that it can properly configure an app during the installation process.
An app package will usually contain an app icon file named AppIcon.png. The AppIcon.png file, like many of the other files in an app package, is paired with an XML file named AppIcon.png.config.xml. The purpose of this XML file is to assign the AppIcon.png file an identifying GUID.
In addition to the AppManifest.xml file, the app package often contains additional files that are used as part of the app’s implementation. For example, the app package for a SharePoint-hosted app contains a file for the app’s start page along with other resources used by the start page such as a CSS file and a JavaScript file. These are examples of files that are added to the app web as part of the app installation process.
The distribution mechanism used by a SharePoint app to add pages and lists to the app web during installation is a standard solution package, which is a CAB file with a .wsp extension. If this sounds familiar, that’s because the solution package file embedded within an app package has the exact same file format as the solution package files that developers have been using to deploy SharePoint solutions in SharePoint 2007 and SharePoint 2010. The one key difference is that the solution package used by the SharePoint app model to add files to an app web is not a stand-alone file. Instead, it is embedded as a .wsp file within the app package, as shown in Figure 1-9.

Figure 1-9. App packages that contain artifacts for deployment contain a separate solution package within the app package.
When a user installs a SharePoint app, the SharePoint host environment examines the app package to see if it contains an inner solution package. It is the presence of an inner solution package within the app package file that specifies to the SharePoint host environment whether it needs to create an app web during installation. If the app package does not contain an inner solution package, the SharePoint host environment installs the app without creating an app web.
The app web solution package contains a single web-scoped feature. The SharePoint host environment activates this feature automatically on the app web immediately after the app web is created. This feature is what makes it possible to add declarative elements such as pages and lists to the app web as the app is installed.
An app web solution package cannot contain a .NET assembly DLL with server-side code. Therefore, you can say that the app web solution package embedded inside an app package is constrained because it must be a fully declarative solution package. This is different from the solution packages for farm solutions and sandboxed solutions, which can contain assembly DLLs with custom .NET code written in either C# or VB.NET.
Keep in mind that the installation of a SharePoint app doesn’t always result in the creation of an app web. Some apps are designed to create an app web during installation and some are not. A SharePoint-hosted app is the type of app that will always create an app web during installation. This is a requirement because a SharePoint-hosted app requires a start page that must be added to the app web.
However, things are different with a cloud-hosted app. Because a cloud-hosted app usually has a start page that is served up from a remote web, it does not require the creation of an app web during installation. Therefore, the use of an app web in the design of a provider-hosted app or an autohosted app is really just an available option as opposed to a requirement as it is with a SharePoint-hosted app.
When you design a provider-hosted app or an autohosted app, you have a choice of whether you want to create an app web during installation to store private app implementation details inside the SharePoint host. Some cloud-hosted apps will store all the content they need within their own external database and will not need to create an app web during installation. Other cloud-hosted apps can be designed to create an app web during installation for scenarios in which it makes sense to store content within the SharePoint host environment for each installed instance of the app.
This chapter has already discussed client web parts and UI custom actions. As you recall, these two types of features are used to extend the user interface of the host web, as opposed to many of the other types of elements in an app that are added to the app web. For this reason, the XML files containing the definitions of client web parts and UI custom actions are not deployed within a solution package embedded within the app package. Instead, the XML files that define client web parts and UI custom actions are added to the app package as top-level files.
Consider an example SharePoint app named MyAppParts that contains two client web parts. The contents of the app package for this app will contain a top-level elements.xml file for each of the client web parts and a top-level feature.xml file for the feature that hosts them. When Visual Studio 2012 creates these XML files and builds them into the output app package file, it adds a unique GUID to each file name to avoid naming conflicts, as illustrated in Figure 1-10.
The feature that hosts client web parts and UI custom actions is a web-scoped feature known as a host web feature. The SharePoint host environment is able to detect a host web feature inside an app package during app installation and activate it in the host web. When an app with a web host feature is installed at tenancy scope, that feature will be activated in more than one site.

When it comes to packaging a SharePoint app for distribution, autohosted apps are more complicated and deserve a little extra attention. The extra complexity is required because the app package for an autohosted app must contain the resources required to create an ASP.NET application on demand to deploy the remote web. An autohosted app can also be designed to create a SQL Azure database, as well, during the app installation process.
When you create a new autohosted app, Visual Studio 2012 creates two projects. There is one project for the app itself and a second web project for an ASP.NET application to implement the remote web. For example, if you create a new autohosted app using the name MyAutoHostedApp, Visual Studio 2012 creates an app project named MyAutoHostedApp and an ASP.NET project named MyAutoHostedAppWeb, and adds them to a single Visual Studio solution.
What is important to understand is that the app package built for the MyAutoHostedApp project must contain all the necessary files to deploy the ASP.NET project named MyAutoHostedAppWeb. This is a requirement because the installation of this app package must provide the Office 365 environment with the means to provision the remote web as a Windows Azure application. This is what makes it possible for an autohosted app to create its own remote web during the installation process.
Visual Studio 2012 relies on a packaging format that Microsoft created especially for the Windows Azure environment by which all the files and metadata required to deploy an ASP.NET application are built in to a single zip file for distribution. This zip file is known as a web deploy package. When used within the SharePoint app model, the web deploy package is embedded within the app package of an autohosted app for distribution.
When Visual Studio 2012 builds the web deploy package for an autohosted app, it creates the file by combining the app package name together with a web.zip extension. For example, an app packaged named MyAutohostedApp.app will have an embedded web deploy package named MyAutohostedApp.web.zip.
Now, consider the scenario in which an autohosted app has an associated SQL Azure database. The Office 365 environment must create this database on demand during app installation. Therefore, the app package must contain the resources required to create a SQL Azure database containing standard database objects, such as tables, indexes, stored procedures, and triggers.
The SharePoint app packaging model takes advantage of a second packaging format that Microsoft created for Windows Azure known as a Data Tier Application package. In this packaging format, the metadata required to automate the creation of a SQL Azure database is defined in XML files that are built in to a zip file with an extension of .dacpac. The name of the Data Tier Application package is typically based on the name of the database. For example, a SQL Azure database named MySqlDatabase will have an associated Data Tier Application package named MySqlDatabase.dacpac. If you look inside a Data Tier Application package, you can locate a file named model.xml, which defines the database objects that need to be created.
Figure 1-11 shows the layout of an app package for an autohosted app that will trigger the Office 365 environment to create a remote and a SQL Azure database as part of the app installation process. Remember that the web deploy package is required in an autohosted app package, whereas the data tier application package is optional.

Figure 1-11. An autohosted app package contains a web deployment package to create the remote web and a data application package to create a SQL Azure database.
When you create an autohosted app, Visual Studio 2012 automatically creates the web project and takes care of setting up all that’s required to build the web deploy package into the app package. However, you have to take a few extra steps to create a SQL database project and configure it to properly build the Data Tier Application package in to the app package.
The first step is to create a new SQL database project in Visual Studio 2012 and add it to the same solution that contains the autohosted project. Next, on the Properties page of the SQL Database project, go to the Project Settings tab and change the target platform setting to SQL Azure. This is the step that changes the project output to a Data Tier Application package. After this, you must build the SQL database project at least once to build the Data Tier Application package.
The final step is to configure the app project to reference the Data Tier Application package. You can accomplish this by using the property sheet for the autohosted app project. You will find that there is a project property named SQL Package. Once you configure the SQL Package property to point to the Data Tier Application package (.dacpac) file, you have made the necessary changes so that Visual Studio 2012 will begin building the Data Tier Application package into app package file.
The app package is a distributable file that’s used to publish SharePoint apps. Once the app package has been published, it is available for users to install. In the case of SharePoint-hosted apps and autohosted apps, the app package contains all the resources required to deploy the app during the installation process. However, provider-hosted apps require the developer to deploy the remote web independently of the publication process and the installation process.
You publish a SharePoint app by uploading its app package file to one of two different places. First, you can publish an app by uploading its app package to the public Office Store. This is the right choice to make your app available to the general public, including users with SharePoint tenancies in Office 365.
The second way to publish a SharePoint app is by uploading the app package to a special type of site known as an app catalog site. This is the option to use when you want to make the app available only to users within a specific Office 365 tenancy or within a specific on-premises farm.
To publish an app to the public Office Store, the developer must first create a dashboard seller account. You can create this type of account by navigating to https://sellerdashboard.microsoft.com in the browser and logging on with a valid Windows Account. Once you have logged on, you can create a new dashboard seller account that is either an individual account or a company account.
A very appealing aspect of publishing apps to the Office Store with a dashboard seller account is that it provides assistance with the management of licensing as well as collecting money from customers through credit card transactions. When you create a dashboard seller account, you are able to create a second payout account from which you supply Microsoft with the necessary details so when it collects money from customers purchasing your apps, it can transfer the funds you have earned to either a bank account or a PayPal account.
Once you have gone through the process of creating a dashboard seller account, it takes a day or two for this new account to be approved. Once your account has been approved, you can then begin to publish your apps in the Office Store. The Office Store supports publishing three types of apps: you can publish SharePoint apps, Apps for Office, and Windows Azure Catalog Apps.
You publish a SharePoint app by uploading its app package file and filling in the details associated with the app. For example, the publishing process for the Office Store requires you to provide a title, version number, description, category, logo, and at least one screenshot that shows potential customers what your app looks like.
When you publish a SharePoint app, you can also indicate via the seller dashboard whether your app is free or must be purchased. If you publish an app for purchase, you can specify the licensing fee for each user or for a given number of users. There is even an option to configure a free trial period for an app that has an associated licensing fee.
Once you have uploaded an app and provided the required information, the app must then go through an approval process. The approval process involves checking the app package to ensure that it only contains valid resources. There are also checks to validate that the app meets the minimum requirements of the user experience guidelines. For example, there is a check to ensure that the start page for the app contains the required link back to the host web.
Once the app has been approved, it is then ready for use and added to the public Office Store where it can be discovered and installed by SharePoint users.
What should you do if you want to publish an app but you don’t want to publish it to the Office Store? For example, imagine a scenario in which you don’t want to make an app available to the general public. Instead, you want to publish the app to make it available to a smaller audience such as a handful of companies that are willing to pay you for your development effort. The answer is to publish the app to an app catalog site.
An app catalog site contains a special type of document library that is used to upload and store app package files. Along with storing the app package file, this document library also tracks various types of metadata for each app. Some of this metadata is required, whereas other metadata is optional.
In the Office 365 environment, the app catalog site is automatically added when a tenancy is created for a new customer. However, this is not the case in an on-premises farm. Instead, you must explicitly create the app catalog site by using the Central Administration site or by using Windows PowerShell. Furthermore, the app catalog is created at web application scope, so you must create a separate app catalog site for each web application.
You must have farm administrator permissions within an on-premises farm to create an app catalog site. You begin by navigating to the home page of Central Administration. On the home page, there is a top-level link for Apps. When you click the Apps link, you will be redirected to a page with a group of links under the heading of App Management. Within this group of links, locate and click the link titled Manage App Catalog.
The first time you click the Manage App Catalog link, you are redirected to the Create App Catalog page, which you can use to create a new app catalog site, as shown in Figure 1-12. Note that the app catalog site must be created as a top-level site within a new site collection. On the Create App Catalog page, you can select the target web app that will host the new app catalog site.
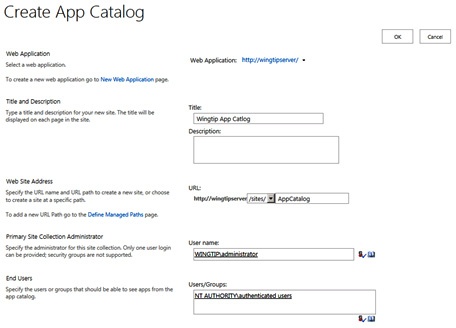
Figure 1-12. The app catalog can be created through Central Administration within a specific web app of your choice.
Note that you can also use the Create App Catalog page (shown a little later in Figure 1-14) to configure user access permissions to the app catalog site. Remember that providing users with access to the app catalog site is what makes it possible for them to discover and install apps of their own. You must provide read access to users if you want them to have the ability to discover apps and install them at site scope. However, you might decide against configuring user access to the app catalog site if you plan on installing apps at tenancy scope.
Once you have created the app catalog site within an on-premises farm, you should navigate to it and inspect what’s inside. You will find that there is a document library with a title of Apps for SharePoint which is used to publish SharePoint apps. There is a second document library with a title of Apps for Office that is used to publish apps created for Office applications such as Word and Excel.
You publish a SharePoint app by uploading its app package to the Apps for SharePoint document library. The SharePoint host environment is able to automatically fill in some of the required app metadata such as the Title, Version, and Product ID by reading the app manifest as the app package is uploaded. However, there is additional metadata that must be filled in by hand or by some other means. A view of apps that have been published in the Apps for SharePoint document library is presented in Figure 1-13.
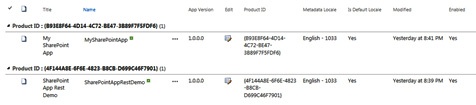
Figure 1-13. The Apps for SharePoint document library contains app package files and associated metadata for published apps.
You will also notice that the app catalog site supports the management of app requests from users. The idea being that a user within a site can request an app from the Office Store. The app catalog administrator can see this request and decide whether to purchase the app or not. If the app request seems appropriate, the app catalog administrator can purchase the app and make it available for site-scope installation. Alternatively, the app catalog administrator can make the app available to the requester by using a tenancy-scoped installation.
Once an app has been published, it can be discovered and installed by a user who has administrator permissions in the current site. If you navigate to the Site Content page within a site and click the tile with the caption add an app, you will be redirected to the main page for installing apps named addanapp.aspx. This page displays apps that have been published to the app catalog site. Remember that an Office 365 tenancy has a single app catalog site, but on-premises farms have an app catalog site per web application. Therefore, you will not see apps that have been published to an app catalog site in a different web application.
A user requires administrator permissions within a site to install an app. If you are logged on with a user account that does not have administrator permissions within the current site, you will not be able to see apps that have been published in the app catalog site. This is true even when your user account has been granted permissions on the app catalog site itself.
Once you locate an app that you want to install, you can simply click its tile to install it. The app installation process typically prompts you to verify whether you trust the app. A page appears that displays a list of the permissions that the app is requesting along with a button to grant or deny the apps permission request. You must grant all permissions that the app has requested to continue with the installation process. There is no ability to grant one requested permission to an app while denying another; granting permissions to an app during installation is always an all-or-nothing proposition.
After the app has been installed, you will see a tile for it on the Site Content page. This tile represents the app launcher that a user can click to be redirected to the app’s start page. The app title also displays an ellipse to access a fly-out menu for app management, as illustrated in Figure 1-14.
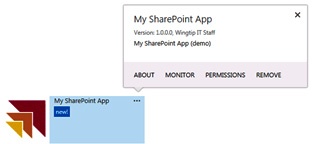
Figure 1-14. Once an app has been installed, it can be launched using an associated tile, which is displayed on the site content page.
Recall from earlier in the chapter what happens during app installation. Some apps require an app web. When this is the case, the app web is created as a child site under the current site where the app has been installed. If the app contains host feature elements such as client web parts and UI custom actions, these user interface extensions will be made available in the host site, as well.
You have seen that the app catalog site provides a place where you can upload apps in order to publish them. Once an app has been published in the app catalog site, a user within the same Office 365 tenancy or within the same on-premises web application can discover the app and install it at site scope. However, the functionality of an app catalog site goes one step further: it plays a central role in installing apps at tenancy level.
You install an app at tenancy scope by installing it in an app catalog site. Just as with a site-scoped installation, you must first publish the app by uploading it to the Apps for SharePoint document library in the app catalog site. After publishing the app, you should be able to locate it on the Add An App page of the app catalog site and install it just as you would install an app in any other type of site. However, things are a bit different after the app has been installed in an app catalog site. More specifically, the app provides different options in the fly-out menu that is available on the Site Content page, as shown in Figure 1-15.
As you can see in Figure 1-15, an app that has been installed in an app catalog site has a Deployment menu command that is not available in any other type of site. When you click the Deployment menu command, you are redirected to a page on which you can configure the app so that you can make it available to users in other sites.
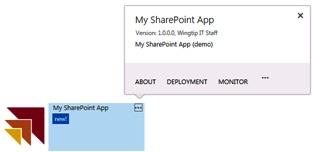
Figure 1-15. Once an app has been installed, the associated deployment menu can be used to make the app available to other sites.
You have several options when you configure an app in an app catalog site to make it available in other sites. One option is to make the app available to all sites within the scope of the app catalog site. Or, you can be more selective and just make the app available in sites that were created by using a specific site template or sites created under a specific managed path. There is even an option to add the URLs of site collections one-by-one if you need fine-grained control.
After you configure the criteria for a tenancy-scoped app installation to indicate the sites in which it can be used, you will find that the app does not appear in those sites instantly. That’s because the SharePoint host environment relies on a timer job to push the required app metadata from the app catalog site to all the other sites. By default, this timer job is configured to run once every five minutes. During your testing you can speed things up by navigating to the Central Administration site and locating the timer job definition named App Installation Service. The page for this timer job definition provides a Run Now button that you can click to run it on demand.
The upgrade process designed by the SharePoint app model provides a much better experience compared to the upgrade process used with SharePoint solutions. When apps are published, the Office Store and app catalog sites always track their version number. When an app is installed, the SharePoint host environment sees this version number and records it for the installed app instance.
Take a simple example. Imagine you have uploaded version 1.0.0.0 of an app. After that, the app is installed in several sites via site-scoped installation. The SharePoint host environment remembers that each of these sites has installed version 1.0.0.0 of the app.
Now, imagine that you want to further develop your app. Maybe you need to fix a bug, improve its performance, or extend the app’s functionality. After you have finished your testing, you decide to update the version number to 2.0.0.0 and publish the new version in the same app catalog site where you installed the original version.
One important aspect of the upgrade process of the SharePoint app model is that an updated version of an app is never forced upon the user that installed the app. Instead, the user is notified that a new version of the app is available. This user can then decide to do nothing or to update the app to the new version. Figure 1-16 shows the notification that the SharePoint host environment adds to the app tile on the Site Contents page.

Figure 1-16. The tile for an app displays a notification when an updated version is available from the SharePoint Store or app catalog.
The notification depicted in Figure 1-16 contains an update link that a user can click to be redirected to a page with a button that activates the upgrade process. What actually occurs during the upgrade process is different, depending on whether the app is a SharePoint-hosted app or a cloud-hosted app.
When you are working on an updated version of a SharePoint-hosted app, you have the ability to change some of the metadata in the app manifest and to add new elements into the app web. For example, you could add a new page to the app web named startv2.aspx and then modify the app manifest to use this start page instead of the start page that was used in the original version of the app. You could also add other, new app web elements such as JavaScript files, lists, and document libraries. Many of the techniques used to upgrade elements in the app web are based on the same techniques developers have been using with feature upgrade in SharePoint solutions.
When it comes to updating a cloud-hosted app, things are different. That’s because most of the important changes to the app’s implementation are made to the remote web and not to anything inside the SharePoint host environment. If you are working with a provider-hosted app, you must roll out these changes to the remote web before you publish the new version of the app to the Office Store or any app catalog site.
It’s equally important that the updated version of the remote web must continue to support customers that will continue to use the original version of the app. Remember; there is nothing that forces the user to accept an update. You should expect that some customers will be happy with the original version and will be opposed to upgrading to a new version of an app.
Once you have pushed out more than one or more updates to a provider-hosted app, you must begin to track what version each customer is using. One technique to accomplish this task is to provide a different start page for each version of the app. Many provider-hosted apps will go a step further and store the current version of app in a customer profile that is tracked in a custom database behind the remote web.
One favorable aspect of the SharePoint app model for developers is the ability to design a cloud-hosted app with custom server-side code that is automatically executed when an app is installed, upgraded, or uninstalled. By taking advantage of the ability to add code behind these three app lifecycle events, you can program against the host web and the app web with logic to initialize, update, and cleanup site elements in the SharePoint environment. These app lifecycle events also provide the necessary triggers for updating the custom database used by provider-hosted apps and autohosted apps.
The architecture of app events is based on registering app event handlers in the app manifest that cause the SharePoint host environment to call out to a web service entry point in the remote web. Due to the architecture’s reliance on a server-side entry point, app events are not supported in SharePoint-hosted apps. Therefore, you can only use the app events in autohosted apps and provider-hosted apps.
It’s relatively simple to add support for app events to the project for an autohosted app or a provider-hosted app. The property sheet for the app project contains three properties named Handle App Installed, Handle App Uninstalling, and Handle App Upgrade, as shown in Figure 1-17.

Figure 1-17. The property sheet for an app project provides Boolean properties for enabling lifecycle events.
The default value for each of these app event properties is false. The first time you change one of these properties to a value of true, Visual Studio 2012 adds a web service entry point into the web project with a name of AppEventReceiver.svc. Visual Studio 2012 also adds the required configuration information into the app manifest file, as well. If you enable all three events, the <Properties> element within <App> element of the app manifest will be updated with the following three elements:
<InstalledEventEndpoint>~remoteAppUrl/AppEventReceiver.svc</InstalledEventEndpoint>
<UninstallingEventEndpoint>~remoteAppUrl/AppEventReceiver.svc</UninstallingEventEndpoint>
<UpgradedEventEndpoint>~remoteAppUrl/AppEventReceiver.svc</UpgradedEventEndpoint>
After you have enabled one or more of the app events, you can then begin to write the code that will execute when the events occur. You write this code in the code-behind file named AppEventReceiver.svc.cs. If you examine this file, you will see that Visual Studio 2012 has created a class shown in the following code that implements a special interface that the SharePoint team created for remote event handling named IRemoteEventService:
public class AppEventReceiver : IRemoteEventService {
  public SPRemoteEventResult ProcessEvent(RemoteEventProperties properties) {}
  public void ProcessOneWayEvent(RemoteEventProperties properties) { }
}
The IRemoteEventService interface is used with app events and also with other types of remote event handlers, as well. There are two methods named ProcessEvent and ProcessOneWayEvent. The SharePoint host environment makes a web service call which executes the ProcessEvent method when it needs to inspect the response returned from the remote web. The ProcessOneWayEvent method is called for cases in which the SharePoint host environment needs to trigger the execution of code in the remote web but doesn’t need to inspect the response. App events always trigger to the ProcessEvent method, so you can leave the ProcessOneWayEvent method empty in the AppEventReceiver.svc.cs file.
If you have registered for the AppInstalled event, the ProcessEvent method will execute whenever a user is installing the app. It is critical to supply robust error handling because an unhandled exception will be returned to the SharePoint host environment and cause an error in the app installation process.
When you implement the ProcessEvent method, you must return an object created from the SPRemoteEventResult class, as demonstrated in the following:
public SPRemoteEventResult ProcessEvent(RemoteEventProperties properties) {
  // return an SPRemoteEventResult object
  SPRemoteEventResult result = new SPRemoteEventResult();
  return result;
}
The SPRemoteEventResult class was designed to make it possible for code in the remote web to relay contextual information back to the SharePoint host environment. For example, imagine that you have detected that the installer’s IP address is located in a country that you do not want to support. You can tell the SharePoint host environment to cancel the installation process and pass an appropriate error message, such as shown here:
SPRemoteEventResult result = new SPRemoteEventResult();
result.Status = SPRemoteEventServiceStatus.CancelWithError;
result.ErrorMessage = "App cannot be installed due to invalid IP address";
return result;
The ProcessEvent method passes a parameter named properties, which is based on a type named RemoteEventProperties. You can use this parameter to access important contextual information such as the URL of host web and security access token required to call back into the SharePoint host environment. Example 1-5 shows that the properties parameter also provides an EventType property with which you can determine which of the three app events has caused the ProcessEvent method to execute.
Example 1-5. Handling events
public SPRemoteEventResult ProcessEvent(RemoteEventProperties properties) {

  // obtain context information from RemoteEventProperties property
  string HostWeb = properties.AppEventProperties.HostWebFullUrl.AbsolutePath;
  string AccessToken = properties.AccessToken;

  // handle event type
  switch (properties.EventType) {
    case RemoteEventType.AppInstalled:
      // add code here to handle app installation
      break;
    case RemoteEventType.AppUpgraded:
      // add code here to handle app upgrade
      break;
    case RemoteEventType.AppUninstalling:
      // add code here to handle app uninstallation
      break;
    default:
      break;
  }

  // return an SPRemoteEventResult object
  SPRemoteEventResult result = new SPRemoteEventResult();
  return result;

}
Note that debugging app event handlers can be especially tricky to set up and in many situations it doesn’t work at all. That’s because the SharePoint host environment must be able to call back into the remote web. For cases in which you have installed the app into an Office 365 tenancy for testing, it is a web server in the Office 365 environment that will be issuing the call to the remote web. This web server hosted in the Office 365 environment must be able to locate and access the web server that is hosting the remote web. Therefore, attempting to debug an app event handler for which the remote web is configured to use a host name such as localhost or to use a host domain name that only resolves to the proper IP address inside your testing environment will not work.
This chapter provided you with an introduction to SharePoint apps. You learned about the pain points of SharePoint solution development and the design goals that influenced how the architecture of the SharePoint app model was created. You also learned many details about app hosting models, user interface design, publishing, installation, and upgrade. Now, it’s time to move ahead and begin learning about how to write code in an app that accesses the SharePoint host environment by using the CSOM and the new REST API.