
The previous chapters in this book have focused on the core concepts necessary for developers to be successful in building SharePoint 2013 apps. This final chapter presents patterns and samples that will assist you in developing professional apps with compelling capabilities. After completing this chapter, you should be well positioned to begin creating apps intended for commercial use.
Chapter 2, outlined the permutations of JavaScript, C#, Client-Side Object Model (CSOM), and Representational State Transfer (REST) development, recommending development scenarios involving JavaScript with REST and C# with CSOM. This section details app patterns that can be used with these development scenarios. Specifically, the Model-View-ViewModel (MVVM) pattern is presented for JavaScript with REST and the Model-View-Controller (MVC) pattern is presented for C# with CSOM.
The MVVM pattern provides a flexible way to build JavaScript/REST apps that promotes code reuse, simplifies app maintenance, and supports testing. The pattern consists of three different components. The Model component is defined as the entities on the SharePoint server such as lists, libraries, and service applications. The View component is defined as the webpages that make up the app user interface. The ViewModel component is defined as the JavaScript that binds the Model and the View together. Figure 4-1 shows a simple block diagram of the MVVM pattern.

The goal of the MVVM pattern is to separate the display of data from the business logic, which is in turn separated from the underlying data. In practical terms, this means that all JavaScript is removed from the app webpages and segregated into libraries. These libraries are responsible for interacting with the back-end data, applying business logic, and feeding data to the webpages for display.
The biggest challenge in implementing apps with JavaScript is the intimate relationship between the webpages and the libraries. In many JavaScript implementations, the code in the libraries must have detailed knowledge of the markup in the webpages. As an example, Example 4-1 shows a snippet of code first presented in Chapter 2 that reflects a tight binding between the webpages and JavaScript code.
Example 4-1. Generating HTML in JavaScript
readAll = function () {
    $.ajax(
            {
                url: _spPageContextInfo.webServerRelativeUrl +
                    "/_api/web/lists/getByTitle('Contacts')/items/" +
                    "?$select=Id,FirstName,Title,WorkPhone" +
                    "&$orderby=Title,FirstName",
                type: "GET",
                headers: {
                    "accept": "application/json;odata=verbose",
                },
                success: function (data) {
                    readAllSuccess(data);
                },
                error: function (err) {
                    alert(JSON.stringify(err));
                }
            }
        );
},

readAllSuccess = function (data) {
    var html = [];
    html.push("<table><thead><tr><th>ID</th><th>First Name</th>" +
              "<th>Last Name</th><th>Title</th></tr></thead>");

    var results = data.d.results;

    for(var i=0; i<results.length; i++) {
        html.push("<tr><td>");
        html.push(results[i].ID);
        html.push("</td><td>");
        html.push(results[i].FirstName);
        html.push("</td><td>");
        html.push(results[i].Title);
        html.push("</td><td>");
        html.push(results[i].WorkPhone);
        html.push("</td></tr>");
    }

    html.push("</table>");
    $('#displayDiv').html(html.join(''));
}
Example 4-1 uses the jQuery ajax method to select items from a contacts list. If the call is successful, an HTML table is constructed and assigned to the inner HTML of a <div> element. Note how the JavaScript must understand that the webpage requires a table for display. Because of this design, the library cannot be reused to display the data in a different way. If you wanted to show the items in a list, for example, you would need to rewrite the success handler to generate a list instead of a table. This is the challenge that the MVVM pattern seeks to address.
JavaScript does not natively support the kind of loose coupling that the MVVM pattern requires. Therefore, additional support must be introduced in the form of a third-party library. Although there are many third-party libraries available for JavaScript, few of them implement the MVVM pattern. One library that does implement it successfully is Knockout, which you can find at http://knockoutjs.com.
Knockout is a JavaScript library that you can add to your apps to implement the MVVM pattern. With Knockout, you can create ViewModel components in JavaScript that effectively bind the server-side SharePoint data sources to the webpages in your apps. The primary capabilities of Knockout that makes the MVVM pattern possible are declarative bindings and dependency tracking.
Declarative bindings make it possible for you to bind a ViewModel to HTML elements in a webpage. Instead of writing HTML elements in your JavaScript, the declarative bindings are defined within the app web page. This approach removes the knowledge of the webpage structure from the JavaScript code and creates the loose binding required by MVVM. Example 4-2 presents an example of declarative bindings in Knockout.
Example 4-2. Declarative bindings
<div id="resultsDiv" style="overflow: auto">
    <table>
        <thead>
            <tr>
                <th>Last Name</th>
                <th>First Name</th>
                <th>Phone</th>
            </tr>
        </thead>
        <tbody id="resultsTable" data-bind="foreach: get_contacts()">
            <tr>
                <td data-bind="text: get_lname()"></td>
                <td data-bind="text: get_fname()"></td>
                <td data-bind="text: get_phone()"></td>
            </tr>
        </tbody>
    </table>
</div>
In Example 4-2, the data-bind attribute binds a method from the ViewModel to HTML elements in the webpage. Note how the table body uses a foreach construct to iterate through a set of contacts returned from the get_contacts method and build a table row for each contact. The last name, first name, and phone number associated with each contact is then bound to a table cell within a row.
When you develop a ViewModel, you start by creating a library to hold the data for binding. Example 4-3 shows a JavaScript library that holds the data for an individual contact. Note how the properties of the contact are exposed through public methods, and these methods are the ones referenced in the associated HTML of Example 4-2.
Example 4-3. The contact data library
"use strict";

var Wingtip = window.Wingtip || {}
window.Wingtip.Contact = function (ln, fn, ph) {

    //private members
    var lname = 'undefined',
        fname = 'undefined',
        phone = 'undefined',
        set_lname = function (v) { lname = v; },
        get_lname = function () { return lname; },
        set_fname = function (v) { fname = v; },
        get_fname = function () { return fname; },
        set_phone = function (v) { phone = v; },
        get_phone = function () { return phone; };

        //Constructor
        lname = ln;
        fname = fn;
        phone = ph;

       //public interface
       return {
           set_lname: set_lname,
           get_lname: get_lname,
           set_fname: set_fname,
           get_fname: get_fname,
           set_phone: set_phone,
           get_phone: get_phone
     };
}
The associated ViewModel performs the queries against the back-end data source and populates the data objects. The ViewModel also provides the public interface that is referenced in the data-bind attribute of the HTML for retrieving the collection of list items. Example 4-4 demonstrates a complete ViewModel that queries a contacts list and creates an array of contact information.
Example 4-4. The contacts ViewModel
"use strict";

var Wingtip = window.Wingtip || {}

Wingtip.ContactViewModel = function () {

    //private members
    var contacts = ko.observableArray(),
        get_contacts = function () { return contacts; },

        load = function () {
            $.ajax(
                    {
                        url: _spPageContextInfo.webServerRelativeUrl +
                            "/_api/web/lists/getByTitle('Contacts')/items/" +
                            "?$select=Id,FirstName,Title,WorkPhone" +
                            "&$orderby=Title,FirstName",
                        type: "GET",
                        headers: {
                            "accept": "application/json;odata=verbose",
                        },

                        success: onSuccess,
                        error: onError
                    }
                );
        },

        onSuccess = function (data) {
            var results = data.d.results;

            contacts.removeAll();

            for (var i = 0; i < results.length; i++) {
                contacts.push(
                    new Wingtip.Contact(
                    results[i].Title,
                    results[i].FirstName,
                    results[i].WorkPhone));
            }

        },

        onError = function (err) {
            alert(JSON.stringify(err));
        };


    //public interface
    return {
        load: load,
        get_contacts: get_contacts
    };

}();
The difference between Example 4-4 and Example 4-1 is significant. Example 4-1 relies on intimate knowledge of the user interface to create a table and push it onto the webpage for display. The ViewModel in Example 4-4 simply creates an array of contacts. You can then easily bind this array to various display forms such as a table or unordered list.
The most important aspect of the ViewModel is its use of the ko.observableArray type for handling the collection of contacts. The Knockout library provides the ko.observableArray type specifically to implement dependency tracking. With dependency tracking, automatic updating of the user interface occurs whenever data elements in the array change. When your app initializes, it should load the observable array and then bind the data. Knockout initializes the data binding when you call the applyBindings method. Example 4-5 illustrates how to initialize the data bindings with the ViewModel.
When developing more complex apps against the REST API, you must often make multiple asynchronous RESTful calls. For example, an initial RESTful call might retrieve master data, whereas subsequest calls fill in child data. The challenge with multiple calls is that they need to happen sequentially, but each call is made asynchronously. So the only solution is to nest dependent calls within the “success” callback functions. Example 4-6 shows an example of nested RESTful calls, wherein the first call retrieves the current user’s account name and the nested call returns the social feed for the account name.
Example 4-6. Nested RESTful calls
"use strict";

var Wingtip = window.Wingtip || {};

Wingtip.FeedViewModel = function () {

    var init = function () {

        //Get the current user's account information
        $.ajax({
                    url: _spPageContextInfo.webServerRelativeUrl +
                        "/_api/SP.UserProfiles.PeopleManager/GetMyProperties",
                    method: "GET",
                    headers: {
                        "accept": "application/json;odata=verbose",
                    },
                    success: function (data) {

                        //Now get the current user's social feed
                        var accountName = data.d.AccountName;

                        $.ajax({
                                url: _spPageContextInfo.webServerRelativeUrl +
                                     "/_api/social.feed/actor(item='" +
                                        accountName +"')/Feed",
                                method: "GET",
                                headers: {
                                    "accept": "application/json;odata=verbose",
                                },
                                success: function (data) {
                                    var feedData = data.d;
                                },

                                error: function (err) {
                                    alert(JSON.stringify(err));
                                }
                            }
                         );
                    },
                    error: function (err) {
                        alert(JSON.stringify(err));
                    }
                }
            );
        };


    return {
        init: init
    }
}();
The challenge with the code in Example 4-6 is that is can rapidly become unmaintainable. Multiple levels of nested asynchronous calls simply creates a pile of “spaghetti” code. What is needed is a mechanism to separate out the various asynchronous calls while still maintaining the dependency between them. That is the function of a promise.
A promise—also known as a deferred—is a pattern that returns an object immediately from an asynchronous call. This object will later be populated with the result of the asynchronous call, but its immediate return simplifies the code structure making it much more maintainable. Furthermore, promises provide a built-in caching mechanism so that the same query does not have to be run again if the promise has already been successfully fulfilled.
There are several techniques for implementing promises, but one of the easiest is to make use of the jQuery $.Deferred method. Using the $.Deferred method, you can create a deferred object, which can be immediately returned from an asynchronous call. The deferred object has resolve and reject methods, which are called on success or failure respectively. Using deferreds makes it possible for you to separate the JavaScript code that performs the asynchronous call. As an example, Example 4-7 shows how to implement the pattern to get the user’s profile information.
Example 4-7. The promise pattern
"use strict";

var Wingtip = window.Wingtip || {};

Wingtip.ProfileQuery = function () {

    var deferred = $.Deferred(),

        execute = function () {

        $.ajax(
                {
                    url: _spPageContextInfo.webServerRelativeUrl +
                        "/_api/SP.UserProfiles.PeopleManager/GetMyProperties",
                    method: "GET",
                    headers: {
                        "accept": "application/json;odata=verbose",
                    },
                    success: function (data) {
                        deferred.resolve(data);
                    },
                    error: function (err) {
                        deferred.reject(err);
                    }
                }
            );

        return deferred;
    };

    return {
        execute: execute
    }
}();
The deferred object exposes a “promise” object that has a method named “then.” The “then” method takes two arguments: the first argument is a success function, the second is a failure function. So the library in Example 4-7 can be invoked easily by using the code in Example 4-8.
The promises pattern significantly simplifies JavaScript code when your app must make multiple, nested asynchronous calls, and that makes it very powerful. However, the promise object also acts like a caching mechanism in that the success or failure function will be called immediately if the promise has already been fulfilled. This opens up additional ideas such as creating arrays of promises that contain fulfilled data so that apps do not have to run queries that have already successfully executed.
The MVC pattern has many of the same goals as the MVVM pattern. The MVC pattern looks to support code reuse, maintenance, and testing. The pattern also consists of three different components that are similar to the ones found in the MVVM pattern. The Model component is defined as the entities on the SharePoint server, such as lists, libraries, and service applications. The View component is defined as the webpages that make up the app user interface. The Controller binds the Model and the View together. The big difference between the MVVM pattern and the MVC pattern is that the MVVM pattern assumes that the data in the ViewModel will persist across create, read, update, and delete (CRUD) operations. The MVC pattern, on the other hand is stateless. Because of the differences in how state is managed, the MVC pattern lends itself to the development of SharePoint apps by using C# and CSOM. Figure 4-2 shows a simple block diagram of the MVC pattern.

When developers think of creating SharePoint apps with C# and CSOM, they might immediately think of using ASP.NET to create a remote web. In fact, this is the default template used in Microsoft Visual Studio for provider-hosted and autohosted apps. This approach involves the development of a set of Active Server Pages (ASPX) that contain web forms, server controls, and associated C# code. The advantage of the web forms pattern is that it is stable, mature, and well understood by web developers. However, the web forms pattern has some limitations that negatively impact code reuse, maintenance, and testing. Example 4-9 presents a web forms app that loads data from a contacts list in the host web and displays it in a grid.
Example 4-9. Using web forms in an app
protected void Page_Load(object sender, EventArgs e)
{
    var contextToken = TokenHelper.GetContextTokenFromRequest(Page.Request);
    var hostWeb = Page.Request["SPHostWebUrl"];

    using (var clientContext = TokenHelper.GetClientContextWithContextToken(
                                 hostWeb, contextToken, Request.Url.Authority))
    {
        clientContext.Load(clientContext.Web);
        List list = clientContext.Web.Lists.GetByTitle("Contacts");
        clientContext.Load(list);

        StringBuilder caml = new StringBuilder();
        caml.Append("<View><Query><OrderBy/></Query>");
        caml.Append("<ViewFields><FieldRef Name='ID'/>
                     <FieldRef Name='FirstName'/>");
        caml.Append("<FieldRef Name='Title'/><FieldRef Name='WorkPhone'/>
                     </ViewFields>");
        caml.Append("<RowLimit>100</RowLimit></View>");

        CamlQuery query = new CamlQuery();
        query.ViewXml = caml.ToString();
        Microsoft.SharePoint.Client.ListItemCollection
            listItems = list.GetItems(query);
        clientContext.Load(listItems);
        clientContext.ExecuteQuery();

        List<Contact> contacts = new List<Contact>();

        foreach (Microsoft.SharePoint.Client.ListItem listItem in listItems)
        {
            Contact contact = new Contact()
            {
                Id = listItem["ID"].ToString(),
                LastName = listItem["Title"].ToString(),
                FirstName = listItem["FirstName"].ToString(),
                WorkPhone = listItem["WorkPhone"].ToString()
            };
            contacts.Add(contact);
        }
        contactsGrid.DataSource = contacts;
        contactsGrid.DataBind();
    }
}
Example 4-9 is a classic example of querying a data source and binding a grid when an ASPX page loads. Even though this code works fine, you can see that the code and the user interface are tightly bound. First, the code is placed directly in the load event of the page. Second, the grid displaying the data is directly referenced in the code. Experienced ASP.NET developers will immediately object that such problems can be fixed in the web forms pattern by separating the code into layers and utilizing data binding. Although these points are certainly valid, years of experience has taught us that web forms apps are typically constructed with tight bindings between the various layers. Furthermore, there is no universally accepted framework for web forms that supports the kind of separation envisioned in the MVC pattern.
Web forms were initially envisioned to support a rapid application development approach by which the developer is abstracted away from the request-response details of HTTP and HTML. Web forms are designed to simulate a stateful environment even though HTTP is stateless. Server controls are intended to abstract away the details of HTML so that developers can use a visual designer to create web forms. To produce the illusion of a stateful environment, ASP.NET stores the last state of a web form—called the viewstate—in a hidden field between postbacks. For complex systems, this can be a serious issue as the viewstate becomes larger. Abstracting away the HTML also limits the ability of the developer to support various browser types and incorporate JavaScript libraries such as Knockout and jQuery. Even though these limitations can be addressed in various ways, many developers are realizing that the web forms pattern is not well suited to developing cloud-based apps that must support millions of users and many types of browsers.
MVC4 is the latest edition of the MVC framework available in Visual Studio 2012 that implements the MVC model and is ideally suited for developing SharePoint apps with C# and CSOM. When you develop a SharePoint 2013 app by using MVC4, you build models, controllers, and views, not web forms. Visual Studio 2012 helps you with the process by providing tools, designers, and wizards that support the MVC4 framework. If you are interested in creating SharePoint apps based on the MVC4 framework, you’ll need to do some work to swap out the web forms project for an MVC4 project.
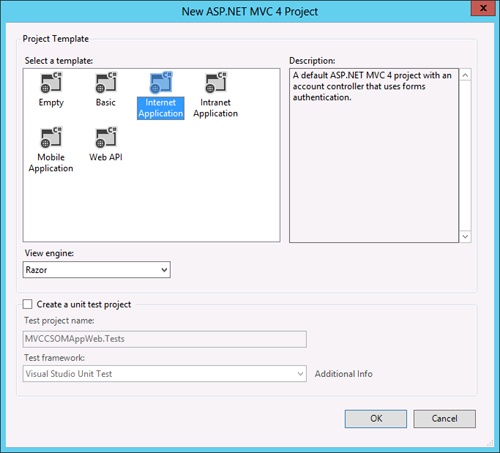
To get started, first create a provider-hosted or autohosted app. When the new remote web is created, open the associated web.config file and copy the settings for the ClientId and ClientSecret entries. You will need to transfer these settings to the new MVC4 remote web. After you have copied the settings, delete the default web project. Then, you can add a new MVC4 project to the solution. In the New ASP.NET MVC 4 Project Wizard, select the Internet Application template, as shown in Figure 4-3.
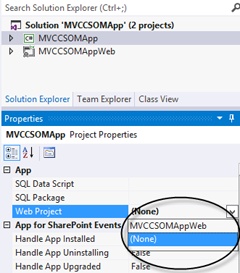
After the new web project is created, you must associate it with the SharePoint app by setting the Web Project property in the SharePoint app project. This property contains a drop-down list of the web projects in the solution. Figure 4-4 shows the property.
After setting the Web Project property, you should update the web.config file for the MVC4 project so that it contains the required ClientId and ClientSecret entries you copied earlier. Now, turn your attention to the app project. In the AppManifest.xml file, ensure that the AppPrincipal setting is correct for your deployment scenario. Next, set the <StartPage> element to refer to the start page of the MVC4 project. MVC4 uses a URL format that references the controller and then the method as opposed to webpages. The default MVC4 project template has a controller named HomeController that you can reference to get started. After these changes, you should be able to run the app in debug mode because the MVC4 web project template is already coded to show off some basic functionality with three built-in pages. The following code shows a sample <StartPage> URL that will work for the default template:
<StartPage>~remoteAppUrl/Home?{StandardTokens}</StartPage>To add your own functionality to the app, you start by creating a new controller. In the MVC4 web project, right-click the Controllers folder, and the in the settings menu that appears, click Add and click Controller. When prompted, you can give the controller a name, ensuring that the name ends with the string “Controller”. Figure 4-5 shows the addition of a ContactsController for reading list items from a contacts list.
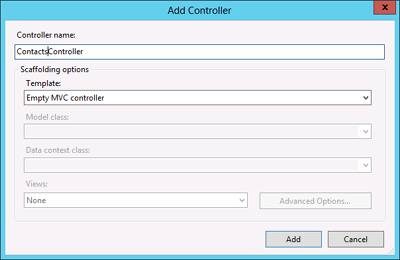
Figure 4-5. By creating a new controller, you can add custom page-level functionality to a remote web.
Controllers expose public methods that return Views. Each controller has a default method named Index, but they can have as many custom methods as you like. Custom methods can also accept arguments that correspond to the query string parameters contained in a URL. Example 4-10 shows the implementation of a method named ReadAll, which uses CSOM to read the list of clients from the app web and return a View.
Example 4-10. Adding a method to a controller
public ActionResult ReadAll(string SPHostUrl, string SPLanguage, string
    SPAppWebUrl)
{
    using (ClientContext ctx = new ClientContext(SPAppWebUrl))
    {
        ctx.Load(ctx.Web);
        List list = ctx.Web.Lists.GetByTitle("Contacts");
        ctx.Load(list);

        StringBuilder caml = new StringBuilder();
        caml.Append("<View><Query><OrderBy/></Query>");
        caml.Append("<ViewFields><FieldRef Name='ID'/>
                       <FieldRef Name='FirstName'/>");
        caml.Append("<FieldRef Name='Title'/><FieldRef Name='WorkPhone'/>
                       </ViewFields>");
        caml.Append("<RowLimit>100</RowLimit></View>");

        CamlQuery query = new CamlQuery();
        query.ViewXml = caml.ToString();
        Microsoft.SharePoint.Client.ListItemCollection listItems =
            list.GetItems(query);
        ctx.Load(listItems);
        ctx.ExecuteQuery();

        List<Contact> contacts = new List<Contact>();

        foreach (ListItem listItem in listItems)
        {
            Contact contact = new Contact()
            {
                Id = listItem["ID"].ToString(),
                LastName = listItem["Title"].ToString(),
                FirstName = listItem["FirstName"].ToString(),
                WorkPhone = listItem["WorkPhone"].ToString()
            };
            contacts.Add(contact);
        }
        ViewBag.Contacts = contacts;
    }
    return View();
}
If you compare Example 4-10 to Example 4-9, you will see that the code to retrieve the list items is largely the same. What is different is that the MVC4 code does not bind directly to a grid. Instead, the code builds a list of contacts and saves them into the Contacts property of the ViewBag object. The ViewBag makes data from the Controller available when the View is generated. A Controller can add properties to the ViewBag dynamically, making it simple to pass data from the Controller to the View. In this example, the Contact class is the Model in the MVC pattern. The MVC4 project template contains a Models folder into which you can easily add data classes that help transfer data between the Controller and View.
A View can be added for any Controller by right-clicking within the Controller code, and then from the settings menu that appears, clicking Add and then clicking View. Within the View, you can define both static and dynamic elements. Static elements set ViewBag properties to a fixed value, whereas dynamic elements use properties of the ViewBag populated by the Controller to generate results. Example 4-11 shows a View to generate a static title for a page and a dynamic table containing the list items retrieved from the contacts list.
Example 4-11. Adding a view
@{
    ViewBag.Title = "SharePoint 2013 MVC App";
}

<table id="contactsTable">
    <thead><th>ID</th><th>Last Name</th><th>First Name</th><th>Work Phone</th>
        </thead>
    @foreach (var contact in ViewBag.Contacts)
    {
        <tr><td>
                @contact.Id
            </td><td>
                @contact.LastName
            </td><td>
               @contact.FirstName
            </td><td>
                @contact.WorkPhone
            </td></tr>
    }
</table>
The code in Example 4-11 is obviously not a complete webpage. This is because the MVC4 framework supports the idea of shared views that can be merged with the partial views to create a complete webpage. In the default template, a shared view named _Layout is used to generate the basic page that is merged with the custom Views you add.
After the Views and Controllers are created, you can invoke them through a URL. The URL format determines which Controller method is invoked. The associated View is then used to render the webpage. The formula for invoking a Controller method follows the format /[Controller]/[Method]?[Parameters]. In order to invoke the start page of your MVC4 remote web from a SharePoint app, you must update the <StartPage> element of the AppManifest.xml file to reflect this formula. As an example, the following URL would invoke the ReadAll method of the ContactsController when the SharePoint 2013 app is launched:
~remoteAppUrl/Contacts/ReadAll?{StandardTokens}Although apps are isolated from the host web, the end-user experience should feel like an app is just a natural extension of the host web. To achieve a seamless feel, apps should take on some of the styling elements of the host web and provide a navigation system that incorporates a link back to the host web. If you are creating a SharePoint-hosted app, these issues are addressed by the app project template in Visual Studio. However, if you are creating a provider-hosted or autohosted app, the remote web will need some help in achieving these goals. This is the purpose of the chrome control.
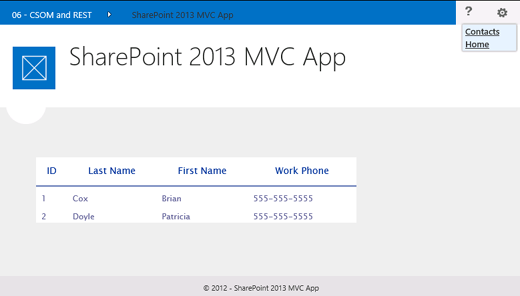
With the chrome control, a remote web can use the header elements of a specific SharePoint site (usually the host web) without knowing the styles ahead of time. In addition to styling, the chrome control also provides a link back to the host web. Optionally, the chrome control can define a drop-down list box similar to the Site Settings menu and a Help menu. Figure 4-6 shows a remote web displaying a table of contacts with the host web chrome visible at the top of the page. The Figure also shows the link back to the host web as well as the drop-down list.
The chrome control is contained within the library sp.ui.controls.js, which is located in the LAYOUTS directory. The simplest way to use the library is to copy it into the remote web project. The library contains the definition for the SP.UI.Controls.Navigation object, which can retrieve the style sheet from the host web for use in the remote web. The SP.UI.Controls.Navigation object makes a call to the handler defaultcss.ashx to retrieve the URL for the host web style sheet. The host web style sheet is then downloaded for use by the chrome control. The chrome control then generates a header section for the app into a target <div> element, which you specify.
The chrome control relies on four parameters in the query string for its functionality: SPHostUrl, SPHostTitle, SPAppWebUrl, and SPLanguage. If your app uses the {StandardTokens} query string in the manifest and has an associated app web, the start URL will include the SPHostUrl, SPAppWebUrl, and SPLanguage parameters. However, you will need to add the {HostTitle} token to include the SPHostTitle parameter, as shown in Figure 4-7.
You can use the chrome control either programmatically or declaratively. When used programmatically, you typically provide a target <div> element in the app page and create a library to set the options for the SP.UI.Controls.Navigation object. Example 4-12 presents a complete library for using the chrome control.
Example 4-12. Using the chrome control
"use strict";

var Wingtip = window.Wingtip || {};

Wingtip.ChromeControl = function () {

     render = function () {
        var options = {
            "appIconUrl": "../Images/AppIcon.png",
            "appTitle": "SharePoint 2013 MVC App",
            "appHelpPageUrl": "../Help?" + document.URL.split("?")[1],
            "settingsLinks": [
                {
                    "linkUrl": "../Contacts/ReadAll?" +
                    document.URL.split("?")[1],"displayName": "Contacts"
                },
                {
                    "linkUrl": "../Welcome/Message?" +
                     document.URL.split("?")[1],"displayName": "Home"
                }
            ]
            };

        var nav = new SP.UI.Controls.Navigation(
                                "chrome_ctrl_placeholder",
                                options
                          );
        nav.setVisible(true);
    },

    getQueryStringParameter = function (p) {
        var params =
            document.URL.split("?")[1].split("&");

        var strParams = "";
        for (var i = 0; i < params.length; i = i + 1) {
            var singleParam = params[i].split("=");
            if (singleParam[0] == p)
                return singleParam[1];
        }
    }

    return {
        render: render
    }
}();

$(document).ready(function () {
    Wingtip.ChromeControl.render();
});
When the ready event of the document fires, the render method of the Wingtip.ChromeControl object is called. This method sets the options for the SP.UI.Controls.Navigation object. Notice the options make it possible for the icon, title, help link, and navigation links to be defined. After they are defined, the SP.UI.Controls.Navigation object is instantiated with the options and the identifier of the <div> element where the chrome should be rendered.
When using the chrome control declaratively, you set the options directly in the markup of the target <div> element. The chrome control will automatically render within the target <div> element if it declares the attribute data-ms-control=“SP.UI.Controls.Navigation”. Example 4-13 demonstrates the declarative equivalent of Example 4-12.
Example 4-13. Using the chrome control declaratively
<div
    id="chrome_ctrl_container"
    data-ms-control="SP.UI.Controls.Navigation"
    data-ms-options=
       '{
        "appIconUrl": "../Images/AppIcon.png",
        "appTitle": "SharePoint 2013 MVC App",
        "appHelpPageUrl": "../Help?" + document.URL.split("?")[1],
        "settingsLinks": [
            {
                "linkUrl": "../Contacts/ReadAll?" + document.URL.split("?")[1],
                "displayName": "Contacts"
            },
            {
                "linkUrl": "../Welcome/Message?" + document.URL.split("?")[1],
                "displayName": "Home"
            }
        ]
        }'>
</div>Because of the strong emphasis on client-side programming in the SharePoint 2013 app model, developers will often need to cope with restrictions designed to prevent cross-site scripting (XSS). XSS is an attack wherein script is injected into the pages of an otherwise safe site. The injected script can be designed to steal passwords and personal information from the user and send them to a service running in a malicious domain. To prevent XSS attacks, browsers only run scripts and call services that originate from the same domain as the webpage.
The challenge for SharePoint developers is that retrieving data from different sources to create a mash-up is a common scenario for apps. Therefore, a mechanism is needed to securely call services in other domains from an app. SharePoint 2013 offers two approaches to solving the problem: the cross-domain library, and the web proxy. Using the cross-domain library, a remote web can access data in a SharePoint app web from client-side JavaScript. With the web proxy, an app can call services in another domain by using SharePoint to make the call on your behalf.
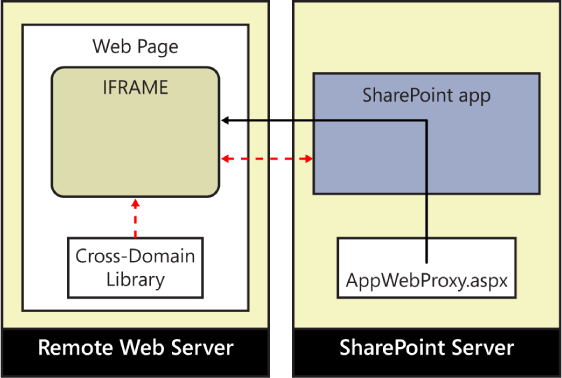
The cross-domain library is contained in the JavaScript file SP.RequestExecutor.js, which is located in the LAYOUTS directory. You can use the cross-domain library when a remote web needs to access data in an app web, but barriers such as a firewall prevent the normal approach of calling back through CSOM with an OAuth token. The cross-domain library works in concert with several components to make cross-site calls possible. Figure 4-8 shows the complete architecture.
At the heart of the cross-domain call architecture is the AppWebProxy.aspx page, which provides the functionality to execute the object model commands requested by the remote web on the target app web. Because the AppWebProxy.aspx page is located in the LAYOUTS directory, its location is well known to every remote web. The remote web loads the SP.RequestExecutor object and initializes it with the URL of the target app web. At this point, the SP.RequestExecutor object creates a hidden IFrame within the remote web and loads the AppWebProxy.aspx page from the target app web. The SP.RequestExecutor object uses the HTML5 postMessage API to send commands from the remote web to the AppWebProxy.aspx page, which in turn executes them against the target app web. Any response passes back across the IFrame to the remote web.
When the cross-domain library is first invoked, the user of the remote web will likely not be signed in to the target app web. In this case, the cross-domain library returns a 401 unauthorized response. The library subsequently redirects the user to the SharePoint logon page. After the user logs on, the cross-domain library attempts the original call again.
For a remote web to access an app web by using the cross-domain library, the target app web must explicitly permit the call. If the app is using the Internal principal, the AllowedRemoteHostUrl attribute must be set in the app manifest. If you are creating a provider-hosted or autohosted app, the domain you register for OAuth authentication will automatically be trusted for calls to the cross-domain library. The app must also be provided specific permission grants in the app manifest, just as it would for any OAuth calls. Finally, the app web associated with the remote web needs to provide the URL to the target app web as a query string parameter in the <StartPage> element of the manifest.
In many cases, the target app web and the app web associated with the remote web will be the same. This is the scenario in which the remote web wants to call back into the associated app web but is blocked by a firewall. The target app web can be different, however. All that is required is that the target app web allows the remote web to make the call and the app web associated with the remote web requests for the appropriate permission grants. Example 4-14 shows some typical settings for app webs that might or might not be in the same manifest, depending upon your scenario.
Example 4-14. Manifest settings
<AppPrincipal>
<Internal AllowedRemoteHostUrl="http://crossdomain.wingtip.com/" />
</AppPrincipal>
<Properties>
<Title>Cross Domain App</Title>
<StartPage>
~remoteAppUrl/Welcome/Message?{StandardTokens}&SPSourceAppUrl=
http://app-4d277429be4d8d.apps.wingtip.com/cloudhosted/CrossDomainSourceApp
</StartPage>
</Properties>The simplest way to start using the cross-domain library is to add it directly to the remote web project. After that, an instance of the SP.RequestExecutor object can be initialized. The URL for the target app web is retrieved from the query string passed to the remote web and used in the initialization process. After it is initialized, RESTful requests can easily be made to the target app web. Example 4-15 shows a sample that reads list items from a contacts list in the target app web.
Example 4-15. Reading list items across domains
"use strict";

var Wingtip = window.Wingtip || {};
Wingtip.CrossDomain = function () {

    load = function () {
        var appweburl = getQueryStringParameter("SPSourceAppUrl");
        var executor = new SP.RequestExecutor(appweburl);

        executor.executeAsync(
        {
            url:
            appweburl +
            "/_api/web/lists/getByTitle('Contacts')/items/" +
                            "?$select=Id,FirstName,Title,WorkPhone,Email" +
                            "&$orderby=Title,FirstName",
            method: "GET",
            headers: { "Accept": "application/json;odata=verbose" },
            success: successHandler,
            error: errorHandler
        })
    },

    successHandler = function (data) {
        //Take action on returned data
    },

    errorHandler = function (data, errorCode, errorMessage) {
        //Handle the error
    },

    getQueryStringParameter = function (paramToRetrieve) {
        //Get querystring value and return it
    }

    return {
        load: load
    }

}()

$(document).ready(function () {
    Wingtip.CrossDomain.load();
});The web proxy is a server-side proxy that can make calls to services in other domains and return them to an app. The web proxy differs from the cross-domain library in that it supports calling any endpoint, not just those contained in an app web. The web proxy is ideal for accessing multiple data sources and creating mashed-up displays in your apps.
You access the web proxy via the SP.WebRequestInfo object, which is available in the sp.js library. To use the web proxy, the SP.WebRequestInfo object is instantiated and initialized with a RESTful URI. The proxy is then invoked, which makes an asynchronous RESTful call. The returned XML can then be processed to extract the desired values. Example 4-16 shows part of a custom library that makes a call to the publically available MusicBrainz API to search for songs based on the name of an artist.
Example 4-16. Using the web proxy
"use strict";

var Wingtip = window.Wingtip || {};
Wingtip.ResponseDocument;

Wingtip.SongViewModel = function () {

    var load = function (artist) {

            var ctx = SP.ClientContext.get_current();
            var request = new SP.WebRequestInfo();

            request.set_url(
                "http://www.musicbrainz.org/ws/2/recording?query=artist:" +
                    artist
                );
            request.set_method("GET");
            window.Wingtip.ResponseDocument = SP.WebProxy.invoke(ctx, request);

            ctx.executeQueryAsync(onSuccess, onError);

        },

        onSuccess = function () {
            var xmlDoc = $.parseXML(window.Wingtip.ResponseDocument.get_body());
            //Process XML to extract values
        },

        onError = function (err) {
            alert(JSON.stringify(err));
        };

    return {
        load: load,
    };

}();
For cross-domain calls to succeed by using the web proxy, the app must explicitly declare that a domain is trusted. This is accomplished by setting the <RemoteEndpoint> element in the app manifest. The following code shows how the element is set for the MusicBrainz sample:
<RemoteEndpoints>
    <RemoteEndpoint Url="http://www.musicbrainz.org"/>
</RemoteEndpoints>This book has concentrated on introducing the foundational concepts associated with app development in SharePoint 2013. However, the app development model offers a rich set of capabilities that go beyond performing CRUD operations on a list. This section provides some examples of advanced app capabilities and APIs that will be important in many scenarios. The examples presented here are by no means the extent of what is possible in app development. For more detailed coverage of advanced topics, I recommend reading Inside Microsoft SharePoint 2013.
SharePoint apps support event handlers—known as remote event receivers—with which code can be invoked when key events happen in the life of an app. Remote event receivers are similar in concept to the standard event handlers that SharePoint developers already build in SharePoint 2010 except that the receiver is a remote endpoint instead of an assembly. Remote event receivers support events at the web, app, list, and list-item level, which can be both synchronous and asynchronous.
Remote event receivers can be added to an app through either the Add New Item dialog box or the Properties dialog box. If the remote event receiver is to handle anything other than app lifecycle events, it should be added to the app by using the Add New Item dialog. If the remote event receiver is to handle one of the app lifecycle events, it is added by setting one of the event properties for the app, as shown in Figure 4-9.

If the remote event receiver is added through the Add New Item dialog box, you will be further prompted to select the event scope and event types to handle. After the scope and type are defined, Visual Studio will automatically add a new web project to your app to handle the events. This web project is automatically set as the associated remote web for the app so that it will start during the debugging process.
The selected events are bound to the remote event receiver through an elements file that is nearly identical to the one routinely used in SharePoint 2010 for standard event handlers. The only difference is that the file adds a <Url> element that refers to the endpoint of the remote event receiver. This is the endpoint that is invoked when an event occurs. Example 4-17 presents a typical elements file handling the ItemAdding, ItemAdded, and ItemDeleting events.
Example 4-17. Declaring event handlers
<?xml version="1.0" encoding="utf-8"?>
<Elements xmlns="http://schemas.microsoft.com/sharepoint/">
  <Receivers ListTemplateId="10000">
      <Receiver>
        <Name>AnnouncementsReceiverItemAdding</Name>
        <Type>ItemAdding</Type>
        <SequenceNumber>10000</SequenceNumber>
        <Url>~remoteAppUrl/AnnouncementsReceiver.svc</Url>
      </Receiver>
      <Receiver>
        <Name>AnnouncementsReceiverItemDeleting</Name>
        <Type>ItemDeleting</Type>
        <SequenceNumber>10000</SequenceNumber>
        <Url>~remoteAppUrl/AnnouncementsReceiver.svc</Url>
      </Receiver>
      <Receiver>
        <Name>AnnouncementsReceiverItemAdded</Name>
        <Type>ItemAdded</Type>
        <SequenceNumber>10000</SequenceNumber>
        <Url>~remoteAppUrl/AnnouncementsReceiver.svc</Url>
      </Receiver>
  </Receivers>
</Elements>
Remote event receivers implement the IRemoteEventService interface. This interface consists of two methods: ProcessEvent and ProcessOneWayEvent. You use the ProcessEvent method to handle synchronous events, and the ProcessOneWayEvent method to handle asynchronous events. The new web project comes with template code that implements the IRemoteEventService interface and uses the TokenHelper class to retrieve a CSOM ClientContext for calling back into SharePoint. Example 4-18 shows the implementation code for handling the events defined in Example 4-17.
Example 4-18. Event handling code
public class AnnouncementsReceiver : IRemoteEventService
{
    public SPRemoteEventResult ProcessEvent(RemoteEventProperties properties)
    {
        SPRemoteEventResult result = new SPRemoteEventResult();
        switch (properties.EventType)
        {
            case RemoteEventType.ItemAdding:
                result.ChangedItemProperties = new Dictionary<String, object>();
                result.ChangedItemProperties.Add("Body", "New Text");
                break;

            case RemoteEventType.ItemDeleting:
                result.ErrorMessage = "Items cannot be deleted from this list";
                result.Status = SPRemoteEventServiceStatus.CancelWithError;
                break;
        }
        return result;
    }
    public void ProcessOneWayEvent(RemoteEventProperties properties)
    {
        HttpRequestMessageProperty requestproperty =
        (HttpRequestMessageProperty)OperationContext.Current.
        IncomingMessageProperties[HttpRequestMessageProperty.Name];
        string contexttokenstring = requestproperty.Headers["x-sp-accesstoken"];
        if (contexttokenstring != null)
        {
            SharePointContextToken contexttoken =
            TokenHelper.ReadAndValidateContextToken(
            contexttokenstring, requestproper-ty.Headers[
              HttpRequestHeader.Host]);
            Uri sharepointurl = new Uri(properties.ItemEventProperties.WebUrl);
            string accesstoken = TokenHelper.GetAccessToken(
            contexttoken, sharepointurl.Authority).AccessToken;
            using (ClientContext clientcontext =
            TokenHelper.GetClientContextWithAccessToken(
            sharepointurl.ToString(), accesstoken))
            {
                if (properties.EventType == RemoteEventType.ItemAdded)
                {
                    List list =
                    clientcontext.Web.Lists.GetByTitle(
                    properties.ItemEventProperties.ListTitle);
                    clientcontext.Load(list);
                    ListItem item =

                    list.GetItemById(properties.ItemEventProperties.ListItemId);
                    clientcontext.Load(item);
                    clientcontext.ExecuteQuery();
                    item["Body"] += "New Text";
                    item.Update();
                    clientcontext.ExecuteQuery();
                }
            }
        }
    }
}SharePoint 2013 provides a RESTful endpoint that you can use to retrieve search results and query suggestions. When coupled with the REST app patterns presented throughout the book, you can easily create sophisticated search-based apps. Table 4-1 describes the available search endpoints.
To use the search REST API, an app must make a permission request, and that request must be granted during app installation. The required permission request is formatted similarly to any other permission request and is available in Visual Studio by using the designer associated with the app manifest. The following code shows the underlying XML that forms the requested permission:
<AppPermissionRequests>
  <AppPermissionRequest Scope="http://sharepoint/search"
     Right="QueryAsUserIgnoreAppPrincipal" />
</AppPermissionRequests>
The simplest way to run a query against the REST API is to pass a keyword query. You do this by setting the value of the querytext parameter in the RESTful URI. You can use this approach for either the query or suggest endpoints. The querytext can be any legal keyword query language (KQL) construction, including managed properties and operators. The following code shows two examples of returning search results with keyword queries:
http://wingtip.com/_api/search/query?querytext='SharePoint'
http://wingtip.com/_api/search/query?querytext='Title:SharePoint'
The real power of the REST API lies in all of the available query parameters that can be used. These parameters reflect many of the properties historically available through the KeywordQuery class. By using these parameters, you can control the columns returns, sorting, paging, and relevance model to name just a few. Table 4-2 lists some of the key query parameters. For a complete list, readers should refer to the SharePoint 2013 SDK.
Table 4-2. Query parameters
Because access to the search engine is available through the REST API, building search-based apps is just a simple matter of creating a library that forms the appropriate URI and parses out the results. Once the results are returned, you can use the MVVM pattern described earlier to render the results. Figure 4-10 shows an app that creates an employee directory by using an A–Z toolbar that runs queries against the people result source. Example 4-19 shows partial code from the app that creates the RESTful URI.
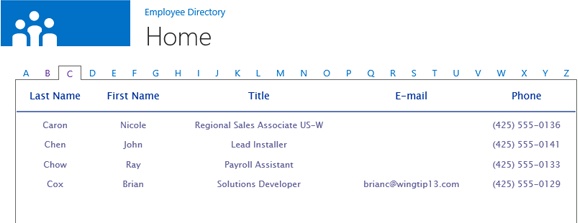
Figure 4-10. You can create Apps that utilize search functionality to find people, documents, and list items.
Example 4-19. People search
load = function (query) {
    $.ajax(
            {
                url: _spPageContextInfo.webAbsoluteUrl
                    + "/_api/search/query?querytext='LastName:"
                    + query
                    + "*'&selectproperties='LastName,FirstName,JobTitle,
                                               WorkEmail,WorkPhone'"
                    + "&sourceid='B09A7990-05EA-4AF9-81EF-EDFAB16C4E31'"
                    + "&sortlist='LastName:ascending'",
                method: "GET",
                headers: {
                    "accept": "application/xml",
                },
                success: onSuccess,
                error: onError
            }
        );
}External Content Types (ECT) are used in Business Connectivity Services (BCS) for connecting SharePoint with external data sources such as databases and web services. In SharePoint 2010, ECTs were defined at the farm level and installed in the Business Data Connectivity service application. Once installed in the service application, ECTs could be used as the basis for defining an External List. External Lists look a lot like standard SharePoint lists; however, External Lists are backed by an external data source. This section assumes that you are familiar with the general concepts surrounding ECTs and have built an External List in SharePoint 2010.
SharePoint 2013 introduces a new type of ECT that you can define against an Open Data Protocol (OData) source and contained within an app. Defining an ECT within an app is powerful because it allows for the creation of External Lists within an app that are not dependent on access to the Business Data Connectivity service application in the SharePoint farm. This means that you can contain ECTs within apps, install them with an associated app, and remove them when the app is removed. Figure 4-11 shows the high-level architecture supporting app-level ECTs.

Figure 4-11. App-level External Content Types are made possible through the use of the FileBackedMetadataCatalog and a custom BDC Metadata model.
An app can only contain a single BDC Metadata Model file defining ECTs. The model itself can contain many ECT definitions, but the app can only support one model. Microsoft Visual Studio 2012 makes it easy to add app-level ECTs that are based on OData endpoints by providing a simple dialog box that requests the data source endpoint. In the Visual Studio Solution Explorer, right-click the app project, and then in the settings menu that opens, click Add, and then click Content Types for an External Data Source. Visual Studio starts the SharePoint Customization Wizard which prompts you for the OData service URL. Figure 4-12 shows the wizard with the publically available Northwind source specified.

On the next wizard page, you are prompted to select the entities to expose. Visual Studio creates a model that includes ECTs defined for each entity you select. You can also elect to have Visual Studio create an External List based on the entities. Figure 4-13 shows the options.
When the wizard completes, Visual Studio creates the BDC Metadata Model and the External List definition. You can view and edit both the model and the list definition as necessary in the app project. When the app is deployed, the associated BDC Metadata Model is stored in a document library within the app. At that time, an instance of the FileBackedMetadataCatalog class is spun up and the model is loaded into it. The FileBackedMetadataCatalog class is part of the BCS API, and it acts as an in-memory catalog for ECTs. This is like having a Business Data Connectivity service application dedicated to the app, which is then used to generate the External List instance.
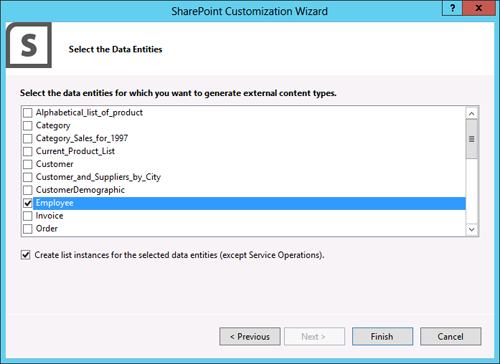
Figure 4-13. Visual Studio 2012 provides a wizard for easily creating external Content Types from OData sources.
Although Visual Studio automatically creates the BDC Metadata Model and External List instance, it does not provide any mechanism for displaying the External List. To display the data, you can either use the REST API to access the list or you can define an XSLT list view web part inside the <Module> element that deploys the Default.aspx page. Both of these techniques work for standard lists and External Lists.
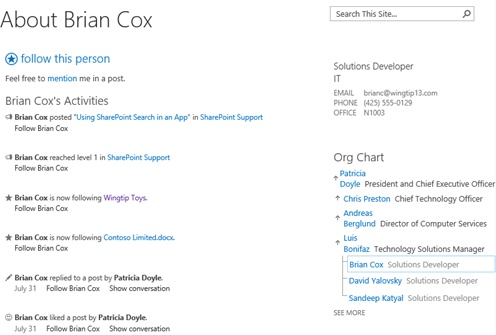
SharePoint 2013 offers some nice improvements in the social networking arena, and chief among them is the social feed. The social feed contains all of the activity around a user in the form of a list. These activities can be either user-generated posts or system-generated events such as notification of a change in your profile. Figure 4-14 shows a view of the social feed on a user’s public page.
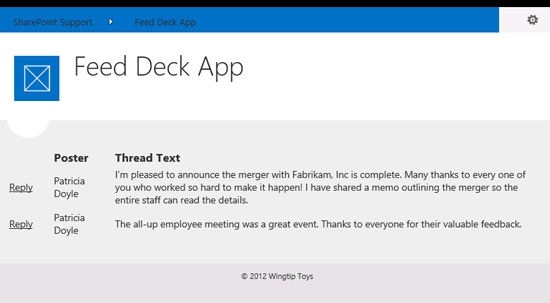
Reading and writing to the social feed is a capability that makes it possible for your apps to participate in the community within an organization. SharePoint 2013 makes this possible by providing CSOM and REST interfaces to the social feed. These interfaces make it possible to interact with user profile properties, posts, and replies. Figure 4-15 shows a sample MVC4 app displaying a user post from the social feed.
To get started by using C# and CSOM against the social feed, you need to set a reference to the Microsoft.SharePoint.Client.UserProfiles.dll assembly, which is located in the ISAPI folder. This assembly gives you access to the SocialFeedManager and the PeopleManager classes with which you can read and write to the social feed and user profiles, respectively. Example 4-20 presents a method from the MVC4 app that reads the social feed for a given user account.
Example 4-20. Reading the social feed
public ActionResult ShowThreads(string SPHostUrl, string Account)
{
    using (ClientContext ctx = new ClientContext(SPHostUrl))
    {

        //Get display name from the user's profile
        PeopleManager peopleManager = new PeopleManager(ctx);
        PersonProperties personProps = peopleManager.GetPropertiesFor(Account);
        ctx.Load(personProps, o => o.DisplayName, o => o.AccountName);
        ctx.ExecuteQuery();

        // Get feed for the person
        SocialFeedManager socialFeedManager = new SocialFeedManager(ctx);
        ctx.Load(socialFeedManager);

        SocialFeedOptions feedOptions = new SocialFeedOptions();
        ClientResult<SocialFeed> feed =
            socialFeedManager.GetFeed(SocialFeedType.Everyone, feedOptions);
                ctx.ExecuteQuery();

        //Collect all the posts
        List<FeedThread> feedThreads = new List<FeedThread>();

        for (int i = 0; i < feed.Value.Threads.Length; i++)
        {
            SocialThread thread = feed.Value.Threads[i];
            FeedThread feedThread = new FeedThread();
            feedThread.Id = i;
            feedThread.Poster = personProps.DisplayName;
            feedThread.ThreadId = thread.Id;
            feedThread.ThreadText = thread.RootPost.Text;
            feedThreads.Add(feedThread);
        }
        //Send posts to view
        ViewBag.FeedThreads = feedThreads;
    }
    return View();
}
The code in Example 4-17 receives the target account as a query string parameter. The People Manager is then used to look up the display name for the account in the user’s profile. After that, the SocialFeedManager is used to look up the user’s posts for display. The SocialFeedType is set to Everyone to retrieve the posts, but can be set to any of the following values to produce different views of the social feed: Personal, News, Timeline, Likes, or Everyone.
Each displayed post in the app has an associated thread identifier, which is the unique ID used to reference the thread in the social feed. Using the thread identifier, the app can allow users to reply to any of the presented threads. Example 4-21 shows the code from the MVC4 app that posts a reply.
Example 4-21. Replying to a post
public ActionResult Reply(string SPHostUrl, string ThreadId, string ReplyText)
        {
            using (ClientContext ctx = new ClientContext(SPHostUrl))
            {
                SocialFeedManager socialFeedManager = new SocialFeedManager(ctx);
                ctx.Load(socialFeedManager);

                SocialPostCreationData postCreationData =
                    new SocialPostCreationData();
                postCreationData.ContentText = ReplyText;
                socialFeedManager.CreatePost(ThreadId, postCreationData);
                ctx.ExecuteQuery();
            }

            return View();
}The SharePoint 2013 app model requires developers to adopt new patterns for app development. If the app is primarily developed by using JavaScript and REST, an MVVM pattern is recommended; if it is primarily developed by using C# and CSOM, an MVC pattern is recommended. Within these new app patterns, SharePoint developers can take advantage of advanced capabilities and features such as cross-domain call support and API support for major SharePoint workloads, including search, Business Connectivity Services, and social networking.