
The Microsoft SharePoint 2013 app model does not support running server-side code within the SharePoint host environment. As a result, SharePoint developers cannot utilize the server-side API in apps. Instead, app developers must use the client-side API, which consists of the Client-Side Object Model (CSOM) and the Representational State Transfer (REST) API.
When developing apps, CSOM and the REST API can be programmed by using either C# or JavaScript. C# is used in remote webs associated with provider-hosted or autohosted apps. JavaScript can run in the browser in SharePoint-hosted, provider-hosted, or autohosted apps. The combination of languages and APIs results in the app designs outlined in Table 2-1.
Whereas the choices outlined in Table 2-1 offer a lot of flexibility, you will find that some app designs are much more natural choices than others. For example, if you want to do most of your development in C#, you will find that CSOM in a provider-hosted or autohosted app is the most straightforward design. On the other hand, if you mostly want to create SharePoint-hosted apps for Microsoft Office 365, JavaScript against the REST API will be the easiest design.
This chapter demonstrates the use of CSOM and REST in the various app designs. Along the way, it introduces the required technical concepts necessary to understand the app designs and the best practices for developing them. The chapter starts with a short JavaScript primer followed by a review of the various patterns for creating reusable and maintainable libraries in JavaScript. It then covers the fundamentals of the CSOM and REST object models.
Because app authentication is covered in Chapter 3, the examples in this chapter steer clear of situations that involve advanced app authentication. Instead, this chapter focuses on the fundamentals necessary to successfully develop apps against CSOM and REST. The patterns and principles presented in this chapter are subsequently applied in samples throughout the book.
JavaScript takes on increased importance in app development. Therefore, this section presents a brief overview of the JavaScript language and its key characteristics from the perspective of an experienced SharePoint programmer. Although you have probably written some JavaScript, you might not have spent time to understand JavaScript at the level necessary to be successful writing SharePoint apps. If you are a JavaScript expert, you can certainly skip this section. If you have only used JavaScript casually in your past SharePoint solutions, you should read this section thoroughly and pay special attention to the discussion in the section Creating custom libraries
As a SharePoint developer, you have probably written at least some JavaScript in a webpage; thus, you understand that JavaScript code is comprised of functions. These functions can be written directly into the webpage by using script tags or referenced in separate library files. If you are more of a casual JavaScript developer, however, you might not be aware that simply writing a named function places that function in the global namespace. The global namespace is the container into which all variables and functions are placed by default. In the browser, this container is the window object. Cluttering the global namespace with functions can easily lead to naming conflicts and “spaghetti” code.
In addition to the global namespace, you can define your own custom namespaces. Namespaces in JavaScript are essentially just containing objects defined within the global namespace. By using custom namespaces, you can isolate your code from other JavaScript in the page. This is essential for preventing naming conflicts. Custom namespaces are one of the few things that should be defined within the global namespace. Most variables and functions are generally defined within a custom namespace. The following code shows how to define a custom namespace:
var Wingtip = window.Wingtip || {};
The sample code sets a global variable named Wingtip to reference either an existing global variable or creates a new one if it does not exist already. This is the standard approach to creating namespaces because this line of code can exist in several different libraries without causing a naming conflict. The first library loaded with this code present establishes the namespace definition for those loaded later.
Variables in JavaScript can be declared either in a namespace or within a function. Unlike C#, JavaScript variables are not declared by using a data type keyword. Instead, JavaScript uses the var keyword to define a variable. Although not strictly required, variables should always be declared by using the var keyword. This is important because when it is not used, the variable is automatically defined within the global namespace. When the var keyword is used outside of a function, the associated variable is always defined within the global namespace. When it is used within a function, the associated variable is scoped to the function only. The following code shows an example of a global variable, global function, and local variable:
<script type="text/JavaScript">
    var myGlobalVar = "This is a global variable";
    function myGlobalFunction() {
        alert("This function is defined in the global namespace");
        for (var i=0; i<5; i++) {
            alert("This variable is local to the function: " + i);
        }
    }
</script>
Variables can be defined within a custom namespace by simply referencing the namespace when using the variable. The code that follows shows how to create a variable within a custom namespace. The section Creating custom libraries expands upon this idea significantly to encapsulate code and keep it out of the global namespace.
var Wingtip = window.Wingtip || {};
var window.Wingtip.myNamespaceVar = "This is a variable defined within a namespace";
Although JavaScript does not have specific data type keywords, declared variables do have a type based on the value they hold. Variable types can be examined by using the typeof operator. The typeof operator returns one of the following values when applied to a variable or function parameter:
undefined
string
number
Boolean
function
object
Because JavaScript is very loose with rules concerning variable and object definitions, you should be sure to always use strict JavaScript in your apps. Strict JavaScript is an improved version of JavaScript. You can enable it by adding the line “use strict” at the top of any library or function. Strict JavaScript will prevent you from making many common mistakes in your code. The following lists some of the key restrictions enabled by strict JavaScript:
Cannot use a variable without declaring it
Cannot write to a read-only property
Cannot add properties to non-extensible objects
Cannot define a property more than once in an object literal
Cannot use a parameter name more than once in a function
Cannot use reserved words, eval, or arguments, as names for functions and variables
The value of this in a function is no longer the window object
Cannot declare functions inside of statements
Cannot change the members of the arguments array
When writing functions, you need to understand that the function signature consists of the function name, parameters, and scope. In C# programming against the SharePoint server-side API, the calling code should match the function signature by passing in parameters that are typed appropriately. Furthermore, an error is thrown when the calling code does not match the function signature. In JavaScript, however, no error is thrown when the list of parameters passed to a function does not match the function signature. Instead, all parameters are available within a function through the arguments array. Consider the following JavaScript function:
function Add(){
    var sum = 0;
    for (var i=0; i<arguments.length; i++) {
        sum += arguments[i];
    }
    return sum;
}
The Add function definition does not include any parameters. Instead, the function looks through the arguments array and simply adds together the values contained within it. Because of this, the following calls to the Add function will all succeed:
var sum1 = Add();
var sum2 = Add(7);
var sum3 = Add(7,11);
var sum4 = Add(7,11,21,36);
Functions in JavaScript are actually objects. As such, they can be assigned to a variable. The variable referencing the function can then be invoked as if it were the name of the function. A function can also be defined without a name, making it an anonymous function. The following code shows an example of an anonymous function assigned to a variable named talk and then invoked:
var talk = function() {
    alert("hello there!");
};
talk();Because anonymous functions can be assigned to a variable, they can also be returned from other functions. Furthermore, the local variables defined within the containing function are available through the returned anonymous function. This concept is called a closure. Consider the following code that returns an anonymous function from a containing named function:
function echo (shoutText) {
    var echoText = shoutText + " " + shoutText;
    var echoReturn = function() { alert(echoText); };
    return echoReturn;
}
Because the return value from the named function is an anonymous function, the code that follows can be used to invoke the returned function. When the returned function is invoked, the browser displays the text “Hello! Hello!”.
echo("Hello!")();What is interesting in this example is the fact that the anonymous function is using the local variable echoText within its body, and the local variable is available even after the function returns. This is possible because the returned value is essentially a pointer to the anonymous function defined within the named function, which means that the local variables do not go out of scope after the named function completes. This is the essence of a closure in JavaScript.
At first glance, closures might appear to be more of a curiosity than a useful construct. However, closures are essential to the process of creating encapsulated JavaScript that is maintainable. Consider the following code:
function person (name) {
    var talk = function() { alert("My name is " + name); };
    return {
        speak:talk
    };
}
In the preceding example, an anonymous function is assigned to the local variable talk. The return value of the function is an object that has a key speak, which references the value talk. By using this type of closure, the function can be invoked by using method syntax, which returns the message “My name is Brian Cox”.
person("Brian Cox").speak();Notice how the code that invokes the function appears almost as if it is object-oriented. Even though JavaScript is clearly not object-oriented, by using closures, you can create functions that look and feel more familiar to C# developers and significantly improve maintainability. This concept results in several development patterns that are investigated in the section Creating custom libraries.
A JavaScript object is really just an unordered collection of key-value pairs. Objects can be created with the key-value pairs defined at the moment they are created. The keys are then used to access the values. The following code shows a simple customer object with a name property defined:
customer = {Name: "Brian Cox"};
alert("My name is " + customer["Name"]);
Every JavaScript object is based on a prototype, which is an object that supports the inheritance of its properties. With prototypes, you can define the structure of an object and then use that structure to create new object instances. Example 2-1 shows an example of defining a prototype and creating an object from it.
Example 2-1. Creating an object from prototypes
var human = Object.create(null);

Object.defineProperty(human, "name",
                      {value: "undefined",
                      writable: true,
                      enumerable: true,
                      configurable: true}
                     );

var customer = Object.create(human);

Object.defineProperty(customer, "title",
                      {value: "undefined",
                      writable: true,
                      enumerable: true,
                      configurable: true}
                     );

customer["name"] = "Brian Cox";
customer["title"] = "Developer";
alert("My name is " + customer["name"]);
alert("My title is " + customer["title"]);
In Example 2-1, a null human prototype is created and then a single name property is defined. The human prototype is then used to create an instance called customer. The customer prototype is then modified to contain a title property. If you call a property on an object but the property does not exist, JavaScript will look for the property by following the prototype chain up the inheritance tree. In this case, the name property of the customer is defined in the human prototype.
Using prototypes is very efficient when you are creating large numbers of objects because the functions do not need to be created for each instance. This behavior results in development patterns that are presented in the next section.
Even though the function-based nature of JavaScript makes it deceptively easy to get started, most developers who are new to the language simply write global functions directly in the web page. This practice, however, is seriously flawed because naming conflicts will inevitably arise between functions in libraries. Furthermore, writing reams of functions in the global namespace is simply unmaintainable. This section examines several approaches for creating custom libraries that are efficient and maintainable.
The singleton pattern creates a single instance of an object that encapsulates code within it. The singleton pattern is a straightforward implementation of an object designed to encapsulate code and keep it out of the global namespace. As an example, consider the following code that sets up a custom namespace and then defines a singleton:
"use strict";

var Wingtip = window.Wingtip || {};
Wingtip.Customer = {

    name: "Brian Cox",
    speak: function() { alert("My name is " + this.name); }

};
Within the Customer object, each member is added by declaring a publicly accessible key, followed by the definition of a function or object as the value. Note the use of the this keyword within the speak function to reference the name member object. Calling code might interact with the publically accessible members as shown in the following code.
Wingtip.Customer.speak();
The singleton pattern does a nice job of encapsulating code into the Customer object outside of the global namespace. Additionally, the calling code is straightforward, readable, and maintainable. The entire Customer definition could subsequently be packaged into a separate file (for example, wingtip.customer.js) and reused across several apps. The obvious disadvantage of this pattern is that you can only have one customer. In a typical SharePoint app, you are going to need to create many customer instances.
The module pattern and its variants use a function instead of an object as the basis for encapsulation. The advantage of the module pattern is that it can support private members, public members, and multiple instances; the exact support is based on the pattern variant that you use.
The standard module pattern uses a self-invoking function as the container. The standard module pattern can be regarded as an improved version of the singleton pattern because it still only supports one instance. Example 2-2 shows an example of the module pattern.
Example 2-2. The module pattern
"use strict";

var Wingtip = window.Wingtip || {};
Wingtip.Customer = function () {

    //private members
    var name = "Brian Cox",
        talk = function() {alert("My name is " + name);};

    //public interface
    return {
        fullname: name,
        speak: talk
    }

}();
In Example 2-2, notice that the function definition is followed by a set of parentheses. It is these parentheses that make the function self-invoking. The return value is an object whose key-value pairs reference the private members, which effectively creates a public interface for the library. The following code shows how the module is called:
alert(Wingtip.Customer.fullname);
Wingtip.Customer.speak();
Note that the return value doesn’t have to actually provide a key-value pair for every one of the private members. When the return value reveals only a subset of the members, the pattern is said to be a variant of the module pattern known as the revealing module pattern. The revealing module pattern allows for the definition of private members that are inaccessible through the public interface. Example 2-3 shows an example that utilizes get and set functions to access the name member.
Example 2-3. The revealing module pattern
"use strict";

var Wingtip = window.Wingtip || {};
Wingtip.Customer = function () {

    //private members
    var name,
        setname = function(n) { name = n; },
        getname = function() { return name; },
        talk = function() {alert("My name is " + name);};

    //public interface
    return {
        set_name: setname,
        get_name: getname,
        speak: talk
    }

}();
If the parentheses are removed from the function, it is no longer self-invoking. To make use of the module, you must create an instance referenced by a new variable. Using this variant of the module pattern, you can create multiple customer instances for use, which should feel very familiar to C# developers. The following code shows how to create an instance if the module were not self-invoking:
var customer1 = new Wingtip.Customer();
customer1.set_name("Brian Cox");
customer1.speak();Unlike previous patterns, the prototype pattern does not rely on closures to achieve its functionality. Instead, it relies on the inheritance of the prototype chain. The prototype provides a means of defining members in a single place for use by many instances. Every object in JavaScript has a prototype property with which you can expand to include new members. This sets up a very interesting pattern that you can utilize to define a prototype that can be used to create instances later. If you’re a C# developer, this feels a lot like defining a class from which instances are created. The following code shows an example of the prototype pattern:
"use strict";

var Wingtip = window.Wingtip || {};
Wingtip.Customer = function (n) {
    this.name = n;
};

Wingtip.Customer.prototype.speak = function() {
    alert("My name is " + this.name);
}
The prototype pattern begins with the definition of a function. This function often accepts initialization parameters, which are stored in variables defined within the prototype by using the this keyword. The initial function definition acts as the constructor for new instances, which means that the variables defined within are also defined for each instance as part of the prototype.
The prototype associated with a function can easily be extended by referencing the prototype property and adding a new member. In the example, a speak function is added to the prototype. As an alternative, you can also define the prototype as an object containing many functions, as shown in the following code:
"use strict";

var Wingtip = window.Wingtip || {};
Wingtip.Customer = function (n) {
    this.name = n
};
Wingtip.Customer.prototype = {
    get_name: function() { return this.name; },
    set_name: function(n) { this.name = n; },
    speak: function() { alert("My name is " + this.name); }
};
The prototype pattern can also be combined with the module pattern by simply defining a self-invoking function in the prototype. Additionally, defining members separately is not required; you could simply define all members in the constructor as shown in the code that follows. The bottom line is that hybrid patterns are possible by combining several concepts together.
"use strict";

var Wingtip = window.Wingtip || {};
Wingtip.Customer = function (n) {
    this.name = n;
    this.speak = function() { alert("My name is " + this.name); };
};
Once the prototype is defined, you can create instances by using the new keyword. Each instance inherits the definition of the function prototype. The code that follows shows how to create an instance and invoke a function. The resulting code has a decidedly object-oriented feel that should make C# programmers comfortable.
var customer1 = new Wingtip.Customer("Brian Cox");
customer1.speak();In the same way that developers can build and reuse their own JavaScript libraries, third parties have created JavaScript libraries that can simply be referenced and used in app development. Although there are many third-party libraries available on the Internet, one library, jQuery, is so popular that it has almost become synonymous with JavaScript itself.
The reason for the popularity of jQuery is that it does two very important things extremely well: it makes it easy to select elements from the document object model (DOM) and then perform operations on the selected elements. jQuery is so important that Microsoft has baked it into the app project template in Microsoft Visual Studio 2012. Therefore, SharePoint app developers must understand how to use the jQuery library. The following sections present a brief introduction to jQuery from the perspective of a SharePoint app developer. Readers who want complete coverage of the library should visit the jQuery website at www.jquery.com.
To include any JavaScript library in an app, it must be referenced by using a script tag. The script tag refers to the location of the library so that it can be downloaded. In the Visual Studio app project template, the jQuery library is included as a file and referenced in the Default.aspx page, as shown in the following code:
<script type="text/javascript" src="../Scripts/jquery-1.6.2.min.js"></script>
Along with directly hosting the jQuery library in your app, you can also choose to use a content delivery network (CDN). A CDN hosts the jQuery library in the cloud so that it is always available. Referencing a CDN can improve performance of public-facing apps because the library is downloaded in parallel and cached. The same version of the library can then be used across several different apps. The following code shows how to reference the Microsoft CDN for jQuery:
<script src="http://ajax.aspnetcdn.com/ajax/jquery/jquery-1.8.0.min.js" type="text/java
script">
</script>
The jQuery library is encapsulated in a single function named jQuery, which is known as the global function. Using the global function, you can easily select elements from the DOM, which is fundamental to any JavaScript solution. To select DOM elements, the global function is invoked and selector syntax is passed. The following code shows the traditional method of selecting elements in JavaScript by using the getElementById method, contrasted with the jQuery approach:
var elem1 = document.getElementById("displayDiv");
var elem2 = jQuery("#displayDiv");
In the preceding code, the jQuery selector syntax uses the hash sign to indicate that the selector corresponds to the ID of the desired element. You can simplify this code even further because the jQuery library uses the $ symbol as an alias for the global function. Therefore, the following code is equivalent:
var elem1 = document.getElementById("displayDiv");
var elem2 = $("#displayDiv");At first, it might seem that selecting DOM elements by using jQuery is not that exciting. The power of jQuery, however, lies in the fact that the selector syntax is identical to that used in cascading style sheets (CSS). This means that you can use a rich, familiar selector syntax to reference any part of the DOM, which becomes a powerful and efficient way to manipulate the DOM elements. Table 2-2 shows common selection operations and how to accomplish them in jQuery.
Table 2-2. jQuery selector syntax
Once you understand the common selection operations, you can move ahead to combine them to create more sophisticated selectors. The jQuery library also supports a number of extensions that provide yet more capabilities. A complete description of supported selectors is available on the jQuery website at http://api.jquery.com/category/selectors/.
Once you have selected DOM elements, you will want to manipulate them. This is where jQuery methods come into play. The jQuery library has a tremendous number of methods that perform all kinds of useful DOM manipulations. These manipulations are always performed on the collection of elements returned from the jQuery global function. Table 2-3 shows some commonly used jQuery methods.
Table 2-3. Common jQuery methods
jQuery supports many methods for manipulating DOM elements beyond what is shown in Table 2-3. The complete reference of supported methods is available at http://api.jquery.com/category/manipulation. Furthermore, jQuery methods can be chained together so that you can perform several operations in a single line of code. The following code changes the inner HTML of an element, adds a class, and then displays the result, all in a single line:
$("displayDiv").html("<p>Hello</p>").addClass("emphasis").show();Along with selecting and manipulating elements, you can use jQuery to attach event handlers to DOM elements. By handling events in jQuery, you can keep your JavaScript code out of the webpage and contained within custom libraries. This approach makes your code much more maintainable and isolated than using a more traditional approach to bind events to DOM elements.
The basic approach for binding events is to select the target DOM element by using the global function and then bind the event. The code to run in response to the event can be defined directly in the binding as an anonymous function. The following code shows a simple example of binding the click event of all paragraph elements:
$("p").click( function (e) {
    alert($(e.target).text());
});
Notice in the preceding code that the function handling the click event is defined in line with the binding. Additionally, notice how the element that caused the event can be determined by selecting e.target within the function. Complete documentation for the events supported by the jQuery library is available at http://api.jquery.com/category/events.
Of all the events available in jQuery, the most important is the ready event of the document object. This event fires when the DOM is ready for selection and manipulation. The SharePoint-hosted app project template in Visual Studio 2012 automatically adds this event handler into the Apps.js library of the app to act as the starting point. This is a pattern that you should follow in your apps, as well.
SharePoint 2010 introduced the CSOM as a way to program against a Windows Communication Foundation (WCF) endpoint in SharePoint by using a style that mimicked server-side API development. Prior to the introduction of CSOM, SharePoint developers had only a limited set of web services available for use from client-side code. With the introduction of CSOM, developers had a way to access a significant portion of core SharePoint functionality from C# (called the “managed” client object model), JavaScript, and Silverlight. Although the Silverlight CSOM is still available in SharePoint 2013, its primary role is for creating mobile apps, so this chapter focuses on the managed and JavaScript implementations of CSOM.
The managed and JavaScript client object models are maintained in separate libraries, which are located under the SharePoint system directory. The managed client object model is contained in the assemblies Microsoft.SharePoint.Client.dll and Microsoft.SharePoint.ClientRuntime.dll, which can be found in the ISAPI folder. The JavaScript client object model is contained in the library sp.js, which is located in the LAYOUTS folder. Although each of the models provides a different programming interface, each interacts with SharePoint through a WCF service named Client.svc, which is located in the ISAPI directory. Figure 2-1 shows a basic architectural diagram for the client object models.
In SharePoint 2013, CSOM has been greatly expanded to include functionality from workloads outside of SharePoint Foundation. Using CSOM, app developers now have client-side access to Enterprise Search, Business Connectivity Services, Managed Metadata, Social, and much more. This additional functionality is made available through separate assemblies and libraries that can be referenced in your apps.
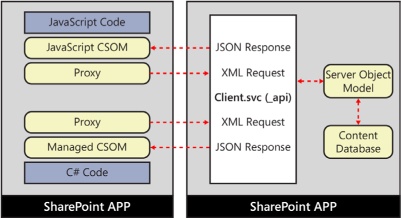
Figure 2-1. The client object model provides a programmatic interface to make web service calls against SharePoint by passing in an XML request and receiving a JSON response.
Each of the object models presents an object interface in front of a service proxy. Developers write client-side code using the object model, but the operations are batched and sent as a single XML request to the Client.svc service. When the XML request is received, the Client.svc service makes calls to the server-side object model on behalf of the client. The results of the server-side calls are then sent back to the calling client in the form of a JavaScript Object Notation (JSON) object.
Much like the standard code you write against the server-side object model, CSOM requires a starting point in the form of a context object. The context object provides an entry point into the associated API that can be used to gain access to other objects. Once you have access to the objects, you can interact with the scalar properties of the object freely (for example, Name, Title, Url, and so on). Example 2-4 shows how to create a context in each of the models and return an object representing a site collection. After the site collection object is returned, the Url property is examined.
Example 2-4. Creating contexts
//Managed Client Object Model
string appWebUrl = Page.Request["SPAppWebUrl"];
using (ClientContext ctx = new ClientContext(appWebUrl))
{
    Site siteCollection = ctx.Site;
    ctx.Load(siteCollection);
    ctx.ExecuteQuery();
    string url = siteCollection.Url;
}

//JavaScript Client Object Model
var siteCollection;
var ctx = new SP.ClientContext.get_current();
siteCollection = ctx.get_site();
ctx.load(site);
ctx.executeQueryAsync(success, failure);

function success() {
    string url = siteCollection.get_url();
}
function failure() {
    alert("Failure!");
}
The ClientContext class in the managed object model inherits from the ClientContextRuntime class. Using the ClientContext class, you can get a valid runtime context by passing in the URL of a site. In Example 2-4, the URL of the app web is retrieved from the SPAppWebUrl query string parameter. This URL is always available to the remote web and can be used to create a client context for scenarios in which the SharePoint app is using the “internal” security principal. Scenarios that utilize OAuth tokens for app authentication are covered in Chapter 3.
The SP.ClientContext object in the JavaScript client object model inherits from the SP.ClientContext Runtime object and provides equivalent functionality to the ClientContext class found in the managed client object model. Like the managed model, you can get a runtime context in the JavaScript model by using the SP.ClientContext class and passing a URL. In Example 2-4, the context is created by using the get_current method, which returns a client context for the app web.
The ClientContextRuntime class used by the managed client defines two methods for loading objects: Load and LoadQuery. You use these load methods to designate objects that should be retrieved from the server. The Load method specifies an object or collection to retrieve, whereas you use the Load Query method to return collections of objects by using a Language-Integrated Query (LINQ) request.
Executing the Load or LoadQuery method does not cause the client to communicate with the server. Instead, it adds the load operation to a batch that will be executed on the server. In fact, you can execute multiple load methods (as well as other operations) before calling the server. Each operation is batched waiting for your code to initiate communication with server. To execute the batched operations, your code must call the ExecuteQuery method in managed code or the Execute QueryAsync method in JavaScript. The ExecuteQuery method creates an XML request and passes it to the Client.svc service synchronously. The ExecuteQueryAsync method sends the request asynchronously. Designated success and failure callback methods receive notification when the asynchronous batch operation is complete.
The sample code in Example 2-4 uses the Load method to request an object representing the current site collection. After an object is returned, you can generally access any of the scalar properties associated with the object. In cases for which you do not want to return all of the scalar properties for a given object, you can designate the properties to return. In the managed object, properties are designated by providing a series of lambda expressions. In the JavaScript object model, properties are designated by name. This technique helps to minimize the amount of data sent between the client and server. The following code shows how to request only the Title and ServerRelativeUrl properties for a site collection object:
//Managed CSOM references properties via lambda expressions
ctx.Load(site, s=>s.Title, s=>s.ServerRelativeUrl);

//JavaScript CSOM references properties by name
ctx.Load(site, "Title", "ServerRelativeUrl");
Because the managed client object model is supported by IntelliSense, is checked at compile time, and functions synchronously, many developers choose to develop apps that utilize remote webs and the managed CSOM to communicate with SharePoint. Using the managed client object model is a simple matter of setting a reference to the assemblies Microsoft.SharePoint.Client.dll and Microsoft.SharePoint.ClientRuntime.dll, adding a using statement for the Microsoft.SharePoint.Client namespace, and writing code. This section details how to perform basic operations with the managed client object model.
When working with the client object models, you will quite often be interested in returning collections of items such as all the lists in a site or all of the items in a list. Collections of items can be returned by using either the Load or LoadQuery methods. When specifying the items of a collection to return, you can use the Load method along with a LINQ query formatted by using method syntax. Additionally, you can use the LoadQuery method with a LINQ query formatted by using query syntax. Example 2-5 shows how to return all of the list titles in a site for which the Title is not NULL.
Example 2-5. Returning collections by using LINQ
string appWebUrl = Page.Request["SPAppWebUrl"];
using (ClientContext ctx = new ClientContext(appWebUrl))
{
    //Method Syntax
    ctx.Load(ctx.Web,
            w => w.Lists.Include(l => l.Title).Where(l => l.Title != null));
    ctx.ExecuteQuery();

    foreach (List list in ctx.Web.Lists)
    {
        Response.Write(list.Title);
    }

    //Query Syntax
    var q = from l in ctx.Web.Lists
            where l.Title != null
            select l;

    var r = ctx.LoadQuery(q);
    ctx.ExecuteQuery();

    Response.Write("<ul>");
    foreach (var i in r)
    {
        Response.Write("<li>");
        Response.Write(i.Title);
        Response.Write("</li>");
    }
    Response.Write("</ul>");
}Because of the disconnected nature of the client object model, error handling is especially important. You might see errors thrown when you attempt to access an object or value that has not yet been retrieved from the server. You might also see errors if you create a query that is not meaningful in the current context, such as trying to retrieve list items before loading the associated list. Finally, you must deal with errors that happen in the middle of batch operations on the server. All of these situations mean that you must pay special attention to error handling in your CSOM solutions.
If you attempt to access a scalar property that has not been retrieved, you will receive a Property OrFieldNotInitializedException error. If you make a request to the server that is deemed invalid, you will receive a ClientRequestException error. If your LINQ query is invalid, you will receive an InvalidQueryExpressionException error. General errors thrown on the server during execution of a request will result in a ServerException error. Example 2-6 shows code that generates the various runtime errors you might see when working with the managed client object model.
Example 2-6. Handling request errors
string appWebUrl = Page.Request["SPAppWebUrl"];
using (ClientContext ctx = new ClientContext(appWebUrl))
{
    try
    {
        //Fails because the object was not initialized
        //Requires Load() and ExecuteQuery()
        Response.Write(ctx.Web.Title);
    }
    catch (PropertyOrFieldNotInitializedException x)
    {
        Response.Write("<p>Property not initialized. " + x.Message + "</p>");
    }

    try
    {
        //Fails because Skip() and Take() are meaningless
        //in the context of a list collection
        ctx.Load(ctx.Web, w => w.Lists.Skip(5).Take(10));
        ctx.ExecuteQuery();
    }
    catch (InvalidQueryExpressionException x)
    {
        Response.Write("<p>Invalid LINQ query. " + x.Message + "</p>");
    }

    try
    {
        //Fails because InvalidObject is a meaningless object
        InvalidObject o = new InvalidObject(ctx, null);
        ctx.Load(o);
        ctx.ExecuteQuery();
    }
    catch (ClientRequestException x)
    {
        Response.Write("<p>Bad request. " + x.Message + "</p>");
    }

    try
    {
        //Fails because the list does not exist
        //The failure occurs on the server during processing
        ctx.Load(ctx.Web,w=>w.Lists);
        List myList = ctx.Web.Lists.GetByTitle("Non-Existent List");
        myList.Description = "A new description";
        myList.Update();
        ctx.ExecuteQuery();

    }
    catch (ServerException x)
    {
        Response.Write("<p>Exception on server. " + x.Message + "</p>");
    }
}
After looking over the errors that can occur during operations, the ServerException stands out as noteworthy. This is because the ServerException is thrown when an operation fails on the server. Furthermore, the failing operation could be in the middle of a large batch of operations, which can lead to unpredictable behavior. The fundamental challenge with the batch model embodied in the client object model is that you need a way to respond to errors that happen on the server so that the remainder of the batch operations can finish processing. The ServerException error is thrown on the client after the batch has failed, which gives you no opportunity to correct the error.
Fortunately, CSOM provides a mechanism for sending error-handling instructions to the server along with the batch operations. You can use the ExceptionHandlingScope object to define a try-catch-finally block that embodies server-side operations. If errors occur during processing on the server, it is handled on the server by the code embodied in the ExceptionHandlingScope object. Example 2-7 shows how exception-handling scopes are implemented in the managed client object model.
Example 2-7. Handling errors in a scope
string appWebUrl = Page.Request["SPAppWebUrl"];
using (ClientContext ctx = new ClientContext(appWebUrl))
{
    //Set up error handling
    ExceptionHandlingScope xScope = new ExceptionHandlingScope(ctx);

    using (xScope.StartScope())
    {
        using (xScope.StartTry())
        {
            //Try to update the description of a list named "My List"
            List myList = ctx.Web.Lists.GetByTitle("My List");
            myList.Description = "A new description";
            myList.Update();
        }

        using (xScope.StartCatch())
        {
            //Fails if the list "My List" does not exist
            //So, we'll create a new list
            ListCreationInformation listCI = new ListCreationInformation();
            listCI.Title = "My List";
            listCI.TemplateType = (int)ListTemplateType.GenericList;
            listCI.QuickLaunchOption = Microsoft.SharePoint.Client.
                                         QuickLaunchOptions.On;
            List list = ctx.Web.Lists.Add(listCI);
        }
        using (xScope.StartFinally())
        {
            //Try to update the list now if it failed originally
            List myList = ctx.Web.Lists.GetByTitle("My List");
            if(myList.Description.Length==0)
            {
                myList.Description = "A new description";
                myList.Update();
            }
        }
    }

    //Execute the entire try-catch as a batch!
    ctx.ExecuteQuery();
}
The most important aspect of the code shown in Example 2-7 is that the ExecuteQuery method is called only once and it appears after the code in the exception handling scope. This means that all of the operations defined in the exception handling scope are sent to the server in a single batch. Initially, the server tries to update the description of the target list. If this operation fails, the exception handling scope assumes it is because the list does not exist. Therefore, the exception-handling scope creates a new list with the correct name. Finally, the description is updated for the newly created list.
The exception-handling scope provides a powerful way for you to deal with errors that occur during batch processing, but it does require some additional planning. For example, the code in Example 2-7 assumes that any failure is the result of a nonexistent list. However, there are other reasons why the operation could fail, such as the end user not having the rights to update the list. Fortunately, the ExceptionHandlingScope provides properties that help you to understand exactly what went wrong on the server. The ServerErrorCode, ServerErrorValue, and ServerStackTrace properties can all be used to analyze the server error and make a decision about how to proceed.
In the conditional scope shown in Example 2-7, a new list is created if the user has the appropriate permissions. Creating new lists and items using the managed client object model is done with the creation information objects. Using the ListCreationInformation and ListItemCreationInformation objects, you can define all of the necessary values for a list or item and then send that data with the batch back to the server. Example 2-8 shows how to use these objects to create a new list and list item.
Example 2-8. Creating a list and list item
string appWebUrl = Page.Request["SPAppWebUrl"];
using (ClientContext ctx = new ClientContext(appWebUrl))
{
    //Create a new list
    ListCreationInformation listCI = new ListCreationInformation();
    listCI.Title = "My List";
    listCI.Description += "A list for use with the Client OM";
    listCI.TemplateType = (int)ListTemplateType.GenericList;
    listCI.QuickLaunchOption = Microsoft.SharePoint.Client.QuickLaunchOptions.On;
    List list = ctx.Web.Lists.Add(listCI);
    ctx.ExecuteQuery();

    //Create a new list item
    ListItemCreationInformation listItemCI = new ListItemCreationInformation();
    ListItem item = list.AddItem(listItemCI);
    item["Title"] = "New Item";
    item.Update();
    ctx.ExecuteQuery();
}
If you would like to return items from a list by using CSOM, you must write Collaborative Application Markup Language (CAML) queries. CAML queries are created for the managed client object model via the CamlQuery object. This object has a ViewXml property that accepts a CAML query designating the items to return. Example 2-9 demonstrates running a CAML query against a list.
Example 2-9. Using CAML to return list items
string appWebUrl = Page.Request["SPAppWebUrl"];
using (ClientContext ctx = new ClientContext(appWebUrl))
{
    //Read the Site, List, and Items
    ctx.Load(ctx.Web);

    List myList = ctx.Web.Lists.GetByTitle("My List");
    ctx.Load(myList);

    StringBuilder caml = new StringBuilder();
    caml.Append("<View><Query>");
    caml.Append("<Where><Eq><FieldRef Name='Title'/>");
    caml.Append("<Value Type='Text'>New Item</Value></Eq></Where>");
    caml.Append("</Query><RowLimit>100</RowLimit></View>");

    CamlQuery query = new CamlQuery();
    query.ViewXml = caml.ToString();
    ListItemCollection myItems = myList.GetItems(query);
    ctx.Load(myItems);

    ctx.ExecuteQuery();
    Response.Write("<p>Site: " + ctx.Web.Title + "</p>");
    Response.Write("<p>List: " + myList.Title + "</p>");
    Response.Write("<p>Item Count: " + myItems.Count.ToString() + "</p>");
}
Updating through the managed client object model is straightforward. In most cases, you will simply set the value of a property and then call the appropriate Update method. Example 2-10 presents samples of updating a site, list, and list item.
Example 2-10. Update operations
//Update the Site, List, and Items
ctx.Web.Description = "Client OM samples";
ctx.Web.Update();

myList.Description = "Client OM data";
myList.Update();

foreach (ListItem myItem in myItems)
{
    myItem["Title"] = "Updated";
    myItem.Update();
}

ctx.ExecuteQuery();
Response.Write("<p>Site: " + ctx.Web.Description + "</p>");
Response.Write("<p>List: " + myList.Description + "</p>");
Response.Write("<p>Item Count: " + myItems.Count.ToString()+ "</p>");
Deleting objects with the managed client object model involves calling the DeleteObject method. This method is the same across most objects that can be deleted. The following code shows how to delete the list created earlier:
myList.DeleteObject();
ctx.ExecuteQuery();
Along with lists, you’ll also want to work with libraries. Document libraries are handled in the managed client object model similarly to lists. Of course, the major difference is handling documents. Fortunately, uploading documents to libraries by using the managed client object model is very similar to using the server object model; you must upload the document using the URL of the folder in which you want to store the document. Example 2-11 shows a full set of create, read, update, and delete operations around a file and a document library.
Example 2-11. Working with document libraries
string appWebUrl = Page.Request["SPAppWebUrl"];
using (ClientContext ctx = new ClientContext(appWebUrl))
{
    //Get site
    Web site = ctx.Web;
    ctx.Load(site);
    ctx.ExecuteQuery();

    //Create a new library
    ListCreationInformation listCI = new ListCreationInformation();
    listCI.Title = "My Docs";
    listCI.Description = "A library for use with Client OM";
    listCI.TemplateType = (int)ListTemplateType.DocumentLibrary;
    listCI.QuickLaunchOption = Microsoft.SharePoint.Client.QuickLaunchOptions.On;
    List list =site.Lists.Add(listCI);
    ctx.ExecuteQuery();

    //Create a document
    MemoryStream m = new MemoryStream();
    StreamWriter w = new StreamWriter(m);
    w.Write("Some content for the document.");
    w.Flush();

    //Add it to the library
    FileCreationInformation fileCI = new FileCreationInformation();
    fileCI.Content = m.ToArray();
    fileCI.Overwrite = true;
    fileCI.Url = appWebAppUrl + "/My%20Docs/MyFile.txt";
    Folder rootFolder = site.GetFolderByServerRelativeUrl("My%20Docs");
    ctx.Load(rootFolder);
    Microsoft.SharePoint.Client.File newFile = rootFolder.Files.Add(fileCI);
    ctx.ExecuteQuery();

    //Edit Properties
    ListItem newItem = newFile.ListItemAllFields;
    ctx.Load(newItem);
    newItem["Title"] = "My new file";
    newItem.Update();
    ctx.ExecuteQuery();

    //Delete file
    newItem.DeleteObject();
    ctx.ExecuteQuery();
}The JavaScript client object model is really only a viable choice in SharePoint-hosted apps for which C# code is not allowed and the pages have an associated SharePoint context. The SharePoint 2013 app project template for SharePoint-hosted apps provides some initial template code to implement a welcome message. This code is a good place to see the fundamentals of CSOM in action. Example 2-12 comes from the app project template for a SharePoint-hosted app.
Example 2-12. Visual Studio 2012 app project template code
var context;
var web;
var user;

$(document).ready(function () {
    context = SP.ClientContext.get_current();
    web = context.get_web();
    getUserName();

});

function getUserName() {
    user = web.get_currentUser();
    context.load(user);
    context.executeQueryAsync(onGetUserNameSuccess, onGetUserNameFail);
}

function onGetUserNameSuccess() {
    $('#message').text('Hello ' + user.get_title());
}

function onGetUserNameFail(sender, args) {
    alert('Failed to get user name. Error:' + args.get_message());
}
The code in Example 2-12 creates three variables in the global namespace named context, web, and user to reference objects needed globally. The context variable is used to setup the SharePoint context on the client side so that calls can be made back to the Client.svc endpoint; the web variable is used to reference the app web itself; and the user variable references the current app user.
Note
This template code violates the best practice of encapsulating code in a separate namespace and using strict JavaScript. Therefore, it is best to simply delete all of the template code when creating your own apps.
To populate the variables, a call is made to the load method to specify that the scalar properties should be loaded, and then a call to the executeQueryAsync method is made to make an asynchronous call to the Client.svc endpoint. In the app project code, the round trip populates not only information about the app web, but also information about the current user. Combining operations in this way makes CSOM programming more efficient. Two callback functions, which the template code names onGetUserNameSuccess and onGetUserNameFail, are passed. The first callback function named is called if the round trip completes without errors. The second callback function is called if errors occur.
The JavaScript client object model supports both a load and loadQuery method. The loadQuery method can be used to store a collection into a variable other than the one referencing the desired collection. In either method, you can use query strings to request that collections be included in the returned results. Example 2-13 illustrates how to use the JavaScript client object model to return all of the list titles in the app web along with the field names and descriptions for each list.
Example 2-13. Returning collections by using JavaScript
"use strict";

var Wingtip = window.Wingtip || {}

Wingtip.Collections = function () {

    //private members
    var site,
        listCollection,

        getListCollection = function () {
            var ctx = new SP.ClientContext.get_current();
            site = ctx.get_web();
            ctx.load(site);
            listCollection = site.get_lists();
            ctx.load(listCollection,
            'Include(Title,Id,Fields.Include(Title,Description))'),
            ctx.executeQueryAsync(success, failure);
        },

        success = function () {

            var html = [];

            //List Information
            html.push("<ul>");
            var listEnumerator = listCollection.getEnumerator();
            while (listEnumerator.moveNext()) {

                //List Title
                html.push("<li>");
                html.push(listEnumerator.get_current().get_title());
                html.push("<ul>");

                //Field Names
                var fieldEnumerator =
                    listEnumerator.get_current().get_fields().getEnumerator();
                while (fieldEnumerator.moveNext()) {
                    html.push("<li>");
                    html.push(fieldEnumerator.get_current().get_title());
                    html.push("</li>");
                }

                html.push("</ul></li>");
            }
            html.push("</ul>");

            //Show results
            $("#displayDiv").html(html.join(''));
        },

        failure = function (sender, args) {
            alert(args.get_message());
        }

    //public interface
    return {
        execute: getListCollection
    }
}();

$(document).ready(function () {
    Wingtip.Collections.execute();
});Just like the managed client object model, the JavaScript client object model must deal with the potential for server-side errors during the round trip. Because the JavaScript client object model can only make asynchronous calls, the basic error-handling pattern involves the definition of success and failure callback methods. However, you can also use error scopes in your JavaScript. Example 2-14 shows how to set up error scopes in JavaScript. The sample performs the same functionality as presented in Example 2-7, wherein managed code was used.
Example 2-14. JavaScript CSOM error scopes
"use strict";

var Wingtip = window.Wingtip || {}

Wingtip.ErrorScope = function () {

    //private members
    var site,

    scope = function () {

        //Get Context
        var ctx = new SP.ClientContext.get_current();

        //Start Exception-Handling Scope
        var e = new SP.ExceptionHandlingScope(ctx);
        var s = e.startScope();

        //try
        var t = e.startTry();

        var list1 = ctx.get_web().get_lists().getByTitle("My List");
        ctx.load(list1);
        list1.set_description("A new description");
        list1.update();

        t.dispose();

        //catch
        var c = e.startCatch();

        var listCI = new SP.ListCreationInformation();

        listCI.set_title("My List");
        listCI.set_templateType(SP.ListTemplateType.announcements);
        listCI.set_quickLaunchOption(SP.QuickLaunchOptions.on);

        var list = ctx.get_web().get_lists().add(listCI);

        c.dispose();

        //finally
        var f = e.startFinally();

        var list2 = ctx.get_web().get_lists().getByTitle("My List");
        ctx.load(list2);
        list2.set_description("A new description");
        list2.update();

        f.dispose();

        //End Exception-Handling Scope
        s.dispose();

        //Execute
        ctx.executeQueryAsync(success, failure);

        },

    success = function () {
        alert("Success");
    },

    failure = function (sender, args) {
        alert(args.get_message());
    }

    //public interface
    return {
        execute: scope
    }
}();


$(document).ready(function () {
    Wingtip.ErrorScope.execute();
});
Creating, reading, updating, and deleting list items by using the JavaScript client object model is more complex than with the managed client object model. The additional complexity comes from not only the asynchronous calls, but also the need to properly encapsulate the JavaScript so that it’s separated from the global namespace. Example 2-15 shows the basic structure of a JavaScript library used to perform create, read, update, and delete (CRUD) operations on a contacts list contained in a SharePoint-hosted app.
Example 2-15. CSOM library structure
"use strict";

var Wingtip = window.Wingtip || {};
Wingtip.Contacts;
Wingtip.ContactList = function () {

    //private members
    createItem = function (lname, fname, wphone) {
    },
    readAll = function () {
    },
    readAllSuccess = function () {
    },
    updateItem = function (id, lname, fname, wphone) {
    },
    removeItem = function (id) {
    },
    success = function () {
        readAll();
    },
    error = function (sender, args) {
        alert(args.get_message());
    }

    //public interface
    return {
        createContact: createItem,
        updateContact: updateItem,
        deleteContact: removeItem
    }

}();

$(document).ready(function () {
    Wingtip.ContactList.createContact("Cox", "Brian", "555-555-5555");
    alert("Contact Created!");
    Wingtip.ContactList.updateContact(1, "Cox", "Brian", "111-111-1111");
    alert("Contact Updated!");
    Wingtip.ContactList.deleteContact(1);
    alert("Contact Deleted!");
});
Before examining the implementation details for the CRUD operations, take some time to study the structure of the library. Example 2-15 contains the definition of a namespace object and a self-invoking function, which should be familiar from other examples in this chapter. In this case, however, a new property named Wingtip.Contacts is also defined. This property is used to hold a reference to the list items between asynchronous calls to the SharePoint server. Within the self-invoking function, all of the CRUD operations are defined, but only the create, update, and delete functions are revealed through the public interface of the library. These functions are called from some example code contained in the ready event handler.
Creating new contacts is done in the createItem function. This function uses the SP.ListItemCreationInformation object to define a new list item. The first name, last name, and phone number are set on the new item, and it is added to the list. Note that in a contacts list, the “Title” field is actually the last name of the contact. Example 2-16 presents the code for adding a new item.
Example 2-16. Creating new items
createItem = function (lname, fname, wphone) {
    var ctx = new SP.ClientContext.get_current();
    var list = ctx.get_web().get_lists().getByTitle("Contacts");
    ctx.load(list);
    var listItemCreationInfo = new SP.ListItemCreationInformation();
    var newContact = list.addItem(listItemCreationInfo);
    newContact.set_item("Title", lname);
    newContact.set_item("FirstName", fname);
    newContact.set_item("WorkPhone", wphone);
    newContact.update();
    ctx.executeQueryAsync(success, error);
}
After each create, update, or delete operation, the list is read and redrawn. The readAll function reads every item in the list by using a CAML query and then creates an HTML table to hold the contacts. The HTML is rendered in a <div> via jQuery. Example 2-17 demonstrates how the list is read and drawn. Note the use of the Wingtip.Contacts property to reference the list data between asynchronous calls to the server.
Example 2-17. Rendering the list items
readAll = function () {
    var ctx = new SP.ClientContext.get_current();
    var query = "<View><Query><OrderBy><FieldRef Name='Title'/>" +
                "<FieldRef Name='FirstName'/></OrderBy></Query>" +
                "<ViewFields><FieldRef Name='ID'/><FieldRef Name='Title'/>" +
                "<FieldRef Name='FirstName'/><FieldRef Name='WorkPhone'/>
                   </ViewFields></View>";
    var camlQuery = new SP.CamlQuery();
    camlQuery.set_viewXml(query);
    var list = ctx.get_web().get_lists().getByTitle("Contacts");
    ctx.load(list);
    Wingtip.Contacts = list.getItems(camlQuery);
    ctx.load(Wingtip.Contacts, 'Include(ID,Title,FirstName,WorkPhone)'),
    ctx.executeQueryAsync(readAllSuccess, error);
},

readAllSuccess = function () {
    var html = [];
    html.push("<table><thead><tr><th>ID</th><th>First Name</th>");
    html.push("<th>Last Name</th><th>Title</th></tr></thead>");

    var listItemEnumerator = Wingtip.Contacts.getEnumerator();

    while (listItemEnumerator.moveNext()) {
        var listItem = listItemEnumerator.get_current();
        html.push("<tr><td>");
        html.push(listItem.get_item("ID"));
        html.push("</td><td>");
        html.push(listItem.get_item("FirstName"));
        html.push("</td><td>");
        html.push(listItem.get_item("Title"));
        html.push("</td><td>");
        html.push(listItem.get_item("WorkPhone"));
        html.push("</td><td>");
    }

    html.push("</table>");
    $('#displayDiv').html(html.join(''));
}
Updating list items is accomplished by using the updateItem function. This function retrieves the item to be updated by its ID in the list. The new values for the fields are applied to the list item and it is updated. After the roundtrip to the server, the table is redrawn with the new values for the list item visible. Example 2-18 shows the code for updating items.
Example 2-18. Updating list items
updateItem = function (id, lname, fname, wphone) {
    var ctx = new SP.ClientContext.get_current();
    var list = ctx.get_web().get_lists().getByTitle("Contacts");
    ctx.load(list);
    var listItem = list.getItemById(id);
    listItem.set_item("Title", lname);
    listItem.set_item("FirstName", fname);
    listItem.set_item("WorkPhone", wphone);
    listItem.update();
    ctx.executeQueryAsync(success, error);
}
Deleting list items is done by using the removeItem function. The function retrieves the item to delete by its ID. The DeleteObject method is then called to remove the designated item from the list. After the item is removed asynchronously, the table is redrawn with the remaining list items. Example 2-19 presents the code for deleting items.
If you are planning to create apps that are based primarily on JavaScript, you will be interested in the Representational State Transfer (REST) API. Making REST calls from JavaScript is considerably easier than making the equivalent CSOM calls. Furthermore, several libraries such as jQuery provide additional support for REST calls. All of this makes the REST API an attractive approach for app development.
Remote Procedure Call (RPC) is a software architecture that uses a generated client-side proxy to communicate with a remote web service. Simple Object Access Protocol (SOAP) is the protocol that is used along with the RPC architecture in classic SharePoint web services. When developers think about making RPCs to SharePoint, they most often think about calling into a SOAP web service to perform tasks, such as retrieve user profile information, run a search, or interact with a list.
REST is a software architecture that uses uniform resource identifiers (URI) to specify operations against a remote service. Open Data Protocol (OData) is the protocol that is used along with REST to access many cloud-based services. Although SharePoint developers are most familiar with the RPC/SOAP approach, the REST/OData approach has become important when developing cloud-based solutions.
REST-based (known more commonly as “RESTful”) solutions use standard HTTP GET, POST, PUT, and DELETE verbs to perform CRUD operations against a remote source. Support for the standard HTTP verbs provides easy cross-platform data access and is ideally suited for cloud-based apps. The OData protocol returns results in either the Atom Publishing Protocol (AtomPub) or JSON.
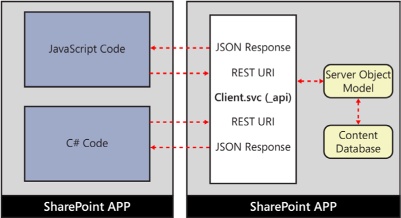
SharePoint 2010 introduced support for RESTful access to list data through the listdata.svc web service. In SharePoint 2013, the listdata.svc service is still available, but it should not be used for any new development. Instead, the client.svc service has been expanded to include significant support for RESTful operations. Nearly all of the APIs available through CSOM have a corresponding RESTful endpoint. Additionally, the client.svc endpoint can be reached through the alias _api, which makes forming appropriate URIs more natural. Figure 2-2 presents a basic architectural diagram of the SharePoint 2013 REST infrastructure.
The essential task required to use the REST capabilities in SharePoint 2013 is to create the correct URI. One of the nice things about REST is that you can enter URIs directly in the browser and immediately see the result of the HTTP GET operation. By using this approach, you can experiment with the URIs quite easily to ensure that they return the desired results. For a SharePoint site collection located at wingtip.com, Example 2-20 shows the returned XML from the URI http://wingtip.com/_api/site, which returns the site collection properties.
Example 2-20. Site collection properties
<?xml version="1.0" encoding="utf-8" ?>
<entry xml:base="http://wingtip.com/_api/" xmlns="http://www.w3.org/2005/Atom"
 xmlns:d="http://schemas.microsoft.com/ado/2007/08/dataservices"
 xmlns:m="http://schemas.microsoft.com/ado/2007/08/dataservices/metadata"
 xmlns:georss="http://www.georss.org/georss"
 xmlns:gml="http://www.opengis.net/gml">
  <id>http://wingtip.com/_api/site</id>
  <category term="SP.Site" scheme="http://schemas.microsoft.com/ado/2007/08/
     dataservices/scheme" />
  <link rel="edit" href="site" />
  <link rel="http://schemas.microsoft.com/ado/2007/08/dataservices/related/
     EventReceivers" type="application/atom+xml;type=feed"
     title="EventReceivers" href="site/EventReceivers" />
  <link rel="http://schemas.microsoft.com/ado/2007/08/dataservices/related/
     Features" type="application/atom+xml;type=feed" title="Features" href="site/
     Features" />

  <link rel="http://schemas.microsoft.com/ado/2007/08/dataservices/related/Owner"
     type="application/atom+xml;type=entry" title="Owner" href="site/Owner" />
  <link rel="http://schemas.microsoft.com/ado/2007/08/dataservices/related/
     RecycleBin" type="application/atom+xml;type=feed"
     title="RecycleBin" href="site/RecycleBin" />
  <link rel="http://schemas.microsoft.com/ado/2007/08/dataservices/related/
     RootWeb" type="application/atom+xml;type=entry" title="RootWeb" href="site/
     RootWeb" />
  <link rel="http://schemas.microsoft.com/ado/2007/08/dataservices/related/
     UserCustomActions" type="application/atom+xml;type=feed"
     title="UserCustomActions" href="site/UserCustomActions" />
  <title />
  <updated>2012-08-27T12:14:20Z</updated>
   <author>
    <name />
  </author>
   <content type="application/xml">
     <m:properties>
      <d:AllowDesigner m:type="Edm.Boolean">true</d:AllowDesigner>
      <d:AllowMasterPageEditing m:type="Edm.Boolean">true
        </d:AllowMasterPageEditing>
      <d:AllowRevertFromTemplate m:type="Edm.Boolean">true
        </d:AllowRevertFromTemplate>
      <d:AllowSelfServiceUpgrade m:type="Edm.Boolean">true
        </d:AllowSelfServiceUpgrade>
      <d:AllowSelfServiceUpgradeEvaluation
        m:type="Edm.Boolean">true</d:AllowSelfServiceUpgradeEvaluation>
      <d:CompatibilityLevel m:type="Edm.Int32">15</d:CompatibilityLevel>
      <d:Id m:type="Edm.Guid">eb53c264-14db-4989-a395-b93cbe8b178c</d:Id>
      <d:LockIssue m:null="true" />
      <d:MaxItemsPerThrottledOperation m:type="Edm.Int32">5000
        </d:MaxItemsPerThrottledOperation>
      <d:PrimaryUri>http://wingtip.com/</d:PrimaryUri>
      <d:ReadOnly m:type="Edm.Boolean">false</d:ReadOnly>
      <d:ServerRelativeUrl>/</d:ServerRelativeUrl>
      <d:ShowUrlStructure m:type="Edm.Boolean">true</d:ShowUrlStructure>
      <d:UIVersionConfigurationEnabled
        m:type="Edm.Boolean">false</d:UIVersionConfigurationEnabled>
      <d:UpgradeReminderDate m:type="Edm.DateTime">1899-12-30T00:00:00
        </d:UpgradeReminderDate>
      <d:Url>http://wingtip.com</d:Url>
    </m:properties>
  </content>
</entry>
The main entry point for RESTful URIs is through the _api endpoint, which is referenced through either the site collection or site. Using the site collection or site URI as the root establishes the context for the RESTful operation. The following code shows a typical entry point:
http://wingtip.com/_api
Following the root reference is the namespace, which refers to the workload that you want to reference, such as search or taxonomy. Table 2-4 shows some sample namespaces in URIs. If the functionality you are invoking resides in SharePoint foundation, no namespace is required. If the functionality resides in one of the many other available namespaces, it can be difficult to determine the exact URI without some form of documentation.
Table 2-4. Namespace sample URIs
Sample URI | Description |
|---|---|
http://wingtip.com/_api/ | SharePoint foundation namespace |
http://wingtip.com/_api/search | Enterprise search namespace |
http://wingtip.com/_api/sp.userProfiles.peopleManager | User profiles namespace |
The namespace in the URI is followed by a reference to the object, property, indexer, or method target that you want to invoke. Objects can include site collections, sites, lists, and list items. After an object is referenced, you can go on to reference the properties, indexers, and methods of the object. Table 2-5 shows several sample URIs referencing objects, properties, indexers, and methods.
Table 2-5. Object sample URIs
Sample URI | Description |
|---|---|
http://wingtip.com/_api/site | Site collection object |
http://wingtip.com/_api/web | Site object |
http://wingtip.com/_api/site/url | Site collection url property |
http://wingtip.com/_api/web/lists | Site lists collection |
http://wingtip.com/_api/web/lists(‘25e2737d-f23a-4fdb-ad5a-e5a94672504b’) | Site lists collection indexer |
http://wingtip.com/_api/web/lists/getbytitle(‘Contacts’) | Site lists collection method |
http://wingtip.com/_api/web/lists/getbytitle(‘Contacts’)/items | List items collection |
The RESTful URI ends with any OData query operators to specify selecting, sorting, or filtering. The $select operator is used to specify what fields to return from the query of a collection such as list items or fields. The $order operator specifies the sort order of the results. In general, if you do not provide a $select operator in your URI, all items in the collection are returned, with the exception of any field or property that might be particularly large. The $select operator also supports returning projected fields from related lookup lists by using the $expand operator. Table 2-6 shows several sample URIs selecting items to return.
Table 2-6. Selecting and sorting items
Description | |
|---|---|
http://wingtip.com/_api/web/lists/getbytitle(‘Modules’)/items Select all fields in Modules list. | |
http://wingtip.com/_api/web/lists/getbytitle(‘Modules’)/items? $select=Title | Select Title field in Modules list. |
http://wingtip.com/_api/web/lists/getbytitle(‘Modules’)/items? $select=Title,Instructor/FullName&$expand=Instructor/FullName | Select the Title and Instructor fields from the Modules list. The Instructor field is a lookup from another list, so expand the selection to include the FullName field from the list used as a lookup. |
http://wingtip.com/_api/web/lists/getbytitle(‘Modules’)/items? $select=Title&$order=Modified | Select Title field in Modules list and sort by the modified date. |
You use the $filter operator to filter the results of the RESTful operation. The RESTful URI can include numeric comparisons, string comparisons, and date/time functions. Table 2-7 shows sample URIs that filter returned collections.
Table 2-7. Filtering items
Sample URI | Description |
|---|---|
http://wingtip.com/_api/web/lists/getbytitle(‘Contacts’)/items?$filter=FirstName eq ‘Brian’ | Return the item from the Contacts list for which the FirstName is equal to “Brian” |
http://wingtip.com/_api/web/lists/getbytitle(‘Contacts’)/items?$filter=startswith(FirstName,‘B’) | Return all items from the Contacts list for which the first name starts with the letter B |
http://wingtip.com/_api/web/lists/getbytitle(‘Contacts’)/items? $filter=month(Modified) eq 8 | Return all items from the Contacts list modified in August |
The $top and $skip operators are used to implement paging for results. The $top operator specifies how many results to return. You can use the $skip operator to pass over a given number of items. Table 2-8 lists several examples using these operators.
Table 2-8. Paging items
Description | |
|---|---|
http://wingtip.com/_api/web/lists/getbytitle(‘Contacts’)/items?$top=10 | Returnthe the first 10 items in the Contacts list |
http://wingtip.com/_api/web/lists/getbytitle(‘Contacts’)/items?$top=10&$skip=10 | Returns the second page of results, with 10 results on each page |
http://wingtip.com/_api/web/lists/getbytitle(‘Contacts’)/ items?$sort=Title&$top=10&$skip=10 |
When you choose to use JavaScript with your app, you will find that by using the REST API, you can write cleaner code than CSOM. Furthermore, you will find built-in support for REST in the jQuery library, which makes it much easier to use than CSOM. This section details the fundamental operations necessary to work with the REST API through JavaScript.
The section Working with the JavaScript client object model explains the SharePoint-hosted app project template code in CSOM. As a starting point for understanding REST, Example 2-21 shows that CSOM code rewritten by using the REST API. Comparing the two implementations reveals that the REST version is more compact.
As discussed in the section Understanding jQuery event handling the function sharePointReady is called when the jQuery library is loaded. The RESTful URI in Example 2-22 is created by using the _spPageContextInfo object to retrieve a reference to the webServerRelativeUrl property. This property returns a URL, which can be concatenated with /_api to form the root of the URI. The _spPageContextInfo object is added to the ASPX pages in your app by the SPWebPartManager control, which means that you can depend on using it to form RESTful URIs in your apps.
The rewritten code makes use of the jQuery.getJSON method to retrieve information about the current user. As the name implies, the data returned from the call is in JSON format. JSON format is easy to transform into a JavaScript object, which simplifies your coding. Notice how easily the Title property for the current user is retrieved from the JSON results.
The jQuery.getJSON method is a shorthand AJAX function that simplifies RESTful calls where JSON is returned. For more control over the call, you can use the jQuery.ajax method. Example 2-22 shows the equivalent call made by using the jQuery.ajax method.
Example 2-22. Using the jQuery.ajax method
$(document).ready( function () {
    $.ajax(
         {
             url: _spPageContextInfo.webServerRelativeUrl +
                 "/_api/web/currentuser",
             type: "GET",
             headers: {
                 "accept": "application/json;odata=verbose",
             },
             success: function (data) {
                 $("#message").text('Hello ' + data.d.Title);
             },

             error: function (err) {
                 alert(JSON.stringify(err));
             }
         }
     );
});Much like performing CSOM CRUD operations, CRUD operations in REST should be encapsulated by using one of the JavaScript library patterns. When you create your RESTful libraries, they can have a structure that is very similar to the ones created for CSOM. Example 2-23 demonstrates a basic library structure for encapsulating RESTful CRUD operations on a contacts list.
Example 2-23. REST library structure
"use strict";

var Wingtip = window.Wingtip || {};
Wingtip.ContactList = function () {

    //private members
    createItem = function (lname, fname, wphone) {
    },
    readAll = function () {
    },
    readAllSuccess = function (data) {
    },
    updateItem = function (id, lname, fname, wphone) {
    },
    removeItem = function (id) {
    }

    //public interface
    return {
        createContact: createItem,
        updateContact: updateItem,
        deleteContact: removeItem
    }

}();

$(document).ready(function () {
    Wingtip.ContactList.createContact("Cox", "Brian", "555-555-5555");
    alert("Contact Created!");
    Wingtip.ContactList.updateContact(1, "Cox", "Brian", "111-111-1111");
    alert("Contact Updated!");
    Wingtip.ContactList.deleteContact(1);
    alert("Contact Deleted!");
});
The library structure in Example 2-23 is similar to the structure used for the CSOM library presented in Example 2-15. The primary difference between this REST library and the CSOM library is that no additional variable is required to reference objects between round trips to the server. Of course, the implementation details will be drastically different.
Creating new items is done by constructing a URI that refers to the collection to which the new items are to be added and using the POST verb to send an object containing the data for the new item. Whenever a RESTful operation changes a SharePoint resource, the request must include a form digest. The form digest is a security validation that guarantees the app page has not changed since it was delivered from the server. The easiest way to obtain the form digest is simply to read it from the form digest control on the app page. Example 2-24 shows how to create a new item in a list by using this technique.
Example 2-24. Creating new items in a list
createItem = function (lname, fname, wphone) {
    $.ajax({
        url: _spPageContextInfo.webServerRelativeUrl +
             "/_api/web/lists/getByTitle('Contacts')/items",
        type: "POST",
        data: JSON.stringify(
            {
                '__metadata': {
                    'type': 'SP.Data.ContactsListItem'
                },
                'Title': lname,
                'FirstName': fname,
                'WorkPhone': wphone
            }),
        headers: {
            "accept": "application/json;odata=verbose",
            "X-RequestDigest": $("#__REQUESTDIGEST").val()
        },
        success: function () {
            readAll();;
        },
        error: function (err) {
            alert(JSON.stringify(err));
        }
    });
}
Along with the form digest, the create operation must also include the type metadata for the item that is being created. The type metadata is unique to the list and can be discovered by examining the metadata returned from a read operation. For list items, the type metadata generally follows the pattern SP.Data, concatenated with the name of the list, concatenated with ListItem. In Example 2-25, the type metadata is SP.Data.ContactsListItem.
Reading items is a straightforward operation that uses a RESTful URI to request the items. This URI is called by using an HTTP GET verb. In the sample library, all successful calls to create, update, or delete an item result in redrawing the list in an HTML table. Example 2-25 shows how to retrieve the list items and render a simple HTML table to display them.
Example 2-25. Reading items and presenting them in an HTML table
readAll = function () {
    $.ajax(
            {
                url: _spPageContextInfo.webServerRelativeUrl +
                    "/_api/web/lists/getByTitle('Contacts')/items/" +
                    "?$select=Id,FirstName,Title,WorkPhone" +
                    "&$orderby=Title,FirstName",
                type: "GET",
                headers: {
                    "accept": "application/json;odata=verbose",
                },
                success: function (data) {
                    readAllSuccess(data);
                },
                error: function (err) {
                    alert(JSON.stringify(err));
                }
            }
        );
},

readAllSuccess = function (data) {
    var html = [];
    html.push("<table><thead><tr><th>ID</th><th>First Name</th>" +
              "<th>Last Name</th><th>Title</th></tr></thead>");

    var results = data.d.results;

    for(var i=0; i<results.length; i++) {
        html.push("<tr><td>");
        html.push(results[i].ID);
        html.push("</td><td>");
        html.push(results[i].FirstName);
        html.push("</td><td>");
        html.push(results[i].Title);
        html.push("</td><td>");
        html.push(results[i].WorkPhone);
        html.push("</td></tr>");
    }
    html.push("</table>");
    $('#displayDiv').html(html.join(''));
}
Updating items is accomplished by creating a RESTful URI that refers to the item that will be updated. Just like item creation, item updating also requires the request to include a form digest. The URI is then invoked by using a PUT, PATCH, or MERGE verb. When a PUT operation is used, you must specify all writable properties in the request. When a PATCH or MERGE operation is used, you can specify only the properties you want to change. Although MERGE and PATCH accomplish the same task, the PATCH operation is considered more standard. Example 2-26 shows how to update a list item by using the PATCH operation.
Example 2-26. Updating items
updateItem = function (id, lname, fname, wphone) {
    $.ajax(
            {
                url: _spPageContextInfo.webServerRelativeUrl +
                    "/_api/web/lists/getByTitle('Contacts')/getItemByStringId
                      ('" + id + "')",
                type: "POST",
                contentType: "application/json;odata=verbose",
                data: JSON.stringify(
                {
                    '__metadata': {
                        'type': 'SP.Data.ContactsListItem'
                    },
                    'Title': lname,
                    'FirstName': fname,
                    'WorkPhone': wphone
                }),
                headers: {
                    "accept": "application/json;odata=verbose",
                    "X-RequestDigest": $("#__REQUESTDIGEST").val(),
                    "IF-MATCH": "*",
                    "X-Http-Method": "PATCH"
                },
                success: function (data) {
                   readAll();
                },
                error: function (err) {
                    alert(JSON.stringify(err));
                }
            }
        );
}
When performing updates on list items, you can utilize ETags for concurrency control. ETags are version numbers assigned at the list-item level. This number determines whether the list item was altered by another process since your code last read the data. You can find the ETag for a list item by reading it from the metadata. Example 2-25 could be updated to display ETag values by reading them with the following code:
results[i].__metadata.etag
ETag values are sent during an update operation via the IF-MATCH header. If the ETag sent in the update process is different from the ETag currently assigned to the list item, the update will fail. If you want to force an update regardless of ETag values, you can pass IF-MATCH:*, which is the approach taken in Example 2-26.
Deleting an item is accomplished by first constructing a URI that references the target item to delete. The URI is invoked by using an HTTP DELETE verb. The delete operation must provide a form digest and an ETag value. Example 2-27 shows the implementation of a delete operation.
Example 2-27. Deleting items
removeItem = function (id) {
    $.ajax(
            {
                url: _spPageContextInfo.webServerRelativeUrl +
                    "/_api/web/lists/getByTitle('Contacts')/getItemByStringId
                      ('" + id + "')",
                type: "DELETE",
                headers: {
                    "accept": "application/json;odata=verbose",
                    "X-RequestDigest": $("#__REQUESTDIGEST").val(),
                    "IF-MATCH": "*"
                },
                success: function (data) {
                    readAll();
                },
                error: function (err) {
                    alert(JSON.stringify(err));
                }
            }
        );
}Using the REST API from a C# application is certainly possible, but it is easily the least attractive of all the programming options. You will find that retrieving form digests, parsing out properties, and creating payloads can be tedious and messy. This section details the steps necessary to work with the REST API in C#.
In the section Working with the REST API in JavaScript the SharePoint-hosted app project template code was rewritten to use REST. As a starting point to understanding how to utilize REST in C#, Example 2-28 shows the same code rewritten in a provider-hosted app. The code runs within the Page_Load event and welcomes the user to the app.
Example 2-28. Welcoming the current user
protected void Page_Load(object sender, EventArgs e)
{
    //Construct URI
    string appWebUrl = Page.Request["SPAppWebUrl"];
    Uri uri = new Uri(appWebUrl + "/_api/web/currentuser");

    //Perform GET operation
    HttpWebRequest restRequest = (HttpWebRequest)WebRequest.Create(uri);
    restRequest.Credentials = CredentialCache.DefaultCredentials;
    restRequest.Method = "GET";
    HttpWebResponse restResponse = (HttpWebResponse)restRequest.GetResponse();

    //Parse out Title
    XDocument atomDoc = XDocument.Load(restResponse.GetResponseStream());
    XNamespace ns = "http://schemas.microsoft.com/ado/2007/08/dataservices";
    message.Text = "Hello " + atomDoc.Descendants(ns + "Title").First().Value;
}
The code in Example 2-28 begins by constructing a URI to request the current user object from the REST API. The URI is invoked by using the HttpWebRequest object, which uses the HTTP GET verb and returns the data in AtomPub format. Finally, the Title property is extracted from the returned XML document by using LINQ-to-XML. You can see that the mechanics of using the REST API are the same in C# as they are in JavaScript, but the implementation is not as clean.
Performing CRUD operations with C# against the REST API can be a bit challenging. This is because you must go through an extra step to retrieve a form digest and because you must create the proper XML payloads by hand. Fortunately, you can encapsulate the basic CRUD functionality in a static class to make it easier. Example 2-29 shows a basic class structure for encapsulating CRUD operations against the REST API. In keeping with previous examples, the class targets a contacts list in the app.
Example 2-29. A class for REST operations
namespace Wingtip
{
    public static class Contacts
    {
        public static string AppWebUrl;
        public static void CreateItem(string LastName,
                                      string FirstName,
                                      string WorkPhone){}
        public static List<TableRow> ReadAll(){}

        public static void UpdateItem(string ID,
                                      string LastName,
                                      string FirstName,
                                      string WorkPhone){}
        public static void RemoveItem(string ID){}
        private static string GetFormDigest(){}
    }
}
The structure of the static class in Example 2-29 is similar to libraries that were shown previously in JavaScript, which contained methods for creating, reading, updating, and deleting. When using C# against the REST API, however, there are two new elements to consider. First, a static variable AppWebUrl is added to make the root URL of the app available to all the methods. Second, a private method named GetFormDigest is added to retrieve the form digest when necessary.
When you use C# against the REST API, it will always be from a remote web. Therefore, you don’t have the luxury of the form digest control being present on the app page. Because of this, you must make a separate RESTful call back to SharePoint solely to retrieve a form digest that can be used in the CRUD operations. Example 2-30 shows the implementation of the GetFormDigest method, which returns the form digest as a string.
Example 2-30. Retrieving the form digest
private static string GetFormDigest()
{
    Uri uri = new Uri(AppWebUrl + "/_api/contextinfo");
    HttpWebRequest restRequest = (HttpWebRequest)WebRequest.Create(uri);
    restRequest.Credentials = CredentialCache.DefaultCredentials;
    restRequest.Method = "POST";
    restRequest.ContentLength = 0;

    HttpWebResponse restResponse = (HttpWebResponse)restRequest.GetResponse();
    XDocument atomDoc = XDocument.Load(restResponse.GetResponseStream());
    XNamespace d = "http://schemas.microsoft.com/ado/2007/08/dataservices";
    return atomDoc.Descendants(d + "FormDigestValue").First().Value;
}
Creating new items in C# requires the same basic approach as JavaScript. A URI is constructed that refers to the collection to which the new items are to be added and the POST verb is used to send an XML chunk containing the data for the new item. In C#, you must create the XML by hand and substitute in the new values. Example 2-31 shows the code to create a new item in the contacts list.
Example 2-31. Creating new items in a contacts list
public static void CreateItem(string LastName, string FirstName, string
                                WorkPhone)
{
    Uri uri = new Uri(AppWebUrl +
    "/_api/web/lists/getByTitle('Contacts')/items");

    string itemXML = String.Format(@"
           <entry xmlns='http://www.w3.org/2005/Atom'
            xmlns:d='http://schemas.microsoft.com/ado/2007/08/dataservices'
            xmlns:m='http://schemas.microsoft.com/ado/2007/08/dataservices/
                       metadata'>
             <category term='SP.Data.ContactsListItem'
              scheme='http://schemas.microsoft.com/ado/2007/08/dataservices/
                        scheme' />
               <content type='application/xml'>
                 <m:properties>
                   <d:FirstName>{0}</d:FirstName>
                   <d:Title>{1}</d:Title>
                   <d:WorkPhone>{2}</d:WorkPhone>
                </m:properties>
              </content>
            </entry>", FirstName, LastName, WorkPhone);

    HttpWebRequest restRequest = (HttpWebRequest)WebRequest.Create(uri);
    restRequest.Credentials = CredentialCache.DefaultCredentials;
    restRequest.Method = "POST";
    restRequest.Headers["X-RequestDigest"] = GetFormDigest();
    restRequest.Accept = "application/atom+xml";
    restRequest.ContentType = "application/atom+xml";
    restRequest.ContentLength = itemXML.Length;
    StreamWriter sw = new StreamWriter(restRequest.GetRequestStream());
    sw.Write(itemXML);
    sw.Flush();

    HttpWebResponse restResponse = (HttpWebResponse)restRequest.GetResponse();
}
Reading items is fairly straightforward. You can simply create the URI referencing the items to return and make the call. Example 2-32 illustrates the implementation of the ReadAll method for the sample. In this case, the method returns a collection of type TableRow, which is subsequently added to an ASP.NET Table control to display the items.
Example 2-32. Reading list items
public static List<TableRow> ReadAll()
{
    Uri uri = new Uri(AppWebUrl +
                "/_api/web/lists/getByTitle('Contacts')/items/" +
                "?$select=Id,FirstName,Title,WorkPhone" +
                "&$orderby=Title,FirstName");

    HttpWebRequest restRequest = (HttpWebRequest)WebRequest.Create(uri);
    restRequest.Credentials = CredentialCache.DefaultCredentials;
    restRequest.Method = "GET";

    HttpWebResponse restResponse = (HttpWebResponse)restRequest.GetResponse();
    XDocument atomDoc = XDocument.Load(restResponse.GetResponseStream());
    XNamespace a = "http://www.w3.org/2005/Atom";
    XNamespace d = "http://schemas.microsoft.com/ado/2007/08/dataservices";

    List<TableRow> rows = new List<TableRow>();
    foreach (var entry in atomDoc.Descendants(a + "entry"))
    {
        TableRow r = new TableRow();
        TableCell c1 = new TableCell();
        c1.Text = entry.Descendants(d + "Id").First().Value;
        TableCell c2 = new TableCell();
        c2.Text = entry.Descendants(d + "FirstName").First().Value;
        TableCell c3 = new TableCell();
        c3.Text = entry.Descendants(d + "Title").First().Value;
        TableCell c4 = new TableCell();
        c4.Text = entry.Descendants(d + "WorkPhone").First().Value;
        r.Cells.Add(c1);
        r.Cells.Add(c2);
        r.Cells.Add(c3);
        r.Cells.Add(c4);
        rows.Add(r);
    }
    return rows;
}
Updating items is also done by using the same basic approach presented with JavaScript. A URI is constructed that refers to the item to be updated. The XML chunk containing the new property values must be created and a form digest added to the headers. Additionally, the PATCH method is used to allow only the desired properties to be updated. Finally, the corresponding ETag value must be supplied or an asterisk used to force an update. Example 2-33 shows the complete implementation of the method to update items in the contacts list.
Example 2-33. Updating items in a contacts list
public static void UpdateItem(string ID, string LastName, string FirstName,
                               string WorkPhone)
{
    Uri uri = new Uri(AppWebUrl +
    "/_api/web/lists/getByTitle('Contacts')/items(" + ID + ")");

    string itemXML = String.Format(@"
           <entry xmlns='http://www.w3.org/2005/Atom'
            xmlns:d='http://schemas.microsoft.com/ado/2007/08/dataservices'
            xmlns:m='http://schemas.microsoft.com/ado/2007/08/dataservices/
                      metadata'>
             <category term='SP.Data.ContactsListItem'
              scheme='http://schemas.microsoft.com/ado/2007/08/dataservices/
                       scheme' />
               <content type='application/xml'>
                 <m:properties>
                   <d:FirstName>{0}</d:FirstName>
                   <d:Title>{1}</d:Title>
                   <d:WorkPhone>{2}</d:WorkPhone>
                 </m:properties>
               </content>
             </entry>", FirstName, LastName, WorkPhone);

    HttpWebRequest restRequest = (HttpWebRequest)WebRequest.Create(uri);
    restRequest.Credentials = CredentialCache.DefaultCredentials;
    restRequest.Method = "POST";
    restRequest.Headers["X-RequestDigest"] = GetFormDigest();
    restRequest.Headers["IF-MATCH"] = "*";
    restRequest.Headers["X-Http-Method"] = "PATCH";
    restRequest.Accept = "application/atom+xml";
    restRequest.ContentType = "application/atom+xml";
    restRequest.ContentLength = itemXML.Length;
    StreamWriter sw = new StreamWriter(restRequest.GetRequestStream());
    sw.Write(itemXML);
    sw.Flush();

    HttpWebResponse restResponse = (HttpWebResponse)restRequest.GetResponse();
}
Deleting items is a simple operation compared to the other methods. To delete an item, a URI is constructed that refers to the item to be deleted. A form digest is sent in the headers and the DELETE verb is used to indicate that the target item should be deleted. There is no XML chunk to create for this operation. Example 2-34 shows the implementation details for deleting items from the contacts list.
Example 2-34. Deleting items from a contacts list
public static void RemoveItem(string ID)
{
    Uri uri = new Uri(AppWebUrl +
    "/_api/web/lists/getByTitle('Contacts')/items(" + ID + ")");

    HttpWebRequest restRequest = (HttpWebRequest)WebRequest.Create(uri);
    restRequest.Credentials = CredentialCache.DefaultCredentials;
    restRequest.Method = "DELETE";
    restRequest.Headers["X-RequestDigest"] = GetFormDigest();
    restRequest.Headers["IF-MATCH"] = "*";
    restRequest.Accept = "application/atom+xml";
    restRequest.ContentType = "application/atom+xml";

    HttpWebResponse restResponse = (HttpWebResponse)restRequest.GetResponse();
}Client-side programming against SharePoint 2013 apps is a new paradigm for all SharePoint developers. Even though previous versions of SharePoint supported some of the capabilities found in SharePoint 2013, most developers concentrated on writing server-side code. With the introduction of the app model, SharePoint developers must now become experts in client-side programming.
There are four options for client-side programming: JavaScript against CSOM, JavaScript against REST, C# against CSOM, and C# against REST. When creating SharePoint-hosted apps, you will find that JavaScript against the REST API is generally the best choice. When creating provider-hosted or autohosted apps, you will likely find that C# against CSOM is the best fit. In any case, as a SharePoint developer, you will need to focus on client-side programming much more than you have in the past.