
|
In the old days, computers were isolated, and the only way to get information from one to another was to transfer it on a floppy disk. With the advent of networks, information transfer became easier, but so did the possibility that the information stored on a computer would be accessed inappropriately or even illegally from another computer. As networks have grown from small to large and worldwide access to local area networks has become simple and commonplace concerns about information security have also increased.
Most people think of security in terms of protecting against viruses and intruders, or hackers. Many commercial software packages that detect and treat computer viruses are available. Apart from the use of special software, the most common way of addressing security concerns in a networked computer environment has been through a system of user accounts and passwords. Microsoft Windows XP extends this account and password system to single stand-alone computers so that more than one person can use the same machine. For example, if you manage your family’s financial records on a home computer that is also used by your children to do their homework, you can set up separate accounts for your children so that they can’t view confidential information or change your files.
The great thing about user accounts and passwords is that they help to keep your information private; that is, you can prevent other users from reading or altering your documents, pictures, music, and other files. You can choose to share files by placing them in a folder that is available to other users, but you don’t have to. With Windows XP, each user can personalize his or her own working environment and have easy access to frequently used files and applications without worrying about other people making changes.
In this chapter, you will learn how to rename your computer, how to manage user accounts on Windows XP Professional and Windows XP Home Edition computers, and how to analyze and manage some of your computer’s security settings.
See Also
Do you need only a quick refresher on the topics in this chapter? See the Quick Reference entries in Chapter 3 Managing Computer Security.
Important
Before you can use the practice files in this chapter, you need to install them from the book’s companion CD to their default location. See "Using the Book’s CD-ROM" in Display for more information.
Important
Because management processes vary depending on whether your computer is part of a workgroup or on a network domain, we address these options separately, and you should follow the steps for your particular installation. The exercises assume that you have administrative privileges on your computer. This means that you are allowed to change basic settings that control access to your computer and the items stored on it. If your computer is connected to a network domain, your network administrator might have set up your computer so that you cannot change some settings. If this is the case, you can read through the exercises, but you won’t be able to follow the steps.
Every computer has a name. That might seem like something out of a science fiction story in which computers take over the world, but there is nothing sinister about it. Your computer was named during the Windows XP initial setup process. It might have been named after its user (you), after its make or model (for example, HP or Laptop), or based on what it is most commonly used for (for example, Media); or it might have been given a whimsical name to give it some sort of personality.
In this exercise, you will locate and change your computer’s name.
Important
Many corporations have standard naming conventions for computers on their network to help employees easily locate and identify network resources. If your computer is connected to a network, check with your network administrator before attempting to change your computer’s name.
BE SURE TO log on to Windows before beginning this exercise.
Follow these steps:
Troubleshooting
If your computer is configured to log on to a network domain, you should change the computer name only while you are connected to the domain. Otherwise you might inadvertently change the name to one that is already in use in the domain, which would result in an error the next time you tried to connect to the domain.
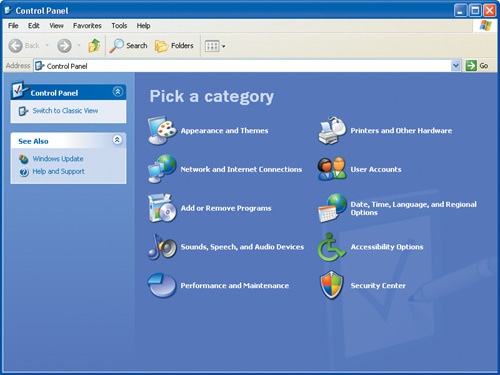
On the Start menu, click Control Panel.
The Control Panel window appears:
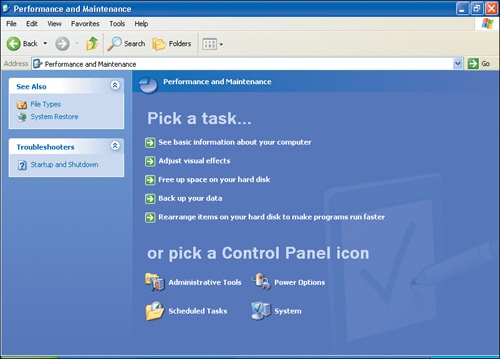
Click the Performance and Maintenance icon.
The Performance and Maintenance window appears, looking something like this:
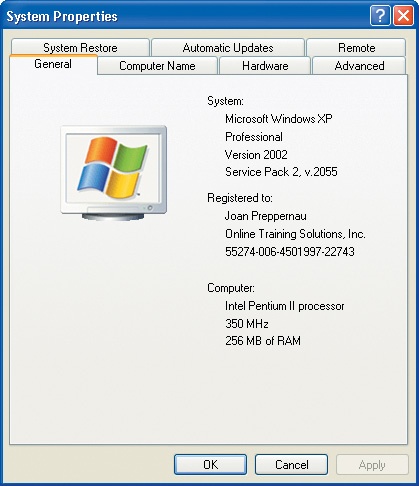
Click the See basic information about your computer task.
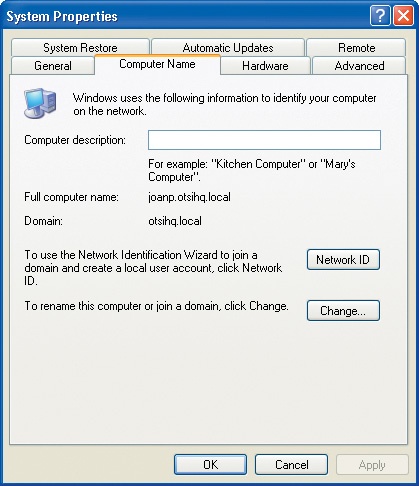
The System Properties dialog box appears:
Click the Computer Name tab to display it:
The names of your computer and, if applicable, your domain or workgroup are displayed in the center of the tab. If you are logged on to a domain, your computer name is represented as computer name.domain.
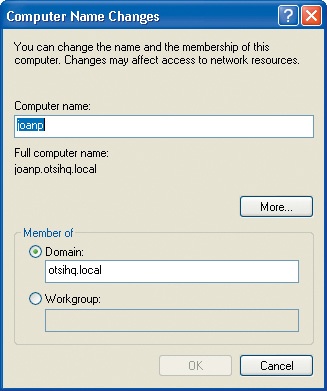
Click Change to open the Computer Name Changes dialog box:
Your current computer name is selected.
Type your new computer name in the Computer name box, and click OK.
Troubleshooting
Computer names cannot be longer than 15 characters and must consist of standard characters, which include uppercase or lowercase letters (A—Z or a—z), digits (0–9), and hyphens (-).
If your computer is connected to a network domain, you will be prompted for the user account name and password of a network administrator who has permission to rename the computer in the domain.
If you are prompted to do so, enter your user account name and password, and then click OK.
When a dialog box appears informing you that you must restart the computer for the changes to take effect, click OK.
Click OK to close the System Properties dialog box, and then click Yes to restart your computer.
Your computer now has a new name.
If your computer is connected to a network domain, your network administrator must set up a user account or accounts for the computer to be able to access the network. User accounts can be established during the setup process or at any time from Control Panel.
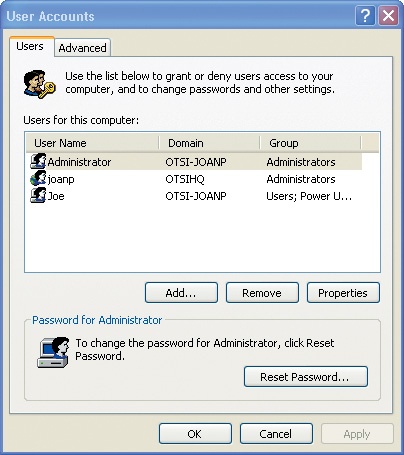
If you have administrative privileges, you can create local computer user accounts that other people can use to access your computer. For example, you might want to create a local user account for a friend so that he can log on to your computer to check his e-mail. Each user account belongs to a group with permissions to perform certain operations on the computer. The most common groups are:
Administrators, who have unrestricted access to the computer.
Power Users, who have most administrative capabilities but with some restrictions.
Users and Guests, who are restricted from making system-wide changes.
Backup Operators, who can override security restrictions for the purpose of backing up or restoring files.
Other groups are available for support personnel, network administrators, and remote users. There are also special groups that might be created when a computer is upgraded from other versions of Windows to Windows XP Professional. And finally, anyone assigned to the Administrators group can create custom groups.
In this exercise, you will create a local computer user account, change its privileges, and then delete it.
BE SURE TO log on to Windows and know your computer’s name before beginning this exercise.
Tip
To find out your computer’s name, open Control Panel, click Performance and Maintenance, click See basic information about your computer, and in the System Properties dialog box, click the Computer Name tab.
Follow these steps:
Click the Start button, and on the Start menu, click Control Panel.
In the Control Panel window, click the User Accounts icon.
Troubleshooting
You must be a member of the Administrators group on your domain-connected computer to access the User Accounts settings.
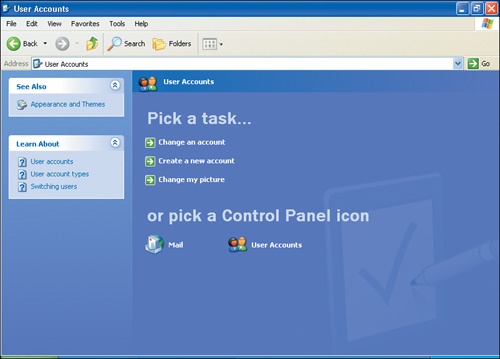
This User Accounts window appears:
In the User Accounts window, click the User Accounts icon to open the User Accounts dialog box.
Click the Advanced tab.
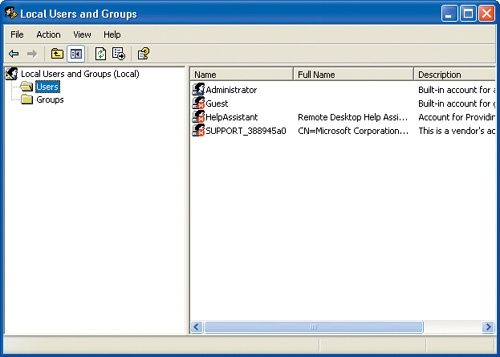
In the Advanced user management area, click Advanced to open the Local Users and Groups window.
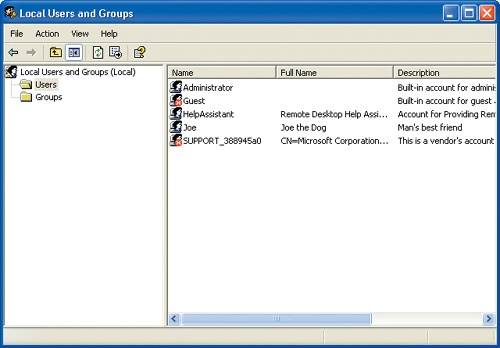
In the left pane of the Local Users and Groups window, click the Users folder to display a list of the current user names:
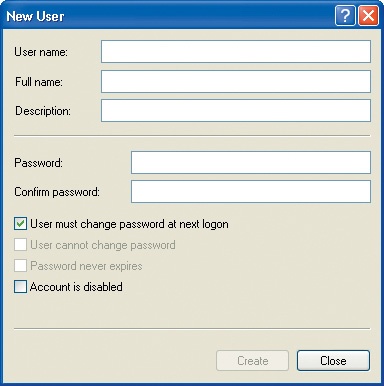
On the Action menu, click New User to open the New User dialog box:
In the User name box, type
Joe.In the Full name box, type
Joe the Dog.In the Description box, type
Man’s best friend.In the Password box, type
Woof!.Type the password again in the Confirm password box.
Ensure that the User must change password at next logon and the Account is disabled check boxes are cleared, and then click Create.
Tip
You clear the first check box because you don’t want the user to have to change the password, and you clear the second because you want the account to be active and available.
The account is created, and the input screen is cleared.
Click Close to return to the Local Users and Groups window.
Joe has been added to the list of users:
In the right pane of the Local Users and Groups window, double-click Joe to open the Joe Properties dialog box.
Click the Member Of tab.
Joe is currently shown as a member of the Users group, the default group for new users.
Click Cancel to close the Joe Properties dialog box.
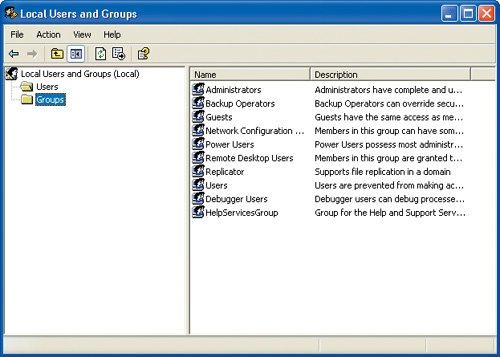
To add Joe to another group, click the Groups folder to display a list of the available groups in the right pane of the Local Users and Groups window:
In the right pane of the Local Users and Groups window, double-click Power Users to open the Power Users Properties dialog box.
Click Add.
If you are connected to a network domain, click the Locations button, if necessary click your computer name, and then click OK.
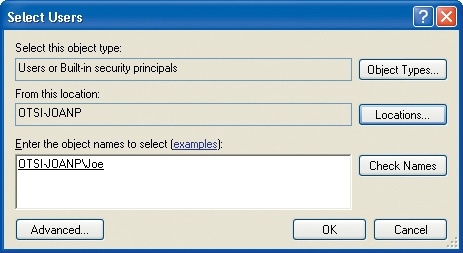
In the Enter the object names to select box, type
Joe, and click Check Names.The Select Users dialog box looks something like this:
The name you typed is replaced by the computer name user name combination.
Click OK to add Joe to the Power Users group, and then click OK to close the Power Users Properties dialog box.
Click the Close button to close the Local Users and Groups window, and click OK to close the User Accounts dialog box. Then click the Close button to close the User Accounts window.
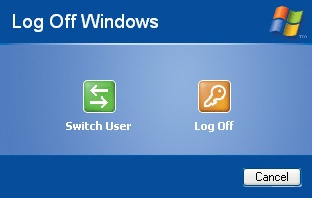
On the Start menu, click the Log Off button, and then click Log Off in the Log Off Windows dialog box.
You are logged off of Windows and returned to the logon security screen.
Press CTRL + ALT + DELETE to access the Log On to Windows dialog box.
In the User name box, type
Joe.In the Password box, type
Woof!(or the secure password you created in step 11).The characters of the password are displayed as dots as you type.
Click the down arrow to the right of the Log on to box, and click your computer in the drop-down list.
Click OK.
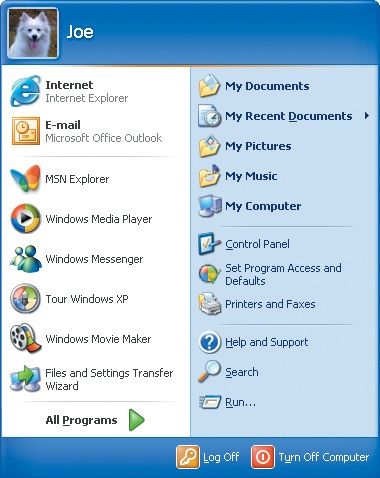
Joe is now logged on to your computer, but not your network domain. The Start menu expands, with Joe’s full name shown at the top:
Because this is the first time that Joe has logged on to this computer, the desktop is in its default state.
On the Start menu, click Log Off, and then click Log Off in the Log Off Windows dialog box to log Joe’s account off of the computer. Then log back on as yourself, changing the Log on to setting to your domain if necessary.
Now you’ll change the group to which Joe is assigned again. Open Control Panel, and click the User Accounts icon to open the User Accounts dialog box.
In the Users for this computer list, click Joe, and then click Properties to open the Joe Properties dialog box.
On the Group Membership tab, click Other, and click Administrators in the drop-down list.
Click OK to change Joe’s group membership to Administrators.
Now that you’ve completed this exercise, you don’t need this account on your computer, so in the Users for this computer list, click Joe, and then click Remove.
A message box warns you that Joe will no longer be able to use this computer.
Click Yes.
Joe is removed from the list of users.
Click OK to close the User Accounts dialog box.
Click the Close button to close Control Panel.


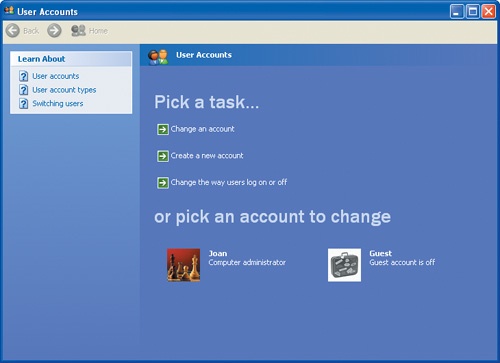
When your computer is part of a workgroup rather than connected to a domain, Windows XP supports two levels of user privileges: computer administrator and limited. Users with computer administrator accounts have permission to do everything, including:
Create, change, and delete accounts.
Make system-wide changes.
Install and remove programs.
Access all files.
Users with limited accounts have permission to do things that affect only their own account, including:
Change or remove their password.
Change their user account picture.
Change their theme and desktop settings.
View files they created and files in the Shared Documents folder.
Important
Users with limited accounts can run into difficulties when trying to install new software, because administrative privileges are required to install or remove certain some programs. Be sure you have the appropriate privileges before attempting to install or remove new software.
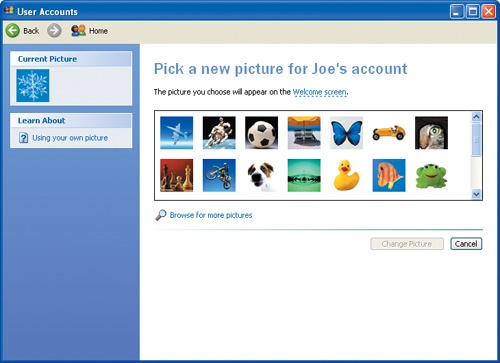
On the logon screen, each user account is represented by the user account name and also by a user account picture. Windows XP comes with 23 user account pictures, representing a variety of animals, sports, and interests. You can select the picture that most closely matches your personality or interests. If none of the default pictures is to your liking, you can add a picture you like better.
Tip
Computer administrators can assign or change the picture for any user. Limited account and guest account users can change only their own picture.
You can use bitmap (BMP) files, Graphic Interchange Format (GIF) files, Joint Photographic Expert Group (JPEG) files, or Portable Network Graphics (PNG) files as user account pictures. The orginal graphic can be any size, but the user account picture is always displayed at 48 pixels high by 48 pixels wide. If you select a graphic that does not have the same height and width, it will be stretched or compressed to the standard size when displayed.
In this exercise, you will create a new user account with administrative privileges, change its privileges, create a password, and choose a custom graphic to represent the user. You will then delete the account.
BE SURE TO log on to Windows before beginning this exercise.
USE the Joe picture in the practice file folder for this topic. This practice file is located in the My DocumentsMicrosoft PressMicrosoft Windows XP SBSComputerUserAcct folder.
Follow these steps:
On the Start menu, click Control Panel.
Click the User Accounts icon.
The User Accounts window appears:
Click Create a new account to open the Name the new account screen.
You are prompted to enter a name for the new account.
Type
Joe, and then click Next to move to the Pick an account type screen.You are prompted to specify the account type.
Select the Computer administrator option, and then click Create Account.
Windows XP creates a new account called Joe, and assigns a user account picture to the account, which now appears at the bottom of the User Accounts window.
Now you’ll customize Joe’s account. In the User Accounts window click Joe’s account.
The options for changing the account are displayed:
Click Change the picture.
You are prompted to select from the default pictures:
Click Browse for more pictures.
In the Open window, click the down arrow to the right of the Look in box, and browse to My DocumentsMicrosoft PressMicrosoft Windows XP SBSComputerUserAcct.
Click the picture named Joe, and then click Open.
A picture of Joe (an American Eskimo dog) is added to the available pictures, Joe’s user account picture is changed, and you are returned to the account options screen.
Click Change the account type.
On the Pick a new account type for Joe screen, select the Limited option, and then click Change Account Type.
In the account options screen, the Limited account type is now indicated to the right of Joe’s user account picture.
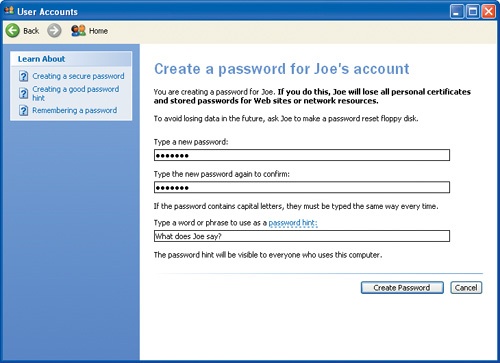
Click Create a password.
You are prompted to enter a password for Joe’s account.
In the Type a new password box, type
BowWow!, and then press the TAB key to move to the next field.To ensure the secrecy of the password, the characters are displayed as dots as you type.
In the Type the new password again to confirm box, retype
BowWow!, and then press the TAB key twice to move to the next field.In the Type a word or phrase to use as a password hint box, type
What does Joe say?.The screen now looks like this:
Click Create Password to save the password as part of Joe’s user account profile and return to the account options screen.
The Password protected status is now indicated to the right of Joe’s user account picture.
Now you’ll delete Joe’s account. Click Delete the account.
Troubleshooting
If the account you are trying to delete is currently logged on to the computer, you must switch to that user account and log it off before you can delete it.
You are asked whether you want to keep or delete any files that Joe might have created on the desktop or in the My Documents folder.
Joe has not created any files that you care about, so click Delete Files, and then click Delete Account to delete Joe’s account and return to the main User Accounts screen.
Joe’s account no longer appears among the active accounts.
Click the Close button to close the User Accounts window, and then close Control Panel.

When you’re using Windows XP Professional on a network domain, there is only one way to log on to your computer: by entering your user account name and your password. If you are not on a network domain, whether you are using Windows XP Professional or Home Edition and whether you are working on a network (with no domain) or on a stand-alone computer, you have two logon options:
You can select from pictorial representations on the Windows XP Welcome screen.
You can use the classic logon prompt that requires you to enter your user account name as well as your password (if the account is password-protected).
The Welcome screen is the default.
Another option available in Windows XP on a stand-alone computer is Fast User Switching, which makes it possible for multiple users to log on to their user accounts without logging previous users off. This feature saves time and decreases frustration for all users, because open applications don’t need to be closed when switching between user accounts.
In this exercise, you will turn on Fast User Switching on your computer.
Tip
Fast User Switching is not available when your Windows XP Professional computer is connected to a network domain.
BE SURE TO log on to Windows before beginning this exercise.
Follow these steps:
On the Start menu, click Control Panel.
The Control Panel window appears.
Click the User Accounts icon.
The User Accounts window appears.
If the user account names aren’t displayed at the bottom of the window, click the secondary User Accounts icon.
Important
If you have only one user account on your computer, you will need to create at least one other account to be able to use Fast User Switching.
See Also
For more information about creating user accounts, refer to "Working with User Accounts in a Domain" and "Working with User Accounts in a Workgroup" in this chapter.
Click the Change the way users log on or off task.
The Select logon and logoff options screen appears.
Select the Use Fast User Switching check box, and click Apply Options.
The change is applied, and you return to the main User Accounts window.
With the User Accounts and Control Panel windows still open, click Log Off on the Start menu.
This Log Off Windows dialog box appears:
Click the Switch User button. The Welcome screen appears with the current user accounts shown.
Click one of the account names to log on with that account.
If the account is password-protected, a password box appears.
If an account password is required, type the password and click the green arrow button to continue.
You are now logged on to the account, and that account’s personal settings are loaded. The Start menu expands, with the account’s user name and user account picture displayed at the top:
If this is the first time this account has logged on, all the settings are the default settings, and there are no open applications.
On the Start menu, click Log Off.
In the Log Off Windows dialog box, click Switch User.
On the Welcome screen, click your own user name, and if your account is password-protected, enter your password.
Your own user account is displayed, and the User Accounts and Control Panel windows are still open. (They might be minimized.)
Click the Close button to close each of the open windows.

Computer security is a hot topic these days. The proliferation of Internet access and e-mail in homes and workplaces around the world has provided a new (and relatively simple) avenue for malicious intrusion into our lives. It is important to be aware of the possible security vulnerabilities of each computer you work on, whether it is at home, at school, at work, or in a public place such as an Internet café. It is also important to protect these computers through correct network setups, appropriate virus scanning software, and informed computer use practices.
Any computer that is connected to the Internet, whether full-time or intermittently, is exposed to the risk of attack by a computer virus. This sounds dangerous, and the potential risk should always be taken seriously, but there are a number of things you can do to protect your system from infection:
Work behind a firewall. A firewall is a secure bridge between the external Internet and your computer (if you have a direct Internet connection) or the intranet to which your computer is connected (if you’re working on a network). In a networked business environment, the corporate intranet should sit behind a firewall that protects the network from intrusion. In a home environment, the firewall can be installed on the computer through which your home network accesses the Internet, or it can be part of your computer’s operating system. Windows XP Service Pack 2 includes Windows Firewall software that monitors the information communicated from the Internet to your computer or network. Windows Firewall ensures that only authorized communications reach your system, thus protecting you from malicious intrusions.
Tip
Windows Firewall can prevent you from doing things like sharing resources across a network or hosting network games. If you experience difficulties when trying to connect to other computers, refer to "Configuring Windows Firewall" later in this chapter.
See Also
For more information about Windows Firewall, refer to "Configuring Windows Firewall" later in this chapter.
Install all available security upgrades. Use Windows Update to automatically keep your Windows XP computer up to date with Microsoft-issued product updates.
See Also
For more information about Windows Update, refer to "Keeping Your Computer up to Date" in Chapter 10.
Utilize third-party antivirus software. Select a program that monitors your hard disk drive and external drives, as well as all incoming and outgoing files.
Do not open unidentified e-mail attachments.
See Also
For more information about e-mail security, refer to "Sending and Receiving E-Mail Messages" in Chapter 8.
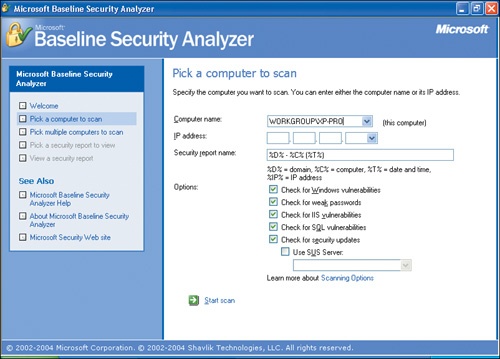
Analyze your system security from time to time to ensure that your computer system is as secure as possible. Microsoft Baseline Security Analyzer is a free tool you can download from the Microsoft Web site that scans your system for security vulnerabilities and leads you through the process of optimizing your system security.
In this exercise, you will install and run the Baseline Security Analyzer.
BE SURE TO log on to Windows and start your Internet connection before beginning this exercise. You might also need to know your computer’s IP address.
Tip
Here’s a simple way to find your computer’s IP address. On the Start menu, click Run. Type cmd in the Open text box and then click OK. In the command window, type ipconfig and press the ENTER key. Your computer’s IP address is printed on the screen along with other related information. Write down the IP address and then click the command window’s Close button to close the window.
Follow these steps:
Click the Start button, and then click Internet at the top of the Start menu.
Your default Internet browser starts. If you are using Internet Explorer and this is the first time you’ve started it, you will be required to specify your location.
If necessary, click the browser window’s Maximize button.
Click in the Address box to select the current Web page address, and then press the DELETE key to clear the Address box content.
In the Address box, type
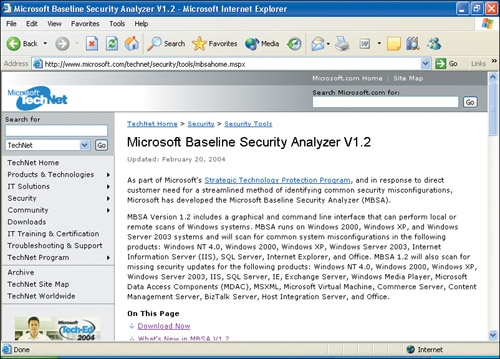
http://www.microsoft.com/technet/security/tools/mbsahome.mspx, and then press the ENTER key or click the Go button.An article about the Microsoft Baseline Security Analyzer opens in a new window. If you are interested, you can learn the technical details of the Baseline Security Analyzer here.
Click in the vertical scroll bar at the right side of the window to scroll down to the Download Now heading. Under this heading, click the link to download the English version of the program.
A File Download dialog box appears.
Click the Run button.
The Microsoft Baseline Security Analyzer Setup Wizard file is downloaded to a temporary folder on your hard disk and then opened.
Click the Next button to move to the wizard’s License Agreement page.
Read the license agreement, select the I accept the license agreement option, and click the Next button.
On the Destination Folder page, keep the default settings and click the Next button.
On the Start Installation page, click the Install button.
When the installation is complete, click OK, and then click the browser window’s Close button to close window.
On your desktop, double-click the Microsoft Baseline Security Analyzer program shortcut installed by the setup wizard.
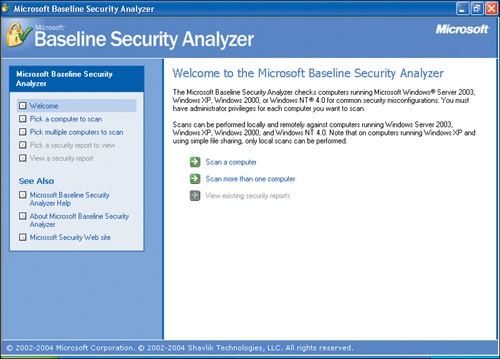
Maximize the Baseline Security Analyzer window if necessary to display a Welcome screen:
Click Scan a computer to move to the next step:
The computer you are working on is selected in the Computer name drop-down list. All scanning options are selected by default.
Click Start scan.
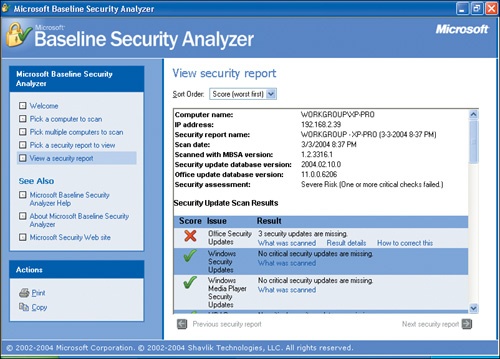
The Baseline Security Analyzer scans your computer for the selected scanning options, and creates an interactive security report:
Troubleshooting
If you see a message that the computer was not found, click Continue to return to the Welcome screen, and then repeat steps 14 and 15, but enter your computer’s IP address in the IP address text boxes before clicking Start scan.
You can print the report by clicking Print in the Actions box in the lower-left corner of the window.
Scroll through the report to see how your computer scored.
If the report points out any critical issues (indicated by a red X in the Score column), click the How to correct this link for the issue to display information describing the issue and how to fix it. If you like, fix each of the reported issues and then rerun the Baseline Security Analyzer to ensure that your system is secure.
When you’re done with the Baseline Security Analyzer, click its Close button to close the window.
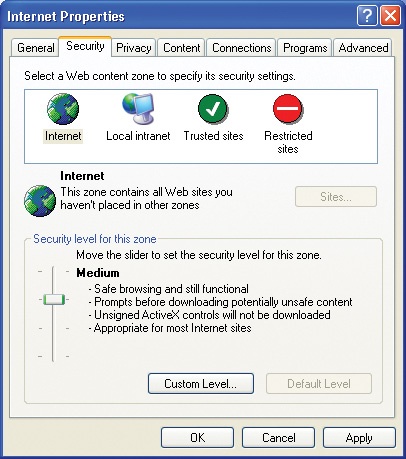
With Internet Explorer, you can set different levels of security for different types of Web sites. For instance, you might not want to allow certain types of programs to run on your computer when you’re surfing the Web, but you might feel perfectly comfortable running programs that originate from your organization’s intranet site or from specific Web sites that you trust (such as your own).
Internet Explorer divides the types of Web sites you visit into four security zones:
Internet. All external Web sites that are not in the trusted or restricted site lists.
Local intranet. All Web sites that are part of your organization’s local network.
Trusted sites. Specific Web sites that you have designated as trustworthy; you believe that content from these sites will not damage your computer or data.
Restricted sites. Specific Web sites that you believe might contain content that will damage your computer or data.
You must specifically designate Web sites as part of the Trusted sites and Restricted sites zones; otherwise these zones are empty.
You can set the security level for each zone at one of four predefined levels, or you can customize the security level for your own or your organization’s needs. The predefined security levels are:
High. This level is appropriate for any Web sites that you don’t trust, or if you want to have full control over the content that is downloaded to and run on your computer. This is the default security level for the Restricted sites zone. Internet Explorer prevents potentially harmful content from running on your computer, which might mean that certain Web sites function or are displayed improperly.
Medium. This level is appropriate for most Internet sites, and it is the default security level for the Internet zone. Internet Explorer prompts you before downloading any potentially unsafe content, and it does not download unsigned ActiveX controls.
Medium-low. This level is appropriate for intranet sites, and it is the default security level for the Local intranet zone. Internet Explorer does not download unsigned ActiveX controls, but most other content runs without prompts.
Low. This level is only appropriate for sites that you absolutely trust, and it is the default security level for the Trusted sites zone. Internet Explorer provides only minimal safeguards and warnings, and it downloads and runs most content without prompting you for permission.
Most people will find that the default settings are adequate for their needs, but from time to time you might want or need to customize a setting. Even if you never do, it’s good to know what your options are so you can feel confident that your Web browsing is done in a secure and sensible manner. The following sections describe the security setting categories and show the default setting for each of the four standard security levels. A discussion of the meaning of each of these security options is beyond the scope of this book, but you will get a general idea of the settings you can control. For most of the security options you have the option to enable, disable, or prompt for approval when Internet Explorer encounters that particular option.
Important
The settings shown here reflect the default options for each security level in its default security zone.
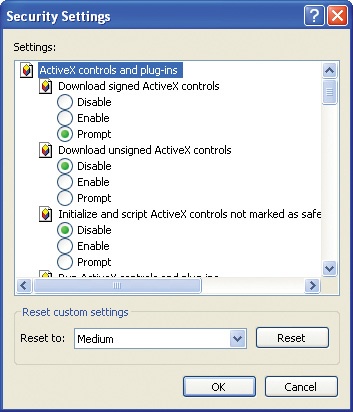
You can set the following options for ActiveX controls and plug-ins:
Security option | High | Medium | Medium-low | Low |
|---|---|---|---|---|
Download signed ActiveX controls | Disable | Prompt | Prompt | Enable |
Download unsigned ActiveX controls | Disable | Disable | Disable | Prompt |
Initialize and script ActiveX controls not marked as safe | Disable | Disable | Disable | Prompt |
Run ActiveX controls and plug-ins | Disable | Enable | Enable | Enable |
Script ActiveX controls marked safe for scripting | Disable | Enable | Enable | Enable |
You can set the following options for downloading files and fonts from Web pages:
Security option | High | Medium | Medium-low | Low |
|---|---|---|---|---|
File download | Disable | Enable | Enable | Enable |
Font download | Prompt | Enable | Enable | Enable |
You can set the following miscellaneous options:
Security option | High | Medium | Medium-low | Low |
|---|---|---|---|---|
Access data sources across domains | Disable | Disable | Prompt | Enable |
Allow automatic prompting for file and code downloads | Enable | Enable | Enable | Enable |
Allow META REFRESH | Disable | Enable | Enable | Enable |
Allow windows to be opened without security restrictions | Disable | Disable | Enable | Enable |
Display mixed content | Prompt | Prompt | Prompt | Prompt |
Don’t prompt for client certificate selection when no certificates or only one certificate exists | Disable | Disable | Enable | Enable |
Prompt | Enable | Enable | Enable | |
Installation of desktop items | Disable | Prompt | Prompt | Enable |
Launching programs and files in an IFRAME | Disable | Prompt | Prompt | Enable |
Navigate sub-frames across different domains | Disable | Enable | Enable | Enable |
Open files based on content, not file extension | Enable | Enable | Disable | |
Software channel permissions | High safety | Medium safety | Medium safety | Low safety |
Submit nonencrypted form data | Prompt | Enable | Enable | Enable |
Userdata persistence | Disable | Enable | Enable | Enable |
Web sites can open new windows in a less restrictive Web content zone | Disable | Disable | Enable | Enable |
You can set the following scripting options:
Security option | High | Medium | Medium-low | Low |
|---|---|---|---|---|
Active scripting | Disable | Enable | Enable | Enable |
Allow paste operations via script | Disable | Enable | Enable | Enable |
Scripting of Java applets | Disable | Enable | Enable | Enable |
You can set the following option for authenticating you as a user on Web sites that require you to log on:
Security option | High | Medium | Medium-low | Low |
|---|---|---|---|---|
Logon | Prompt for user name and password | Automatic logon only in Intranet zone | Automatic logon only in Intranet zone | Automatic logon with current username and password |
See Also
For more information about Internet Explorer security settings, refer to "Setting Up Security Zones" on the Microsoft Web site at www.microsoft.com/windows/ie/using/howto/security/setup.asp and "Working with Internet Explorer 6 Security Settings" on the Microsoft Web site at www.microsoft.com/windows/ie/using/howto/security/settings.asp.
In this exercise, you will examine your current Internet Explorer security zone settings, experiment with changing your security options, and add and remove Web sites from the trusted and restricted sites lists.
OPEN Control Panel.
Troubleshooting
To complete this exercise as written, you must be running Internet Explorer as your default Web browser. If you do not have a working Internet connection, the dialog box settings you see might look slightly different from the ones shown here, but you will still be able to complete the exercise.
Follow these steps:
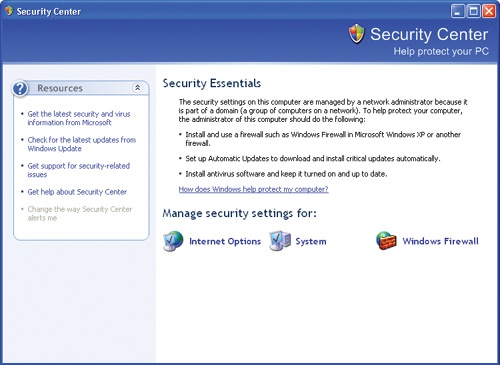
In Control Panel, click the Security Center icon.
The Security Center window appears:
The contents of this window may change depending on whether you are connected to a network domain.
Click the Internet Options icon.
The Internet Properties dialog box appears.
Click the Security tab, which looks something like this:
Depending on your current security settings, the Security level for this zone area displays either a slide control like the one shown here or a custom setting.
If your screen shows a custom setting, click the Default Level button to return the Internet zone to the default Medium security level.
Drag the slide control down one mark to Medium-low.
A message box warns you that you have selected a security level lower than the recommended minimum.
Click OK to retain the default Medium security level.
Next you’ll try customizing the security options.
Click the Custom Level button to display this Security Settings dialog box:
The default security level is displayed in the Reset custom settings area. You can change this to Low, but it is not recommended.
Scroll through the options and change a few to see how changing security levels works. When you’re finished making changes, click OK.
A message box prompts you to confirm your changes.
Click Yes to customize your security options and close the Security Settings dialog box.
In the Internet Options dialog box, the security level is now shown as Custom.
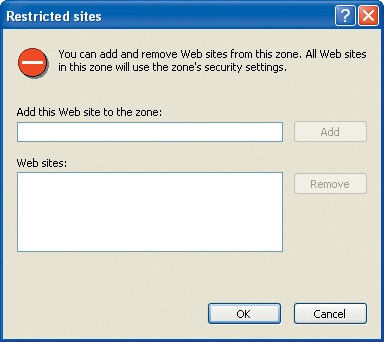
Click the Restricted sites icon, and then click the Sites button.
This Restricted sites dialog box appears:
In the Add this Web site to the zone box, type the name of a Web site to experiment with, such as
www.microsoft.com, and then click the Add button.The Web site you entered moves to the Web sites list; if you visit the Web site now it will be as a restricted site.
Tip
If you want to experiment with the restricted sites setting, you can click OK to close the Restricted sites dialog box, and then click OK to close the Internet Properties dialog box and apply your changes. If you do this, be sure to return to the Internet Properties dialog box and reset your security levels when you’re done.
In the Web sites list, select your practice site, click the Remove button to clear the list, and then click OK to close the Restricted sites dialog box.
Click the Internet icon, and then click the Default Level button to return the Internet zone to the default security level.
To implement this security level, click OK; otherwise, click Cancel to close the Internet Properties dialog box without implementing any of the changes.
CLOSE Security Center and Control Panel.
Windows XP (prior to SP2) includes Internet Connection Firewall (ICF). Service Pack 2 updates ICF to the new Windows Firewall. Windows Firewall protects your computer from receiving any unwanted connections, such as connections made by certain kinds of computer viruses. With Windows Firewall, the only connections that can be made to your computer are those either initiated or approved by you.
Unlike ICF, Windows Firewall is enabled by default for all users and all connections to your computer, including local area network (LAN), Virtual Private Network (VPN), and dial-up connections. You can make changes to the configuration of Windows Firewall for your own user profile without affecting other users’ configurations.
Windows Firewall settings are controlled from the Security Center window installed with Service Pack 2.
In this exercise, you will examine your Windows Firewall setting options.
OPEN Control Panel.
Follow these steps:
In Control Panel, click the Security Center icon.
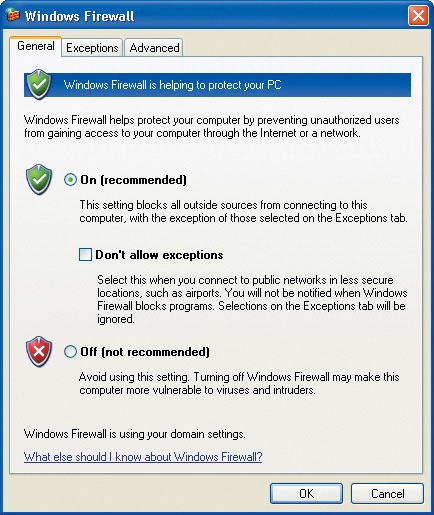
In the Security Center window, click Windows Firewall.
The Windows Firewall dialog box appears:
Read the descriptions of the three basic options: On (with exceptions allowed), Don’t allow exceptions, and Off.
When you are connecting to an unsecured or questionable network such as free connections in public locations, you should return to this dialog box and select the Don’t allow exceptions check box.
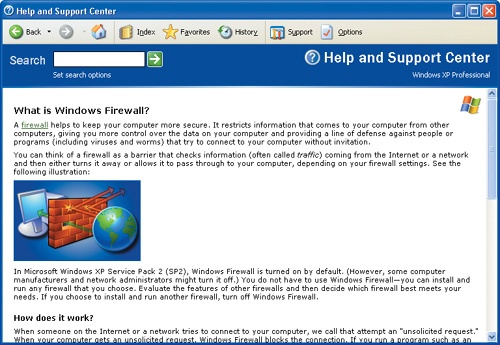
At the bottom of the General tab, click the What else should I know about Windows Firewall link.
The Help and Support Center opens to the Windows Firewall topic:
You can consult this Help file at any time if you want further information about Windows Firewall.
Read through the topics, and then click the Help and Support Center window’s Close button.
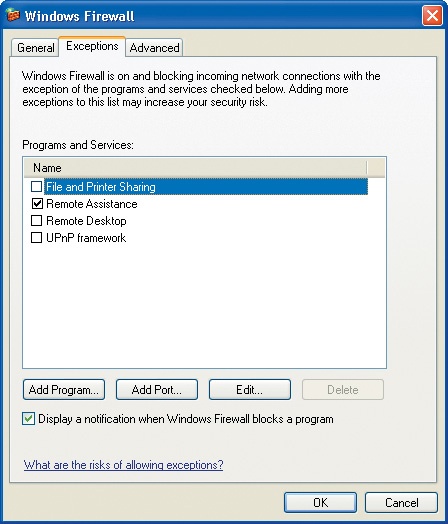
In the Windows Firewall dialog box, click the Exceptions tab to display the list of programs and services that you can choose to allow to bypass the firewall:
Remote Assistance is the only exception enabled by default.
See Also
For more information about Remote Assistance, refer to "Asking for Help from Someone Else" in Chapter 10.
By clicking the buttons below the list, you can grant access to additional programs, and specify whether those programs can access the entire Internet, your local network only, or a specific list of computers. Or, if the program you want to use requires access to a specific port, you can open that port through the firewall.
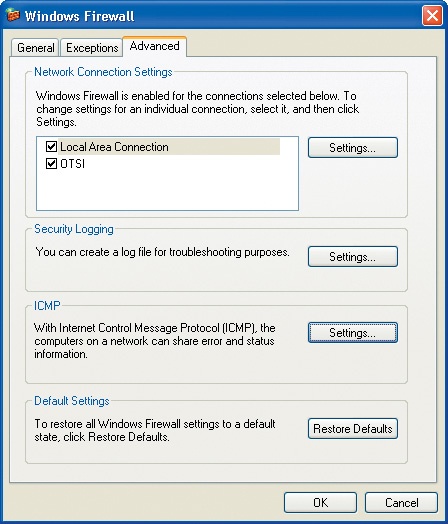
Click the Advanced tab to display the network connection setting options:
Note that you can configure individual settings for each of your network connections. You can enable logging and network information sharing, and if you are concerned that your firewall protection might be compromised by settings you’ve changed, you can restore the default Windows Firewall settings at any time.
Click the Cancel button to close the Windows Firewall dialog box without making any changes.
CLOSE the Security Center and Control Panel windows.
Every computer has a name that uniquely identifies it within a workgroup or network domain.
Multiple people can log on to one Windows XP computer with their own user accounts. The user account type governs the tasks that a person can perform on the computer.
Each computer user can control the look and feel of his or her Windows XP computing experience.
User accounts can have associated passwords to protect the privacy of each person’s data.
Windows XP Service Pack 2 enables certain security settings by default to protect your computer from unwanted traffic.
You can easily analyze and optimize your computer’s security settings. You can also set different levels of security for different types of Web sites.