
|
Your computer stores information in the form of files. There are many different types of files. Some are used to run programs, some are created by programs, and some are created by you. The files used or created by programs include executable files and dynamic-link libraries (DLLs). These files are sometimes hidden to prevent accidental deletion of important data. The files you create include documents, spreadsheets, graphics, text files, slide shows, audio clips, video clips, and other things that you can open, look at, and change using one of a variety of applications.
Files are organized on your computer in folders. When Microsoft Windows XP is installed on a computer, it creates three system folders:
Documents and Settings. This folder contains a subfolder for each user profiles–each user who has logged on to the computer or who has logged on to a network domain through the computer. Windows XP can create multiple profiles for one person if that person logs on in different ways. For example, you might have one folder for when you are logged on to the domain and another folder for when you are not logged on to the domain.
Program Files. This is the folder where most programs install the files they need in order to run. When you install a new program, you are generally given the opportunity to change the installation folder; if you accept the default, the program is installed in this location.
WINDOWS. This folder contains most of the critical operating system files. You can look, but unless you really know what you are doing, don’t touch! If you upgraded your computer from an earlier version of Windows, the earlier version’s WINNT folder might still remain on your computer.
Troubleshooting
If you upgraded your computer from an earlier version of Windows, the earlier version’s WINNT folder might still remain on your computer.
Within each profile subfolder in the Documents and Settings folder, Windows XP creates five folders:
Cookies. This folder contains special files that store your Internet account information for various Web sites.
Desktop. This folder contains the files, folders, and shortcuts displayed on the Windows desktop.
Favorites. This folder contains the files, folders, and Web sites that you save as your Favorites.
My Documents. This folder is a convenient place to store documents, spreadsheets, and other files you want to access quickly. This folder contains two subfolders: My Music and My Pictures, which have special capabilities for handling multimedia files.
Start Menu. This folder contains the program shortcuts displayed on the Start menu.
You shouldn’t ever need to change the folders that individual programs create and use on your computer, but knowing how to organize the files you create is essential if you want to be able to use your computer efficiently.
All files have names, and all file names consist of two parts: the name and the extension, separated by a period. The type of file or the program in which it was created is indicated by the extension. The extension is a short (usually three letters, sometimes two or four) abbreviation of the file type. By default, Windows XP hides file extensions. If you would prefer to see your file extensions, open My Documents (or any folder) in Windows Explorer, and on the Tools menu, click Folder Options. On the View tab, clear the Hide extensions for known file types check box, and then click OK to close the dialog box and apply your settings.
Tip
When discussing file types, people often refer to them by their extensions only, as in "I’m going to e-mail you some docs for your review."
Files also have icons, which are graphic representations of the file type. Depending on the way you’re looking at your files, you might see a large icon, a small icon, or no icon at all.
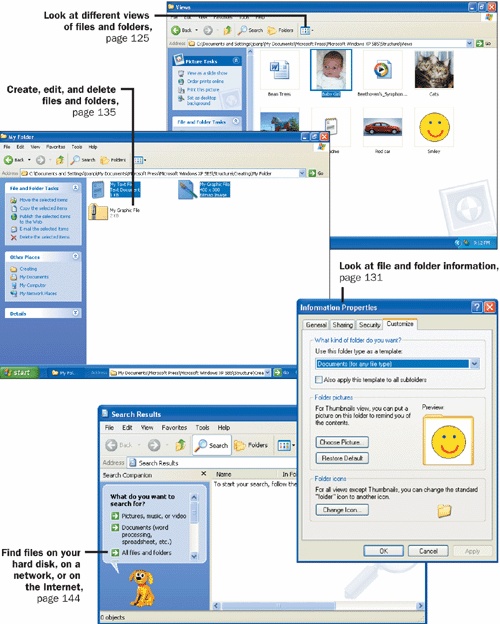
In this chapter, you will learn how to view and manipulate your files and folders.
See Also
Do you need only a quick refresher on the topics in this chapter? See the Quick Reference entries in Chapter 5 Working with Files and Folders.
Important
Before you can use the practice files in this chapter, you need to install them from the book’s companion CD to their default location. See "Using the Book’s CD-ROM" in Display for more information.
More About Extensions and Icons
Whether or not you can see extensions and icons, every file has one of each assigned to it. Some of the most common file type extensions and icons include the following:
File type | Extension | Icon |
|---|---|---|
Bitmap image | .bmp | |
Cascading style sheet | .css | |
comma-delimited text file | .cvs | |
Dynamic-link library | .dll | |
Microsoft Office Word document | .doc | |
Document template | .dot | |
Executable file | .exe | |
Graphics Interchange Format image | .gif | |
Hyper Text Markup Language document | .htm or.html | |
Joint Photography Experts Group image | .jpg | |
Microsoft Office Access database | .mdb | |
Audio file | .mp3 | |
Portable Document Format file | ||
Microsoft Office PowerPoint presentation | .ppt | |
Rich Text Format document | .rtf | |
Plain text file | .txt | |
Waveform audio file | .wav | |
Microsoft Office Excel spreadsheet | .xls | |
Extensible Markup Language file | .xml | |
Compressed (zipped) folder | .zip |
You can use Windows Explorer to view all the files, folders, drives, and peripherals on your computer, as well as those on any computers you are connected to through a network. Windows Explorer now has two views:
Folders view displays the hierarchical structure of files, folders and subfolders, drives, and peripheral storage devices on your computer. It also shows any network drives that have been mapped to drive letters on your computer.
Tasks view displays links to tasks and places that are related to the folder you’re currently looking at. The tasks and places are updated automatically based on the contents of the folder.
You can open a specific folder in Windows Explorer by using the Start menu options, the Windows Explorer Address Bar, or the Address toolbar on the taskbar.
In this exercise, you will start Windows Explorer in Folders view, explore the files and folders on your computer in different views, and practice navigating between folders.
BE SURE TO log on to Windows before beginning this exercise.
Follow these steps:
On the Start menu, point to All Programs, point to Accessories, and then click Windows Explorer.
Tip
You can quickly display Windows Explorer by right-clicking the Start button and clicking Explore. If you have a WINDOWS LOGO key on your keyboard, you can hold down this key and press E. You also can create a shortcut to Windows Explorer on your desktop to make it easily accessible. Right-click a blank area of the desktop, point to New, and then click Shortcut. In the Type the location of the item box, type
explorer.exe, and click Next. In the Type a name for this shortcut box, typeExplorer(or accept the default), and click Finish. To make the shortcut accessible when open windows obscure the desktop, you can drag the shortcut to the Quick Launch toolbar on the taskbar.Windows Explorer opens your My Documents folder in Folders view, looking something like this:
Tip
The Microsoft Press folder will be visible only if you installed the practice files from this or any other Microsoft Press book in the default folder. If you did not install the practice files, or if you installed them in an alternate location, you will not see them here.
Below the title bar, most windows have a menu bar with several categories of actions, called menus. Each menu lists a number of commands that you can carry out on the files and folders displayed in the window. Below the menu bar you see one or more toolbars of various types. These toolbars include buttons that you use to carry out common actions, often with a single mouse click.
Folders view displays the folder structure on the left and the contents of the selected folder on the right. For example, in the screen graphic on the facing page, the My Documents folder is selected on the left and its contents are shown on the right. This is the traditional Windows way of looking at things.
On the toolbar, click the Folders button.
The My Documents window changes to look like this:
Tip
Your specific Windows Explorer display can vary depending on the hierarchical structure of your computer and whether you have explored its contents before. For example, the Address Bar might not be visible in your Windows Explorer window.
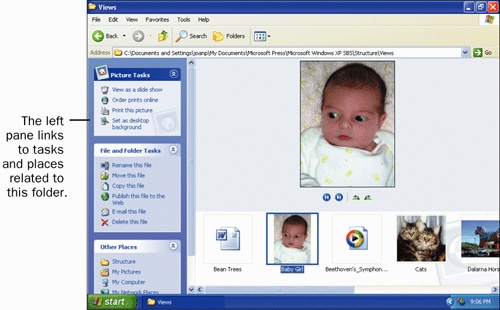
The right pane still displays the contents of the current folder, but the left pane now displays a list of tasks and places that are relevant to the currently selected folder or file. This is the Windows XP way of looking at things.
Click the Folders button again to return to Folders view.
In the left pane, click My Computer to see the list of drives and removable storage devices available to your computer.
Click Local Disk (C:) to see the list of folders stored there.
Important
The folders and files stored directly on a drive are said to be stored in that drive’s root directory. The first time you attempt to display the contents of the root directory, you might see a warning message telling you to click a link to display the files. This is because the root directory often contains system files that should not be modified or moved in any way.
If the right pane does not display the contents of the root directory, click Show the contents of this folder.
The Folders pane now lists the available drives and removable storage devices, the default Windows folders, and any other folders you have created in the root directory.
The right pane displays the contents of the root directory. As you can see here, the subfolders displayed in the right pane are the same as those listed in the Folders pane:
In the left pane, click Documents and Settings to expand the folder.
Click All Users to expand that folder.
The All Users folder contains four subfolders: Desktop, Favorites, Shared Documents, and Start Menu. Files, programs, and shortcuts contained in these folders are available to everyone using this computer.
In the left pane, click each of the folders and subfolders in the All Users folder to view the contents of that folder.
Click the minus sign next to the All Users folder to contract the folder structure.
Click your own name or user name to expand your user profile.
In the right pane, double-click the My Documents folder.
In Home Edition, click your personalized folder (for example, Joan’s Documents).
The folder is highlighted in the left pane, and its contents are displayed in the right pane. The folder name appears on the window’s taskbar button, and the full path to the folder is displayed in the Address Bar.
Tip
The path of a folder or file gives the address where the folder or file is stored on your hard disk. A typical path starts with the drive letter and lists the folders and subfolders, separated by backslashes (), you have to go through to find the folder or file. If the Address Bar is not visible, you can display it by right-clicking the toolbar and clicking Address Bar on the shortcut menu. You might then have to right-click the toolbar and click Unlock the Toolbars to be able to drag the Address Bar below the toolbar.
In the right pane, double-click the My Pictures folder.
The folder contains a shortcut to a Sample Pictures folder, whose icon displays previews of up to four pictures in the folder:
In Home Edition, you might not see these pictures.
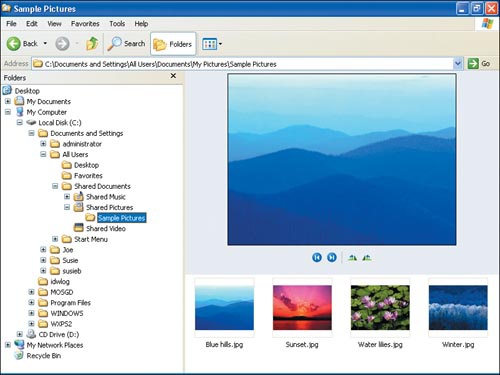
In the right pane, double-click the Sample Pictures folder.
The contents of the folder are displayed:
When you double-click the shortcut, you link to the folder to which the shortcut points. In this case, the shortcut links to the All Users folder. The Address Bar reflects the actual location of the folder.
On the toolbar, click the Back button.
You return to your previous location, your own My Pictures folder.
On the toolbar, click the Forward button.
You return to the Sample Pictures folder.
On the toolbar, click the Up button.
You move up one folder to the C:Documents and SettingsAll UsersDocumentsMy Pictures folder.
Click the Close button at the right end of the window’s title bar to close the window.


On the right side of the Windows Explorer window, you can view your files and folders in several different ways. You can view thumbnails or slide shows of graphic files, display file and folder types as tiles or icons, or view a detailed or not-so-detailed file list. The view options for each folder are available on that folder window’s toolbar, and they vary depending on the contents of the folder. Available views include the following:
Details view displays a list of files or folders and their properties. The properties shown by default for each file or folder are Name, Size, Type, and Date Modified. For pictures, the defaults also include Date Picture Taken and Dimensions. You can display a variety of other properties that might be pertinent to specific types of files, including Date Created, Data Accessed, Attributes, Status, Owner, Author, Title, Subject, Category, Pages, Comments, Copyright, Artist, Album Title, Year, Track Number, Genre, Duration, Bit Rate, Protected, Camera Model, Company, Description, File Version, Product Name, and Product Version.
Filmstrip view displays a large version of the currently selected picture at the top of the window above a single row of smaller versions of all the pictures in the current folder. This option is available only for the My Pictures folder and its subfolders. Subfolders containing graphics display miniature versions of up to four of the graphics contained in the folder on top of the folder icon.
Icons view displays the icon and file name for each file or folder in the current folder.
List view displays a list of the files and folders in the current folder, with no information other than the file name and a small icon representing the file type.
Thumbnails view displays miniature representations of each file in the current folder. Thumbnails of graphics are small versions of the graphics themselves. Other types of files are represented by file type icons. Subfolders containing graphics display miniature versions of up to four of the graphics contained in the folder on top of the folder icon. The file or folder name is displayed below the thumbnail.
Tiles view displays a large file type icon or folder icon, the file or folder name, and up to two additional pieces of information for each file in the current folder. The additional information varies depending on the type of file.
In this exercise, you will open a folder in Windows Explorer, navigate to another location using the Address Bar, and then view a group of files in several different ways.
BE SURE TO log on to Windows and display the Windows Explorer Address Bar before beginning this exercise.
Tip
If the Address Bar is not visible in your current view of Windows Explorer, right-click the toolbar and then click Address Bar on the shortcut menu.
USE the image, text, document, and audio files in the practice file folder for this topic. These practice files are located in the My DocumentsMicrosoft PressMicrosoft Windows XP SBSStructureViews folder.
Follow these steps:
On the Start menu, click My Documents.
The My Documents folder opens in Windows Explorer.
The right pane displays the folders and files contained in your My Documents folder. The left pane displays a list of tasks and places that are relevant to the My Documents folder.
Click in the Address box on the Address Bar.
My Documents is highlighted, and anything you type will now replace it.
Press END, and then type
Microsoft PressMicrosoft Windows XP SBSStructureViews. (If you did not save the practice files in the default location, substitute the correct location.)Click the Go button or press ENTER.
You move to the specified folder.
Click Baby Girl to preview this picture:
The current view displays the selected file, along with a "filmstrip" of all the other files in the folder.
On the toolbar, click the Views button.
A drop-down menu displays the view options available for this folder:
The menu indicates that Filmstrip view is currently selected.
On the menu, click Thumbnails.
The folder content is displayed in Thumbnails view:
The associated tasks and locations do not change, because you have changed only how you see the folder’s content, not the content itself.
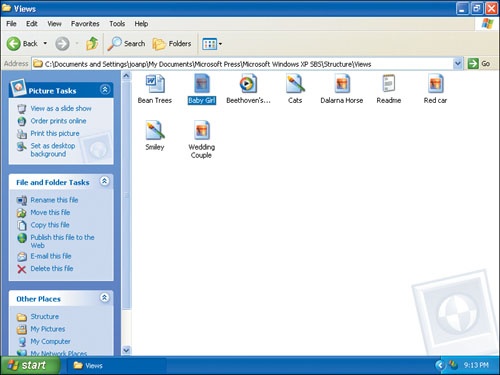
On the toolbar, click the Views button again, and then on the drop-down menu, click Icons to switch to Icons view:
On the Views drop-down menu, click List to switch to List view:
On the Views drop-down menu, click Details to switch to that view:
Move the pointer over the first four column headings (Name, Size, Type, and Date Modified).
As the pointer passes over each heading, the heading changes color to indicate that it is currently selected.
Click Size.
The nine files are re-sorted in ascending order by file size, as indicated by the up arrow next to Size.
Click Size again.
The files are re-sorted in descending order by file size, and the arrow changes direction to indicate the change of order.
Right-click any of the column headings to display this shortcut menu:
The columns currently displayed on the right side of the window are indicated by check marks. Name is gray because the file name must be displayed.
On the shortcut menu, click Author.
A check mark appears next to your selection. When the menu closes, a new column called Author is displayed, and the names of the people who created the files are listed, for files that have associated authors.
Right-click a column heading, and click More at the bottom of the shortcut menu.
The Choose Details dialog box appears:
The currently displayed columns appear at the top of the list.
Scroll through the list of available columns.
Clear the Author check box, and then click OK.
The Choose Details dialog box closes and the Author column disappears.
Click the Close button to close Windows Explorer.


Each file and folder has a variety of information associated with it, including its name, size, author, and many other items. You can view the information for all the files or subfolders in a folder by looking at the folder contents in Details view. You can look at the information for a specific file or folder by viewing its properties. You can also edit some file and folder properties.
Windows XP has a variety of special folder types. By storing files of the corresponding type in one of these folders, you can use features that are desirable for that type, such as playing music clips or viewing photographs. Folder types include:
In this exercise, you will add the Address toolbar to the taskbar, navigate to a directory using the Address toolbar, view the properties of a file, view the properties of the folder, and change the picture shown on the front of the folder.
BE SURE TO log on to Windows and unlock the taskbar before beginning this exercise.
Tip
To lock or unlock the taskbar, right-click the taskbar and then click Lock the Taskbar on the shortcut menu.
USE the image, text, document, and audio files in the practice file folder for this topic. These practice files are located in the My DocumentsMicrosoft PressMicrosoft Windows XP SBSStructureInformation folder.
Follow these steps:
Right-click the taskbar. On the taskbar shortcut menu, point to Toolbars, and then click Address.
The Address toolbar is added to the taskbar. It is currently minimized, like this:
Position the pointer over the double dotted line to the left of the Address toolbar until the pointer changes to a double-headed arrow. Then drag the line to the left until you can see the entire Address toolbar:
Click in the Address box, and type
My DocumentsMicrosoft PressMicrosoft Windows XP SBSStructureInformation.Click the Go button or press ENTER.
You move to the specified folder, which looks like this:
Right-click the Bean Trees file, and click Properties on the shortcut menu.
This Bean Trees Properties dialog box appears:
Click each tab, and look at the information. Then click Cancel.
On the Other Places menu, click Structure to move up one level.
Right-click the Information folder and then click Properties on the short-cut menu.
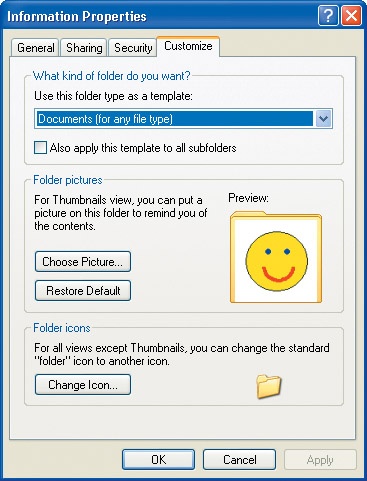
The Information Properties dialog box appears.
Look at the information on the General, Sharing, and Security tabs.
The information on the tabs is identical to that in a file’s Properties dialog box.
Click the Customize tab:
Click the down arrow to the right of the Use this folder type as a template box to view the list of available folder templates.
Click the down arrow again to contract the list.
In the Folder pictures section, click Choose Picture.
The Browse dialog box appears, displaying the graphic files contained in the Information folder.
Click Smiley, and then click Open to close the dialog box and apply your selection.
Click OK to close the Information Properties dialog box and save your changes.


Each application on your computer creates files of a particular type. For example, Microsoft Office Word creates documents (.doc files), Microsoft Office Excel creates spreadsheets (.xls files), Microsoft Office Access creates databases (.mdb files), and so on. You can also create and edit simple text documents and graphics using the tools that come with Windows XP.
As you create these files, you will want to create folders in which to organize the files for easy retrieval.
When you buy a computer these days, it likely comes with a hard disk that will store several gigabytes (GB) of information. A gigabyte is 1 billion bytes, and a byte is a unit of information that is the equivalent of one character. Some of your files will be very small–1 to 2 kilobytes (KB), or 1000 to 2000 bytes–and others might be quite large– several megabytes (MB), or several million bytes. If you create enough files that you start to get concerned about running out of hard disk space, you might want to zip folders. A zipped folder is a folder whose contents are compressed. The folder can contain files you created, program files, or even other folders. Compressed content takes up less space and is easier to copy or move from one place to another, especially if you are doing the copying via e-mail. Zipped folders are indicated by a zipper on the folder icon. You can protect a zipped folder with a password.
In this exercise, you will create a new folder and two new files: a text document and a picture. You will then compress your two new files into a zipped folder and delete all the files and folders you created in the exercise.
BE SURE TO log on to Windows and display the Address toolbar on the taskbar before beginning this exercise.
Tip
If the Address toolbar is not open on the taskbar, open it by right-clicking the taskbar, pointing to Toolbars on the shortcut menu, and clicking Address. Then resize the toolbar by dragging the dotted line to the left. The taskbar must be unlocked for you to be able to resize the Address toolbar.
On the taskbar, click in the Address box, and type
C:My DocumentsMicrosoft PressMicrosoft Windows XP SBSStructureCreating.Press ENTER or click the Go button.
The window for the specified folder opens in Windows Explorer. The folder is empty.
Click the Views button, make sure that Tiles is selected on the drop-down menu, and then click away from the menu to close it.
Read the list of tasks currently available on the File and Folder Tasks menu.
Because the folder doesn’t contain any files, all three available options are related to folders.
On the File and Folder Tasks menu, click Make a new folder.
A new folder is created with the name New Folder. The file name is selected so that you can change it:
Type
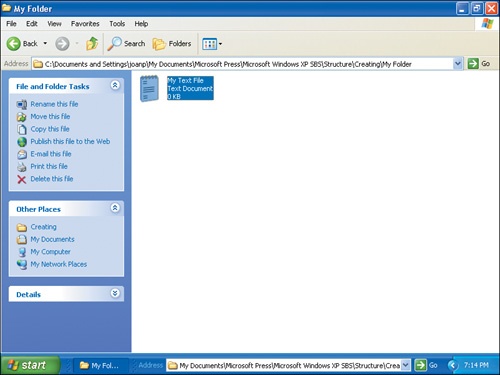
My Folder, and then press ENTER.Double-click your new folder to open it.
Right-click the empty right pane, and on the shortcut menu, point to New, and then click Text Document.
A new text document is created with the name New Text Document. The file name is selected so that you can change it.
Type
My Text File.txt, and then press ENTER.The file is renamed, and the file name, file type, and file size are displayed next to the file’s icon. Because the file is empty, the size is 0 KB.
The File and Folder Tasks menu changes to reflect the addition of your new file:
Double-click the file icon.
The text document opens in the Microsoft Notepad program, where you can edit it.
Tip
Notepad is a text-editing program that comes with Windows XP.
Type
This is a text file that I created in Microsoft Windows Notepad.Click the file’s Close button to close the file, and click Yes when you are prompted to save your changes.
The file information changes to reflect a new file size of 1 KB.
Right-click an empty area of the right pane, and on the shortcut menu, point to New, and then click Bitmap Image.
A new graphic file is created with the name New Bitmap Image. The file name is selected so that you can change it.
Type
My Graphic File.bmp, and then press ENTER.The file is renamed, and the file name and file type are displayed next to the file’s icon.
Right-click the graphic file, and click Edit on the shortcut menu.
The file opens in the Microsoft Paint program:
Because it is a new file, the canvas is empty.
Click the Maximize button to make the window fit the screen.
Tip
Paint is a simple graphics program that comes with Windows XP. You can use Paint to create simple bitmap images and to edit graphics in the bitmap format. Bitmaps represent images as dots, or pixels, on the screen.
See Also
For more information, refer to Chapter 9.
Experiment with the Paint tools as you paint a picture of any kind. (Click a tool, move the pointer over the blank canvas, and drag the pointer to use the tool.) When you’re done, click the Paint window’s Close button, and click Yes when you are prompted to save your changes.
The file information changes to reflect the size of the graphic; in this case, the file is 400 pixels wide x 300 pixels high.
Click the text file to select it, hold down the CTRL key, and then click the graphic file to select it as well.
As you select each file or combination of files, the File and Folder Tasks menu changes to reflect the currently valid options.
Right-click the selection, and on the shortcut menu, point to Send To, and then click Compressed (zipped) Folder.
If you are prompted to associate ZIP files with compressed (zipped) folders, click Yes.
A zipped folder named after one of the selected files is created:
Double-click the zipped folder to open it.
You can see your files inside.
On the toolbar, click the Up button two times to return to the My DocumentsMicrosoft PressMicrosoft Windows XP SBSStructureCreating folder.
Click the My Folder folder to select it.
On the File and Folder Tasks menu, click Delete this folder, and click Yes when you are prompted to confirm the deletion of the folder and its contents.
Click the window’s Close button to close it.


When you have accumulated enough files that you need to organize them in some way, you can easily make copies of existing files and folders, move files and folders from one location to another, and rename files and folders. The organization methods of copying, pasting, moving, and renaming are the same for both files and folders.
In this exercise, you will make copies of files and folders using four different methods and then move files between folders using two different methods.
BE SURE TO log on to Windows and display the Address toolbar on the taskbar before beginning this exercise.
Tip
If the Address toolbar is not open on the taskbar, open it by right-clicking the taskbar, pointing to Toolbars on the shortcut menu, and clicking Address. Then resize the toolbar by dragging the dotted line to the left. The taskbar must be unlocked for you to be able to resize the Address toolbar.
USE the Folder 1 and Folder 2 folders and the My Graphic File image in the practice file folder for this topic. These practice files are located in the My DocumentsMicrosoft PressMicrosoft Windows XP SBSStructureOrganizing folder.
Follow these steps:
On the taskbar, click in the Address box, and type
My DocumentsMicrosoft PressMicrosoft Windows XP SBSStructureOrganizing.Press ENTER or click the Go button.
The My DocumentsMicrosoft PressMicrosoft Windows XP SBSStructure Organizing folder opens in Windows Explorer. The folder contains two subfolders named Folder 1 and Folder 2. Folder 1 contains a file called My Graphic File. Folder 2 is currently empty.
Click the Views button, and make sure that Tiles is selected.
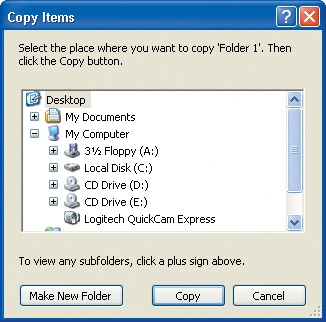
Click Folder 1 to select it. On the File and Folder Tasks menu, click Copy this folder.
The Copy Items dialog box appears:
In the dialog box, browse to the My DocumentsMicrosoft PressMicrosoft Windows XP SBSStructureOrganizing folder, and then click Copy.
Windows creates a copy of the folder, called Copy of Folder 1.
Right-click the new folder, and click Rename on the shortcut menu.
The folder name is selected for editing.
Type
Folder 3, and press ENTER.The folder is renamed.
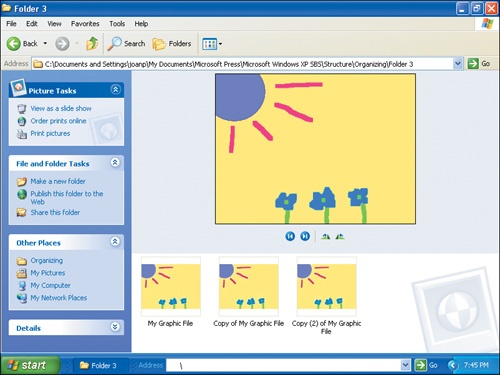
Double-click Folder 3 to open it.
Folder 3 opens in Filmstrip view. The folder contains a file called My Graphic File.
Now you’ll create a copy of this file. Right-click the file, and click Copy on the shortcut menu.
Right-click an empty area at the bottom of the right pane, and click Paste on the shortcut menu.
Troubleshooting
In Filmstrip view, you manipulate the files shown at the bottom of the window rather than the preview file at the top of the window.
Windows creates a copy of the file, called Copy of My Graphic File.
To create a second copy by using a different method, on the Edit menu, click Paste.
Windows creates a copy with the name Copy (2) of My Graphic File:
To create a third copy by using a different method, on the toolbar, click the Up button to return to the My DocumentsMicrosoft PressMicrosoft Windows XP SBSStructureOrganizing folder.
Double-click Folder 2 to open it, and press CTRL+V, the keyboard shortcut for the Paste command, to paste the copy in that folder.
Windows creates a copy of the file. Because it is the first copy in this location, it is named My Graphic File without a copy number.
Tip
Keyboard shortcuts provide a quick way of carrying out actions from the keyboard instead of using the mouse. If a command has a keyboard shortcut, the shortcut appears next to the command on its menu. For a list of keyboard shortcuts, search the Help file for Windows keyboard shortcuts overview.
On the toolbar, click the Back button two times to return to Folder 3.
Click Copy (2) of My Graphic File to select it.
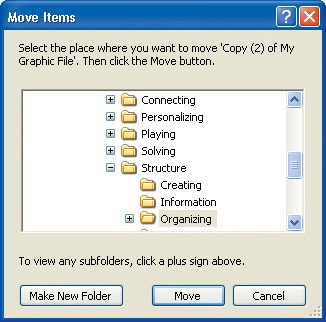
On the File and Folder Tasks menu, click Move this file.
The Move Items dialog box appears with the My DocumentsMicrosoft Press Microsoft Windows XP SBSStructureOrganizing folder highlighted:
Click Organizing, click Folder 2, and then click Move to move the file to Folder 2. When prompted to confirm the move, click Yes.
The file disappears from Folder 3.
Click the Up button, and then double-click Folder 2 to open it.
The file is now in this folder.
On the toolbar, click the Folders button to change to Folders view.
The left pane displays the hierarchical structure of your computer, expanded to show the current folder:
Drag Copy (2) of My Graphic File from the right pane, and drop it in Folder 1 in the left pane. Click Yes when prompted to confirm the move.
The file disappears from Folder 2.
In the left pane, click Folder 1 to open it.
The file is now in this folder.
Click the window’s Close button to close it.
You can search for all types of objects, including files, printers, and computers, using a feature of Windows XP called Search Companion. You can search for files on your own computer, on other computers on your network, or even on the entire Internet. You can search for computers on your organization’s network, and you can also search for people on your network or on the Internet.
Search Companion is user-friendly and comes equipped with a guide, in the form of an animated screen character. The default character is Rover the dog, but you can change the character to Merlin the wizard, Courtney the tour guide, or Earl the surfer. If you want, you can remove the character entirely.
Included in Search Companion is Indexing Service, which indexes the files on your computer while your computer is idle, improving search speed. (Indexing creates a database of file names and contents so that Search Companion can search the database instead of having to search the files themselves.)
In this exercise, you will search for a text file called Find this file on your computer, turn on Indexing Service to speed up future searches, and change the Search Companion animated screen character.
BE SURE TO log on to Windows before beginning this exercise.
USE the Find this file text file in the practice file folder for this topic. This practice file is located in the My DocumentsMicrosoft PressMicrosoft Windows XP SBSStructureSearching folder.
Follow these steps:
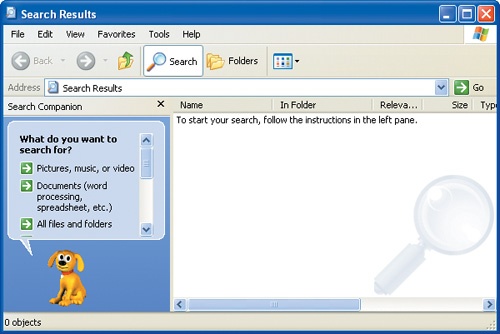
On the Start menu, click Search.
The Search Results window opens, with Search Companion displayed on the left side:
Click the window’s Maximize button so that you can see all the options at once.
In the list of search options, click All files and folders.
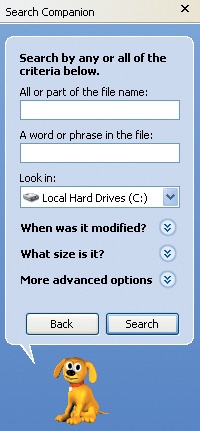
Search Companion’s next page prompts you to enter identifying characteristics, called search criteria, for the file or folder you are searching for:
In the A word or phrase in the file box, type
Windows XP Step by Step.Tip
In searches, the asterisk (*) is a wildcard that represents any number of characters (including zero). The question mark (?) is a wildcard that represents one character. For example, enter *.txt to search for any text file; enter s*.txt to search for any text file with a file name that begins with the letter s; and enter s??.txt to search for any text file that has a three-letter file name beginning with the letter s.
In the Look in box, make sure that Local Hard Drives is selected in the drop-down list, and then click Search.
Search Companion searches your computer for all files containing the search phrase and displays a list of the files in the right pane. The search might take some time, but entering a specific phrase helps to narrow the results.
When the search is complete, Search Companion’s next page asks whether your desired file was found. It should now be easy to spot the file you’re looking for, Find This File.
In the left pane, click Yes, but make future searches faster.
On the next page, click Yes, enable Indexing Service, and then click OK.
There is no apparent change when you turn on Indexing Service, but from that point on, it will run continuously on your computer.
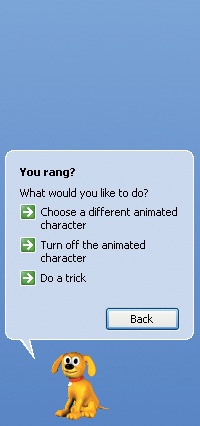
Just for fun, click Do a trick a few times to see how talented Rover is.
When you’re done, click Choose a different animated character.
On the selection page, click Next to cycle through the available options, and when you find a character you like, click OK.
Rover wanders off, and your selected character takes his place.
Click the Close button in the Search Companion title bar to close the pane.
Windows XP displays graphic representations of the files and folders on your computer. Different file types are represented by different graphic icons, so you can more easily differentiate between them.
Certain data such as file size and author is stored with each file. You can view and change this data in Windows Explorer.
You can use Windows Search Companion to locate a file or folder on your computer using whatever information you have about that item. You can locate specific files based on words or phrase contained therein.