Chapter 17. Customizing Word
In This section:
You can customize almost every part of Microsoft Word 2013 to match your preferences, no matter how unique your work requirement and methods might be. The tabs, groups, and tools on the ribbon; the buttons on the Quick Access Toolbar; and the default locations of document files can all be modified.
In addition, the Word Options dialog box contains settings that modify the way Word 2013 displays, prints, saves, and edits documents. You can control how your spelling and grammar are checked, and you can protect your documents against possible loss of data.
Styles are central to the way Word documents are formatted, and different types of documents need different groups of styles. By learning to use the Manage Styles dialog box, you can control which styles appear in the Styles pane and the Quick Style gallery on the Home tab. You can also determine the order in which they are sorted.
Customizing the screen
You can change the way Word 2013 displays many of its tools so that they suit the way you work. If you find that you’re distracted by the ribbon and other items that appear by default, you can reduce the clutter to the minimum. Alternatively, if you prefer to reduce the number of clicks needed to work on documents, you can make all of the tools visible.
In addition to the options mentioned here, there are many display choices available in the Word Options dialog box (these are discussed in Show or hide information on screen and on paper).
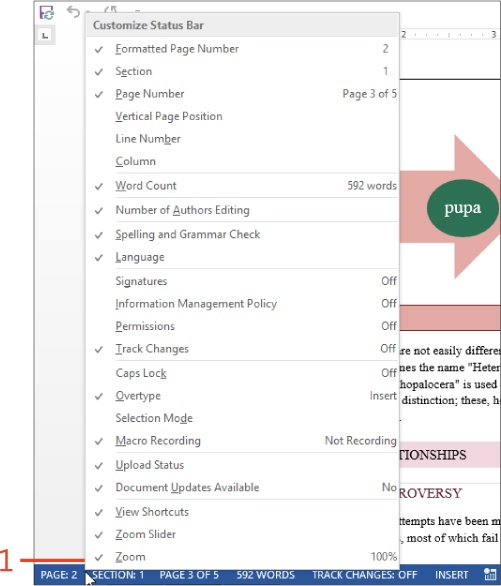
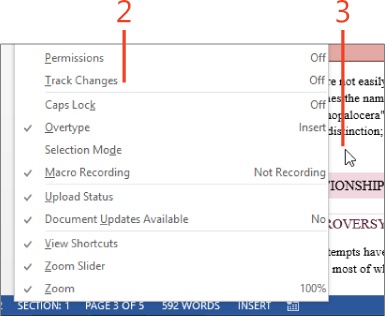
Show or hide items on the status bar
Right-click the status bar to display the Customize Status Bar shortcut menu.
Tip
For many of the items on the Customize Status Bar shortcut menu, when you change their state, the corresponding text or icon either appears or disappears immediately. However, some icons—for example, Number Of Authors Editing and Selection Mode—will not appear even after they’re enabled unless there is some information for them to show.
Click any item on the shortcut menu to add or clear the check mark to the left of the item.
Click anywhere outside the shortcut menu to dismiss it.
Tip
The Formatted Page Number item shows the number that would be displayed by a Page field on the current page. It is affected by the restarted numbering that you can apply in the Format Page Numbers dialog box. Conversely, the Page Number item shows the count of pages from the beginning of the document to the current page as well as the number of pages in the whole document.
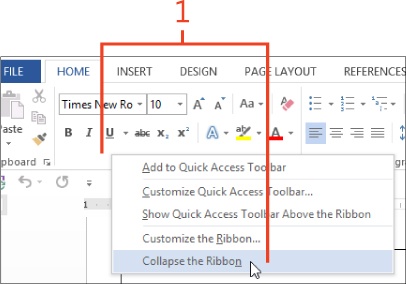
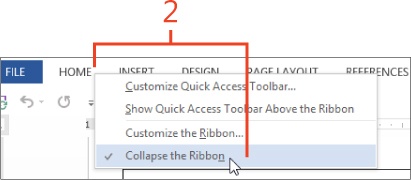
Show or minimize the ribbon
Right-click anywhere on the ribbon and then, on the shortcut menu that appears, click Collapse The Ribbon.
When the ribbon is minimized, right-click any of the tabs and then, on the shortcut menu, click Collapse The Ribbon to clear the check mark to its left.
Tip
Other ways of showing and hiding the ribbon include clicking the up-arrow at the right end of the ribbon, pressing the keyboard shortcut Ctrl+F1, and double-clicking any tab.
See Also
For information about auto-hiding the ribbon, see Hide the ribbon.
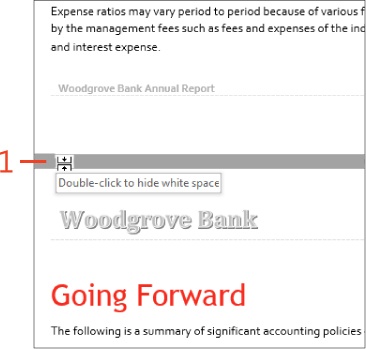
Show or hide white space
If the document isn’t already in Print Layout view, on the View tab, in the Views group, click Print Layout. Hold the cursor over the space between the bottom of one page and the top of the next page so that the cursor changes to a pair of boxes containing arrows pointing toward one another.
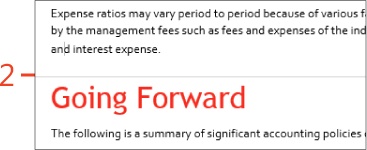
Double-click to collapse the space between pages and to hide any header or footer.
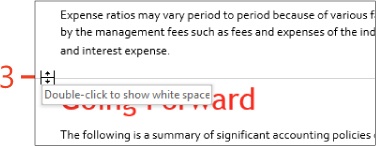
Double-click the collapsed space between pages to restore the space and any header or footer.
Customizing the keyboard
Much of the work that you do in Word 2013 typically consists of typing text. When your hands are on the keyboard, it can be time-consuming and disruptive to reach for the mouse to select and format text, copy and paste, or do other tasks that involve buttons on the ribbon. By remembering a small set of keyboard shortcuts, you can greatly increase your efficiency.
There is a list of common built-in keyboard shortcuts in Use keyboard shortcuts, and many other commands also have default keyboard shortcuts. When you find that you often use a command that doesn’t have a keyboard shortcut, you can assign a shortcut of your own.
Keyboard shortcuts in Word aren’t limited to commands. You can also assign keyboard shortcuts to macros, styles, fonts, building blocks, and symbols.
Assign a keyboard shortcut to a command
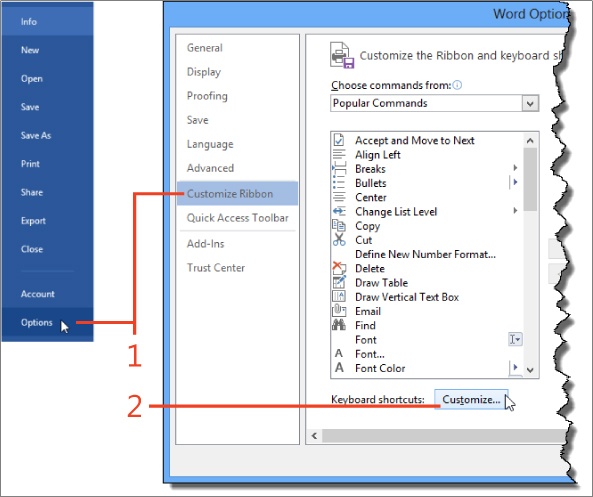
Click File to display the Backstage view and then click the Options tab. In the Word Options dialog box, in the left panel, click Customize Ribbon.
Toward the bottom of the dialog box, click the Customize button.
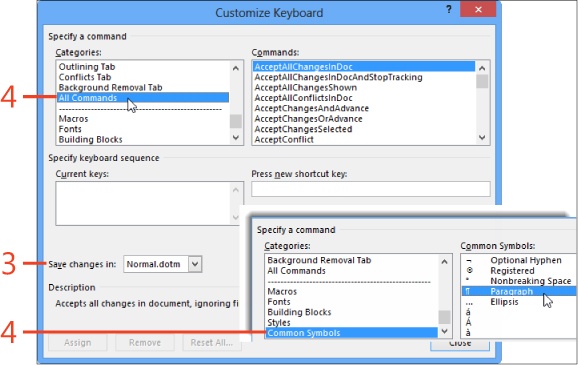
In the Customize Keyboard dialog box, if the open document is based on a custom template, and you want the new keyboard shortcut to apply only to documents based on that custom template, click the Save Changes In list box and select the template’s name. Otherwise, leave Normal.dotm selected.
Click one of the following items in the Categories list:
If the command to which you want to assign a keyboard shortcut is visible on one of the tabs of the ribbon, click the name of that tab.
If the command to which you want to assign a keyboard shortcut is not visible on any of the tabs of the ribbon, or if you aren’t sure which tab contains the command, click All Commands.
If you want to assign a keyboard shortcut to a macro, a font, a building block, a style, or one of a small set of common symbols, click the corresponding item at the bottom of the list.
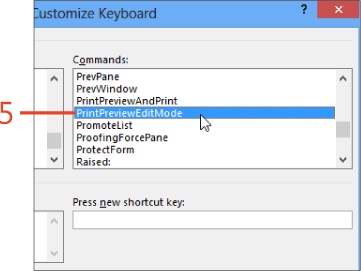
In the Commands list, click the command to which you want to assign a keyboard shortcut.
If you selected one of the items at the bottom of the Categories list in step 4, the label above the Commands list changes to the name of the category you selected.
Tip
If the keyboard shortcut that you press is already assigned to another command, the message Currently assigned to: command name (where command name is the actual command) appears below the Current Keys list box. If you want to leave the keyboard shortcut assigned to its original command, delete the contents of the Press New Shortcut Key text box and then press a different shortcut. Otherwise, the keyboard shortcut will be removed from the original command and assigned to the new command.
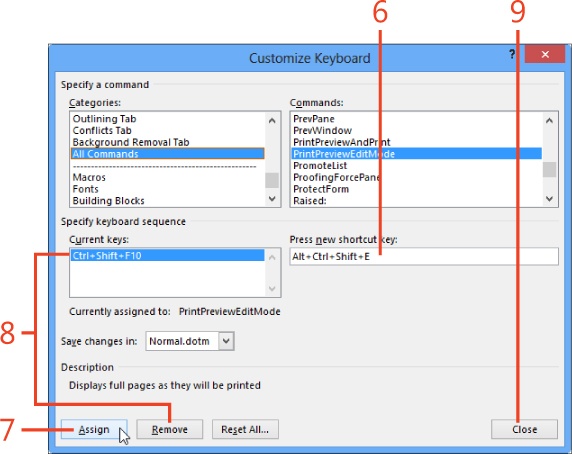
Click the Press New Shortcut Key text box and then press the key or group of keys that you want to use as the keyboard shortcut for the selected command.
Click Assign.
If the selected command has a keyboard shortcut that you no longer want, click that keyboard shortcut in the Current Keys list box and then click the Remove button.
While the Customize Keyboard dialog box remains open, you can assign more keyboard shortcuts. When you have assigned all the shortcuts that you want, click Close.
Assign a shortcut to a symbol
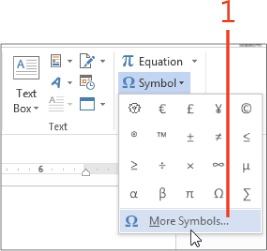
If the symbol to which you want to assign a keyboard shortcut is not one of those in the Common Symbols category, on the ribbon, click the Insert tab. Then, in the Symbols group, click Symbol. At the bottom of the drop-down gallery that appears, click More Symbols.
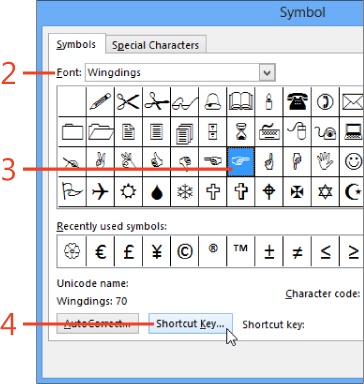
Click the Font list box and then click the name of the font that contains the symbol you want.
Click the symbol that you want.
Click Shortcut Key.
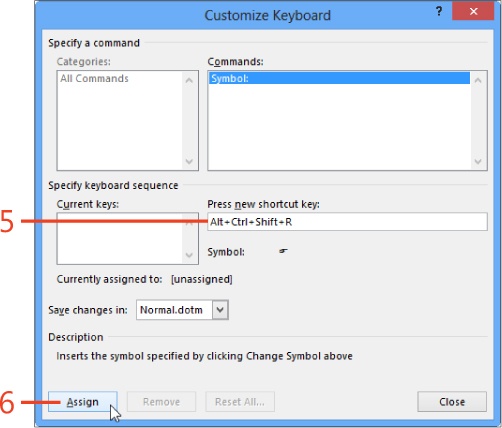
In the Customize Keyboard dialog box, place the cursor in the Press New Shortcut Key text box and then press the key or group of keys that you want to use as the keyboard shortcut for the selected symbol.
Click Assign and then click Close.
Try This
When you click a symbol in the Symbol dialog box, a label next to the Shortcut Key button shows the built-in keyboard shortcut (if any) for that symbol. For some symbols it is of the form Alt+number, which means that you hold the Alt key while typing the number on the numeric keypad (with Num Lock turned on). For other symbols it is of the form number, Alt+X, which means that you type the number as ordinary text in the document and then press Alt+X.
Customizing the Quick Access Toolbar
The Quick Access Toolbar is a place where you can put buttons for frequently used commands. This makes it easy for you to reach them no matter which tab is selected on the ribbon. It’s very easy to add and remove buttons on the Quick Access Toolbar. You can add any command or group that appears on the ribbon and many more that don’t appear there.
Although the Quick Access Toolbar initially sits in the title bar above the ribbon, you can move it below the ribbon. In that position the toolbar is closer to your document, and it can hold more buttons.
Add a ribbon item to the Quick Access Toolbar
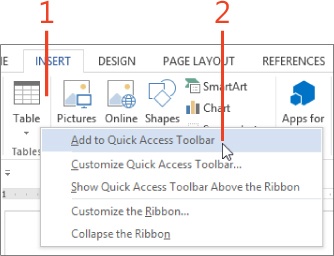
On the ribbon, right-click the tool that you want to add to the Quick Access Toolbar.
On the shortcut menu that appears, click Add To Quick Access Toolbar.
If you clicked a thumbnail in a gallery on the ribbon, such as the Styles gallery on the Home tab, the shortcut menu shows Add Gallery To Quick Access Toolbar. Individual thumbnails can’t be added to the Quick Access Toolbar.
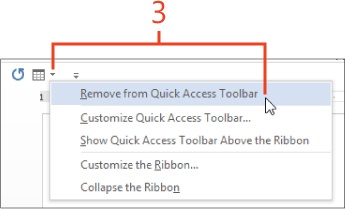
To remove a tool from the Quick Access Toolbar, right-click the tool on the toolbar and then, on the shortcut menu, click Remove From Quick Access Toolbar.
Tip
You can click the drop-down arrow at the right end of the Quick Access Toolbar and select or clear the check mark next to any of the common commands to show or hide them on the toolbar. One of those commands is the Touch/Mouse Mode tool, which changes the spacing of the ribbon and toolbar buttons.
Add other items to the Quick Access Toolbar
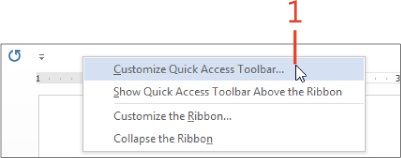
Right-click anywhere on the Quick Access Toolbar or on the ribbon. Then, on the shortcut menu that appears, click Customize Quick Access Toolbar.
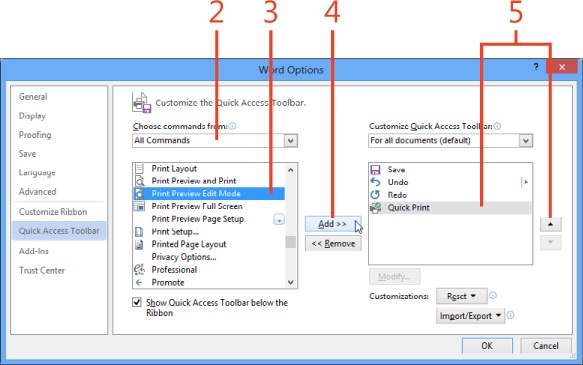
In the Word Options dialog box, click the Choose Commands From list box and click a category of commands.
Click the name of a command that you want to add to the Quick Access Toolbar.
Click Add.
To change the order of the tools on the Quick Access Toolbar, click a command name in the list on the right and then click the up-arrow or down-arrow to move the command in the list.
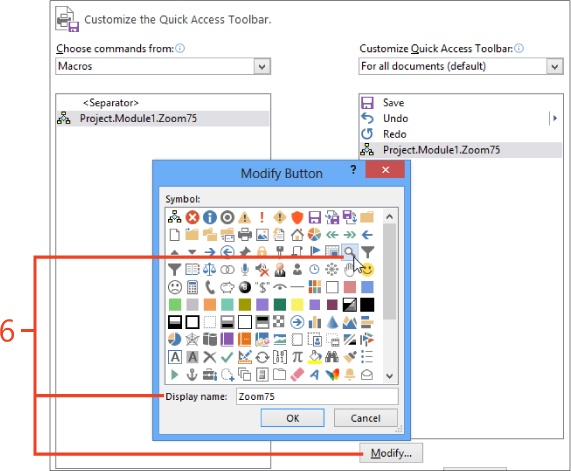
If you added a macro to the Quick Access Toolbar, you can click Modify. Then, in the Modify Button dialog box, you can edit the display name that is shown in the button’s tooltip and select an icon from the Symbol box. Tools other than macros cannot be modified.
Tip
When the value in the Customize Quick Access Toolbar list box is For all documents (default), your customizations will be stored in the Normal.dotm template. If you want to keep the customizations only in the current document, click the box and select the document’s name. To store your customizations in a template other than Normal.dotm, use the Open command in the Backstage view to open that template and then select the template’s name in the Customize Quick Access Toolbar list box.
Creating a custom tab or group on the ribbon
As you work in Word 2013, you might find that the arrangement of tools on the ribbon tabs doesn’t match your preferences. Instead of struggling to change your habits, you can change the ribbon. You can add new groups to the existing tabs, and you can create entirely new tabs, with just a few clicks.
You can’t add or remove tools in the built-in groups. However, you can add a new custom group to an existing tab, and then put the tools of your choice into that group.
Insert a new custom tab
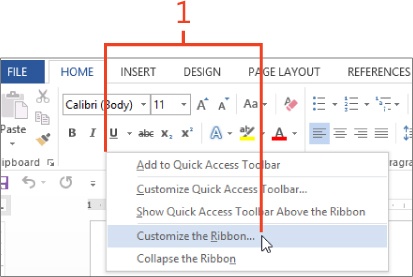
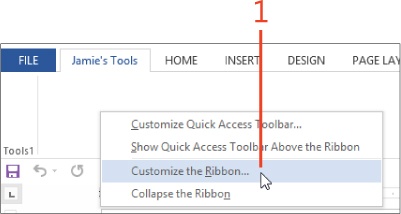
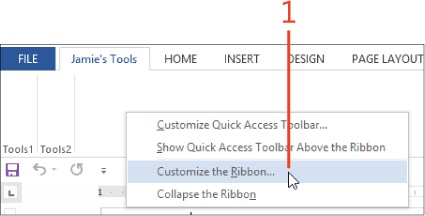
Right-click anywhere on the ribbon and then, on the shortcut menu that appears, click Customize The Ribbon.
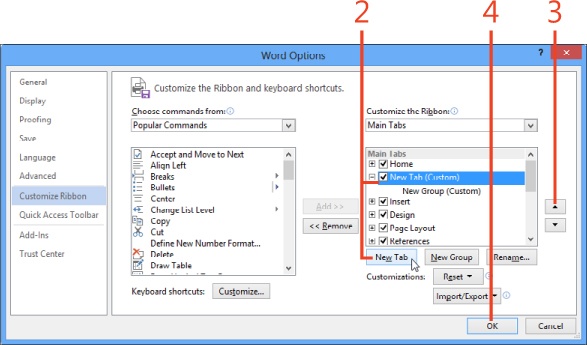
In the Word Options dialog box, click New Tab to insert a new custom tab in the list box on the right. The new custom tab automatically contains one new custom group.
To change the order of the tabs, in the list box on the right, click a tab’s name and then click the up-arrow or down-arrow to move the tab within the list.
Click OK.
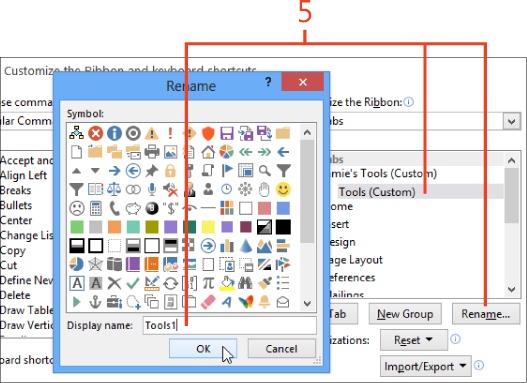
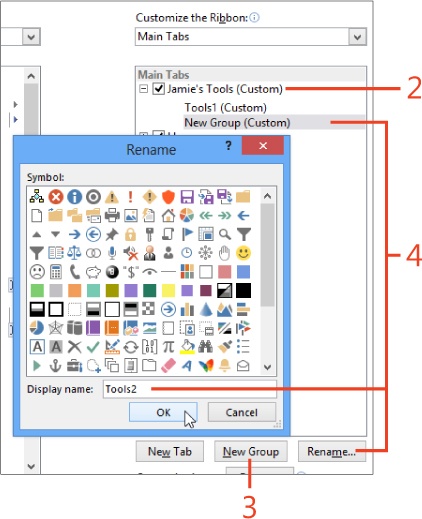
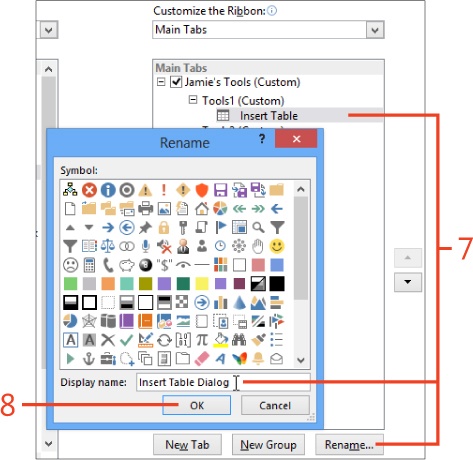
Click the new tab in the list, click the Rename button, and then, in the Rename dialog box, enter the name that you want the tab to display and click OK. Next, click the new group in the list, click the Rename button, and then, in the Rename dialog box, enter the name you want the group to display and click OK.
Try This
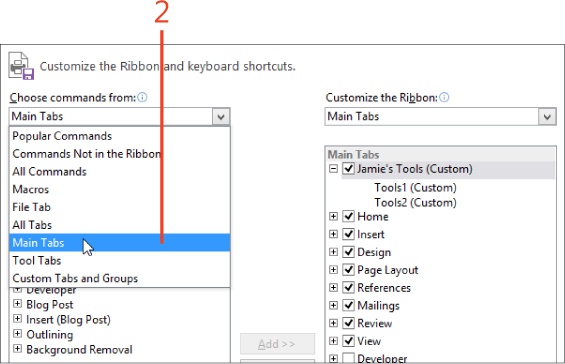
Click the Choose Commands From list box and select All Tabs. Click the plus sign next to a tab’s name in the list box on the left and click the name of a built-in group. Then, click Add to copy the group to the tab that is selected in the list box on the right. For example, you could add a copy of the Envelopes And Labels group to the Insert tab.
Insert a new custom group
Right-click anywhere on the ribbon and then, on the shortcut menu that appears, click Customize The Ribbon.
In the Word Options dialog box, in the list box on the right, click the name of the tab to which you want to add a custom group.
Toward the bottom of the dialog box, click the New Group button.
Back in the list box, click the new group, click the Rename button, and then, in the Rename dialog box, enter the name that you want the group to display.
Adding tools to a custom group
You can add any tools to a custom group that will make your work sessions more efficient. You can mix and match items from any of the built-in tabs, including the contextual tabs, and you can add commands that don’t appear anywhere on the built-in tabs.
Add a tool to a group
Right-click anywhere on the ribbon and then, on the shortcut menu that appears, click Customize The Ribbon.
Click the Choose Commands From list box and select the category that contains the tool that you want to add. If you aren’t sure which category contains the tool, click All Commands.
In the list box on the left, if the names of tabs appear, click the plus signs next to the tab and group that contain the tool you want to add, expanding the group so that the tool’s name is visible.
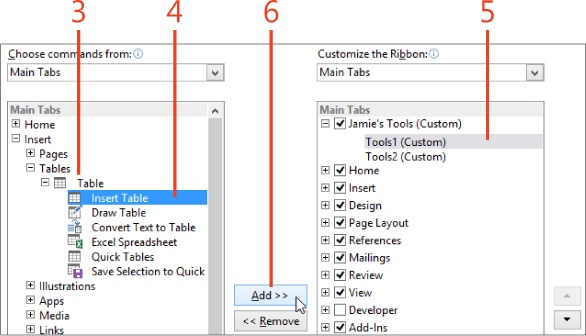
Click the name of the tool.
In the list on the right, click the custom group to which you want to add the tool.
Click Add.
If you want to change the name or icon of the tool, you can click the Rename button. Then, you can edit the display name that is shown below the tool’s button and select an icon from the Symbol box.
Click OK in each dialog box.
Setting general options
The General tab of the Word Options dialog box contains an assortment of configuration choices that you’ll probably set shortly after you install Office 2013, and never change again.
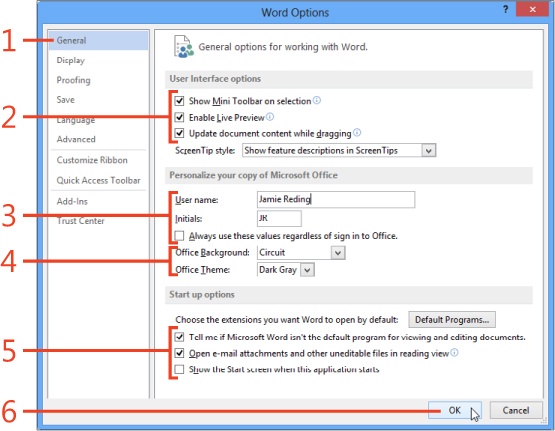
Set options on the General tab
Click File to display the Backstage view and then click the Options tab. In the Word Options dialog box, in the left panel, click General.
Select all the check boxes in the User Interface Options section unless your computer isn’t powerful enough to show live previews at full speed.
You might set the ScreenTip Style list box to Show Feature Descriptions In ScreenTips until you become familiar with most tools. Then, to avoid clutter on the screen, you can change it to Don’t Show Feature Descriptions In ScreenTips.
Enter your user name and initials, if you didn’t do so during installation of Office 2013. These values are used to identify your tracked changes and comments. If you use your copy of Word 2013 with multiple accounts, select the check box to use the same user name and initials with all accounts.
Select an Office Background (a design that appears in the right side of the title bar) and an Office Theme (the shading of the areas that surround the document surface). The values you choose affect all Office 2013 programs.
In the Start Up Options section, select the check boxes according to your preferences.
Click OK.
Tip
To see more information about an option that displays a circular icon with an i in the middle of it, hover the mouse pointer over that icon.
Tip
The Start screen is a part of the Backstage view that can appear when you start Word from its program icon. It includes a list of recently used documents and the template thumbnails from the New tab. If you clear the Show The Start Screen When This Application Starts check box, Word shows a new blank document immediately when it starts.
Controlling what is displayed and printed
The Display tab of the Word Options dialog box is where you can control some of the information that can be shown in and around your documents. It also contains some options that affect what appears when you print a document.
Show or hide information on screen and on paper
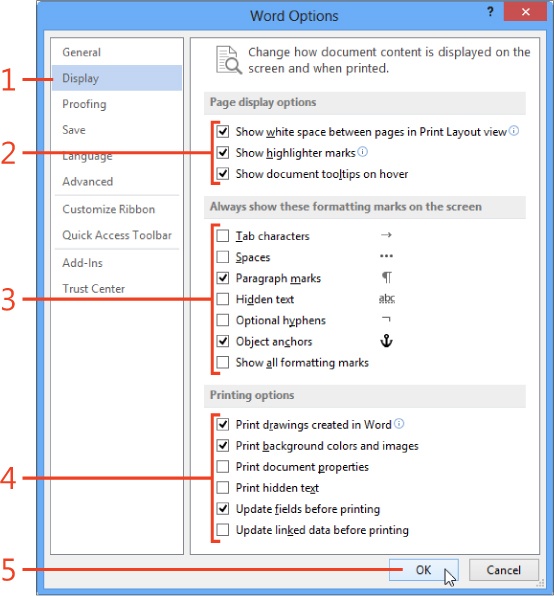
Click File to display the Backstage view and then click the Options tab. In the Word Options dialog box, in the left panel, click Display.
Select all the check boxes in the Page Display Options section.
In the Always Show These Formatting Marks On The Screen section, select the check boxes for Paragraph Marks and for Object Anchors. You can clear the other check boxes unless you want to see those marks at all times.
In the Printing Options section, select the check boxes for Print Drawings Created In Word, for Print Background Colors And Images, and for Update Fields Before Printing. You can clear the other check boxes, unless you want those items to print.
Click OK.
Tip
Changing the state of the Show All Formatting Marks check box is equivalent to clicking the Show/Hide ¶ button in the Paragraph group on the Home tab.
Tip
Changing the state of the Show White Spaces check box is equivalent to double-clicking the space between pages, as described in Show or hide white space. If you clear the Show Document Tooltips check box, tooltips won’t appear when the mouse pointer hovers over hyperlinks, cross-references, or Table of Contents fields.
See Also
For other options that affect what is displayed, see Control screen and printing behavior.
Setting spelling and grammar options
The Proofing page of the Word Options dialog box is where you can change the behavior of the spelling checker and the grammar checker. You can decide whether you want Word to notify you with red and blue squiggles whenever it detects a problem or whether you prefer to run a manual check at your convenience. You can determine which rules the grammar checker will apply, and you can add or remove custom dictionaries.
The Proofing page also contains the AutoCorrect Options button, which opens a separate dialog box. For a description of the AutoCorrect and AutoFormat options, see Set AutoCorrect options and Setting AutoFormat options.
Change the behavior of the spelling checker
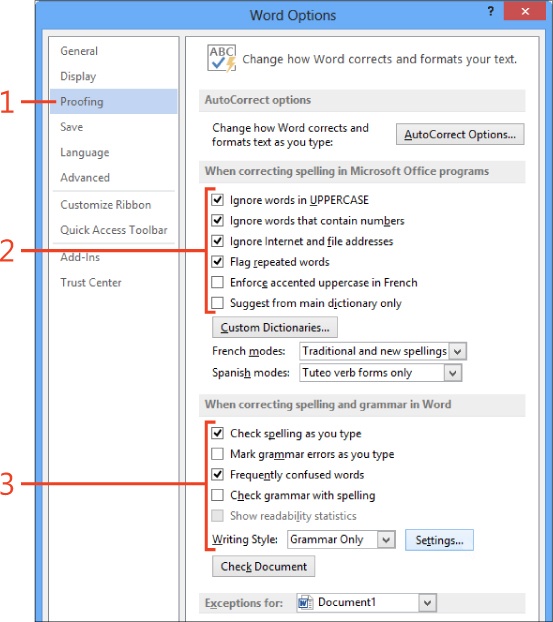
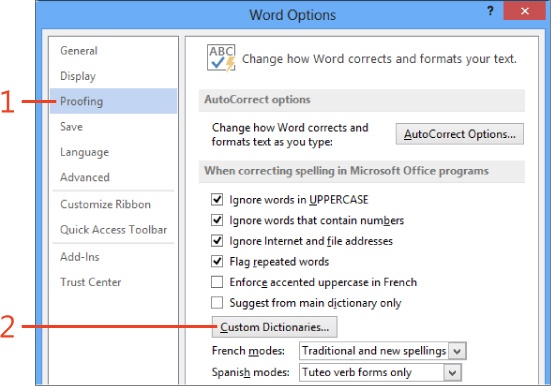
Click File to display the Backstage view and then click the Options tab. In the Word Options dialog box, in the left panel, click Proofing.
In the When Correcting Spelling In Microsoft Office Programs section, select the check boxes for at least the first four options. If you select the Suggest From Main Dictionary Only check box, the spelling checker won’t use any custom dictionaries that you have configured.
Select or clear any of the check boxes in the When Correcting Spelling And Grammar In Word section according to your preferences.
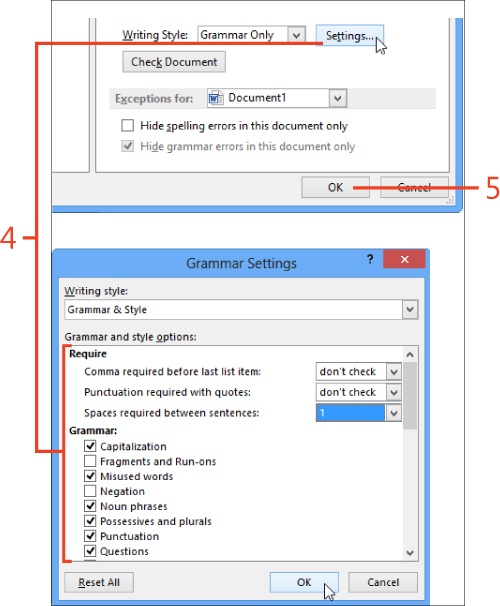
If you want to choose which rules the grammar checker applies to your documents, click the Settings button and then, in the Grammar Settings dialog box, select or clear the check boxes.
Click OK.
Tip
Word makes the check boxes in the Exceptions section available only when you have selected the corresponding As You Type options in the When Correcting Spelling And Grammar In Word section. The settings you choose are saved in the document file, so they will be maintained when you reopen the document.
Add a custom dictionary
Click File to display the Backstage view and then click the Options tab. In the Word Options dialog box, in the left panel, click Proofing.
In the When Correcting Spelling In Microsoft Office Programs section, click Custom Dictionaries.
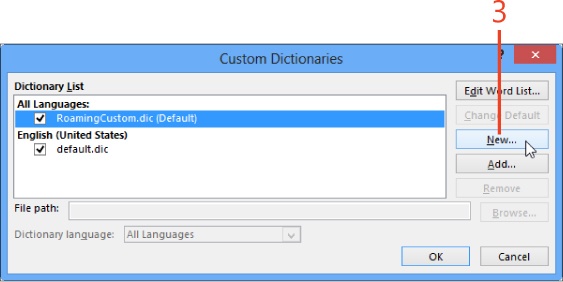
In the Custom Dictionaries dialog box, if you want to create a new custom dictionary, click New.
In the Create Custom Dictionary dialog box, enter a name for the dictionary file and click Save.
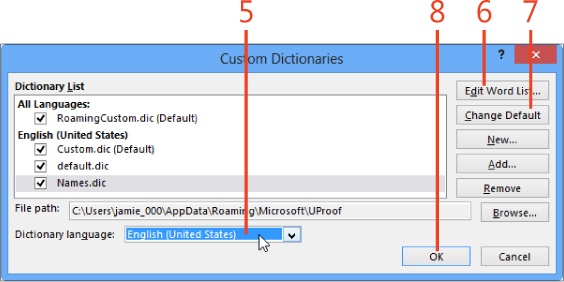
The new dictionary is initially in the All Languages section of the Custom Dictionaries dialog box. If you want this dictionary to be specific to one language, click the dictionary’s name and then, in the Dictionary Language list box, select a language.
To add or remove words in a dictionary, click the dictionary’s name and click Edit Word List.
If you want to change which dictionary is the default for a language, click the dictionary’s name and click Change Default.
Click OK.

Tip
The All Languages section and each of the individual languages have one dictionary that is designated as its default dictionary. When you right-click an unrecognized word in a document and click Add To Dictionary, that word is stored in the default dictionary for the proofing language applied to the word.
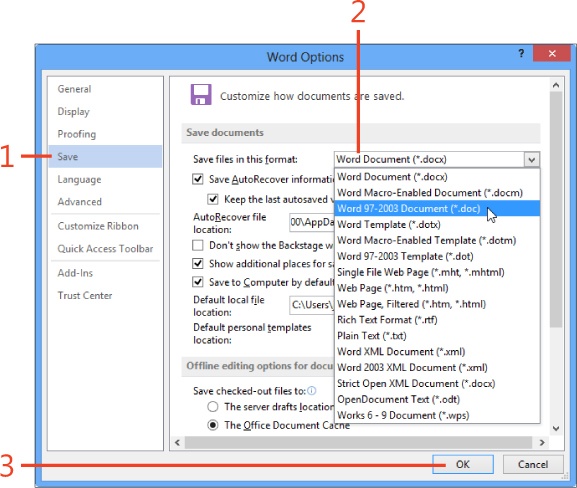
Changing the default file format for saving documents
When you save a document in Word 2013, you can choose one of the many available file formats by clicking the Save As Type list box in the Save As dialog box. If the format you choose most often is not Word Document (*.docx), you can choose another format as the default. For example, if many of the documents you write will be sent to users who might not have a version of Word later than Word 2003, you can choose Word 97-2003 (*.doc) as the default format. Then, you’ll need to change the Save As Type list box only when you want to save a document in some other file format.
Set a default file format
Click File to display the Backstage view and then click the Options tab. In the Word Options dialog box, in the left panel, click Save.
Click the Save Files In This Format list box and select the format you want to use as the default for saving new documents.
Click OK.
See Also
For more information about choosing a file format for a specific file, see Change the file type.
Set default file locations
Click File to display the Backstage view and then click the Options tab. In the Word Options dialog box, in the left panel, click Save.
Click the AutoRecover File Location text box and enter the desired path, or click Browse to choose the folder.
Click the Default Local File Location text box and enter the desired path, or click Browse to choose the folder.
Click the Default Personal Templates Location text box and enter the desired path for the folder that opens when you create and save a new template.
Click OK.

See Also
For more information about AutoRecover options, see Configure AutoRecover. For more information about saving templates, see Modify and save the template.
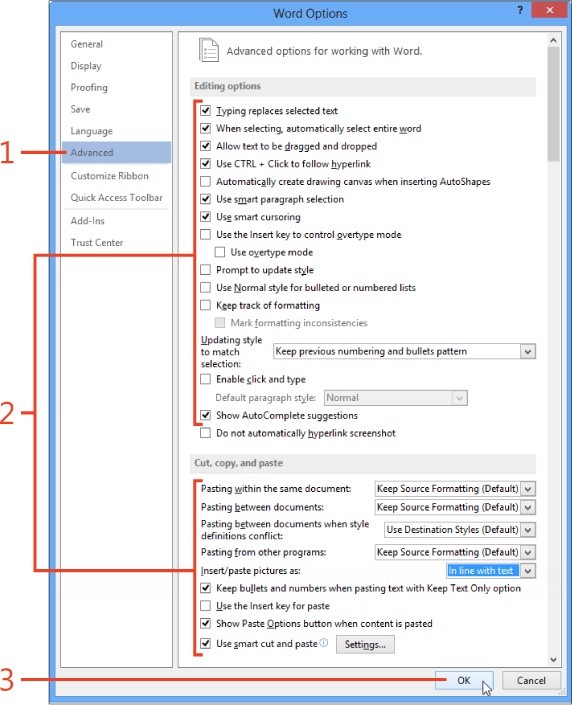
Working with advanced options
The Advanced page in the Word Options dialog box contains a large set of options that control the behavior of dozens of functions. It is divided into sections to help you navigate through the list.
Enable and disable editing features
Click File to display the Backstage view and then click the Options tab. In the Word Options dialog box, in the left panel, click Advanced.
In the Editing Options section and the Cut, Copy, And Paste section, select or clear the check boxes for the options according to your preferences. Set the more important or troublesome options as follows:
Select the Typing Replaces Selected Text check box. If it’s cleared, selected text is pushed aside when you type or paste.
Select the Use Ctrl+Click To Follow Hyperlink check box. If it’s cleared, it will be difficult to select a hyperlink in order to edit or format it.
Clear the Enable Click And Type check box. If it’s selected and you click in an area where there is no text, Word inserts empty paragraph marks and a tab character to create a paragraph at the place you clicked. You should avoid empty paragraph marks whenever possible. Instead, apply a style with a Space Above setting or insert a text box or floating table to achieve the desired text position.
Select the Show AutoComplete Suggestions check box. Auto-Complete suggestions include those for dates and for AutoText entries that are stored in the Normal.dotm template.
Set the list box for Insert/Paste Pictures As to the text wrapping that you use most often. When you need a text wrapping that’s different from the default chosen in this option, click the Layout Options button next to the picture.
Click OK.
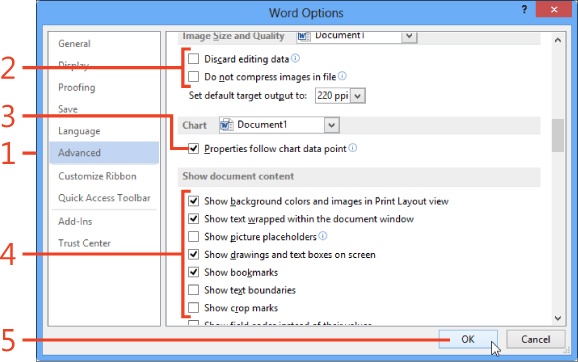
Change options related to pictures
Click File to display the Backstage view and then click the Options tab. In the Word Options dialog box, in the left panel, click Advanced.
In the Image Size And Quality section, select or clear the check boxes as follows:
If you think you might need to restore cropped or modified images to their original state, clear the Discard Editing Data check box. Otherwise, selecting the check box will help to minimize the document file size.
If you intend to print the document and need high-quality images, select the Do Not Compress Images In File check box. If you clear the check box and save the document, the images will be changed to the resolution shown in the Set Default Target Output box, which reduces the document file size but might degrade the image quality.
If your document contains charts, and you modify the formatting of the data points, select the Properties Follow Chart Data Point check mark.
In the Show Document Content section, select the check boxes for Show Background Colors And Images In Print Layout View and for Show Drawings And Text Boxes On Screen. Clear the Show Picture Placeholders check box.
Click OK.
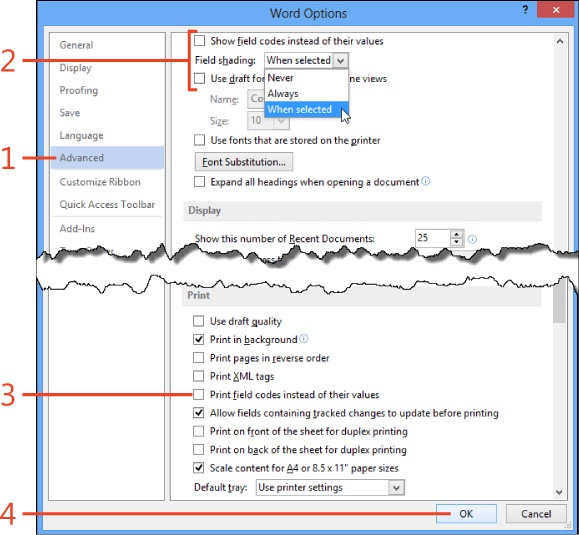
Change options related to fields
Click File to display the Backstage view and then click the Options tab. In the Word Options dialog box, in the left panel, click Advanced.
In the Show Document Content section, clear the Show Field Codes Instead Of Their Values check box. Set the Field Shading list box according to your preference.
In the Print section, clear the Print Field Codes Instead Of Their Values check box.
Click OK.
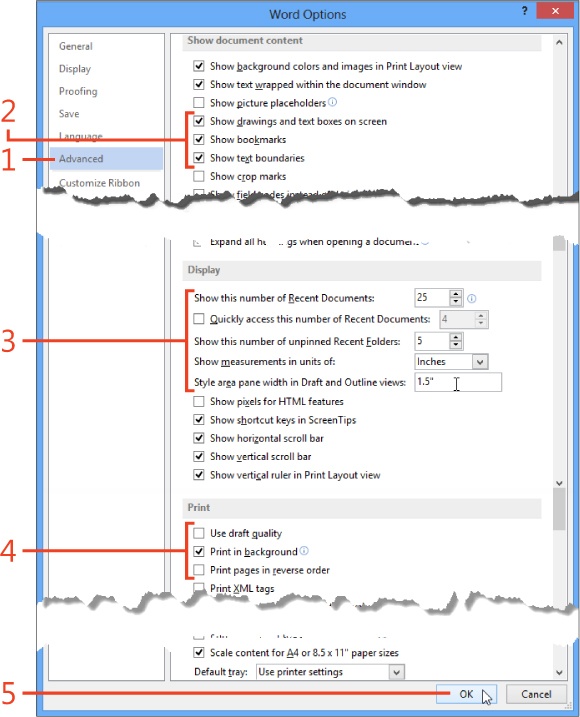
Control screen and printing behavior
Click File to display the Backstage view and then click the Options tab. In the Word Options dialog box, in the left panel, click Advanced.
In the Show Document Content section, it’s often useful to select the check boxes for Show Bookmarks and for Show Text Boundaries, at least temporarily. Select the Expand All Headings When Opening A Document check box.
In the Display section, set the first five options according to your preferences.
In the Print section, select or clear the check boxes as follows:
Clear the Use Draft Quality check box unless you want to conserve ink or toner while printing a large draft document. It might be easier to set a similar option in the Printer Properties dialog box when preparing a specific print run.
Select the Print In Background check box. This option makes it possible for you to get back to editing the document while printing is occurring. Otherwise, you have to wait until the document has been processed and passed to the Windows Spooler Service. Clearing the check box can be a useful step in troubleshooting printing problems.
Select Print Pages In Reverse Order only if your printer delivers the pages so that you have to reorder them by hand. Most printers have a similar setting in the Printer Properties dialog box.
Click OK.
Tip
The option Quickly Access This Number Of Recent Documents places the names of recent documents at the bottom of the left panel on the Open page in the Backstage view. However, the recent documents also appear on the right side of the view, and you can pin frequently used documents to keep them at the top of the list.
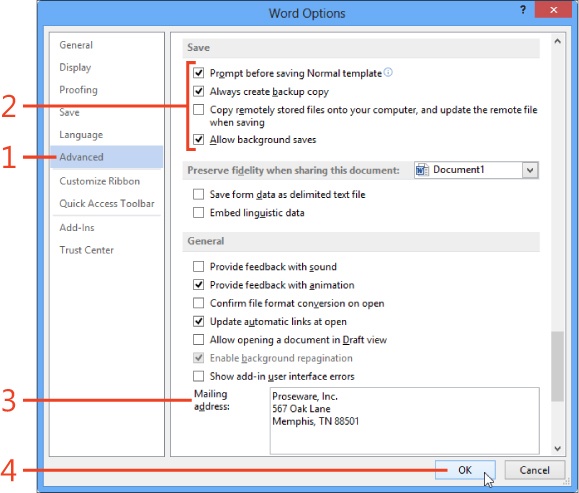
Control opening and saving behavior
Click to display the Backstage view and then click the Options tab. In the Word Options dialog box, in the left panel, click Advanced.
In the Save section, select the check boxes for Prompt Before Saving Normal Template, Always Create Backup Copy, and Allow Background Saves.
In the General section, enter your address in the Mailing Address text box. This entry is used as the return address in the Envelopes And Labels dialog box.
Click OK.
Tip
The prompt before saving the Normal Template can alert you when a change is about to be saved by mistake or when a macro has made an unexpected change.
Tip
The backup copy mentioned in the Always Create Backup Copy option is actually the most recently saved file (without any of the changes that have been made since then), renamed as Backup of filename.wbk (where filename is the actual name of the file) and stored in the same folder as the document. It might be useful if no other backup copy exists.
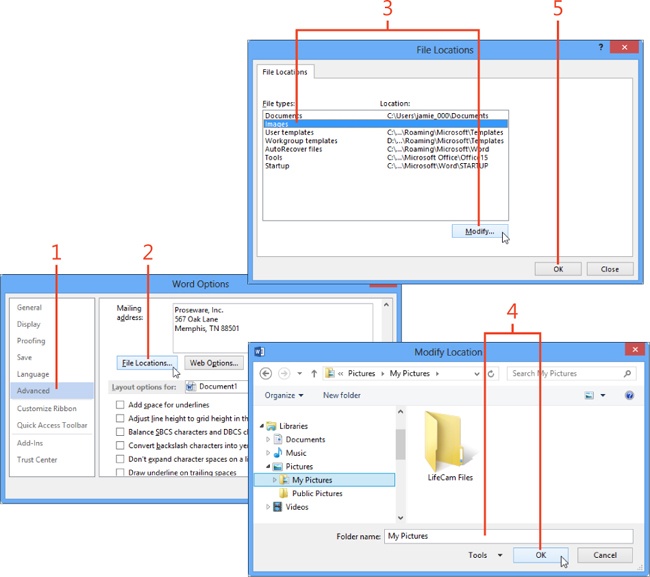
Set file locations
Click File to display the Backstage view and then click the Options tab. In the Word Options dialog box, in the left panel, click Advanced.
In the General section, click the File Locations button.
In the File Types list box, click one of the lines and click the Modify button.
If you want to change the folder that Word 2013 uses for the file type you selected, open the desired folder in the Modify Location dialog box and then click OK.
Repeat steps 3 and 4 for any other locations that you want to change and then click OK.
Caution
If you modify the locations of documents, user templates, or workgroup templates, you might need to add the new locations to the list of trusted locations. For information about trusted locations, see Trust a file location.
Managing styles
You can configure the Styles pane and the Quick Style gallery in Word 2013 to show just the set of styles that you prefer, in the order you want. The Manage Styles dialog box contains the tools you need to do this task.
For each style, you can specify whether its name is visible in the Styles pane or hidden when the Styles pane shows recommended styles. Also, for each style, you can specify a priority number that determines the order in which the style names are sorted. When the Styles pane is set to sort in the recommended order, the styles are displayed with the smallest priority numbers at the top of the list. The priority numbers also determine the order in which the styles appear in the Quick Style gallery.
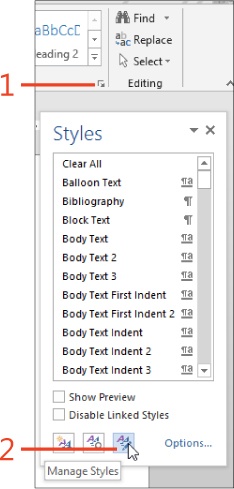
Set the recommended order of styles
On the Home tab, in the Styles group, click the dialog box launcher to open the Styles pane (shortcut, Ctrl+Alt+Shift+S).
At the bottom of the Styles pane, click the Manage Styles button.
In the Manage Styles dialog box, click the Recommend tab.
Click the Sort Order list box and select the order in which you want the list of styles in the Manage Styles dialog box to be sorted. If you want the list box to contain only the recommended styles, select the check box for Show Recommended Styles Only.
Click the name of a style in the list box or hold the Ctrl key while clicking several names. Alternatively, click Select All or Select Built-In.
Click Move Up to subtract 1 from the priority number of each selected style, or click Move Down to add 1 to the priority number of each selected style. Alternatively, you can click Make Last to assign the last possible priority number to the selected styles, or you can click Assign Value and enter the priority number that you want.
Click one of the following to change which styles appear in the Styles pane when that pane is configured to display recommended styles:
Show. Always display the style
Hide Until Used. Display the style only when it has been applied to text in the document
Hide. Never display the style
To save your changes in the template on which the current document is based, click the option New Documents Based On This Template.
Click OK.

Try This
In the Styles pane, right-click the name of any style. If the style appears in the Quick Style gallery on the Home tab, the shortcut menu in the Styles pane includes the command Remove From Style Gallery. If the style doesn’t appear in the Quick Style gallery, the shortcut menu includes the command Add To Style Gallery.
Tip
The Restrict tab of the Manage Styles dialog box performs the same function as the Formatting Restrictions section of the Restrict Editing pane, described in Limit formatting to selected styles. The Manage Styles dialog box contains an option for New Documents Based On This Template, which makes it useful for defining restrictions for a template.
Recording macros
With Word 2013, you can automate series of actions that you perform frequently. For example, suppose that you receive a monthly report from which you need to copy a set of numbers and paste them into a table in a new document. You can record the entire sequence of actions as a macro and play it back each month with a single click.
Word’s macros are written in Microsoft Visual Basic for Applications, which is a complete and powerful programming language. Although recorded macros are useful, macros created by knowledgeable programmers can greatly expand Word’s capabilities by adding features and enhancing its interactions with the other Office programs.
Start and stop the macro recorder
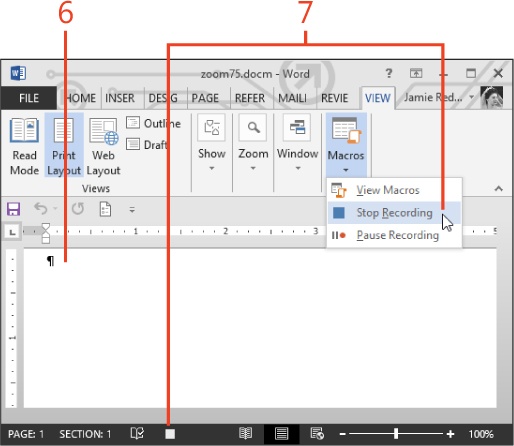
On the View tab, in the Macros group, click the drop-down arrow in the bottom part of the Macros button, and then, on the menu that appears, click Record Macro. Alternatively, if the macro recording icon is displayed on the status bar, click that icon.
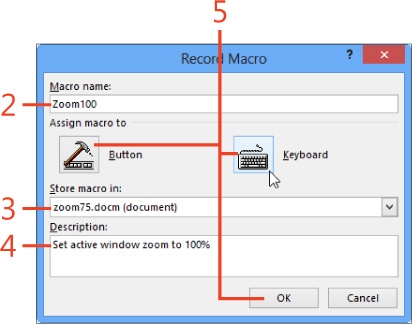
In the Record Macro dialog box, in the Macro Name text box, enter a name that describes the purpose of the macro that you want to record.
You can use letters, numbers, and underscore characters in the name. Spaces and other characters are not allowed.
Click the Store Macro In list box and choose whether to store the macro in the Normal.dotm template, the current document, or the template on which the current document is based (if that is different from Normal.dotm).
If you want to store a description of the macro as a comment in the macro’s code, type text in the Description text box.
If you want to create a button on the Quick Access Toolbar or to assign a keyboard shortcut to run the macro, click the corresponding button in the Assign Macro To section. Otherwise, click OK.
Perform all the actions that you want the macro to do, such as typing and formatting text, clicking commands, or inserting graphics or other objects.
On the View tab, in the Macros group, click the drop-down arrow in the bottom part of the Macros button, and then, on the menu that appears, click Stop Recording. Alternatively, if the macro recording icon is displayed on the status bar, click that icon.

Caution
If you click one of the buttons in the Assign Macro To section, the macro recorder will start immediately after you close the Customize Quick Access Toolbar dialog box or the Customize Keyboard dialog box. Make all the necessary entries in the Record Macro dialog box before you click either button.
Play back a macro
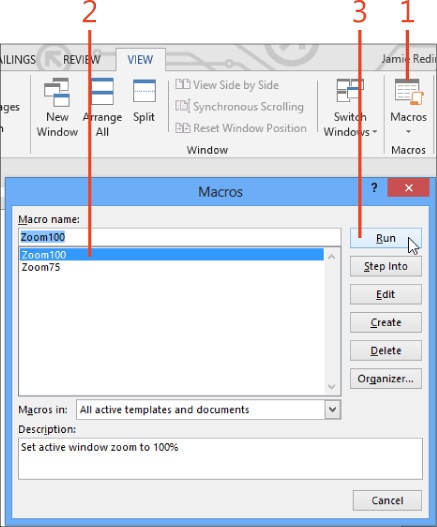
On the View tab, in the Macros group, click the top part of the Macros button (shortcut, Alt+F8) to open the Macros dialog box.
In the Macro Name list box, select the name of the macro that you want to run.
Click the Run button.
Tip
When you play back some recorded macros, they might not perform the actions that you executed during the recording session. This might be caused by running the macro when the document content differs from the document used to record the macro, or the macro recorder might have failed to record all of your actions. For information about modifying recorded macros to repair such problems, see www.word.mvps.org/FAQs/MacrosVBA/ModifyRecordedMacro.htm.