
Chapter 20
Managing Collaboration Workspaces
IN THIS CHAPTER
![]() Comparing the three key collaboration solutions
Comparing the three key collaboration solutions
![]() Glancing at the adoption rate of SharePoint in your organization
Glancing at the adoption rate of SharePoint in your organization
![]() Administering active sites
Administering active sites
“ Keep calm. It works on my machine.”
That mantra greets employees from the back of a strategically positioned monitor on the IT admin’s desk at one of my small-business customers. I’m not sure how effective the sticker is in diffusing the panic or frustration employees feel when they decides that a personal visit to the IT guy is due because the ticket they submitted a minute ago is not enough. But what I do know is that the IT guy is one of the more than half a million subredditors who regularly post tales of IT admin woes at a popular subreddit for professionals in tech support.
Admit it. If you’re an IT admin, you have mastered, or are on your way to mastering, the art of duplicity. You’ve probably used phrases like “sorry for being unclear” when you really meant “No, I wasn’t unclear. You obviously didn’t read my response to your support ticket, so do me a favor and read the entire email before you reply and copy your boss and my boss and their boss.”
I’m not going lie to you. As an IT admin for Microsoft 365 Business, you will have your share of support tickets from users confused about what productivity tool to use when. Between SharePoint, OneDrive for Business, Office 365 Groups, Skype for Business, Microsoft Teams, Yammer, and email, you won’t have a shortage of ways to create collaboration overload. A colleague once sent me an email, and then followed it up with an instant message on Skype, and then tried to catch my attention with an @mentions on Microsoft Teams. And as if that weren’t enough, I got a text message too. When I asked why he went through such lengths, the response was “I wanted to make sure that I covered all the channels because it’s urgent.”
In this chapter, you gain clarity on the use cases for SharePoint versus OneDrive for Business versus Microsoft Teams. I then walk you through the new SharePoint Admin Center experience to prepare you for managing your SharePoint environment.
Understanding Teamwork in Microsoft 365
If you look at marketing materials for Microsoft 365, you’ll repeatedly find the message that the solution is designed to unlock creativity, is integrated for simplicity, has intelligent security, and is built for teamwork. Microsoft 365 has three main scenarios for teamwork:
- Collaborating regularly with people in your internal team: Use Microsoft Teams.
- Connecting with people across the organization: Use Yammer.
- Sending targeted email communications: Use Outlook.
Underpinning this triad of scenarios is SharePoint, which is the solution for content collaboration. Within SharePoint, you also have OneDrive for Business, which is a solution for storing personal files versus team files.
In this section, I cover specific use cases to determine when to use OneDrive versus SharePoint versus Microsoft Teams to help you plan your implementation and, I hope, drive adoption of the technology you’ve invested in.
Use cases for OneDrive for Business
Each user with the Microsoft 365 Business license gets 1 terabyte (TB) of online storage in OneDrive for Business (OneDrive for short). Typically, you save documents on OneDrive for personal use at work. Personal files are documents you don’t want to share with anyone else or are not ready to share with anyone yet. For example, if I’m working on a sales report for the month and I’m still pulling in all the numbers, I might not want people to have access to that document. When the sales report is final, I might post it at a team site in SharePoint or keep the file in my OneDrive folder but give others access to the file.
Another use case for OneDrive is people management. For example, if I’m a manager who has people reporting to me, I might have a folder for each of my people reporting to me in OneDrive to store documents such as performance reviews and compensation information. OneDrive is the best place to store this information because I can control who has access to the folders. By default, files and folders in OneDrive are Private which means only the user has access to them. If the user decides to share a file, it is clearly marked as Shared under the Sharing column when the user is logged in to OneDrive, as shown in Figure 20-1.

FIGURE 20-1: Sharing status for files and folders in OneDrive for Business.
OneDrive is accessed from https://office.com using a Microsoft 365 Business credential. If users have an existing consumer OneDrive account, they will be prompted to choose either a Microsoft personal account or a work account. In this book, I refer to the work account, and the login credentials are the username and password associated with the Microsoft 365 Business license.
The benefits of SharePoint Online
Just like OneDrive, SharePoint Online (SharePoint for short), allows you to store documents and files online in a document library. Unlike OneDrive, however, files stored in a document library are by default shared with the people who have access to the SharePoint site. That’s because SharePoint is designed for groups of people working together on projects or initiatives.
However, the site owner or site collection administrator for a SharePoint site can change the default sharing status of documents in the library to restrict access on either the file level or the folder level. For example, in Figure 20-2, I can change a group’s access level to a folder in the document library from Can View to either Can Edit or Stop Sharing.

FIGURE 20-2: Managing access to a folder in a document library in SharePoint.
To manage access to a folder in SharePoint, follow these steps:
- Hover your cursor over the folder you want to manage access to, and then click the circle to the left of the folder, as shown in Figure 20-3.
- With the folder selected, click the Details icon (i in a circle) on the command bar, and then click the Manage Access link, as shown in Figure 20-4.
-
Click the down arrow next to the user or group whose access you want to change and then make your selection.
If you choose Stop Sharing, you will be prompted to confirm the removal of the access.
- Close the Manage Access pane by clicking X at the top right, and then close the Details pane by clicking the Details icon again.

FIGURE 20-3: Selecting a folder in SharePoint.

FIGURE 20-4: Find the Details icon and the Manage access link.
 Note that SharePoint provides more than just document storage. When a project team needs a shared task list, calendar, site page, and even integration with built-in or third-party apps, SharePoint is a better solution than OneDrive.
In Microsoft 365 Business, each organization gets 1 TB of storage in SharePoint plus 10 GB per licensed user. With, say, one hundred users, an organization would have 2 TB of storage in SharePoint. If you’re administering the service for your organization, I highly recommend reviewing the SharePoint Online limits here: https://docs.microsoft.com/en-us/office365/servicedescriptions/sharepoint-online-service-description/sharepoint-online-limits.
The deal about Microsoft Teams
In previous chapters and specifically in Chapter 4, I touched on Microsoft Teams as yet another collaboration tool in Microsoft 365 Business. As a digital collaboration hub, Microsoft Teams also comes with its own document library — no surprise here.
When you create a Teams hub, you’re also provisioning a SharePoint site with a document library called Documents. The default channel in a Teams hub is called General, and that channel automatically provisions a folder called General within the Documents document library. If you create a new channel called Knowledge Share, for instance, a new folder called Knowledge Share will be created within the Documents library at the same hierarchy as the General folder.
In Figure 20-5, I accessed the Knowledge Share library in Microsoft Teams by clicking the Files tab in the Knowledge Share channel. When viewing the shared library, I can click Open in SharePoint on the command bar to launch the document library in SharePoint.

FIGURE 20-5: Accessing the document library for a channel in Microsoft Teams.
So, what does Microsoft Teams have that SharePoint doesn’t? Well, aside from the fact that Teams is the fastest growing application in the Microsoft 365 suite, it is the one-stop modern collaboration solution for today’s organizations. In Teams, you can chat with colleagues, make phone calls, conduct web conferencing, interact with bots, and more.
As a bonus, you can also view all your OneDrive files in Microsoft Teams! Don’t worry, even though you’re using the Microsoft Teams app, the access controls set on your OneDrive documents remain intact.
To view your OneDrive files in Microsoft Teams, click the Files icon on the app bar on the left and then click the OneDrive icon from the Teams pane, as shown in Figure 20-6.
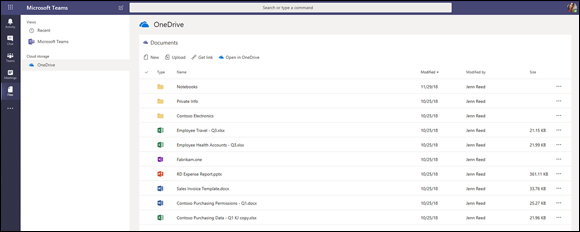
FIGURE 20-6: Accessing OneDrive from Microsoft Teams.
If you want to learn how to supercharge your team collaboration with Microsoft Teams, I recommend picking up Office 365 For Dummies, 3rd edition, which I co-authored (shameless plug). In that book, I dedicate Chapter 15 to Microsoft Teams.
Better three-gether: OneDrive, SharePoint, and Microsoft Teams
I often get asked whether IT should direct users to use just OneDrive or SharePoint or Microsoft Teams for teamwork and collaboration. The reality is, you don’t have to choose one over the other. They are better together, or in this case, three-gether!
Rather than focusing on the technology, it’s best to start by asking, What kind of file am I working on? Is it a personal file that I don’t want to share with others? Or is it a team file? If it’s a personal file, store it in OneDrive. If it’s a team file, store it in either SharePoint or Microsoft Teams so others can access the file and collaborate on it.
The OneDrive app allows you to access files wherever they are stored. To see this in action, navigate to your OneDrive app. The default view displays the files you stored in OneDrive. Look in the left navigation, and note the list of all the document libraries — in SharePoint and in Microsoft Teams — you have access to. In Figure 20-7, I clicked the Business Development icon to display the document library for the Microsoft Teams hub of which I’m a member.

FIGURE 20-7 Use OneDrive to access files wherever they’re located.
Working in SharePoint Admin Center
If you’re administering your Microsoft 365 Business tenant, you’ll likely run into tasks related to SharePoint administration. If you’re never used SharePoint before, the knobs in classic SharePoint Admin Center may seem daunting. Don’t worry, the fact that I described the current Admin Center as classic bodes well for you. The current user interface for Admin Center is undergoing a major overhaul to make life easier for IT admin who are not SharePoint gurus — yet.
As of November 2018, some functionalities of the new SharePoint Admin Center experience have been rolled out in Microsoft 365 tenants signed up for targeted release. More features and functionalities will be gradually released until the new experience becomes available for all tenants in late 2019. The screenshots captured in this section as based on the functionalities available in the preview version. By the time you read this, more features will probably be available. Such is the nature of a SaaS solution — things are always changing. But remember, change is good in this situation because it usually means more features.
Turning on the new experience
Depending on when you provisioned your Microsoft 365 Business tenant and whether you signed up for targeted release, you may see the classic experience when you log in to SharePoint Admin Center. You can tell if you’re in the classic experience if you’re greeted with the user interface in Figure 20-8 when you click SharePoint under the Admin Centers group from the Microsoft 365 Admin Center at https://admin.microsoft.com. Simply click the Try It Now button on the blue notification bar to start administering SharePoint using the new features and functionalities.
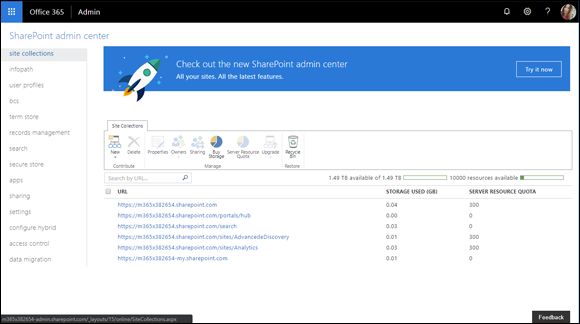
FIGURE 20-8: The classic SharePoint Admin Center.
The Home Page
The Home page of SharePoint Admin Center is a great way to see, at a glance, a visual representation of your organization’s adoption of SharePoint. The charts tell you activities on the files stored in SharePoint and how active the sites are. For example, Figure 20-9 does not indicate a file shared externally, but the File by Activity Type chart could help you act quickly to minimize or prevent data loss if you see a spike in externally shared files.

FIGURE 20-9: SharePoint Admin Center Home page.
The Message Center, which is below the two charts, filters the list of all the messages from Microsoft 365 Admin Center to just the ones related to SharePoint. This feature is handy because otherwise you might find yourself wading through dozens of messages to find the ones related to SharePoint.
Active Sites under the Sites group
The Active Sites menu item, which is below the Sites group in the left navigation, displays a list of all active sites in your environment. The list is similar to the look and feel of lists in SharePoint.
And what is a list without a view? The developers at Microsoft added some built-in views you can choose for managing the list of active sites, as shown in Figure 20-10. To access the views, click the arrow next to All Sites in the top right.
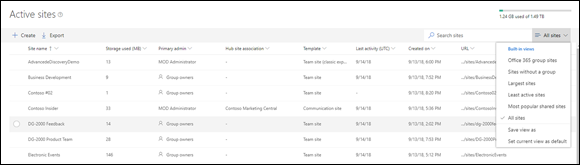
FIGURE 20-10: Built-in views for the list of active sites.
If you select a site from the list, the details pane will appear, chockful of additional information about the site, such as Insights (page views and activities), properties, admins for the site, and the external sharing status.
To create a site collection, click the +Create button on the command bar. The Create a Site panel appears. The average user (without global admin privileges) sees two options: Team Site and Communications Site. IT admins, however, see a third option: Other Options, as shown in Figure 20-11.
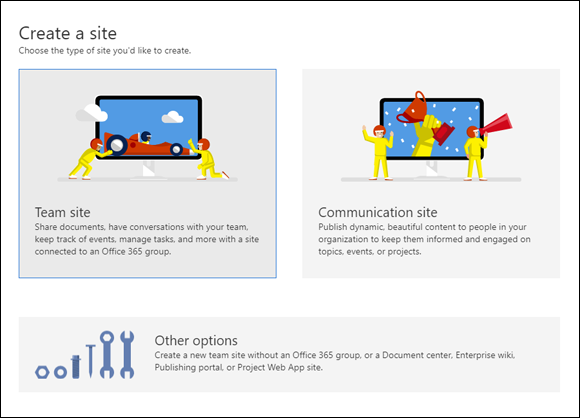
FIGURE 20-11: Admins have three options for creating sites.
The choices in Other Options include legacy templates such as Document Center, Enterprise Wiki, Publishing Portal, and a Team site without Office 365 groups tied to it.
Access Control under the Policies group
If you head over to Access Control, below Policies in the left navigation, you’ll find a number of controls you can configure to keep your environment protected. For example, under Unmanaged Devices, you can block access to SharePoint if the user is using a computer from a library that’s not enrolled in MDM.
Note that additional submenus will be added under Policies later.
The Settings Menu
Controls in the Settings menu (see Figure 20-12) could help automate some admin tasks. For example, under Site Storage Limits, you can select Automatic to allow site collections to expand based on storage needs up to 25 TB without intervention. I was out skiing with my son one beautiful morning when I received a call from a frantic customer because a site had reached its maximum storage of 5 GB and the site admin wanted to increase it so she could load a huge PowerPoint presentation. If I had set that settings to Automatic, I could have gotten one more run in that day.

FIGURE 20-12: The Settings menu.
Note that not all the controls from the classic experience have been ported over to the new experience. Even so, the typical tasks an IT admin does on a daily basis in SharePoint Admin Center are already there. If you do need to complete a task and the control is not available, you can always go back to the classic mode by clicking the Classic SharePoint Admin Center menu in the left navigation.