

Apply a Theme
</objective> <objective>Create a Slide Layout
</objective> <objective>Use Picture Placeholders
</objective> <objective>Rotate Pictures
</objective> <objective>Change Line Spacing
</objective> </feature>ON THE CD:
The sample presentation and all other files with which you need to work can be found on the CD in the Makeover 01 folder.
Corporate presentations can be incredibly boring. Although we can’t do a whole lot to help you with the subject matter of your presentations, we can at least help you make them look better!
To give this presentation some polish, we’ll apply a PowerPoint 2007 theme, and we’ll replace the clip art with photographs. Even these seemingly small changes can make a huge difference.
All photos in this presentation were graciously supplied by PhotoSpin.com.
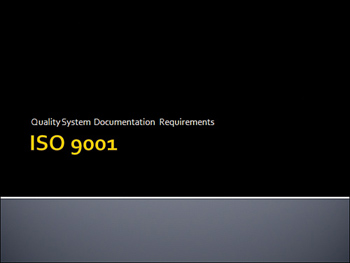
Figure 2.1 shows you two slides from the “before” presentation; these are typical briefing slides seen in a million different offices throughout the world every day.
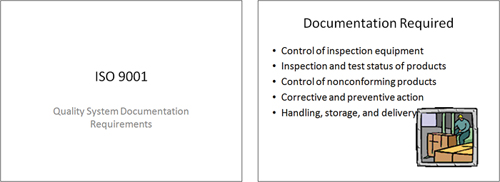
You can see the same slides in Figure 2.2. It’s really amazing how much difference a sophisticated theme and a few pictures can make!
Open the original presentation, corporate_00.pptx, by clicking Office Button, Open. This file can be found on the CD in the Makeover 01Steps folder.
This presentation is a typical corporate presentation. It’s dry, but someone added clip art in an attempt to jazz it up a bit. Applying an appropriate theme will immediately give it some class.
To apply a theme, follow these steps:
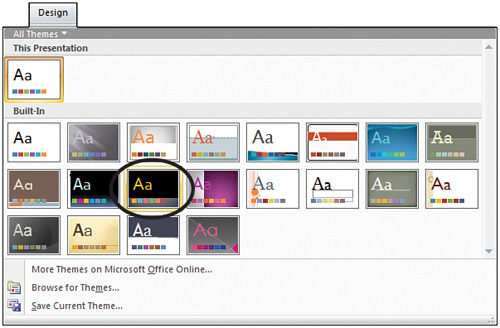
On the Design tab of the Ribbon, click the More button in the Themes gallery to view it as a drop-down gallery.
Click the Module theme to apply it (see Figure 2.3). Module is a good template to use for corporate presentations. It’s simple and sophisticated with a little drama on the title slides, but it’s not opulent like, well, the Opulent theme is.
One of the best new features in PowerPoint 2007 is the ability to create your own layouts. We’re going to take advantage of this by adding a new layout for text and pictures so that when we replace the clip art with photos, they’ll be sized and cropped automatically.
If you are following the makeover step by step, continue using your saved presentation. If you just stepped in, you can use the corporate_01.pptx presentation from the Makeover 01Steps folder on the CD.
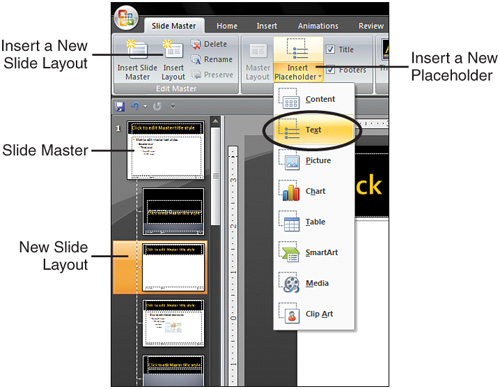
Now that we’ve created a Slide Layout, we need to add some placeholders for text and pictures. Here’s how to do it:
With the new, inserted layout active, click Insert Placeholder on the Ribbon to view the Placeholder gallery, and then click Text (see Figure 2.4).
Click and drag on the slide to create the text placeholder right below the slide title area, and toward the left part of the slide (refer to Figure 2.5). Resize if required.
Click Insert Placeholder on the Ribbon again, but this time, choose Picture from the Placeholder gallery.
Click and drag on the right part of the slide to create the picture placeholder (see Figure 2.5). Resize if required.
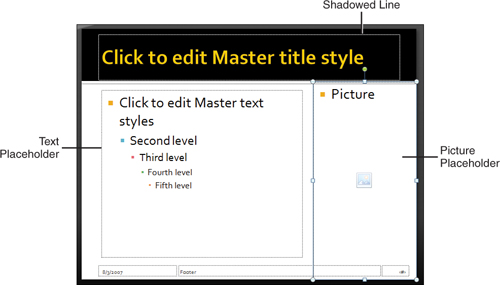
It can be difficult to align the bottom of one object with the top of another. In this instance, it’s difficult to align the top of the picture placeholder with the bottom of the shadowed line just beneath the black area that defines the title (see Figure 2.5).
If we were working on a slide instead of the Slide Masters and layouts, we’d just size the picture placeholder so that it’s close enough, and then use the Arrange tools or the Selection Pane to bring the shadowed line above the picture placeholder. However, because the shadowed line is on the Slide Master, we can’t change its position or layer on the actual slides; items on the Slide Master and layouts always appear beneath the objects on the slides themselves. Think of the masters and layouts as the bottom layer of the slide.
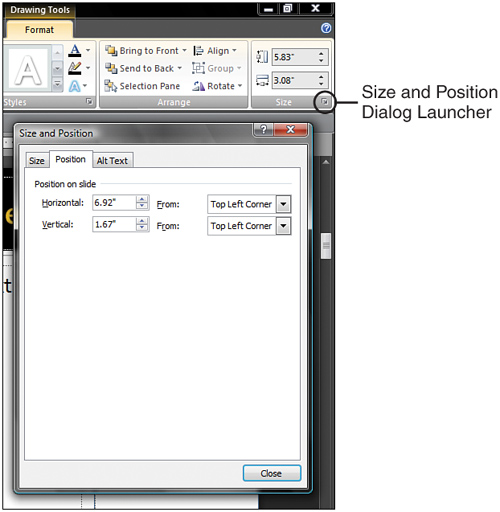
In this case, just zoom up close using the Zoom tool on the status bar, and you’ll be able to see where the shadow on the line ends and the picture placeholder should begin. You also can click the Drawing Tools Format tab on the Ribbon, click the Size and Position dialog launcher, and on the Size tab, type 5.83 for the height and 3.08 for the width. On the Position tab, specify 6.92 for the horizontal position, and 1.67 for the vertical (see Figure 2.6). Click Close to get the dialog box out of the way.
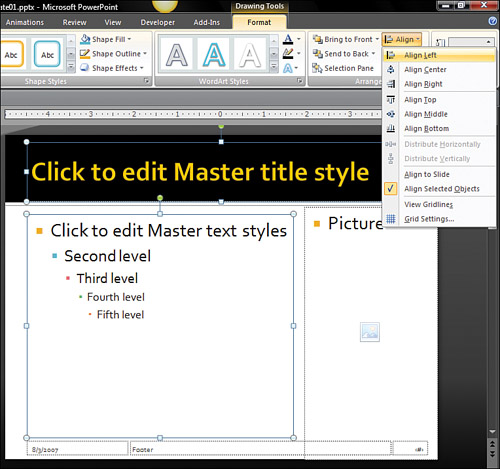
Align the left edges of the text and title placeholders by doing the following:
Select the title placeholder and the text placeholder. The title placeholder should be farther to the left than the text placeholder (refer to Figure 2.5).
On the Drawing Tools Format tab of the Ribbon, click Align, and then click Align Left (see Figure 2.7). You also can access these tools from the Home tab of the Ribbon by clicking Arrange and then clicking Align.
Deselect both the title and text placeholders, and then select just the text placeholder. Drag the right edge of this placeholder so that it’s close to the picture placeholder, but not right up against it. You want to keep a little breathing room between your picture and the text (refer to Figure 2.7).
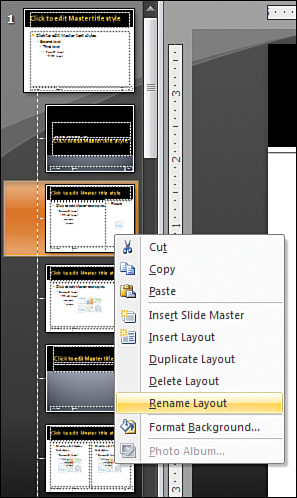
Finally, we’ll give our custom Slide Layout a name by right-clicking the layout thumbnail in the Slides pane, choosing Rename Layout, and typing Text and Picture (see Figure 2.8).
Click the Close Slide Master View button on the Slide Master tab of the Ribbon (or click Normal on the View tab of the Ribbon) to get back to Normal editing view.
To make the new layout available on our slides (complete with picture and text placeholders), we must apply it to the slides.
If you are following the makeover step by step, continue using your saved presentation. If you just stepped in, you can use the corporate_02.pptx presentation from the Makeover 01Steps folder on the CD.
To apply a layout to a slide, follow these steps:
Click slide 2 in the Slides pane.
Press and hold the Shift button, and then scroll down and click slide 7 in the Slides pane. This selects slides 2–7.
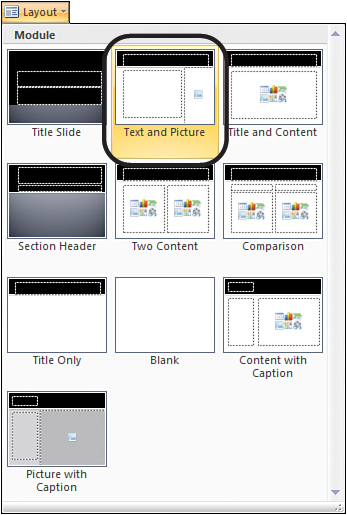
On the Home tab of the Ribbon, click Layout.
From the Layout gallery, choose the layout we created (it is named Text and Picture). When you click it, it will be applied to the slides we selected (see Figure 2.9).
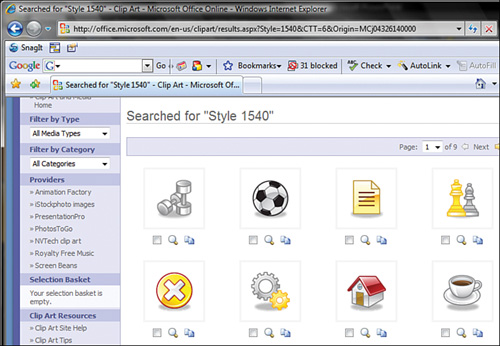
We’ll replace the clip art in this presentation with photographs. Photos are much more sophisticated than most clip art, and you easily can find appropriate photos for a reasonable cost.
Tip
If you do many presentations, you might want to look into purchasing some royalty-free stock photo CDs or a download subscription so that you’ll have what you need at your fingertips. Check http://www.pptkit.com/media for links to several stock media sites.
There are many ways to add pictures to your presentations. In this chapter, we’ve used the picture placeholder because it automatically crops pictures to fill the placeholder, and that often makes the pictures look way cool. (You’ll learn other methods of inserting pictures in some of the other makeovers.)
If you are following the makeover step by step, continue using your saved presentation. If you just stepped in, you can use the corporate_03.pptx presentation from the Makeover 0Steps1 folder on the CD.
Click slide 2 in the Slides pane.
Delete the clip art from the slide.
Click the icon in the picture placeholder (see Figure 2.10) to open the Insert Picture dialog box.
Select an appropriate picture and click Insert. We used picture 14_2503379 from PhotoSpin, and it’s included on the
Makeover 01Picturesfolder on the CD.Tip
Picture placeholders are different from content placeholders. Both allow you to click an icon to add something to your slide, but a picture placeholder crops your picture automatically to fill the placeholder. A content placeholder just sizes the picture proportionately within the area specified by the placeholder.
Repeat steps 1–4 for the rest of the slides, using the PhotoSpin-supplied images in the
Makeover 01Picturesfolder on the CD. We used 10_2502557 for slide 3, 2120008 for slide 4, 10_2502337 for slide 5, 2160249 for slide 6, and 1080012 for slide 7.
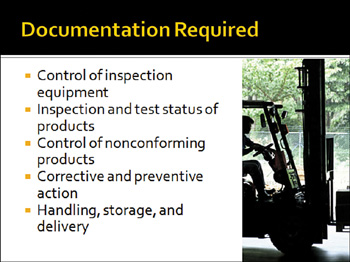
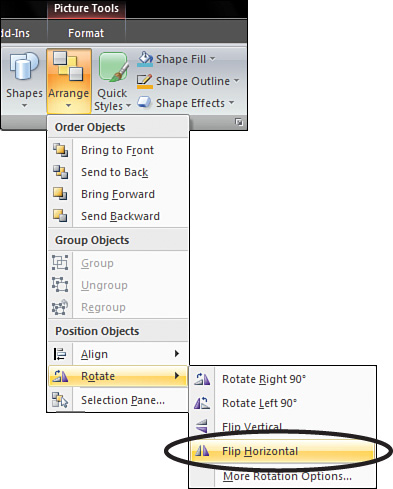
A general rule of thumb is that you want people (and sometimes things) to be facing into your slide, not looking off the page. The picture of the forklift (which we added to slide 4) is a good example. It should be facing the opposite direction, moving onto the slide instead of off it (see Figure 2.13). That’s easy enough to fix by following these steps:
Select the picture on the slide.
On the Home tab of the Ribbon, choose Arrange, Rotate, and then Flip Horizontal (see Figure 2.14).
Now that we’ve finished adding and manipulating the pictures, all that’s left is to finish the text.
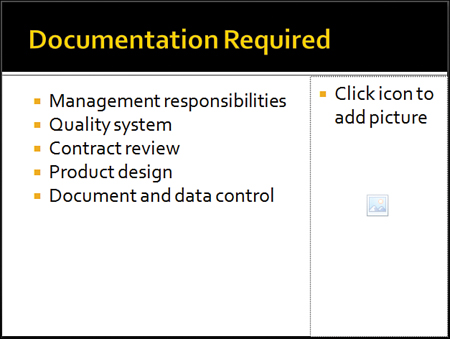
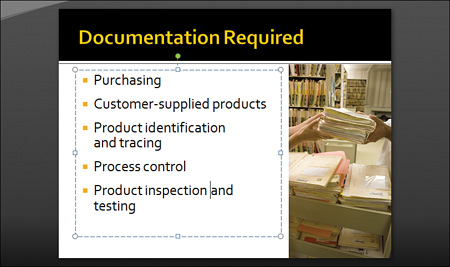
After you’ve gotten the basics of your presentation together, you might find that you need to tweak some things. For example, on slides 3 and 4, you can see that when the text drops to a second line, all the bullets run together (refer to Figure 2.13). We will tweak the line spacing to help the reader distinguish one point from another.
If you are following the makeover step by step, continue using your saved presentation. If you just stepped in, you can use the corporate_04.pptx presentation from the Makeover 01Steps folder on the CD.
Here’s how to fix line spacing:
On the View tab of the Ribbon, click Slide Master to open Slide Master view.
Click the Text and Picture layout in the Slides pane.
Click the top level of text in the placeholder in the spot where it says “Click to Edit Master Text Styles.”
Tip
If you want to apply the same line spacing settings to all levels of text, select the placeholder. When the placeholder is selected, the selection border appears as a solid line.
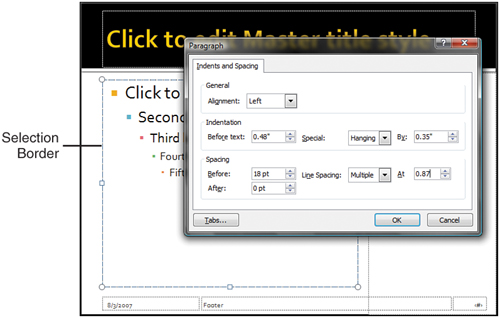
If you want to apply different settings to each level, just click that level of text inside the placeholder. The selection border will show as a dotted line to indicate that your changes affect individual lines rather than the entire placeholder (see Figure 2.15).
On the Home tab of the Ribbon, click the Paragraph dialog launcher.
In the Paragraph dialog box, specify Line Spacing as Multiple at
.87and Spacing Before at18pt (see Figure 2.15). Click OK to apply the settings and close the dialog box.On the Slide Master tab of the Ribbon, click Close Master View to return to Normal editing view. You’ll be able to spot the changes in line spacing on Slide 3 right away.
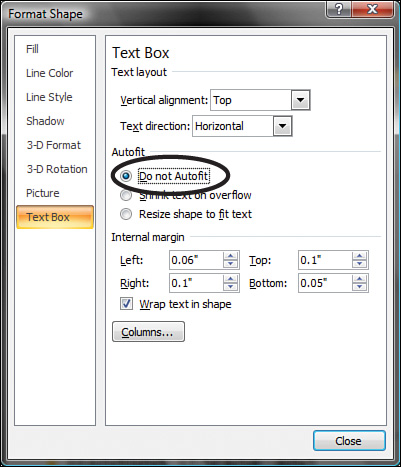
PowerPoint’s text autofitting is not as heavy-handed as it was in the past, but the results still might not be satisfactory. In this presentation, it’s squishing the text on slide 4 a little. To correct it, follow these steps:
Right-click the text placeholder on slide 4 and choose Format Shape.
In the Text Box area, choose Do not Autofit (see Figure 2.16). Click Close to close the dialog box.
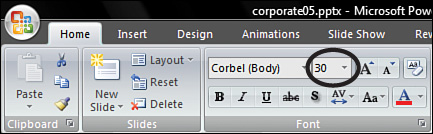
Change the font size by typing
30into the Font Size box on the Home tab of the Ribbon and pressing Enter (see Figure 2.17).
Tip
Some people don’t like to leave one word hanging alone on the last line of a bullet. It’s a leftover from desktop publishing standards, where those dangling words are known as widows and orphans.
PowerPoint 2007 has text kerning capabilities (click the Font dialog launcher on the Home tab to use them). These capabilities enable you to adjust the spacing between characters within a word, but they won’t always be enough to do the trick. If you need to force a line break to move text to the next line, place your cursor where you want the line break and press Shift+Enter. This creates what is known as a soft return; it creates a new line, but not a new paragraph with a new bullet point (see Figure 2.18).
See? Just a few simple changes can take your presentation from “ow” to “wow!” If you have been following the makeover step by step, take a minute to review your saved presentation. If you want to see what the final made-over presentation looks like, you can open the corporate_05.pptx presentation from the Makeover 01Steps folder on the CD.