
YOU WILL LEARN HOW TO:
<objective>Navigate the New User Interface
</objective> <objective>Find New Features
</objective> </feature>At first glance, PowerPoint 2007 seems vastly different from PowerPoint 2003 and previous versions. It seems different because the interface, known as the Microsoft Office Fluent user interface, is unlike anything most of us have seen before. However, never fear—your favorite tools are still available. It won’t be long before you speak fluent PowerPoint 2007 because it’s really very easy to use!
Throughout the rest of this book, we explain every process step by step, and we also tell you which part of the interface you need to access. Even then, we cannot emphasize enough that reading this short chapter will be helpful, and 15 minutes is all it takes! Are you ready to get started?
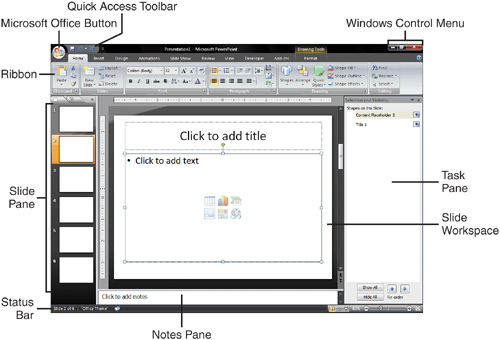
Throughout this book, we talk about the Ribbon, tabs, and dialog launchers, as well as other terms that might be unfamiliar to you. Understanding these terms is key to becoming fluent with the PowerPoint 2007 interface (see Figure 1.1), so take a look at the next few figures to see what’s what.
After you’ve read this chapter (or even while you have this book open), launch PowerPoint 2007 and click all around the new stuff. It’s all very intuitive and straightforward.
Figure 1.1 shows you the new PowerPoint interface; here’s an explanation of the interface elements:
Office Button—. The Office Button is where you work with your file. You’ll find Save, Open, Print, and a variety of new tools, such as the Compatibility Checker and the Document Inspector, in this location. You also can access PowerPoint Options, where you can change various PowerPoint- and file-related settings, manage add-ins, and run diagnostics. If you have worked with PowerPoint before, you’ll know this is an enhanced version of the old File menu.
Quick Access Toolbar (QAT)—. This is the one item you can customize in the Office interface. Click the small arrow next to it and choose More Commands to start the customization. You also can opt to show it below the Ribbon, where you’ll have more room to add your favorite tools.
Windows Control menu—. The Minimize, Restore, and Close buttons are part of the Windows Control menu. They let you minimize and maximize the PowerPoint window. When you click the Close button, the current file closes. If you click the Close button when you have only one file open, PowerPoint itself will close.
The Ribbon (see Figure 1.2) is the heart of the Office 2007 interface. It replaces the traditional menus and toolbars found in older versions of PowerPoint and other Office applications.
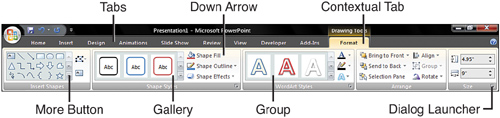
The Ribbon itself is a long, fixed-size strip that includes several interface elements of its own:
Tabs—. The Ribbon has several tabs; each tab is a collection of tools organized around a specific activity. For example, you will find animation and slide transition tools on the Animations tab. The most commonly used options are found on the Home tab. The Drawing Tools Format tab is the active tab shown in Figure 1.2.
Contextual tab—. Contextual tabs don’t always show on the Ribbon; they appear only when you can use their tools on the object you’ve selected. For example, if you select a table, the Table Tools Design and Layout contextual tabs become available on the Ribbon. The Drawing Tools Format tab (seen in Figure 1.2) is a contextual tab; it is available because we’ve selected a text box in the workspace.
Group—. Chunks of related tools on a tab are known as groups. In Figure 1.2, you can see the Insert Shapes group, the Shape Styles group, the WordArt Styles group, the Arrange group, and the Size group.
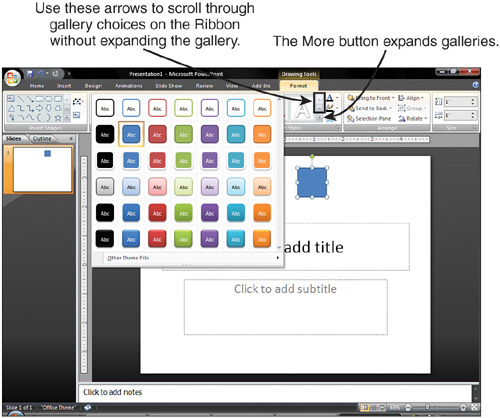
Gallery—. Galleries are collections of thumbnails that represent a particular style or property. In Figure 1.2, you can see the Shape Styles gallery within the group of the same name. More often than not, these galleries can be expanded to form drop-down galleries by clicking the More button (see the next bullet). Whenever you hover your cursor over a gallery thumbnail, you can see how it will influence the selected slide object through the new Live Preview feature. Then just click any thumbnail in the gallery to apply that option.
More button—. Clicking the More button expands a gallery so that you can see all your options. Clicking the up and down arrows above a More button simply scrolls the choices in the gallery inside the Ribbon without expanding the gallery (see Figure 1.3).
Down arrow—. Click the downward-pointing arrow beside a tool on the Ribbon to display a gallery or additional options.
Dialog launcher—. The small square in the lower-right corner of some groups is a dialog launcher. It opens a related dialog box with more advanced options.
The Slide pane (see Figure 1.4) lets you move easily from slide to slide, select more than one slide at a time, delete slides, and rearrange them. You can switch between the Slide Thumbnails pane and the Outline View pane by clicking at the top of the Slide pane.
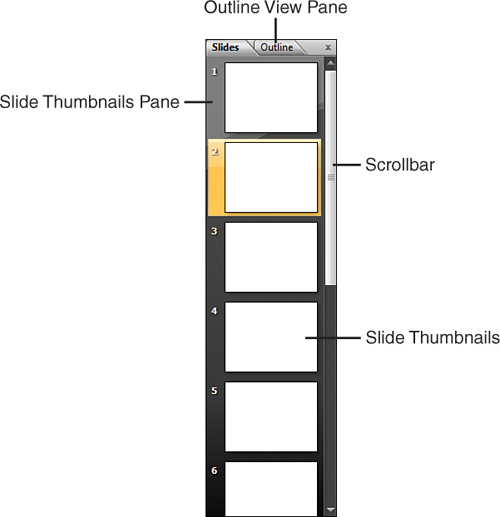
If you are looking for the Outlining toolbar found in previous PowerPoint versions, just right-click in the Outline View pane to find the same options.
The Slide workspace (see Figure 1.5) is where you edit an individual slide. The slide you’ve selected in the Slides pane is the slide that shows up in the workspace.
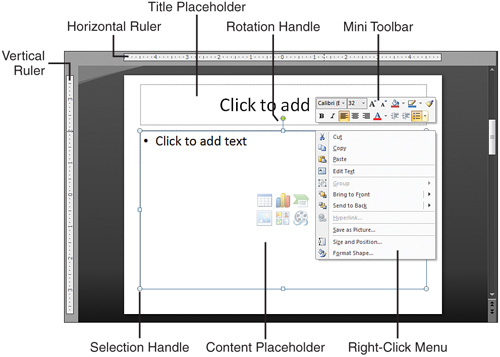
At any point of time, your slide may or may not include these objects and interface elements:
Placeholders—. PowerPoint 2007 has a number of different kinds of placeholders: text, content, picture, and others. Placeholders are formatted and defined on Slide Masters and layouts. Using placeholders helps you maintain consistency throughout your presentation; you also can format them directly on the slides themselves if you prefer.
Mini toolbar—. The mini toolbar appears when you select text or right-click an object that can include text. It gives you quick access to the most popular formatting tools.
Right-click menu—. A contextual menu appears when you, well, right-click.
The status bar (see Figure 1.6) shows information about your file. It also holds the zoom tools.
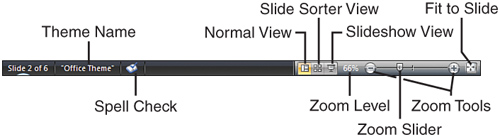
Here’s an explanation of some interface elements in the status bar:
Theme name—. The name of the theme that’s been applied to the selected slide appears here.
View icons—. Click the appropriate view icon to switch to the Normal, Slide Sorter, or Slide Show view.
Zoom tools—. Click the Zoom level option to open a dialog box where you can specify your zoom level, or simply drag the caret on the Zoom slider.
Fit to Slide—. Click to return to full slide view after zooming.
PowerPoint 2007 has a slew of great new features, and it also says good-bye to a few old friends.
There are many new features. Here are some of our favorites:
Office Themes—. Themes actually are Office-wide. They’re similar to templates, but they allow you to maintain a common set of colors, fonts, and effects throughout your Word, PowerPoint, and Excel files.
Custom layouts, placeholders, and prompt text—. You now can create your own slide layouts! To go along with them, you now have the ability to add placeholders and change the “click here to add text” prompt to whatever you want.
SmartArt Graphics—. The new SmartArt Graphics option lets you create sleek diagrams with just a few clicks.
Text handling—. PowerPoint does a better job with basic text handling than ever before; for example, you now can kern text. In addition, underlines can be colored separately from text, tab settings apply to individual paragraphs of text instead of to the entire text box, and you have numeric control over tab placement.
Text effects—. The text engine was completely rewritten, and now text acts more like other drawing objects. Thus, in addition to better text handling in general, you now can apply slick effects—such as soft shadows, reflections, outlines, bevels, and picture fills—to regular, editable text.
Shape effects—. You know all that sweet stuff we said you can do with text? You can do them with drawing shapes, too. You even can make gradient lines now! In addition, you can convert shapes to freeforms, so that you can bend shapes to your will.
Picture effects—. In addition to new, theme-friendly recoloring tools, you also have one-click picture frames and edges. Very cool!
Quick Styles—. These are one-click, preset formatting options you can apply to almost any object.
Live preview—. Now you don’t have to waste time applying formatting and then checking to see how it looks. Live preview does this on the fly when you run your mouse over selections in a gallery. Simply click the thumbnail in the gallery to accept and apply the formatting.
Nonmodal dialog boxes—. Some dialog boxes have the equivalent of live preview; that is, you don’t have to specify a bunch of settings and then close the dialog box to see how it looks. With nonmodal dialog boxes, changes happen in real time, and you can select other objects on the slide without having to close the dialog box first.
Selection and Visibility pane—. This handy tool makes it easy to select objects on a slide, hide them, or change their stacking order. In addition, if you rename an object in this pane, the new name shows up in the Custom Animation pane, making your animation tasks much easier.
Editing within grouped objects—. You can resize and move individual objects within a group. Thus, you no longer have to ungroup items and lose their animation settings.
Ctrl+G and Ctrl+Alt+V—. We love that pressing Ctrl+G groups selected objects and pressing Ctrl+Alt+V opens the Paste Special dialog box.
Charting—. Charting now is done in Excel, giving PowerPoint users easy access to its powerful graphing features. In addition, chart parts work much like drawing objects, so all those shape and text effects can be applied to chart elements as well. Remember, you’ll need to have Excel 2007 installed to access all the new charting options.
Chart templates—. You can save charts as chart templates and send them to other users. Unfortunately, chart templates don’t travel with themes or templates, but at least it’s a step in the right direction!
Tables—. Like so many other objects, tables got a facelift in PowerPoint 2007. Quick Styles make them look great right off the bat, and you finally can specify sizes for cell height and width.
Save as PDF—. Downloading and installing an add-in from http://office.microsoft.com lets you save files as PDFs. Be sure to save them as PowerPoint files first, or you won’t be able to go back and edit them.
New file formats—. PowerPoint files now are XML-based. This doesn’t mean a whole lot to the typical user, other than the file extensions now are four letters instead of three: PPTX, PPSX, and so on.
Slide libraries—. If you’re lucky enough to have a Microsoft Office Sharepoint Server (MOSS) 2007 available, you have access to slide libraries, which allow you to upload and download slides, keep track of the latest version of a slide, and use the workflow services for your review process.
Mark as final—. This is a convenience marking, not a security feature. It tells users the file is considered to be the final one, and if they want to edit it, they must either click the Mark as Final button again to unmark it or save the file with a new name.
Compatibility Checker—. When you save your file in PPT/PPS format so that people using previous versions of PowerPoint can open it, the Compatibility Checker checks your file and tells you what will be uneditable.
Presenter view—. Presenter view got an overhaul, with bigger buttons, adjustable panes, and sizeable notes text.
This list is much, much shorter than the new features list:
Recolor Picture tool—. The Recolor Picture tool works differently than it used to, and the new tool doesn’t let you recolor clip art or charts the way previous versions of PowerPoint did.
Insert Slides from File feature—. The Insert Slides from File feature now is located on the Home tab of the Ribbon. Click the bottom half of the New Slide button to open the New Slide gallery, and then choose Reuse Slides.
Macro recorder—. The macro recorder has been removed from PowerPoint 2007. The Microsoft Script Editor has been removed as well.
Customizing—. The Ribbon cannot be customized without third-party add-ins, and there are no more tear-away menus.
Select Multiple Objects tool—. The Select Multiple Objects tool doesn’t exist in PowerPoint 2007, but who cares? You now have the Selection and Visibility pane, which is about a gazillion times better!
Insert From Scanner option—. This option was officially removed from Office 2007 applications, but you still can access it from the Clip Organizer.
Pattern fills and Lines—. If you rely on pattern fills and lines, you’ll want to create your own pattern images and then apply them as a texture fill, because they no longer exist in PowerPoint 2007. However, all patterned fills and lines from previous versions of PowerPoint do show up in PowerPoint 2007 as long as you leave them unchanged.
Save as HTML option—. PowerPoint 2007 saves the same HTML as PowerPoint 2003 did. That means new features in PowerPoint 2007 won’t display when you save the file as HTML.
Producer for PowerPoint—. Producer doesn’t work with PowerPoint 2007.
Animation schemes—. Gone.
Send for Review option—. Zapped.
Presentation broadcasting—. Buh-bye.