Chapter 8. Using SkyDrive Pro
In previous versions of the Microsoft SharePoint platform, there was a feature called Workspaces (or, if you are familiar with using the MOSS 2007 version of the platform, it was referred to as Groove). For the SharePoint 2013 platform, Workspaces has been replaced with SkyDrive Pro. Workspaces (Groove) was a feature that a team could use for sharing documents on which they were collaborating.
This was a peer-to-peer networking feature that was used for downloading libraries to a computer for local storage and usage. This was quite helpful in case you needed to work on documents from a location that didn’t have access to the Internet (on a plane, for instance). You were able to download the documents that you wanted to work on ahead of time and then, while you were disconnected from the Internet, you could make changes to the documents. When you were once again connected, the application would automatically upload your changes and synchronize them with the documents in the library (or site).
You might already be familiar with Microsoft’s personal storage service called SkyDrive. This is a free cloud-based service available to anyone who sets up a Microsoft Account. SkyDrive gives you the flexibility to access your files, no matter what device you’re using.
Tip
The SkyDrive Pro feature not only replaced Workspaces but it also has taken on the role of serving as the content repository area for your My Site. As such, you now have one convenient place for your documents that are not stored within a team site, and it also doubles as a place where you can share information.
See Also
For additional information on Using SkyDrive Pro, go to http://aka.ms/SP2013PS/SkyDrivePro.
Accessing your SkyDrive Pro account
Each SharePoint 2013 account is set up with a SkyDrive Pro account. Remember that there are two main differences between SkyDrive and SkyDrive Pro:
Skydrive is a free online storage option that provides you with a personal library that you can use to to upload and access files form any of your devices.
Skydrive Pro provides you with a personal library that you use for business.
Saving files to SkyDrive Pro
You can treat your SkyDrive Pro account as a storage area. (Refer to Chapter 12, for directions on connecting your SkyDrive Pro library to Microsoft Office.)
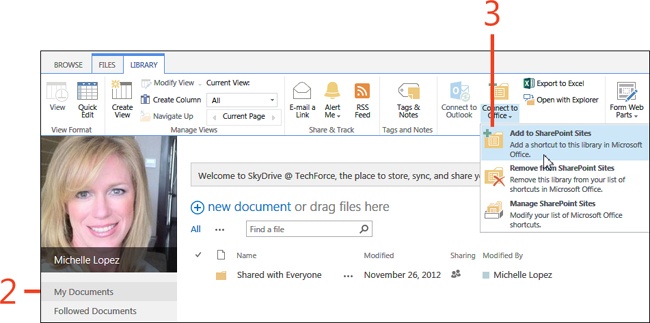
When you open SkyDrive Pro initially, you’ll notice that you have a folder named Shared With Everyone. As the name implies, anything that you place in this folder is accessible to anyone in your organization by default. (This is similar to the Shared Documents library in SharePoint 2010.) If you store a file in a folder other than the Shared With Everyone folder, it will only be accessible to you by default.
Save files to be shared with everyone
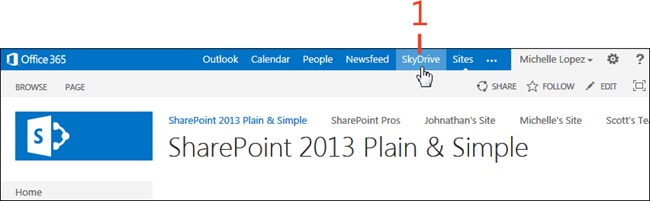
On the toolbar at the top of your SharePoint site, click the SkyDrive link.
On the SkyDrive page, on the Quick Launch bar, select the library that you want to use for saving files.
Follow the instructions in Chapter 12 for connecting a SharePoint site to Office.
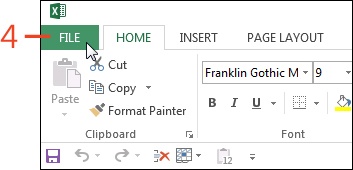
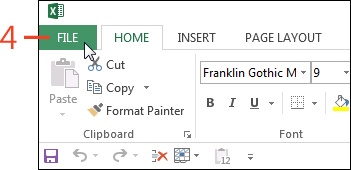
Open the Office file that you want to save to the SkyDrive Pro folder (in this example, a Microsoft Excel worksheet) and then, on the ribbon, click the File tab to display the Backstage view.
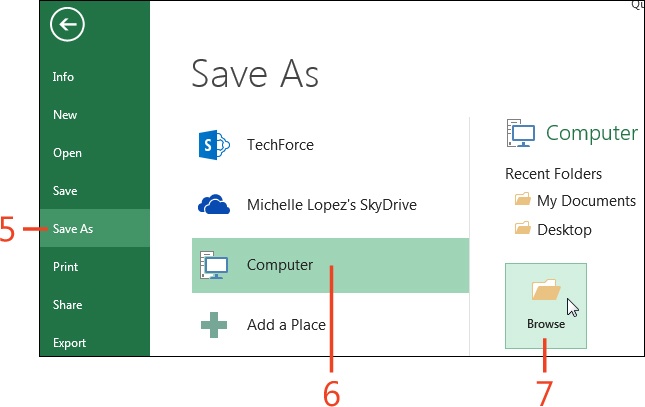
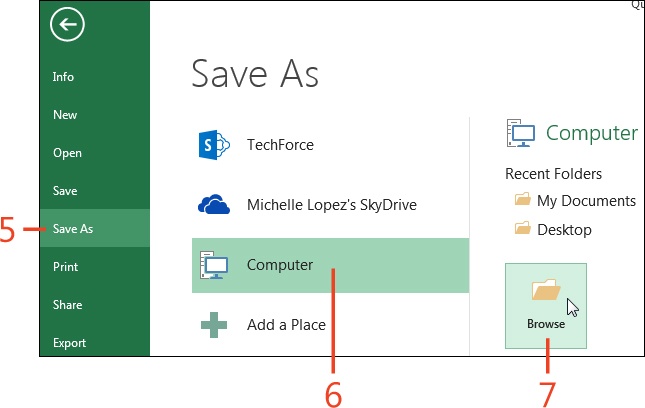
Click the Save As tab.
In the Save As section, click Computer.
Click Browse.
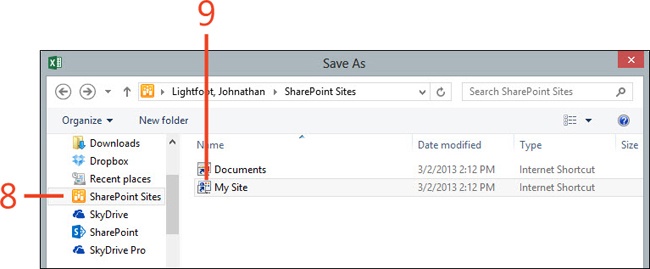
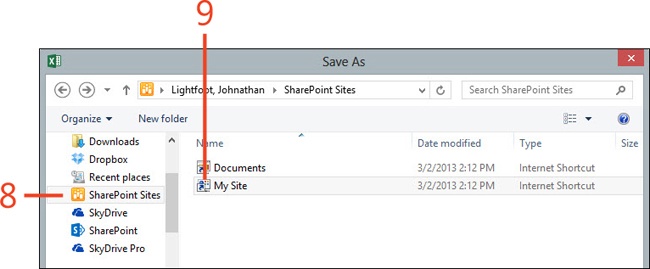
In the Save As dialog box, in the Navigation pane on the left, select the SharePoint Sites folder.
Double-click My Site.
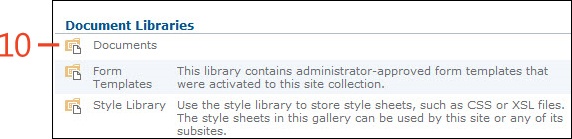
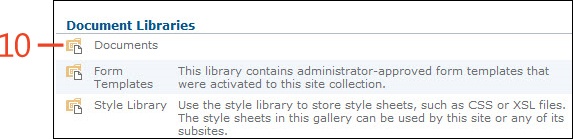
Double-click Documents.
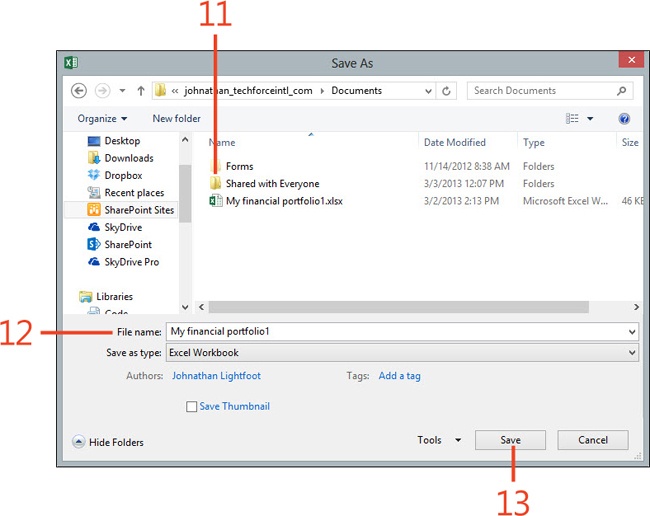
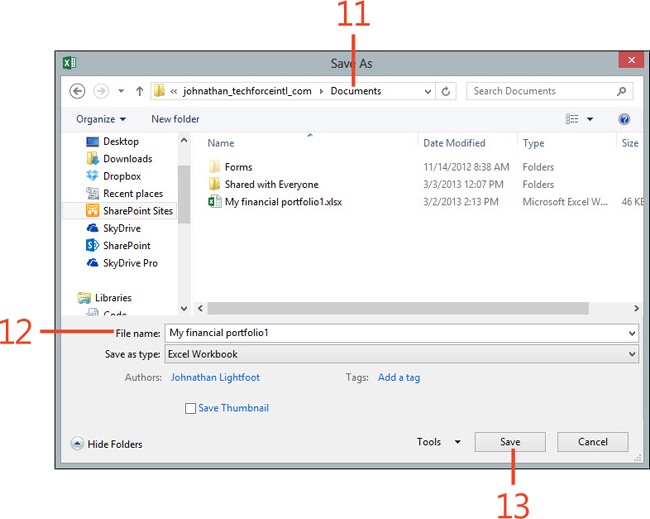
Double-click the Shared With Everyone folder.
Type a name for the file.
Click Save.

Saving files to be accessible only to you
In the previous task, we went over saving files that anyone can access and open. However, you probably have files that you want to store to which only you should have access. The tasks that follow show you how to save files such that they are accessible only by you. You will also see how you can selectively share these files with certain individuals.
Save files for access only by you
On the toolbar at the top of your SharePoint site, click the SkyDrive link.
On the SkyDrive page, on the Quick Launch bar, select the library that you want to use for saving files.
Follow the instructions in Chapter 12 for connecting a SharePoint Site to Office.
Open the Office file that you want to save (in this example, a Microsoft Excel worksheet) and then, on the ribbon, click the File tab to display the Backstage view.
Click the Save As tab.
In the Save As section, click Computer.
Click Browse.
In the Save As dialog box, in the Navigation pane on the left, select the SharePoint Sites folder.
Double-click My Site.
Double-click Documents.
Select the location to which you want to save the file.
Type a name for the file.
Click Save.


Sharing SkyDrive Pro files
You might be used to saving files and granting permissions to coworkers, permitting or denying them access those files. Although this method can also be used when you are using SkyDrive Pro, you might not want to give access to your entire SkyDrive Pro library. Perhaps you only want to give coworkers access to a specific file, instead. In this case, granting permission to your entire SkyDrive Pro library might seem like overkill.
Share SkyDrive Pro files
On the toolbar at the top of your SharePoint site, click the SkyDrive link.
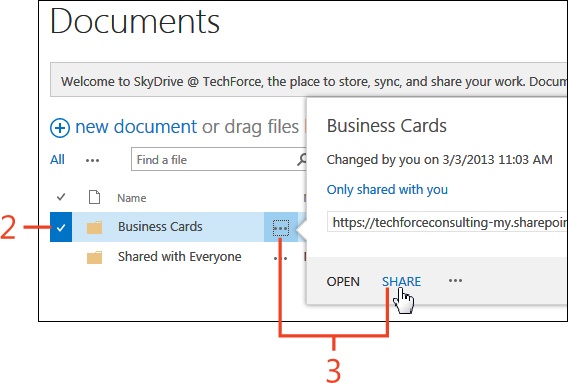
On the SkyDrive page, select the file that you want to share with others.
Click the More Options ellipsis (...) and then, in the Properties pop-up box that appears, click the Share link.
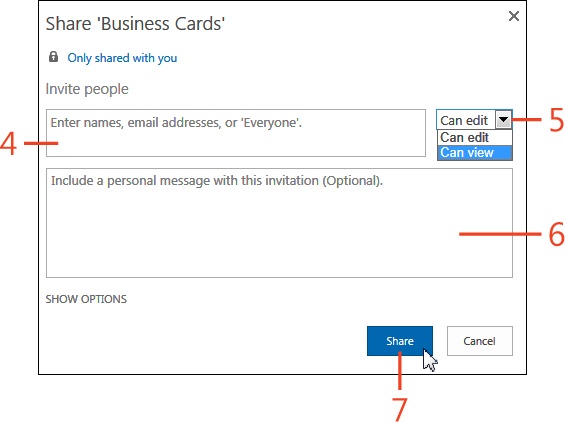
In the Share dialog box, do one of the following:
If you want to share the file with coworkers within your company or organization, type their names and then select them from the drop-down selection box that appears.
If the people are not within your company, you can type their email address.
If you want to share the file with everyone within your organization you can type Everyone.
To the right of the Invite People text box, chose whether the invitees can edit the document or view it only.
Enter a message that will be sent to the invitees.
Click Share.

Tip
An email invitation will be sent to the people with whom you share the content. If you don’t want to send an email to the new people, click Show Options and clear the Send An Email Invitation check box before sharing.
Following SkyDrive Pro documents
When you share and collaborate on documents with others, you might want to keep abreast of any changes that are made to those documents. With SharePoint 2013 you can do this by “following” those documents. When you follow a document you are in essence elevating this document so that it will appear in your newsfeed. This way, you can receive notifications through your newsfeed when there have been changes made to it. This alleviates from you the burden of having to constantly open a document to check its status.
Follow SkyDrive Pro documents
On the toolbar at the top of your SharePoint site, click the SkyDrive link.
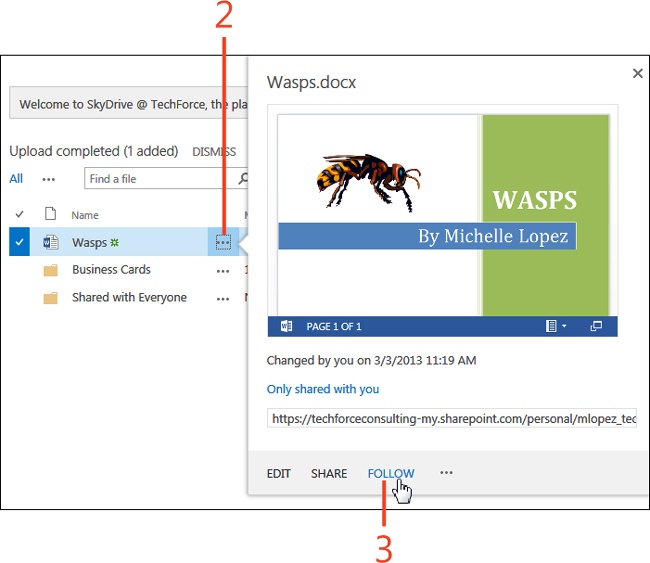
On the SkyDrive page, click the More Options ellipsis (...) next to the document that you want to follow.
In the Properties pop-up box that appears, click Follow.

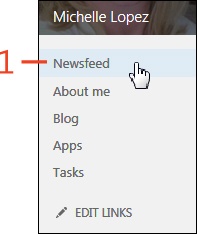
Locating followed documents by using the newsfeed
When you follow documents, you can end up monitoring several that could be located in various sites, libraries, and folders that might not be located on your SkyDrive Pro account. SharePoint 2013 provides several ways for you to locate all of these files. One of those is through your newsfeed.
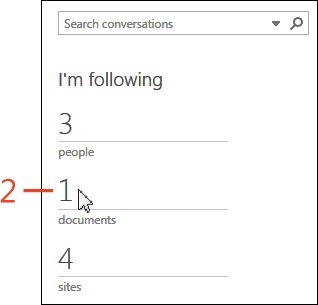
Locating followed documents by using SkyDrive Pro
You can also find documents that you are following through the SkyDrive Pro interface.


Synchronizing SkyDrive Pro to your local computer
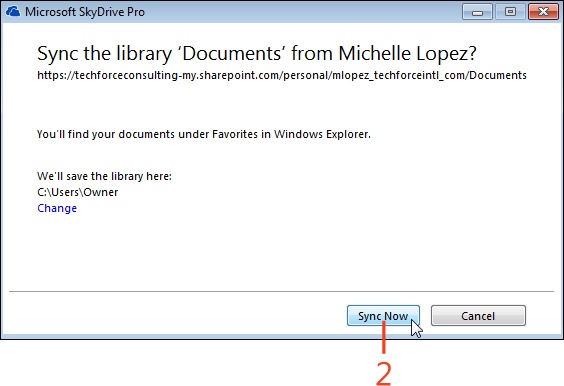
You can synchronize a SkyDrive Pro library to your computer. When you synchronize the files initially, SharePoint automatically recognizes the name and web address of your SkyDrive Pro library. Also, by default it synchronizes your files to C:Users[username]SkyDrive Pro. After you have synchronized your SkyDrive Pro library to your computer, you can access a local copy of your files located within your SkyDrive pro account. You are also able to add documents locally to your computer, which will also replicate over to your SkyDrive Pro account the next time you connect to your organization’s network.
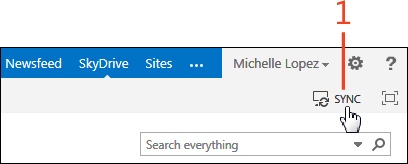
Synchronize SkyDrive Pro to your local computer
In the upper-right corner of your SharePoint Home page, click the Sync button.
In the Microsoft SkyDrive Pro dialog box, click the Sync Now button.
On the next page of the Microsoft SkyDrive Pro dialog box, click the Show My Files button.

Try This
Synchronize your SkyDrive Pro account to your local computer. Upon completion, view the files on your local computer and drag a file from another location on your computer to your SkyDrive Pro folder on your computer. Notice SharePoint pick up the file and it appears in your SharePoint 2013 SkyDrive Pro library.
Discontinuing sync between SkyDrive Pro and your local device
Being able to synchronize content on your SkyDrive Pro account with your local computer is a great convenience. However, be advised that when you do this you are actually introducing a possible security issue: remember that you are taking a file that is in a secure location and making the file available on your local device. If your computer is compromised—perhaps lost, stolen, or hacked—your synchronized files will then be available to whomever or whatever has compromised your computer.
Also, when you synchronize sites to your local computer you might end up with a site that houses more information than you can store on your local computer. You are able to synchronize up to 20,000 items from your SkyDrive Pro account to your local computer. Each file downloaded can be up to 2 GB in size. So, in theory, you can synchronize up to approximately 39 terabytes (TB) of data from your SkyDrive Pro account to your local device. I don’t know about you, but I haven’t seen many PCs or tablets lately with 39 TB of storage capacity!
Therefore (and not surprisingly), it is considered a best practice to stop synchronizing files, folders, or sites when you no longer require offline access to them.
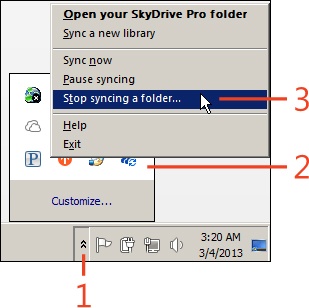
Discontinue syncing SkyDrive Pro files with your local device
In the notification area, at the far right of the taskbar, click the up arrow.
Right-click the SkyDrive Pro icon.
On the shortcut menu that appears, click Stop Syncing A Folder.
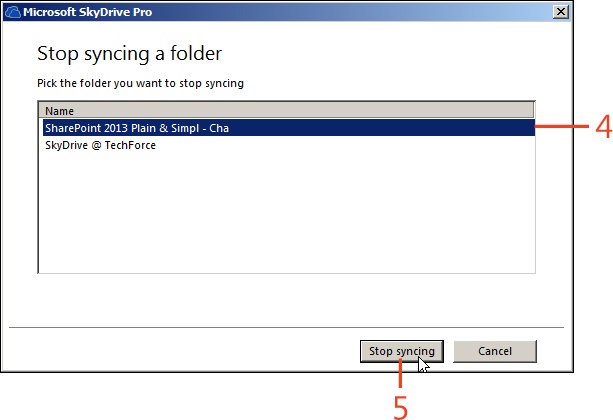
In the Stop Syncing A Folder dialog box, select the item with which you want to stop synchronization.
Click Stop Syncing.
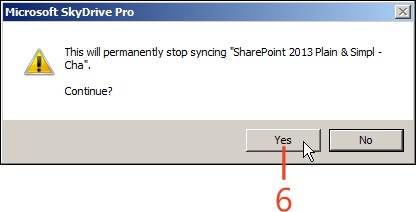
In the pop-up message box that appears, Click Yes.