Chapter 12. Using SharePoint with Office 2013
Microsoft SharePoint 2013 is a very powerful platform. But, you must also remember that the platform is a part of the overall Microsoft Office 2013 suite of products, as well. With this suite, Microsoft has set up a rich user experience by providing you with servers, desktop applications, and online services. These products are all designed to work seamlessly together. As such, when used in tandem, you have the ability to share, collaborate, create, and manage information within the SharePoint platform.
Office 2013 has been redesigned from previous iterations. And although the changes are significant, the core capability of being able to use SharePoint remains unchanged. You are able to subscribe to individual lists as well as link to SharePoint folders to synchronize documents, which provides you with an improved capability to work with contacts, calendars, and other content.
You are also able to open and save Microsoft Excel, Microsoft PowerPoint, and Microsoft Word documents directly to SharePoint libraries as if they were local storage devices as well as being able to insert media content, which can be stored in SharePoint. Additionally, you can utilize features when working with PowerPoint such as the broadcasting of a presentation to a virtual audience.
Connecting SharePoint libraries to Office
There has been one major change with regard to using Office with SharePoint: the evolution of Workspaces (formerly known as Groove) to SkyDrive Pro. This is available to you as either part of an installation of SharePoint 2013 or as a service if you are using Office365 or a SharePoint Online account. You can organize and store your documents and other files in your personal SkyDrive Pro account. From there you can easily share files and collaborate on documents with others within your company or organization.
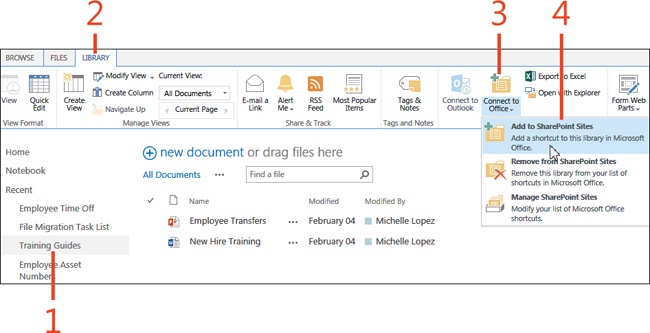
Before you can begin to use SharePoint 2013 with Office 2013 products, you need to connect them to one another. When you connect a library to Office, what you are actually doing is adding the library to your SharePoint Sites library in Windows. This is similar to the action you took when you added a mapped drive in older versions of Windows.
Connecting SharePoint calendars to Outlook
One of the breakthrough features Microsoft has maintained within the SharePoint platform is the ability to connect SharePoint calendars to Outlook. Because Outlook is a common business application that people use for receiving email messages and keeping track of their schedules, the ability to access SharePoint calendars from within Outlook is a great convenience for those who need to maintain multiple calendars. When you connect a SharePoint calendar to Outlook you have a view into the SharePoint calendar from within Outlook. You can also, add, edit, and delete calendar items within a SharePoint calendar by using the familiar Outlook interface.
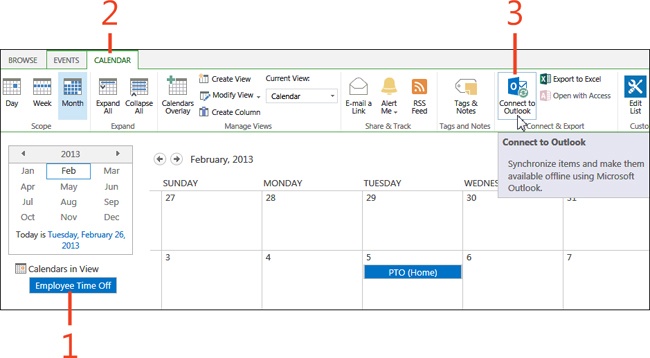
Connect a SharePoint calendar to Outlook
In SharePoint, select the calendar to which you want to connect in Outlook.
On the ribbon, click the Calendar tab.
In the Connect & Export group, click Connect To Outlook.
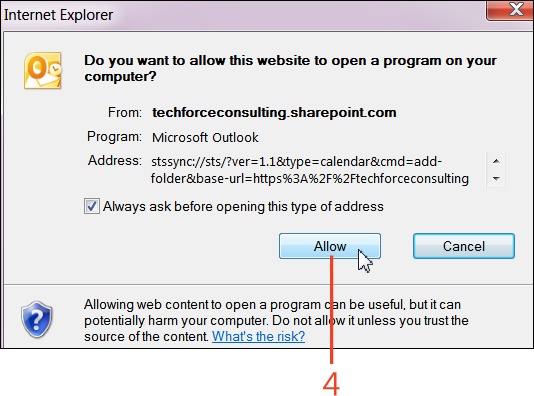
In the pop-up message box that appears, click Allow.
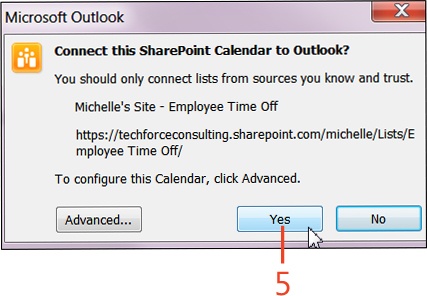
In the next pop-up message box that appears, click the Yes button.
Archiving Outlook email in SharePoint
Since the 1990s, business has depended on email. It is the one application with which practically every business professional around the world is very familiar. Despite the increased usage of alternative communication tools, it continues to prevail as the most dominant communication tool that professionals utilize, especially with external customers, vendors, and partners.
As such, it is a common requirement of business professionals to be able to store email messages within SharePoint. By doing so, they are able to not only share the communication with team members but they can turn a mail message into content that can be collaborated on and included with other content from a project, contract, proposal, and so on.
Although it is easy to simply drag a message from Outlook into a library. It is also easy to store the message as a discussion. The Discussion app is designed specifically to manage threaded conversations, grouped by subject. When an email message is moved to a SharePoint Discussion list, the email body is automatically aggregated into the discussion item as a series of replies. Attachments to any email message are also preserved as attachments on the discussion list item.
Archive Outlook email in SharePoint
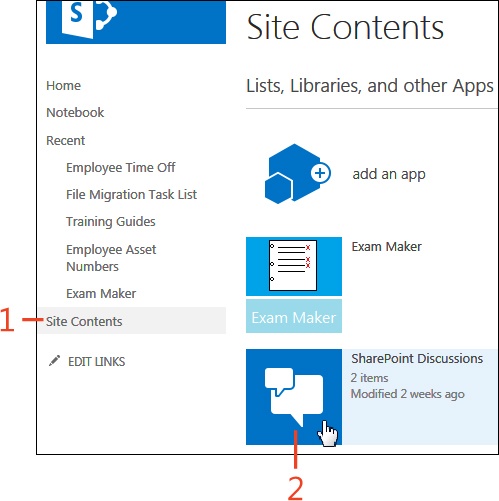
In SharePoint, on the Quick Launch bar, click Site Contents.
On the Site Contents page, click a Discussion Board.
Follow the steps in the previous section (Connecting SharePoint calendars to Outlook) to connect the Discussion Board to Outlook.
Tip
The tasks that follow assume that you have a Discussion list already on your site that you can use. If you do not have a Discussion list available, go to Creating and deleting lists, and refer to the task “Adding an app on SharePoint.”
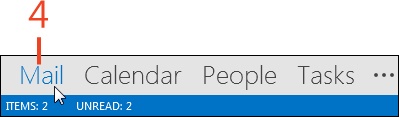
In Outlook, on the taskbar, click the Mail option and open an email message in your Inbox.
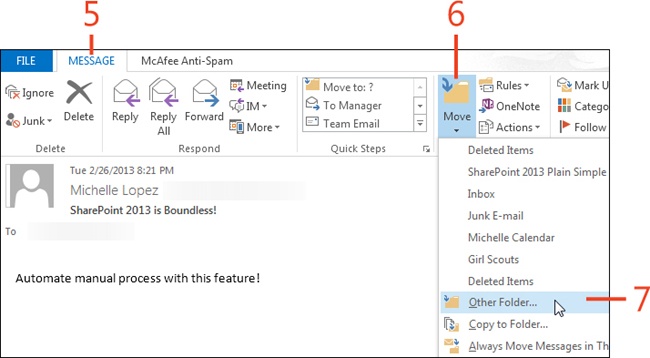
On the ribbon, click the Message tab.
In the Move group, click the Move button.
On the menu that appears, click the Other Folder option.
In the Move Item To dialog box, click a SharePoint Discussion.
Click OK.

Importing a spreadsheet into SharePoint
Spreadsheet programs are mainstays of companies and organizations. They are used throughout the world for anything from organizing and calculating financial information to administrative listings. Excel is the spreadsheet program of choice for the majority of business professionals everywhere. So, it only makes sense that SharePoint 2013 should work very well with it.
Traditionally, Excel spreadsheets were built and saved to a hard disk or some other network storage device. This was not ideal. When you combine the features of both SharePoint and Excel, you are able to use the software in ways that were not possible just a few short years ago, such as using the data within a table to drive a Web Part on a SharePoint site.
Also, the features give you the ability to import and export data from SharePoint lists. You can also use Excel spreadsheets to automatically map and create columns within SharePoint lists to match columns in Excel tables.
You might have a spreadsheet on a shared location that you use with team members. However, if users don’t have the Excel application on their computer or if they are trying to access the information through a mobile device, they might not be able to access the file. By using a SharePoint list, however, you are able to avoid these issues. You can also use the information more readily within other lists and libraries. For example, you might want to use a column within the list to populate the choices within another list.
Import a spreadsheet into SharePoint
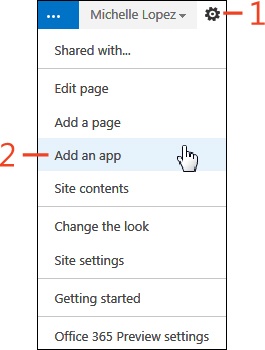
In the upper-right corner of your SharePoint site, click the Settings button (the small gear icon next to the name of the logged-on user).
On the menu that appears, click Add An App.
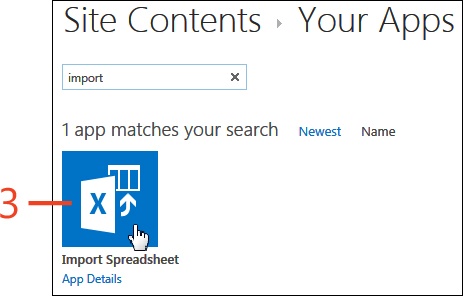
On the Your Apps page, select the Import Spreadsheet Icon.
To find the icon, you might need to scroll through the available apps.
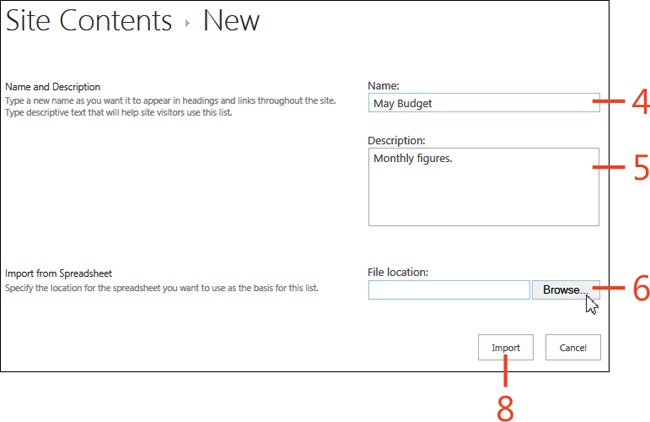
On the New page, enter a Name for the list.
Enter a Description for the list.
Click the Browse button.
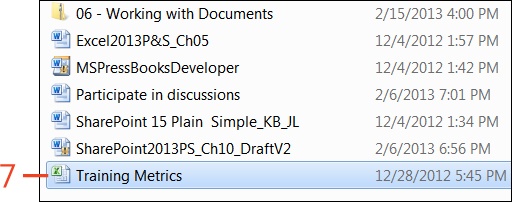
Double-click the Excel file that you want to import.
Back on the New page, click the Import button. (Refer to the screen shot on the previous page.)
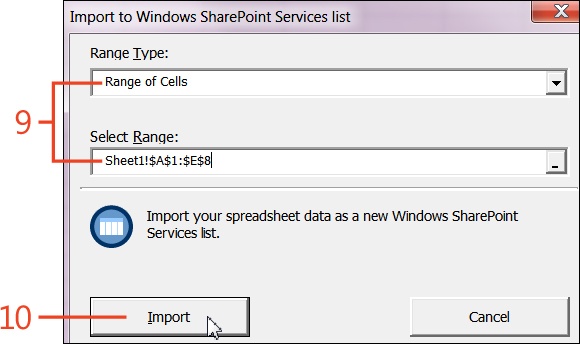
In Excel, select a range type and range by using one of the following options:
Range Of Cells. In your workbook, select a range by dragging your mouse across a selection of rows and columns.
Table Range. Select a predefined formatted table from the list box.
Named Range. Select a named range of cells from the list box.
Click Import.
Exporting data from a SharePoint list to Excel
SharePoint is a great platform to use for the display of data along with connecting the data to other applications. However, if you need to do extensive analysis of the data within the list, you might encounter some difficulties. Because Excel and SharePoint can operate together, you can take advantage of the powerful data analysis features of Excel to extrapolate needed details. But, you first need to get the data out of the SharePoint list into Excel.
Export data from a SharePoint list to Excel
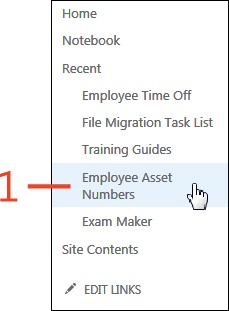
On the Quick Launch bar, click Site Contents or, under Recent, click a list to go to a previously opened list.
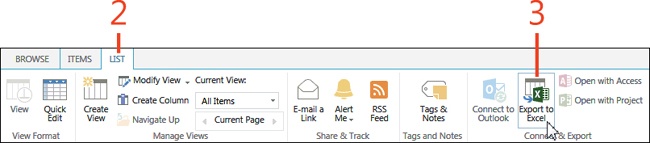
On the ribbon, click the List tab.
In the Connect & Export group, click the Export To Excel button.
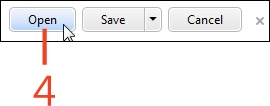
In the dialog box, click Open.
Excel opens automatically.
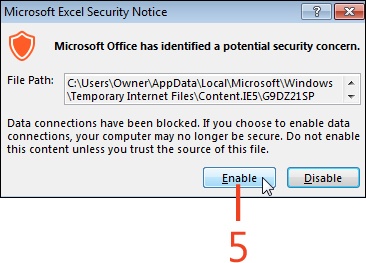
In the Microsoft Excel Security Notice pop-up message box, click Enable.
Try This
When you export a list to Excel you are given the opportunity to refresh the data from SharePoint when the list is opened. This is due to SharePoint establishing a new data connection between the Excel file and the SharePoint list. On the Design tab in the spreadsheet, explore the options available in the External Table Data group.
Exporting an Excel table to SharePoint
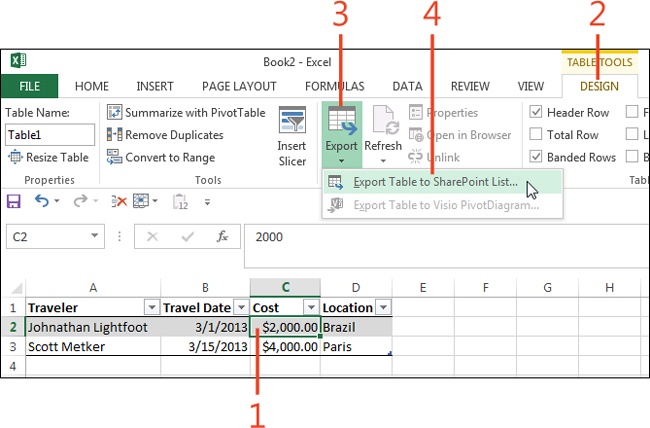
While working within an Excel table, you might want to export the data to SharePoint 2013. In doing so, you are in essence creating a new SharePoint list.
Export an Excel table to SharePoint
Open an Excel file that has been formatted as a table and click inside the table.
On the ribbon, click the Design tab.
In the External Table Data group, click the Export button.
On the menu that appears, click Export Table To SharePoint List.
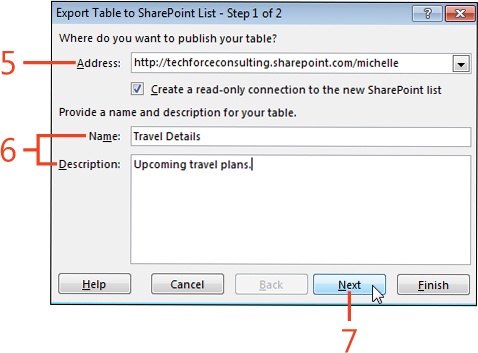
On the first page of the Export Table To SharePoint List Wizard that opens, to specify the address to publish to, do either of the following:
Type the URL to a SharePoint site.
Select a Quick Link from the list box of sites to which you previously published.
Type a name and optional description for the new SharePoint list.
Click Next.
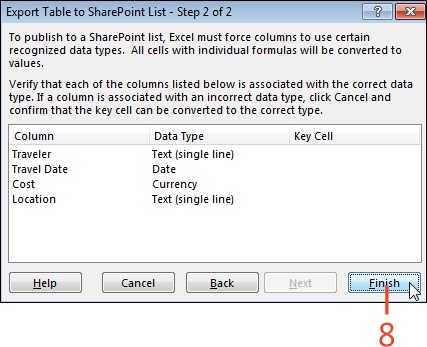
On page 2 of the wizard, click Finish.
Connecting Access and SharePoint
Microsoft Access is a powerful database tool that, in fact, was also the basis for the datasheet view in previous releases of the SharePoint 2013 platform. Currently, when you select the Quick Edit view on a list within the current SharePoint platform, you are able to do so because of the Access features that have been incorporated into the platform. As a consequence, you can connect a SharePoint list to Access to utilize even more of the tools it offers. One of the more commonly utilized features is the ability to keep information synchronized from both within SharePoint and Access. In doing so, someone could be in Access and update the data, and those changes will show up within the SharePoint list, and vice versa.
Connect Access and SharePoint
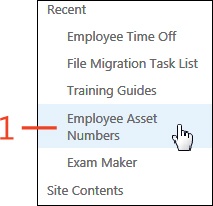
On the Quick Launch bar, click Site Contents or, under Recent, click a list to go to a previously opened list.
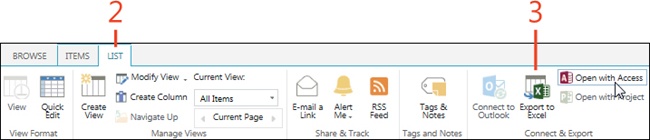
On the ribbon, click the List tab.
In the Connect & Export group, click the Open With Access button.
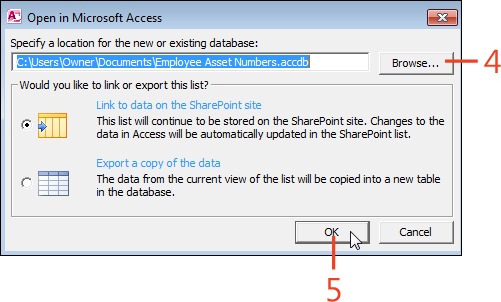
In the Open In Microsoft Access dialog box, click Browse to select an existing or new database.
Choose from two options when exporting the list:
Link To Data On The SharePoint Site. Using this option, you can create a bidirectional link between the Access table and the SharePoint list.
Export A Copy Of The Data. This option exports a copy of the data to an Access table. No link is created by which the data would otherwise remain synchronized between the SharePoint list and the Access table.
Click OK.