Chapter 17. Community portals and sites
Microsoft SharePoint 2013 includes a new site template designed for community discussions and social interaction called the Community Site template. This section discusses the administration and use of a community site.
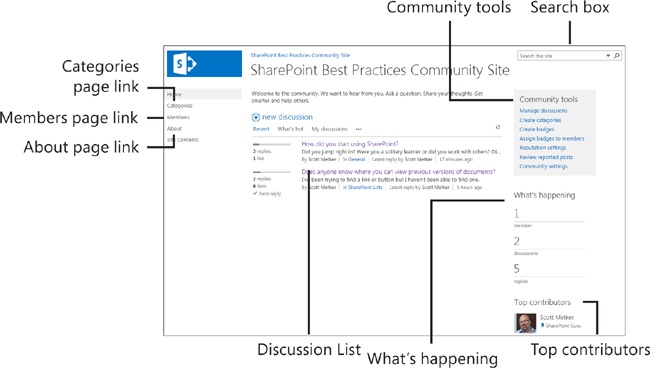
When you first access the Home page for a community site, you will notice a number of default Web Parts with which you can quickly track what’s happening on the site. The following Web Parts and links on the Home page can be quite helpful:
The Search box shows your current query and gives you the capability to query discussions and conversations, both in this site and across many other sites
Using the Community Tools links, site owners and moderators can manage discussions, categories, badges, and other community settings.
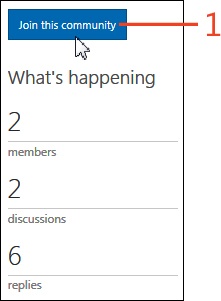
The What’s Happening area shows high-level statistics regarding the usage of the site, including total members, discussions, and replies.
The Top Contributors section shows a list of the most active contributors to the site.
The discussion list section shows recent discussions on the site. You can use the links at the top of this section to filter the results to show recent or popular discussions as well as discussions that you have started.
The About page link shows the About page of the site that describes the purpose of the site and any other information that the owner or moderators would like to provide for site usage (including rules and guidelines for content).
The Members page link shows the Members page of the site that lists site members and their current usage statistics including their reputation on the site.
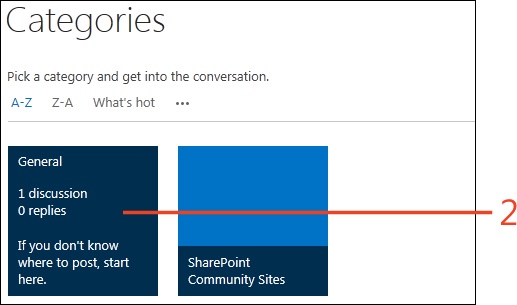
The Categories page link shows the Categories page on which you can filter and show posts within site-managed categories.
Creating a community site site collection
The first step for working with community sites is to create your own site. In many companies, there might already be a governance policy in place by which you can request a new site. You should use process when requesting a new site to ensure that it falls under corporate guidelines. Alternatively, if you have a smaller implementation without a formal mechanism for site creation (and you have administrative access to your SharePoint 2013 instance), you can create your own site collection based upon the Community Site template.
Create a community site site collection
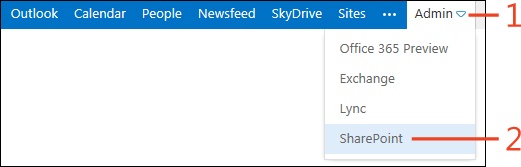
On the Admin Center for your Office 365 instance, at the right end of the toolbar, click the Admin button.
On the menu that appears, click SharePoint.
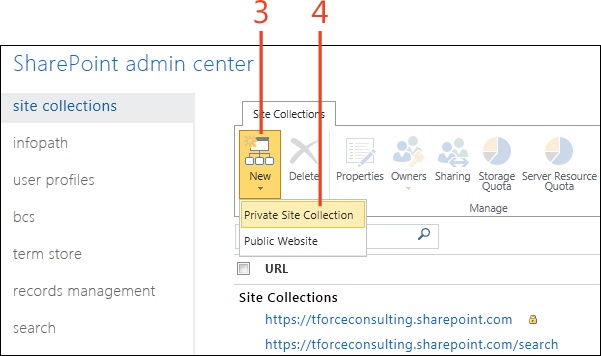
In the SharePoint Admin Center, on the ribbon, click the Site Collection tab and then click New.
On the menu that appears, click Private Site Collection.
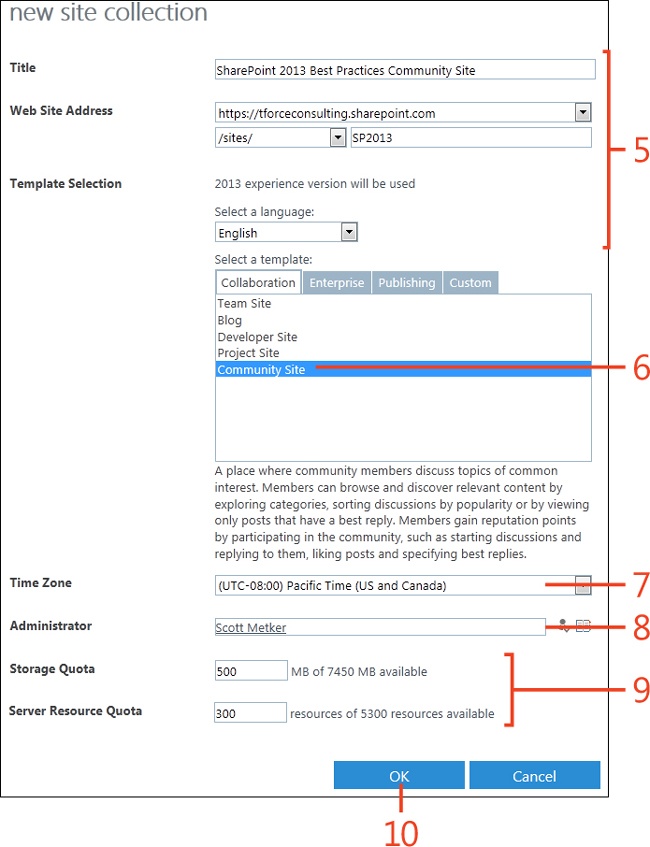
On the New Site Collection page, type a title for the Community Center, a URL that will be used to access the site under your main URL, and a language for the new site.
Select Community Center (under the default Collaboration tab).
Specify the appropriate Time Zone.
Choose the site administrator who will have administrator rights to the site.
Select your storage quota and server resource options.
Click OK.
Creating a community site subsite
If you have a collection of similar SharePoint 2013 community sites that are managed by the same group of people, or if you don’t have administrative access to create site collections, you can also create a discussion site as a subsite.
Create a community subsite
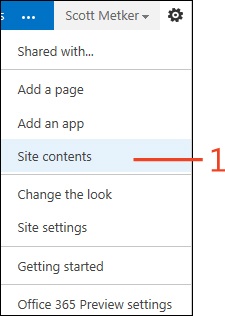
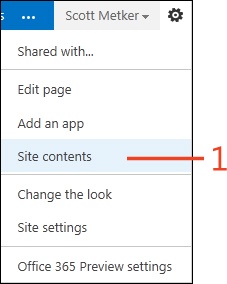
From the root site that will contain your community subsite, click the Settings button (the small gear icon next to the name of the logged-on user). On the menu that appears, click Site Contents.
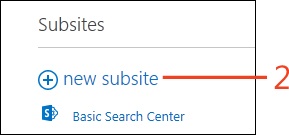
On the Site Contents page, in the Subsites section, select the New Subsite link.
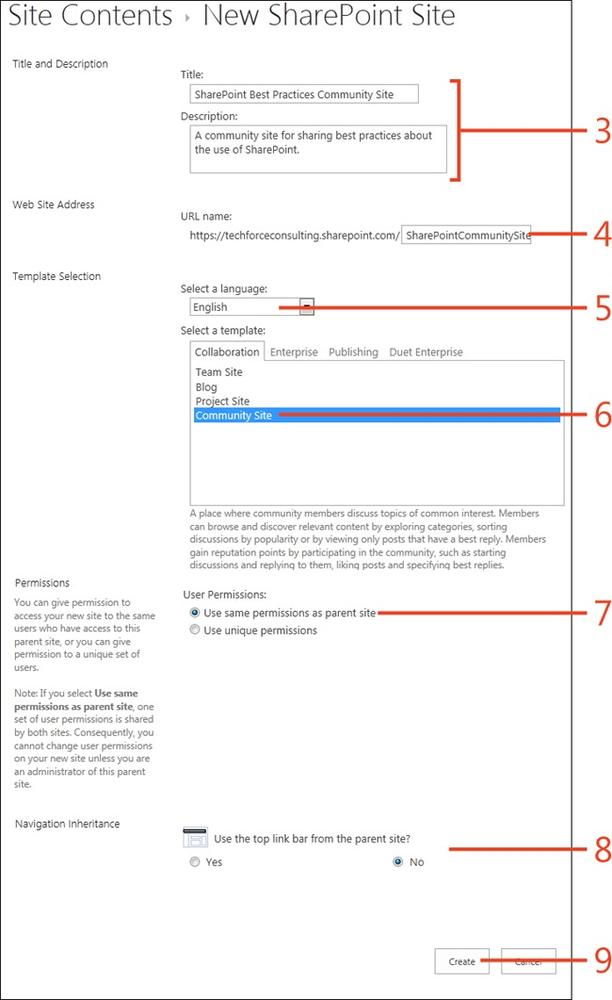
On the New SharePoint Site page, type a title and description.
Type a URL for the site, relative to the root site.
Choose a language.
Choose the Community Site template (located on the Collaboration tab).
Choose user permissions for the site.
If you select Use The Same Permissions As Parent Site, you will not have an automatically created Moderators group if your parent site is not also a Community Site. You will need to manually create the Moderators group if you choose this option.
Select navigation options for the site.
Click Create.
Adding moderators to community sites
After you have created a SharePoint 2013 community site site collection, you should then choose and assign an initial list of moderators to the site. Unless you are willing to undertake all moderation tasks, you should identify other moderators as early as possible. Effective site moderation is a key for user adoption, so your moderators should be ready and available prior to sharing the site with other users.
Add a moderator to your community site
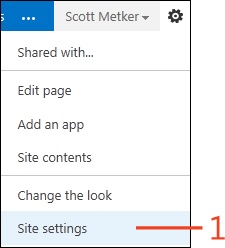
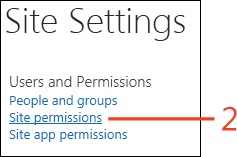
On your community site, click the Settings button (the small gear icon next to the name of the logged-on user). On the menu that appears, click Site Settings.
On the Site Settings page, in the Users And Permissions section, click the Site Permissions link.
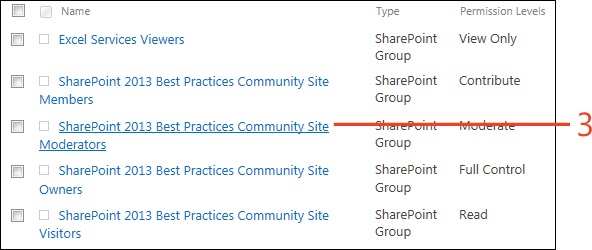
On the Permissions page, locate the group named [Site Name] Moderators, where [Site Name] is the name of your current site. Click the name of the group.
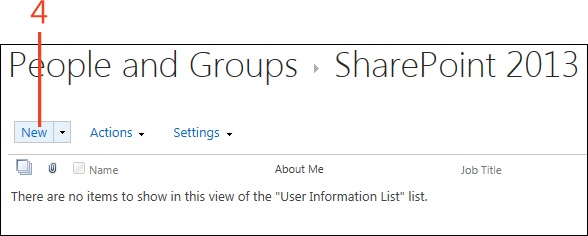
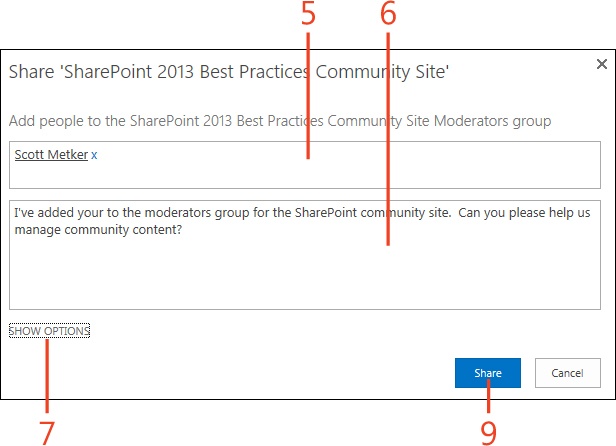
On the People And Groups page for your moderators group, click the New link.
In the Share dialog box that opens, type the first few letters of a user name or full name for each moderator. The system prompts you with partial matches as you type ahead. Select and add each user.
Type the text that you want to send in an email to each moderator. This should describe the reason that you’re making them a moderator and any follow-up instructions that are needed.
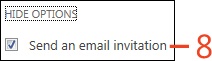
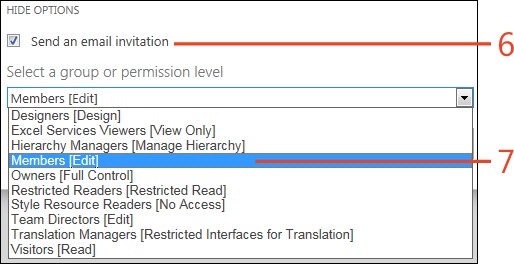
Click the Show Options link to expand the dialog box and display additional information.
To automatically notify each moderator via email, in the expanded portion of the dialog box, select the Send An Email Invitation check box.
Click the Save button to complete the process, add the moderators, and send the email notification.
Adding users to community sites
There are two primary ways that users will first access your SharePoint 2013 community sites:
Sharing from other users. Site users can share an invitation to an existing community. If you want, the invitation sends an email to the user with some descriptive text.
Joining the site manually. Site users can access some of the content of your site when they first discover it. For example, they can discover an existing discussion on your site via a SharePoint search and choose to join the site after they determine the content is relevant to them.
This task describes how users can join (or be asked to join the site).
Sharing your community site
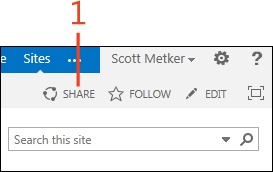
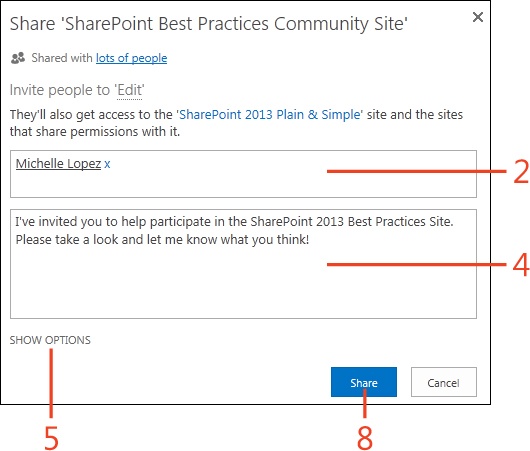
On the Home page of your community site, toward the right end of the toolbar, click the Share link that appears under the name of the logged-on user.
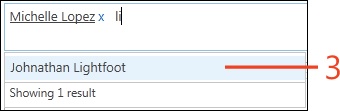
In the Share dialog box that opens, type of the user name or full name of the user whom you are trying to add.
As you type, the system presents a filtered list of potential matching users.
In the list, select the appropriate user to add to the list. You can repeat this step for multiple users.
Type the text for an email notification to the user or users.
Click the Show Options link to expand the dialog box and display additional information.
To automatically notify each moderator via email, in the expanded portion of the dialog box, select the Send An Email Invitation check box.
Click the list box and select a permission group to which the user or users will be added on this site.
For example, you might add them to the Read group to give them view-only access to the site.
Click Save to send the email and invite the users.
Managing your community settings
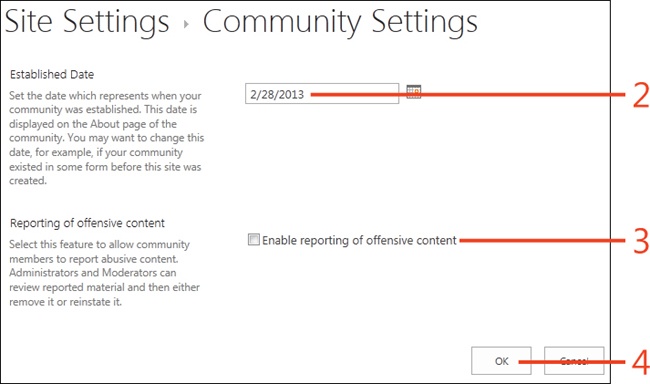
On the Community Settings page, SharePoint 2013 owners and moderators can specify the date the group was established. This date defaults to the date your site was created, but it is intended to define when your community first started as a formal entity. If your group existed as a formal entity prior the creation of the site, you can specify this date manually. This date is displayed on the About page of the site so that users can see how long the community has been in operation.
Manage community settings
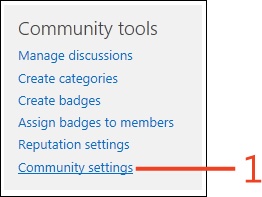
On the Home page of your site, in the Community Tools section, click the Community Settings link.
On the Community Settings page, enter the date on which your community was established. This date is defaulted to the creation date of the site, but you can specify an earlier date if your community existed outside of SharePoint prior to the creation of the site.
Select the Enable Reporting Of Offensive Content check box if you want users to be able to report offensive content to moderators.
Click the OK button to save your changes.
Working with categories
Within a community site, you can create categories that are used to classify discussions. Unlike tags, which are used elsewhere within SharePoint 2013, only a single category can be assigned to each discussion. As a result, you should choose broad and easily assignable categories. After all, if discussion authors have trouble choosing categories when they add discussions, the organization of content within your site will become increasingly arbitrary over time.
Non-owners and non-moderator users of your site cannot create categories, but they can browse the list of categories and view new discussions within a category. With categories, users can focus their viewpoint on discussions and conversations relevant to areas of interest.
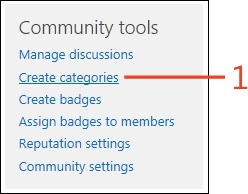
Creating categories
On the Home page of your site, in Community Tools section, click the Create Categories link.
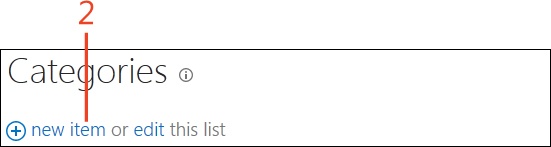
On the Categories page, click the New Item Link located above the list of categories.
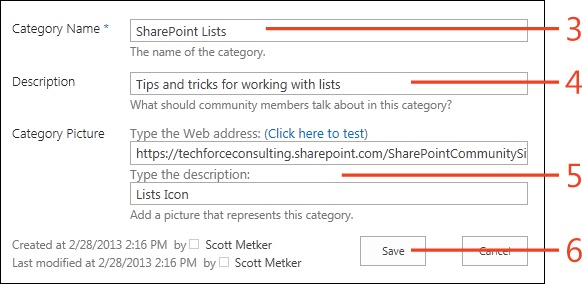
On the New Category page, type a name for the category you are creating.
Type a description of the category.
The description displays when users hover their mouse over the category tile on the Categories page.
You can choose to provide a link to an image that will be used for the category tile icon in the Categories page.
Click the Save button to save the new category.
Find discussions by category
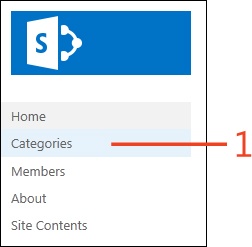
On the Home page of your site, in the Navigation pane, click the Categories link.
On the Categories page, click the Category tile representing the category you will be viewing.
You can view the description of the category before you click it by hovering your mouse over the category before you click it.
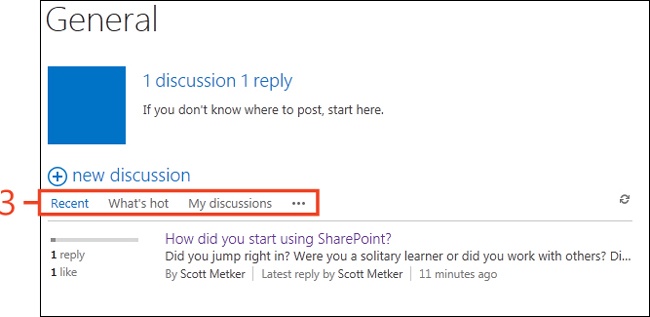
On the Category page for your selected category, you can filter the resulting list by clicking the Recent, What’s Hot, or My Discussions links. You can find additional filters by clicking More Options ellipsis (...).
Working with badges
Badges are another new feature with SharePoint 2013. You can create new badges representing special achievements on your site, and you or your moderators can award badges to users for special achievements on the site. Badges are a form of gamification, which refers to using game-style mechanics and awards in a non–game-playing scenario.
One such example is Microsoft’s own SharePoint MVP certification, which is granted to SharePoint pioneers within the Internet community, based upon the breadth and depth of their SharePoint support and evangelism.
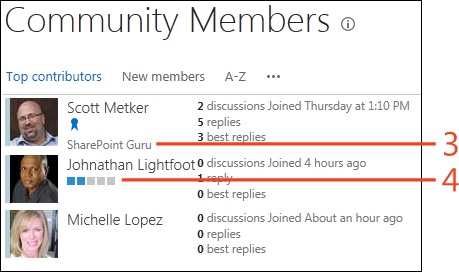
Badges, when used properly, also help users within large communities to lend credibility to a particular reply. When a user who is assigned a badge named SharePoint Guru replies to a discussion, other users attach additional credibility to the response because the badge indicates that it was authored by a Guru.
You (and your moderators) should make judicious use of badges; if you award badges in a capricious fashion, you devalue the badge and the perception of content authored by all users who have this badge assigned to them.
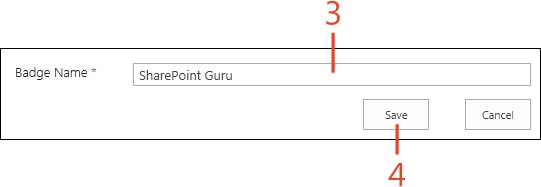
Create badges
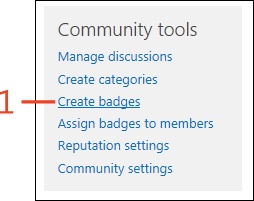
On the Home page of your site, In the Community Tools section, click the Create Badges link.
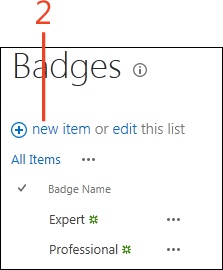
On the Badges page, click the New Item link.
On the New Badge page, type a title for your badge.
Click the Save button to save the new badge.
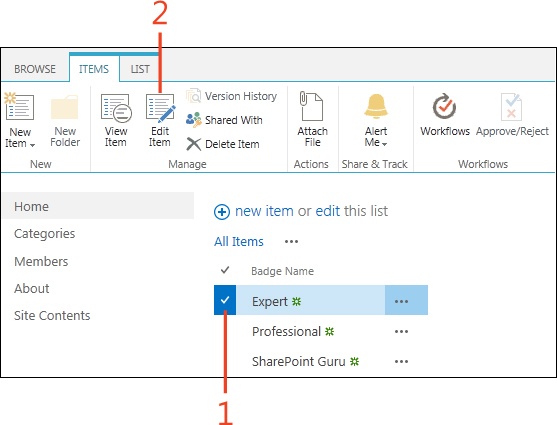

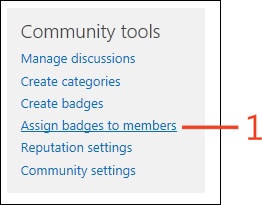
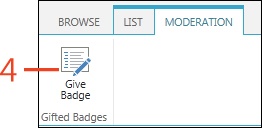
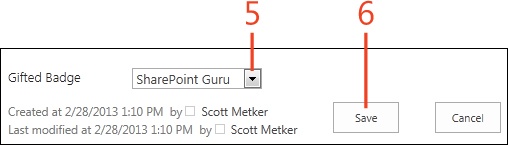
Assigning badges to members
After you have created badges on your site, you can proceed to assign badges to users. When you have decided which users will receive each badge, you can begin to assign them.
Assign badges to members
On the Home page of your site, in the Community Tools section, click the Assign Badges To Members link.
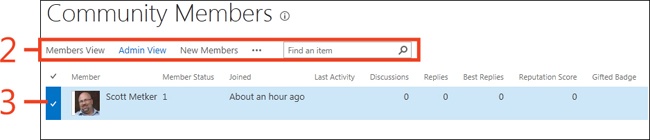
On the Community Members page, you can filter displayed users via the predefined view links or the search box.
Locate a site member to whom you will assign a badge. Select the user by clicking to the left of the user name column.
On the ribbon, click the Moderation tab and then, in the Gifted Badges group, click the Give Badge button.
On the Assign Badge page, select a Gifted Badge.
Click Save to assign the badge.
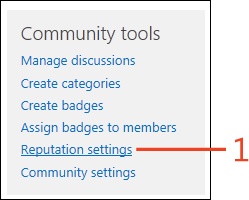
Enabling site-wide reputation tracking
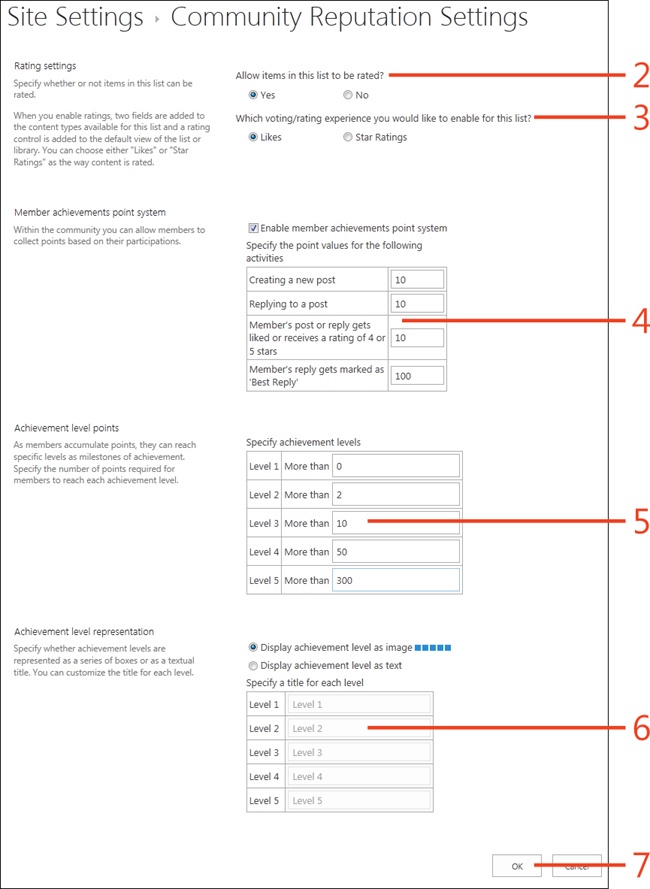
You can assign reputation settings to an entire SharePoint 2013 community site that specify automated achievement levels for members based on the amount of content (discussions and replies). Reputation settings manage how members are awarded reputation scores on your sites.
The first two settings within the reputation settings determine whether ratings on the site are enabled and what type of rating (“likes” versus star-based scoring) are used for user feedback. Using the rest of the settings, you can specify reputation tracking and fine-tune the scoring system. The member achievement point system specifies what site actions a member must take to increase their reputation score, and the achievement level points allows you to set the score thresholds for up to five achievement levels. Finally, the last achievement level representation section determines how SharePoint displays a member’s achievement level (either as a small icon or as a custom text label).
Enable site-wide reputation tracking
On the Home page of your site, in the Community Tools section, click the Reputation Settings link.
On the Community Reputation Settings page, in the Allow Items In This List To Be Rated section, click Yes.
Click to offer users the choice to either “like” or apply star ratings to items on the site.
If you want to use the member achievements point system, select the Enable Member Achievements Point System check box and enter point values for the indicated achievements.
In the Achievement Level Points section, choose threshold values for each achievement level.
In the Achievement Level Representation section, click either the Display Achievement Level As Image option or the Display Achievement Level As Text option. If the latter option is chosen, you can specify names for each achievement level in place of the default values.
Click OK to enable reputation tracking.
Viewing badges and reputation scores for a member
Reputation scores are another way that site members can associate credibility with users of a site. When enabled, you can view the achievement level scores for any site member next to any discussion or reply that they post on the site. However, if you know the member’s name, you can simply look up the reputation for that individual on the member’s page.
View badges and reputation scores for a member
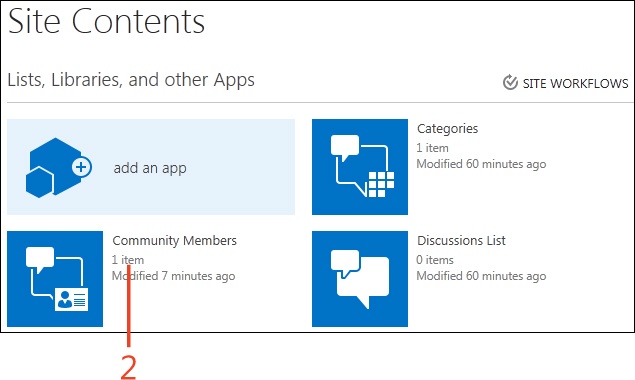
On your community site, click the Settings button (the small gear icon next to the name of the logged-on user). On the menu that appears, click Site contents.
On the Site Contents page, in the Lists, Libraries, And Other Apps section, select the Community Members tile.
In the member list, locate the individuals whom you are interested in viewing. View the badges for the individuals directly under their user name.
View the achievement level for individuals under their user names, as well (if available).
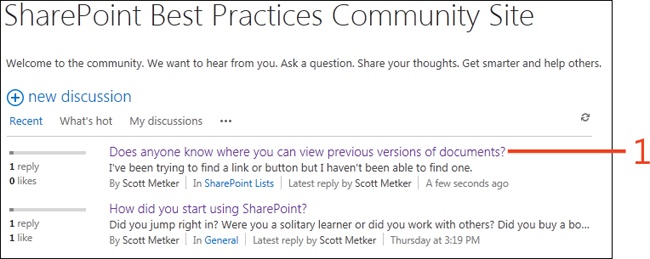
Creating and editing discussions
Discussions are main types of content used within a SharePoint 2013 community site. A single discussion acts as a starting point for users to publicly ask a question or make a comment and for other site members to reply to the question or add their own thoughts.
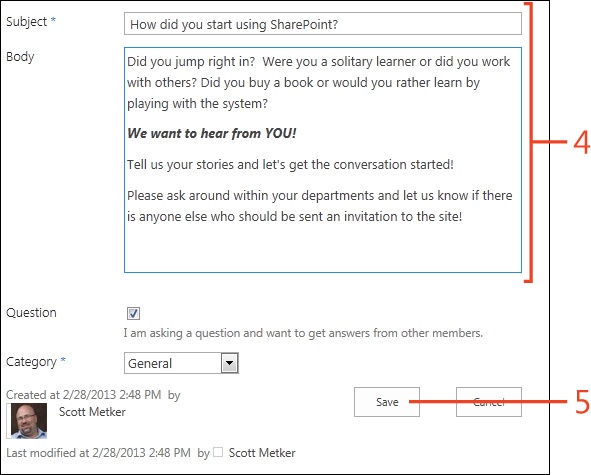
When you first author a discussion, you can create a basic title to the post, categorize the discussion, and then you can attach a detailed body to the post that includes rich text, images, or even multimedia. After you have authored a discussion, you can also return and edit the original discussion post.
Create a new discussion
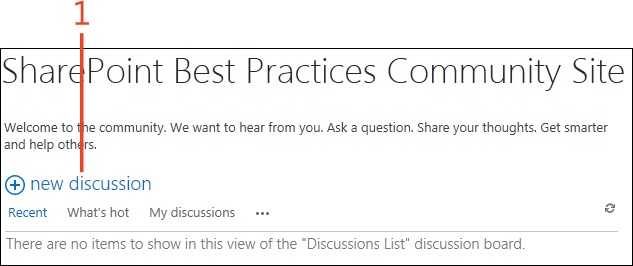
On the Home page of a Community Site of which you are a member, click the New Discussion button.
Tip
You should generally reserve edits to your original discussion to grammatical corrections or quick corrections made immediately after your original post. Because other members can respond to your discussion, you don’t want to change your original text too much, or members who follow the discussion might become confused by replies that are invalidated by your changes.
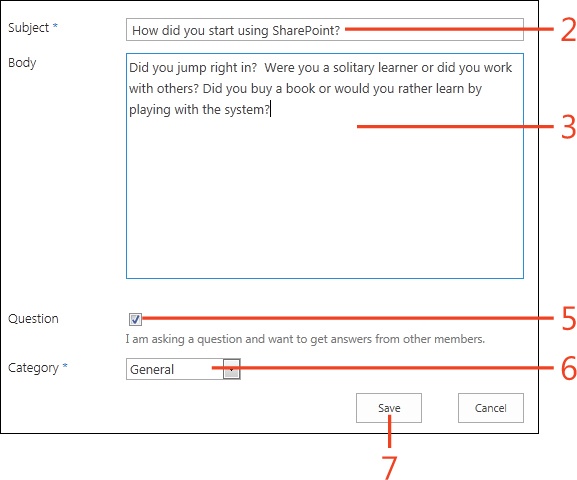
On the New Discussion page, type a title for the new discussion.
Enter text for the body of the discussion.
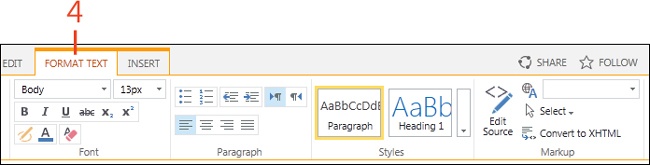
While you are editing the body of the discussion, the Format Text contextual tab automatically appears on the ribbon. Use the tools on this tab to apply rich-text formatting to your content.
If you want to indicate that this discussion is a query, select the Question check box.
Select a category for the discussion.
Click the Save button to post your discussion to the site.
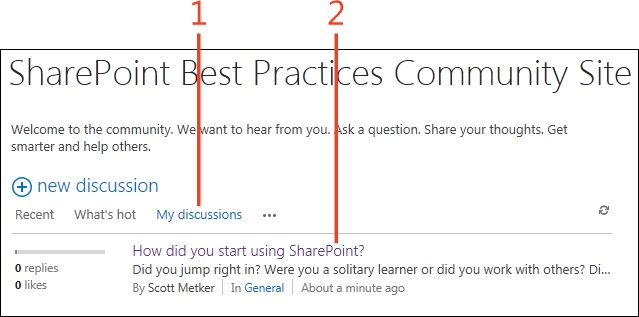
Edit a discussion you have created
On the Home page of a community site on which you have already posted a discussion, click the My Discussions link in the Discussion list.
Click the subject link for the discussion that you want to edit.
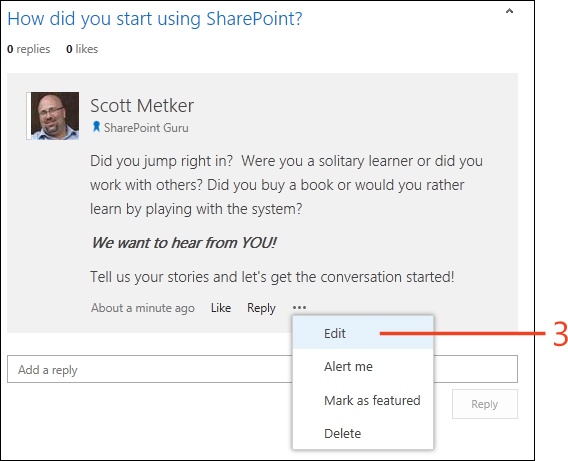
At the bottom of your discussion, click the More Options ellipsis (...) and then, on the menu that appears, click the Edit command.
On the Edit Discussion page, edit any of your discussion settings.
Click the Save button to save your changes.
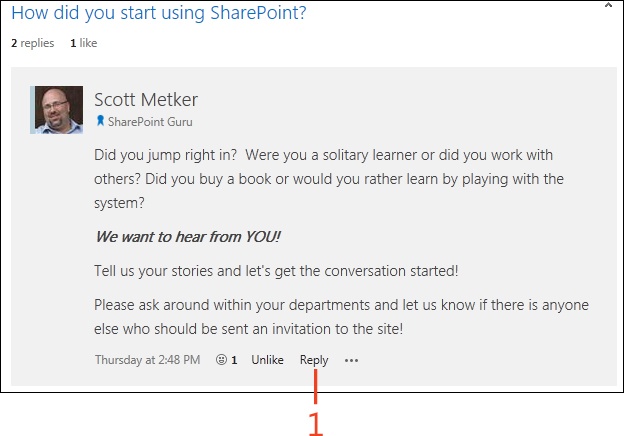
Replying to a discussion
Even if you don’t have a new discussion to add to a SharePoint 2013 community site, you can contribute by responding to discussions that are already in progress. Adding your thoughts, feedback, and answers to existing questions is one way that you can enhance your reputation on a site and assist other users within your organization.
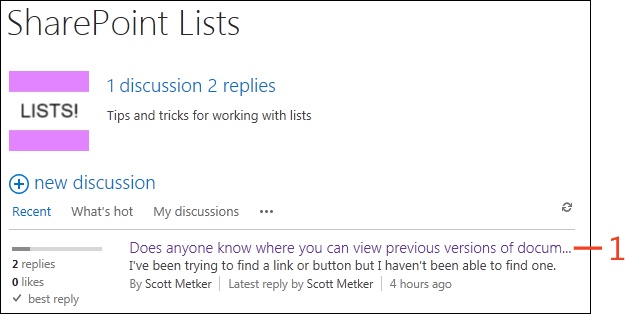
You can respond to a discussion from virtually anywhere that you can view discussions on a community site. You can reply to discussions from the Home page or from the discussions list, which is accessible by clicking the Categories link on the Home page.
Reply to a discussion
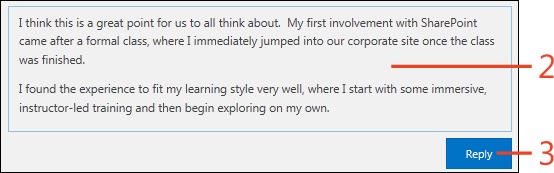
At the bottom of the discussion to which you want to respond, click the Reply button.
In the window that appears, type your reply.
Click the Reply button to save your reply.
Tip
Before you respond to a discussion, ensure that you have read the site guidelines, which you can view by clicking the About link on the Home page.
Tip
You can also reply to any of the replies under the main discussion. Your response will be slightly indented and appear under the reply rather than at the end. This facilitates threads of a discussion to be grouped together so that users can engage in side-discussions while still on the main thread.
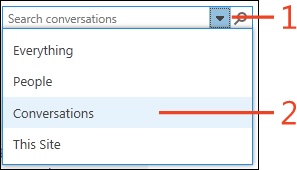
Searching for discussions
One of the ways that you can find discussions is via SharePoint 2013 search. On any community site (or from many other types of SharePoint sites) you can search all conversations to which you currently have access. Using search, you can find discussions and communities that you might not have known existed. This is one of SharePoint’s most powerful features because you can discover content without requiring explicit advertisement or communication to the end-user community. Many organizations are exploring this functionality as the first steps toward informal, self-guided learning that could eventually replace formal eLearning classes for many job functions.
Search for discussions
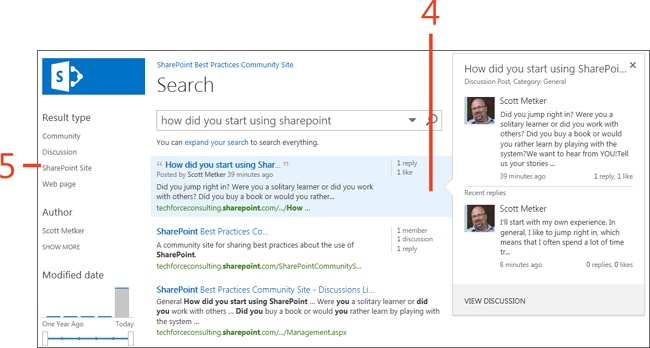
In the upper-right corner of the community site (and most other site templates), click the drop-down arrow on the right end of the Search box, next to the Search button (the magnifying-glass icon).
On the menu that appears, click Conversations.
Enter the text of your query and click the Search button to start your query.
Within the search results, you can hover the mouse over each conversation to display a ScreenTip that contains more detail on a discussion and associated replies.
Within the search results, you can filter returned results further by using the refinement options on the left side of the search results.
Tracking discussions in progress
Sometimes, you might find a SharePoint 2013 discussion contains a question that you are unable to answer yourself, but you are interested in tracking it in case anyone else responds. In this case, you can create an alert on the discussion that will send you a notification if someone else adds a reply.
Set an alert on a discussion
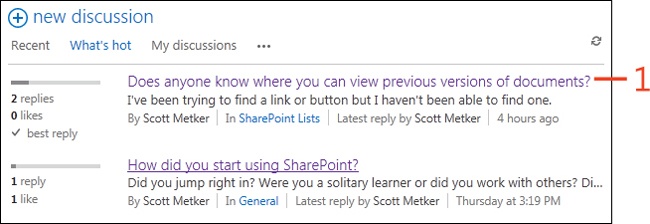
From the discussion list (on the Home page or from one of the site categories discussion lists), click the subject of one of the discussions to open it.
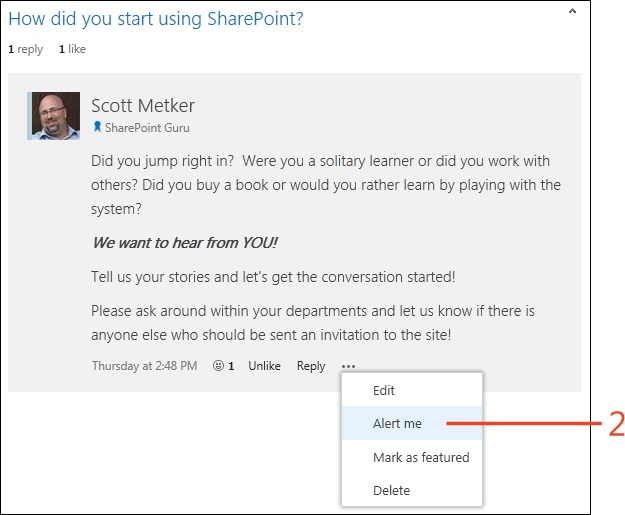
At the bottom of the first part of the discussion, click the More Options ellipsis (...) and then, on the menu that appears, click Alert Me.
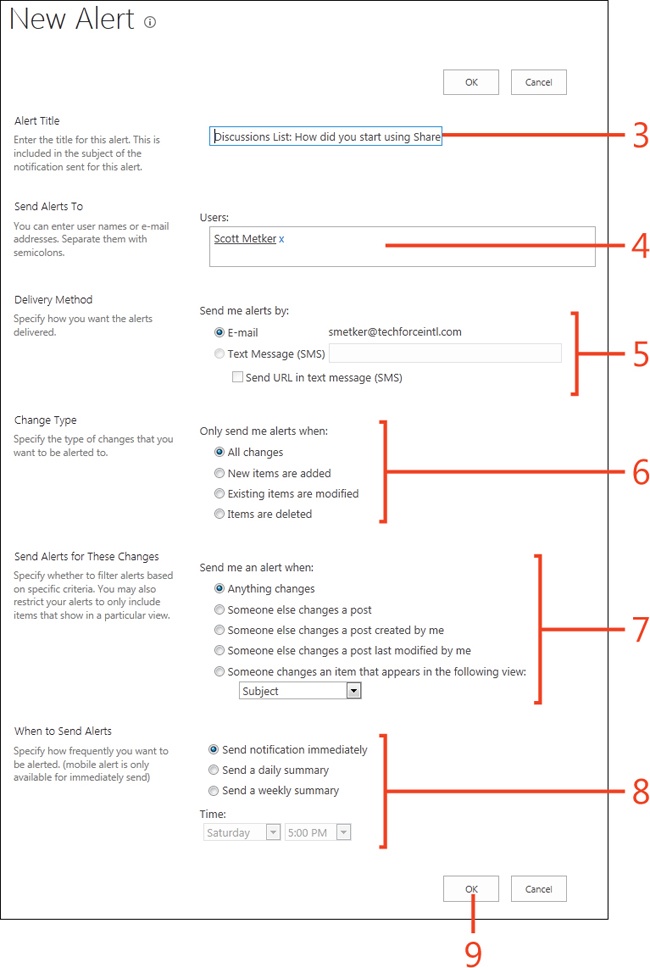
On the New Alert page, modify the title of the alert if the suggested title isn’t specific enough. This title is used for future alerts notifications.
If you have library administrative privileges via the Manage Lists permission, you can also add additional recipients for the alert notifications.
Specify a delivery type for notifications.
Specify which types of changes to the discussion should result in a notification being sent.
Type additional filter for the notification.
Specify how often notifications should be sent.
Click OK to create the alert.
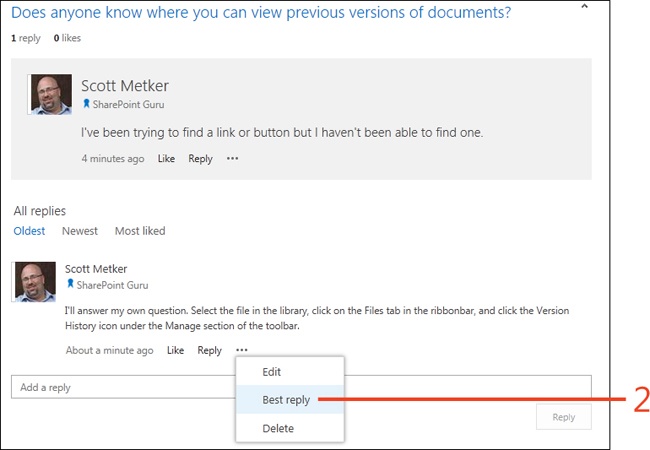
Managing replies
As a member of a SharePoint 2013 community site, you still can manage replies if you are not a moderator or owner of the site. Your editing capabilities, however, are limited to replies that you have authored or replies that belong to discussions that you have authored.
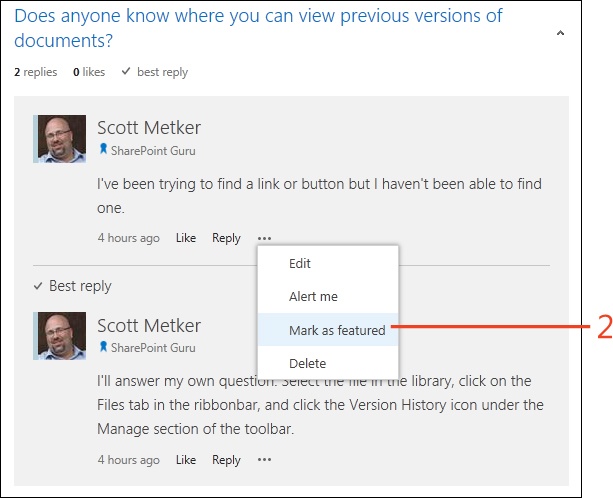
Mark a reply as a best reply
In the Discussion list on the Home page, click a discussion title to open it.
Locate the reply to which you want to assign best reply and then click the More Options ellipsis (...) located at the bottom of the reply. On the menu that appears, click Best Reply.
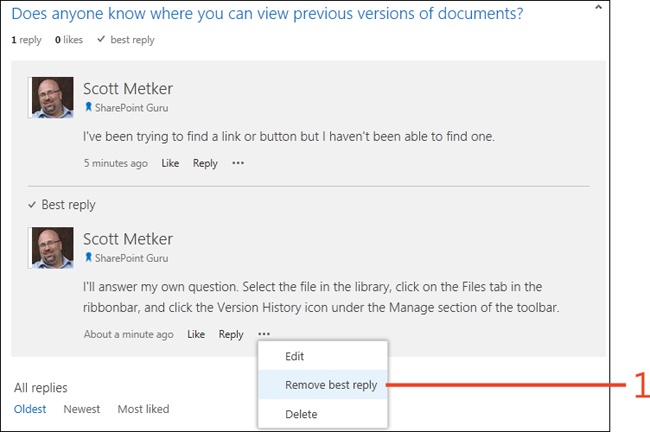
Remove a best reply
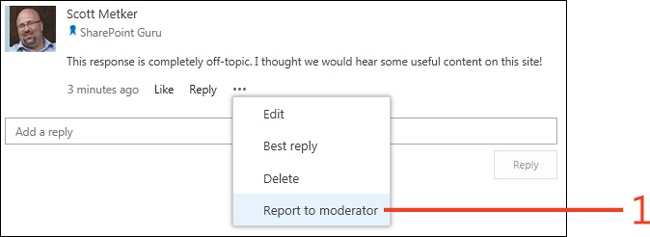
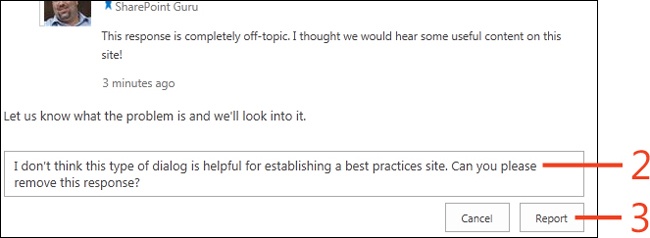
Report a reply to the moderator
On a reply that contains inappropriate content, click the More Options ellipsis (...) located at the bottom of the reply. On the menu that appears, click Report To Moderator.
In the Report Offensive Content dialog box that opens, type a note to the moderator staff about the inappropriate content.
Click the Report button to submit the note and a link to the flagged content.
Moderating discussions
One of the primary jobs of a SharePoint 2013 community site moderator is overseeing discussions on the site. In one case, the moderator staff should seek out unanswered questions that have become stale over time. Although not all questions must be answered by the moderator staff, it is important that they contribute to open questions when they can. This might entail writing answers to questions from scratch or simply consolidating many partial answers into a cohesive response.
Another job of a moderator is to promote important discussions and ensure that they are featured on the site. Featured discussions can be separately accessed under the featured discussions view. This provides a moderator-curated view of important content, and members of this site might find themselves monitoring the featured discussions to keep up with important discussions within the community.
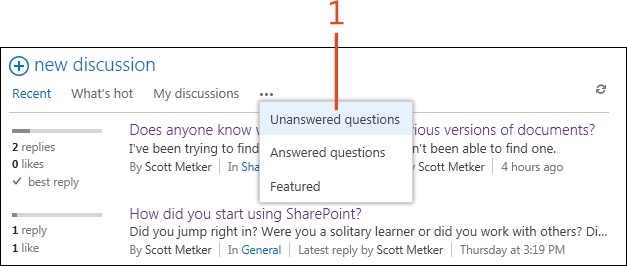
Find unanswered questions
In the discussions list, click the More Options ellipsis (...) in the line directly under the New Discussion link. On the menu that appears, click Unanswered Questions.
Reviewing posts submitted for moderation
Another responsibility of the SharePoint 2013 moderator is reviewing reported items. This can consist of discussions or replies that violate the site guidelines, corporate policies, or the limits of acceptable behavior. Effective moderation of these reported items is essential to maintain a consistency of content and proper tone within a site. Additionally, your company or organization might have rules regarding appropriate content that might need to be applied, as well.
Review posts submitted for moderation
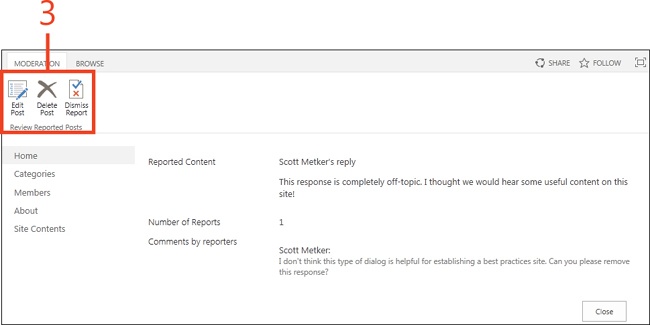
On the Home page of your site, in the Community Tools section, click the Review Reported Posts link.
From the list of items submitted for moderation, click the post link associated with an item.
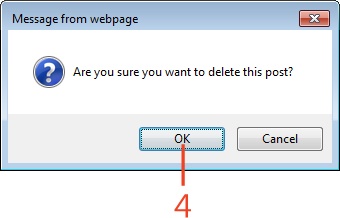
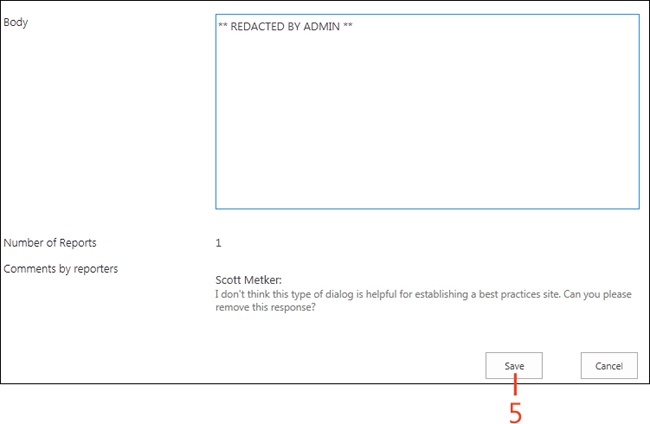
After viewing the item, click the Delete, Edit Post, or Dismiss Report buttons to process the request.
If you click Delete, you will be prompted to verify. Click OK to verify and delete the post.
If you click Edit Post, you will be granted access to the post where you can edit and then click Save to commit your edits.
If you click the Dismiss Report button, you will be prompted to verify. Click OK to verify and delete the report.