Chapter 19. SharePoint and eDiscovery
If you work within a typical company or organization, you will likely have vast amounts of content produced by your group, both formally and informally. This covers simple documents, such as contracts and invoices, as well as informally produced content such as departmental webpages, intra-office emails, and online chat sessions.
All of this information could be subject to discovery or legal hold rules at some point in the future, which dramatically changes how you create and store data on a daily basis. Your organization might be subject to these rules due to industry regulations or compliance, internal corporate policies, or due to a court case. In any of these scenarios, you will likely face two primary directives:
Don’t allow the deletion of anything relevant during an investigation.
Find, export, and deliver all content relevant to the investigation to the appropriate authorities.
Throughout this book, we have presented ways of producing, sharing, and organizing information by using Microsoft SharePoint 2013. In this section, we will focus on ways that this information can be discovered (in the legal sense of the word), archived, and preserved.
Electronic discovery, or eDiscovery, is the process of finding and delivering electronic information that can be used as evidence in a court case. Tools that are used for eDiscovery scan through information systems searching for material that might be relevant to a case. After this content is identified, these tools can extract and deliver the information to representatives of the court.
What are eDiscovery and legal holds?
A legal hold occurs when a company receives a communication from legal counsel or a court that requires the organization to immediately suspend any disposal of information that might be relevant in a legal proceeding. A legal hold covers all forms of information storage used at a company, spanning both paper-based and electronic information.
In a simple example, if a company is involved in a court case involving potentially fraudulent billing to another customer (for this example, let’s use Contoso Ltd), a legal hold might be issued. This legal hold would immediately block any shredding or recycling of paper-based materials concerning Contoso Ltd. In addition, this would also require that all emails containing references to Contoso as well as any documents assigned to this account (or containing certain keywords) become immediately locked down and preserved. These rules ensure that information relevant to an ongoing court case remains intact prior to a full discovery effort.
eDiscovery in SharePoint
One of the challenges of legal discovery within software systems is that the discovery process typically requires both technical skills and system access reserved to IT staff, whereas the discovery process is conducted by non-technical personnel such as compliance officers or HR personnel.
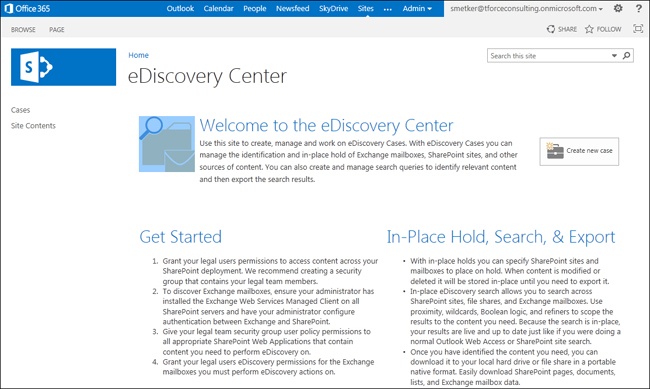
SharePoint 2013 introduces a new site, the eDiscovery Center, which can be used by non-technical personnel to support these processes. Content can be preserved via a general hold, which preserves all content on a site, or via a targeted query-based hold, which uses search queries to precisely focus on specific content for preservation.
Within the eDiscovery Center site, you can work with the following items:
eDiscovery Case. A case is a way of grouping all of the queries and preserved content from a particular legal case into a single site. SharePoint implements each case as a subsite under the eDiscovery Center.
eDiscovery Set. An eDiscovery set is a query scenario in which a collection of query keywords is applied to a number of target sources (SharePoint sites or Exchange email servers). Typically, you would implement a number of eDiscovery sets to fully comply with a legal hold or discovery request.
eDiscovery Source. An eDiscovery source is a collection of mailboxes (for Exchange integration) or SharePoint sites against which the query will be run. All matching items within the query results will be subject to the legal hold.
eDiscovery Queries. An eDiscovery query is a search query that can be used to export a set of all matching documents or simply generate a report of documents matching the query.
In a typical eDiscovery session, you would create one or more eDiscovery sets to find content and issue an in-place hold. This would preserve any content matching the hold parameters from deletion or change while you prepare for further action. You would then further refine your queries (without risk of content being deleted in the meantime), preview the information, and report upon the total volume of the content. Finally, you would schedule an export of the materials and forward this information to the relevant authorities. After the legal action was completed, you would be able to close the case and release all relevant holds.
Creating an eDiscovery Center
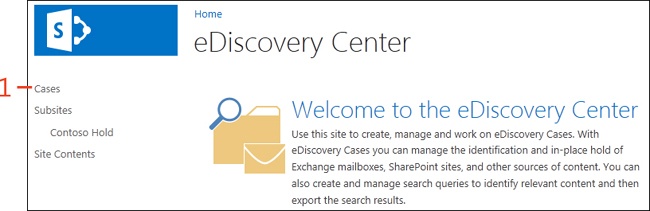
SharePoint 2013 introduces a new type of site, the eDiscovery Center. An eDiscovery Center is a single site that can be used to organize your discovery and legal-hold activities. To work with legal holds and discovery queries, you must create at least one eDiscovery Center. This site is used to track one or many cases, which represent individual legal or regulatory actions. In this task, we will walk through the process of creating an initial eDiscovery Center in SharePoint 2013.
Create an eDiscovery Center
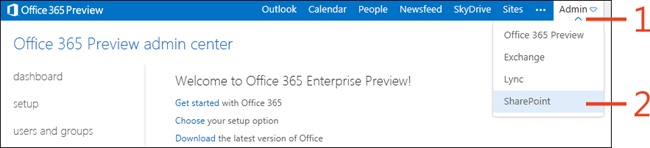
From the Admin Center for your Office 365 instance, at the right end of the toolbar, click the Admin menu.
On the menu that appears, click SharePoint.
In the SharePoint Admin Center, on the ribbon, click the Site Collection tab, and then click New.
On the menu that appears, click Private Site Collection.
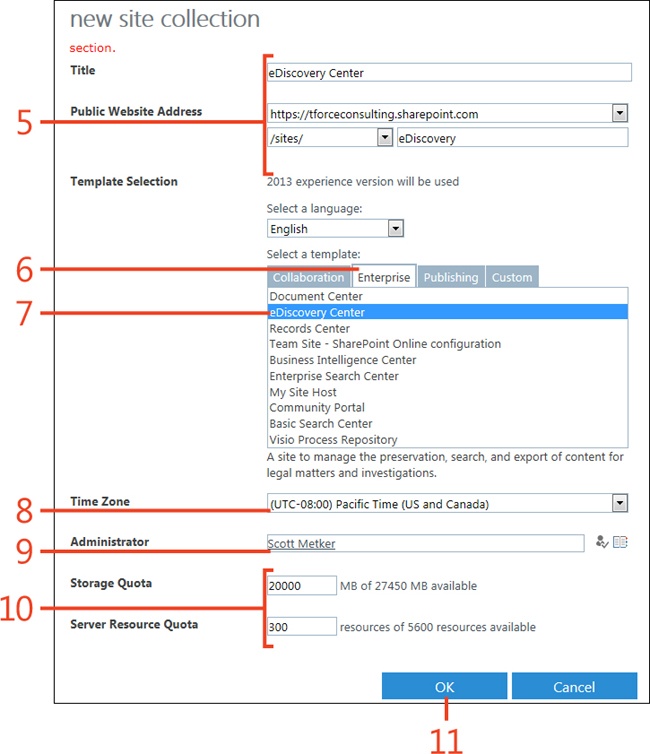
On the New Site Collection page, enter a title for the eDiscovery Center, a URL that will be used to access the site under your main URL, and a language for the new site.
Click the Enterprise tab.
Select eDiscovery Center.
Specify the appropriate Time Zone.
Choose the site administrator who will have administrator rights to the site.
Select your storage quota and server resource options.
Click OK.

Working with eDiscovery cases
After you have a working SharePoint 2013 eDiscovery Center, you are able to create and manage cases that represent specific legal or regulatory investigation. Each case is designed to represent a single investigation and can contain all of the queries and holds encountered during the investigation. Because each case is represented by a separate subsite under the eDiscovery Center, you have independent access control for each of these cases.
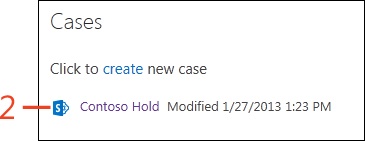
Create an eDiscovery case
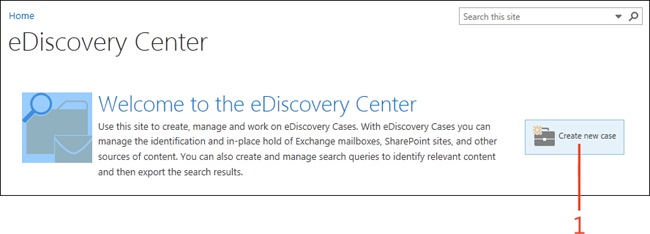
Navigate to your eDiscovery Center and click Create New Case.
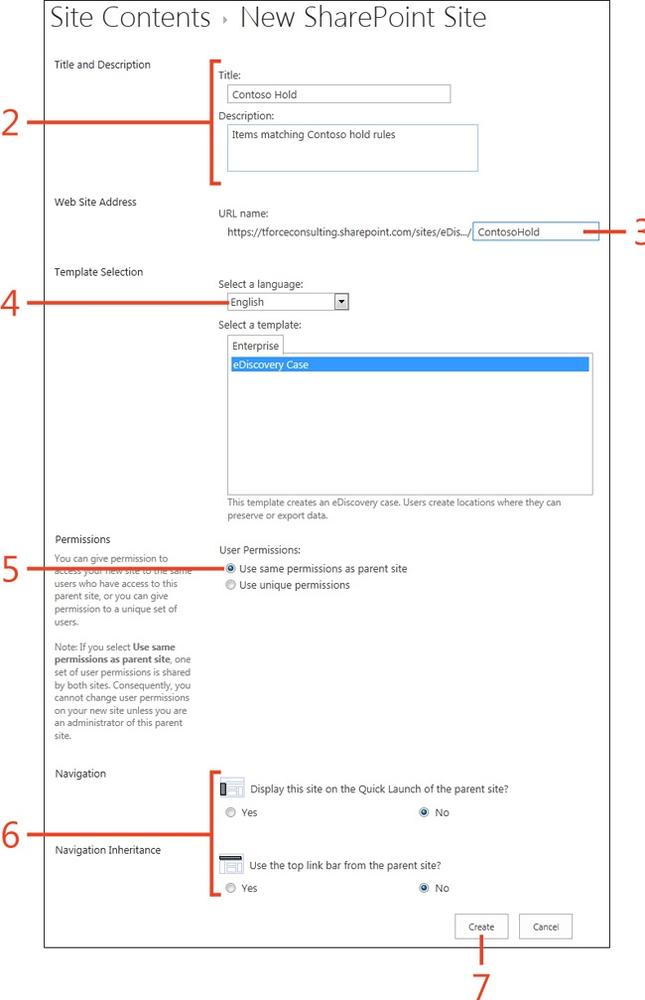
On the New SharePoint Site page, enter a title and description for the case.
Enter a URL for the site, relative to the eDiscovery Center.
Choose a language for your case.
Choose user permissions for the case.
Select navigation options for the site.
Click Create.
Identifying and holding content
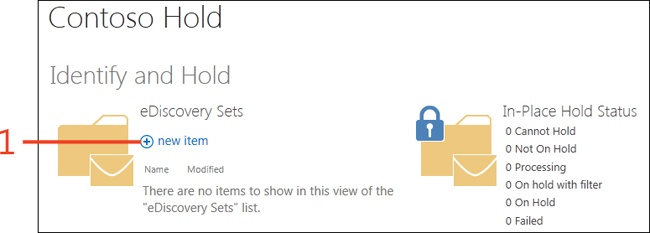
One of the first steps for any legal or regulatory action is to ensure that data is not changed or deleted during an investigation. Within SharePoint 2013, eDiscovery Sets are used to identify content that matches search constraints and rapidly enforce a hold on that content. After the hold is put in place, you have time to explore and export relevant data during the course of the investigation.
Create a hold on a case
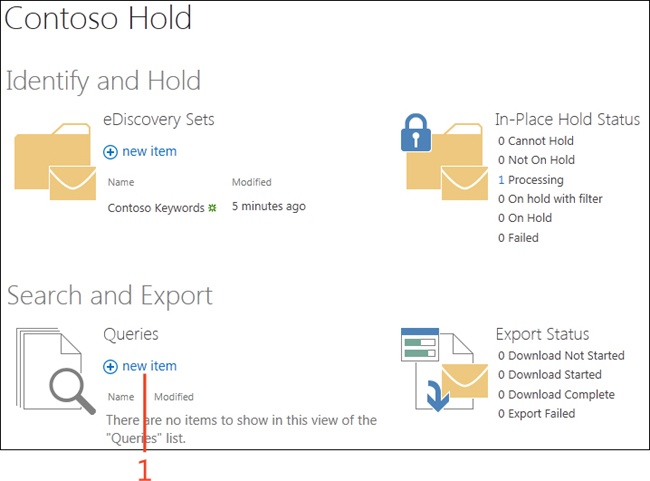
Navigate to the Home page of your case. In the Identify And Hold section, click New Item.
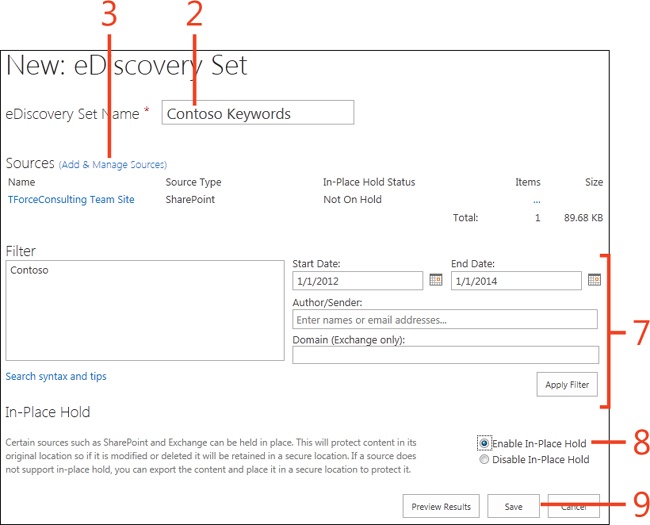
On the New: eDiscovery Set page, enter a name for the set.
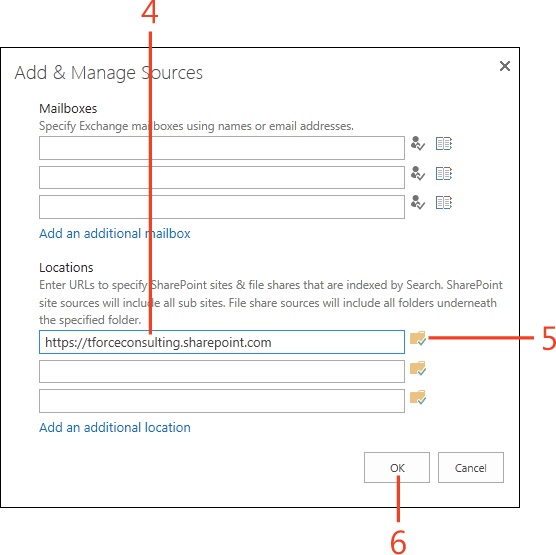
Click the Add & Manage Sources link.
On the Add & Manage Sources page, in the Locations section, enter one or more URLs to SharePoint sites that you want to add to the hold operation.
Click the Check icon next to each URL to validate the address.
Click OK to return to the New: eDiscovery Set page.
Enter your search constraints. If you leave these values blank, the entire contents of each site will be placed under the hold.
Select Enable In-Place Hold.
Click Save to trigger the hold operation.
Removing an eDiscovery hold
There are a number of reasons that you might remove a current hold. For instance, the case or regulatory investigation might have completed, or you might want to replace a general hold with a more targeted hold after further details have emerged from an investigation. Regardless of the reason, If you have authorized access to the eDiscovery Case, you can disable a hold associated with any SharePoint 2013 eDiscovery Set.
Remove an eDiscovery hold
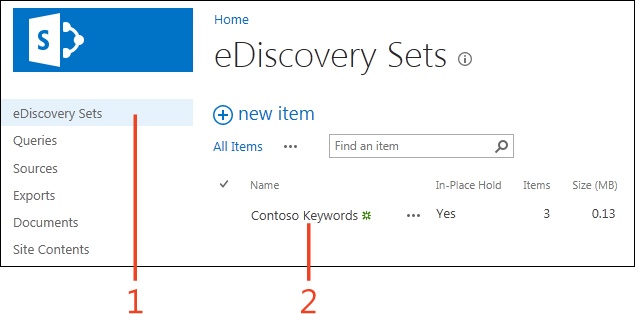
Navigate to the eDiscovery Case Home page and then, on the Quick Launch bar, click the eDiscovery Sets link.
On the the eDiscovery Sets page, click the link under the name of the set that you want to modify.
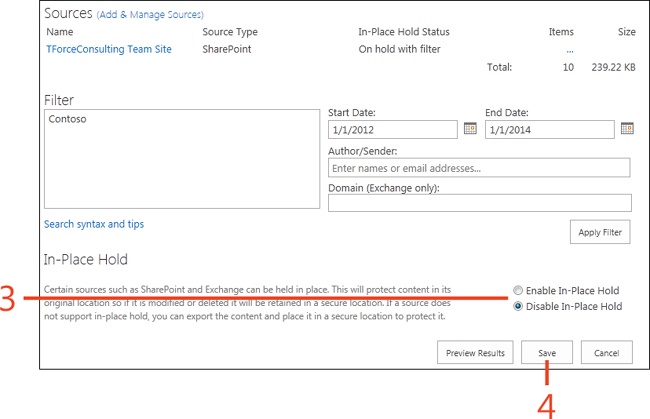
On the page for the specific eDiscovery set, click the Disable In-Place Hold option.
Click Save.
Accessing deleted content under legal hold
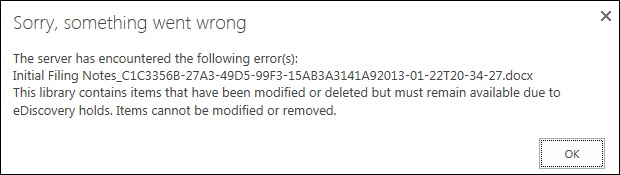
After content is placed under an in-place hold, users can continue to use content normally within the affected sites (this was a change from previous versions of SharePoint, which simply blocked modification or deletion of affected files). When an edit or deletion is made to that content, a uniquely named copy of the original content is placed in a special library called the Preservation Hold Library within the same site. This library can be viewed directly by site collection administrators, and it is also used when consolidating and exporting content by using eDiscovery Queries.
Access content in a Preservation Hold library
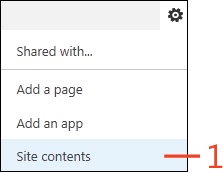
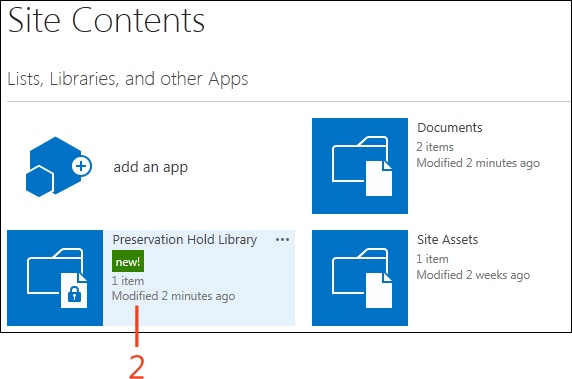
On the site containing the content that’s been placed on hold, click the Settings button (the small gear icon next to the name of the logged-on user). On the menu that appears, click Site Contents.
On the Site Contents page, click the Preservation Hold Library.
Tip
If a file is changed multiple times, the intermediate versions are not saved. Only the version that existed at the time of the hold is preserved.
Tip
If you are unable to locate the Preservation Hold library within a site with an in-place hold configured, this might be because you are not a site collection administrator for the site (the library is only visible to users added as the site collection administrator or granted special permissions through the web application by IT staff).
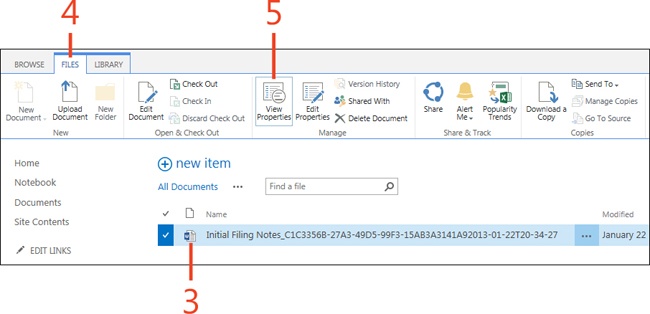
In the Preservation Hold Library, select an item by clicking to the left of the item’s icon.
On the ribbon, click the Files tab.
In the Manage group, click the View Properties button.
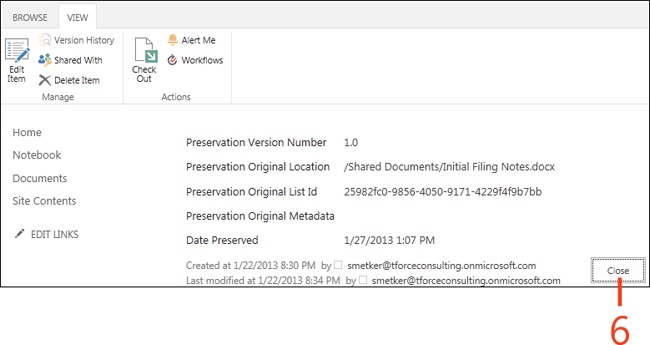
Inspect the document properties. You can see the preservation date or even open the document for viewing. Click Close to return to the library.
Creating an eDiscovery query
After you have created an in-place hold on content within your sites by using eDiscovery Sets, you can sift through your content at a more leisurely pace without worrying that content might disappear during the investigation.
SharePoint 2013 uses eDiscovery queries, which make it possible for users to further filter and explore content as well as generate a full export of targeted content. This export can be sent to legal or regulatory personnel outside of your corporate network, as required.
Create an eDiscovery query
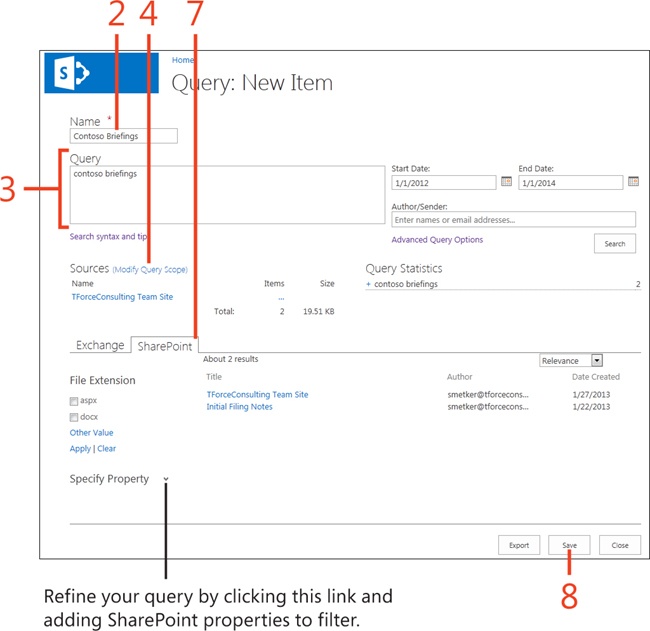
On the Home page of an eDiscovery case, in the Search and Export section, click New Item.
Enter your query keywords and other search information.
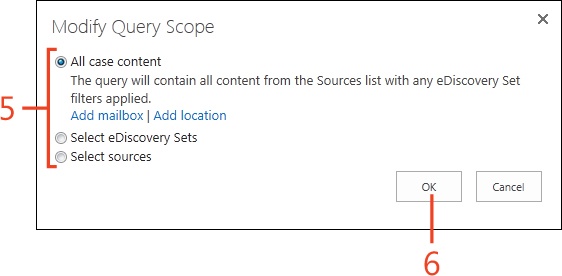
Click the Modify Query Scope link.
In the Modify Query Scope dialog box, click the option that reflects the scope of content that you will include in the query.
Click OK.
Back on the Query: New Item page, click the SharePoint tab.
Click Save to save your query.
Exporting eDiscovery results
After you have created an eDiscovery query, you can export a report of the results or download the raw content from SharePoint. You can export eDiscovery results directly from one of your eDiscovery Case sites to a local archive. This archive could then be transferred to the appropriate legal team who could browse this content without ever requiring access to the SharePoint sites.
Export eDiscovery results
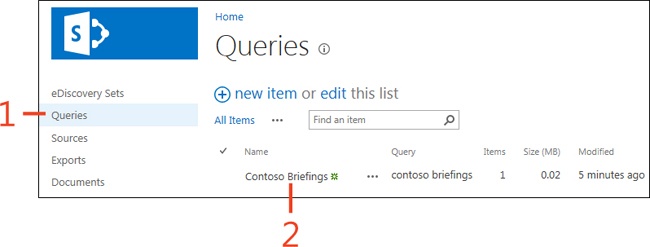
On the Quick Launch bar, click Queries.
On the Queries page, click the eDiscovery query that you want to export.
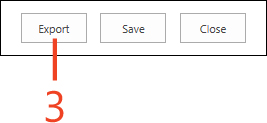
Scroll to the bottom for that query and click Export.
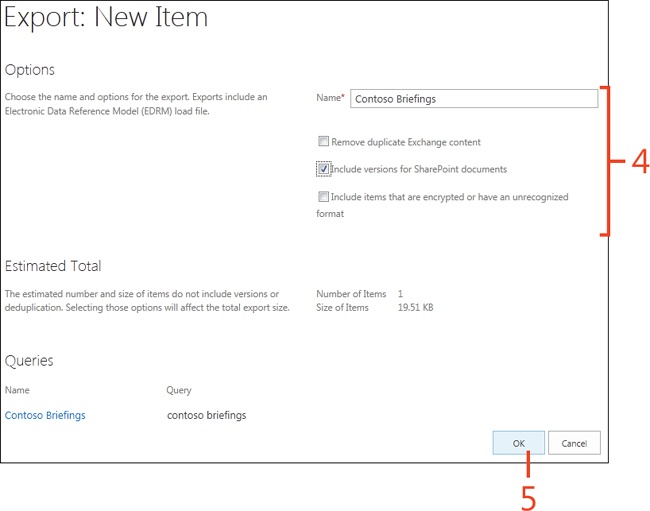
Click OK.
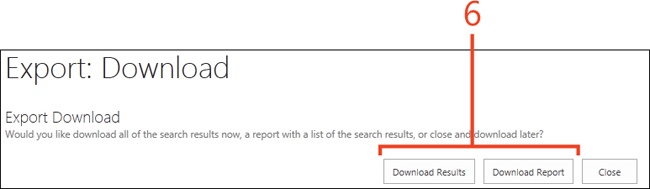
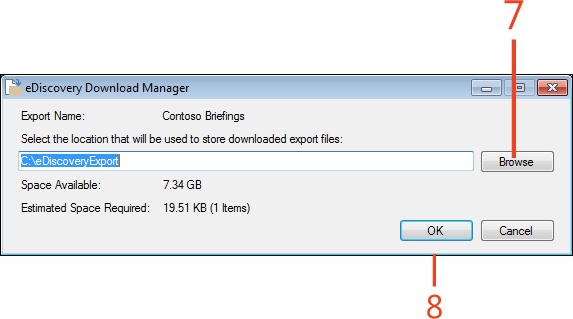
In the Export: Download dialog box, click Download Report to download a report of all findings, or click Download Results to download the actual content files that were identified. If you are prompted to sign in, click the Sign In button and enter your password.
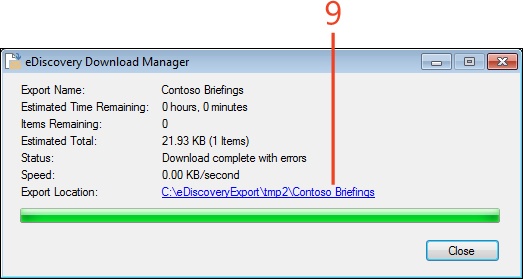
In the eDiscovery Download Manager dialog box, select an export destination.
Click OK.
Navigate to your export folder by clicking the Export Location link when complete.