Chapter 20. Decoupling application logic and handling events
After completing this chapter, you will be able to:
Create an instance of a delegate to refer to a specific method.
Call a method through a delegate.
Handle an event by using a delegate.
Many of the examples and exercises in this book have placed great emphasis on the careful definition of classes and structures to enforce encapsulation. In this way, the implementation of the methods in these types can change without unduly affecting the applications that use them. However, sometimes it is not always possible or desirable to encapsulate the entire functionality of a type. For example, the logic for a method in a class might depend upon which component or application invoked this method; it might need to perform some application or component-specific processing as part of its operation. The problem is that when you build such a class and implement its methods, you might not know which applications and components are going to use it, and you need to avoid introducing dependencies into your code that might restrict the use of your class. Delegates provide the ideal solution, making it possible for you to fully decouple the application logic in your methods from the applications that invoke them.
Events in C# support a related scenario. Much of the code you have written in the various exercises in this book assumed that statements execute sequentially. Although this is the most common case, you will find that it is sometimes necessary to interrupt the current flow of execution and perform another, more important task. When the task has completed, the program can continue where it left off. The classic examples of this style of program are the Windows forms that you have been using in the exercises involving graphical applications through this book. (Remember that in this book, the term form refers to a page in a Window Store app or a Microsoft Windows Presentation Foundation [WPF] window.) A form displays controls such as buttons and text boxes. When you click a button or type text in a text box, you expect the form to respond immediately. The application has to temporarily stop what it is doing and handle your input. This style of operation applies not only to graphical user interfaces (GUIs), but also to any application where an operation must be performed urgently—shutting down the reactor in a nuclear power plant if it is getting too hot, for example. To handle this kind of processing, the runtime has to provide two things: a means of indicating that something urgent has happened, and a way of specifying the code that should be run when the urgent event happens. Events, in conjunction with delegates, provide the infrastructure with which you can implement systems that follow this approach.
You’ll start by looking at delegates.
Understanding delegates
A delegate is a reference to a method. It is a very simple concept with extraordinarily powerful implications. Let me explain.
Note
Delegates are so named because they “delegate” processing to the referenced method when they are invoked.
Typically, when you write a statement that invokes a method, you specify the name of the method (and possibly specify the object or structure to which the method belongs). It is clear from your code exactly which method you are running and when you are running it. Look at the following simple example that calls the performCalculation method of a Processor object (what this method does or how the Processor class is defined is immaterial for this discussion):
Processor p = new Processor();
p.performCalculation();
A delegate is an object that refers to a method. You can assign a reference to a method to a delegate in much the same way that you can assign an int value to an int variable. The next example creates a delegate named performCalculationDelegate that references the performCalculation method of the Processor object. I have deliberately omitted some elements of the statement that declares the delegate because it is important to understand the concept rather than worry about the syntax (you will see the full syntax shortly).
Processor p = new Processor();
delegate ... performCalculationDelegate ...;
performCalculationDelegate = p.performCalculation;
It is important to understand that the statement that assigns the method reference to the delegate does not run the method at this point; there are no parentheses after the method name, and you do not specify any parameters (if the method takes them). This is just an assignment statement.
Having stored a reference to the performCalculation method of the Processor object in the delegate, the application can subsequently invoke the method through the delegate, like this:
performCalculationDelegate();
This looks like an ordinary method call; if you did not know otherwise, it looks like you might actually be running a method named performCalculationDelegate. However, the Common Language Runtime (CLR) knows that this is a delegate, so it retrieves the method that the delegate references and runs that, instead. Later on, you can change the method to which a delegate refers, so a statement that calls a delegate might actually run a different method each time it executes. Additionally, a delegate can reference more than one method at a time (think of it as a collection of method references), and when you invoke a delegate all of the methods to which it refers will run.
Note
If you are familiar with C++, a delegate is similar to a function pointer. However, unlike function pointers, delegates are completely type safe. You can make a delegate refer to only a method that matches the signature of the delegate, and you cannot invoke a delegate that does not refer to a valid method.
Examples of delegates in the .NET Framework class library
The Microsoft .NET Framework class library makes extensive use of delegates for many of its types, two examples of which are in Chapter 18: the Find method and the Exists method of the List<T> class. If you recall, these two methods search through a List<T> collection, either returning a matching item or testing for the existence of a matching item. The designers of the List<T> class had absolutely no idea of what should actually constitute a match in your application code when they were implementing this class, so consequently they let you define it instead by providing your own code in the form of a predicate. A predicate is really just a delegate that happens to return a Boolean value.
The following code should help to remind you of how you use the Find method:
struct Person
{
    public int ID { get; set; }
    public string Name { get; set; }
    public int Age { get; set; }
}
...
List<Person> personnel = new List<Person>()
{
    new Person() { ID = 1, Name = "John", Age = 47 },
    new Person() { ID = 2, Name = "Sid", Age = 28 },
    new Person() { ID = 3, Name = "Fred", Age = 34 },
    new Person() { ID = 4, Name = "Paul", Age = 22 },
};
...
// Find the member of the list that has an ID of 3
Person match = personnel.Find(p => p.ID == 3);
Other examples of methods exposed by the List<T> class that use delegates to perform their operations include Average, Max, Min, Count, and Sum. These methods take a Func delegate as the parameter. A Func delegate refers to a method that returns a value (a function). In the following examples, the Average method is used to calculate the average age of items in the personnel collection (the Func<T> delegate simply returns the value in the Age field of each item in the collection), the Max method is used to determine the item with the highest ID, and the Count method calculates how many items have an Age between 30 and 39 inclusive.
double averageAge = personnel.Average(p => p.Age);
Console.WriteLine("Average age is {0}", averageAge);
...
int id = personnel.Max(p => p.ID);
Console.WriteLine("Person with highest ID is {0}", id);
...
int thirties = personnel.Count(p => p.Age >= 30 && p.Age <= 39);
Console.WriteLine("Number of personnel in their thirties is {0}", thirties);
This code generates the following output:
Average age is 32.75
Person with highest ID is 4
Number of personnel in their thirties is 1
You will meet many examples of these and other delegate types used by the .NET Framework class library throughout the remainder of this book. You can also define your own delegates. The best way to fully understand how and when you might want to do this is to see them in action, so next you’ll work through an example.
The automated factory scenario
Suppose you are writing the control systems for an automated factory. The factory contains a large number of different machines, each performing distinct tasks in the production of the articles manufactured by the factory—shaping and folding metal sheets, welding sheets together, painting sheets, and so on. Each machine was built and installed by a specialist vendor. The machines are all controlled by computer, and each vendor has provided a set of functions that you can use to control its machine. Your task is to integrate the different systems used by the machines into a single control program. One aspect on which you have decided to concentrate is to provide a means of shutting down all the machines—quickly, if needed!
Each machine has its own unique computer-controlled process (and functions) for shutting down safely, as summarized here:
StopFolding();    // Folding and shaping machine
FinishWelding();  // Welding machine
PaintOff();       // Painting machine
Implementing the factory control system without using delegates
A simple approach to implementing the shutdown functionality in the control program is as follows:
class Controller
{
    // Fields representing the different machines
    private FoldingMachine folder;
    private WeldingMachine welder;
    private PaintingMachine painter;
    ...
    public void ShutDown()
    {
        folder.StopFolding();
        welder.FinishWelding();
        painter.PaintOff();
    }
    ...
}
Although this approach works, it is not very extensible or flexible. If the factory buys a new machine, you must modify this code; the Controller class and code for managing the machines is tightly coupled.
Implementing the factory by using a delegate
Although the names of each method are different, they all have the same “shape”: they take no parameters, and they do not return a value. (You’ll consider what happens if this isn’t the case later, so bear with me.) The general format of each method, therefore, is this:
void methodName();This is where a delegate can be useful. You can use a delegate that matches this shape to refer to any of the machinery shutdown methods. You declare a delegate like this:
delegate void stopMachineryDelegate();
Note the following points:
You use the delegate keyword.
You specify the return type (void in this example), a name for the delegate (stopMachineryDelegate), and any parameters (there are none in this case).
After you have declared the delegate, you can create an instance and make it refer to a matching method by using the += compound assignment operator. You can do this in the constructor of the controller class like this:
class Controller
{
    delegate void stopMachineryDelegate();       // the delegate type
    private stopMachineryDelegate stopMachinery; // an instance of the delegate
    ...
    public Controller()
    {
        this.stopMachinery += folder.StopFolding;
    }
    ...
}
It takes a bit to get used to this syntax. You add the method to the delegate; remember that you are not actually calling the method at this point. The + operator is overloaded to have this new meaning when used with delegates. (You will learn more about operator overloading in Chapter 22.) Notice that you simply specify the method name and do not include any parentheses or parameters.
It is safe to use the += operator on an uninitialized delegate. It will be initialized automatically. Alternatively, you can use the new keyword to initialize a delegate explicitly with a single specific method, like this:
this.stopMachinery = new stopMachineryDelegate(folder.StopFolding);
You can call the method by invoking the delegate, like this:
public void ShutDown()
{
    this.stopMachinery();
    ...
}
You use the same syntax to invoke a delegate as you use to make a method call. If the method that the delegate refers to takes any parameters, you should specify them at this time, between the parentheses.
Note
If you attempt to invoke a delegate that is uninitialized and does not refer to any methods, you will get a NullReferenceException exception.
An important advantage of using a delegate is that it can refer to more than one method at the same time. You simply use the += operator to add methods to the delegate, like this:
public Controller()
{
    this.stopMachinery += folder.StopFolding;
    this.stopMachinery += welder.FinishWelding;
    this.stopMachinery += painter.PaintOff;
}
Invoking this.stopMachinery() in the Shutdown method of the Controller class automatically calls each of the methods in turn. The Shutdown method does not need to know how many machines there are or what the method names are.
You can remove a method from a delegate by using the –= compound assignment operator, as demonstrated here:
this.stopMachinery -= folder.StopFolding;
The current scheme adds the machine methods to the delegate in the Controller constructor. To make the Controller class totally independent of the various machines, you need to make stopMachineryDelegate type public and supply a means of enabling classes outside Controller to add methods to the delegate. You have several options:
Make the stopMachinery delegate variable, public:
public stopMachineryDelegate stopMachinery;
Keep the stopMachinery delegate variable private, but create a read/write property to provide access to it:
private delegate void stopMachineryDelegate();
...
public stopMachineryDelegate StopMachinery
{
    get
    {
         return this.stopMachinery;
    }
    set
    {
         this.stopMachinery = value;
    }
}
Provide complete encapsulation by implementing separate Add and Remove methods. The Add method takes a method as a parameter and adds it to the delegate, whereas the Remove method removes the specified method from the delegate (notice that you specify a method as a parameter by using a delegate type):
public void Add(stopMachineryDelegate stopMethod)
{
    this.stopMachinery += stopMethod;
}
public void Remove(stopMachineryDelegate stopMethod)
{
    this.stopMachinery -= stopMethod;
}
An object-oriented purist would probably opt for the Add/Remove approach. However, the other approaches are viable alternatives that are frequently used, which is why they are shown here.
Whichever technique you choose, you should remove the code that adds the machine methods to the delegate from the Controller constructor. You can then instantiate a Controller and objects representing the other machines like this (this example uses the Add/Remove approach):
Controller control = new Controller();
FoldingMachine folder = new FoldingMachine();
WeldingMachine welder = new WeldingMachine();
PaintingMachine painter = new PaintingMachine();
...
control.Add(folder.StopFolding);
control.Add(welder.FinishWelding);
control.Add(painter.PaintOff);
...
control.ShutDown();
...
Declaring and using delegates
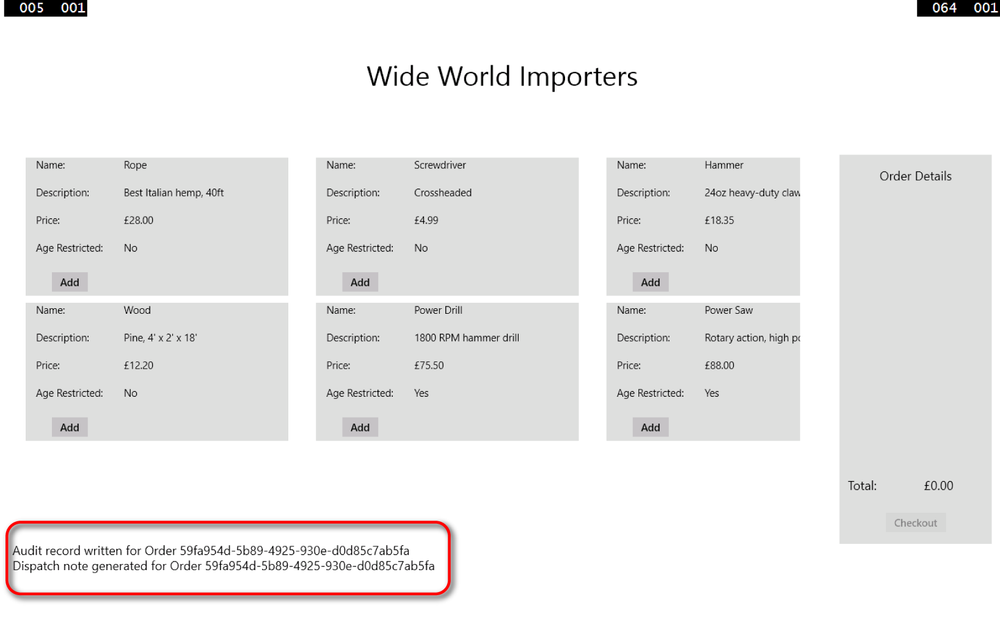
In the following exercises, you will complete an application that forms part of a system for a company called Wide World Importers. Wide World Importers imports and sells building materials and tools, and the application that you will be working on gives customers the ability to browse the items that Wide World Importers currently has in stock and place orders for these items. The application contains a form that displays the goods currently available, together with a pane that lists the items that a customer has selected. When the customer wants to place an order, she can click the Checkout button on the form. The order is then processed, and the pane is cleared.
When the customer places an order, currently several actions occur:
Payment is requested from the customer.
The items in the order are examined, and if any of them are age restricted (such as the power tools), details of the order are audited and tracked.
A dispatch note is generated for shipping purposes. This dispatch note contains a summary of the order.
The logic for the auditing and shipping processes is independent from checkout logic, although the order in which these processes occur is immaterial. Furthermore, there is the possibility that either of these elements might be amended in the future, and additional processing might be required by the checkout operation as business circumstances or regulatory requirements change in the future. Therefore, it is desirable to decouple the payment and checkout logic from the auditing and shipping processes to make maintenance and upgrades easier. You will start by examining the application and see how it currently fails to fulfill this objective. You will then modify the structure of the application to remove the dependencies between the checkout logic and the auditing and shipping logic.
Start Microsoft Visual Studio 2013 if it is not already running.
Open the Delegates project, which is located in the Microsoft PressVisual CSharp Step By StepChapter 20Windows XDelegates folder in your Documents folder.
On the Debug menu, click Start Debugging.
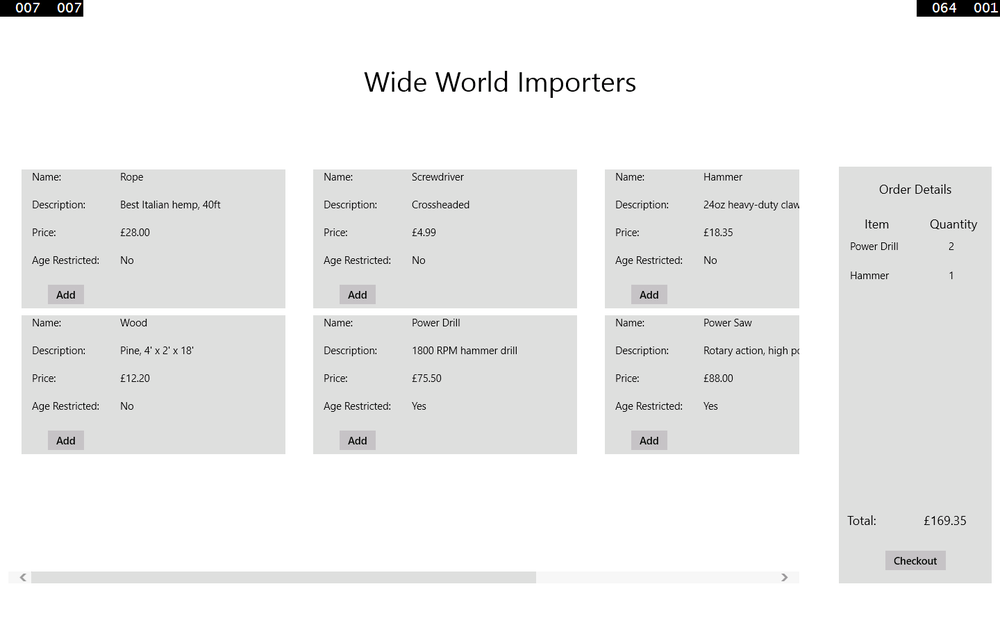
The project builds and runs. A form appears displaying the items available, together with a panel showing the details of the order (it is empty initially). The form has a different appearance depending on whether you are running the Windows Store app by using Windows 8.1, or the WPF application running on Windows 7 or Windows 8.
In Windows 8.1, the Windows Store app displays the items in a GridView control that scrolls horizontally (this is the Windows Store app–style of displaying data):
The WPF application running in Windows 7 or Windows 8 displays the items in a ListView control that scrolls vertically:
Apart from the look and feel of the application, the remainder of the functionality is the same in both environments.
Select one or more items and then click Add to include them to the shopping basket. Be sure that you select at least one age-restricted item.
As you add an item, it appears in the Order Details pane on the right side. Notice that if you add the same item more than once, the quantity is incremented for each click (this version of the application does not implement functionality to remove items from the basket).
In the Order Details pane, click Checkout.
A message appears indicating that the order has been placed. The order is given a unique ID, and this ID is displayed together with the value of the order.
If you are using Windows 8.1, click Close to dismiss the message. If you are using Windows 7 or Windows 8, click OK.
Return to the Visual Studio 2013 environment and stop debugging.
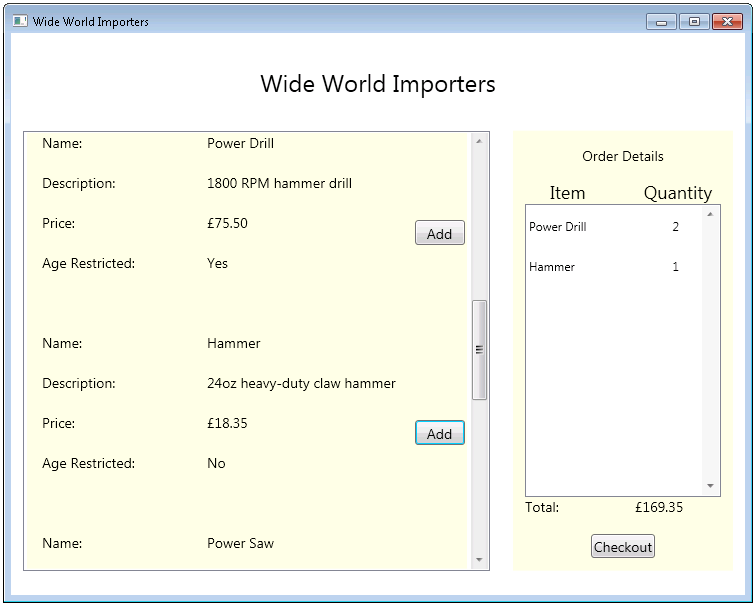
Using File Explorer in Windows 8 or Windows 8.1, or Windows Explorer in Windows 7, move to your Documents folder. You should see two files named audit-nnnnnn.xml (where nnnnnn is the ID of the order displayed earlier), and dispatch- nnnnnn.txt. The first file was generated by the auditing component, and the second file is the dispatch note generated by the shipping component.
Open the audit-nnnnnn.xml file by using Internet Explorer. This file contains a list of the age-restricted items in the order together with the order number and date. It should look similar to this:
Close Internet Explorer when you have finished examining this file.
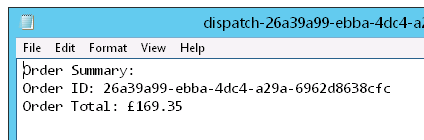
Open the dispatch-nnnnnn.txt file by using Notepad. This file contains a summary of the order, listing the order ID and the value. It should look similar to this:
Close Notepad, return to Visual Studio 2013, and stop debugging.
In Visual Studio, notice that the solution consists of the following projects:
Delegates. This project contains the application itself. The MainWindow.xaml file defines the user interface, and the application logic is contained within the MainWindow.xaml.cs file.
AuditService. This project contains the component that implements the auditing process. It is packaged as a class library and contains a single class called Auditor. This class exposes a single public method called AuditOrder that examines an order and generates the audit-nnnnnn.xml file if the order contains any age-restricted items.
DeliveryService. This project contains the component that performs the shipping logic, packaged as a class library. The shipping functionality is contained in the Shipper class, and it provides a public method named ShipOrder that handles the shipping process and also generates the dispatch note.
DataTypes. This project contains the data types used by the other projects. The Product class defines the details of the products displayed by the application, and the data for the products is held in the ProductDataSource class. (The application currently uses a small hard-coded set of products. In a production system, this information would be retrieved from a database or web service.) The Order and OrderItem classes implement the structure of an order; each order contains one or more order items.
In the Delegates project, display the MainWindow.xaml.cs file in the Code and Text Editor window and examine the private fields and MainWindow constructor in this file. The important elements look like this:
...
private Auditor auditor = null;
private Shipper shipper = null;
public MainWindow()
{
    ...
    this.auditor = new Auditor();
    this.shipper = new Shipper();
}
The auditor and shipper fields contain references to instances of the Auditor and Shipper classes, and the constructor instantiates these objects.
Locate the CheckoutButtonClicked method. This method runs when the user clicks Checkout to place an order. The first few lines look like this:
private void CheckoutButtonClicked(object sender, RoutedEventArgs e)
{
    try
    {
        // Perform the checkout processing
        if (this.requestPayment())
        {
            this.auditor.AuditOrder(this.order);
            this.shipper.ShipOrder(this.order);
        }
        ...
    }
    ...
}
This method implements the checkout processing. It requests payment from the customer and then invokes the AuditOrder method of the auditor object followed by the ShipOrder method of the shipper object. Any additional business logic required in the future can be added here. The remainder of the code in this method after the if statement is concerned with managing the user interface: displaying the message box to the user and clearing out the Order Details pane on the right side of the form.
Note
For simplicity, the requestPayment method in this application currently just returns true to indicate that payment has been received. In the real world, this method would perform the complete payment processing.
Although the application operates as advertised, the Auditor and Shipper components are tightly integrated into the checkout processing. If these components change, the application will need to be updated. Similarly, if you need to incorporate additional logic into the checkout process, possibly performed by using further components, you will need to amend this part of the application.
In the next exercise, you will see how you can decouple the business processing for the checkout operation from the application. The checkout processing will still need to invoke the Auditor and Shipper components, but it must be extensible enough to allow additional components to be easily incorporated. You will achieve this by creating a new component called CheckoutController. The CheckoutController component will implement the business logic for the checkout process and expose a delegate that enables an application to specify which components and methods should be included within this process. The CheckoutController component will invoke these methods by using the delegate.
Create the CheckoutController componentIn Solution Explorer, right-click the Delegates solution, point to Add, and then click New Project.
In the Add New Project dialog box, if you are using Windows 8.1, in the left pane, click the Windows Store node. If you are using Windows 7 or Windows 8, in the left pane click the Windows node. In both cases (Windows 8.1 and Windows 7/Windows 8), in the middle pane select the Class Library template. In the Name box, type CheckoutService, and then click OK.
In Solution Explorer, expand the CheckoutService project, right-click the file Class1.cs, and then, on the shortcut menu that appears, click Rename. Change the name of the file to CheckoutController.cs and then press Enter. Allow Visual Studio to rename all references to Class1 as CheckoutController when prompted.
Right-click the References folder in the CheckoutService project and then click Add Reference.
In the Reference Manager – CheckoutService dialog box, in the left pane click Solution. In the middle pane select the DataTypes project, and then click OK.
The CheckoutController class will use the Order class defined in the DataTypes project.
Note
If you are using Windows 8.1 and you receive an error at this point, you probably did not create the CheckoutService project by using the Class Library template for Windows Store apps earlier in this exercise. In this case, right-click the CheckoutService project in Solution Explorer and then click Remove. Using Windows Explorer, move to the Microsoft PressVisual CSharp Step By StepChapter 20Windows 8.1Delegates folder in your Documents folder and delete the CheckoutService folder, and then return to step 1 of this exercise.
In the Code and Text Editor window displaying the CheckoutController.cs file, add the following using directive to the list at the top of the file:
using DataTypes;Add a public delegate type called CheckoutDelegate to the CheckoutController class, as shown in the following in bold:
public class CheckoutController
{
    public delegate void CheckoutDelegate(Order order);
}
You can use this delegate type to reference methods that take an Order parameter and that do not return a result. This just happens to match the shape of the AuditOrder and ShipOrder methods of the Auditor and Shipper classes.
Add a public delegate called CheckoutProcessing based on this delegate type, like this:
public class CheckoutController
{
    public delegate void CheckoutDelegate(Order order);
    public CheckoutDelegate CheckoutProcessing = null;
}
Display the MainWindow.xaml.cs file of the Delegates project in the Code and Text Editor window and locate the requestPayment method (it is at the end of the file). Cut this method from the MainWindow class. Return to the CheckoutController.cs file and paste the requestPayment method in the CheckoutController class, as shown in bold in the following:
public class CheckoutController
{
    public delegate void CheckoutDelegate(Order order);
    public CheckoutDelegate CheckoutProcessing = null;
    private bool requestPayment()
    {
        // Payment processing goes here
        // Payment logic is not implemented in this example
        // - simply return true to indicate payment has been received
        return true;
    }
}
Add the StartCheckoutProcess method shown here in bold to the CheckoutController class:
public class CheckoutController
{
    public delegate void CheckoutDelegate(Order order);
    public CheckoutDelegate CheckoutProcessing = null;
    private bool requestPayment()
    {
        ...
    }
    public void StartCheckoutProcessing(Order order)
    {
        // Perform the checkout processing
        if (this.requestPayment())
        {
            if (this.CheckoutProcessing != null)
            {
                this.CheckoutProcessing(order);
            }
        }
    }
}
This method provides the checkout functionality previously implemented by the CheckoutButtonClicked method of the MainWindow class. It requests payment and then examines the CheckoutProcessing delegate; if this delegate is not null (it refers to one or more methods), it invokes the delegate. Any methods referenced by this delegate will run at this point.
In Solution Explorer, in the Delegates project, right-click the References folder and then, on the shortcut menu that appears, click Add Reference.
In the Reference Manager – Delegates dialog box, in the left pane, click Solution. In the middle pane, select the CheckoutService project, and then click OK.
Return to the MainWindow.xaml.cs file of the Delegates project and add the following using directive to the list at the top of the file:
using CheckoutService;Add a private variable named checkoutController of type CheckoutController to the MainWindow class and initialize it to null, as shown in bold in the following:
public ... class MainWindow : ...
{
    ...
    private Auditor auditor = null;
    private Shipper shipper = null;
    private CheckoutController checkoutController = null;
    ...
}
Locate the MainWindow constructor. After the statements that create the Auditor and Shipper components, instantiate the CheckoutController component, as follows in bold:
public MainWindow()
{
    ...
    this.auditor = new Auditor();
    this.shipper = new Shipper();
    this.checkoutController = new CheckoutController();
}
Add the following statements shown in bold to the constructor, after the statement you just entered:
public MainWindow()
{
    ...
    this.checkoutController = new CheckoutController();
    this.checkoutController.CheckoutProcessing += this.auditor.AuditOrder;
    this.checkoutController.CheckoutProcessing += this.shipper.ShipOrder;
}
This code adds references to the AuditOrder and ShipOrder methods of the Auditor and Shipper objects to the CheckoutProcessing delegate of the CheckoutController object.
Find the CheckoutButtonClicked method. In the try block, replace the existing code that performs the checkout processing (the if statement block) with the statement shown here in bold:
private void CheckoutButtonClicked(object sender, RoutedEventArgs e)
{
    try
    {
        // Perform the checkout processing
        this.checkoutController.StartCheckoutProcessing(this.order);

        // Display a summary of the order
    ...
    }
    ...
}
You have now decoupled the checkout logic from the components that this checkout processing uses. The business logic in the MainWindow class specifies which components that the CheckoutController should use.
Test the applicationOn the Debug menu, click Start Debugging to build and run the application.
When the Wide World Importers form appears, select some items (include at least one age-restricted item), and then click Checkout.
When the Order Placed message appears, make a note of the order number, and then click Close or OK.
Switch to Windows Explorer and move to your Documents folder. Verify that a new audit-nnnnnn.xml file and dispatch-nnnnnn.txt file have been created, where nnnnnn is the number that identifies the new order. Examine these files and verify that they contain the details of the order.
Return to Visual Studio 2013 and stop debugging.
Lambda expressions and delegates
All the examples of adding a method to a delegate that you have seen so far use the method’s name. For example, returning to the automated factory scenario described earlier, you add the StopFolding method of the folder object to the stopMachinery delegate, like this:
this.stopMachinery += folder.StopFolding;
This approach is very useful if there is a convenient method that matches the signature of the delegate, but what if this is not the case? Suppose that the StopFolding method actually had the following signature:
void StopFolding(int shutDownTime); // Shut down in the specified number of seconds
This signature is now different from that of the FinishWelding and PaintOff methods, and therefore you cannot use the same delegate to handle all three methods. So, what do you do?
Creating a method adapter
One way around this problem is to create another method that calls StopFolding but that takes no parameters itself, like this:
void FinishFolding()
{
    folder.StopFolding(0); // Shut down immediately
}
You can then add the FinishFolding method to the stopMachinery delegate in place of the StopFolding method, using the same syntax as before:
this.stopMachinery += folder.FinishFolding;
When the stopMachinery delegate is invoked, it calls FinishFolding, which in turn calls the StopFolding method, passing in the parameter of 0.
Note
The FinishFolding method is a classic example of an adapter: a method that converts (or adapts) a method to give it a different signature. This pattern is very common and is one of the set of patterns documented in the book Design Patterns: Elements of Reusable Object-Oriented Software by Erich Gamma, Richard Helm, Ralph Johnson, and John Vlissides (Addison-Wesley Professional, 1994).
In many cases, adapter methods such as this are small, and it is easy to lose them in a sea of methods, especially in a large class. Furthermore, apart from using the adapter method to adapt the StopFolding method for use by the delegate, it is unlikely to be called elsewhere. C# provides lambda expressions for situations such as this. Lambda expressions are described in Chapter 18, and there are more examples of them earlier in this chapter. In the factory scenario, you can use the following lambda expression:
this.stopMachinery += (() => folder.StopFolding(0));
When you invoke the stopMachinery delegate, it will run the code defined by the lambda expression, which will, in turn, call the StopFolding method with the appropriate parameter.
The forms of lambda expressions
Lambda expressions can take a number of subtly different forms. Lambda expressions were originally part of a mathematical notation called the lambda calculus, which provides a notation for describing functions. (You can think of a function as a method that returns a value.) Although the C# language has extended the syntax and semantics of the lambda calculus in its implementation of lambda expressions, many of the original principles still apply. Here are some examples showing the different forms of lambda expressions available in C#:
x => x * x // A simple expression that returns the square of its parameter
           // The type of parameter x is inferred from the context.
x => { return x * x ; } // Semantically the same as the preceding
                        // expression, but using a C# statement block as
                        // a body rather than a simple expression
(int x) => x / 2 // A simple expression that returns the value of the
                 // parameter divided by 2
                 // The type of parameter x is stated explicitly.
() => folder.StopFolding(0) // Calling a method
                            // The expression takes no parameters.
                            // The expression might or might not
                            // return a value.
(x, y) => { x++; return x / y; } // Multiple parameters; the compiler
                                 // infers the parameter types.
                                 // The parameter x is passed by value, so
                                 // the effect of the ++ operation is
                                 // local to the expression.
(ref int x, int y) => { x++; return x / y; } // Multiple parameters
                                             // with explicit types
                                             // Parameter x is passed by
                                             // reference, so the effect of
                                             // the ++ operation is permanent.
To summarize, here are some features of lambda expressions of which you should be aware:
If a lambda expression takes parameters, you specify them in the parentheses to the left of the => operator. You can omit the types of parameters, and the C# compiler will infer their types from the context of the lambda expression. You can pass parameters by reference (by using the ref keyword) if you want the lambda expression to be able to change its values other than locally, but this is not recommended.
Lambda expressions can return values, but the return type must match that of the delegate to which they are being added.
The body of a lambda expression can be a simple expression or a block of C# code made up of multiple statements, method calls, variable definitions, and other code items.
Variables defined in a lambda expression method go out of scope when the method finishes.
A lambda expression can access and modify all variables outside the lambda expression that are in scope when the lambda expression is defined. Be very careful with this feature!
Enabling notifications by using events
You have now seen how to declare a delegate type, call a delegate, and create delegate instances. However, this is only half of the story. Although by using delegates you can invoke any number of methods indirectly, you still have to invoke the delegate explicitly. In many cases, it would be useful to have the delegate run automatically when something significant happens. For example, in the automated factory scenario, it could be vital to be able to invoke the stopMachinery delegate and halt the equipment if the system detects that a machine is overheating.
The .NET Framework provides events, which you can use to define and trap significant actions and arrange for a delegate to be called to handle the situation. Many classes in the .NET Framework expose events. Most of the controls that you can place on a form in a Windows Store app or WPF application, and the Windows class itself, use events so that you can run code when, for example, the user clicks a button or types something in a field. You can also declare your own events.
Declaring an event
You declare an event in a class intended to act as an event source. An event source is usually a class that monitors its environment and raises an event when something significant happens. In the automated factory, an event source could be a class that monitors the temperature of each machine. The temperature-monitoring class would raise a “machine overheating” event if it detects that a machine has exceeded its thermal radiation boundary (that is, it has become too hot). An event maintains a list of methods to call when it is raised. These methods are sometimes referred to as subscribers. These methods should be prepared to handle the “machine overheating” event and take the necessary corrective action: shut down the machines.
You declare an event similarly to how you declare a field. However, because events are intended to be used with delegates, the type of an event must be a delegate, and you must prefix the declaration with the event keyword. Use the following syntax to declare an event:
event delegateTypeName eventNameAs an example, here’s the StopMachineryDelegate delegate from the automated factory. It has been relocated to a new class called TemperatureMonitor, which provides an interface to the various electronic probes monitoring the temperature of the equipment (this is a more logical place for the event than the Controller class):
class TemperatureMonitor
{
    public delegate void StopMachineryDelegate();
    ...
}
You can define the MachineOverheating event, which will invoke the stopMachineryDelegate, like this:
class TemperatureMonitor
{
     public delegate void StopMachineryDelegate();
     public event StopMachineryDelegate MachineOverheating;
     ...
}
The logic (not shown) in the TemperatureMonitor class raises the MachineOverheating event as necessary. You will see how to raise an event in the upcoming section Raising an event. Also, you add methods to an event (a process known as subscribing to the event) rather than adding them to the delegate on which the event is based. You will look at this aspect of events next.
Subscribing to an event
Like delegates, events come ready-made with a += operator. You subscribe to an event by using this += operator. In the automated factory, the software controlling each machine can arrange for the shutdown methods to be called when the MachineOverheating event is raised, like this:
class TemperatureMonitor
{
     public delegate void StopMachineryDelegate();
     public event StopMachineryDelegate MachineOverheating;
     ...
}
...
TemperatureMonitor tempMonitor = new TemperatureMonitor();
...
tempMonitor.MachineOverheating += (() => { folder.StopFolding(0); });
tempMonitor.MachineOverheating += welder.FinishWelding;
tempMonitor.MachineOverheating += painter.PaintOff;
Notice that the syntax is the same as for adding a method to a delegate. You can even subscribe by using a lambda expression. When the tempMonitor.MachineOverheating event runs, it will call all the subscribing methods and shut down the machines.
Unsubscribing from an event
Knowing that you use the += operator to attach a delegate to an event, you can probably guess that you use the –= operator to detach a delegate from an event. Calling the –= operator removes the method from the event’s internal delegate collection. This action is often referred to as unsubscribing from the event.
Raising an event
You can raise an event, just like a delegate, by calling it like a method. When you raise an event, all the attached delegates are called in sequence. For example, here’s the TemperatureMonitor class with a private Notify method that raises the MachineOverheating event:
class TemperatureMonitor
{
    public delegate void StopMachineryDelegate();
    public event StopMachineryDelegate MachineOverheating;
    ...
    private void Notify()
    {
        if (this.MachineOverheating != null)
        {
            this.MachineOverheating();
        }
    }
    ...
}
This is a common idiom. The null check is necessary because an event field is implicitly null and only becomes non-null when a method subscribes to it by using the += operator. If you try to raise a null event, you will get a NullReferenceException exception. If the delegate defining the event expects any parameters, the appropriate arguments must be provided when you raise the event. You will see some examples of this later.
Understanding user interface events
As mentioned earlier, the .NET Framework classes and controls used for building GUIs employ events extensively. For example, the Button class derives from the ButtonBase class, inheriting a public event called Click of type RoutedEventHandler. The RoutedEventHandler delegate expects two parameters: a reference to the object that caused the event to be raised, and a RoutedEventArgs object that contains additional information about the event:
public delegate void RoutedEventHandler(Object sender, RoutedEventArgs e);
The Button class looks like this:
public class ButtonBase: ...
{
    public event RoutedEventHandler Click;
    ...
}
public class Button: ButtonBase
{
    ...
}
The Button class automatically raises the Click event when you click the button on the screen. This arrangement makes it easy to create a delegate for a chosen method and attach that delegate to the required event. The following example shows the code for a WPF form that contains a button called okay and the code to connect the Click event of the okay button to the okayClick method (forms in Windows Store apps operate in a similar manner):
public partial class Example : System.Windows.Window,
    System.Windows.Markup.IComponentConnector
{
    internal System.Windows.Controls.Button okay;
    ...
    void System.Windows.Markup.IComponentConnector.Connect(...)
    {
        ...
        this.okay.Click += new System.Windows.RoutedEventHandler(this.okayClick);
        ...
    }
    ...
}
This code is usually hidden from you. When you use the Design View window in Visual Studio 2013 and set the Click property of the okay button to okayClick in the Extensible Application Markup Language (XAML) description of the form, Visual Studio 2013 generates this code for you. All you have to do is write your application logic in the event handling method, okayClick, in the part of the code to which you do have access, which is the Example.xaml.cs file in this case:
public partial class Example : System.Windows.Window
{
    ...
    private void okayClick(object sender, RoutedEventArgs args)
    {
        // your code to handle the Click event
    }
}
The events that the various GUI controls generate always follow the same pattern. The events are of a delegate type whose signature has a void return type and two arguments. The first argument is always the sender (the source) of the event, and the second argument is always an EventArgs argument (or a class derived from EventArgs).
With the sender argument, you can reuse a single method for multiple events. The delegated method can examine the sender argument and respond accordingly. For example, you can use the same method to subscribe to the Click event for two buttons. (You add the same method to two different events.) When the event is raised, the code in the method can examine the sender argument to ascertain which button was clicked.
Using events
In the previous exercise, you amended the Wide World Importers application to decouple the auditing and shipping logic from the checkout process. The CheckoutController class that you built invokes the auditing and shipping components by using a delegate and has no knowledge about these components or the methods it is running; this is the responsibility of the application that creates the CheckoutController object and adds the appropriate references to the delegate. However, it might be useful for a component to be able to alert the application when it has completed its processing and enable the application to perform any necessary tidying up.
This might sound a little strange at first—surely when the application invokes the delegate in the CheckoutController object, the methods referenced by this delegate run, and the application only continues with the next statement when these methods have finished? This is not necessarily the case! Chapter 24 demonstrates that methods can run asynchronously, and when you invoke a method, it might not have completed before execution continues with the next statement. This is especially true in Windows Store apps in which long-running operations are performed on background threads to enable the user interface to remain responsive. In the Wide World Importers application, in the CheckoutButtonClicked method, the code that invokes the delegate is followed by a statement that displays a dialog box with a message indicating that the order has been placed. In the Windows 8.1 Windows Store app, the code looks like this:
private void CheckoutButtonClicked(object sender, RoutedEventArgs e)
{
    try
    {
        // Perform the checkout processing
        this.checkoutController.StartCheckoutProcessing(this.order);
        // Display a summary of the order
        MessageDialog dlg = new MessageDialog(...);
        dlg.ShowAsync();
        ...
    }
    ...
}
The code for the WPF version of the application used by Windows 7 and Windows 8 is similar except that WPF uses a different API for displaying messages.
private void CheckoutButtonClicked(object sender, RoutedEventArgs e)
{
    try
    {
        // Perform the checkout processing
        this.checkoutController.StartCheckoutProcessing(this.order);
        // Display a summary of the order
        MessageBox.Show(...);
        ...
    }
    ...
}
In fact, there is no guarantee that the processing performed by the delegated methods has completed by the time the dialog box appears, so the message could actually be misleading. This is where an event is invaluable. The Auditor and Shipper components could both publish an event to which the application subscribes. This event could be raised by the components only when they have completed their processing. When the application receives this event, it can display the message, safe in the knowledge that it is now accurate.
In the following exercise, you will modify the Auditor and Shipper classes to raise an event that occurs when they have completed their processing. The application will subscribe to the event for each component and display an appropriate message when the event occurs.
Return to Visual Studio 2013 and display the Delegates solution.
In the AuditService project, open the Auditor.cs file in the Code and Text Editor window.
Add a public delegate called AuditingCompleteDelegate to the Auditor class. This delegate should specify a method that takes a string parameter called message and that returns a void. The code in bold in the following example shows the definition of this delegate:
class Auditor
{
    public delegate void AuditingCompleteDelegate(string message);
    ...
}
Add a public event called AuditProcessingComplete to the Auditor class, after the AuditingCompleteDelegate delegate. This event should be based on the AuditingCompleteDelegate delegate as shown in bold in the following code:
class Auditor
{
    public delegate void AuditingCompleteDelegate(string message);
    public event AuditingCompleteDelegate AuditProcessingComplete;
    ...
}
Locate the AuditOrder method. This is the method that is run by using the delegate in the CheckoutController object. It invokes another private method called doAuditing to actually perform the audit operation. The method looks like this:
public void AuditOrder(Order order)
{
    this.doAuditing(order);
}
Scroll down to the doAuditing method. The code in this method is enclosed in a try/catch block; it uses the XML APIs of the .NET Framework class library to generate an XML representation of the order being audited and saves it to a file. (The exact details of how this works are beyond the scope of this chapter, and they vary between the Windows Store app implementation and the more traditional approach implemented by the WPF version of the code.)
After the catch block, add a finally block that raises the AuditProcessingComplete event, as shown in the following in bold:
private async void doAuditing(Order order)
{
    List<OrderItem> ageRestrictedItems = findAgeRestrictedItems(order);
    if (ageRestrictedItems.Count > 0)
    {
        try
        {
            ...
        }
        catch (Exception ex)
        {
            ...
        }
        finally
        {
            if (this.AuditProcessingComplete != null)
            {
                this.AuditProcessingComplete(String.Format(
                    "Audit record written for Order {0}", order.OrderID));
            }
        }
    }
In the DeliveryService project, open the Shipper.cs file in the Code and Text Editor window.
Add a public delegate called ShippingCompleteDelegate to the Shipper class. This delegate should specify a method that takes a string parameter called message and that returns a void. The code in bold in the following example shows the definition of this delegate:
class Shipper
{
    public delegate void ShippingCompleteDelegate(string message);
    ...
}
Add a public event called ShipProcessingComplete based on the ShippingCompleteDelegate delegate to the Shipper class as shown in bold in the following code:
class Shipper
{
    public delegate void ShippingCompleteDelegate(string message);
    public event ShippingCompleteDelegate ShipProcessingComplete;
    ...
}
Find the doShipping method, which is the method that performs the shipping logic. In the method, after the catch block, add a finally block that raises the ShipProcessingComplete event, as shown here in bold:
private async void doShipping(Order order)
{
    try
    {
        ...
    }
    catch (Exception ex)
    {
        ...
    }
    finally
    {
        if (this.ShipProcessingComplete != null)
        {
            this.ShipProcessingComplete(String.Format(
                "Dispatch note generated for Order {0}", order.OrderID));
        }
    }
}
In the Delegates project, display the layout for the MainWindow.xaml file in the Design View window. In the XAML pane, scroll down to the first set of RowDefinition items. If you are using Windows 8.1, the XAML code looks like this:
<Grid Background="{StaticResource ApplicationPageBackgroundBrush}">
    <Grid Margin="12,0,12,0">
        <Grid.RowDefinitions>
            <RowDefinition Height="*"/>
            <RowDefinition Height="2*"/>
            <RowDefinition Height="*"/>
            <RowDefinition Height="10*"/>
            <RowDefinition Height="*"/>
        </Grid.RowDefinitions>
        ...
If you are using Windows 7 or Windows 8, the XAML code looks like this:
<Grid Margin="12,0,12,0">
    <Grid.RowDefinitions>
        <RowDefinition Height="*"/>
        <RowDefinition Height="2*"/>
        <RowDefinition Height="*"/>
        <RowDefinition Height="18*"/>
        <RowDefinition Height="*"/>
    </Grid.RowDefinitions>
    ...
If you are using Windows 8.1, change the Height property of the final RowDefinition item to 2* as shown in bold in the following code:
<Grid.RowDefinitions>
    ...
    <RowDefinition Height="10*"/>
    <RowDefinition Height="2*"/>
</Grid.RowDefinitions>
If you are using Windows 7 or Windows 8, change the Height property of the final RowDefinition item to 3*:
<Grid.RowDefinitions>
    ...
    <RowDefinition Height="18*"/>
    <RowDefinition Height="3*"/>
</Grid.RowDefinitions>
This change in the layout makes available a bit of space at the bottom of the form. You will use this space as an area for displaying the messages received from the Auditor and Shipper components when they raise their events. Chapter 25 provides more detail on laying out user interfaces by using a Grid control.
Scroll to the bottom of the XAML pane. If you are using Windows 8.1, add the following ScrollViewer and TextBlock elements shown in bold before the penultimate </Grid> tag:
            ...
            </Grid>
            <ScrollViewer Grid.Row="4" VerticalScrollBarVisibility="Visible">
                <TextBlock x:Name="messageBar" FontSize="18" />
            </ScrollViewer>
        </Grid>
    </Grid>
</Page>
If you are using Windows 7, add the ScrollViewer and TextBlock elements shown in the following code before the final </Grid> tag (note the different font size):
       ...
        </Grid>
        <ScrollViewer Grid.Row="4" VerticalScrollBarVisibility="Visible">
            <TextBlock x:Name="messageBar" FontSize="14" />
        </ScrollViewer>
    </Grid>
</Window>
This markup adds a TextBlock control called messageBar to the area at the bottom of the screen. You will use this control to display messages from the Auditor and Shipper objects.
Display the MainWindow.xaml.cs file in the Code and Text Editor window. Find the CheckoutButtonClicked method and remove the code that displays the summary of the order. The try block should look like this after you have deleted the code:
private void CheckoutButtonClicked(object sender, RoutedEventArgs e)
{
    try
    {
        // Perform the checkout processing
        this.checkoutController.StartCheckoutProcessing(this.order);
        // Clear out the order details so the user can start again with a new order
        this.order = new Order { Date = DateTime.Now, Items = new List<OrderItem>(),
                                 OrderID = Guid.NewGuid(), TotalValue = 0 };
        this.orderDetails.DataContext = null;
        this.orderValue.Text = String.Format("{0:C}", order.TotalValue);
        this.listViewHeader.Visibility = Visibility.Collapsed;
        this.checkout.IsEnabled = false;
    }
    catch (Exception ex)
    {
        ...
    }
}
Add a private method called displayMessage to the MainWindow class. This method should take a string parameter called message, and it should return a void. In the body of this method, add a statement that appends the value in the message parameter to the Text property of the messageBar TextBlock control, followed by a newline character, as shown in the following in bold:
private void displayMessage(string message)
{
    this.messageBar.Text += message + "
";
}
This code causes the message to appear in the message area at the bottom of the form.
Find the constructor for the MainWindow class and add the code shown here in bold:
public MainWindow()
{
    ...
    this.auditor = new Auditor();
    this.shipper = new Shipper();
    this.checkoutController = new CheckoutController();
    this.checkoutController.CheckoutProcessing += this.auditor.AuditOrder;
    this.checkoutController.CheckoutProcessing += this.shipper.ShipOrder;
    this.auditor.AuditProcessingComplete += this.displayMessage;
    this.shipper.ShipProcessingComplete += this.displayMessage;
}
These statements subscribe to the events exposed by the Auditor and Shipper objects. When the events are raised, the displayMessage method runs. Notice that the same method handles both events.
On the Debug menu, click Start Debugging to build and run the application.
When the Wide World Importers form appears, select some items (include at least one age-restricted item), and then click Checkout.
Verify that the “Audit record written” message appears in the TextBlock at the bottom of the form, followed by the “Dispatch note generated” message:
Place further orders and note the new messages that appear each time you click Checkout (you might need to scroll down to see them when the message area fills up).
When you have finished, return to Visual Studio 2013 and stop debugging.
Summary
In this chapter, you learned how to use delegates to reference methods and invoke those methods. You also saw how to define lambda expressions that can be run by using a delegate. Finally, you learned how to define and use events to trigger execution of a method.
If you want to continue to the next chapter, keep Visual Studio 2013 running, and turn to Chapter 21.
If you want to exit Visual Studio 2013 now, on the File menu, click Exit. If you see a Save dialog box, click Yes and save the project.