
Chapter 9
Effects
Acting crazy for the heck of it tends to amuse only one person: yourself. A mix with special effects flying all over the place is like a bad joke that only makes the joker laugh.
This chapter explores the means that you can use to make many bad sound jokes. But they can also help the music a lot, if you use them sensibly. Effects can attract attention, but they can also work more subtly, like the clues you subconsciously pick up in a Sherlock Holmes book. You can direct the listener’s attention with them, give extra meaning to certain things, and use them to build tension or make suggestions.
9.1 Distortion: Simulating Intensity
Using distortion is like coloring outside the lines, which might be exactly why it sounds so interesting. When you push a device beyond its ability, it can result in the most unpredictable, raw sounds. This evokes a kind of primal response in the listener, who perceives the sound as loud, dominant and aggressive, even if it’s soft in absolute terms. But also when it’s used as a subtle effect, in barely perceptible amounts, distortion can be a very useful tool to give a mix more cohesion and warmth.
9.1.1 How it Works
Overtones
An acoustic instrument produces sound by generating and amplifying a vibration. Plucking a stretched string, blowing on a reed and hitting a membrane are ways to excite such a vibration. The acoustics of the instrument then determine which vibration is amplified through resonance. For example, the soundboard and connected soundbox of an acoustic guitar are designed to evenly amplify as many notes as possible, just like the acoustics of a good studio. The tube of a clarinet, on the other hand, was developed to produce one specific resonance (depending on which tone hole you open). A quarter of the wavelength of this resonance’s frequency fits exactly between the reed and the first opened hole (see Figure 9.1A). In a guitar, it’s not the soundbox that determines the pitch, but you who does it by adjusting the string length with your finger. This creates a vibration with a wavelength that’s exactly twice as long as the distance between the bridge and your finger (see Figure 9.1B).

Figure 9.1Fundamentals.
Harmonic
The vibrations in Figure 9.1 are the lowest frequencies that can resonate in the instrument; these are called fundamentals. But there are more frequencies with wavelengths that precisely fit the instrument’s system, which can therefore resonate as well. These frequencies, which are integer multiples of the fundamental (for instance two, three or four times the fundamental frequency), are called harmonic overtones, and they form beautifully harmonic intervals with the fundamental (see Figure 9.2A). Many sound sources have a similar series of harmonic overtones, albeit in varying compositions. You’re so used to the sound of this phenomenon, that if you hear a combination of harmonic overtones, you automatically add the corresponding fundamental in your head. The standard waveforms on a synthesizer (sine, triangle, sawtooth, square wave) can all be seen as a fundamental supplemented with a specific series of harmonic overtones (see Figure 9.2B).
Non-harmonic
Not all resonances in an instrument relate to the fundamental in neat intervals. Sometimes the shape of the soundbox or the vibration mechanism produces a series of overtones that seem unrelated to the fundamental. In church bells or drums you do hear a tone, but it’s much harder to identify than the same note on a piano. This is because these instruments contain a dense pattern of non-harmonic resonances above their fundamental. These kinds of overtones make for a less ‘smooth’ and sometimes even unpleasant sound. But higher harmonic overtones can also sound dissonant, for instance when they relate to the fundamental in intervals containing minor seconds.
Identity
Whether they’re harmonic or not, overtones give a sound its identity. If you have old strings on your guitar, the higher overtones attenuate faster than if you use brand new ones. And if you sing a crescendo, you can hear your vocal cords producing more and more overtones. The sound will not only become louder, but richer as well. The effect is surprisingly similar to electronic overdrive, so no wonder that distortion is so popular as a means to liven up boring sounds.

Figure 9.2Harmonic overtones.
The Weakest Link
It’s different for every device what exactly happens when you send it into overdrive, but in every case, the weakest link in the circuit is no longer able to transfer the signal linearly. Sometimes it’s the transformers, at other times the amplifiers, inductors (coils), magnetic tape, AD converters or your software’s digital ceiling. The principle is always the same: the signal wants to go upward in a straight line, but the circuit can’t keep up and bends the line downward.
The shape of this bend can be visualized in a transfer curve, and it determines the sound of the distortion (see Figure 9.3). Distortion adds overtones—frequencies that weren’t there before—to the signal. Just think of what happens when you keep pushing a sine wave further into overdrive: slowly but steadily, it will start to look like a square wave. On a spectrum analyzer, a square wave will look very different, as it has an infinitely long series of odd overtones, which a sine wave doesn’t have.

Figure 9.3The effects of different transfer curves on a sine wave. A sharp angle causes a lot of high-order, dissonant overtones, while a smooth transition results in more low-order, relatively consonant overtones.
Just Like in Real Life
When you listen carefully, you’ll notice that electronically generated distortion doesn’t necessarily have a natural sound. Still, many listeners subconsciously accept it as normal, even in acoustic music. This is because harmonic distortion also occurs naturally, due to mechanical or acoustical causes. Just think of a membrane that generates sound by vibrating, for example a drumhead. It’s only elastic within a limited range, and when it can’t stretch any further at the extremes of this range, the drumhead starts to hold back the vibration peaks. That’s just as much distortion as overdriving a tube amplifier is. The harder you play on your drum or guitar, or the more you strain your vocal cords, the more overtones you’ll hear due to harmonic distortion. Even our ears are anything but distortion-free. So distortion is all around us, and it’s a sound we mainly associate with loudness. And that, of course, makes it a very useful effect in music production.
Hard and Soft
The makeup of the added overtones depends on the clipping character of the device being overdriven. If the distortion is symmetrical (if it’s identical for the positive and negative half of the signal), it will only produce odd overtones. However, if the distortion of a device is asymmetrical, this will result in both even and odd overtones. Even overtones are very pleasant-sounding, as the first two are exactly one and two octaves higher than the source. This kind of distortion is very inconspicuous, but it does make the sound richer. Especially devices with a ‘soft ceiling’ really exploit this principle, as they add a relative high number of these consonant intervals.
The harder the curve’s knee, the more high-order overtones are added, which relate to the source signal at increasingly dissonant intervals. The hardest knee is digital clipping, as a digital system can react perfectly linearly up until its ceiling, but above that, it has no headroom at all. This type of distortion sounds so sharp and crackling that it’s rarely seen as desirable. Some analog devices come close to this kind of hard clipping, but the diodes used—in fuzz pedals, for example—have a much larger transition region than an AD converter.

Figure 9.4The difference between symmetrical and asymmetrical distortion. Asymmetrical means that positive and negative voltages don’t distort the same way. One half of the wave distorts more than the other, which results in pleasant-sounding, even overtones. Some instruments (such as trumpets) already produce asymmetrical waveforms by themselves.
9.1.2 Distortion in a Mix
The main reason for using distortion is to suggest loudness, but there are many more reasons. Distortion can be a good alternative to EQ and compression, because, like these processes, it affects the dynamics and frequency spectrum of a signal. You can make details come to the surface, enrich the frequency spectrum, attenuate peaks, make sounds decay longer, and so on. All of this can be done with EQ and compression as well, but distortion still sounds completely different. EQ only affects already existing frequencies, while distortion actually adds new ones. An equalizer can influence the frequency spectrum without changing the dynamics, but with distortion this is impossible.
Conversely, compression can affect the dynamics without radically changing the frequency spectrum, which is also impossible with distortion. On top of this, compression has a time response (it fluctuates with the music), while distortion starts and stops instantaneously. Compression can be used over a wide dynamic range, while most distortion only sounds good within a small dynamic window. Above the window’s boundary the distortion will quickly become extreme, while below there’s usually not so much going on. That’s why the combination of compression and distortion works very well: the compressor comes first in the chain, keeping the dynamics of the signal you want to distort within the range where the distortion sounds nice (see Figure 9.6).
Types of Distortion
Fuzz, clipping and overdrive are only a few terms to describe what a certain distortion effect does. For example, the fuzz category can be subdivided into countless variations, based on the type of diode they use. The abundance of names might be clarifying to the connoisseur, but is possibly confusing as well, as the terms can mean something else to different people. Technically speaking, any form of harmonic distortion is overdrive: you overdrive a device until it distorts. The differences are in the hardness of the ceiling and the amount of distortion. These are the most commonly used names, from soft to hard: (tape) saturation, drive, crunch, overdrive, distortion, high gain distortion, fuzz, (hard) clipping, bit crushing. The first part of this list refers to overdriven analog circuits or emulations of these, while bit crushing sounds completely different. This effect occurs when you reduce the bit depth of your audio files to very low values without dithering, for example from 24- to 6-bit. The remaining dynamic range will be very low, which creates quantization distortion: extremely aggressive, crackling distortion.
The range of sounds you can make with different types of distortion is so incredibly wide that it’s almost incomprehensible. A fun and educational way to explore some possibilities is by trying out Decapitator by Soundtoys (or something similar). This plugin contains models of a number of different circuits. You’ll instantly hear the effects of various series of overtones: some almost seem to add an octave below the fundamental, while others place much more emphasis on the high frequencies. On top of this, you can choose to focus the distortion more on the low or high end, which allows you to create all kinds of different sounds.
Frequency Dependence
If you’ve ever sent a loud sine sweep through your speakers, you’ll know that it’s harder for the average speaker to reproduce the lows without distortion than the highs. In order to reproduce low frequencies, the excursion of the cone has to be relatively large. As a result, it will be stretched to its limit earlier. This kind of frequency-dependent distortion occurs in more places: transformers, for example, also distort more on low than on high frequencies. And it gets even crazier, because they distort the most on extremely strong and weak signals. Many old-fashioned tube microphones also distort more on low than on high frequencies. And recording on tape comes with a real cocktail of non-linear mechanisms. The setting of the recorder and the type of tape greatly affect the way different frequencies distort. This kind of frequency dependence can be very useful musically: transformers and tape recorders make the lows both warmer and deeper, without being recognizable as distortion.

Figure 9.5Analog tape.

Figure 9.6The range in which overdriving a device sounds nice (orange) is often not so wide. If you exceed the red line (hard clipping), the distortion will become too extreme, but if you stay in the yellow area, the effect is too small. By compressing the input signal first, you can keep it within the orange zone as much as possible.
Restricting
What’s so addictive about distortion is that it seems to make everything more energetic, thick and fat. But therein lies the problem, because if you use a lot of distortion, the sounds you create will be so dense that other sounds will have a hard time cutting through. This is what makes high-gain guitars or sawtooth synths so hard to mix: these sounds have such a dense frequency spectrum—and often such even dynamics—that they can end up covering the entire mix like a blanket. This can be avoided by using filters to carefully restrict the area within which these sounds are permitted. The speaker of a guitar amp already barely reproduces the very high frequencies, but an additional low-pass filter can still create a lot more room in the mix. The effect of this is that you retain the lower overtones (which have a strong harmonic relationship with the signal), while attenuating the higher, dissonant distortion (which isn’t very powerful musically). Because of this, distortion and low-pass filters are a popular combination.
Focusing
Instead of using filters to process the signal after it’s been distorted, you can also focus the distortion more precisely on a specific frequency range. This can be useful when you can’t allow an instrument to take up much space, but you still want to put some emphasis on it. Making bass instruments audible in a busy mix is a common application of this. Putting distortion on the entire instrument will produce a lot of density in the octave directly above the fundamental of the bass. Usually, that’s exactly where the fundamentals of the harmonic instruments are, so this range will quickly turn into a muddy cluster of sounds. This problem can be solved by dipping the distorted bass between 150 and 300 Hz, but there’s another option as well. If you split the bass into a low and a high part, you can choose to only distort the high part. This way, you’ll mainly generate more overtones on the overtones of the bass. As a result, you’ll hear these tones more clearly, and the instrument will cut through the mix more. The fundamentals remain undistorted, so the bass won’t push other instruments away. This is exactly the reason why a lot of producers combine a clean DI signal with a distorted amplifier signal, as this will give them both ‘smooth’ lows and a ‘biting’ midrange. Some distortion effects have built-in crossover filters (or pre-emphasis filters) to make this type of frequency-focused distortion easy.
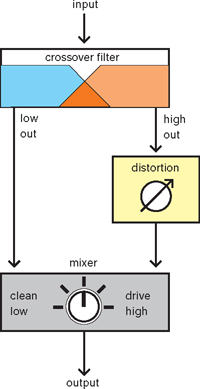
Figure 9.7With a crossover filter (which you can also create yourself, by using two separate filters) you can keep an instrument’s low end distortion-free. This way, the mix will still sound open, while the distortion makes the midrange cut through the mix more.
Blending
By definition, distortion evens out the peaks of your signal. Usually that’s not your main reason for using it, as you’re mostly interested in the sound of the distortion. Sometimes you wish you could capitalize on this timbre, without having to flatten everything. This is because mixes tend to sound ‘overcooked,’ rhythmically weak and generally undefined if there aren’t enough peaks left. You can solve this problem by blending the distortion and the original signal together. This way, you can make a combination of the original peaks and the added timbre. When you use this technique, make sure that the original and the distorted version add up in phase. This is not always easy, as many distortion effects also contain filters that can cause phase shifts. In these cases, all-pass filters can help to keep the low end in phase (see section 7.4). Parallel distortion is the ideal way to give sounds more definition and character, without turning the mix into a tiring and flat listening experience.
Distortion can save a lifeless piece of music or ruin a beautiful song. The trick is to use it functionally, and to avoid using it if the music doesn’t need it. Guitarists know how to play this game, since distortion is such a major part of their sound. They adjust the amount of distortion to the part they’re playing, and vice versa. For example, when there’s a lot of distortion, they often remove the third from the chord to keep the sound more harmonically open, plus they will emphasize the rhythmic attack a bit more. In music production, a mindset like that can help to convincingly integrate distortion into your mix. And once you manage to do that, take cover!
9.2 Re-amping: Providing Context
Re-amping is nothing more than playing a sound back through an amplifier and a speaker, and then recording it again with one or more microphones. But why would you want to do that with instruments other than directly recorded guitars? Apparently, what’s added to a sound on its way from a speaker to a microphone is hard to achieve in a different way: depth and perspective. Of course you can also record sounds this way from the start, but if you don’t have this option, or if you’re working with electronic sources, re-amping is a pretty close approximation of this process. On top of this, there’s a lot to be gained in terms of sound texture, as amplifiers and speakers can be pushed into overdrive. And a distorted sound that’s recorded via a speaker in a space with its own acoustics is usually easier to place in the mix than a sound with distortion directly applied to it. It won’t be as dominant in the mix, and it automatic ally has a clear place in terms of depth—which you can easily manipulate by moving the microphone(s). So plenty of reasons to warm up those tubes!
9.2.1 How it Works
The re-amping chain that you put together should of course match the effect you have in mind. A small speaker can work well to ‘focus’ the sound, while a large woofer can remove all kinds of unwanted high-frequency noises. When you add distortion, the small speaker will sound even brighter and smaller, while the large speaker will seem even fuller and thicker. The resonance of a loudspeaker within its enclosure always gives the sound an emphasis around a certain frequency. You can see this as the system’s lower limit. If this frequency fits the instrument you’re running through it, it will seem to have more body. This is why guitarists value the diameter of their speakers so much. If the speakers are too big, their response will be too slow for some playing styles, but if they’re too small, their emphasis will be too high up the frequency range to add enough weight to certain parts.
Impedance
Guitar amps are designed to deal with the (generally) high output impedance of electric guitars. As a result, they have a much higher input impedance than the line inputs of studio equipment. So if you want to record a guitar directly, it’s a good idea to use a DI box or hi-Z input. This way, the guitar’s frequencies will be transferred in the same proportions as when you send them to an amplifier. If you don’t do this, you’re bound to lose the high end. And if you later want to run this recording through a guitar amplifier, you can apply the same principle in reverse by using a re-amp box to increase the impedance (and attenuate the signal level) before it goes into the amplifier. An additional advantage of a re-amp box is that it usually has a transformer that breaks ground loops, thus preventing hum.
This doesn’t mean there’s a law that says impedance should always be matched. If you don’t need to exactly reproduce the sound of a particular guitar/amp combination, DIs and re-amp boxes are often unnecessary. I sometimes use stompboxes as an effect while mixing, directly connected to the converters. I keep the converter levels low, and after the effects I (digitally) add some gain to match the gain structure of my mix. If there are any small timbre differences due to an impedance mismatch, I can usually live with that. It varies per effect how it turns out, but if it sounds good, it is good.
At the same time, one-way systems like guitar amplifiers also have an upper limit because they don’t have tweeters. The larger the speakers, the sooner you’ll lose the high end. This loss can work well to temper dissonant overtones caused by extreme distortion. Of course you’re not restricted to guitar amps, as all speakers can be used for re-amping, and you can even hook up multiple speakers to create all kinds of spatial effects.
Speaker Placement
If you want to make a good recording, you have to make sure the speaker sounds good in the recording room. This process is a lot like positioning your studio monitors or choosing the best place for your drum kit. The speaker’s interaction with the space depends mostly on its own directivity and the room’s geometry. The direction in which you point it determines the sound, level and arrival time of the early reflections you’ll hear in your recording. The placement of the speaker is particularly critical for the lower part of the frequency response, which is greatly affected by room modes. If placement and angle alone don’t get you there, you can also use acoustic aids like gobos or diffusors to fine-tune the sound. Getting to know your space by experimenting with placement is the only way to really get a grip on the process, as there are too many mechanisms working simultaneously to be able to provide a formula for good placement. Besides this, ‘good’ is subjective and strongly dependent on the musical context (more information on acoustics and speaker placement can be found in Chapter 17).
Listening to the effect of placement in the recording space is extremely important, but it’s not always possible. With loud (guitar) amplifiers, there’s a risk of hearing loss. And even if things don’t get that ear-splittingly loud, your ears will quickly get used to the high sound levels, and two minutes later you won’t be able to say much about the sound of your recording in the control room. It’s better to stay in the control room while you make an assessment of the problem and come up with a solution, then make adjustments in the recording room (in silence), and finally return to the control room to evaluate whether your adjustments worked. For those who are good with robotics: a remote-controlled guitar amp platform or a microphone placement robot are handy gadgets to have. An assistant you can instruct via isolated headphones is also an option, of course.
Distortion in Stages
In a typical ‘guitar chain,’ the sound can be distorted in a number of places. Stompboxes, preamps, power amplifiers and speakers can all be pushed to their limits. But stacking distortion on distortion on distortion doesn’t necessarily have a positive effect on the definition of the sound. So if you mainly want to hear the distortion of the power amp and the speaker, it’s best to set the preamp gain a bit lower, and vice versa. Varying this multi-stage gain structure is something guitarists can endlessly tinker with, as it greatly affects the dynamics, timbre and harmonic density of the result.
Save Your Ears
Pushing the tubes of a guitar amplifier into overdrive can sound great, but the resulting sound levels are no picnic. Fortunately, there are several ways to limit this inconvenience. An isolation cabinet containing a speaker and a microphone of choice is closest to the real thing. The only downside to this is that the cabinet has internal acoustics, which can never be completely damped. As a result, these solutions sometimes literally sound a bit ‘boxy.’ Another approach is to use a so-called power soak to attenuate the signal after overdriving the power stage. This will make the speaker work less hard, while the amplifier is still distorted. The drawback to this is that you reduce the distortion the speaker itself introduces at high levels, so it still doesn’t sound exactly the same. The most extreme solution is a dummy load (a heavy resistor that can fully absorb the power of the amplifier) with a line output. This allows you to tap the amplifier signal directly, without having to put a speaker in motion at all. The problem is that besides the distortion of the speaker, you also miss its frequency response this way. That’s why many dummy loads come with a low-pass filter, which simulates the frequency response of a woofer.
Microphone Placement
If you’ve never recorded electric guitars before and you’re just starting to read up on the different methods engineers use for this, the recipes you come across can seem extremely detailed. ‘Place a type X microphone at five centimeters from the speaker, two centimeters away from the cone’s axis, at a 30-degree angle,’ and so on. The reason for this is simple: this close to the sound source, tiny changes can make huge differences.
Speakers and microphones are definitely not technically perfectly functioning inventions. The smoothed-out frequency response graphs that manufacturers like to advertise with are only true for sound that’s perfectly on axis with the speaker or microphone. If you use them at an angle, and not in an anechoic chamber but in a room with acoustics, the frequency response can change dramatically. This is why speaker and microphone placement is a lot like turning the knobs of an equalizer, only with less predictable results. In general, you can say that speakers and microphones radiate and pick up low-frequency sound more omnidirectionally, and that they become more and more directional as the frequencies get higher.
You can also use multiple microphones, of course. The combinations of different microphones and distances are endless, but a single microphone in the right place always produces a bigger sound than a mix of three microphones that don’t work together well. A good rule of thumb is to only add extra microphones if the sound they pick up is actually different, and not just a variation on the same theme. For example, stereo room mics placed a few meters away from a single close mic can add a lot of extra width and depth. Due to the difference in distance and the relatively high level of diffuse reflections picked up by these microphones, they add much more to the close mic than they take away through phase interaction. If you intend to blend your re-amped recording with the original source, it’s important to precisely correct any delay and phase shifts introduced by the re-amp chain. Close mics should be aligned as accurately as possible with the original signal, while room mics usually benefit from separation: a little delay compared with the original goes a long way (see sections 7.2 and 7.3 as well).

Figure 9.8The frequency response of speakers and microphones depends on the angle at which you place them. The bottom setup will sound a lot less bright than the top one.
9.2.2 Re-amping in a Mix
Adding Air
A common mixing problem is the depth placement of electronic sources or directly recorded instruments. You can add reverb to these instruments, but the resulting effect will often be a very direct-sounding source with the reverb trailing behind it. In cases like these, re-amping can add a lot of realism, especially if you precisely adjust the speaker and microphone setup to where you want to place the sound in the mix. Figure 9.9 shows how you can make a very direct-sounding violin ‘breathe’ a bit more. If the speaker that simulates the violin isn’t aimed straight at the microphones, but at an angle (just like a violin at a concert is at an angle with the audience), it will already sound a lot less direct. The microphones are placed at some distance to the side, where they pick up a realistic stereo image (in terms of width and depth) of the instrument and its reflections. Naturally, this method can only work in a space with good acoustics: in a room with a low ceiling you’ll have the same problem as with a real violin, so the distant microphones won’t sound very good.
Stereo Movement
It’s not easy to turn a mono source into something that fills the entire width of the stereo image in a meaningful way. If it mainly has to be impressive—and realism is less important—you can use multiple speakers to reproduce the same sound source, and make them all sound different. There are many ways to create these sound changes, for instance by using two guitar amps, one with overdrive, chorus and delay, and the other clean. Aim one amp toward the corner of the space with the microphone a bit further away, and place the other one in the middle of the space with a close mic. Pan the resulting tracks to the left and right and voilà: you’ve created an impressively wide sound that’s much more complex than the average stereo synthesis plugin.

Figure 9.9Just like an instrument, you can make a speaker radiate in one particular direction, thus changing the sound of the recording.

Figure 9.10Recording vocals with three microphones and live stereo delays in the same space will result in a completely different mix than when you add the delay afterwards. The spill makes everything more intertwined.
Combining Acoustics and Amplification
The main problem with combining electronic and acoustic sounds is that it’s difficult to place them in the same world. Of course, the ideal solution would be to literally place them in the same world. Instead of programming an electronic beat first and separately recording all kinds of acoustic additions, you can also play this beat in the recording space while you record the piano. With a couple of room mics, it will immediately sound a lot more convincing than when you use electronic reverb. Figure 9.11 shows how to complement a drum kit with a PA in the recording room. When it’s amplified, the acoustic snare drum will be louder in the room mics. As a result, the drum kit will seem a lot bigger than when you only boost the close mic of the snare in the mix. And by not only recording the triggered electronic drum sounds directly, but also amplifying them in the space, they will automatically blend with the acoustic drums more.
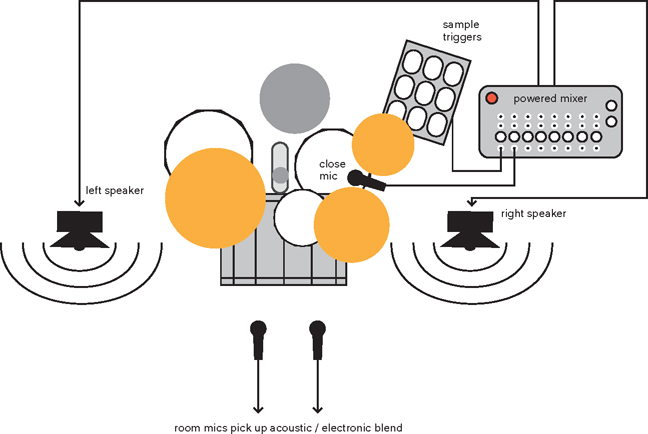
Figure 9.11Combining acoustic drums with electronic elements is a lot more convincing if you amplify the electronics live and then record everything at once with the room microphones.
9.3 Modulation: Putting Things in Motion
If you’ve ever worked with a modular synthesizer, you’ll know the power of modulation. Influencing one parameter with another helps to put a sound in motion and give it complexity. With effects, it’s the same: when they move, they attract more attention than when they remain static. Examples of this kind of motion are:
•motion in pitch (vibrato and chorus);
•motion in amplitude (tremolo and envelope manipulations);
•motion in spectral composition (filtering, flanging and phasing).
The advantage of sounds that change with time is that our brain pays more attention to them, which makes them stand out more in the mix as a whole. Because of this, modulation can also help to reduce masking: an instrument that’s easier to hear can be turned down, so it won’t get in the way of the other instruments so much.
9.3.1 How it Works
Vibrato, Chorus and Flanging
Pitch modulation works just like a passing fire truck. The Doppler effect that causes the pitch to drop is the result of the fire truck first moving toward you and then away from you. So actually it’s distance modulation that causes this fluctuation (see Figure 9.12). Delay is a perfect tool for simulating distance: the longer the delay time, the greater the distance. If you change the delay time during playback, you’ll hear a similar pitch bend. (Or you’ll hear a lot of rattle, as some digital delays don’t make smooth movements when you adjust the timing. This effect is called zipper noise, and it’s usually undesirable.)
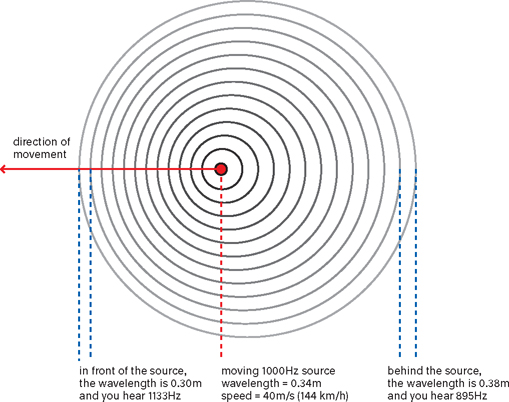
Figure 9.12The Doppler effect. The movement of a sound source results in greater distances between the pressure variations behind the source (longer wavelength = lower pitch), and shorter distances in front of it (higher pitch).
With the delay set to 100 percent wet, you can make Doppler-like effects by modulating the delay time. The resulting pitch fluctuations are mainly interesting as a special effect: think of imitating a wobbly tape recorder, making musically timed pitch sweeps, or simulating vibrato. You often have to use quite a lot of modulation to make the effect stand out, so much that it will sometimes sound a bit out of tune. This changes when you blend some of the raw signal with the delay. Then, even the slightest pitch fluctuation will cause a huge change in sound. This is the result of interference: the original and the delayed signal are very similar, so they partly amplify and attenuate each other when you combine them. With average delay times—somewhere between 10 and 40 ms— this principle produces a chorus-like effect. It’s a lot like double tracking a part, and it makes the sound richer.
With very short delay times, the interference gets stronger, resulting in comb filters with regularly (harmonically) distributed peaks and dips. The location of these peaks and dips keeps changing with the delay time. You can make the peaks even more extreme by adding feedback to the delay, which produces a whistling sound. This effect is called flanging, and it’s nothing more than a chorus effect with very short delay times. If you create this flanging by using tape recorders as delays (the way it was once discovered), the delay times can even become negative. This is the result of playing the same recording on two tape recorders, which you both manipulate in terms of playback speed. The copy can then end up both before and after the original, and this kind of ‘through-zero’ flanging undeniably has a beautiful character. Digitally, this is easy to imitate by delaying the original as well, and if you then also add tape simulation to both signal paths, you’ll get a pretty good approximation of this sonic character. Due to their imperfections (skewed phase response, fluctuating playback speed, distortion), tape recorders add an unpredictable, lively dimension to the sound when used as a parallel effect. For example, you can double track parts more convincingly with a tape recorder than with a chorus effect, as if they were really played twice. There’s even a name for this process: automatic double tracking (ADT). Many chorus effects sound too ‘perfect,’ so the duplication doesn’t feel human.

Figure 9.13Chorus and flanging are nothing more than modulated delays that you blend with the original. You can make the sound more complex by using more delays (taps). Adding feedback enhances the effect.
Natural Modulation
The method invented in the psychedelic sixties of having microphones (or musicians) spin around while suspended from cables is a great way to accomplish acoustic pitch modulation, but this effect is also found in less adventurous situations. For example, a violin section playing in unison is similar to an irregularly modulating 18-tap chorus effect, each delay tap with its own panning. On top of this, violinists can play with vibrato, and they usually don’t hold their instruments still either. So there are more pitch fluctuations in the acoustic world than you might expect. It’s just that they aren’t nearly as regular and predictable as electronic effects. As a result, they don’t attract attention, but unconsciously they do contribute a lot to your sense of size and depth. For many mixers, this is reason enough to apply chorus in subtle amounts. To a certain extent, it can increase your perception of size.
Phasing and Filtering
Flanging and chorus effects use a delay for the overall signal, creating a comb filter with regularly distributed peaks and dips. If you introduce a phase shift in the parallel path instead of a delay, you’ve created a phaser that can also produce irregularly distributed peaks and dips. A phase shift can be seen as a frequency-dependent delay, as each frequency gets a different delay time, courtesy of an all-pass filter. The shift is 180 degrees around the filter’s cutoff frequency, resulting in attenuation when the signal is combined with the original, while elsewhere in the spectrum amplification occurs. Unlike a flanger, a phaser doesn’t produce an endless series of peaks and dips, but only a few of them, depending on the number of all-pass filters (also called stages) used by the phaser. The cutoff frequencies of these filters can be modulated with an LFO, which constantly changes the frequency where the peaks and dips occur. A phaser can also use feedback to make its response even stronger.
So phasing is actually nothing more than the constant moving of a number of notch filters. But of course you can think of many more types of filters that can create interesting effects when you modulate them. A simple example is a low-pass filter that filters out the hi-hat spill from a snare drum microphone, except when the snare drum triggers the filter, causing the cutoff frequency to shift upward. Or two filter banks, one for the left and one for the right channel, which remove and pass opposite frequency ranges. Add some subtle modulation to it, and you’ll have a great setup for generating a wide stereo image from a mono source.

Figure 9.14The difference between the (static) frequency response of a phaser and a flanger.
The most fun example of a modulating filter is probably the talk box, a small speaker that sends the source sound through a plastic tube and into the mouth of the player, who creates a modulating acoustic filter by changing the shape of the mouth. The filtered sound is then picked up by a microphone.
Tremolo and Ring Modulation
Turning a sound up or down is the most basic manipulation there is, but you can still create very powerful effects with it. Tremolo is simply the result of modulating the sound level with a low-frequency oscillator (LFO). This LFO generates a periodic signal (a waveform) that drives the modulation. Of course, the tempo of the modulation (the frequency of the wave) can be synchronized with the music, and the shape of the LFO’s waveform has a very strong effect on the feel of the final result (see the box ‘Modulation Sources’). If you keep increasing the frequency of the LFO, you’ll slowly turn the tremolo into a ring modulator, as this creates sum and difference tones between the source signal and the modulator. This effect is also called amplitude modulation, and it can produce beautifully dissonant sci-fi sounds.
Rotary Speaker
The rotary speaker or Leslie speaker (named after its inventor) is mainly known for the recognizable electronic organ sounds heard on countless records. The bulky cabinet contains a rotating sound reflector connected to a woofer for the low frequencies, and an independently rotating horn tweeter for the high frequencies. Both rotation speeds can be adjusted separately. Besides a source of backaches for roadies, this double rotation system also produces an extremely lively sound, in which vibrato, tremolo and a modulated filter effect can be heard, independently for the low and high frequencies. Add the overdrive of a tube amplifier to this, and you have a very complexly responding sound machine. The Leslie speaker has been imitated a lot, but in its original form it still sounds unique.

Figure 9.15Leslie speaker cabinet.
9.3.2 Modulation in a Mix
Width
One of the main reasons for using modulation effects is to create stereo width without the need for large amounts of reverb. By manipulating the left and right channel separately, with different modulation speeds, opposing movements, (inverse) feedback between left and right or different frequency characteristics, you can give the sound more dimension. All of the modulation effects mentioned in this section can be used this way, but chorus is the most obvious choice. It’s less conspicuous than flanging or phasing, and it can make the sound a lot thicker and bigger.
Attention
A car that’s rushing by will attract your attention more than a stationary one, and in a mix, moving sounds also seem more important than static ones. You can exploit this principle by putting sounds in motion if they need to draw more attention. The most obvious way to do this is through panning automation. Besides a ready-made auto panner, you can also use two separate tremolos for the left and right channels to achieve this. This way, you can create very complex and unpredictable movements. But if you overdo it by making the movements too fast, you will lose definition— and therefore attention—in your mix. Slow, handmade sweeps with panners, phasers, flangers or filters often give the best results.
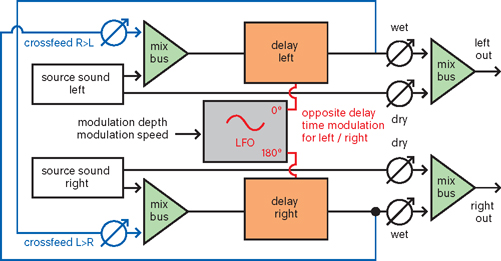
Figure 9.16Stereo widening can be easily achieved by modulating the left and right halves of an effect in opposite directions. If you then also add feedback between the left and right channels (crossfeed), the combined sound will become even wider.
Distinction
Another way to utilize the extra attention that moving sounds attract is by turning these sounds down in your mix. Thanks to their distinctive texture, modulated sounds can be musically effective at a lower mixing level than static ones. This is ideal for doubled parts and other additional elements that take up too much space, because the more softly you can place these extras in your mix, the more room you’ll have left for the important things, and the more powerful your final mix will be. Reverb and delay can also be seen as extras: if you put chorus or phasing on the reverb and delay returns, you can usually turn them down a bit, while achieving a similar perception of size.
Rounding Off
An application of chorus, flanging or phasing that you might not think of right away is making sharp sounds like metal percussion milder. Tambourines or other piercing percussion sounds that stubbornly stay in the front of the mix, no matter how much reverb you put on them, can be pushed back quite far this way. Comb filtering and phase distortion make the transients less sharp: by spreading them out a bit in time, they become less direct-sounding. This approach will sometimes sound more pleasant than a low-pass filter, which also makes the transients milder, but often ends up muffling the sound as a whole.
Modulation Sources
Just as important as the sound of the effect you use is the source that controls it. This can make all the difference between an effect that sounds predictable and ‘tacked on,’ and an effect that blends with the source and appeals to the imagination. The most basic modulator, a constant oscillator, can be given different rhythmic functions by changing the waveform. For example, a sawtooth has a sharp emphasis, while a sine has a more spread-out pulse. The phase of the waveform determines the position of the rhythmic emphasis: on the beat or between the beats. But you don’t need to stick to the tempo, and you can even go as far as modulating the tempo of the modulator itself. This way, you can create alternately rushing and dragging movements. If this is still too predictable, you can also consider using a random generator (noise) as a modulation source. Especially if you cut some of its highs, you can introduce very unpredictable, slow movements with it, which sometimes sound very ‘human.’

Figure 9.17A way to make chorus sound less regular and predictable.
On the other hand, if the sound should be more recognizable, you can use a step sequencer as a modulator. This creates rhythmic patterns in the sound that go much further than simply repeating the same movement like an oscillator does. This way, you can use a filter to turn long tones into arpeggio-like sounds, without changing the pitch. One way to make sure the movements made by your effects are related to the music is by using the music itself as the modulation source. Auto-wah is a well-known example of this: the louder you play, the higher the cutoff frequency of the filter. But with this kind of envelope modulation, you don’t necessarily have to use the signal you’re manipulating as the source: you can also use the level of the drums to modulate a phaser on the bass.
The danger of all automatic modulation constructions is that they easily end up sounding contrived and drawing more attention than necessary. When you think about it, the trick in music is to use movement sparingly and to not keep all the elements constantly in motion. The best—and most fun way—to do this is by appointing yourself as the modulator. A filter sweep or ‘jet flange’ that precisely follows the song’s structure is made quickest by hand. This way, you’ll automatically end up with effects that are only active during the musical moments they’re meant to affect. These are much more powerful than a tremolo that keeps rippling for minutes on end.
9.4 Pitch Manipulation: Creating What Wasn’t There
If you’ve ever played an LP record at 45, or even better, at 78 rpm, you know what pitch shifting is. The mechanism is very simple: you play something faster or slower than it was recorded, and the pitch shifts up or down. You can do this digitally as well: the sample rate then becomes your recording speed. If you tell your computer to play 96,000 samples per second, but the file you’re playing was recorded at 48,000 samples per second, it will sound an octave higher. And be twice as short! Which is exactly the problem of pitch shifting, because in many cases you don’t want to change the length of a sound, only its pitch.
9.4.1 How it Works
Time Stretching
If you want to raise or lower the pitch of a sound, but maintain its duration, you’ll need to lengthen or shorten it. Technically, this simply means repeating or cutting out tiny pieces. But the trick is to do this inaudibly, because if you’ve ever made a cut at a random point in your audio, you’ll know that an interruption of a waveform almost always causes a loud click or other noise. Crossfading is a good way to solve this problem, but in the middle of a long note it’s still a challenge. It’s important to keep a close eye on the phase of the waveform: if you remove or add one or more entire periods (repetitions in a waveform), you’ll hardly notice it, because the crossfaded parts will then be in phase.
If the sound isn’t periodic, because it’s undergoing a change of pitch or because it contains noise sounds (transients are a good example of this), it’s much more difficult to lengthen or shorten it. Therefore, a smart pitch shifter studies the signal to see which parts are periodic, and which ones only occur once. The latter won’t be time-corrected by the device, only the periodic parts. For instance, in a spoken sentence, the vowels are stretched or shortened, while the consonants are manipulated much less severely.
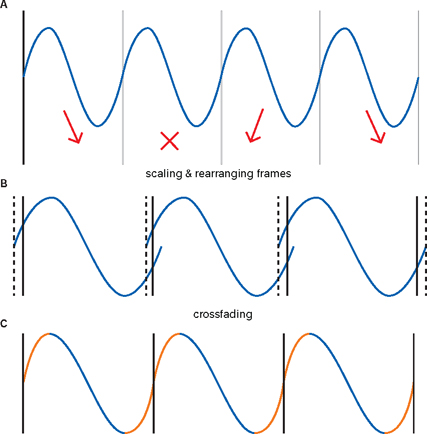
Figure 9.18Lowering a tone through pitch shifting with time correction. The system divides the original wave into a whole number of periods (A). Then, at the new pitch, it tries to create a continuous wave of the same length which also has a whole number of periods. In this case, the system cuts out one period and rearranges the remaining ones for an as-close-as-possible approximation (B). But because it’s still not perfect, the difference is corrected through interpolation (crossfades). This creates some distortion (the yellow sections in C).
FFT
An alternative method for pitch shifting is the so-called phase vocoder. This principle uses FFT (see section 9.6 for more information on this) to convert a sound to the frequency domain. This way, you can see the frequency components (and their phases) that make up a signal. This information can be manipulated, which allows you to easily perform time and pitch adjustments without interruptions or phase cancellations in the signal. After all, you’ll control the phase and pitch of each of the frequency components in every successive piece of audio (these pieces are called bins in the frequency domain). This way, you can make sure there’s a smooth transition from one bin to the next when you copy or remove a few.
Some pitch shifters use this method for time correction, and then resampling for pitch adjustment. Other pitch shifters also adjust the pitch in the frequency domain, which creates a lot of extra possibilities, like shifting the pitch of individual frequency components or copying them to generate harmonies. It’s even possible to isolate individual notes and their overtones, and shift them compared to other notes (polyphonic pitch correction). Still, it’s not easy to do this without side effects. This is due to both the difficulty of isolating the right frequency components and the inherent resolution problems of FFT. As soon as you want to move something by anything in between a whole number of bins, you’ll need to interpolate between different bins, which produces all kinds of by-products.
Formants
Usually, you want to use pitch shifting to create the illusion that the same instrument produces a different note. To make this work, you want to simulate that the strings vibrate at a different frequency, while the soundbox stays the same. This is not easy: with standard pitch shifting, the resonances of the soundbox shift along with the new pitch. The human voice also has a soundbox with resonances, which are called formants. The frequency of these resonances is quite constant; all you can do is modulate them a bit by shaping your mouth. The effect of these formants is that they amplify some of the frequencies produced by your vocal cords more than others.
For a natural-sounding pitch shift, you want to keep this ‘EQ effect’ at the same frequency, while adjusting the frequency of the vocal cords. There are pitch shifters that try to distinguish the influence of the formant filter from the source of the vibration. Then the fundamental and its overtones are shifted to a new pitch, and an estimation of the original formant filter is put on top of it. This principle is called formant correction, and it can greatly expand the usable range of a pitch shifter.
Imperfections
The signals that are the hardest to shift contain few periodic waves: percussion, for example. In these cases, the side effects create a granular/ grainy sound, which is sometimes exactly the effect you’re looking for. In old-fashioned pitch shifters, this effect was even stronger, because the grain size—the size of the chunks the audio is divided into before it’s time-corrected—wasn’t perfectly matched to the waveform. This was inevitable, as these pitch shifters had to perform their task almost in real time. There was no time for offline arithmetic. Nowadays, things are better of course, but due to its ‘drawbacks,’ the old technology is still a popular tool for making grainy textures. Especially if you also add delay and feedback, you can create unreal, mysterious worlds with it. Feedback can be used to make pitch bends: a shift down that you send back to the input via a delay is shifted down even further, and so on. And some processors even allow you to set the grain size yourself or play the grains backwards: instant vintage sci-fi!

Figure 9.19A schematic view of formant correction. The original filter character of the soundbox is retained as much as possible, while the pitch shifts upward.
9.4.2 Pitch Shifting in a Mix
Supplementing
Pitch shifting can be used for many other things besides creating cartoon effects. For example, it can be very useful if the low end of a song’s arrangement doesn’t work so well. A section in which the bass plays high notes can be EQ’d all you want, but this won’t give you a full low end. What does work is generating an octave below the bass, as this will make the mix feel bigger without attracting too much attention. An easy way to do this is by using a subharmonic generator that’s specifically developed for this purpose. But it also works great to copy the entire bass, shift it an octave down and use a filter with a very steep slope to attenuate the area above the lower octave. Just make sure you don’t get any phase problems when you blend the copy with the original. You can also replace entire parts with octavated versions, but this is bound to stand out as a manipulation. A blend usually works better. Just try to shift a drum room mic down an octave and blend it with the dry drums. Ka-boommmm!
Pitch shifting is also a great tool for harmonizing melodies. Some pitch shifters even let you set a specific key, so they can automatically generate suitable polyphonic harmonies. It’s only when you place them loudly in the mix that they will start to sound fake, plus the timing is so neatly synced with the original that it won’t sound like a separate recording. It’s better to select a spare take of the lead vocal and use pitch correction software to manually turn it into any harmony you want. It’s a bit more work, but the result can sound very realistic. For melodies it can also work to simply add an octavated version of the original, though not as a convincing extra part, as the shift would be too extreme for this. But as a supplement or special effect it can sound great. Just run an octave above the lead vocal through a reverb that’s set to 100 percent wet, and use it as the reverb for the original.
Varispeed
You wouldn’t expect it, but even in mastering studios it’s not uncommon to use pitch manipulation. Usually, the purpose is not to change the pitch of the music, but the tempo. Playing a track faster can give it a more energetic and tight feel, and make it more suitable as a single or turn it into a dance floor smash (all DJs know this trick, and in the club, pitch control is used a lot for this purpose). The reason for not using time stretching to make tempo corrections is that playing a song at a different pitch doesn’t affect the sound quality as much (in case of minor adjustments). But if you ever want to play along with the master in A = 440 Hz tuning, it’s not an option of course!
During recording, it can also be useful to temporarily play your track faster or slower. At half speed (a standard feature on most tape recorders), you can record fast-paced parts with extreme precision. Of course, this means you’ll have to play the part an octave lower than usual, unless the pitched-up cartoon effect is exactly what you’re going for. The opposite is also possible: recording drums at double speed will give you deep thunderclaps when the result is played at the original tempo. With drums, the recording speed doesn’t even have to correspond to whole tone intervals, since drums aren’t strictly tied to a specific pitch. If the sound of your drums is just a tad too light for the song you want to record, or if certain frequencies clash with the tonal instruments in the track, you can simply use varispeed (if your DAW/word clock generator supports this) to record the drums a bit faster and then listen to the result at the original tempo. Sometimes this is a faster and better solution than tuning a drum kit to a pitch that doesn’t sound good due to the size of the drums. A little goes a long way with these kinds of adjustments.
Corrections
If the instruments themselves are in tune, most tuning problems can be solved with a pitch shifter. A common issue is when a grand piano or other orchestral instrument that’s tuned in A = 442 Hz has to be used in an A = 440 Hz production. This can be fixed by shifting the entire instrument 7.85 cents down, so it will still be in tune with the rest of the production. Of course, this particular problem could also be solved by using the varispeed recording method. Things get more complicated if the problem isn’t caused by tuning. Sometimes musicians are consistently sharp or flat, for instance when they aren’t used to playing or singing with headphones, or when the monitor mix isn’t good. In these cases, shifting the entire part by a few cents can sound much more natural than adjusting every individual note with correction software. But when the sharpness or flatness isn’t consistent throughout the part, there’s no getting around the latter method—apart from re-recording.
Go Forth and Multiply
Chorus is popular as a doubling effect, but the drawback is that the repeating modulation of the delay time (which causes the pitch to fluctuate) can be too conspicuous. It sounds like an effect, not really like multiple parts being played. With a pitch shifter, you can also create chorus-like effects, but without modulation. A pitch shifter can adjust the pitch of the entire part by a few cents (100 cents equals one semitone), and when you blend the result with the original, you’ll hear a chorus-like thickening of the sound, but no recognizable modulation. This effect (commonly known as micropitch) was made famous by the Eventide Harmonizers, and Figure 9.20 shows how it can be used to make a mono source sound wider and fuller. When used this way, pitch shifters can also be good stereo synthesizers. Panning a pitch-shifted copy to the opposite side of your mix sounds very different than only using delay. The change in pitch slightly disconnects the copy from the original. This reduces the effect of the copy ‘pulling your ears apart’ as a result of the phase shift, and it sounds more like a real double-tracked part.
Distortion
If you let go of the requirement that your pitch shifting should pass a listener unnoticed, much more extreme effects are possible than the ones we’ve discussed so far. The takeoff-and-landing sweeps you can make with a Digitech Whammy (a foot pedal-controlled pitch shifter) are a good example of this, and many DAWs have offline pitch shifts that can be combined with an envelope to create all kinds of sweeps, risers or tape stop effects. Sounds can get an entirely new meaning after an extreme shift (a couple of octaves down or up). Sound designers use this technique a lot: a seagull turns into a roaring dragon and a plastic bag becomes a cosmic storm. If you record at a high sample rate, you can even shift ultrasound down to the human hearing range: metal percussion overtones and other things you’ve never heard before suddenly become usable sound material.
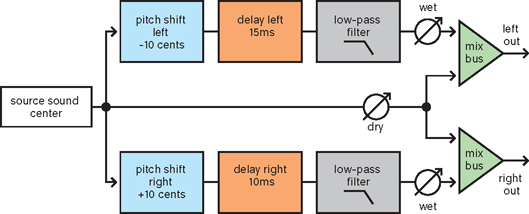
Figure 9.20The famous micropitch effect: it gives you the width of a chorus effect, but without a recognizable repetitive modulation pattern.
9.5 Triggering: Cause and Effect
Rhythm is the driving force of every mix. A good rhythm leads the listener through the music and gives contrast and energy to all the other elements. But whether this works or not mostly depends on timing. You might think this is pretty obvious, but there’s a lot more to it than just the ability to keep tempo. The interpretation of ‘between the beats,’ the timing relationship with other instruments, the duration of the rhythmic sounds and their tuning, size, mutual balance, strength and timbre all determine the feel of the rhythm. Many parameters can still be influenced while mixing, regardless of the original performance. With faders, compressors, equalizers and reverb effects you can already manipulate a lot. But you can take things even further if you use the rhythm as the driving force to trigger special effects or completely new sounds. This opens up a world of interesting constructions that can help to put your mix in motion.
9.5.1 How it Works
The first question to answer is whether the things you trigger should respond to the loudness of the rhythm or not. For example, if you want to use the rhythm of the kick to open a gate on a bass synth, you’d prefer the gate to open on every kick, regardless of how loud it was played. To pull this off, you’ll need a ‘clean’ trigger signal. If the kick was recorded with little spill from other instruments, you can first compress it before you let it open the gate on the bass synth. This way, at least every kick will be equally loud. And if there’s too much spill from the toms, you can also EQ the kick in such a way that its own fundamental is emphasized, while those of the toms are suppressed as much as possible. This will make sure that your trigger signal is as clear as can be (see Figure 9.21).
If this fails, you can also try to trigger a sample with the uncompressed kick (compression amplifies the spill as well, which makes it harder to differentiate between the kick and toms), and set the touch sensitivity of the sampler to zero. This way, every kick will trigger an equally loud sample, which opens the gate the same way every time. Such clear trigger signals can also be made by recording the drums with additional contact microphones or drum triggers, attached to the rims of the drums. And many DAWs have an audio-to-MIDI function that uses transients to generate MIDI notes with velocity values that can be manipulated. The major advantage of this approach is that you can easily correct double triggers or missed drum hits by hand.

Figure 9.21Creating a stable trigger signal to precisely place a bass synth under the recording of a kick. First you EQ the kick to attenuate the spill of the toms as much as possible, and then you use a limiter to make the kicks equally loud, so they will form a reliable source for triggering a sample on every kick. Since this sample contains no spill, the gate won’t get ‘confused,’ and it will react consistently on every kick hit.

Figure 9.22By using transient detection in your DAW or a trigger plugin with a MIDI output (top), or acoustic triggers and a trigger module (bottom), you can generate MIDI from your acoustic drum sounds. This makes the manipulation of the trigger points a lot easier.
Touch Sensitivity
It’s a different story if you want touch sensitivity, for example if you intend to replace or supplement the sound of a particular drum without changing the dynamics of the recording. Good source material is very important in this case, because you don’t want to go overboard in terms of filter manipulation (as this changes the dynamics), yet you should still be able to distinguish a soft snare drum from a loud hi-hat. This is often a problem, since the weak recordings that you want to supplement with samples usually have a lot of spill. This means that sometimes there’s no other option than to align the samples manually with the waveforms, and to scale them in terms of dynamics.
Making Samples
Of course, touch sensitivity is only interesting if the things you trigger actually do something with those level variations. For example, you can use one instrument to trigger the compression on another instrument through an external sidechain. In this case, the louder the first part plays, the more the second one is compressed. Or you can make the drums trigger the gate on the reverb, and the louder the drummer plays, the longer the gate remains open. If you want the triggered samples to have convincing dynamics, it’s important that you use samples that were recorded at different loudness levels (or create them yourself).
A softly played snare drum doesn’t sound the same as a snare that was played loudly and then turned down. For this reason, it’s a good idea and a small effort to ask the drummer at the end of a recording session to play all the drums individually at a few different loudness levels. Sometimes these samples can already be used in the same project to drive reverbs or trigger extra ambience. In any case, they will be a nice addition to your library, so you won’t have to use the same drum samples as the rest of the world for your next project.
9.5.2 Triggering in a Mix
Building Drum Sounds
The perfect drum should work well in the music on various levels: its center of gravity and resonance must match the style, the part and the tempo, there should be enough attack for it to cut through the mix, and if it also sounds unique, that’s a nice bonus. However, it’s not always possible to tick all these boxes with a single drum sound, whether it’s a recording or a sample. In these cases, you can trigger additional samples (or a drum synth) that you combine with the original. A sample with a clear, sharp attack can help a round, warm kick to cut through the mix, while retaining its original character. It’s very important to keep an eye on how the different drum sounds add up, because if you’re not careful, they might end up attenuating each other instead of amplifying, due to phase interaction.
It helps to strongly filter the samples that you use as supplements, so they will only add sound in the ranges where you need it. Polarity switches and all-pass filters can help to get the lows in phase, and pitch shifting the samples can make them match well in terms of tone. A trick that won’t cause any phase problems is triggering a gate on a noise generator. The resulting envelope of the pulse can be perfectly controlled with the timing of the gate. And with the help of some EQ and reverb, you can easily turn an ordinary snare drum into a cannon.
Adding Space
Sometimes your drums lack space and size, but adding reverb turns your mix into an undefined mush. In these cases, triggering can help to use the space more efficiently. Using an extreme gate on an acoustic snare drum usually doesn’t sound very great, but if you only use the gate on the send to the reverb, you’ll make sure that only the snare—and not the spill— ends up in the reverb. This way you can make the snare drum appear to be louder in the recording room than it actually was, without manipulating the dry signal. On drums, a distant room microphone usually sounds better than artificial reverb, but the sound it picks up tends to be dominated by the cymbals, so it instantly fills up your mix. You can avoid this by using the close mic of the snare to trigger a gate on this ambience. And by stretching the gate’s attack, you can even remove the first part of the room’s reflections, which subjectively makes the space seem a bit larger and more diffuse. This effect sounds very different from delaying the room microphones to achieve pre-delay, because in the latter case, you’ll still hear the early reflections, only delayed. Using a gate doesn’t mean that you need to completely close the gate between the snare hits. An attenuation of 6 dB already helps a lot to keep the sound focused, while the snare does sound a lot more spacious. If the room doesn’t sound well, if the drummer’s playing is out of balance, or if you don’t have separate tracks of everything (drum loops can be tricky when it comes to this), you’ll reach the limits of the recorded material. You can then try to make each drum hit trigger a room-miked sample of a similar drum in a (larger) space. This can be a pretty laborious process, if you want to do it convincingly (it sometimes helps to compress the triggered ambience together with the drums), but the result can sound very impressive, yet still defined (see Figure 9.23).
Movement in the Mix
When good musicians play together, they constantly anticipate each other. This almost automatically results in a mix that’s full of cohesion and interaction. The more ‘production’ you add in the form of overdubs, extreme effects or programmed parts, the less of this kind of natural interaction you’ll get for free. Fortunately, there are techniques to generate a bit of interaction between different parts. The most well-known of these is sidechain compression, which is when one instrument pushes another away. But the opposite can be just as useful, for instance when a rhythm triggers an expander on the bass, which then ends up giving the rhythm an extra boost. This way, you can make a sustained bass sound as if it was played with a similar rhythm to the drums. In an extreme form, with a gate instead of an expander, you can use a trigger signal to turn a particular part on and off. The famous ‘trance gate effect,’ which is when a fast rhythm part makes a pad sound stutter, can be created this way.
Interaction doesn’t necessarily have to take place between existing parts. As a producer/mixer, it sometimes helps to think more like a musician, and start interacting with an instrument or effect yourself. By triggering EQs, compressors and expanders manually, you can automatically make parts less flat, as if the performances were much more high-octane than they actually were. A boost in the high mids on all the guitars can be too much if you apply it to the entire chorus, as this would leave no room for the vocals. But if you only trigger it on the first attack and maybe again halfway, you can create the impression that the guitars play a lot louder in the chorus than they actually do. A simple patch for this is shown in Figure 9.24.

Figure 9.23Three ways to add space to a snare drum recording without emphasizing the cymbals too much. A: Gating the input of the reverb, so only the snare goes into the reverb and the kick and hi-hat don’t. B: Putting a gate on an ambience microphone, and only opening it when the snare plays. C: Using the original snare to trigger an ambience sample of a separately played snare.

Figure 9.24Instead of using another instrument to drive the sidechain of a dynamics processor, you can also play a sampler to easily trigger gates, expanders or dynamic equalizers yourself during mixing. With the construction above, you can give a certain part a bit more bite, but only at select moments. In this case, the drum sample only serves as the command signal for the dynamic equalizer.
9.6 Spectral Editing: Unreal Reality
Acoustic sound consists of an interplay of resonances, each with its own pitch, intensity and progression in time. If you can manipulate the individual resonances of a sound, you can dramatically influence its character. For instance, by giving a trumpet a different overtone structure, or by suppressing the soundbox resonances of an acoustic guitar, you can create instruments that sound strangely familiar, but not quite. Spectral processing makes this kind of magic a reality, but you’ll still have to find useful purposes for it.
9.6.1 How it Works
You can visualize sound in two ways: in the time domain or in the frequency domain. I’m sure you’re familiar with the time domain from working with your DAW: an audio track displays the amplitude of a sound wave, which moves from left to right in time. The frequency domain is a bit more abstract, as you don’t see the same sound wave at a single moment in time, but in its entirety. And not as a complex wave, but as a long list containing the frequencies and amplitudes of all the sine and cosine components that are present in the sound. According to Fourier’s theorem, any sound can be described as a combination of sine and cosine waves. Converting a sound to the frequency domain is done with a (fast) Fourier transform. And after you’ve done your magic with it, you can use the inverse Fourier transform to turn the list of frequency components into sound again. This transform/inverse transform is lossless if you don’t make any changes, so the sound will come out the same as it went in.
All spectral effects processors use a Fourier transform to gain access to the individual frequency components of a signal. But what they do with this information differs widely. Sometimes the manipulations have more in common with the formulas in a spreadsheet program than with traditional effects. For instance, you can shift or exchange frequency components. You can erase, copy, stretch or delay them, or manipulate their intensity (see Figure 9.25). Time and pitch are very elastic concepts in the frequency domain. In order to visualize the data—and the manipulations you make with them—a graphical representation (a spectrogram) is often used. Sometimes you can directly make edits inside this graph, such as selecting a specific frequency component or drawing a filter response.
It’s easy as pie to create completely unrecognizable sounds with only a few simple edits, but their usefulness is limited. It gets more interesting when the analysis and processing of the data are dependent less on random craziness and more on recognizing and manipulating specific aspects of the sound. For instance, the detection (and therefore isolation) of individual notes (including all their overtones) in a harmony. Or the detection of a spectral envelope, which is the filter response of the soundbox that shapes the source sound. Examples of this are the resonances of your voice box, or those of a snare drum’s shell. If you can distill this kind of filtering from the source material, you can also apply it to other sounds. Or you first remove the resonances of the original soundbox, and then manipulate the filter coefficients (if you realize during mixing that you should have used a deeper snare drum shell) and apply these to the source material (see Figure 9.26).
Figure 9.25Spectral processing can be used to easily manipulate overtones. In this example, a square wave is built up of partials. Eventually, each of these partials is moved up by the same number of hertz (frequency shifting), which is not the same as shifting the entire square wave up (pitch shifting). The ratio between the partials changes, resulting in a completely new waveform, as you can see when you compare the bottom two waveforms.

Figure 9.26A spectral envelope can be analyzed and then used as a filter, for example to make a flute sound as if it was played through the soundbox of a violin.
9.6.2 Spectral Processing in a Mix
Laser EQ
A spectral processor can be seen as a very finely divided crossover filter that can give each frequency band its own manipulation. I will describe some of the exotic possibilities this has to offer, but first the most basic manipulation: amplifying or attenuating a particular frequency band. Of course, you can also do this with a normal equalizer, but removing one specific tone plus all its overtones can be done faster and more accurately with a spectral EQ. This is in part thanks to the visual feedback, but mainly to the precise selection possibilities and steepness of the filter slopes. On top of this, any filter curve you can think of is easy to make. You’re not tied to standard shapes like shelf or bell, but you can freely draw all kinds of asymmetrical shapes. Because of this, you can see a spectral processor as a graphic equalizer with 512 to 4,096 bands. This allows for very distinct-sounding EQ treatments.
Repair
Most spectrum editors were originally intended as a repair tool. They can be used to fix all kinds of disturbances in your recordings. As long as these are loud enough to attract attention, they can be isolated by drawing a selection frame around them. The exact frequencies of the disturbance can then be attenuated or replaced by an adjacent sound fragment. Some editors have smart selection tools that make this process even faster and more focused. For example, they let you select a tone and all its overtones in a harmonic series with one click, or all frequency components that last longer than a specified time. These smart tools make it tempting to use these editors as music manipulators as well, instead of only removing coughs with them. Stretching one note of a chord in time, amplifying or shifting specific overtones, seamlessly replacing a piano’s hammer with a tone so it becomes a kind of organ; anything you can think of can be done with spectrum processing.
The graphic way of working has inspired some manufacturers to add an import option for graphic files to their spectral (synthesis) software. This usually won’t lead to sound that’s immediately usable as music, but images with regular patterns can sometimes produce surprising rhythms or overtone structures.
Dynamic Wizardry
It gets even more exciting when you start amplifying or attenuating the frequency components signal-dependently. For example, a spectral gate can remove all the frequency components from the signal below a user-defined threshold. This is the system that’s used by a lot of noise reduction plugins, which mainly differ in how intelligently they adjust the threshold of the various frequency bands to the (often variable) source material. Besides as a tool for attenuating noise, spectral gates are also very interesting as an effect. For example, you can use them to trim a sound down, so only its tonal essence remains. This can make the sound more condensed, and therefore more focused.
The reverse manipulation—attenuating all frequency components that exceed the threshold—is also possible. The spectral compressor that you create this way can be seen as a multiband compressor with an infinite number of bands. The great thing about this is that you can deduce the threshold level of the individual bands from the source material. If you like the tonal balance of a certain section of the material (for example, a vocal line without hard S sounds), you can use this section as a benchmark. As soon as there’s a passage with a lot of sibilance, the compressor will only work in those ranges. Pro Audio DSP’s Dynamic Spectrum Mapper is a good example of such a compressor.
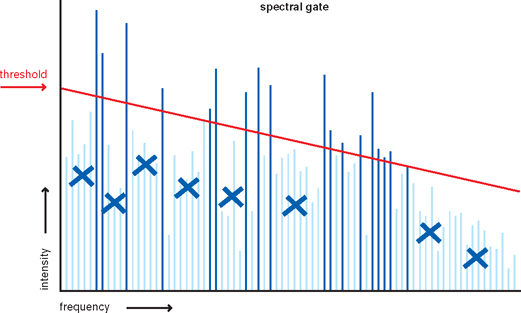
Figure 9.27Noise reduction software removes frequency components that fall below the threshold, but a spectral gate like this can also be used as a dynamic filter effect.

Figure 9.28A spectral compressor is a multiband compressor that can guard the frequency balance of the source sound very accurately.
A Different Kind of Echo
So far, all frequency components have neatly stayed in their place on the timeline, while only their amplitudes have been adjusted. But it’s also possible to move individual components in time, or send them into a delay with feedback. This way, you can produce sounds with the timbre of the source sound (so they will still be vaguely recognizable), but with a completely different progression in time. Strange envelopes, resonances, time stretch-like effects and even reverb can be created this way. Spectral delay is a particularly great effect for sound design, because it’s a perfect way to take a sound that evokes an overly conscious association, and turn it into something subconscious. You’ll still hear the original character, but you can’t actively identify the source sound anymore.
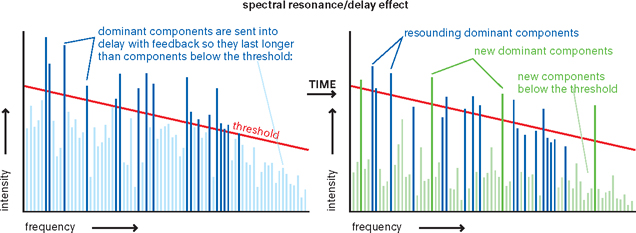
Figure 9.29By sending frequency components that exceed a threshold level into a delay with feedback, you create a resonance effect that only makes the dominant frequencies resound longer.
Up- and Remixing
Besides as an effect, spectral processing can also be used to isolate sound elements in a stereo mix and redistribute them across more than two speakers (upmixing), or to isolate only the vocals so you can use them in a remix. This is not so easy, and you can see it as an attempt to undo a finished mix. Still, with modern software you can achieve pretty useful results. Especially by analyzing the direction (based on phase and intensity differences) of all the frequency components in a stereo mix, you can find out which components belong together. In simple terms: if two frequencies always sound at the same time and come from the same direction, they are probably produced by the same instrument. By detecting melody lines and recognizing which transients belong to which notes, the detection can be further refined.
Smooth Transition
The frequency spectrum of a sound can be seen as the sheet music for all the frequency components that make up the sound. If you had a bank frequency with oscillators, one for each frequency, this spectrum would precisely indicate which oscillator should be activated when and at what intensity in order to reconstruct the sound. That’s the exact same principle a vocoder uses to apply the character of one sound (often a voice) to another. The vocoder measures the distribution of the source sound in a number of frequency bands, and then applies this distribution to the target sound. A spectral vocoder works the same, but with a much higher degree of precision than the classic vocoder, simply because the number of frequency bands for the analysis and reconstruction is much larger.
This higher resolution is not the only advantage of spectral vocoding. Much more complex manipulations are possible than with a classic vocoder, such as seamlessly blending one sound into another. This principle is called morphing, and in the simplest form it involves two frequency spectra that are merged into each other by filling in the intermediate spectra (through interpolation). This way, you can create very interesting effects. A rhythm guitar could start a song, but then slowly turn into a drum kit that plays the same rhythm. The provocative lyric you always wanted to incorporate into a track can almost un noticeably be ‘uttered’ by the rest of the instruments. Seamlessly blending multiple vocal characters together to create a schizophrenic impression (or to symbolize the ultimate togetherness, depending on how you look at it) is a possibility as well. And even making a transition from one complete track into another can yield interesting results. At least, it will be something different than sweeping your filter down while you mix in the next beat. Not all morph effects use the same technology, and a simple interpolation of two spectra won’t always lead to a convincing intermediate form. That’s why smart algorithms use psycho-acoustic principles to determine which sound aspect should be dominant in the transition from one sound to another.