
Chapter 13
Templates
This chapter is about making presets for your mix: basic settings that you can almost always rely on. This might sound like a recipe for making the same mix over and over again, but I would argue that the opposite is true. A familiar starting point gives you the confidence and ease required to make decisions quickly, leaving you more time to get to the core of the music. Hardware can speed up this process a bit, because it settles into your muscle memory. You’ve probably seen how experienced engineers can really fly across the mixing desk. But it can also be a burden if you have to switch between projects a lot and restore the settings every time. The last part of this chapter discusses how you can address this problem.
13.1 Time Is Money
The more often you hear a piece of music, the more you get used to it, and the harder it becomes to still judge it objectively. Once you start mixing, you want to utilize every second you spend listening to the music as best you can, especially during the first stages of the process, when your ears are still fresh. I’m pretty strict when it comes to this: after I’ve heard the rough balance once, while I’m preparing the mix (sorting and naming the tracks, setting up the routing), I don’t listen to anything anymore. I want the first few times that I play a song to be as effective as possible. If these initial plays give me an idea for a mixing approach, I should be able to immediately test this idea. This way, I get to know a lot about the material. During this testing phase, finding out what doesn’t work is almost as educational as finding out what does, which is why it’s so important to try things out. If you don’t do this, you won’t learn anything. Ideas that seem amazing in your head can be very disappointing in practice.
The first phase of a mix resembles the rough sketch a painter makes on the canvas. The details can be filled in later: first, the main decisions about the shape of the composition should be tested. Translating this process to your mix means that you should be able to quickly control the most important mix parameters. Besides volume balance, these are timbre, space and dynamics. A mix template can help you to quickly make these parameters manageable. Such a template consists of a number of ‘proven formulas’ for routing, EQ, compression and effects that you can use as a starting point.
In a way, an analog mixing console can also be seen as a template: all the choices in terms of which basic EQ and compressor you want to use have already been made (sometimes the settings are still there from the previous mix), plus usually you already have effect sends connected to external reverbs, and sometimes processors plugged in as inserts on a subgroup. In a DAW, this is very different, as you completely start from scratch if you don’t develop templates yourself. These templates are anything but a way to keep repeating the same trick. On the contrary: they can tell you right away that the method that usually works doesn’t work this time around, and you’ll have to think in another direction.
Organization
It’s not recommended to put default EQ, compression and reverb on all the channels from the get-go, through a system of presets. A template should be about the big picture, not about the individual details that are different for every mix. Take vocals for example: after a hundred or so mixes, you come to the conclusion that—though you might need different EQ corrections for each voice—you pretty much always add some high mids and use the same plugin to add some compression. In this case, you can already prepare this high mid boost and compression in a template. The nice thing about this kind of template is that you can immediately dive into the things that make the voice unique if the general approach works. And if it doesn’t work, the resulting sound will usually give you an idea about what will.
Why do you often end up with the same kind of manipulations in mixing? Aren’t all mixes different? True, but conceptually, it always comes down to the same thing: enhancing musical parameters such as rhythm, tone and dynamics, and solving problems such as lack of definition or messy dynamics. And while it differs per mix which instruments provide these parameters and to what extent your interventions are needed, the formulas you develop for these interventions are pretty widely applicable. You can see these formulas as your unique toolbox, which can be used in various degrees in all your mixes. Therefore, the artistic part of mixing is less about your toolbox (although you might come up with unique solutions, of course) than about knowing when and how to use it. This is why many famous mixing engineers are very open about their setup and sometimes even publish their DAW templates, as they are the only ones who can really work effectively with these systems.
13.2 Building Templates
The most important function of a mix template is to organize the mix components according to a fixed pattern. If you want to work quickly, the main thing is to avoid spending a lot of time figuring out where a particular sound is coming from. This is not so easy these days, with sessions that can easily have a hundred source channels. Therefore, the first step I always take is to divide these channels into a number of groups (sixteen at most, a number most fader controllers can handle well), which I put together based on instrument groups (so all drum microphones end up in a drums group, all overdubbed percussion parts in a percussion group, a string quartet made up of close-miked instruments and a main microphone pair also ends up in one group, and so on). With these sixteen faders, I can quickly outline all the mix balances I want to try out, which makes experimentation easy.
During this outlining stage, I usually hear a couple of things I want to change in some instruments. To quickly fix these, I use a preset chain that can apply a rough approximation of the adjustment I have in mind. Examples are presets for making things bigger, wider, warmer or more aggressive. These settings can still be refined later, but initially I’m only drawing a rough sketch (see Figure 13.1). Sometimes I also merge several instrument groups together into a single ‘supergroup,’ if they share a particular musical function that I want to emphasize. An example of this is a rhythm created by a combination of drums, handclaps and keyboards. If I manipulate these instruments as one group with EQ, compression or whatever other effects I want to use, the rhythm will automatically start to feel like even more of a whole.
One Turn of the Knob
When setting up an initial mix, you usually only need your faders, pan pots and the routing discussed above. But sometimes you can immediately hear that certain sounds aren’t working yet in their current form. In these cases, it’s important to quickly force them into a mold that does work, because otherwise one flawed sound can hold back the progress of your entire mix. This process can be facilitated by putting the same EQ and compressor/gate on each channel (which means you’re actually mimicking an analog mixing console).
But there’s an even easier way to do this: the aux-sends can be used to connect all kinds of parallel effects. The main advantage of this is that you can quickly try out a couple of basic sonic characters to give the sounds a certain perspective. These characters can be used for multiple sources, and you don’t have to change their settings every time you want to use them. One turn of the knob is enough to immediately hear if it works on a particular source. If you categorize these aux-sends according to a ‘best of’ selection of your own effect settings, you can set up an initial rough mix in no time. And as soon as you want to try something else, you can always replace effects or change their settings.

Figure 13.1Three levels for grouping and manipulating audio.
Besides for spatial effects, the aux-send approach is also highly suitable for compression (see Figure 13.2). Parallel compression that’s connected this way can keep sounds from disappearing in the mix: it guards the lower limit, whereas insert compression keeps the peaks in check (see section 5.3 for more explanation on this topic). Disappearing sounds are usually the biggest problem during the sketch phase of the mix, so it’s very useful to have a couple of parallel compressors ready when you start mixing. And if you ever need more compression than 50 percent, you can connect the aux pre-fader and then turn down the source sound in the mix, independently of the compressed sound. So all in all, it’s a pretty flexible approach, plus it makes very efficient use of the available equipment (or processing power). However, keep in mind that for parallel compression, good delay compensation (and/or hardware that doesn’t cause big phase shifts) is essential, otherwise comb filtering will occur.
Gain Structure
A template can only work if its signal levels are calibrated. Calibration is important, because you don’t want sounds to make huge level jumps when you send them to another bus (which can easily be adjusted by running an equally loud test tone through all the buses). But on top of this, mixing chains made up of compressors and/or distortion-adding devices also have a sweet spot. Ideally, your template is designed in such a way that the signal levels in the chains end up exactly in those sweet spots (with average mix balances, at least). This way, your balance choices will have the biggest effect: besides changing the level they will also change the sound and perspective. Test tones are less suitable for adjusting compressor thresholds or amounts of overdrive, as they’re too static for this. It’s better to determine these settings empirically during mixing.

Figure 13.2This is what your template’s channel strip could look like. The EQ and dynamics correct the source sound if necessary, the auxes add a certain color to it, and the routing determines where it ends up in the mix.
Stocking the Pantry
To develop your templates, it’s important to keep your eyes open for techniques that affect the sound in a way that could come in handy again in the future. For example, a chorus effect that you created might simply be a chorus effect to you—and then you slowly forget about it again. But you can also listen to what it really does: maybe it stretches a sound beyond the width of the speakers. The latter is a solution you might need much more often. Over the years, I’ve come to look at equipment this way: not at what it is, but rather at what it does. For example, I found myself dubbing certain combinations of EQ and compression ‘warmer-upper,’ ‘cutting torch,’ ‘magnifier,’ ‘restrainer’ and ‘focus puller.’
By giving technology a personality, you can make it easier to apply. Over time, you can develop characters for all frequently used manipulations: rounding off transients, widening the stereo image, applying focus and density in the midrange, emphasizing the rhythm or the space, enhancing tonality, adding air, and so on. These prefab solutions aren’t a standard part of the template, like routing and bus processing. Instead, you keep them stored in the pantry, ready to be used whenever you need them. Your template can be as complex as you want it to be. You can turn it into a real masterpiece, made up of built-in sidechain constructions, thirty different send effects, bussing, tracks to record stems with, and so on. But keep in mind that your template should work as a catalyst, not as a complication. It should be as universally applicable as possible for the work you want to do with it.
Tilt EQ: A One-Knob Equalizer
If the problems in your mix aren’t too extreme, most corrections can easily be made with very broad EQ curves. Often a bit more or less bass or treble is all it takes to get an instrument where it should be. A device that can be very useful for this purpose is a tilt filter, which consists of a high-shelf and a low-shelf filter around the same center frequency. These two shelf filters work inversely in terms of amplification and attenuation, so more high end automatically means less low end, and vice versa. Because a tilt filter can be controlled with a single knob, it’s the perfect candidate for inclusion in your template. This will make EQ just as quick to control as your faders, pan pots and parallel compression, which is ideal during the sketch phase of your mix.

Figure 13.3With a tilt equalizer, you can tilt the entire frequency spectrum with a single knob: downward (blue) or upward (red).
13.3 Integrating Equipment in the 21st Century
Hardware can stimulate your creativity and result in unique sounds. But the speed and flexibility of a computer isn’t so bad either, especially the possibility of instantly trying out any idea that comes into your head. With just a couple of mouse clicks, you can duplicate a channel, create a complex routing or choose any effect you can think of. Everything is saved in your project, and with a laptop and a set of headphones you can work on it wherever you are in the world. The possibilities this offers are nearly endless, so the thought of restricting this workflow by using all kinds of hardware can be pretty frightening.
Recall
The main problem with using external equipment is retrieving previous settings if you still want to change things a week later. Especially if you’re mixing through an analog mixing console, it’s a time-consuming task to put all those little knobs back in the exact same position. Even with expensive mixing desks with total recall systems (which partially automate this process) it takes time and effort, and it still won’t sound exactly the same as the original mix. In the old days, studio assistants would write down the settings of each device on sheets after every production, but fortunately, thanks to digital photography, those days are over. With a good camera, you can capture the settings of multiple devices in a single photo. If you then copy these pictures to your tablet, you can hold them next to the device when you’re restoring the settings.
If you’ve ever used this method, you’ll immediately understand importance of a clear legend and easily readable knobs. Stepped attenuators instead of potentiometers are even better—but expensive. On top of this, the market for digitally controlled analog devices is still growing.
Freeze
Photography might make it quicker to save your settings, but restoring them still takes a lot of time. It’s for this reason that I always divide my mixes into separate instrument and effect groups, which I record onto empty tracks (stems) at the end of a mixing day. This way, I only need to restore the devices of the stems I still want to adjust later, and of the mix bus where the stems are routed through. The effects on individual tracks can be saved with the freeze function (which many DAWs have on board). This is nothing more than a recording of the output of a particular track, including all internal and external effects, which is used in the project as a replacement for the original audio and effects. This is a very useful feature, because after you’ve frozen your external effects, you can use the newly available processing capacity for other instruments.
Another advantage of recording stems is that it makes your project portable, so you can also work on it somewhere else. In my own setup, I usually only need to recall the mix bus chain, while all the other mix adjustments can simply be made on the recorded stems. Most of the time, a little fine-tuning is all you need after the first mix version has been recorded. For example, with an EQ plugin, you can easily cut the lows of your analog-processed drum bus a bit more, without having to restore the settings of the entire drum chain to redo the whole thing. This working method also allows for automation after the use of analog EQ and compression. This way, you prevent the compressor from working less hard when you turn the vocals down.
Setups with analog summing mixers make this scenario much more difficult, unless you accept that you can’t record the manipulated stems (not a lot of summing mixers have direct outputs), which means you have to completely restore your equipment for every single mix revision. If you then also want to use post-compression automation, you’ll even need a digitally automated summing mixer.
For me personally, the convenience of a setup that allows me to record all the manipulations made with external equipment onto new tracks outweighs the sonic advantages of analog summing. But since I still want to reap some of the benefits of using analog circuitry on the whole mix, I do send these recorded channels through a multibus compression setup (as discussed in Chapter 12) to an analog mixer. However, the settings on this mixer are always the same, so the system still has ‘total recall.’ Of course, your preference can be different from mine, for instance if you like the sound and ergonomics of a specific analog mixer.
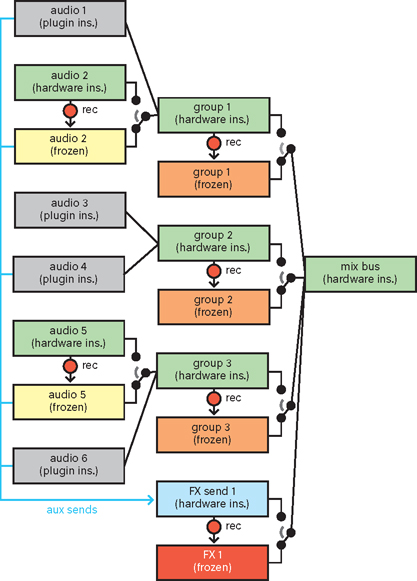
Figure 13.4A mix with hardware inserts on three levels. If you record the individual tracks, groups and send effects separately, you often only need to restore the settings of the hardware on the mix bus if you still want to adjust things later. And otherwise you only restore the equipment of the groups and tracks you want to adjust. Of course, this recording will have to take place post-fader, and therefore including automation. And if you want to retrieve a send effect, you’ll have to run the recorded tracks and groups through it again.
To Patch or Not to Patch . . .
Using hardware seems like fun, until you end up sorting through a tangle of patch cables for minutes every time you want to use a device. Fortunately you can make your life a lot easier, simply by having enough converter channels available. You can then connect your equipment directly to the converters, instead of through a patchbay. This way, it’s just as quick and easy to choose a hardware insert in your DAW as a plugin. Only if you want to create multiple chains of devices is this approach not so efficient, since every device requires its own DA/AD conversion. This is why I create fixed hardware chains (for instance an equalizer and compressor that work together well) that I connect to the converters as a whole.
Levels
All analog equipment has a range in which it functions best. If the signal levels are too low at the input, the noise floor will get too close to your signal, while high levels can lead to hard distortion. Therefore, it’s important to provide each analog device with the right signal level. This sounds like a lot of hassle, but it can be easily controlled from within your DAW, which means you can also store these levels as a preset. High-quality 24-bit DA/AD conversion allows you to make signals weaker at the output or input, without running into noise problems. Using digital trim plugins—which you place before and after the hardware inserts in your DAW—you can easily set the ideal analog level for every device in the chain. This is very useful, because a tape echo will start distorting at a lower signal level than a mastering equalizer. If your converters can send out a high analog signal level, you can access the entire usable operating range of your analog equipment without ever making your converters clip (Figure 13.5A).

Figure 13.5Good gain structure provides the best possible signal-to-noise ratio, and total control over the amount of coloration added by your analog devices. This is achieved by raising or lowering the levels you send to these devices.
If the maximum usable level of your analog equipment is higher than that of your converters, or if you don’t set your trim plugins properly, you’re wasting dynamic range. This also means that for some devices the input level will be too low to make them distort (slightly), so you won’t be able to use the edge these devices can add to the sound (Figure 13.5B).
Devices that you often combine in different sequences can also be connected through an analog switcher (optionally with a digital memory for the created routing), a setup that allows you to create and recall your routings with a push of a button. These kinds of handy tricks might seem like an unnecessary luxury, but saving time is literally the reason why some studios use plugins when the original hardware is in a rack two steps away.

Figure 13.6With this setup, you don’t need a patchbay: all equipment is permanently connected to converter channels. Unbalanced devices can be connected with isolation transformers to keep unbalanced cables as short as possible, and to prevent hum. The routing can be controlled from your DAW mixer and by using analog tools such as the insert switcher and mixer.
Delay Compensation
With any setup that combines hardware and software, the success depends on delay compensation. AD/DA conversion, DAW buffers and plugins all cause delay, which must be compensated for with military precision to prevent phase problems. Although most DAWs automatically correct any delay that’s known to the application, you won’t know for sure that your system is fully synchronized unless you test it. Some DAWs offer the option of measuring and automatically compensating the delay caused by hardware inserts. They do this by sending a pulse through the chain, but unfortunately this doesn’t always produce a correct result.
Especially with effects that add a lot of distortion (and of course reverbs), the delay is hard to determine. While measuring, I often put these effects in bypass mode. After the measurement, the easiest way to verify if your entire system is synchronized is by placing a test file with a number of pulses in each audio track. After playing these tracks through your mixer and all of the internal and external effects you use, the pulses of all tracks combined should be perfectly aligned in the mix that comes out on the other side (except for some phase shifts caused by EQ, and decay caused by reverb and delay). The only problems that can still arise have to do with polarity: some hardware switches the plus and minus of the signal, resulting in a pulse that seems synchronous, but when you use the effect in parallel, it still causes attenuation in the mix.

Figure 13.7Delay compensation in a digital mixer with plugin inserts and hardware inserts. The amount of delay that each track gets is measured in such a way that, at the end of the chain, all tracks are aligned with the track that’s delayed the most. Keep in mind that automatic delay compensation can be wrong: the delay caused by digital hardware and separate AD/DA converters isn’t known to the DAW. Therefore, this delay will have to be measured and manually compensated for.