
Chapter 10: Using .NET Core for Azure Serverless
Azure functions are serverless compute modules that take advantage of various triggers, including HTTP requests. Using Azure functions, developers can create business logic containers, completely isolated from the problems brought by monolithic web application paradigms and infrastructure. They can be used as simple HTTP request processing units and so-called microservices, as well as for orchestrating complex workflows. Azure functions come in two flavors (compiled or script-based) and can be written in different languages, including C# with .NET Core modules.
In this chapter, you will get a chance to use different runtimes available for Azure functions and get a glimpse of the available configuration, trigger, and hosting options for Azure serverless. We will then incorporate Azure functions into our infrastructure so that we can process data on different triggers. We will then integrate Azure functions with a logic app, which will be used as a processing unit in our setup.
The following topics will be covered in this chapter:
- Understanding Azure Serverless
- Implementing Azure Functions
- Creating logic applications
- Integrating Azure services with functions
By the end of this chapter, you will know more about the foundational concepts of Azure functions and logic apps. You will be able to integrate Azure serverless components into your cloud infrastructure and implement functions according to your needs. In other words, you will be able to confidently set up Azure functions and logic apps for your ad hoc requirements in your next cloud-based project.
Understanding Azure Serverless
Developing a distributed system on a cloud platform has its perks as well as its disadvantages, such as growing complexity as the data you are managing spreads across multiple processes. It is extremely common to find yourself in a deadlock situation where you have to compromise on architectural requirements in favor of decreasing the cost of introducing a new feature. Azure serverless components can provide flexible solutions to ad hoc requirements with their simplistic event-driven computing experience.
In Chapter 8, Creating a Datastore with Cosmos DB, we created a document structure as a repository, and later, in Chapter 9, Creating Microservices Azure App Services, we implemented ASP.NET Core services as containerized microservices so that we could cover our main application use cases. These use cases can be considered the primary data flow through the application, and our main concern for performance is concentrated on these data paths. Nevertheless, the secondary use cases, such as keeping track of the statuses of auctions for a user that they have previously gotten involved in, or creating a feed to inform users about new vehicles up for auction, are the features that could increase the return rate of the users and maintain the user base. Therefore, we will need a steadfast, event-driven strategy that will not interfere with the primary functionality and should be able to scale without having to interfere with the infrastructure.
In short, Azure functions and other Azure serverless components are tailor-made Azure offerings for these types of event-driven scenarios where one or more Azure infrastructure services would need to be orchestrated.
Developing Azure Functions
Azure functions, as one of the earliest members of the Azure serverless ecosystem, provide a wide variety of options for development languages and SDKs, welcoming developers from different platforms. In this section, we will learn about the development options and function integration options. We will finally implement a sample Azure function to create a materialized view using data from different document stores in our Cosmos DB database.
The available options for development environments to develop Azure functions include, but are not limited to, the following:
- Using the Azure portal
- Using the Azure CLI with Azure functions Core Tools
- Using Visual Studio or Visual Studio Code
- Using other IDEs such as Eclipse or IntelliJ IDEA
As for the language and runtime, we can create our functions with the following:
- Java/Maven
- Python
- C# (.NET Core and Scripts)
- JavaScript/Node
- F# (.NET Core)
As you can see, multiple platform and development environment combinations can be used to create Azure functions. This means that any operating system, including Windows, macOS, and Linux, can be used as a development station. In the following sections, we will try to demonstrate the versatile nature of Azure functions using some of these platforms and tools for developing Azure functions.
Using Azure Function Runtimes
We will start our journey across Azure function options with available runtimes. For this demonstration, we will first create an Azure function with Python using nothing but a simple text processor and will continue to do the same on .NET and C#.
Without further ado, let's start with the cross-platform development toolset using macOS by creating our example functions using Azure Functions Core Tools:
- In order to install the platform runtime, we will first register the azure/functions repository:
brew tap azure/functions
- Once the azure/functions repository has been registered, continue with the installation of Azure Functions Core Tools:
brew install azure-functions-core-tools
The installation should not take long, and you should see an output similar to this:

Figure 10.1 – Installing Azure Functions Core Tools
Once the installation is complete, we can continue with the development of our sample functions. To demonstrate functions, we will create a simple calculator function (that is, x + y = z).
- Next, initialize a virtual work environment to start with Python development:
$ python3 -V
Python 3.6.4
$ python3 -m venv .env
$ ls
.env
$ source .env/bin/activate
(.env) $
- Once the environment is created and activated, initialize the function project using the following command. When prompted, choose python as the runtime:
(.env) $ func init myazurefunctions
Select a worker runtime:
1. dotnet
2. node
3. python
Choose option: 3
python
- Once the project is created, create a new function called add. When prompted, choose HTTP trigger as the template:
(.env) $ cd myazurefunctions/
(.env) $ func new
Select a template:
1. Azure Blob Storage trigger
...
9. Timer trigger
Choose option: 5
HTTP trigger
Function name: [HttpTrigger] add
- Now that the function has been created, you can use any editor to edit the __init__.py file in order to implement the function, as follows:

Figure 10.2 – Azure Function in Python
- In order to test our function, within the project directory, execute the following command, which will start the local function server:
func host start
- Once the function server is running, execute a get query on the given port that is displayed on the terminal window. This will trigger the HTTP request and return the result:
curl 'http://localhost:7071/api/add?x=5&y=8'
Addition result is 13
We have now successfully created an Azure function using Python and an HTTP trigger template.
If, in the creation step, we had chosen the first option, that is, dotnet, the project would have been created with a compiled C# function template:
$ func init myazurefunctions
Select a worker runtime:
1. dotnet
2. node
3. python
Choose option: 1
dotnet
$ cd myazurefunctions
$ func new
Select a template:
1. QueueTrigger
2. HttpTrigger
...
12. IotHubTrigger
Choose option: 2
Function name: add
$ nano add.cs
$ func host start
Our source code for the add function would look similar to the following:

Figure 10.3 – Azure Function in C#
Of course, while this works for demonstration purposes, development with Visual Studio (for both macOS and Windows) as well as Visual Studio Code would provide the comfort of an actual .NET development environment.
In this part, we have successfully created an HTTP-triggered function both on Python and .NET. While doing this, as a development environment, we used a simple text editor and the Azure CLI to demonstrate the simplicity of Azure function development. In the next section, we will take a deeper look at other triggers that can be used for functions and learn how bindings work.
Function triggers and bindings
The function projects and the functions that we created in the previous section, in spite of the fact that they are implemented and executed on completely separate runtimes, carry function manifests that adhere to the same schema (that is, function.json). While the manifest for Python implementation can be found in the folder carrying the same name as the function, the dotnet version is only generated at compile time from the attributes used within the implementation (this can be found in the bin/output/<function> folder). Comparing the two manifests, we can immediately identify the respective sections where the input, output, and triggering mechanisms are defined for these functions:
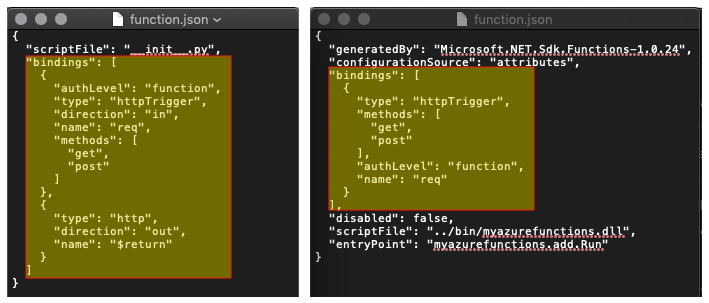
Figure 10.4 – Azure Function bindings
As we mentioned earlier, Azure functions are event-driven Azure resources. The trigger mechanisms define not only when the function is going to be executed but also the input and output data types and/or connected services. For instance, a blob storage entry can be used as a trigger, as well as input and output.
Similarly, HttpTrigger can define the execution method, as well as the input and output mechanisms (like in the previous examples). This way, additional service integrations can be included within the function as declarative attributes rather than functional implementations.
Some of these binding types are as follows:

Figure 10.5 – Available Azure Binding Options
In addition to the listed items, there are other extensions available via Azure Functions Core Tools or NuGet packages and, by default, only timer and HTTP extensions are registered in a function runtime.
As you can see, Azure Function bindings provide a very trivial manifest approach to integrate functions with various events from different resources. Nevertheless, the manifest will probably not be enough to configure our event-driven functions; we will need a proper configuration facility.
Configuring functions
Azure Functions use the same configuration infrastructure as ASP.NET Core applications, hence utilizing the Microsoft.Extensions.Configuration module.
While the application is running on the local runtime during development, in order to read the configuration values from the local.settings.json file, a configuration builder needs to be created and the AddJsonFile extension method needs to be used. After the configuration instance is created, the configuration values, as well as the connection strings, can be accessed through the indexer property of the configuration instance.
During deployment to the Azure infrastructure, the settings file is used as a template to create the app settings that will be governed through the Azure portal, as well as the resource manager. These values can also be accessed with the same principle, but they are added as environment variables.
In order to support both scenarios, we can use the extension methods that are available during the creation of the configuration instance:
var config = new ConfigurationBuilder()
.SetBasePath(context.FunctionAppDirectory)
.AddJsonFile("local.settings.json", optional: true,
reloadOnChange: true)
.AddEnvironmentVariables()
.Build();
Now that we are familiar with how to set up a function manifest and configure it, let's take a look at the options that are at our disposal for hosting it.
Hosting functions
Azure Functions, once deployed, are hosted on the App Service infrastructure. In App Service, as you saw in the previous examples, only the compute and possibly other integrated resources are accumulated toward your bill. In addition, Azure Functions, in a consumption plan, are active only when they are triggered by one of the events that has been configured; hence, Azure Functions can be extremely cost-effective in mission-critical integration scenarios. Function resources can also be scaled out and down, depending on the load they are handling.
The second plan that's available for functions is the premium plan. In the premium plan, you have the option to set up always-running functions to avoid cold starts, as well as to configure unlimited execution duration. Unlimited duration can come in handy with longer-running processes since, by default, Azure Functions have a hard limit of 5 minutes, which can be extended to 10 minutes with additional configuration.
This section summed up the available hosting options for Azure functions and finished our coverage of the fundamental concepts of Azure functions. Now, let's use these concepts to implement an Azure function for our ShopAcross application.
Creating our first Azure function
One of the patterns mentioned previously in the context of Azure was the materialized view. For instance, in our initial structure, we have basic information about the auctions that are embedded within user documents. This way, auctions can be included as part of the user profile and users can be rated based on their involvement in successful auctions. In this setup, since the auction data on the user profile is just denormalized data chunks from the main auction table, the services would not need to directly interact with the auctions table.
Let's take a look at the following user story and see how we can implement this solution:
"As a solution architect, I would like to implement an Azure function that will update the Cosmos DB Users collection with modified auctions data so that the Auctions API can be decoupled from the Users API."
Our task here would be to implement an Azure function that will be triggered when an auction document is modified. The changes on this document should be propagated to the Users collection:

Figure 10.6 – SynchronizingDocument Data on Cosmos DB
In this setup, we will start by doing the following:
- First, we will create our Azure Functions project, which will be hosted as a function app in our resource group:

Figure 10.7 – Cosmos DB Triggered Function Template
This will create our first function with the following declaration:
[FunctionName("Function1")]
public static void Run(
[CosmosDBTrigger(
databaseName: "ProductsDb",
collectionName: "AuctionsCollection",
ConnectionStringSetting = "DbConnection",
LeaseCollectionName = "leases")]
IReadOnlyList<Document> input, ILogger log)
By using CosmosDBTrigger here, we are instructing the Azure Functions runtime to create a lease so that we can connect to the Cosmos DB change feed on the given database (that is, ProductsDb) and collection (that is, AuctionsCollection) using the set connection string setting (that is, DbConnection).
- Now, let's expand our configuration to include the given connection string setting:
{
"ConnectionStrings": {
"DbConnection":
"AccountEndpoint=https://handsoncrossplatform.documents.azure.com:443/;AccountKey=...;"
}
}
- Let's now add the additional lease settings. After this step, our trigger declaration will look like this:
[CosmosDBTrigger(
databaseName: "ProductsDb",
collectionName: "AuctionsCollection",
ConnectionStringSetting = "DbConnection",
LeaseCollectionPrefix = "AuctionsTrigger",
LeaseCollectionName = "LeasesCollection")]
By defining a lease collection, you can record the triggers that are consumed by Azure functions. In order to use a single lease collection, on top of the LeaseCollectionName option, we can also add the LeasePrefix property to our declaration. This way, each lease entry will receive a prefix value, depending on the function declaration.
- After this, we can run our function in debug mode and see whether our trigger is working as expected. After updating a document on the AuctionsCollection collection, you will receive the updated data almost immediately:
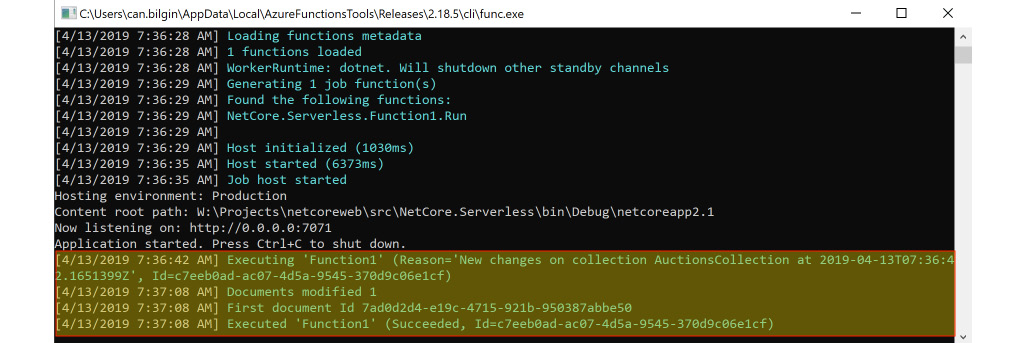
Figure 10.8 – Executing the Azure Function
- We are now receiving the modified document. If the modifications are based on the incoming data alone, we could have added an output binding with a single document or an async collector to modify or insert documents into a specific collection. However, we would like to update a list of auctions that the user is involved in. Therefore, we will get a Cosmos client instance using the attribute declaration:
[CosmosDBTrigger(
databaseName: "ProductsDb",
collectionName: "AuctionsCollection",
ConnectionStringSetting = "DbConnection",
LeaseCollectionPrefix = "AuctionsTrigger",
LeaseCollectionName = "LeasesCollection")]IReadOnlyList<Document> input,
[CosmosDB(
databaseName: "ProductsDb",
collectionName: "UsersCollection",
ConnectionStringSetting = "DbConnection")] DocumentClient client,
Now, using the client, we can execute the necessary updates on the Users document collection.
In this section, we have successfully implemented functions using Python and C#, using HTTP and Cosmos DB triggers. Now we have a wider knowledge about the available development and integration options for Azure functions. Next, we will be looking into another Azure serverless member, logic apps.
Developing a Logic App
Logic apps are simple, event-driven workflow declarations that can utilize a number of intrinsic actions as well as other Azure serverless resources. They also work on a similar trigger-based execution strategy to Azure functions. In this section, we will learn how to create simple workflows using logic apps and how to integrate them with other Azure resources.
When tasked with implementing a logic app, in theory, a developer will not necessarily need anything else other than a text editor, since logic apps are an extension of ARM resource templates. The manifest for a logic app consists of four main ingredients:
- Parameters
- Triggers
- Actions
- Outputs
Parameters, triggers, and outputs, similar to the binding concept from Azure functions, define when and how the application is going to be executed. Actions define what the application should do.
Logic apps can be created using an IDE with an additional schema and/or visual support, such as Visual Studio, or can be developed solely on the Azure portal using the web portal.
The following sections will take you through the steps of creating and designing logic apps, using the Logic App Designer, connectors, Azure functions, and in-built flow control mechanisms.
Implementing Logic Apps
In order to create a Logic App with Visual Studio, we need to do the following:
- We need to use the Azure Resource Group project template and select the Logic App template from the screen that follows:
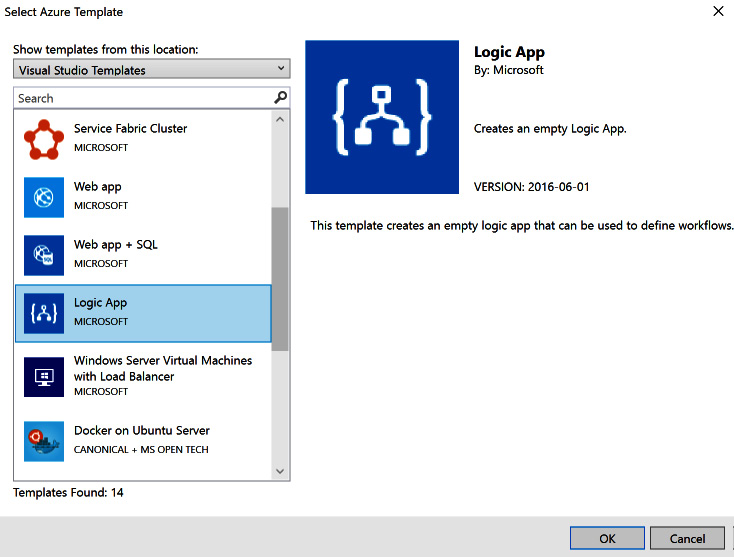
Figure 10.9 – Azure Logic App
This will create a resource group manifest that contains the logic app definition. The logic app can now be modified using the logic app designer within Visual Studio, given that the Azure Logic Apps Tools extension is installed (right-click on the resource group JSON file and choose Open with Logic App Designer).
- The first step to implementing a Logic App is to select the trigger, which will be the initial step in our workflow. For this example, let's select When a HTTP request is received.
- Now that the logic app flow has been created, let's expand the HTTP request and paste a sample JSON payload as the body of a request we are expecting for this application trigger:

Figure 10.10 – HTTP Trigger Schema
This will generate Request Body JSON Schema. Now, we can send our requests, just like in the sample JSON payload.
- Next, we will add an action to send an email (there are many email solutions; for this example, we will be using the Send an email action using Outlook):

Figure 10.11 – Send an Email Action
As you can see, we are in fact using the email, subject, and message parameters defined in our trigger to populate the email action.
- Finally, we can add a Response action and define the response header and body. Now, our application is ready to execute:
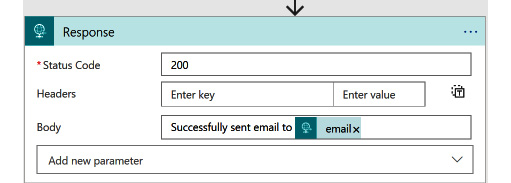
Figure 10.12 – HTTP Response Action
After the logic app is deployed, you can retrieve the request URL, as well as the integrated security token, from the Azure portal designer. Executing a simple POST call with the required parameters would trigger the logic application and trigger actions:
curl -H "Content-Type:application/json" -X POST -d '{"email":"[email protected]", "title":"Test", "subject":"Test", "message" : "Test Message"}' "https://prod-00.northcentralus.logic.azure.com:443/workflows/5bb----------/triggers/manual/paths/invoke?api-version=2016-10-01&sp=%2Ftriggers%2Fmanual%2Frun&sv=1.0&sig=eOB----------------"
Successfully sent the email to [email protected]
As you can see, using logic apps, these types of simple or even more intricate business workflows can be declaratively converted into web services and executed on triggers such as queues, feeds, and webhooks. Connectors are the key components in this setup that serve these actions and the triggers that are available for logic apps.
Using connectors
In the previous example, we used the HTTP trigger and response actions, as well as the Outlook email action. These actions and triggers are packaged in so-called connectors for the logic app infrastructure. Connectors are essentially part of a bigger SaaS ecosystem that also involves Microsoft Flow and Power Apps, as well as logic apps. Connectors can be described as encapsulated connectivity components for various SaaS offerings (for example, email, social media, release management, HTTP requests, file transfer, and so on).
On top of the standard free set of connectors (including third-party connectors), the Enterprise Integration Pack (EIP), which is a premium offering, provides building blocks for B2B enterprise integration services. These integration scenarios generally revolve around the supported industry standards, that is, Electronic Data Interchange (EDI) and Enterprise Application Integration (EAI).
It is also possible to create custom logic apps connectors in order to implement additional custom use cases that cannot be realized with the available set of connectors.
If/when the actions provided through the available connectors do not satisfy the requirements, Azure functions can be integrated as tasks into logic apps. This way, any custom logic can be embedded into the workflow using .NET Core and simple HTTP communication between logic apps and functions.
Creating our first Logic App
The main service application, so far, is built to accommodate the main application use cases and provide data for users so that they can create auctions and user profiles, as well as bidding on auctions. Nevertheless, we need to find more ways to engage users by using their interests. For this type of engagement model, we can utilize various notification channels. The most prominent of these channels is a periodic notification email setup.
The user story we will use for this example is as follows:
"As a product owner, I would like to send out periodic emails to registered users if there are new auctions available, depending on their previous interests, so that I can engage the users and increase the return rate."
Before we start implementing our logic app, in spite of the fact that it is possible to use the Cosmos DB connector to load data, let's create two more Azure functions to load the users and latest auctions for email targets and content, respectively. Both of these functions should use HttpTrigger and should return JSON data as a response. For this exercise, you can use the same Azure function project that was created in the previous section. Let's get started:
- The function that will return the list of users that we will send the notifications to is as follows:
[FunctionName("RetrieveUsersList")]
public static async Task<IActionResult> Run(
[HttpTrigger(AuthorizationLevel.Function, "get", "post", Route = null)] HttpRequest req,
ILogger log)
{
// TODO: Retrieve users from UsersCollection
var users = new List<User>();
users.Add(new User{ Email = "[email protected]", FirstName = "Can"});
return (ActionResult)new OkObjectResult(users);
}
- Next, we will need the data for the latest auctions:
[FunctionName("RetrieveLatestAuctionsList")]
public static async Task<IActionResult> Run(
[HttpTrigger(AuthorizationLevel.Function, "get", "post", Route = null)] HttpRequest req,
ILogger log)
{
// TODO: Retrieve latest auctions from AuctionsCollection
var auctions = new List<Auction>();
auctions.Add(new Auction
{
Brand = "Volvo",
Model = "S60",
Year = 2017,
CurrentHighestBid = 26000,
StartingPrice = 25000
});
return (ActionResult)new OkObjectResult(auctions);
}
Now that we have our data feeds ready, we can start implementing our logic app.
Important Note
In this example, we have used Azure functions to retrieve a set of DTOs in order to be cost-efficient. It is also possible to create a change feed function that will prepare the daily notification feed as soon as the data store is updated with a new user or auction/bid. This way, the logic app can directly load the data from the daily feed document collection or table storage.
- In our previous example, we created a logic app using an HTTP trigger. For this example, let's start with a recurrence trigger so that we can process our data and prepare a periodic feed:

Figure 10.13 – Recurrence Trigger Setup
- Next, let's retrieve the set of users using our Azure function. In order to select a function from the available actions, you should locate the Azure Functions action in the Choose an action dialog, then select the target function app that contains your functions, and finally, select the desired function:
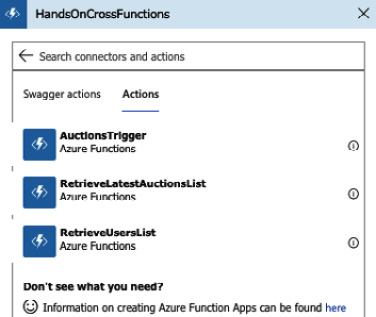
Figure 10.14 – Azure Functions with the Logic App
- Once we have retrieved the results from the Azure function, it will be in JSON format. In order to ease the design and access properties of the contained data items, it would be good to include a data parse action with a predefined schema. At this point, you can have a simple run and copy the results:
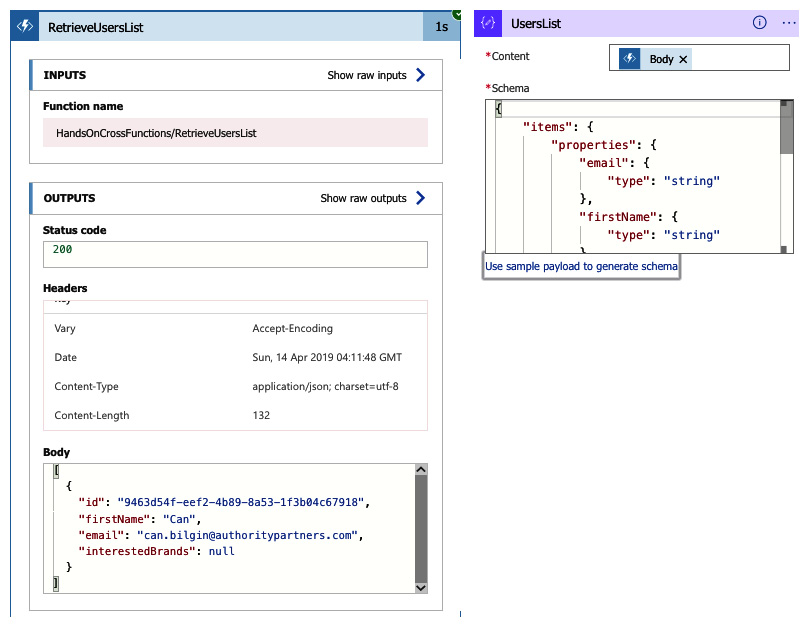
Figure 10.15 – Calling the Azure Function
- Now, repeat the same actions for the auctions list data, so that we can start building out email content. Our current workflow should look similar to the following:
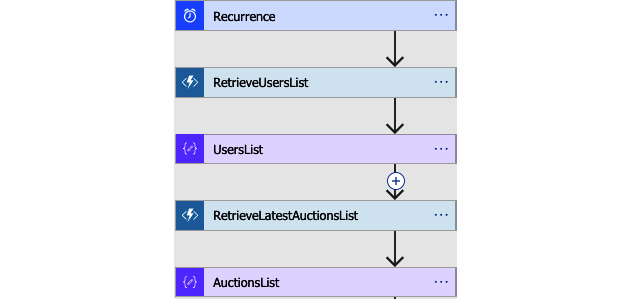
Figure 10.16 – Sequential Azure Function Calls
- Before we continue with preparing the email content and sending it to each user on the list, let's structure the flow a little bit so that the data retrieval actions for users and auctions are not executed sequentially:
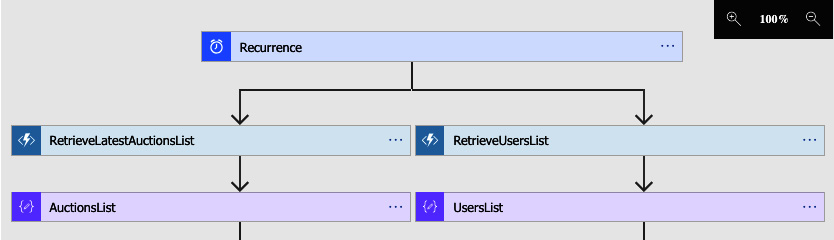
Figure 10.17 – Parallel Azure Function Calls
So far, we have created a logic app that retrieves the list of users and available auctions from Cosmos DB using two separate Azure functions. The logic app then parses the JSON data so that the object data can be utilized by the following actions. We can now continue with additional control statements and the preparation of the email content.
Workflow execution control
By definition, being an orchestration tool, Logic Apps uses control statements such as foreach, switch, and conditionals in order to compose a controlled workflow using available actions. These control statements can be used as actions within the workflow using the input and output values of other actions within the logic app context. The available set of control statements is as follows:
- Condition: Used to evaluate a condition and define two separate paths, depending on the result
- Foreach: Used to execute a path of dependent actions for each item in a sequence
- Scope: Used to encapsulate a block of actions
- Switch: Used to execute multiple separate action blocks, depending on the switch input
- Terminate: Terminates the current execution of the logic app
- Until: Used as a while loop, where a block of actions is executed until a defined condition evaluates to true
These statements can be accessed using the Control action within Logic App Designer:
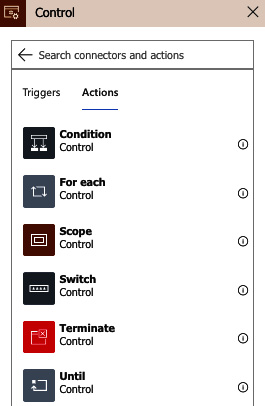
Figure 10.18 – Control Actions
In our example, we are supposed to send an email to each user with the latest auctions list. We can achieve this with a For each action on the list of users:

Figure 10.19 – Using variables from a For each loop
As you can see, we are using the body of the UsersList action (that is, body(UsersList), using logic app notation), and for each item in the list, we are retrieving the email (that is, items('For_each')['email']) and firstName. In a similar manner, we can prepare the auction's email body and assign the result as the body of the subject. In addition to this simple setup, the content can be filtered according to the interest of the user using the data operations that are available:
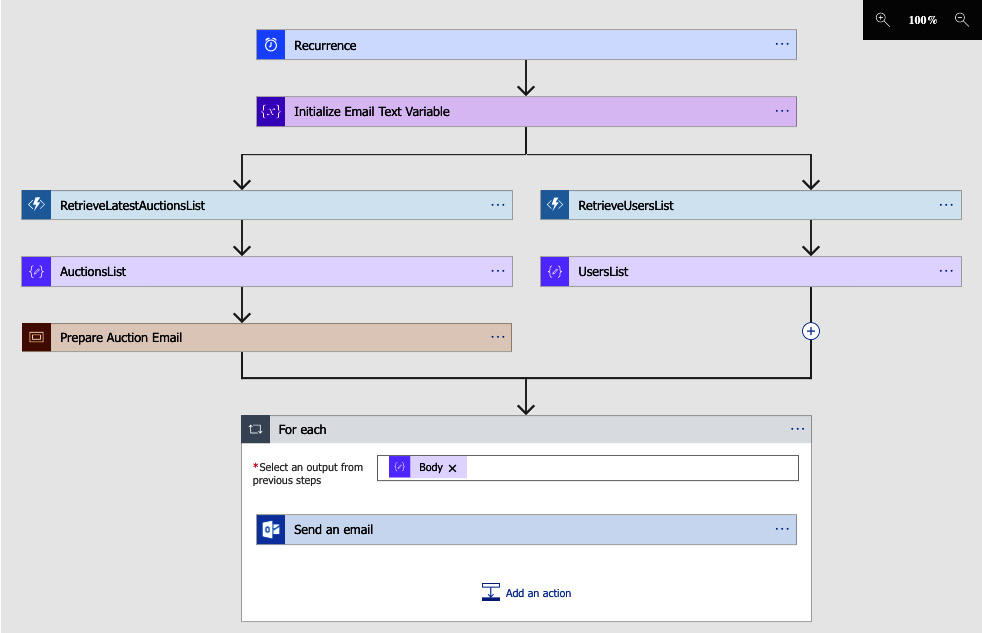
Figure 10.20 – Complete Azure Logic App View
Now, we will be periodically sending auction updates to users without having to compromise or add additional complexity to our current service infrastructure.
In this section, we have learned about the basic logic app concepts and implemented a fully functional Azure Logic app using several control statements, connectors, and custom Azure functions. As you can see, the declarative and event-driven nature of Azure logic app design makes them a good choice for orchestrating secondary event-driven processes.
Integration with Azure services
So far, we have only utilized Cosmos DB in the context of logic apps and Azure functions among the many Azure services that we can integrate with Azure serverless components. In this section, we will analyze the other available integration options for Azure serverless components with other Azure resources.
As you have seen, these integrations are available through bindings for Azure functions and through connectors for logic apps. Using this integrated business model, multiple architectural patterns can be composed, and event-driven scenarios can be accomplished.
The following sections will take you through repository-, queue-, and event-based Azure resources that can be integrated with Azure serverless components. Let's take a deeper look at some of these integrated services.
Repository
In the Azure Serverless context, it is fair to say that almost all Azure repository models are tightly integrated with the infrastructure. Let's take a look at the following models:
- Cosmos DB: This has an available binding for Azure functions. This is a connector with various actions to execute mainstream CRUD actions, as well as advanced scenarios to create, retrieve, and execute stored procedures. Cosmos DB can also be used to trigger Azure functions.
- SQL Server: This is another repository service that can be integrated into logic apps with the available connector, hence allowing triggers such as an item being created or modified. Logic apps can also use the SQL and Azure SQL Data Warehouse connectors to execute both raw and structured queries on SQL instances. Additionally, SQL connections can be initialized within Azure functions using nothing but the native SQL client that's available as part of .NET Core.
- Azure Table Storage: This is another repository model that can be integrated with Azure serverless components. Table Storage tables can be used as input parameters and can be the receivers of new entities as part of an output configuration within the Azure function infrastructure. The connector for logic apps can be utilized to execute various actions on Table Storage:
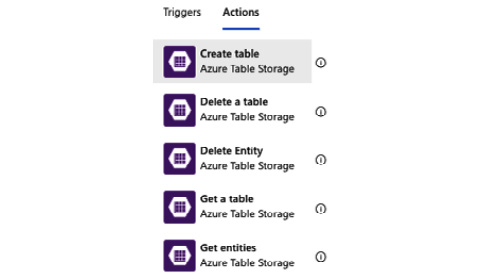
Figure 10.21 – Azure Table Storage Actions
- Azure Blob Storage: This can be used as a trigger for both functions and logic apps. The available function binding and app connector provide a variety of tasks and binding elements that can be utilized within the serverless app model.
Queue-based processing
In order to implement the aforementioned queue-based load-leveling pattern, Azure distributed systems can utilize Azure queues, as well as Azure Service Bus. In this way, various asynchronous processing patterns can be implemented.
Azure queues can be configured to trigger functions and logic apps. Both the binding and the connector have available actions so that they can listen to a specific queue. The connector contains actions for executing basic operations, including but not limited to the creation of message queues, the insertion of messages, and the retrieval of messages. An Azure message queue can also be used as an output target of an Azure function to create a message in the configured queue.
The connector and binding for Azure Service Bus have an extended set of available actions and various triggers. Queues and topics are both available for listening for new messages as part of the trigger setup. Logic apps can also execute almost all possible actions that a managed client can achieve through operations related to managing basic messages, dead-letter queues, locks, topics, and subscriptions.
Event aggregation
Another citizen of the Azure serverless ecosystem, Event Grid is the most appropriate candidate for implementing the classic publisher/subscriber model between distributed service components, especially when Azure functions and logic apps are involved. In addition to Event Grid, Event Hubs is the best choice for big data pipelines that involve event streaming rather than discreet event distribution.
Event Grid aggregates the events that are collected from various so-called event sources, such as container registries, resource groups, service bus, and storage. Event Grid can also consume and deliver custom topics that are posted by capable components. Aggregated events are then dispersed to the registered consumers or so-called event handlers. Event handlers for Event Grid include, but are not limited to, the following:
- Azure Automation
- Azure Functions
- Event Hubs
- Hybrid connections
- Logic Apps
- Microsoft Flow
- Queue Storage
- Webhooks
This infrastructure means that developers aren't limited by the available triggers for functions and logic apps as the initial point of a certain mission-critical scenario. They can also create a complete event-driven subscription model.
Event Hubs can be integrated as a consumer for Event Grid events and used as triggers and output for Azure functions. A connector is available for logic apps with triggers and actions. An event hub, when used together with Azure functions, can create an extremely agile scaling model for processing big data streams.
We now have a complete picture of integration options for Azure serverless components and in which types of scenarios they can be utilized.
Summary
Overall, Azure Functions and Logic Apps, as part of the Azure Serverless platform, provide ad hoc, event-driven solutions to fill in the gaps in any distributed cloud application. In this chapter, we have analyzed the available development options for Azure Functions. We have implemented simple Azure Functions to denormalize data on a Cosmos DB setup. Finally, we created Logic Apps by utilizing out-of-the-box connector tasks, as well as Azure Functions with HTTP and periodic triggers.
This chapter completes our coverage of the Azure cloud services-related topics. In the following chapters, we will take a look at more advanced topics to improve the integration between Xamarin applications and the cloud-based service backend.