
Chapter 2: Defining Xamarin, Mono, and .NET Standard
Xamarin is the app model implementation for the modern .NET infrastructure. As part of the cross-platform infrastructure, Xamarin uses the Mono runtime, which, in turn, acts as the adaption layer for the .NET Standard base class library/libraries. By means of the abstraction provided by the Mono runtime (MonoTouch and MonoDroid), Xamarin can target mobile platforms such as iOS and Android.
This chapter will try to define the relationship between .NET and Xamarin. You will start by preparing the Xamarin development environment and create your first Xamarin application. You will then discover how the .NET source code is executed with MonoTouch on iOS and the Mono runtime on Android. This will help you understand the cross-platform nature of .NET better and how it is run on mobile platforms.
The following sections will walk you how to implement your first Xamarin application:
- Understanding Xamarin
- Setting up Your Development Environment
- Creating your first Xamarin application
- Developing with Xamarin.Forms
- Extending the reach
Let's get started!
Understanding Xamarin
Xamarin, as a platform, can be identified as the legacy of the Mono project, which was an open source project that was led by some of the key people that later established the Xamarin group. Mono was initially a Common Language Infrastructure (CLI) implementation of .NET for Linux that allowed developers to create Linux applications using the .NET (2.0) framework modules. Later on, Mono's runtime and compiler implementation were ported to other platforms until Xamarin took its place within the Microsoft .NET Core ecosystem. The Xamarin suite is one of the flagships of .NET Core and the key technologies for cross-platform development.
Setting up Your Development Environment
As a developer planning to create native mobile applications using Xamarin, you have several options for setting up your development environment. In terms of development, both macOS and Windows can be utilized, using either Visual Studio or Rider IDEs.
As a .NET developer, if you are looking for a familiar environment and IDE, the best option would be to use Visual Studio on Windows.
In order to use the Xamarin-related templates and available SDKs, the first step would be to install the required components using the Visual Studio installer:

Figure 2.1 – Visual Studio installer
When you install the Mobile Development with .NET component, the required SDKs (for Android and iOS) are automatically installed, so you don't need to do any additional prerequisite installation.
Once the setup is complete, various project templates become available under the Cross Platform App section, as well as platform-specific sections, namely Android and iOS. The multi-project template for the cross-platform Xamarin app will help guide you through the project creation process using Xamarin.Forms, while the available Android App and iOS App templates create application projects using the classic Xamarin infrastructure:

Figure 2.2 – Cross Platform App
Using this template, Visual Studio will create a common project (shared or .NET Standard) and a project for each selected platform (selected platforms out of iOS, Android, and UWP). For this example, we will be using the Shared Project code sharing strategy and selecting iOS and Android as target platforms.
Important Note
It is important to note that if you are developing on a Windows machine, a macOS build service (a macOS device with Xamarin.iOS and Xcode installed) is required to compile and use the simulator with the iOS project.
If you, in the first compilation of the iOS project, receive an error pointing to missing Xcode components or frameworks, you need to make sure that the Xcode IDE is run at least once manually so that you can agree to the terms and conditions. This allows Xcode to complete the setup by installing additional components.
In this solution, you will have platform-specific projects, along with the basic boilerplate code and a shared project that contains the Main.xaml file, which is a simple XAML view. While the platform-specific projects are used to host the views that are created using the declarative XAML pages, the MainActivity.cs file on an Android project and the Main.cs file on an iOS project are used to initialize the Xamarin.Forms UI framework and render the views.
This XAML view tree is rendered on the target platforms using the designated renderers. It uses the page, layout, and view hierarchy:

Figure 2.3 – Xamarin.Forms Boilerplate Application
In this section, we set up our development environment and tested it using the boilerplate application that was generated for us. Assuming that your development environment is ready, we can move on and start implementing our cross-platform calculator application from the previous chapter – first as a classic Xamarin application and then as a Xamarin.Forms application.
Creating your First Xamarin Application
The project that we created in the previous section used the Xamarin.Forms UI rendering. While this can be the most efficient way to implement a cross-platform application, in some cases, you might need to implement a very platform-specific application (this includes many platform APIs and specialized UI components). In these types of situations, you can resort to creating a classic Xamarin.iOS and/or Xamarin.Android application. Let's implement the calculator application for both.
Xamarin on Android – Mono Droid
We will start our implementation with Xamain.Android. The application will use a single view with a standard calculator layout, and we will try to reuse the calculator logic from the console calculator we created in the previous chapter. Without further ado, let's start creating our application:
- For the Android application, we will add a new project to our calculator solution, namely calculator.android. For this example, we will use the Blank Android App template:
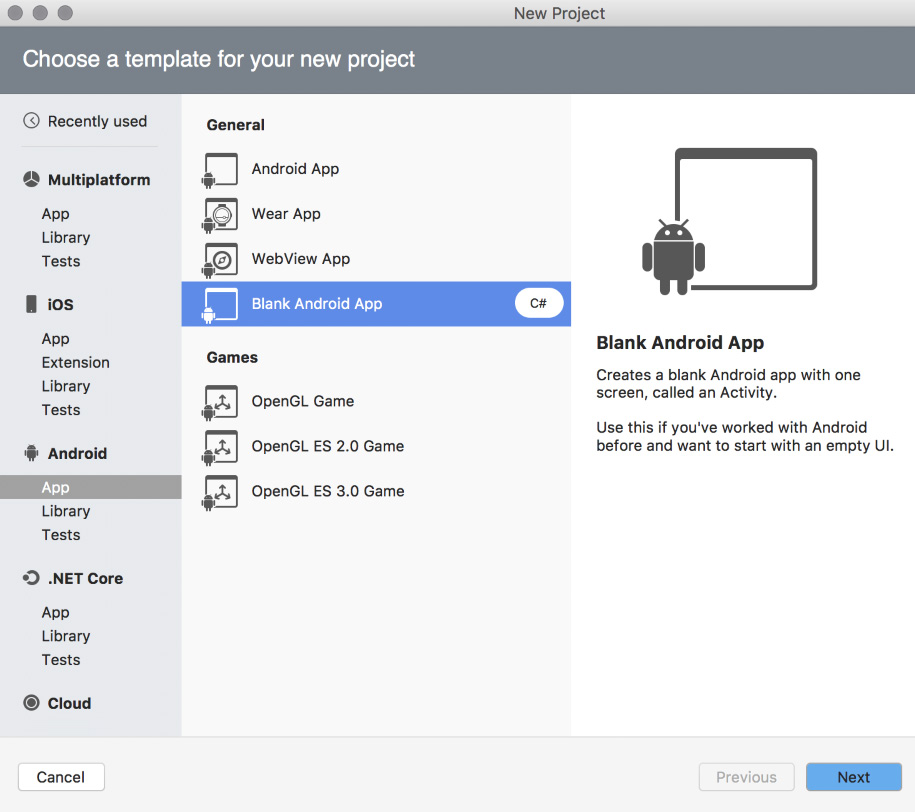
Figure 2.4 – Blank Android App
This will create a standard boilerplate application project for Xamarin.Android with a single view and associated layout file. If you open the created Main.axml file, the designer view will be loaded, which can be used to create our calculator:

Figure 2.5 – Xamarin.Android Designer View
- Now, let's start designing our calculator view by creating the result. When handling the Android XML layout files, you are given the option to either use the designer or the source view. When using the designer view to create the welcome view, you have to drag and drop the text view control and adjust the alignment, layout, and gravity properties for the label.
Using the source view, you can also paste the following layout declaration to see what the application looks like when it's run on the Android platform:
<?xml version="1.0" encoding="utf-8"?>
<LinearLayout xmlns:android="http://schemas.android.com/apk/res/android"
xmlns:app="http://schemas.android.com/apk/res-auto"
xmlns:tools="http://schemas.android.com/tools"
android:layout_width="match_parent"
android:layout_height="match_parent"
android:orientation="vertical">
<TextView
android:id="@+id/txtResult"
android:layout_width="match_parent"
android:layout_height="100dp"
android:gravity="center|right"
android:textSize="30sp"
android:layout_margin="5dp"
android:text="0"
/>
</LinearLayout>
This will be the upper view that we will use to display the calculation results.
- Next, let's create the number pad. In order to create the rows of buttons, we will be using a LinearLayout with a horizontal orientation. You can insert the following row right under the result TextView so that it contains the first row of buttons:
<LinearLayout
android:layout_width="match_parent"
android:layout_height="0dp"
android:layout_weight="1"
android:orientation="horizontal">
<!-- The buttons will sit here >
</LinearLayout>
- Next, you can use simple Button controls within the horizontal LinearLayout to create the number pad:
<Button android:id="@+id/number7" android:text="7"
android:layout_width="0dp"
android:layout_height="match_parent"
android:layout_weight="1"
android:textSize="20sp" />
<Button android:id="@+id/number8" android:text="8"
android:layout_width="0dp"
android:layout_height="match_parent"
android:layout_weight="1"
android:textSize="20sp" />
<Button android:id="@+id/number9" android:text="9"
android:layout_width="0dp"
android:layout_height="match_parent"
android:layout_weight="1"
android:textSize="20sp" />
<Button android:id="@+id/opDivide" android:text="/"
android:layout_width="0dp"
android:layout_height="match_parent"
android:layout_weight="1"
android:textSize="20sp" />
Repeat this for the other rows, changing the android:id attribute depending on the button text label until you reach the last row (that is, 4 5 6 * and 1 2 3 -). Each row will use a separate LinearLayout with a horizontal orientation. The last row will only have three buttons (that is, 0 = +). In order to make button 0 span for two columns, you can use a layout_weight of 2.
The final layout should look similar to the following:
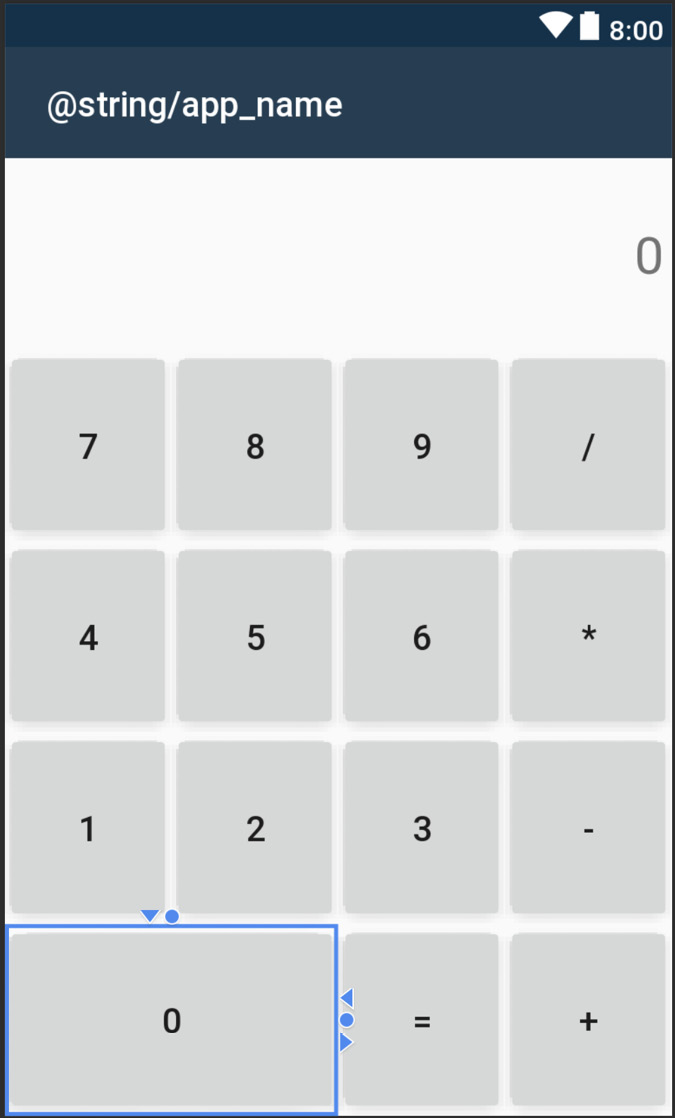
Figure 2.6 – Android Calculator Layout
- Next, we will modify the generated Android activity code to introduce the calculator logic, while keeping the IDs of the controls we have added to the layout in mind.
In order to keep references to the controls that we have added, we should create private fields:
Button _btnNumber0, _btnNumber1, _btnNumber2, _btnNumber3, _btnNumber4, _btnNumber5, _btnNumber6, _btnNumber7, _btnNumber8, _btnNumber9;
Button _btnOpAdd, _btnOpSubstract, _btnOpMultiply, _btnOpDivide, _btnOpEqual;
TextView _txtResult;
- During this code's execution, once the content view has been set to the layout, we can retrieve the view and assign it to the private fields using the FindViewById function. In order to intercept this activity life cycle event and assign the respective references, you can use the OnCreate method:
protected override void OnCreate(Bundle savedInstanceState)
{
base.OnCreate(savedInstanceState);
Xamarin.Essentials.Platform.Init(this, savedInstanceState);
SetContentView(Resource.Layout.activity_main);
_btnNumber0 = FindViewById<Button>(Resource.Id.number0);
// …
// Removed for brevity
}
- Now, copy the Calculator class from the console application and instantiate it within the OnCreate method.
- After this, we can assign the event handlers to the buttons to execute the calculation logic:
_btnNumber0.Click += (_, __) => _calculator.PushNumber("0");
// …
// Removed for brevity
_btnOpAdd.Click += (_, __) => _calculator.PushOperation('+');
// …
// Removed for brevity
- Finally, for the resulting delegate of the calculator logic, we can simply assign the result value to the _txtResult field:
_calculator.ResultChanged = (result) =>
{
_txtResult.Text = result;
};
You can now run the application and test the calculator's implementation.
The Xamarin.Android platform functions a little more like .NET Core. Unlike Xamarin.iOS, there are no restrictions on code generation, so the Mono Droid runtime execution is done using the JIT compiler, which is responsible for providing the IL packages that are part of the application package. The Mono Droid runtime exists in the application package in the form of native code that replaces the .NET Core runtime:
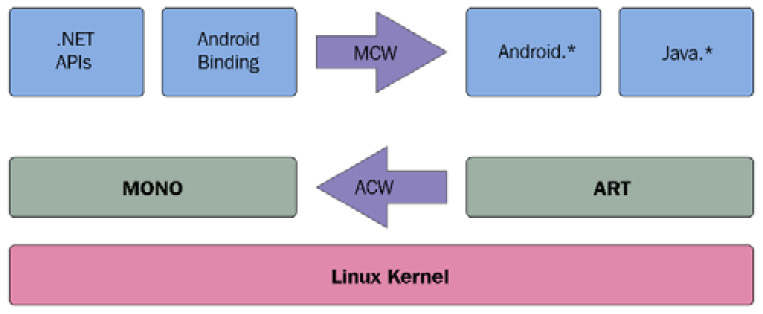
Figure 2.7 – Xamarin Android runtime
After this exploration of the Android platform, let's re-create our calculator application on iOS platform using Mono Touch.
Xamarin on iOS – Mono Touch
As you have seen in the Android example, in a classic Xamarin application, views are created using native SDK components and toolsets. This way, custom native controls can be introduced into views without you having to create instructions (that is, custom renderers) for the common UI infrastructure. In the case of Xamarin.iOS, developers can create application views either using an iOS namespace and UI elements using code or using XIBs or storyboards with backing controllers.
Now, let's recreate the implementation of the calculator app that we did on Xamarin.Android for Xamarin.iOS:
- We will start by creating our project. Use the iOS Single View App application template listed under the iOS section:
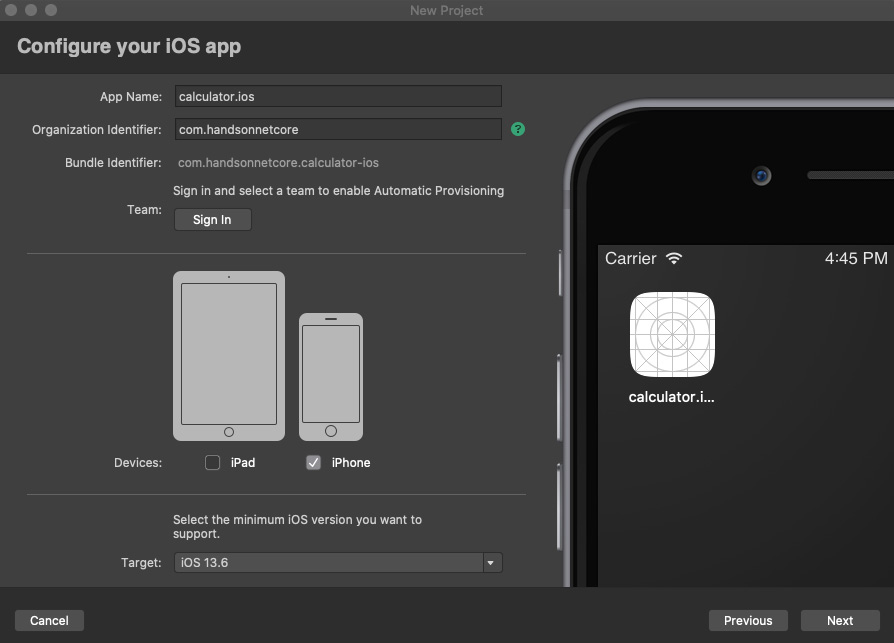
Figure 2.8 – Creating a Xamarin.iOS Project
This template will create a simple Xamarin.iOS application with a single view, an associated storyboard, and a controller for the main view that was created.
- Once the project has been created, open the Main.storyboard file to start creating the user interface. With either Visual Studio on Windows or macOS, use the Visual Studio designer, as well as the Xcode designer, depending on your development environment setup. If you are using Windows, you will need to have a Xamarin build agent that has XCode and Xamarin installed and has been paired with your Windows environment.
- To create the button controls, drag and drop the button control from the toolbox. To begin with the layout, you can use a size of 90 for the width and height of the buttons. In this example, we are using the dark background color and black for the tint color.
- To complete the UI, we will need to introduce a label control that should appear on top of the keypad layout.
Now, if we compile and run the application, you will get a similar view to that of Xamarin.Android in the previous section:
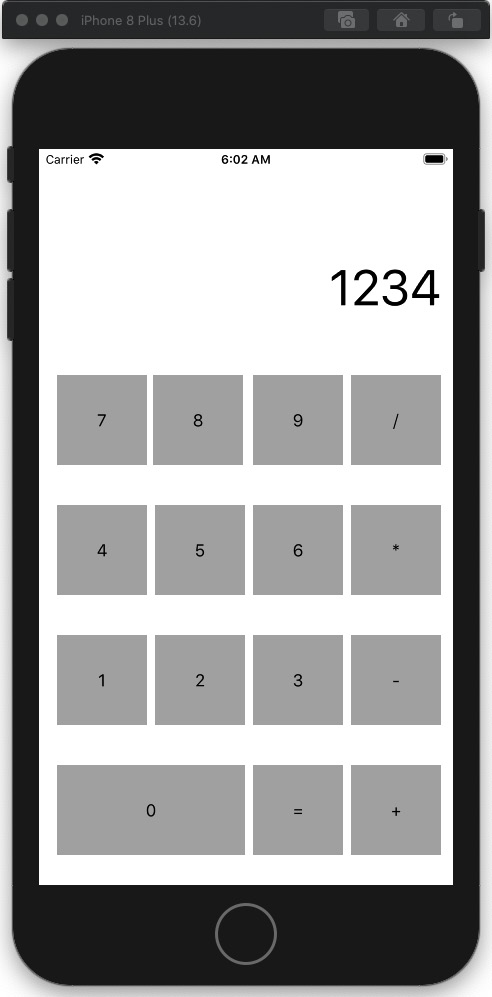
Figure 2.9 – Calculator Layout for iOS
- Now that our UI is ready, we can start introducing the calculator logic. We will start by creating the so-called outlets for our UI controls, so that they can be referenced from within the view controller. You can create an outlet by simply assigning a name to a UI Control. While naming the controls, we will be using the same field names that we used in our Android application (thatis, . _btnNumber0 and _btnOpAdd). After naming all the controls on the UI, you can open the ViewController.designer.cs file to verify whether outlets have been created for all the controls.
- Next, we will introduce the calculator logic. In order to import the application logic, copy and paste the calculator class into the ViewController.cs file. Now, in the ViewDidLoad method, we can copy and paste the same event handling logic that we had for the Android sample:
base.ViewDidLoad();
_calculator = new Calculator();
_btnNumber1.TouchDown += (_, __) => _calculator.PushNumber("0");
// … Removed for brevity
_calculator.ResultChanged = (result) =>
{
_txtResult.Text = result;
};
As you can see, the only change here would be to use the TouchDown event instead of the Click event to propagate the action to the application logic.
You can now build and run the application. The behavior will be the same as it is for the Android version of the application.
Using Xamarin.iOS, during the compilation process, the project that we created with the C# and .NET (standard) modules is first compiled into a Microsoft Intermediate Language (MSIL), just like any other .NET project, and is then compiled into native code with AOT compilation. At this point, one of the most crucial components is the monotouch runtime, which acts as the adaption layer that sits on top of the iOS kernel, allowing the .NET Standard libraries to access the system-level functions. During compilation, just like the application code, the monotouch runtime libraries, together with the .NET Standard packages, are linked and trans(com)piled into native code.
Important Note
AOT compilation is only a requirement when the compiled package is being deployed to a real device because of the code generation restrictions on iOS. For other platforms or when running the application on an iOS simulator, a JIT compiler is used to compile MSIL into native code – not at compile time, but at runtime.
The following diagram outlines the transcompilation process of APT and LLVM for Xamarin.iOS applications:
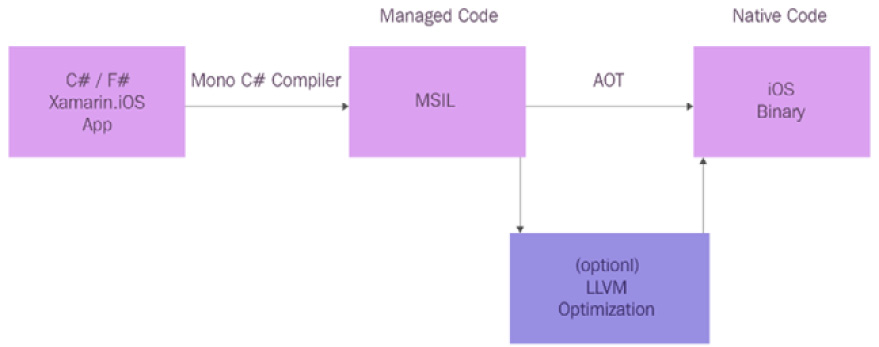
Figure 2.10 – Xamarin.iOS Compilation
At this point, you have probably noticed the similarities between the Xamarin.Android and Xamarin.iOS platforms, one of which is the application domain implementation. In both examples, we have used the same application logic that was previously implemented for the console application sample. In order to reuse this logic, we have copied the calculator class implementation. For the maintainability of our solution, it would be helpful if we could reuse this implementation. In the next section, we will discuss the possibility of using .NET as a common ground between these platforms to create reusable components.
Using .NET with Xamarin
Even though the Xamarin and/or .NET Core target platforms (Platform APIs) are treated as if they have the same setup, capabilities, and functionalities as a platform-agnostic framework, each of these target platforms are different from each other. The adaption layer (implementation of .NET Standard) allows us, as developers, to treat these platforms in the same way.
Before the unification and standardization of .NET modules, together with shared projects, cross-platform compatibility was maintained by common denominators of implemented functionality on target platforms. In other words, the available APIs on each selected platform made up a profile that determined the subset of functionality that could be used for these platforms. These platform-agnostic projects that were used to implement the application logic were then packaged into so-called Portable Class Libraries (PCLs). PCLs were an essential part of cross-platform projects, since they could create and share application code that would be executed on multiple platforms:
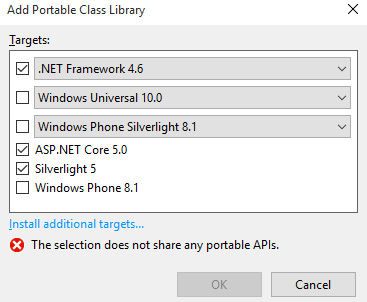
Figure 2.11 – Portable Class Library
At some point, since .NET API implementations on various platforms have all converged into (almost) the same subset, a standard set of .NET APIs were defined as the common implementation ground for cross-platform implementation – .NET Standard. As a simple analogy, .NET Standard can be considered the interface that's used to access the platform APIs that are implemented by target platform runtimes. With .NET 5, this subset is now defined as .NET platform, making it a truly cross-platform framework.
Using .NET (Standard), we can create a shared application core project that can be referenced by the Xamarin classic and our .NET console application. This allows us to create a testable platform-agnostic logical application, which can then be tested as a standalone library.
You can create a .NET Standard Library using the .Net Library project template. Once you've selected this template, you will also need to select net5.0 as the target framework. You can now copy and paste the Calculator class implementation into this project and reference it from our .NET calculator, as well as the Xamarin.iOS and Xamarin.Android applications.
As much as this helps with the maintainability of the business logic, in Xamarin classic implementations, we will still need to take care of two separate UIs. In order to create and manage a common declarative UI for multiple platforms, we can use Xamarin.Forms.
Xamarin.Forms
In the Android and iOS examples, we followed almost the same implementation methodology, which is composed of three steps, as follows:
- Declare the UI Elements.
- Create the Application Domain logic.
- Integrate the Application Logic to the UI.
The main difference between the two platforms was how the first step was executed. This is exactly where Xamarin.Forms comes to the aid of developers.
Xamarin.Forms greatly simplifies the process of creating UI mobile applications on two complete different platforms using the same declarative view tree, even though the native approaches on these platforms are, in fact, almost completely different.
From a UI renderer perspective, Xamarin.Forms provides native rendering with two different ways of using the same toolset at compile time (compiled XAMLs) and at runtime (runtime rendering). In both scenarios, page-layout-view hierarchies that are declared in XAML layouts are rendered using renderers. Renderers can be described as the implementations of the view abstractions on target platforms. For instance, the renderer for the label element on iOS is responsible for translating label control (as well as its layout attributes) into a UILabel control.
Nevertheless, Xamarin.Forms can't just be categorized as a UI framework, since it provides various modules out of the box that are essential to most mobile application projects, such as dependency services and messenger services. Being among the main patterns for creating SOLID applications, these components provide the tools for creating abstractions on platform-specific implementations, thus unifying the cross-platform architecture to create application logic that spans across multiple platforms.
Additionally, the data binding concept, which is the heart and soul of any Model-View-ViewModel (MVVM) implementation, can be directly introduced at the XAML level, saving developers from having to create their own data synchronization logic:
- In order to demonstrate the capabilities of Xamarin.Forms, we will implement our calculator application using Xamarin.FormFirst step will be to create the Xamarin.Forms application using the multi-project template for a Blank Forms App:

Figure 2.12 – Creating a Xamarin.Forms application
- This will create three projects called calculator.forms (a Xamarin.Forms common application), calculator.forms.Android, and calculator.forms.iOS.
- Now that the projects have been created, we can add a reference to the calculator.core project (from the previous section) from the calculator.forms project. This will allow us to reuse the calculator logic.
- Next, we need to create the MainPageViewModel class under the common application project. We will integrate the calculator logic inside this class:
public class MainPageViewModel : INotifyPropertyChanged
{
private Calculator _calculator = new Calculator();
private string _result;
public event PropertyChangedEventHandler PropertyChanged;
public MainPageViewModel()
{
}
}
- The view-model will need to have two commands that will handle the number push and operation push actions. Add these two declarations to the class:
public Command<string> PushNumberCommand { get; set; }
public Command<char> PushOperationCommand { get; set; }
- Finally, the view-model should also declare a Result field. This should propagate the changes to the view using the PropertyChanged event handler:
public string Result
{
get => _result;
set
{
_result = value;
PropertyChanged?.Invoke(this, new PropertyChangedEventArgs(nameof(Result)));
}
}
- We can now initialize the commands and assign the result delegate to the calculator instance within the constructor:
PushNumberCommand = new Command<string>(_ => _calculator.PushNumber(_));
PushOperationCommand = new Command<char>(_ => _calculator.PushOperation(_));
_calculator.ResultChanged = _ => { Result = _; };
- Now, let's assign this view model as our binding context to the main view:
public partial class MainPage : ContentPage
{
public MainPage()
{
InitializeComponent();
BindingContext = new MainPageViewModel();
}
}
- We can now create our UI elements and bind the appropriate commands to our buttons. We will start by creating our Grid layout (copy and paste the following XAML into MainPage.xaml):
<?xml version="1.0" encoding="utf-8"?>
<ContentPage
xmlns="http://xamarin.com/schemas/2014/forms"
xmlns:x="http://schemas.microsoft.com/winfx/2009/xaml"
x:Class="calculator.forms.MainPage"
<Grid>
<Grid.RowDefinitions>
<RowDefinition />
<RowDefinition />
<RowDefinition />
<RowDefinition />
<RowDefinition />
</Grid.RowDefinitions>
<Grid.ColumnDefinitions>
<ColumnDefinition />
<ColumnDefinition />
<ColumnDefinition />
<ColumnDefinition />
</Grid.ColumnDefinitions>
</Grid>
</ContentPage>
This will create a grid of five rows and four columns.
- Insert the result label into the first row and make sure it spans for four columns:
<Label FontSize="50" HorizontalTextAlignment="End" Grid.Row="0" Grid.ColumnSpan="4"
Text="{Binding Result}" />
Notice the binding setup for the Result property of the binding context.
- Next, we will create the buttons for the calculator's keypad. Use the following example to create the buttons on the grid with the correct column and row values:
<Button Text="7" BackgroundColor="DarkGray" TextColor="Black" Grid.Row="1" Grid.Column="0"
Command="{Binding PushNumberCommand}" CommandParameter="7" />
It is important to make sure that the Command property of each number button is bound to the PushNumberCommand property of the binding context.
- Repeat this process for the operation buttons:
<Button Text="7" BackgroundColor="DarkGray" TextColor="Black" Grid.Row="1" Grid.Column="0"
Command="{Binding PushNumberCommand}" CommandParameter="7" />
This concludes the implementation of the calculator. Our application is now ready for its first test run.
By revisiting our onion structure, we can easily see how using Xamarin.Forms expands the portable part of the application between the platforms:

Figure 2.13 – Xamarin versus Xamarin.Forms
In this section, we created a cross-platform application that targets iOS and Android with a single declarative UI using Xamarin.Forms. In addition to the fact that the UI implementation is fully shared between the two platforms, using data bindings also substantially decreases the complexity of our application, thus creating a robust and maintainable mobile application. Here, we have only targeted iOS and Android, but it is possible to expand the platform coverage to other platforms using standard or extension SDKs while making minimal modifications to the UI layouts.
Extending the reach
Finally, since we are talking about Xamarin, it is important to mention that Xamarin and/or Xamarin.Forms do not bind the developers to Android and iOS phone or tablet devices. By using Xamarin and Xamarin.Forms, developers can target devices varying from simple wearables such as smart watches to IoT devices and home appliances.
When developing applications for iOS- or Android-based appliances, exactly the same toolset can be used, while more specialized platforms (such as Tizen) can constitute a target platform, given that the .NET Standard implementation exists natively:
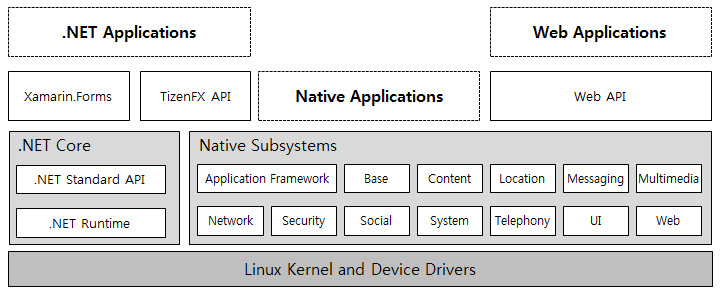
Figure 2.14 – Additional Target Platforms
Source: (https://developer.tizen.org/development/training/overview#type / [CC BY-SA 3.0 (https://creativecommons.org/licenses/by-sa/3.0)])
The Tizen implementation is also a good example of .NET being used by Xamarin.Forms and the Linux kernel.
As you can see, Xamarin and .NET provides the necessary infrastructure and abstractions so that cross-platform applications can be distributed to various platforms.
Summary
In this chapter, we learned about Xamarin, one of the main supported runtimes of .NET, and how to use it to create mobile applications for multiple platforms. We explored two distinct ways of cross-platform development using Xamarin. While the classic Xamarin approach allows developers to directly interact with native components, Xamarin.Forms provides a more generic and maintainable approach. We also saw how the Xamarin infrastructure can be extended to other platforms such as wearables and Tizen, as well Universal Windows Platform (UWP).
In the next chapter, we will take a deeper look at UWP and how it can contribute to .NET developers who are executing cross-platform development projects. UWP, being the most mature member of the cross-platform .NET initiative, can provide developers with a completely separate market for development.