
Chapter 14: Azure DevOps and Visual Studio App Center
Visual Studio App Center is an all-in-one service provided by Microsoft and is mainly used by mobile application developers. Both Xamarin platforms as well as UWP applications are among the supported platforms. The primary goal of App Center is to create an automated Build-Test-Distribute pipeline for mobile projects. App Center is also invaluable for iOS and Android developers since it is the only platform that offers a unified beta distribution for both target runtimes, which supports telemetry collection and crash analytics. Using Azure DevOps (previously known as Visual Studio Team Service) and App Center, developers can set up a completely automated pipeline for Xamarin applications that will connect the source repository to the final store submission.
This chapter will demonstrate the fundamental features of Azure DevOps and App Center and how to create an efficient application development pipeline suited to individual developers, as well as development teams.
The following topics will be covered in this chapter:
- Using Azure DevOps and Git
- Creating Xamarin application packages
- App Center for Xamarin
- Distribution with App Center
- App Center telemetry and diagnostics
By the end of this chapter, you will have learned how to effectively use Git to create manageable histories for your projects that will be stored on Git. Using these Git repositories, you will be able to create continuous integration and delivery pipelines to provide Android and iOS packages to App Center. These will then be used for distribution and telemetry collection.
Using Azure DevOps and Git
We will start our Azure DevOps journey with an introduction to Git and how to utilize Git on Azure DevOps. We will also discuss different techniques for Git branching and managing these branches.
The first and foremost crucial module of Azure DevOps that is utilized by developers is its available source control options. Developers can choose to use either Team Foundation Version Control (TFVC) or Git to manage the source code (or even both at the same time). Nevertheless, with the increasing popularity of decentralized source control management, because of the flexibility and integration that the development toolset offers, Git is the more favorable choice to many. Git is natively integrated with both Visual Studio and Visual Studio for Mac.
Creating a Git repository with Azure DevOps
Multiple Git repositories can be hosted under the same project collection in Azure DevOps, depending on the project structure that is required. Each of these repositories can be managed with different security and branch policies.
To create a Git repository, we will use the Repos section of Azure DevOps. Once a DevOps project has been created, an empty Git repository is created for you that needs to be initialized. The other options here would be to import an existing Git repository (not necessarily from another Azure DevOps project or organization) or push an existing local repository from your workstation:

Figure 14.1 – Initializing an Azure DevOps Repository
Important Note
Choosing a repository type used to be an initial decision while creating a Visual Studio Team Services project that couldn't be changed. However, with Azure DevOps, it is possible to create Git repositories even after the initial project's creation, side by side with a TFVC repository.
It's important to note that the clone option allows us to generate Git credentials in order to authenticate with this Git instance. The main reason for this is that Azure DevOps utilizes federated live identity authentication (possibility two-factor authentication), which Git doesn't support by itself. Thus, the users of this repository would need to generate a Personal Access Token (PAT) and use it as a password. The Git for Windows plugin automatically handles this authentication issue by creating the PAT automatically (and renewing it once it has expired). PAT is currently the only solution if you wish to use Git with Visual Studio for Mac.
In the initialize option, we can also select the .gitignore file (similar to TFVC's .tfignore file) to be created so that undesired user data from the project folders isn't uploaded to the source repository.
Branching strategy
Using Git and the Git flow methodology/pattern, a development team can base their local and remote branches on two main branches: development and master.
The development branch is used as the default branch (also known as the trunk) and represents the next release source code until the set of features (branches) are completed and signed off by the development team. At this point, a release branch is created, and the final stabilization phase on the next release package uses the release branch as the base for all hotfix branches for development. Each pull request from a hotfix branch that changes the release version will need to be merged back into the development branch.
The general flow of the feature, development, and release branches is shown in the following diagram:

Figure 14.2 – Git flow Branching Strategy
This general flow is as follows:
- To safeguard the development branch as well as the release branches, developers, whether they're working on local or feature branches, will need to create a pull request that will be verified per the branch's policies.
Important Note
Pull requests promote the peer review process, as well as additional static analysis that needs to be executed in order to contribute to the development or release branches.
- In this setup, the development branch will have a continuous integration build and deployment to the fast ring of the App Center distribution. This allows the dev and QA team to verify the features that have been merged into the branch immediately.
- Once the current release branch is ready for regression, it can be merged into the master branch. This merge is generally verified with automated UI tests (that is, automated regression). The master branch is used as the source repository for Visual Studio App Center slow ring deployments (that is, the staging environment).
- Feature branches that go stale (see the outer feature branch) span across multiple releases and need to be rebased so that the development branch's history is added to the feature branch. This allows the development team to have cleaner metadata about the commits.
- The hotfix branch is used to rectify either failed store submissions or regression bugs that are reported on release branches. Hotfix branches can be tested with automated UI tests (fully automated regression) and manually using slow ring releases.
- Once the master branch is ready for release, a new tag is created as part of a code freeze, and a manually triggered build will prepare the submission package for iOS and Android versions of the application.
This methodology can also be modified to use the release branches for staging and store deployments, rather than using the master branch. This approach provides a little more flexibility for the development team and is a little easier than managing a single release branch (that is, the master branch).
Managing development branches
During the development phase, it is important – especially if you are working with a bigger team – to keep a clean history of the development and feature branches.
In an agile-managed project life cycle, the commits on a branch (either local or remote) state that tasks belong to a user story or a bug, while the branch itself may correlate with the user story or bug. Bigger, shared branches among team members can also represent a full feature. In this context, to decrease the amount of commits while still keeping the source code safe, instead of creating a new commit each time a change set push occurs, you can make use of the Amend Previous Commit feature:
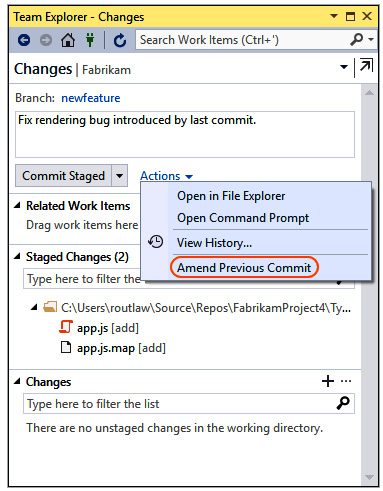
Figure 14.3 – Amending a Commit
Once the commit has been amended with these changes, the local commit will need to be merged with the remote version. Here, the key to avoiding the merge commit between the remote and local branch (since the remote branch has the older version of the commit, hence a different commit) would be to use the --force or --force-with-lease options with the push command. This way, the local commit (the amended one) will overwrite the remote version:
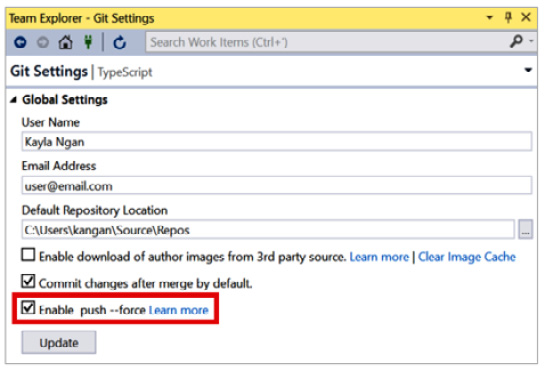
Figure 14.4 – Enabling Push --Force
It is important to note that it is highly discouraged to amend commits and overwrite remote branches when multiple developers are working on the same branch. This can create inconsistent history for a branch on local repositories of involved parties. To avoid such scenarios, the feature branch should be branched out and rebased onto the latest version of the feature branch once it's ready to be merged.
Let's assume that you have created a local branch from the remote feature branch and have pushed several commits. Meanwhile, your teammates pushed several updates to the feature branch:
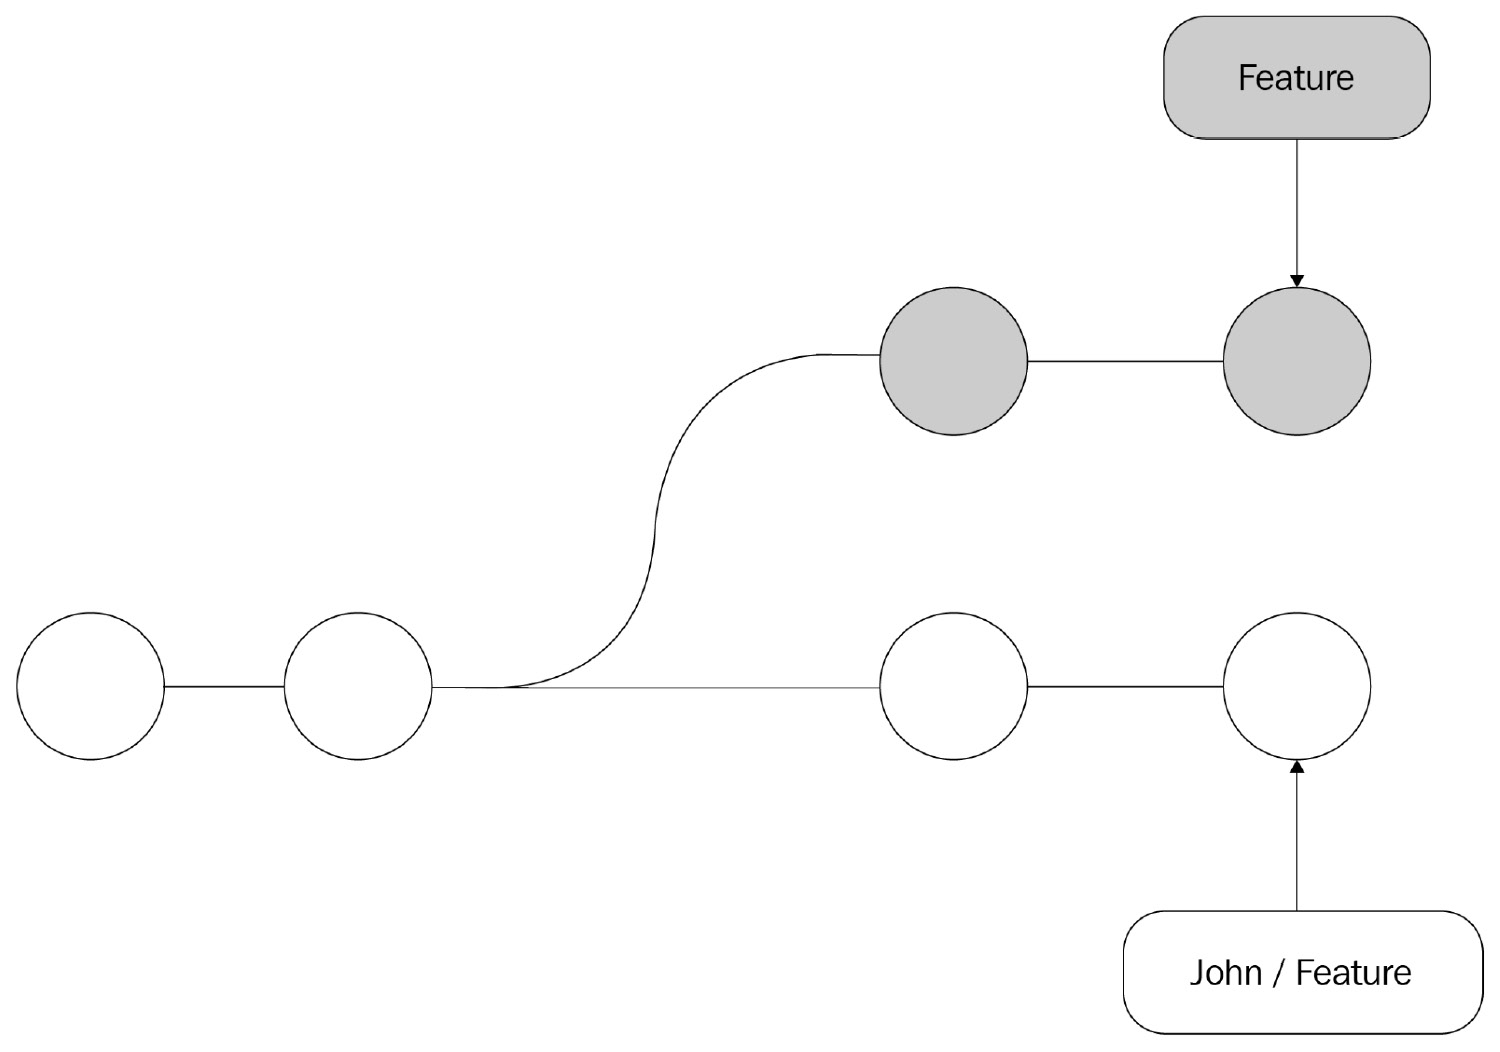
Source: (https://www.atlassian.com/git/tutorials/merging-vs-rebasing / CC BY 2.5 AU)
Figure 14.5 – Git Feature Branches
With a conventional sync (pull and push), a merge commit will be created, and the history for the feature branch will look similar to the following:
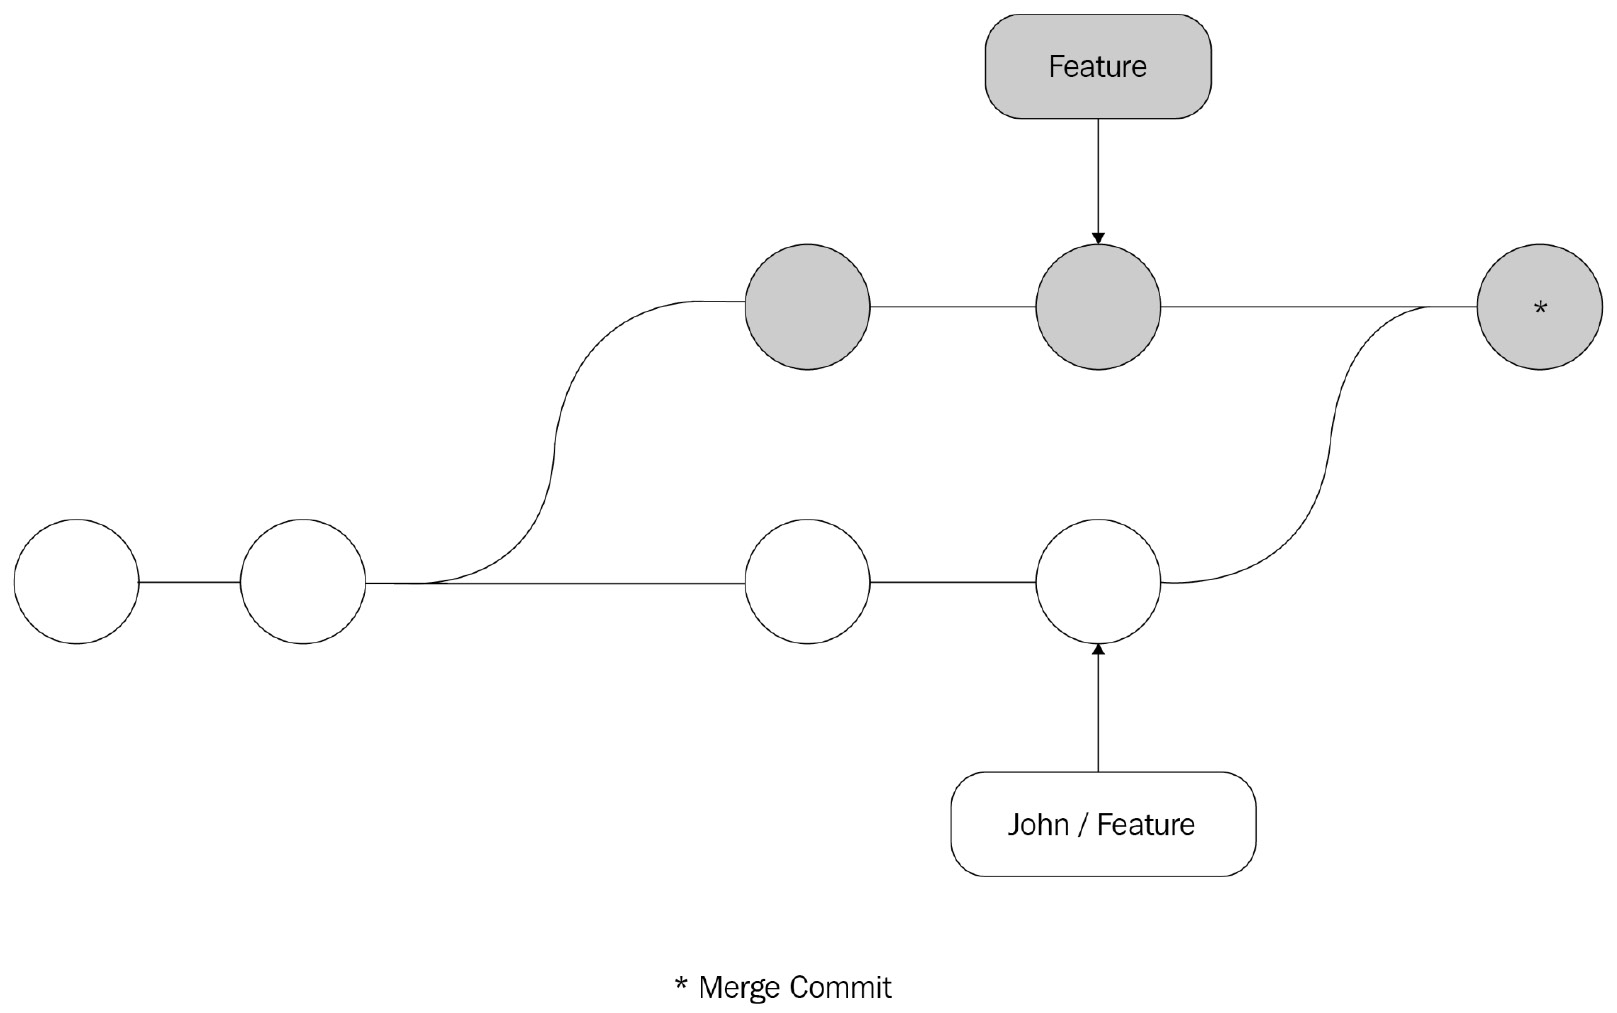
Source: (https://www.atlassian.com/git/tutorials/merging-vs-rebasing / CC BY 2.5 AU)
Figure 14.6 – Git Merge Commit
However, if the local branch is rebased onto the latest version of the remote branch prior to the push, the history will look like this:
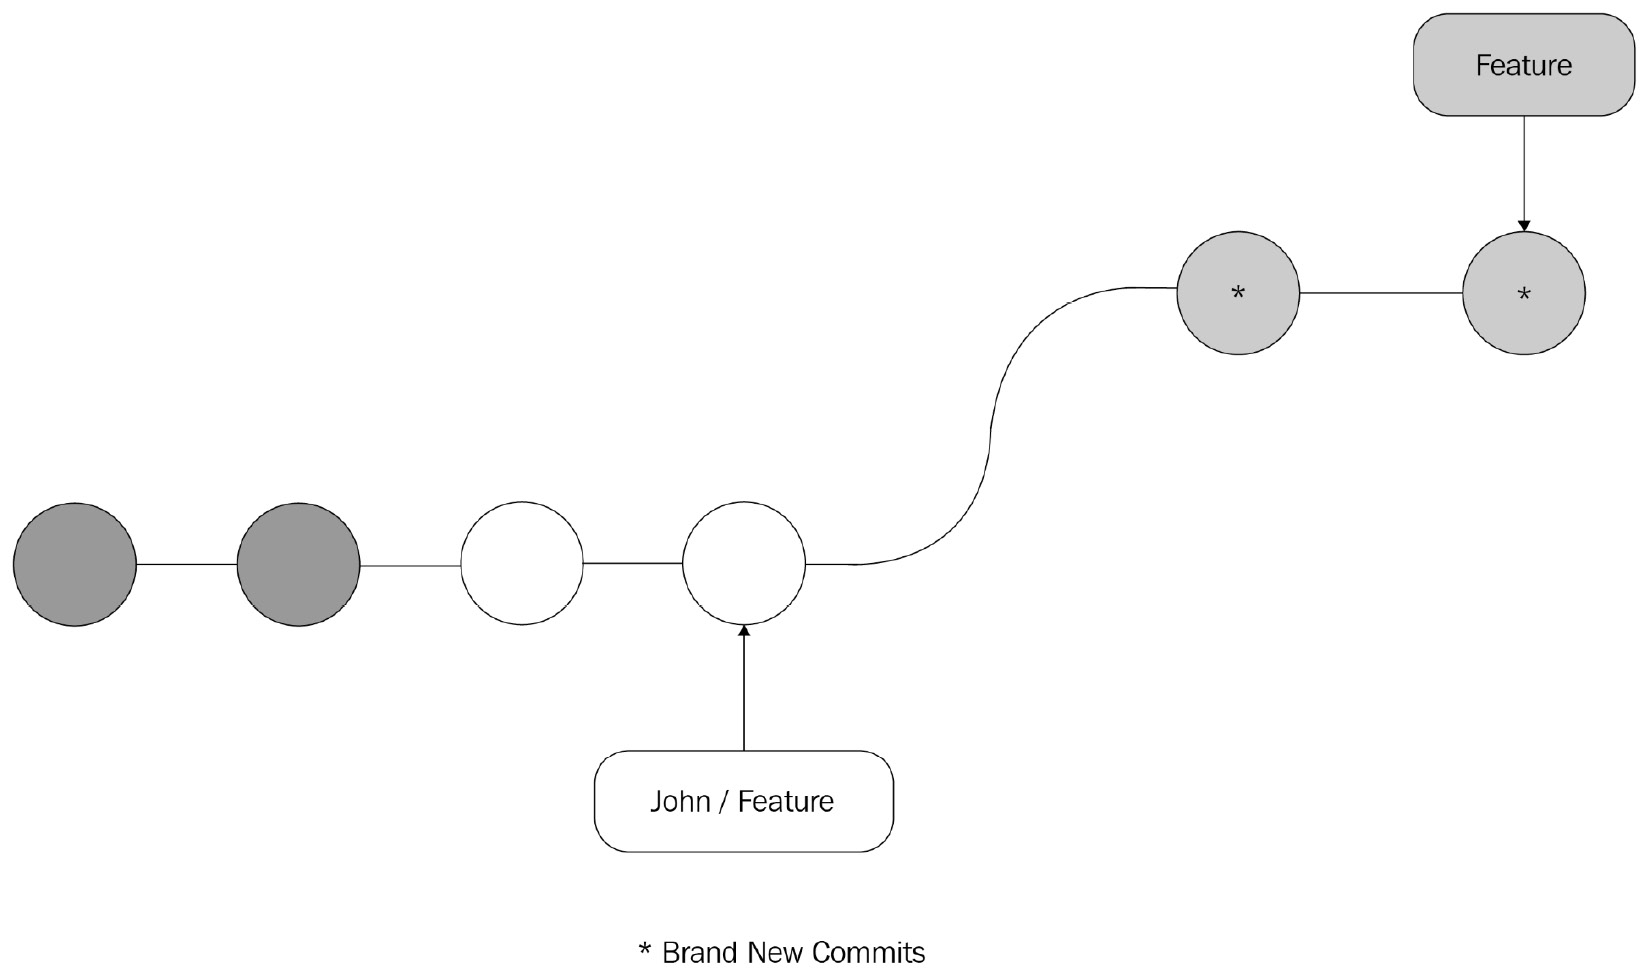
Source: (https://www.atlassian.com/git/tutorials/merging-vs-rebasing / CC BY 2.5 AU)
Figure 14.7 – Git Rebase
A rebase strategy should be employed before you create a pull request to the development or release branches so that the clean history of the branch can be preserved, thus avoiding complex merge conflicts.
In this section, we focused on Git repositories on Azure DevOps, how we can create and initialize them, and how to execute well-known Git branching strategies using Visual Studio while using best practices.
Creating Xamarin application packages
Once our application is ready to be tested on real devices, we can start preparing the pipeline so that we can compile and package the application to be deployed to our alpha and beta environments on App Center. Azure DevOps provides out-of-the-box templates for both the Xamarin.Android and Xamarin.iOS applications. These pipelines can be extended to include additional testing and static analysis.
Using Xamarin build templates
Creating a build and release template for Xamarin applications is as trivial as using the Xamarin template for iOS and Android. Additionally, the UWP (if your application supports this platform) template can also be used to create a UWP build:
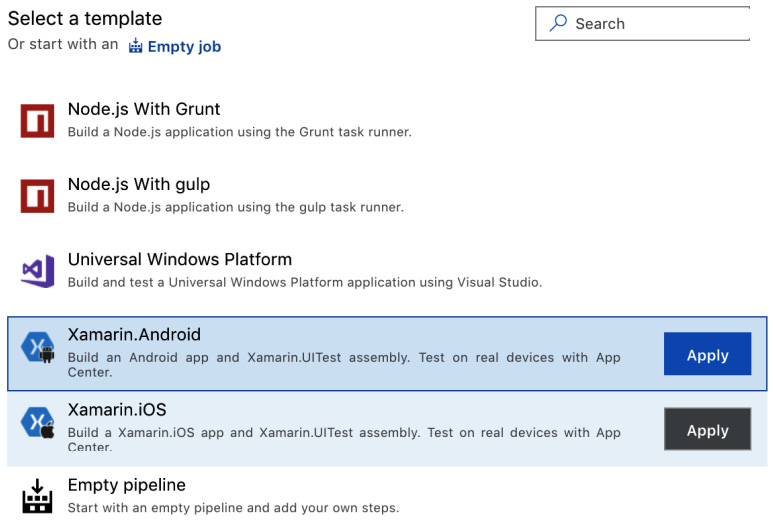
Figure 14.8 – Xamarin Build Tasks
Once the pipeline has been created, we will need to make several small adjustments to both platforms in order to prepare the application so that we can put it on real devices.
Xamarin.Android build
Let's have a look at the steps for building the Android project:
- First, identify the correct Android project to be built using the wildcard designation and the target configuration:
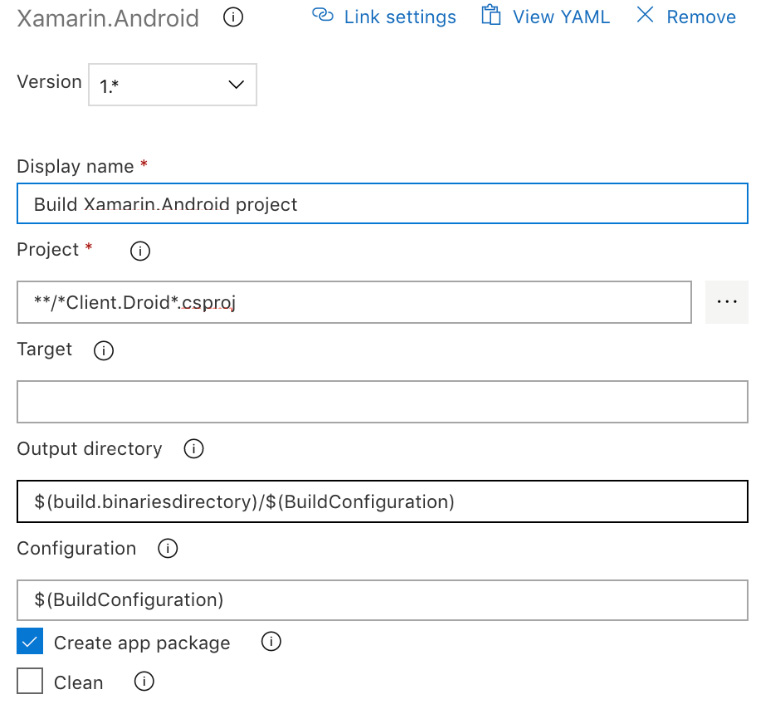
Figure 14.9 – Xamarin.Android Build Setup
Important Note
Note that the configuration and output directory are using pipeline variables. These parameters can be defined in the Variables section of the Pipeline configuration page.
- Select a keystore file so that you can sign the application package.
Unsigned application packages cannot be run on real Android devices. A keystore is a store that contains certificate(s) that will be used for signing the application package. If you are using Visual Studio for development (on Mac or Windows), the easiest way to generate an ad hoc distribution certificate would be to use the Archive Manager:

Figure 14.10 – Creating a distribution certificate
- Once the store has been created, the keystore file can be found in the following folder on Mac:
~/Library/Developer/Xamarin/Keystore/{alias}/{alias}.keystore
It can be found in the following folder on Windows:
C:Users{Username}AppDataLocalXamarinMono for AndroidKeystore{alias}{alias}.keystore
- Now, use the .keystore file to complete the signing step of our Android build pipeline:
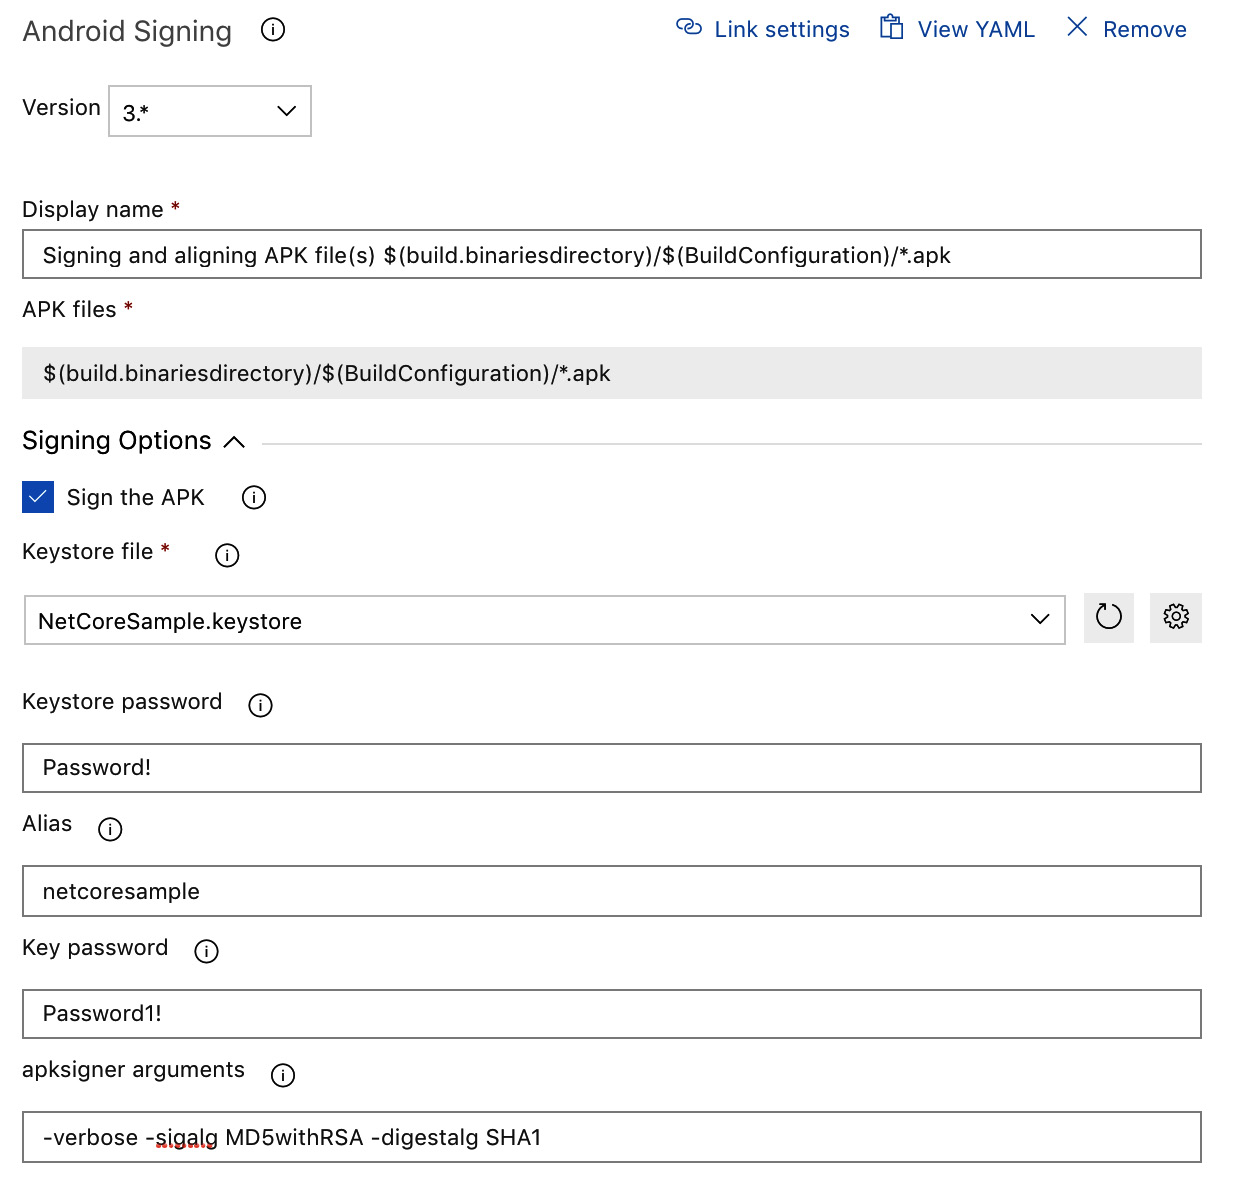
Figure 14.11 – Signing the Xamarin.Android Package
Note that the .keystore file is used by the pipeline as a secure file. In a similar fashion, the keystore password can (should) be stored as a secure variable string.
- The pipeline is now ready. Compile the Android version of the application to create an APK package.
Next, we will need to prepare a similar pipeline for the iOS platform.
Xamarin.iOS pipeline
Similar to its Android counterpart, the Xamarin.iOS template creates the full pipeline for compiling the iOS project. We will need to modify the parameters for the created tasks so that we can successfully prepare the application package. Let's get started:
- Before we start the pipeline configuration, head over to the Apple Developer site to generate a distribution certificate, Application ID, and an ad hoc provisioning profile:
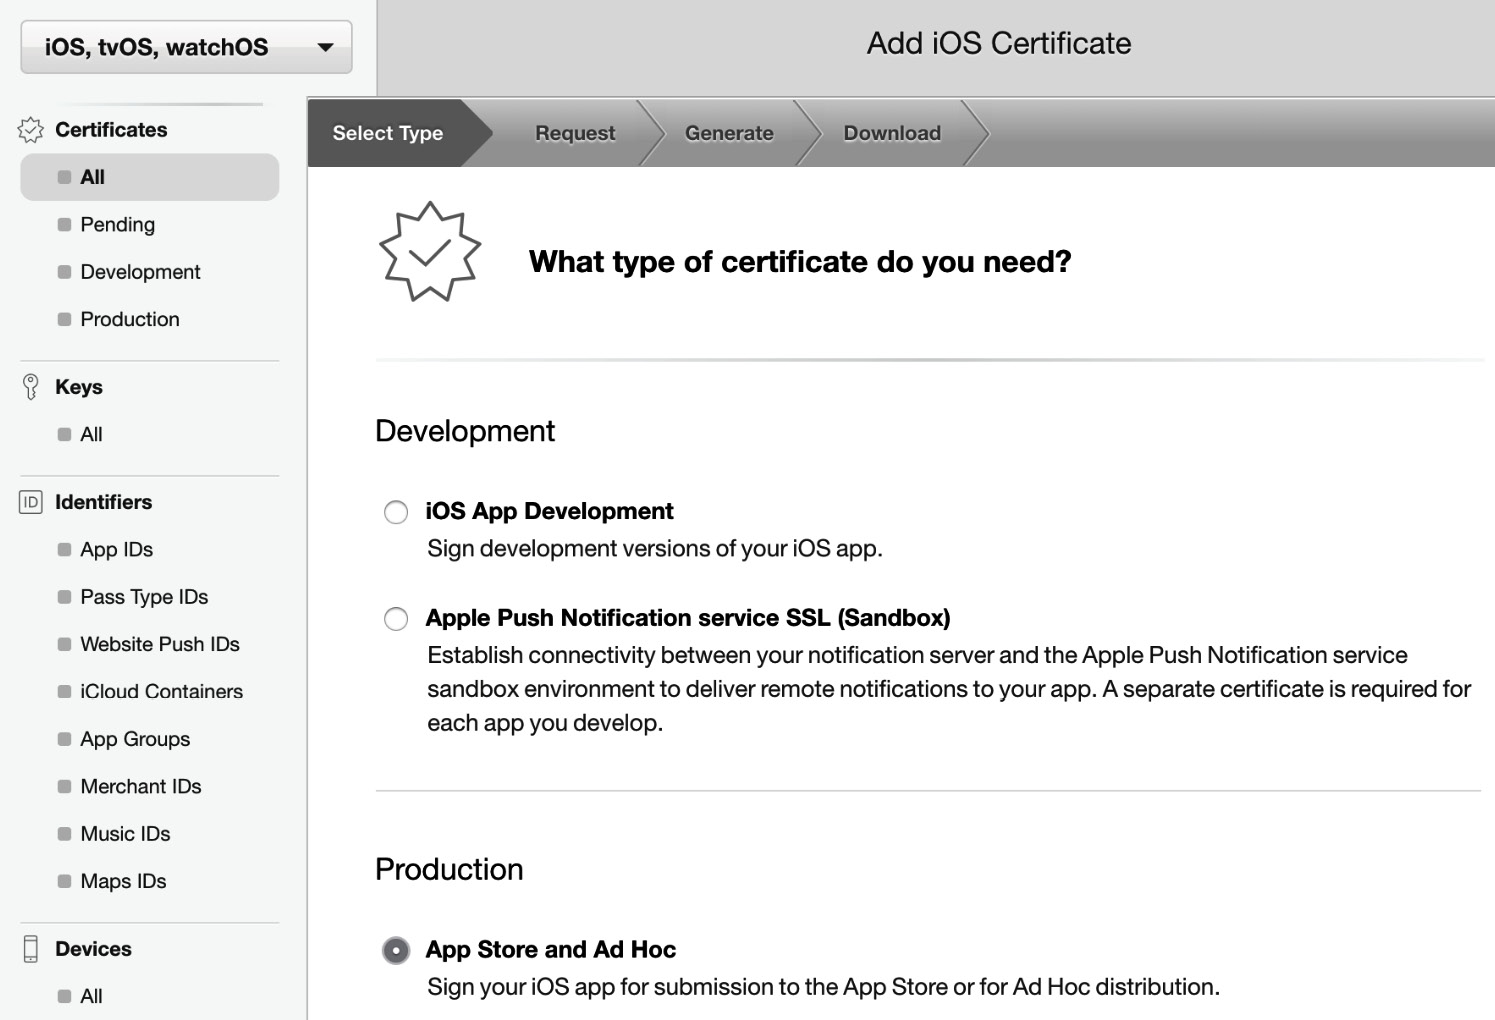
Figure 14.12 – Creating a Distribution Certificate
- Select the distribution certificate option and let the developer site guide you through the steps of generating a CSR and generating the signing certificate.
- Once the certificate has been created, download and install the certificate so that you can export it as a public/private key pair (.p12). You will need to follow these steps to do this:
- Open the Keychain Access tool.
- Identify the distribution certificate that we have downloaded and installed.
- Expand the certificate, thus revealing the private key.
- Select both the public certificate and private key so that you can use the Export option.
Once we have the distribution certificate, we will need an app ID in order to generate a provisioning profile. When generating the app ID, the important decision is to decide whether to use a wildcard certificate (this might be a good option to use with multiple applications in their prerelease versions) or a full resource identifier.
- Finally, create the application provisioning profile for ad hoc distribution. The ad hoc distribution is the most appropriate distribution option for prerelease distribution through App Center.
- With the P12 certificate we've exported and the mobile provisioning profile that we have generated and downloaded from the Apple Developer site, head over to Azure DevOps and modify the Install an Apple certificate and Install an Apple provisioning profile tasks:

Figure 14.13 – Installing our Provisioning Profile and Certificate
Finally, it is important to make sure that the application package is created for real devices, and not a simulator.
- Select the following settings in the Xamarin.iOS build tasks:
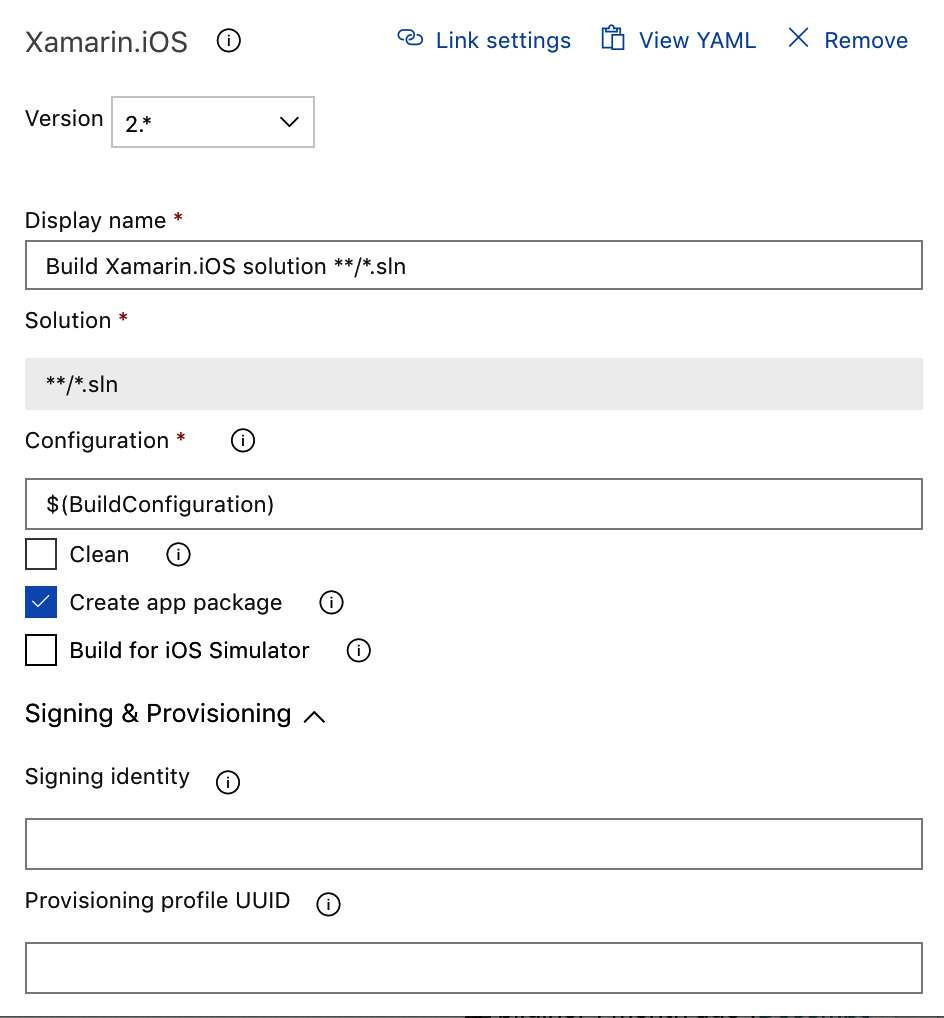
Figure 14.14 – Xamarin iOS Build Setup
Here, the Signing identity and Provisioning profile UUID boxes can be left blank as these elements will be installed by the pipeline. If multiple profiles or certificates exist in the pipeline, you will need to define a specific one to use.
Important Note
The Apple ad hoc distribution profile requires the UUID of the devices that are allowed to use the distributed version of the application. In simple terms, any device involved in using and testing this version of the application should be registered in this provisioning profile, and the application should be signed with it.
This finalizes the setup for the Xamarin Android and Xamarin iOS build pipelines. Now, we can produce the application packages so that they're ready to be distributed. Nevertheless, we have not considered the environment-specific configurations in these setups. Let's take a look at some possible solutions for environment-specific configurations.
Environment-specific configurations
Native applications differ from web applications from a configuration perspective since the application CI pipeline should embed the configuration parameters into the application package. While the configuration parameters for different environments can be managed with various techniques, such as separate JSON files, compile constants, and so on, the common denominator in these implementations is that each of them uses conditional compilation or compilation constants to determine which configuration parameters are to be included in the application package. In other words, without recompiling the application, it isn't possible to change the environment-specific configurations for an application.
To create multiple distribution rings that are pointing to different service endpoints, the application will need to have different single pipelines with multiple configurations to build, or we would need to create multiple pipelines to build the application for a specific platform and configuration.
Creating and utilizing artifacts
To increase cross-project reusability, we can use the package management extension for Azure DevOps. UI components across Xamarin projects, as well as DTO models shared between Azure projects and the client application, can be merged into NuGet packages with their own life cycle: develop-merge-compile-deploy.
Storing these modules in a separate project/solution in a separate Git repository within the same Azure DevOps project would make integrating into previously created builds easier.
Once the NuGet project is ready to be compiled and packaged with a defined .nuspec file, a separate DevOps pipeline can be set up to create this package and push it into an internal feed within the same team project.
A sample NuGet build pipeline would look similar to the following:

Figure 14.15 – NuGet pipeline
To include this feed in the Xamarin iOS and Android pipelines, the NuGet Restore step would need to be configured to include the internal feed, as well as the Nuget.org source. Additionally, Nuget.org can be set as an upstream source for the internal feed so that the public packages can be cached in the internal feed.
In this section, we have analyzed various pipeline options for multiple platforms, including Xamarin.Android and Xamarin.iOS, as well as NuGet packages. These pipelines are the cornerstones of the continuous integration and delivery pipeline since they provide the artifacts to be distributed.
App Center for Xamarin
Visual Studio App Center, which expands on its predecessor, HockeyApp, and its feature set, is a mobile application life cycle management platform that's used to easily build, test, distribute, and collect telemetry data from iOS, Android, Windows, and macOS applications. Its intrinsic integration with various repository options and build capabilities can even be used to migrate the development and release pipeline from Azure DevOps. Visual Studio App Center, just like Azure DevOps, follows a freemium subscription model, where the developers can access most of its functionality with a free subscription; they would need to have a paid subscription for quota enhancements on certain features.
Integrating with the source repository and builds
Even though we have already set up our source repository on Azure DevOps and its associated build pipelines, App Center can be used for the same purpose.
For instance, if we were to set up the iOS build pipeline, we would follow these steps:
- Start by creating an application within our organization. An application on App Center also represents a distribution ring:
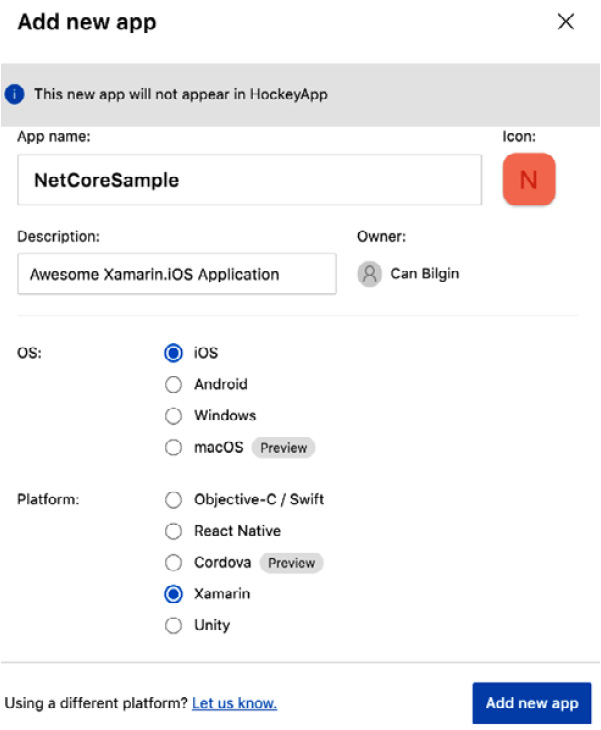
Figure 14.16 – Creating a New App on App Center
- Once the application has been created, in order to create a build, connect the App Center application to the target repository. Just like Azure DevOps pipelines, you are free to choose between Azure DevOps, GitHub, and Bitbucket:

Figure 14.17 – Selecting the Source Repository
- Now that the repository is connected, start creating a build that will retrieve the branch content from the source repository and compile our iOS package:

Figure 14.18 – Setting up our App Center Build
- Once the build has been set up, it can be built either manually or configured to be a CI build that will be triggered every time there is a push to the source branch (in this case, the master branch).
In this section, we created an app registration and associated our source repository from Azure DevOps with it so that App Center builds can be utilized. Next, we will be creating distribution rings on our App registrations so that our CI pipelines on Azure DevOps can provide packages to App Center for distribution.
Setting up distribution rings
We have been mentioning distribution rings in regard to App Center since we started setting up the ALM pipeline for our applications. As we have already seen, a distribution ring refers to an app that's created on your personal or organization account. This ring represents an environment-specific (for example, Dev) compilation or a certain platform (for example, iOS) on our application.
An App Center application is represented through what is called an application slug. An application slug can be extracted from the URL of the App Center page. The URL syntax is as follows:
- https://appcenter.ms/users/{username}/apps/{application}:
App Slug: {username}/{application}
- https://appcenter.ms/orgs/{orgname}/apps/{application}:
App Slug: {orgname}/{application}
If we go back to our Azure DevOps pipeline, we can use this value to set up the deployment to App Center. However, before we can do this, we will need to create an App Center service connection with an API token that you can retrieve from App Center. This will allow Azure DevOps to authorize with App Center and push application packages:
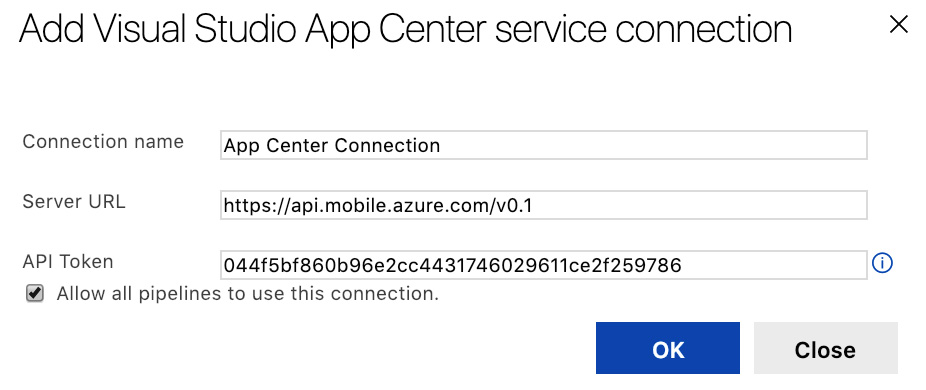
Figure 14.19 – App Center Integration on Azure DevOps
Let's complete the rest of the configuration parameters:

Figure 14.20 – App Center Distribution Task
Repeating the same steps for the Android version using another App Center application would complete the initial CI setup for our application. This build can be, similar to the App Center build, set up to be triggered with each merge to the develop or master branches.
Important Note
It is extremely convenient to store a markdown sheet (for example, ReleaseNotes.md) within the solution folder (that is, in the repository) to record the changes to the application. In each pull request, when developers enter the updates into this file, the release notes about the changes being deployed can easily be pushed to the alpha and beta distribution channels.
In this section, we successfully created application registrations in App Center and created simple build pipelines for demonstrating its capabilities. Finally, we integrated the previously prepared Azure DevOps pipelines into App Center application registrations so that they can be used as distribution rings. In the next section, we will focus on the App Center releases.
Distributing with App Center
Aside from the build, test, and telemetry collection features of App Center, the main feature of App Center is that you can manage the distribution of prerelease applications, as well as automating submissions to public and private App Stores.
App Center releases
Once the application package has been pushed from the build pipeline to App Center, an application release is created. This release represents a version of the application package. This package can be distributed to a distribution group within the current distribution ring or an external distribution target:
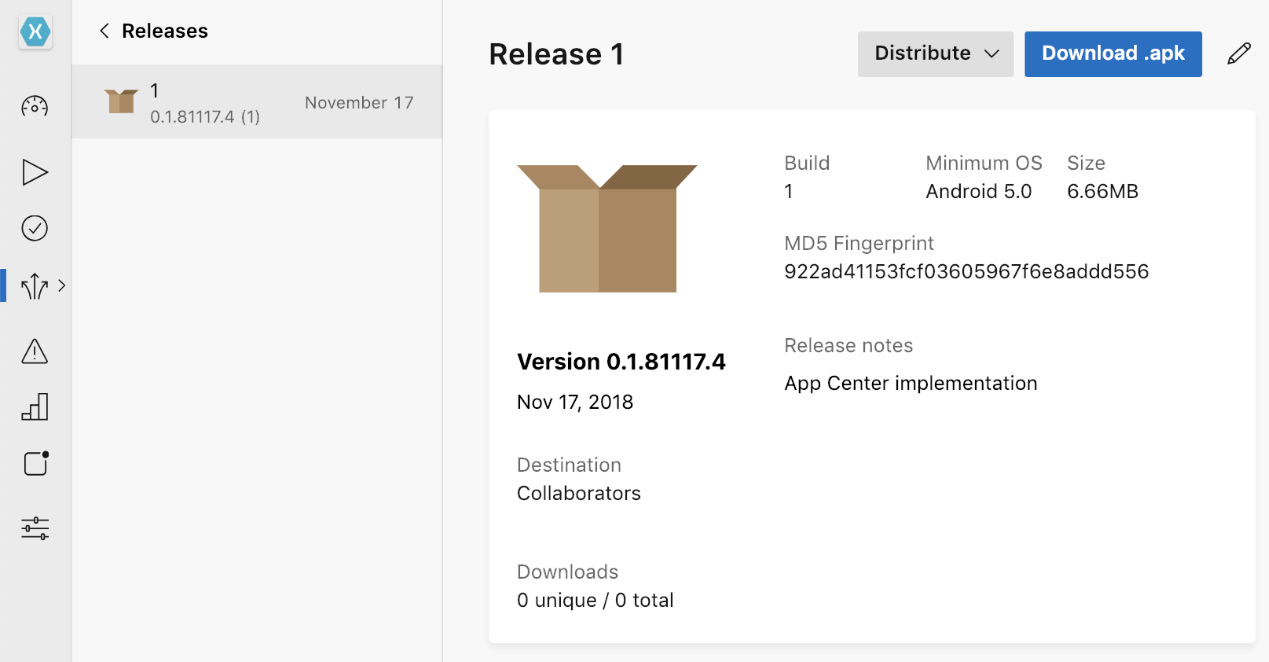
Figure 14.21 – App Center Release
When a release is created, it can be accessed by the collaborators group (that is, developers who have management access to App Center).
AppCenter distribution groups
Distribution groups are groups of developers and testers that an application release (environment- and platform-specific versions of the app) can be distributed to:

Figure 14.22 – App Center Distribution Groups
Distribution groups are extremely valuable since they provide additional staging for different distribution rings. For instance, once a release version has been pushed to App Center from Azure DevOps, the first distribution group can verify the application before allowing the second distribution group access to this new release. This way, the automated releases from various pipelines can be delivered to certain target groups on both alpha and beta channels.
Additionally, if you navigate to the collaborators group details on an iOS application ring, you can identify which devices are currently included in the provisioning profile:

Figure 14.23 – App Center Device Registration
For registering devices, App Center allows you to automatically provision devices for iOS releases. In this setup, each time a new device is registered within a distribution group (given that automatic provisioning is configured), App Center will update the provisioning profile on the Apple Developer Portal and resign the release package with the new provisioning profile.
App Center distribution to production
Once the application has been certified on lower rings (that is, alpha and beta), the App Center release can be pushed to the production stage. The production stage can be the target public App Store (for example, iTunes Store, Google Play Store, and so on), or the application can be published to users using Mobile Device Management or Mobile Application Management (for example, Microsoft Intune).
To set up iTunes Store as the target store, you will need to add an Apple Developer account to App Center. Similarly, if your target is going to be InTune, an administrator account should be added to your App Center integration:
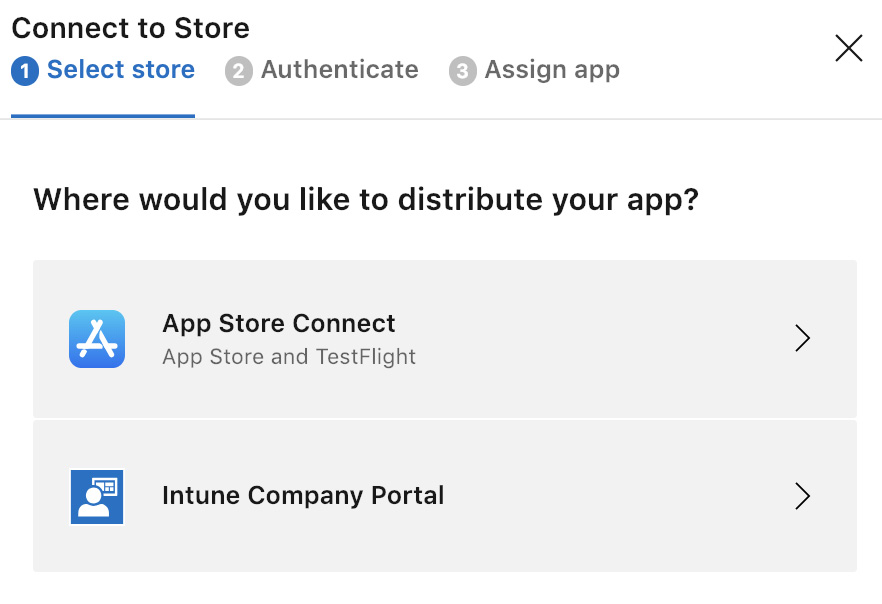
Figure 14.24 – App Center Distribution to Stores
It is important to note that App Store Connect submissions will not bypass the Apple store verification for the application package – it is simply a handover process that is normally handled through Xcode.
App Center telemetry and diagnostics
App Center offers advanced telemetry and diagnostic options. To start using these monitoring features, the App Center SDK needs to be installed on the application and initialized for all target platforms. Follow these steps to learn how:
- Install the NuGet package from the public NuGet store. Use the package manager context as follows:
PM> Install-Package Microsoft.AppCenter.Analytics
PM> Install-Package Microsoft.AppCenter.Crashes
- In this case, we are creating a Xamarin.Forms application, so the initialization does not need to be platform-specific:
AppCenter.Start("ios={AppSecret};android={AppSecret};
uwp={AppSecret}", typeof(Analytics), typeof(Crashes));
- Once the App Center SDK has been initialized, default telemetry information, as well as crash tracking, is enabled for the application. This telemetry information can be extended with custom metrics and event telemetry using the available functionality within the SDK:
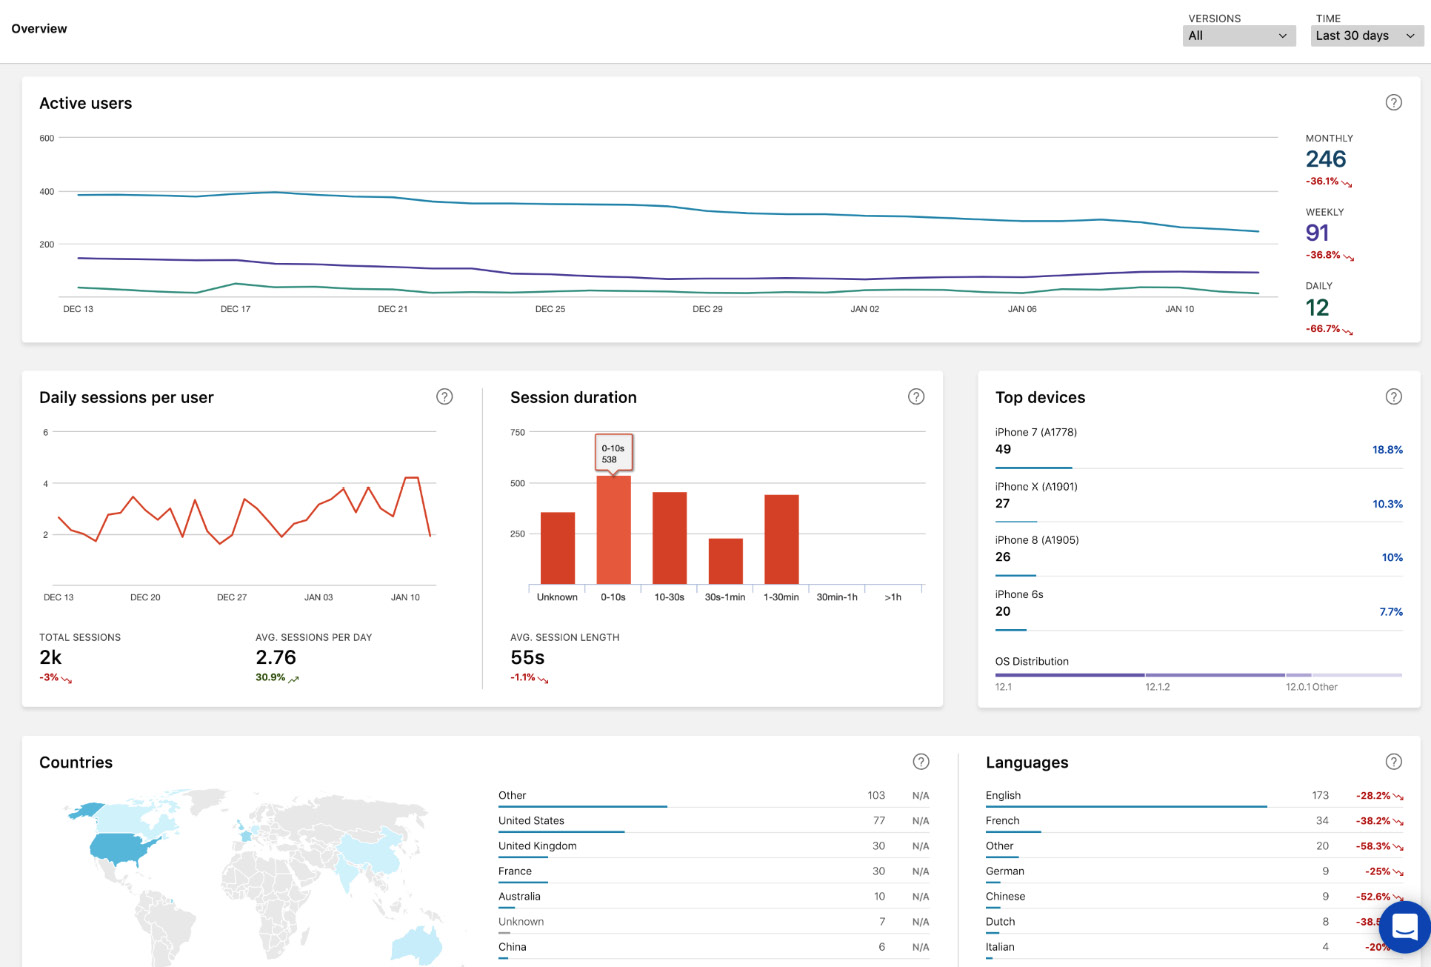
Figure 14.25 – App Center Telemetry Collection
On top of this telemetry information, App Center allows you to track two types of error information: app crashes and errors. App crash information is logged together with the telemetry events that lead to the application crashing, allowing developers to easily troubleshoot problems.
Moreover, telemetry information can be pushed to Application Insights so that it can be analyzed on the Azure portal.
Summary
In this chapter, we set up the initial build pipeline, which will be expanded on in the upcoming chapters. We also discussed the available ALM features on Azure DevOps and Visual Studio App Center, as well as how to effectively use these two platforms together. Depending on the team's size and the application type, many different configurations can be implemented on these platforms, thus providing developers with an automated and easy-to-use development pipeline.
In the next chapter, we will learn how to monitor our mobile application, as well as the Azure resources that are used with Azure Application Insights.