
9 Preparing the Environment for Your First Collection
If your collection and analysis environment is set up properly, you are far more likely to extract and analyze forensic data successfully. If the environment is set up improperly, however, you can be confronted with many problems throughout an examination. Perhaps, for example, the collection device or computer is different from the analysis computer, and the optimal configurations on the two may be different as well. In a poorly configured environment, software may be ineffective not only at connecting to the device but also at extracting valuable data, leading to frustration.
Typically, software vendors include specifications on release notes or user guides that detail the computer configurations required to run their software properly. Sometimes, however, vendors’ configurations are unrealistic for a working environment in which several different types of software are stored on the computer, and their minimum requirements are insufficient for running all the software. In addition, because forensic software solutions often write critical data temporarily as well as permanently, you need to know the location of this data, especially when you’re conducting sensitive investigations.
Device drivers are also critical to a mobile device examination, and when properly installed, they provide the conduit to the device’s digital data store. The mobile device examiner is often responsible for setting up the system at a scene location, so it’s important that he or she get to know the devices. What happens when a driver is not installed properly? Obviously, communication to the device will not occur. But do all the drivers have to be installed? Many devices can also mean many drivers, which can hinder the computing environment’s performance, especially in the Windows environment.
For the many reasons covered in this chapter, examiners often create virtual machines to operate each type of mobile forensic software in their toolboxes. This often eliminates the configuration problems that can be associated with each piece of software. Both NowSecure (which is built on Santoku Linux) and Santoku are Linux virtual machines that have been configured and fine-tuned to help eliminate some configuration problems, but they cannot solve all problems. Subsequently, Santoku Community Edition, sponsored by NowSecure, has not been updated since September 2014. In addition, some forensic software solutions cannot be run in a virtual machine and must be installed in a traditional, statically installed operating system. Not only do some mobile forensic solutions inhibit their software from running within a virtual machine, but devices such as iOS do not work well with virtual machines because of driver issues. When an Apple iOS device is plugged in, a driver installs, but when you’re conducting a non-invasive physical collection of the device, additional drivers for Device Firmware Update (DFU) and iBoot must be installed on the fly. This installation flow gets caught up when the device drivers first attempt to connect with the host operating system before the virtualized system can take hold, often causing errors. Furthermore, additional drivers are required for the acquisition of Android devices at the physical level, but drivers are also required during the extraction process. For this reason, and others, some devices simply cannot be collected using a virtualized environment.
![]()
Mobile forensic solutions that offer software installed on hardware, such as Cellebrite UFED Touch 2 and other embedded mobile forensic units, are not covered in this section, because these devices are self-contained hardware units that come preconfigured with device drivers. Other solutions from Cellebrite include the UFED 4PC and Physical Analyzer, which do require that device drivers be installed.
Creating the Ideal System
Computer specifications typically depend upon the analysis functions of the software that is installed on the system. If a software solution contains features such as data carving, database processing, searching, or other hardware-intensive functions, it would stand to reason that a more powerful computer solution should be used. Some software applications that extract data from a mobile device have little or no analysis capabilities, and a less powerful computer solution would be needed. The particular situation or mission will generally dictate the type of hardware and software configuration that a mobile examiner should use.
Most software vendors list the minimum specifications required for the base operating system, but few take into account the installation of other mobile solutions on the system. Experience has shown that the minimum specs that are listed for many vendors are too low for today’s devices and, if used, can have negative effects on the overall collection and analysis process—even without the installation of another mobile forensic solution.
For example, consider the minimum specs listed for MSAB XRY Logical on its web site (www.msab.com):
• Processor Intel dual-core processor 1.6 GHz dual-core (Recommended 2.0 GHz dual-core)
• RAM 4GB
• 2GB hard drive space for the application
• 500GB for the storage of data
• USB ports Minimum two ports
• Operating system Microsoft Windows 7 64-bit (recommended Windows 10 64-bit)
• Windows .NET 4.5
• Screen resolution of 1366 × 768
The software will function and run with these specifications, but other processes must take place during the collection of the device, and with the low specs indicated here, operating system performance will be affected and the process can become frustrating.
The following sections offer general recommendations for building a mobile forensic environment that will efficiently run most mobile forensic software without issue. These are recommendations based upon a typical install running three mobile forensic tools simultaneously. Each additional software solution installed on the system will generally degrade the performance of the computer, so you should make adjustments as necessary.
![]()
These recommendations are based upon multiple tools installed on the system per the guidelines outlined in this chapter.
Processor (CPU)
The processor, or central processing unit (CPU), type is integral to the success of your forensic software. The CPU runs the computations, functions, and I/O specified by the system, and its performance, measured in gigahertz (GHz), depends on several factors. The higher the clock speed rate of the CPU, the more functions it can perform each second. For example, a 3.4 GHz processor can perform 3,400,000,000 cycles per second, which is obviously more computations than a 1.8 GHz processor that performs 1,800,000,000 cycles per second. Although a higher clock speed rate means more cycles are performed, this should not be your only consideration in choosing a comparable processor, especially when it includes multiple cores. A CPU can contain multiple cores that enable simultaneous computations n times, where n equals the number of processors. So a computer with more cycles per second (GHz) but with a single or dual core may handle less information and run more slowly than a computer containing a processor with four cores and a slower clock speed.
Another important consideration in processor selection is choosing a 64-bit (x64) versus a 32-bit (x86) processor. A processor that is capable of x64 operations can handle twice as many bits (64) of information with the same clock speed as an x86 processor. A computer with at least a dual core capable of 64-bit processing should be the minimum recommended for mobile forensic software.
![]()
Even if the mobile forensic solution can run on a 64-bit machine, that doesn’t necessarily mean it operates in 64-bit mode. Some solutions can run as a 64-bit solution but operate only in 32-bit mode. Be sure to check the documentation to gauge your expectations regarding performance.
RAM
Random Access Memory (RAM) enables the processor to run computations on the flash memory rather than on the actual storage disk of the computer. When the processor places data into a computer’s temporary memory, faster input and output result, which means data analysis can be completed more quickly. RAM is typically measured in gigabytes (GB) in today’s computers. Mobile forensic software running in a Windows environment should have a minimum of 8GB of RAM, based on a single running instance of software at a time. Anything less than 4GB of RAM will not corrupt or invalidate the device collection, but it can cause software solutions to crash from out-of-memory exceptions.
By Microsoft’s recommendations, Windows requires at least 1GB of RAM to run on an x86 system and at least 2GB to run on an x64 system, which gives the forensic software approximately 3GB of RAM to conduct the collection, analysis, or reporting—or all these functions simultaneously. If Windows cannot access the required RAM or is left with less than the required memory resources, the operating system will display the familiar “Blue Screen Of Death” (BSOD). If a BSOD occurs during a collection or an analysis, the information will be lost and the collection or analysis will most likely have to be redone.
Most software vendors in the mobile forensic field recommend that a minimum of 2GB of RAM should be used, but with only 2GB of RAM, even a small device containing approximately 10,000 records will have noticeable limitations. With most smart devices having hundreds of thousands of records that need to be processed using RAM, less than 4GB of RAM is not recommended, hence having 8GB will be sufficient.
Input/Output (I/O)
A computer’s I/O throughput can also have a dramatic effect on the success and overall presentation of the forensic software. I/O involves not only the physical USB hub that is part of the computer but also secondary hubs attached to the computer. I/O is directed by the processor, and it’s important that you understand how the controller and processor work together.
The USB controller and its USB hubs on a computer come in three types: 1.0, 2.0, and 3.0. USB 1.0 is the slowest I/O and USB 3.0 is currently the fastest. USB 1.0 is seldom found in newer computers these days, but many mobile devices communicate only at USB 1.0 speeds. It is recommended that at least three USB ports be available in a forensic workstation, including at least one USB 3.0 port. Table 9-1 shows information specifications from the USB Implementers Forum (www.usb.org).
TABLE 9-1 USB Speeds as Determined by USB-IF
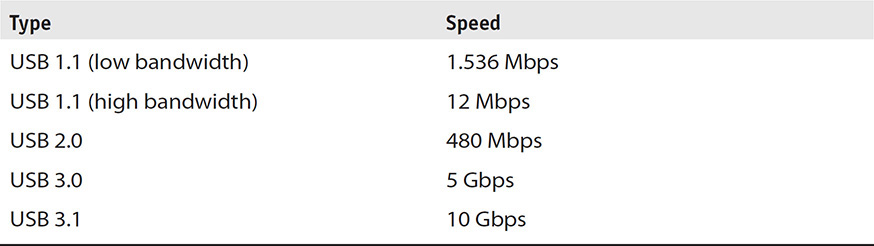
Simply having a USB 3.0 port does not necessarily mean that information will flow at a higher rate from a mobile device to the software during collection. The mobile device and the software conducting the collection will govern the speed of connection and data transfer. As specified, most devices communicate using USB 1.0 protocols. USB 3.0 and USB 2.0 are backward-compatible, so the connection between device and computer is not much different from that of USB 1.0 when the device is connected to one of these USB drivers. However, the speed of data output from the device to the collection computer can be noticeable. Obviously, collection speeds using USB 3.0 will be faster than those of USB 1.0 and 2.0, but if the device cannot output at a higher rate, the speed of the computer’s USB hub will not matter. The speed is dictated by the device and software, not the computer’s port.
Storage
Storage space and storage media are often underestimated by examiners seeking to collect and examine a mobile device, perhaps because the physical size of the device is misleading as to the amount of actual storage available and the number of computations and calculations completed by the mobile forensic solution. Today, the most popular mobile smart device’s (iOS and Android) on-board storage averages 32GB. Most mobile forensic storage solutions need to be twice the size of the evidence when processing a single device because of the storage of the collected image and any temporary storage used during examination, processing, and analysis. You must consider portability, segregation of forensic tools, and I/O speed when choosing a storage medium for the mobile forensic solution and device processing. The use of multiple hard drives for the forensic analysis of mobile devices is not required, but it is often critical because of the many variables, processing overhead, and growing size of today’s mobile devices. Apple iPad devices now come with up to 512GB of storage, and Android devices routinely carry 64GB SD cards and even up to 2TB cards, so having additional storage available for these devices is necessary.
The operating system, utility software, and forensic software should be installed on a hard drive devoid of any evidence or temporary data collected from a forensic tool. This drive should be used only to run the computer and associated software. By segregating the entire OS and software to a single drive, you can clone the drive and restore a pristine copy without compromising evidence or the integrity of the OS and software. In this way, forensic software and other related software can be maintained, changes and updates to the operating system or restores can be made without compromising evidence, and disk capacity does not shrink due to saving evidence images, temporary files, or other files relating to the processing and analysis of mobile devices. The operating system and software drive can be a traditional spinning hard drive (HDD) or solid-state drive (SSD) with a minimum of 250GB of storage.
A secondary drive should be used to store all temporary data, both from the operating system and forensic software. If using Windows, moving the location of the Windows pagefile
.sys file to another drive can also increase software performance. The Windows pagefile.sys file is used as a virtual memory swap file when a computer’s RAM is exceeded and is often set to the same size as available physical RAM installed to the computer. If the pagefile.sys file is moved to an external drive, the operating system could crash if the drive is removed from the system, so moving the pagefile.sys file to an internal drive is recommended if the move is warranted.
The location of pagefile.sys file differs between Windows 7, Windows 8, and Windows 10. The following instructions show how to change the location of the pagefile.sys file for Windows 7, 8, and 10.
For Windows 7:
1. Press the Windows key.
2. Right-click Computer and then choose Properties.
3. Click Advanced System Settings.
4. On the Advanced tab, under Performance, click Settings.
5. In the Advanced tab’s Virtual Memory section, click Change.
6. Clear the Automatically Manage Paging File Size For All Drives checkbox.
7. Under Drive [Volume Label], click the drive where the page file should be stored.
8. Check the Automatically Manage Paging File Size For All Drives checkbox.
9. Click OK.
For Windows 8:
1. Press Windows key-X, and then choose System in the pop-up menu.
2. Click Advanced System Settings.
3. On the Advanced tab, under Performance, click Settings.
4. In the Advanced tab’s Virtual Memory section, click Change.
5. Clear the Automatically Manage Paging File Size For All Drives checkbox.
6. Under Drive [Volume Label], click the drive where the page file should be stored.
7. Check the Automatically Manage Paging File Size For All Drives checkbox.
8. Click OK.
For Windows 10:
1. Press Windows key-R, type SystemPropertiesAdvanced in the RUN box, and then press ENTER.
2. Click the Settings button in the Performance section.
3. In the Advanced tab’s Virtual Memory section, click Change.
4. Clear the Automatically Manage Paging File Size For All Drives checkbox.
5. Under Drive [Volume Label], click the drive where the page file should be stored.
6. Check the System Managed Size checkbox and select the button to enable the OS to decide the correct size.
7. Click OK and restart the PC.
![]()
Moving the pagefile.sys file is not mandatory, and not moving the file will not adversely affect the evidence you obtain during a mobile device collection and analysis. The recommendation to move the file is based on storage and I/O speed when the file is stored on the same disk with the operating system and forensic software.
The effect of temporary storage is not limited to the operating system, because it affects forensic software as well. Most software solutions use temporary storage to conduct different transactions against the evidence being examined to maintain a usable level of memory for the solution and the operating system. When the transactions are completed by the software solution, the temporary data is supposed to be removed from the disk by the software using that space, but this is not always the case.
Storing temporary data on a secondary drive enables the examiner to control the data, such as removing and purging sensitive data (company intellectual property, financial records, criminal case evidence, or other data), which is often part of the forensic examination. The drive should be dedicated to the temporary storage of the data from the Windows temp folder and pagefile.sys along with any forensics tools. This area can be sanitized after each forensic examination without compromising the operating system or installed applications on another drive within the forensic workstation. Because this secondary drive will be used by both the operating system and forensic software to store large amounts of data temporarily, a drive that is three times the size of the largest device that will be processed is required. Also, an SSD drive, if possible, should be used, which will provide a noticeable increase in both read and write speed during the collection and analysis of the mobile device data, as analysis tools used by mobile forensic software require large amounts of temporary storage to complete transactions.
A third drive should also be used for the storage of the evidence files from mobile devices either temporarily, semi-temporarily, or permanently. This drive is used only for the files and images classified as evidence: the original mobile device image, the output proprietary image from a mobile forensic solution if applicable, any generated reports, exported native files, case notes, case folders, and anything else that will be needed to complete a final report presentation and later archiving. This drive can be an external drive or internal drive with an HDD or SSD configuration. The appropriate size of this disk depends on its intended use: If it will temporarily house the evidence until the case is completed, the size is determined by the number of cases that will be typically concurrently worked. If the drive will store all of the evidence permanently until it can be deleted, a RAID solution can help protect against failing hard drives and data loss and allows for more efficient I/O functions.
External Storage
External storage is not attached to the device that is conducting the collection, computation, and evidence. It has two specific storage options: temporary and semi-permanent. Both are often required, but this is generally determined by the type of software being used and its features.
Using an external device for temporary storage is usually needed when the tool exporting the collected data sends it to an externally attached drive for later analysis, when the temporary data used by the device is later removed by the tool when the tool has completed its work, or in both cases. Tools such as Cellebrite UFED Touch specify that the examiner plug in a removable drive to complete the extraction, which then deposits the collected image and data to the attached removable storage. UFED Classic, which has now reached its end of life and is no longer sold (but still available on online outlets), was able to extract only to storage drives formatted with a File Allocation Table (FAT) file system, which often led to a large number of files for high-capacity devices because of the file size limitations for FAT-formatted devices. The UFED Touch and UFED4PC and Oxygen Forensic Detective can perform writes to NTFS drives, which allows for large file writes.
![]()
Both UFED Touch 2 and Oxygen Forensic Detective can also export the data to a network or mapped drive if needed.
Once the data has been collected, it will be available at the location indicated by the examiner. Also, as discussed, having a secondary drive to write temporary data to is advised, and a removable drive can be used much like an internal drive. However, the I/O of a removable disk will be slower than that of an internal drive, and when a removable drive is used as a temporary location, there are noticeable limitations.
![]()
Some examiners also use the removable drive to store temporary data and export collected image files. Using this method is not advisable for obvious reasons, however, such as possible evidence contamination or inadvertent deletion when the software solution decides to purge the temporary data.
External storage can also enable archiving. When an image of a mobile device is created, it should be stored separately after a copy has been made. The copy image will then be analyzed. Typically, the storage of any electronic evidence should be on RAID to ensure redundancy and safeguard the image should a hardware malfunction occur with the external storage.
Operating System
Mobile forensic tools usually run on some version of Microsoft Windows. BlackBag BlackLight runs on macOS, but BlackLight can also run on Windows.
![]()
Mac setup is not covered here because most examiners who use Macs for mobile device forensics use a type of virtualization that runs Windows. For those using Macs for mobile forensics, the information in this chapter can be used to set up the Windows virtualized environment, just as a user would on a system running Windows.
Some forensics software still indicates that Windows XP is a supported operating system, but using Windows XP is not recommended simply because newer devices and their associated drivers cannot run on XP and this version of the operating system is no longer supported by Microsoft. Also, software built using Microsoft .NET Framework versions later than 3.5 will not run on XP. Most mobile forensic software supports Windows 7, 8, and 10, with a recommendation by most to run Windows 10 (Microsoft extended support of Windows 7 will end in 2020). Experience conducting hundreds of examinations has shown that Windows 10 is much more efficient at communicating with mobile devices and both setting up and then removing drivers as necessary. Previous versions, such as Windows 7, did not remove device drivers from allocated COM areas, and some mobile forensic software had difficulty with communication. However, some device drivers, such as MediaTek, can be installed more easily in Windows 7 simply because of the driver enforcement rules in version 7 versus the newer Windows operating systems.
As mentioned earlier, with today’s forensic processing and its demands on the operating system, if possible, use a 64-bit version of Windows, as long as the forensic software will support it. This will allow for more information to be processed and will address more memory than a 32-bit system.
Allowing automatic updates will also benefit the mobile device examiner; be sure to enable this within the software as recommended. Prior to installing any mobile forensics software, you should install all Windows updates and security patches.
Power functions can also cause difficulties while processing a mobile device. Most communication between a mobile device and forensic software solutions occurs via the USB port and a cable. If the power to the USB port is regulated by the operating system, the forensic solution cannot communicate properly and collection cannot occur. The power to the USB ports for both desktops and laptops is regulated by default in Windows. This enables Windows to turn off the USB ports when the OS believes that there is a need (such as during inactivity, low battery, or hibernation). In theory, Windows should wake the USB ports when a device is plugged in, but experience shows that this is not always the case, depending on the version of Windows installed in the forensic environment.
![]()
Troubleshooting this problem within Windows is covered in the “Troubleshooting the Device Connections” section later in the chapter.
Once the operating system has been updated and configured and all supporting software has been installed (but before any forensic software is installed), you should create a restore point. This restore point will enable the user to return to a baseline if needed. The following procedures show how to create a restore point in Windows 7, 8, and 10.
For Windows 7:
1. Press the Windows key.
2. Right-click Computer, and choose Properties.
3. In the left pane, click System Protection.
4. Click the System Protection tab, and then click Create.
5. In the System Protection dialog, type a description, and then click Create.
For Windows 8:
1. Press Windows key-X, and then choose System in the pop-up menu.
2. Click Properties.
3. In the left pane, click System Protection.
4. Click the System Protection tab, and then click Create.
5. In the System Protection dialog, type a description, and then click Create and OK.
For Windows 10:
1. Press Windows key-X, and then choose System in the pop-up menu.
2. Click Properties.
3. In the left pane, click System Protection.
4. In the System Protection dialog, type a description, and then click Create and OK.
![]()
If possible, use software such as Symantec Ghost to return the forensic computer to a point in time identical to when the image was created, which is unlike the Windows built-in Restore function. I suggest that you create a ghost image after all software is installed but before the first examination. This way, the machine can be brought back to a “clean” restore point after each examination to ensure a clean version before each new collection.
Device Drivers and Multiple-Tool Environments
Using multiple tools is important to achieve success in the world of mobile forensic investigations, but there can be consequences, particularly issues that occur with the unique drivers used by the various types of software to communicate with different mobile devices. Software vendors, at times, develop their own mobile device drivers that do not work with every piece of software that might also be installed on the system. As a result, when a mobile device is plugged in and a software-specific device driver is installed, other software solutions on the computer will be unable to communicate directly using a proprietary driver. This is immediately evident when an error is returned by the software solution indicating that the software was unable to communicate with the attached device. A quick check of the Windows Device Manager can identify the driver and the manufacturer. If the driver is not the original equipment manufacturer (OEM) version of the driver (for example, the equipment is Motorola but the driver is from and XRY or Cellebrite), you could encounter problems with all other software titles that use the OEM driver to communicate with the mobile device. Changing from the proprietary device driver to the proper OEM driver will typically solve the problem.
Some examiners create independent virtual machines for each software product and then run all the virtual machines on a single machine to combat a software-caused driver conflict. This enables all software to run independently and conflict-free using software-specific drivers. This can be a good solution, albeit a more advanced one, but unfortunately not all software will be able to run within a VM. To complicate matters, some mobile devices, such as iOS devices, which disconnect frequently within the VM, attach to the host operating system, which causes a collection failure.
The key to running a multitool environment, or even a single-tool environment, successfully is to understand how to control driver problems.
Understanding Drivers
Mobile device drivers are the gateway that allows hardware or software to communicate with the mobile device. If a device driver is not installed or is improperly installed, communication is generally impossible. Device drivers are not unique to mobile devices; they are also used for printers, scanners, cameras, motherboards, CD/DVD drives, USB controllers, monitors, and other computer peripherals and software. Anything that is not a part of the original operating system code base will need a driver to interact properly with the operating system. Device drivers are used in every operating system available and are undoubtedly one of the most common problems encountered in mobile device forensics.
Device drivers are themselves software applications that enable an operating system or another application to use hardware or other devices with common code and procedures to perform I/O. However, drivers are hardware dependent and also specific to an operating system. This means that, for example, a driver developed for Windows XP will generally not work if it’s installed in any other version of Windows, and a driver developed for an LG device will not work with an HTC device.
A driver is like a switching station, where data from the operating system or application is interpreted upon arrival and translated to communicate to the device by way of the device driver. The device sends data back to the application and operating system as requested. A device driver allows a generic set of instructions from the operating system or application to request to read data, perform functions, and send data independent of knowing what device the software will be communicating with.
Here’s an example dealing with mobile device forensic tools. Many different mobile devices are supported by a mobile forensic tool, but a single set of instructions is used to read data from a mobile device. Consider, for example, processing an Android device logically, when there are more than 18,000 different Android mobile phone devices on the market. How could a development team write specific code for each type of hardware? It is possible, but this would be an enormous task! By using a device driver unique to the Android hardware, the communication code is interpreted and translated to a format specific to the hardware connected by the driver. By using the device driver, virtually all the data collected will use the same communication code transmitted from the forensic solution for any Android device attached. The driver allows the forensic software to “speak” to the device using a single set of commands to enable the support of thousands of devices by way of the single driver.
Now that you have a basic understanding of what device drivers are and how they operate, your next challenge is finding the correct driver for the mobile device that needs to be processed.
Finding Mobile Device Drivers
When a mobile device comes into the lab for processing and has not been pre-installed into the mobile forensic solution, the examiner must locate and install the driver manually on the system before collection can occur.
![]()
Some manufacturers, such as Cellebrite (UFED Touch), have pre-installed the device drivers directly to the hardware device they ship, so generally device drivers are not needed.
There are times when trying to locate mobile device drivers is like trying to find a needle in a haystack. Typically, mobile devices do not ship with a driver on a CD, as most other hardware devices (such as printers and cameras) do, and sometimes drivers are not readily available on the manufacturers’ web sites. Nonexistent or missing drivers are more common with older feature phones, but even some newer Android devices do not have available drivers on the manufacturers’ sites. Often, missing or nonexistent drivers are encountered with newer prepaid devices. In an effort to subsidize the cost of the device, manufacturers will allow the communication port to be disabled. By disabling the port for connections to a personal computer, a company can then offer additional services to transfer media or user data via online services, thus making additional revenue on data transfer that would not be possible if the user could plug the device into a computer and do the same thing. Because some of these drivers are needed and are not available on the manufacturer’s web site, a hunt for the driver ensues.
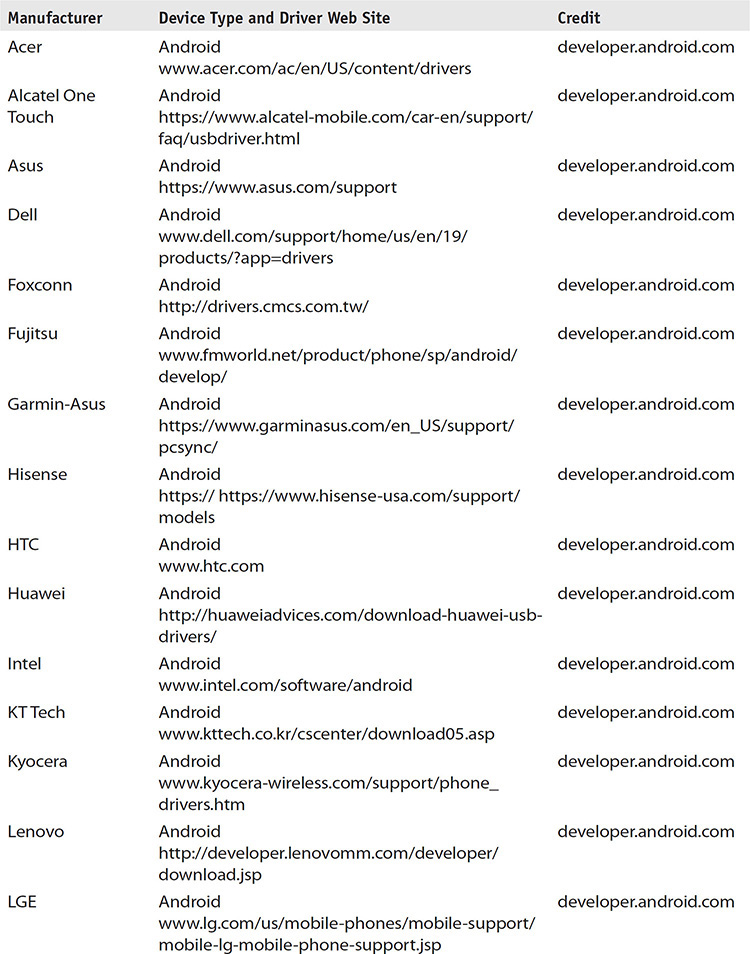
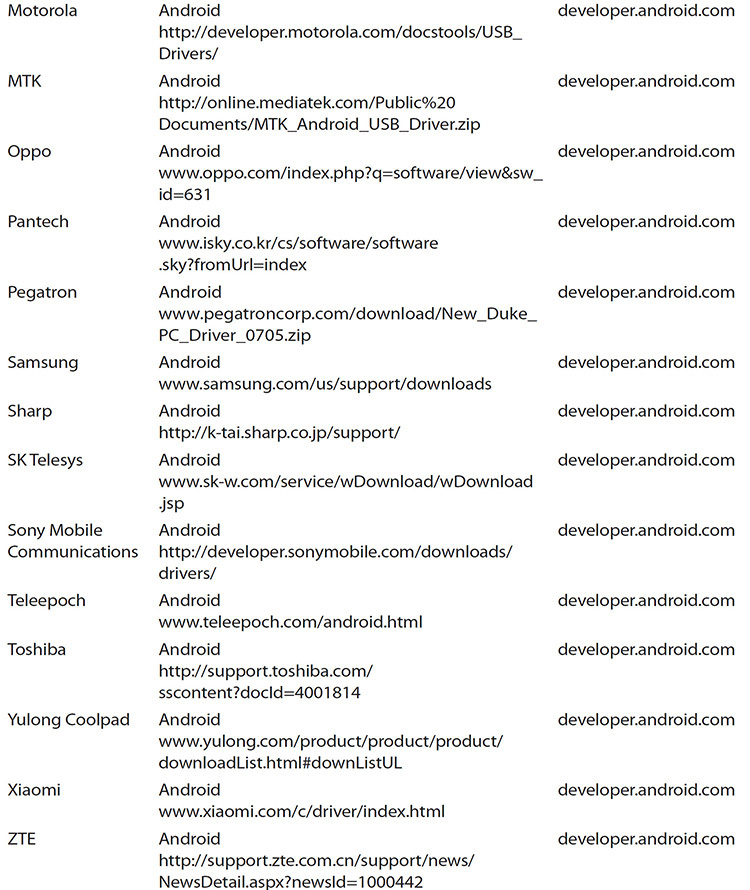
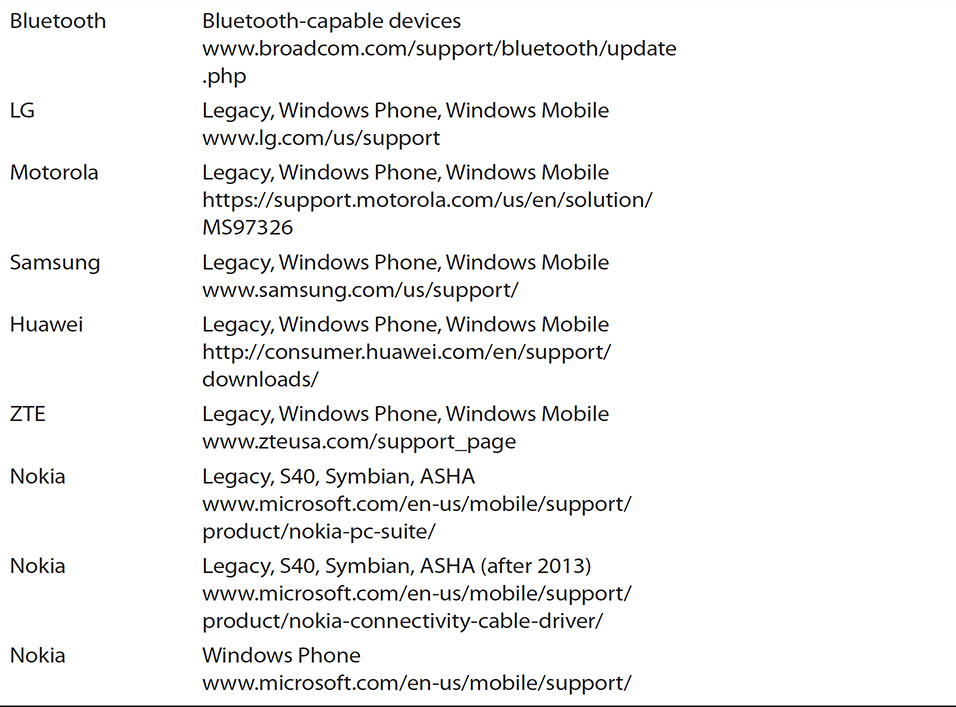
Where does an examiner go to locate drivers if the solution does not have one? The answer is “it depends.” It depends on several factors, ranging from the type of device, the manufacturer of the device, and the type of connection required to transmit the data to the operating system. Table 9-2 is not exhaustive, but it contains information on where to find drivers for the majority of devices encountered.
TABLE 9-2 Mobile Device Drivers for Device Manufacturers and Models
![]()
URLs in Table 9-2 continually change. It is entirely possible the URL will not be correct or will be different from what has been documented at the time of publishing.
Installing Drivers
Once the examiner has located a driver, the next step will be installing it. Most of the drivers located on a manufacturer’s web site include an installation program that makes it easy to install the device and then register it on the operating system, which enables the OS to place it into the proper Windows driver location so that when a device is plugged in, it is installed without user interaction. The method used by Windows when searching for and installing a driver for a new device is outlined in Table 9-3.
TABLE 9-3 Windows Installation Path for Device Drivers (Microsoft Developers Network)

When a device is plugged into a Windows computer running Windows 7 or later, Windows will automatically check the Microsoft Update Services, and if it cannot locate the driver, Windows will check the driver store. If the driver is not located in the driver store, Windows will look to the default system location of the INF (device information file) as specified in the registry HKEY_LOCAL_MACHINESoftwareMicrosoftWindowsCurrentVersion.
![]()
Other operating systems are not covered here simply because most forensic software operates with the Windows OS, which subsequently experiences the most driver issues.
If the driver is located from the Windows Update query or from the default system location for INF files, it is then moved (staged) to the driver store and installed from that location. The driver store, introduced in Windows Vista, is a two-part process comprising staging and installation. To be installed, a driver must be staged, which involves moving the INF file and all the files referenced in the INF file and then verifying and validating the package. If all checks pass, the driver is copied into the store and installed without user interaction. If the driver does not pass (for example, files are missing from INF, the user does not have correct permissions, or the digital signature is not correct), the driver is not installed, and manual installation of the driver must then be handled by the examiner.
![]()
Manually installing drivers for all versions of Windows involves locating the problem driver via the Device Manager and then updating the device with the proper driver.
Windows Device Manager
All examiners should be familiar with the Windows Device Manager, an application within Windows that enables the user to view and update device drivers on the system, check to see that the hardware is functioning properly, and modify the hardware’s settings. How you navigate to the Device Manager depends upon the version of Windows in use.
![]()
Only Windows 7, Windows 8, and Windows 10 are covered here because Microsoft no longer supports Windows XP.
For Windows 7 using Control Panel:
1. Click Start, and then click Control Panel.
2. Click Hardware And Sound.
3. Click Device Manager.
For Windows 7 using the command line:
1. Click Start.
2. In the search box, type mmc devmgmt.msc.
3. Press ENTER.
For Windows 8 and 10 on the main Start screen:
1. Press Windows key-C, and then click Search in the pop-up menu.
2. Enter Device Manager in the search box.
3. Select Apps and then click Device Manager.
For Windows 8 and 10 on the desktop:
• Press Windows key-X, and then click Device Manager in the pop-up menu.
Once you access the Device Manager, you’ll quickly see any existing driver problems. Typically, the yellow exclamation prompt or question mark makes it clear that there is a problem with the installed driver or that a driver is not found. If a driver is not found for a device, the device will be installed in the Other Devices section, as shown in Figure 9-1. If the driver is installed, Device Manager will identify whether a problem exists with it. In both cases, you must install the correct driver before the forensic software can communicate properly with the device. To diagnose the problem and determine what steps will be needed, the Device Manager takes a closer look at what Windows indicates as the problem and the device as described by the operating system.
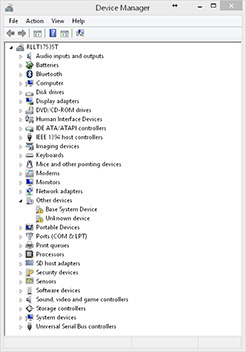
FIGURE 9-1 If devices are not recognized or the driver cannot be found, they are located in the Other Devices section of the Device Manager.
In the Device Manager, locate the device with the exclamation point or question mark—for mobile devices, these are typically located under Ports, Modems, ADB, USB Controllers, and Portable Devices. There are always exceptions, but the most important information will be listed in the properties for the troubled device: Right-click the device and select Properties. A new dialog will open (Figure 9-2) with several tabs and a description of the device that you selected. Directly in the center of the first page under Device Status is the first clue to a problem or problems with the device. The displayed message will provide a short description of the problem and the associated code: in the figure, the message “The drivers for this device are not installed. (Code 28)” is displayed.
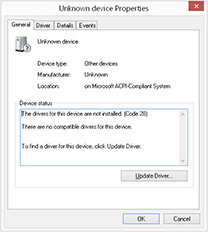
FIGURE 9-2 The Properties dialog for a device in the Device Manager details the device and associated drivers.
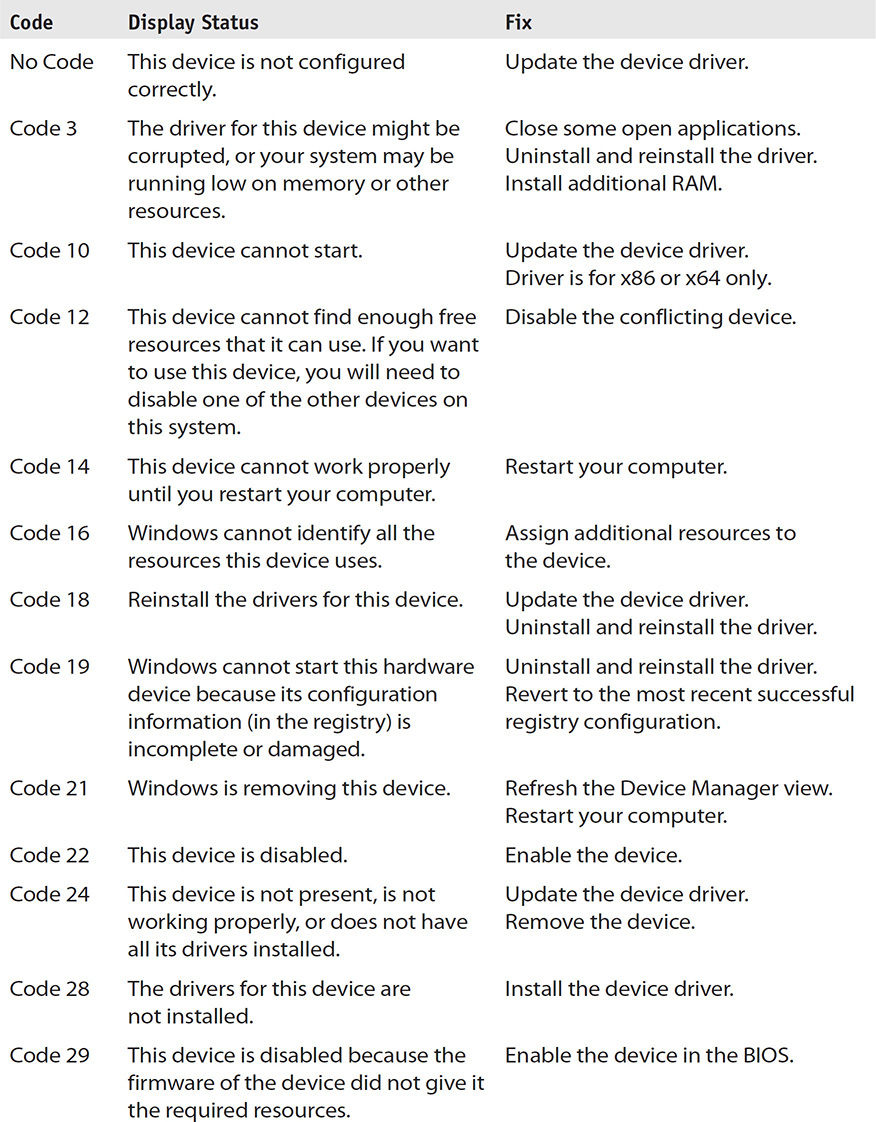
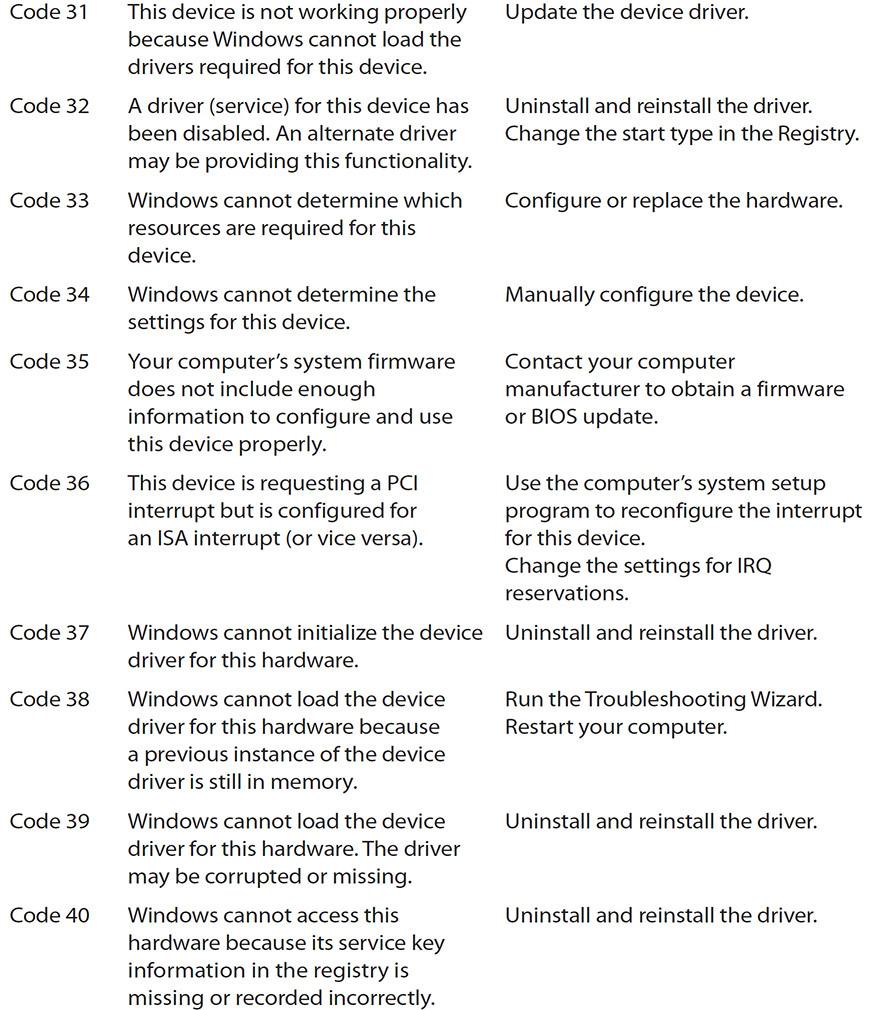
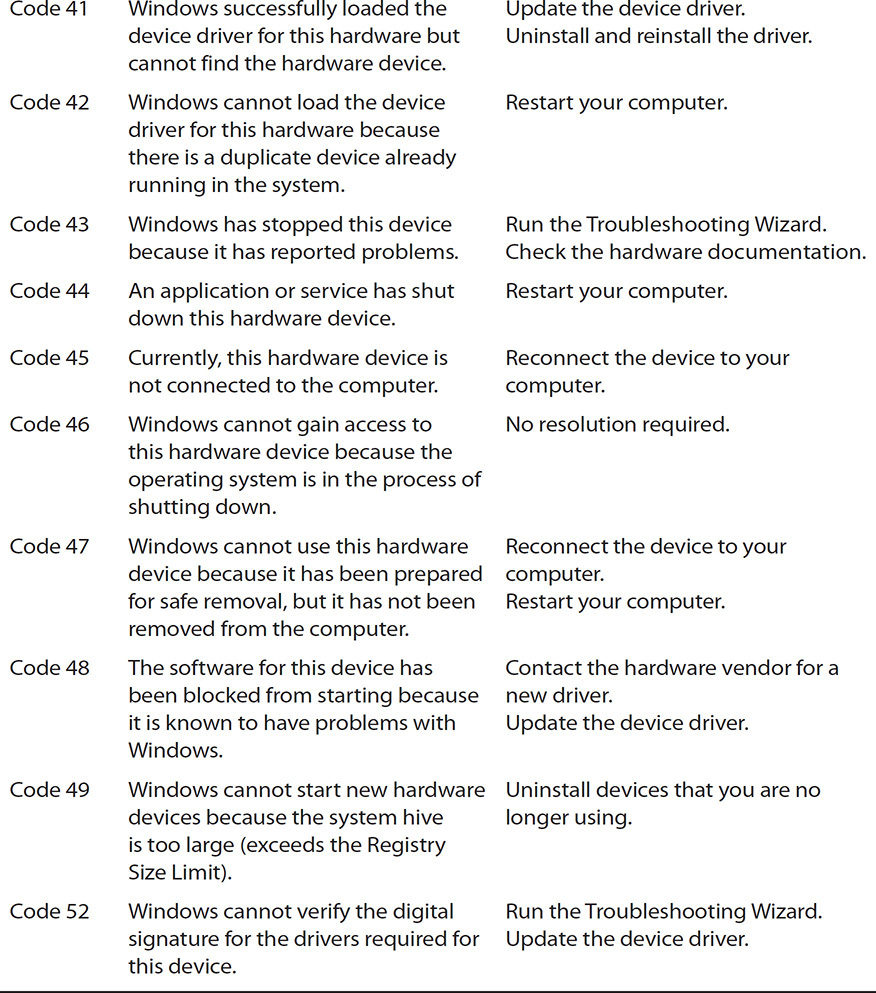
Many codes can be listed here, but typically the codes displayed for a mobile device are Codes 10 and 28. Table 9-4 shows a listing of all the codes used by Microsoft to describe problems in the Device Manager. This is not an exhaustive list, but it includes the most prevalent device problems.
TABLE 9-4 Device Dialog for Each Device Describing the Status, Drivers, and Compatibility (http://support.microsoft.com/KB/310123)
Your next steps will be determined by the code and/or the description of the error listed in the Device Manager. This could involve finding the correct driver package for the device and running an executable program that installs the driver and reattaches the device. Or it might involve you manually installing the driver when an installation package cannot be located. Whatever the course, becoming familiar with the Device Manager in Windows should be one of your priorities.
![]()
Something that has always been suggested, but rarely implemented, is placing a shortcut to the Device Manager on the desktop or taskbar of the analysis machine. By creating a shortcut, the examiner can quickly navigate to the Device Manager if any issues need to be investigated during a mobile device examination.
Identifying the Driver
If a problem exists with the driver and it is determined that the version of the driver is compatible with only a certain operating system version (such as x86 or x64), then generally the device properties will indicate, “This device cannot start. (Code 10),” but it will install. On the other hand, if a driver could not be located by the operating system and the installed device does not have a driver, it will be listed under Other Devices in the Device Manager with a message, “The drivers for this device are not installed. (Code 28).” In either situation, to find the correct driver, you can determine the device information by consulting the device properties, but this time using the Details tab.
The Details tab lists all the information about the device that is connected to the computer system. The important sections and tags for determining the correct driver are Hardware IDs and Compatible IDs. Both will help you locate a suitable driver for the attached device, and both contain valuable information in determining exactly what device is attached to the computer. An example in Figure 9-3 shows a Hardware ID with several lines that are important to the overall meaning; each will need to be broken down. Every USB device has two codes that distinguish it from other USB devices: the Product ID (PID) and the Vendor ID (VID).
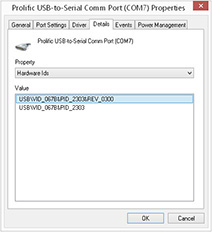
FIGURE 9-3 The prolific cable properties table under the Details tab identifies the assigned PID and VID for the device.
• PID (Product ID) This is an essential part of every driver and must be used. This indicates the type of product or a family of products (such as modem, serial port, human interface device). The PID does not have to be unique and can be anything that a vendor assigns.
• VID (Vendor ID) This is also an essential part of every driver and must be used. A VID must be granted by the USB Implementers Forum, which assigns and maintains all VIDs as part of the compliance program. Sometimes this may not be the vendor of the mobile device. The VID could identify the chip vendor that is either embedded into the cable itself or the silicon chip embedded in the mobile device, but a manufacturer has cooperated with the vendor and conformed to the driver specifications.
![]()
You can determine whether a driver is needed for a cable by plugging in the cable without the mobile device attached. If a driver is installed, or a driver install is attempted but fails, then hardware is embedded in the cable. The typical chips embedded into cables are Prolific or FTDI. If you do not see drivers install when you plug in the cable, check the cable; it may be for charging only and not for data transfer.
Once you’ve obtained this information, you can search both the VID and PID on the Internet to identify the correct driver needed for the mobile device. When you locate the package, you must download and install the INF and associated files manually.
Troubleshooting the Device Connections
At times, a device will not communicate with the forensic software, even when the correct driver has been installed. This might be encountered in the following situations:
• Multiple tools accessing the same device are running concurrently.
• The computer is allowed to manage the power to the USB hub.
• The computer is using a USB hub with multiple devices attached.
• The mobile device does not have enough power.
When multiple software processes are accessing a device, the device will be able to respond only to one at a time. I call this “COM envy”—if a communication port (COM) is open by one piece of software, it will not be released until that software either completes the tasks or releases the device or the software and processes are stopped and closed. Because of this limitation, another software solution cannot connect to the mobile device. When collecting mobile device data, you must have only one software solution running while initializing a connection and conducting an extraction.
Power management of USB hubs can also cause device connection problems, often disabling the connection and causing a collection error. Windows 7, by default, turns power off to the USB hub when the system senses that power needs to be managed. This is particularly noticeable with laptops that are not plugged in because of their power management profiles. There are two ways to manage the power management, but in all instances, the ability for Windows to manage the USB hubs should be disabled.
For Windows 7, 8, and 10:
This should be done for all USB root hub listings.
1. Click Start, or press Windows key-X for Windows 8.
2. In the search field, enter mmc devmgmt.msc.
3. Navigate to the Universal Serial Bus Controllers section at the bottom of the device listings.
4. Locate all USB Root Hub listings.
5. Right-click and select Properties.
6. Select Power Management.
7. Uncheck Allow The Computer To Turn Off Device To Save Power, and click OK.
A better way for both Windows 7, 8, and 10 will be to change the power settings via the power management console:
1. Click Start, or press Windows key-X for Windows 8.
2. In the search field, enter edit power plan.
3. Click OK.
4. Click Change Advanced Power Settings.
5. Scroll to USB Settings.
6. Expand USB Selective Suspend Setting.
7. Switch both On Battery and Plugged In to Disabled, and click OK.
Power to a USB device can also be inhibited when the power is distributed across multiple devices attached to a single external hub. When you’re processing mobile devices, if you use an external USB hub that is attached to the processing computer, drivers may not be installed, and inconsistent connections can occur to an attached mobile device. If possible, attach a mobile device directly to the computer when conducting the mobile device collection, not through a USB hub.
Lastly, the power of the mobile device being examined can also cause problems with device driver installation. If the mobile device does not have at least 50 percent power, when you attach it to the collection computer, a failure to recognize and install the device driver is possible. During all collections, a mobile device should have at least 50 percent power before you connect the mobile forensic solution and throughout the entire extraction process.
Cleaning the Computer System of Unused Drivers and Ports
Windows, in an effort to be efficient, will cache all devices that have been attached to a Windows computer at one time with its assigned COM port number. What is considered efficient by Windows can have dire effects on mobile forensic software, however. This problem has been improved with the release of Windows 8, but it’s still a problem. It boils down to phantom devices (or non-present devices)—hidden ports (devices) that are not shown in the Device Manager because the actual device is no longer connected with Windows. By default, users cannot see these hidden devices and will not even realize there is a problem. Even when an error is encountered by the mobile forensic solution because of the presence of a phantom device, most examiners are still unaware of the root of the problem.
The issue that arises with a phantom port and mobile forensic software is called port enumeration. Mobile forensic software enumerates through each port number that is used, looking for an attached device, and it will submit a challenge to the port to identify the device so communication can begin. When a computer running Windows has been used for mobile forensics, many devices get plugged into the USB port. When a device gets plugged into the computer and the driver is installed, a COM port is assigned to the device. When the device is unplugged, the device information, including the COM it was attached to, is saved so that when the device is plugged back into the same USB port, Windows will have already identified it and the same COM number can be assigned. This all means a couple of things to the examiner: One, if the device is plugged into any other USB port, it is assigned another COM number. Two, when any other device gets plugged in, a new unique COM number is assigned to that new device even if it had been plugged in to the same computer before. This means some computers can soon be operating with hundreds of assigned COM numbers, which can cause forensic software to time out while looking through all of the COM ports for a valid device.
Remove these phantom devices so problems do not arise when you’re attempting to connect to a mobile device with a Windows-based forensic solution. You can manually remove the ports from the Windows command line, invoking a Registry change, by navigating to the Device Manager to show hidden devices and then removing each device by right-clicking and choosing Uninstall. They also can be removed with several open source automated tools that are currently available, along with CPD PortScrubber and Micro Systemation XRY, which include a port cleaner as part of their solutions.
Removing Non-Present Devices (Phantom Devices)
The manual method is covered here in an effort to help you understand what Windows is doing or what process is undertaken by the automated tools when they remove the phantom devices.
For Windows 7:
1. Click Start.
2. Search for Command and select Command Prompt.
3. At the command prompt, type the following, and then press ENTER:
set devmgr_show_nonpresent_devices=1
4. Type the following command, and then press ENTER:
start devmgmt.msc
5. Choose View | Show Hidden Devices, as shown next:

6. Navigate to Ports, Modems, USB Controllers, ADB, and other device areas where mobile devices have been installed.
7. Right-click any device that is “ghosted,” or faded, as shown in Figure 9-4, and select Uninstall.
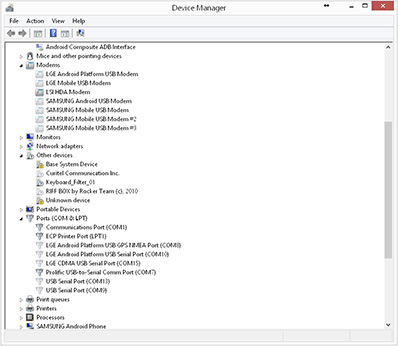
FIGURE 9-4 Several devices are shown as phantom devices under Modems and Ports (here, for example, Android Composite ADB Interface, Samsung Mobile USB Modem, LGE Mobile USB Modem).
8. Do not check the box to uninstall the driver unless the driver is causing a conflict.
9. When finished, close Device Manager.
10. Type exit and close the Command window.
For Windows 8:
1. Press Windows key-X.
2. Select Command Prompt.
3. At the command prompt, type the following, and then press ENTER:
set devmgr_show_nonpresent_devices=1
4. Type the following command, and then press ENTER:
start devmgmt.msc
5. Choose View | Show Hidden Devices.
6. Navigate to Ports, Modems, USB Controllers, ADB, and other device areas where mobile devices have been installed.
7. Right-click any device that is “ghosted,” as shown in Figure 9-4, and select Uninstall.
8. Do not check the box to uninstall the driver unless the driver is causing a conflict.
9. When finished, close Device Manager.
10. Type exit and close the Command Prompt window.
For Windows 10:
1. Press Windows key.
2. Type Command Prompt and press ENTER.
3. At the command prompt, type the following, and then press ENTER:
set devmgr_show_nonpresent_devices=1
4. Type the following command, and then press ENTER:
start devmgmt.msc
5. Choose View | Show Hidden Devices.
6. Navigate to Ports, Modems, USB Controllers, ADB, and other device areas where mobile devices have been installed.
7. Right-click any device that is “ghosted,” as shown in Figure 9-4, and select Uninstall.
8. Do not check the box to uninstall the driver unless the driver is causing a conflict.
9. When finished, close Device Manager.
10. Type exit and close the Command Prompt window.
Several automated tools are available to conduct this process simultaneously on multiple phantom devices, and some are freely available. Phantom device removal applications are generally based upon the Microsoft DevCon (https://docs.microsoft.com/en-us/windows-hardware/drivers/devtest/devcon) utility. DevCon, or Device Console, is a command-line utility that lists the devices on a computer running Windows. The utility can show phantom devices and remove them using several built-in commands and controls. By using the basic functioning of the DevCon source code, GhostBuster (http://ghostbuster.codeplex.com/releases/view/566397) enables the enumeration of phantom devices and aids in their removal with a GUI. GhostBuster is available for both x86 and x64 Windows systems. Prior to connecting a device to the forensic workstation, make sure that phantom devices are not consuming available COM port numbers. CPD PortScrubber is available from CPD Forensics. This is a commercial tool, but it works with Windows x86 and x64 systems up to and including Windows 10.
It is also recommended that you use the same USB port when conducting a mobile device collection. This will ensure that the driver that was installed previously for the same device is not installed again. By using the same port every time, Windows will already have reference to the device and will use the same driver that was used successfully the previous time the device was attached to the computer. If another port is used, Windows will search for the driver using the same process, depending upon the OS version, described in the section “Installing Drivers,” and then install the driver to the device store.
Chapter Summary
How a computer system has been set up prior to installing mobile forensic software can ultimately determine the success of the software solution. If the hardware, such as processors, RAM, and hard drives, is not set up correctly, forensic collection and analysis will suffer no matter what type of software is running on the computer system. You can consult the ideal specifications outlined on the vendor’s site and then follow the guidelines listed in this chapter to ensure that the software solution will perform well.
Simply using the minimum specifications listed on a vendor’s site will generally not allow the software to run at peak performance, typically because the vendor tests when only a single solution—their solution—is running on the machine. A rule of thumb is to multiply the component capacities and requirements by two to get an idea of the ideal size system that should efficiently run the vendor software, but also any other solution that may be used in a multitool environment. By multiplying the specifications by two and allowing for additional software solutions, along with providing enough storage space for each solution’s temporary storage and evidence storage, all solutions should operate well.
One of the most important, and often overlooked, problems with mobile device forensics is the device driver. By first understanding how device drivers are used, the examiner can make reasonable decisions as to whether the software solution simply does not support the device or the device is not installed correctly. Too often, examiners blame the software solution for failing to work, when the problem is actually based on a conflict between the operating system and the device. Because some device manufacturers update their device drivers regularly, it is a good idea to check regularly with a manufacturer’s web site to make sure that the current driver used by the forensic solution is the newest driver for the device. Using Table 9-2, the examiner can at least have a starting point to identify the problem and then locate a device driver if communication to the device and the software becomes an issue. By understanding that some devices do not have an OEM driver and that each is identified by a PID and VID, an examiner can search for the driver using other methods. This can help uncover drivers for devices that could not be previously located by simply searching a device manufacturer’s site.
When troubleshooting, you may find communication problems between software and devices, faulty drivers, software conflicts with other software, or an overabundance of COM ports. The examiner’s ability to identify exactly where the problem lies takes a keen sense of understanding the different fault points. For example, when drivers do not install correctly, the forensic solution will be unable to communicate with the device. The examiner must be able to locate and update a driver manually. If multiple software solutions are installed on the same machine, and one uses a custom-built driver for a mobile device while another uses the OEM driver, an error will be caused in communication if the wrong driver is installed. Realizing this, the examiner can switch to the compatible driver instead of dismissing the failure as a problem with the forensic software. Lastly, COM ports are a way of life for communication to a connected mobile device. Clearing COM port numbers that are not being used and using the same port for all mobile device connections will substantially reduce the time Windows takes to install a driver and can also fix problems encountered by software solutions that iterate over all COM ports whether the devices are present or not.
Troubleshooting expertise is an important step in becoming a mobile forensic expert and can be a common practice when conducting hundreds of examinations using multiple forensic solutions. Understand a device connection, the proper setup for forensic tools, and common pitfalls associated with drivers, and you can minimize many of the frustrations involved in conducting mobile device forensic collections and examinations.