
14 Querying SQLite and Taming the Forensic Snake
Chapter 13 covered the various files within the iOS file system, and Chapter 15 will deal with files within the Android file system. This chapter introduces the methods for scraping, carving, infiltrating, and exposing the maximum amount of data from iOS and Android mobile devices—or any device with which the examiner has access to files and folders. With repetition, practice, and desire, an examiner can uncover, dissect, and parse critical data that an automated tool can miss.
In this chapter, SQLite database parsing will be demystified to offer the examiner a better understanding of how automated tools pull data from these files. It includes instructions on creating queries within apps that may (or may not) be supported by an automated tool that may be missing critical data or data types. SQLite database files are the primary source for today’s smart devices, including iOS, Android, Windows Phone, and BlackBerry 10 devices. These files, along with their cache files, contain an enormous amount of evidence. Because of the many devices supporting this file type, the treasure trove of information about SQLite provided in this chapter can be helpful for the examiner involved in any smart device collections that involve these files.
Thousands of files are contained within a smart device file system, and the examiner should by now recognize that automated tools cannot support every file type, dissecting each file and displaying its contents. Because of this impossibility, the examiner should be versed in how to obtain that information without having to document the contents of the file manually by photographing the mobile device or printing the screen containing the data. Instead, the examiner can automate the process by creating custom-built SQL queries or custom-built code using Python, a free, open source scripting language that is making its way into many forensic tools.
Python enables an examiner to build file parsers, file identifiers, file searchers, and much more, removing the bottleneck that can be created by the process of software design, from implementation to release. An examiner can now create, in as few as eight lines of code, support for a file type within an app that would have taken a software company two months to release to the public.
Technological power must shift back to the examiner because of tech growth volatility. A software company releases fixes and updates to apps that have been updated three times prior to the solution’s support release. Essentially, a forensic solution’s release is built on a previous version of an app and as such can be completely useless to the examiner. Given the tools and information, the examiner can supplement the automated tools to fill the gap between solution release and app proliferation. This is how a mobile forensic expert is born.
Querying the SQLite Database
Probably the most important skill for an examiner is his or her ability to analyze a SQLite database. Of course, there are automated tools that will query and recover information from these file types, but what if the data is not retrieved, is in an improper format, or the particular app database is not directly supported? With the approximately 6.2 million available apps for iOS, Android, Windows Phone, and BlackBerry 10 devices, an examiner needs to have advanced skills to open the associated SQLite databases, examine the contents, and create queries to recover the needed data.
Many tools are available for both Windows and Mac devices that can enable an examiner to view the contents of SQLite files and extract targeted information to produce data for any investigation. An examiner’s reliance on an automated tool to recover app data consistently will be short lived, however—not because the automated tools are not up to par, but because the forensic software companies are aiming their products at moving targets. Apps can be updated weekly or monthly, so keeping up with the database schema changes, data value formats, and addition of functionality is an almost impossible task. To combat that, the examiner must be able to traverse the SQLite database and build queries to stay current with even the “zero-day” apps.
What Is a SQL Query?
SQLite, as mentioned earlier in the chapter, is a structured language and, as such, SQLite understands most of the standard SQL queries and uses a few of its own. Communicating with a SQLite database is completed by formulating a structured query using a properly formatted statement. Several types of queries can be used to create, delete, and alter tables (these will not be covered in this book because they will not be needed for forensic investigations). An examiner querying SQLite databases should be aware of several basic statements shown in Table 14-1 that are often used “under the hood” of forensic software. Other statements not covered in this book can be found at SQLite.org.
TABLE 14-1 SQL Syntax for the Investigation of App Data Within SQLite Databases
If an investigation of the SQLite database will occur outside of the forensic environment, the examiner should use a compiled SQL browser because of communication requirements with the SQLite database. Windows does not natively communicate with a SQLite database unless the SQLite engine is installed, available, and used for communication; using a compiled application, either portable or installed, will be much easier. (Alas, if the examiner wants to communicate at the command prompt with the database, that is also easily done—but is not covered in this book—and the sqlite3 library is needed.)
![]()
Of course, prior to communicating with the SQLite database, the sqlite3 library (www.sqlite.org/download.html) must be available or used by any software the examiner will use to complete the navigation of the database. The most current and up-to-date open source browser for SQLite databases is available without cost on the DB Browser for SQLite site (http://sqlitebrowser.org). The examiner should become familiar with the DB Browser for SQLite and the exposed SQLite database using this tool, which is supported by Windows, Mac, and Linux. This robust software will allow for navigating, viewing, query building and saving, as well as exporting the executed query data. The following section outlines the examination of a database file within DB Browser for SQLite in an effort to convey the usefulness of the tool.
Looking into a database after being exposed to the interworking and file metadata, an examiner should be able to understand the information displayed by the automated tool. As you examine the figures in this chapter, you will see that the information identified within the DB Browser GUI includes the kind of journaling used and the size of the page in bytes, as shown in the Edit Pragmas tab in Figure 14-1. If necessary, the examiner could find this information manually, now armed with the knowledge of its location in the database file.

FIGURE 14-1 The Edit Pragmas tab, where you can see and edit information about the database
While using a database viewer, the examiner can view tables and rows as a hierarchy and concentrate on identifying the relationships between the tables as defined in the schema. SQLite databases within apps will include some information in one table, more in another, and sometimes even more in a third. Being able to locate these relationships is important to the examiner, and using a GUI to identify keys within a database can assist when these tables need to be joined in an effort to merge the tables using their relationships. Keys define the relationships within a database, and using a key within a query will enable the JOIN to be successful and show all the related data. There are two types of keys: primary keys and foreign keys.
![]()
DB Browser for SQLite can alter, create, delete, add, and modify the SQLite database with features included within the product. Before using it on an actual evidence file, examiners should work only on a copy of the evidence file and learn about the feature set by reading the application documentation.
Primary keys are unique and singular, and only one can be assigned within a single table, although the table is not required to have a primary key. The primary key is generally an integer primary key and can often contain an empty column (NULL) if the table does not contain a ROWID (rowid). Most SQLite databases will use ROWID (rowid) or a derivative of ROWID to indicate the primary key. Within a database viewer, the primary key is often shown graphically as a key icon next to the table. The primary key is used by the database to create tables and to make updates and other changes to the database to ensure that information is not overwritten.
![]()
To maintain uniqueness, an examiner should look at the ROWID in iOS databases. A gap in the ROWID indicates that a row has been deleted, because the ROWID is never duplicated, to maintain uniqueness within the table.
Foreign keys, on the other hand, are references that show the relationship between tables. You can observe this relationship when a value in the parent table is equal to a value in the associated child table. You can also identify a foreign key within a SQLite database table if a column contains one or more NULL values, which indicates that the column is a foreign key per SQLite standards (this will also be reported by database viewers). The examiner will use the related values between existing parent and child tables to build JOINs within a SQL query.
When constructing and viewing app databases, the examiner should pay special attention to foreign keys by first checking the tables and verifying the relationships prior to creating a SQL query. This information is available in the Database Structure tab, shown in Figure 14-2. Some keys may be related to other tables, and on many occasions, a field (column) is not identified as a key but can be used as such to create stellar results.

FIGURE 14-2 Once the database is imported into the application, the Database Structure tab shows the tables and keys associated with a column; these are important for joining tables.
BLOB (Binary Large Object) data is used in many SQLite databases to store binary data representing large objects (such as images and files) not to exceed 65,535 bytes. Typically, the BLOB data will be displayed as thumbnails of images, small video clips, or text. Having a tool to look at the BLOB data (Figure 14-3) can be extremely important to the examiner, since most mobile forensic solutions do not resolve the BLOB data. If binary files are too large to be stored efficiently within the database, they will be stored to disk and then referenced within the BLOB data. The examiner should carefully examine BLOB data, because this might be the only location with important images, videos, or text from the mobile device.
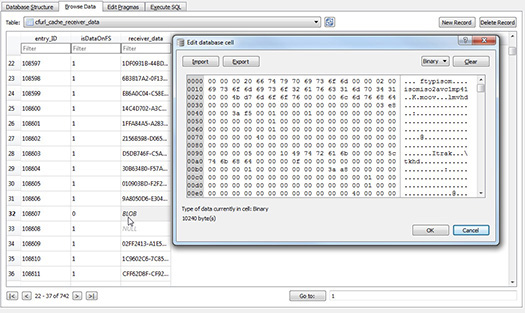
FIGURE 14-3 Looking into the table cfurl_cache_receiver_data, the examiner can click any record labeled BLOB and the data will be exposed in a separate window, as shown with a video file that can be exported and viewed within a native viewer.
Once an examiner has located the tables and significant columns within the table, any associated foreign keys between tables and child tables should be ascertained. A SQL query should then be created outlining the significant tables and their rows, the related table columns (foreign key), and either a reference or filter. The SQL statement can then be executed on the database. The SQLite engine will parse the database based upon the built statement and produce the results. As shown in Figure 14-4, the examiner can manually input, paste, or load a saved SQL statement into the Execute SQL tab to execute the script.

FIGURE 14-4 Results of the executed SQL statement
Using a GUI to navigate a SQLite database, an examiner can uncover much more information than is available by relying on a software engineer to decide what is important in a SQLite database. No automated tool supports the many cache.db files within an iOS device, and as shown in Figure 14-4, a lot of additional information gathered using a SQL query can assist any mobile forensic examination.
Building a Simple SQL Query
Building a query is not the most difficult thing to do, but some examiners believe it may not be the best use of their time. For those examiners, there are automated tools that build SQL queries with just a few clicks of the mouse. Others will appreciate some basic queries covered within this section to help them understand the compilation and execution of a statement on a database.
The easiest queries can be formulated using some of the following examples. Note that data shown within brackets (< >) are variables the examiner would fill in with a unique name from the database being examined.
The first query starts with a SELECT and asks the database to retrieve ALL (*) of the rows from a table the examiner specifies after the FROM statement:
SELECT * FROM <TABLENAME>;
The next query asks for four columns within the table. The data from the four columns will be retrieved and displayed:
SELECT <column1>,<column2>,<column3>,<column4> FROM <TABLENAME>;
The next query will obtain all the records from a single table, but will show the matching records only if column 4 contains the string Lee. This query can help the examiner search for records with a column and return only data that contains that record.
SELECT * FROM <TABLENAME> WHERE <column4> = 'Lee';
The next query will obtain records from two different tables within the same database and combine the results. The statement requests the data from columns 1 and 2 in both table 1 and table 2 if the information in column 3 of table 1 matches the information in column 4 in table 2. This statement is extremely powerful since most apps will be using multiple tables.

Knowing how to build SQL queries will help the examiner not only in creating his or her own queries but also in understanding how an automated tool uses queries to obtain information from a database. Furthermore, an examiner can save the template SQL queries and simply change table names, column names, and functions and reuse the queries on many apps within the iOS device and any other media where a SQLite database is located.
There are some limitations, of course, to these examples. What if the data is stored in UNIX, MICROSECONDS, WEBKIT, MILLISECONDS, MAC DATE, or other date formats? In such cases, the SQL statement will probably be more complex, especially if the examiner is assigning formulas to rows—but writing such a query is not impossible, and more about this is covered in the next section.
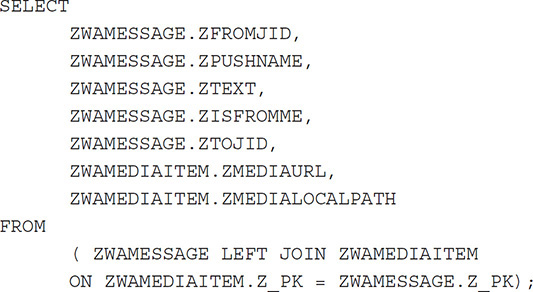
Once the examiner gets more comfortable building queries, he or she can build queries that extract selected data from any SQLite database. Following are some examples of queries that can work with iOS databases for two popular apps: WhatsApp and Kik Messenger.
The WhatsApp query will extract the messages, any attachment data information, and associated metadata and match it with the username of the sender. This first query starts with the SELECT command and then the <TABLENAME>.<COLUMNNAME> from the database FROM the <TABLENAME> and <TABLENAME> based upon the primary keys of the SELECTED TABLES.
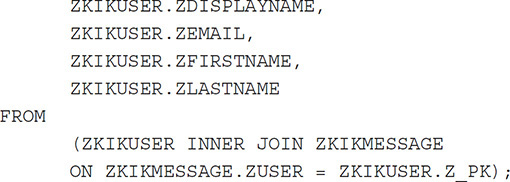
The next query for Kik Messenger will extract valuable message data, convert date and time information, and match the associated data with the username of the sender. This query is similar to the preceding query, but the datetime function converts the unixepoch date to a normalized date:

Automating Query Building
An examiner can manually build queries within many SQL database browsers. As mentioned, time is sometimes against many examiners as they perform forensic examinations; they might not have the time to learn, dive into, or formulate their own queries. These examiners tend to rely on automated tools to extract data from SQLite databases or apps that come their way. There are just too many apps in the world today—with no end in sight—to rely on commercial tools. For these examiners, and even those who feel comfortable writing queries, there are automated query building tools available within many mobile forensic tools and in standalone products.
For example, Oxygen Forensic Detective and Cellebrite Physical Analyzer include a SQL builder that enables an examiner to build queries based upon the selection of the table and then the rows. Using a SQL builder, the examiner can assign a data format (such as a String, Date/Time, Duration) and create a SQL query without having to write a single line of SQL code.
Paul Sanderson, from Sanderson Forensics, created a tool called Forensic ToolKit for SQLite, which is similar to both the Oxygen Forensic and Cellebrite tools. It also enables browsing, write-ahead-log reviewing, and SQLite navigation. This tool can be used to verify information discussed within this chapter, such as exploration of pages, frames, and byte-level information with a built-in HEX view.
A third tool that automates query building is SQLQuery Builder (Figure 14-5). Using this tool, the examiner drags and drops, double-clicks, and joins tables by dragging the parent table to the child table to form the relationship. Columns can be added to the query or entire tables by simply moving them into the query build frame. There is no limit on the foreign keys that can be joined between multiple tables within a single database, and, when completed, the SQL query can be executed and results reported.

FIGURE 14-5 A complex query between two tables with multiple rows using a foreign key can be completed in a short time using automated query builders such as SQLQuery Builder.
These tools will assist the examiner who does not have the time to create his or her own queries, but they also help the examiner gain a better understanding of what it takes to create a SQL query. These automated query builders also help the examiner not to miss or misidentify data—or give up for lack of support by mobile forensic solutions. In Figure 14-6, the results of the query of a database show what current mobile forensic solutions do not offer: by using SQL queries, an examiner can recover any type of data from most SQLite databases.
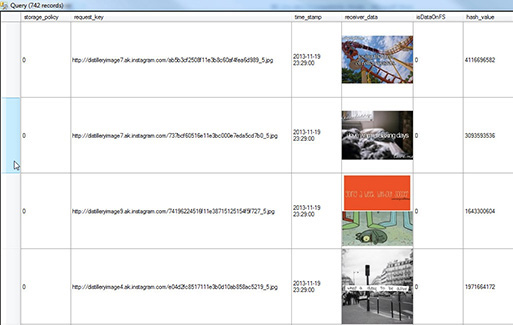
FIGURE 14-6 Results of a SQL query
The analysis of SQLite databases is critical during any mobile device examination. An examiner who understands SQLite structures, the data they can hold, and the various types of data formats and hidden data within free pages is a necessity for examining today’s smart devices. With so many apps available from the iTunes Store and Google Play, having this knowledge and the ability to harvest these artifacts is essential for any good examiner.
Analysis with Python
Mobile devices contain massive amounts of data, and as you know, mobile forensic solutions cannot extract every app’s data or parse every file for its data. For an examiner to be successful and eliminate such obstacles, he or she will have to think outside of the box, forget about the limitations imposed by a software solution, and start thinking of ways to parse the information from these valuable files. A mobile forensic examiner today must believe that in order to be prepared for tomorrow, you have to think about tomorrow today.
In the early days of mobile forensic examination, data on mobile device file systems was usually parsed manually. Most early forensic examiner training focused on extracting data, manually locating the data, converting it into a readable format, and finally making the data presentable for court. As device storage grew, these tasks became extremely time consuming, often taking weeks for a first-generation iPhone. Forensic solution providers struggled to release updates to their software to deal with the growing number of smart devices. To make the best use of their limited time, examiners needed a way to automate the repetitive task of manually parsing data that was not supported by mobile forensic solutions.
Enter Python, the most widely used scripting language in mobile forensics today. Using Python, examiners can create individual “programs” to act upon a file, folder, image, or really anything stored on a mobile device. Python scripts act as parsers to complete the task the examiner previously undertook manually.
Python was created in 1989 by Guido von Rossum, who also helped create the ABC language, a precursor to Python. Python also has roots in the C programming language. It was targeted at nonprofessional programmers with its ease of readability, many supported functions, modules, and cost. Python is 100 percent free, and because of its many contributors, it has a large repository of modules for building powerful scripts with little effort. Python is currently at version 3.4.x and 2.7.x, which are available on the www.python.org web site. The most popular version of Python is still version 2.7, and most available scripts in the community are written for that version. Version 2.7 does not contain many of the new modules introduced in Python 3, however, which makes Python 2.7 and 3.x not cross-compatible; modules are version specific, and running a 2.7 script against a 3.x interpreter will fail. In the following section and all included examples, Python 3.x is used.
![]()
If the examiner is looking to keep current with modules and support, using Python 3.x is recommended. If a software solution has built-in Python support, such as in Cellebrite Physical Analyzer, it is important to read the documentation to determine what version of Python the solution supports. Because Python 2.7 and 3.x are not 100 percent compatible, understanding the version of Python supported by the tool is important.
Python can be used in forensics to recover volatile memory from mobile devices, recover files, decrypt files, parse strings and dates from a file, recover passcodes from a binary image, pull exchangeable image file format (EXIF) data from photos taken with the device camera, and so much more. The things a Python script can do are limited only by the examiner’s imagination. If an examiner becomes familiar with the creation and execution of a Python script, the limitation of forensic tools will be negligible and the script will be invaluable.
This section is not intended to teach every aspect of Python, but to introduce the concept of using scripts to automate processes and supplement the mobile forensic solutions available. If you are looking for additional information on learning Python, the www.python.org web site offers guides for both nonprogrammers and programmers and is a wealth of information.
![]()
Python binaries can be downloaded from www.python.org/downloads. To use Python, the interpreter must be installed prior to running a script. However, if scripts are being created to be used within a forensic tool such as Physical Analyzer, the interpreter does not need to be installed. Both forensic solutions have built-in interpreters and have installed their respective Python bundles.
Python Terminology
An examiner will hear many terms when getting involved with a programming language. These terms describe actions and data types and are also important to know while creating statements within the code. Of course, all terms used in Python cannot be included within this section, but terms that are commonly seen, heard, and used are included here. These terms will be used throughout the section to create scripts that complete tasks the examiner can immediately use in a mobile forensic examination.
Functionality Terms
Python’s syntax can explain the code in comments, load common libraries, and commence and end the executed code. Common syntax that anyone conducting mobile forensic exams using Python should understand are listed next.
Comments Python and any other programming language can become difficult to read, especially when the code contains many lines. To help with readability, an author can annotate the code with comments to assist with the interpretation. A statement is not processed by the interpreter as long as the comment annotation (#) precedes the comment.

Expressions When values, variables, and operators are combined, an expression is formed.
Operators Symbols are used to represent some type of computation in an expression. Examples of operators are addition (+) subtraction (−), multiplication (×), and division (/) operators.
Statements In Python or any other programming language, a statement is a unit of code that can be executed. A statement can comprise a single word, multiple words, a single line, or many lines.
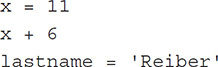
Variables All programming languages, including Python, use a name to represent a value. This value can be assigned a name, and the name can be used to refer to the value throughout the script. In this example, x and lastname are both variables: x holds the integer 11 and lastname holds the string 'Reiber'.

Values Values are the represented data within a variable and the data with which a script is working. Data is represented by values, and values are represented as a type.
Data Types
The data type or value will tell Python how the data is to be handled and how expressions should be evaluated. Python is different from some other popular programming languages, because the type of value or variable does not have to be declared; Python just knows. In some languages, such as C#, a variable must be declared and a type assigned prior to use, as shown in this C# example:
string lastname = 'Reiber';
The Python equivalent does not have to declare the type; the interpreter knows the value is a string because of the quotation marks:
lastname = 'Reiber'
Python’s data types are listed here with some examples.
Boolean A Boolean value is either a true or false value. A Boolean is used to make a decision. The Python interpreter evaluates a statement, determines the Boolean value of the statement, and then acts as instructed in the code depending on whether the statement is true or false.
11==11
This is true (the == tests for equality).
11==1
This is false.
11!=11
This is false (the != tests for inequality).
11!=1
This is true.
String A string is text that contains characters—numbers, letters, spaces, and anything else as long as it is surrounded by double ("string") or single ('string') quotation marks.
print ('Python can be good for forensics')
Integer Numbers without a decimal point are integers. Integers are recognized by Python in a statement because they are not surrounded by quotation marks.
Float Numbers with a decimal point are integers. Floats are also recognized by Python in a statement because they are not surrounded by quotation marks.
List Lists are represented to Python enclosed within brackets: [ ]. A list is used in Python when ordering is important and an index is needed to represent a store of data that can include any Python type. The index within a list always starts at 0, so the first value in a list would be referenced by [0].

The result would be
'WindowsPhone'
Dictionary Much like lists, dictionaries store multiple types of data within a single listing, but instead of using ordering by an index like a list, a dictionary uses a key-value pairing system. Dictionaries are represented in Python using braces: { }. Each key can have only one value, but multiple keys can store the same value. The key and value within a dictionary are separated using a colon (:), and values can be accessed with the key.

The result would be
'104 S Overland'
Additional Terms
Additionally, Python provides ways to create arguments, import common or created libraries, assign parameters, and create functions to run methods within a single script, as listed next.
Argument An argument is the value (or values) that is passed to a function. The two types of arguments are a keyword (kwargs) and positional argument (args). A keyword argument contains an identifier, whereas a positional argument does not. In this example, firstname is an args and lastname is the kwargs:
![]()
Another argument commonly used within Python is a system-specific function/parameter, which allows command-line arguments to be used with a Python script called sys.argv. To use sys.argv, the argv module must be imported from the Python sys module into the script. Once this module is imported, the script can assign a variable that will be used as the command-line argument. The first argv will always be the script name and can be referenced as argv[0]; subsequent command line arguments then follow. Here’s an example:
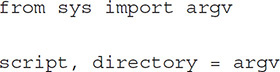
The first line imports the module argv from the module sys, and the second line holds two variables, script and directory; both are assigned the argv argument. The directory value can then be used in the script after the value is obtained at the command line when the script is executed (that is, my_script.py C:PathToDirectory).
Parameter A parameter value is contained within the parentheses of a function and defines which types of arguments are accepted by the function.
Modules Modules are separate, precomposed scripts that can be imported by another script to use the module’s function. Using modules expands the functions of a script without having to recode many lines since they are already composed within the imported module.
import An import statement is generally accompanied by a value telling the Python interpreter what module should be loaded into memory. This import statement imports the standard Python system module and OS module, making that code available to the script that is being composed:
import sys
import os
def These three letters represent define and are often included within Python code to define a function. A function is a block of reusable code that performs a single action and is often requested multiple times within a Python script, where writing the code block over and over would be inefficient. A statement within the code can call the defined function using the function name followed by parentheses. The parentheses often contain a variable that represents an input parameter or argument. Using functions is highly recommended when repetitive tasks are required. Here’s an example:

Here’s how to call the function and perform the creation of a directory if one does not exist:

The function create_and_check_path( ) is called, and the variable tmpDir is passed and used within the function to see if this path exists and, if not, to create the path.
Python Rules
When creating a Python script, you must follow some rules, which enable the interpreter to make sense of the script, understand what blocks of code work with others, and know how the script should progress. These rules are based upon the Python Enhancement Proposals (PEPs) within the Python Developer’s Guide (www.python.org/dev/). The information in this section does not cover every rule that is suggested in the PEPs, but it represents the most frequent issues examiners might encounter when creating or running Python scripts.
Indentation Python defines blocks of code using indentation—exactly four spaces should be used per indention level. Indenting a statement line four spaces tells the interpreter that it belongs with the statement immediately preceding it. Using indentation levels enables blocks of code to work either together or independently, depending on the function the block of code is providing. Mixing tabs and spaces within a script will often create interpreter errors; spaces are the preferred indentation method. Colons are also used to declare that the following line will be the start of an indented block. Colons are not entirely needed within the code to declare an indentation is coming, but their use is widely accepted to help with the readability of the code, and if an editor uses syntax highlighting, it keys off the colon to identify syntax problems. Here’s an example:

The preceding code shows the colon in the first line, which indicates the next line will be indented four spaces. The second line is indented, which indicates that it is a part of the block started in the first line. This line also has a colon, which indicates that the following line will be indented. The next line, x = 518, is indented to indicate it is a part of the block immediately preceding if bar: and tells the interpreter the statements at this level, which also includes y = 911, will be evaluated as part of the if bar: statement block. The code continues with a dedent (the opposite of indent) and the else: statement. The dedent indicates to the interpreter that this statement is at the same level of the if foo: statement and will be evaluated along with the if foo: statement. If the else: statement is true, the following statement will be evaluated because the interpreter recognizes the indent and associates x = 11 with the else: statement.
Line Length Python documentation recommends that a single line be limited to 79 characters.
Imports Python rules state that import statements will always be placed at the top of the file and on separate lines, as shown earlier in the section “Additional Terms.”
String Quotes Python allows either double or single quotation marks, which should be mixed only when a literal quote must be added to the string.
String Formatting Python allows two methods of formatting strings using placeholders instead of using the variable within the string. This method is much like creating a template and filling the placeholders with variable data assigned at runtime. This is often referred to as string interpolation. The variables are located at the end of the statement, and the placement of the variables into the statement string is dictated by the placement in the list. One method uses braces ({}), whereas the other method uses the percent sign (%). The % is currently deprecated in Python 3.x, but because it is frequently used in Python 2.7x, it is important that the examiner understand its use within a Python statement. The difference between the two methods is that if the examiner uses the {} string formatting technique, he or she must use the .format() method within the statement; if the examiner uses the % string formatting, the .format() method is not used.
The following would be used and observed in Python 2.7x and older versions:

The following example would be used and observed in Python in version 3.x:

When using this technique, if the placeholder contains an integer (such as {0} or{1}), the integer within the braces identifies the variable that will be used at that position. If there is no integer, as in the example, the placement in the string indicates the ordinal position within the list.
print A big change from 2.7x and 3.x versions of Python is the use of parentheses for print statements. To print in Python 3.x, the examiner must enclose the information that is to be printed in parentheses. When converting any 2.7 scripts to 3.x scripts, this change will be the most frequently encountered. An example of the print statement is in the preceding string formatting example.
Using Python Scripts
As indicated earlier in the chapter, the examiner can use Python within every forensic examination to complete various tasks that automated tools cannot do. Much like using SQL queries, Python scripts enable an examiner to dive deeper within mobile device file systems, uncovering data and formatting that data into readable output. Python scripts can be built to search for files; to search for strings; to carve data from binary files and file systems; to pull out laser-focused data from files such as EXIF, IP addresses, or names; and even to convert data into a readable format. As mentioned, Python scripting can enable an examiner to do just about anything with the data; the only limitation will be imposed by the examiner’s imagination.
The following sections contain code examples that the examiner can use in forensic situations. These scripts can be copied, modified, or used as is. Included within the code snippets are comments that explain the code to aid in understanding or to enable the examiner to make adjustments when needed.
EXIF
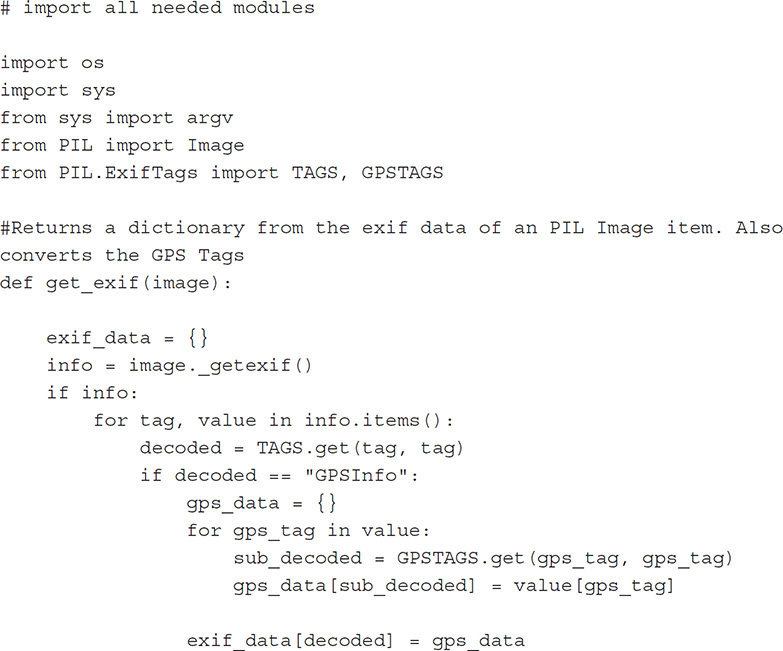
Exchangeable image file format (EXIF) can be important for any investigation. Several tools, including Physical Analyzer, XRY, and Oxygen Forensic Detective, will parse EXIF data from photographs and display it and enable the reporting of such—but what if the examiner simply wants to extract the location information from all the images within a directory without having to look at each one within a directory? A customized script is the answer. Using the script located here and the directory to be searched as the argument, the examiner can run this code as a Python file at the command line or within an interpreter against a directory containing photos. The output data will contain the latitude and longitude along with the name of the file from which it was obtained.


Searching for Files
Examiners may want to search through a file system within a mobile device and identify and output certain files, or at least obtain their names and locations. This would be much like filtering the files by extension in an effort to find important files quickly. Why not write a Python script?
![]()
The file extension is important; if the file extension is changed to hide the real file type, this script will not locate the file. However, a simple MIME type script could easily be created with this script to identify the file by its header, which would identify the file even if the user changed the extension.

Hashing a Directory of Files
As you’ll recall, obtaining hashes for files is important for verification, validation, and overall case success. Many mobile forensic solutions provide hashes for media only and another for created reports. The examiner can create a hashing script that will enable him or her to hash an entire file system and output that list of data to a CSV. When access to a file system is available, examiners can process and list all files using this script:


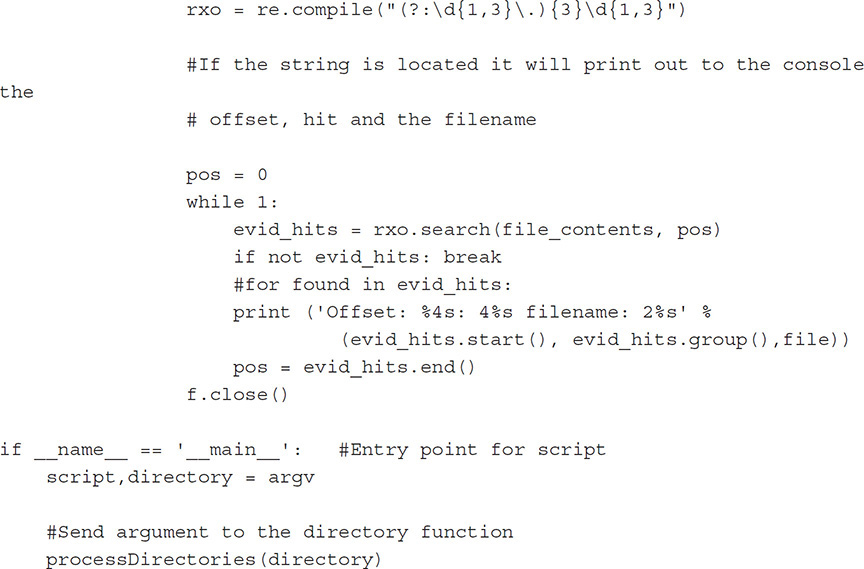
Using Regular Expressions
Searching across a data set to locate strings and other values can often provide the “smoking gun”; however, most mobile forensic tools do not enable searching across data sets, and if a tool does support searching, it can be limited by what can be searched and how a search can be performed. By creating a Python script, the examiner can create regular expressions for things like credit card numbers, Social Security numbers, name formats, IP addresses, and more. These regular expressions can be controlled within the script to turn on and off what regular expressions will be used. An examiner can also add to the list in the following example when needed. Python is very versatile.

Chapter Summary
Building SQLite queries to supplement an automated tool’s poor support, or even lack of support, for extracting information from an app is a necessity for today’s mobile device investigations. Today’s tools such as Oxygen Forensic Detective SQL Viewer and Cellebrite’s SQL tool can build visual queries without your knowing a line of SQL! However, queries can be built using many free tools as well, such as the SQLQuery Builder and SQLite Toolkit, with little knowledge of SQLite structures and statement building as well. The examiner must understand the SELECT command and various others, such as JOIN, ON, and WHERE, even when using an automated query builder. This knowledge will help the examiner explain what the commercial mobile forensic tools are doing when extracting information. Understanding what is “under the hood” will help an examiner build superior queries that extract much more information, surpassing even the most expensive mobile forensic solutions. The information in this chapter showed that data is available and within the examiner’s grasp—just build a query and extract it!
SQLite queries cannot be built for files that are not SQLite files, but there are thousands of these types of files within a mobile device. Armed with the power of Python, no file is safe from an examiner’s custom Python scripts. Building Python scripts from scratch may seem intimidating, but the examiner can consult many online resources to help with writing scripts. In this chapter, you were exposed to the surface-level scripting needs and rules, along with terminology frequently used to build simple, quick, and effective scripts for mobile device file interrogation. By using this information, an examiner gains the basic skills to complete several tasks using Python. An examiner should be able to take an already built Python script and modify it as needed to complete a specific task. In addition, an examiner should be able to create small scripts using the various statements, variables, expressions, and operands in the Python language. The take-away is the realization that these tools and methods enable an examiner to parse information from any file, any file system, and any mobile device image using custom-built Python scripts. The sky is the limit, and the options are unlimited for an examiner who has the desire and aptitude to learn.