Chapter 7. Advanced Topics
MongoDB supports some advanced functionality that goes well beyond the capabilities discussed so far. When you want to become a power user, this chapter has you covered; in it we’ll discuss the following:
Using database commands to take advantage of advanced features
Working with capped collections, a special type of collection
Leveraging GridFS for storing large files
Taking advantage of MongoDB’s support for server-side JavaScript
Understanding what database references are and when you should consider using them
Database Commands
In the previous chapters we’ve seen how to create, read, update, and delete documents in MongoDB. In addition to these basic operations, MongoDB supports a wide range of advanced operations that are implemented as commands. Commands implement all of the functionality that doesn’t fit neatly into “create, read, update, delete.”
We’ve already seen a couple of commands in the previous chapters;
for instance, we used the getLastError command in Chapter 3 to check the number of documents affected by an
update:
> db.count.update({x : 1}, {$inc : {x : 1}}, false, true)
> db.runCommand({getLastError : 1})
{
    "err" : null,
    "updatedExisting" : true,
    "n" : 5,
    "ok" : true
}
In this section, we’ll take a closer look at commands to see exactly what they are and how they’re implemented. We’ll also describe some of the most useful commands that are supported by MongoDB.
How Commands Work
One example of a database command that you are probably familiar
with is drop: to drop a collection from the shell, we
run db.test.drop(). Under the hood, this function is
actually running the drop command—we can perform the
exact same operation using runCommand:
> db.runCommand({"drop" : "test"});
{
    "nIndexesWas" : 1,
    "msg" : "indexes dropped for collection",
    "ns" : "test.test",
    "ok" : true
}
The document we get as a result is the command
response, which contains information about whether the
command was successful, as well as any other information that the
command might provide. The command response will always contain the key
"ok". If "ok" is
true, the command was successful, and if it is
false, the command failed for some reason.
Note
In version 1.5 and earlier, the value of "ok"
was 1.0 or 0.0 instead of
true or false,
respectively.
If "ok" is false, then an
additional key will be present, "errmsg". The value
of "errmsg" is a string explaining why the command
failed. As an example, let’s try running the drop
command again, on the collection that we just dropped:
> db.runCommand({"drop" : "test"});
{ "errmsg" : "ns not found", "ok" : false }
Commands in MongoDB are actually implemented as a special type of
query that gets performed on the $cmd collection.
runCommand just takes a command document and
performs the equivalent query, so our drop call becomes the
following:
db.$cmd.findOne({"drop" : "test"});When the MongoDB server gets a query on the
$cmd collection, it handles it using special logic,
rather than the normal code for handling queries. Almost all MongoDB
drivers provide a helper method like runCommand for
running commands, but commands can always be run using a simple query if
necessary.
Some commands require administrator access and must be run on the admin database. If such a command is run on any other database, it will return an “access denied” error.
Command Reference
At the time of this writing, MongoDB supports more than 75 different commands, and more commands are being added all the time. There are two ways to get an up-to-date list of all of the commands supported by a MongoDB server:
Run
db.listCommands()from the shell, or run the equivalentlistCommandscommand from any other driver.Browse to the http://localhost:28017/_commands URL on the MongoDB admin interface (for more on the admin interface see Chapter 8).
The following list contains some of the most frequently used MongoDB commands along with example documents showing how each command should be represented:
- buildInfo
{"buildInfo" : 1}Admin-only command that returns information about the MongoDB server’s version number and host operating system.
- collStats
{"collStats" :collection}Gives some stats about a given collection, including its data size, the amount of storage space allocated for it, and the size of its indexes.
- distinct
{"distinct" :collection, "key":key, "query":query}Gets a list of distinct values for
keyin documents matchingquery, across a given collection.- drop
{"drop" :collection}- dropDatabase
{"dropDatabase" : 1}- dropIndexes
{"dropIndexes" :collection, "index" :name}Deletes the index named
namefromcollection, or all indexes ifnameis"*".- findAndModify
See Chapter 3 for a full reference on using the
findAndModifycommand.- getLastError
{"getLastError" : 1[, "w" :w[, "wtimeout" :timeout]]}Checks for errors or other status information about the last operation performed on this connection. The command will optionally block until
wslaves have replicated the last operation on this connection (or untiltimeoutmilliseconds have gone by).- isMaster
{"isMaster" : 1}- listCommands
{"listCommands" : 1}Returns a list of all database commands available on this server, as well as some information about each command.
- listDatabases
{"listDatabases" : 1}- ping
{"ping" : 1}Checks if a server is alive. This command will return immediately even if the server is in a lock.
- renameCollection
{"renameCollection" :a, "to" :b}Renames collection
atob, where bothaandbare full collection namespaces (e.g.,"foo.bar"for the collection bar in the foo database).- repairDatabase
{"repairDatabase" : 1}Repairs and compacts the current database, which can be a long-running operation. See Repair for more information.
- serverStatus
{"serverStatus" : 1}Gets administrative statistics for this server. See Monitoring for more information.
Remember, there are far more supported commands than just those
listed earlier. Others are documented as appropriate throughout the rest
of the book, and for the full list, just run
listCommands.
Capped Collections
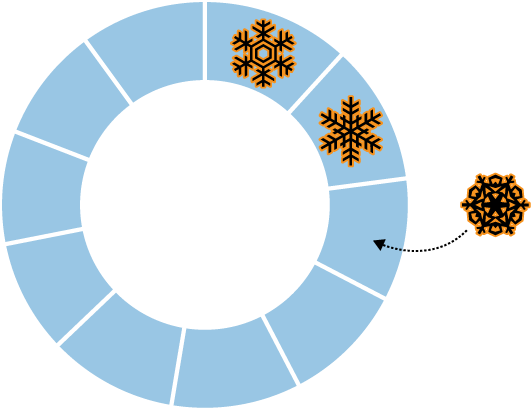
We’ve already seen how normal collections in MongoDB are created dynamically and automatically grow in size to fit additional data. MongoDB also supports a different type of collection, called a capped collection, which is created in advance and is fixed in size (see Figure 7-1). Having fixed-size collections brings up an interesting question: what happens when we try to insert into a capped collection that is already full? The answer is that capped collections behave like circular queues: if we’re out of space, the oldest document(s) will be deleted, and the new one will take its place (see Figure 7-2). This means that capped collections automatically age-out the oldest documents as new documents are inserted.
Certain operations are not allowed on capped collections. Documents cannot be removed or deleted (aside from the automatic age-out described earlier), and updates that would cause documents to move (in general updates that cause documents to grow in size) are disallowed. By preventing these two operations, we guarantee that documents in a capped collection are stored in insertion order and that there is no need to maintain a free list for space from removed documents.

A final difference between capped and normal collections is that in
a capped collection, there are no indexes by default, not even an index on
"_id".
Properties and Use Cases
The set of features and limitations possessed by capped
collections combine to give them some interesting properties. First,
inserts into a capped collection are extremely fast. When doing an
insert, there is never a need to allocate additional space, and the
server never needs to search through a free list to find the right place
to put a document. The inserted document can always be placed directly
at the “tail” of the collection, overwriting old documents if needed. By
default, there are also no indexes to update on an insert, so an insert
is essentially a single memcpy.
Another interesting property of capped collections is that queries
retrieving documents in insertion order are very fast. Because documents
are always stored in insertion order, queries for documents in that
order just walk over the collection, returning documents in the exact
order that they appear on disk. By default, any
find performed on a capped collection will always
return results in insertion order.
Finally, capped collections have the useful property of automatically aging-out old data as new data is inserted. The combination of fast inserts, fast queries for documents sorted by insertion order, and automatic age-out makes capped collections ideal for use cases like logging. In fact, the primary motivation for including capped collections in MongoDB is so that they can be used to store an internal replication log, the oplog (for more on replication and the oplog, see Chapter 9). Another good use case to consider for capped collections is caching of small numbers of documents. In general, capped collections are good for any case where the auto age-out property is helpful as opposed to undesirable and the limitations on available operations are not prohibitive.
Creating Capped Collections
Unlike normal collections, capped collections must be explicitly
created before they are used. To create a capped collection, use the
create command. From the shell, this can be done
using createCollection:
> db.createCollection("my_collection", {capped: true, size: 100000});
{ "ok" : true }
The previous command creates a capped collection,
my_collection, that is a fixed size of 100,000
bytes. createCollection has a couple of other options
as well. We can specify a limit on the number of documents in a capped
collection in addition to the limit on total collection size:
> db.createCollection("my_collection", {capped: true, size: 100000, max: 100});
{ "ok" : true }
Note
When limiting the number of documents in a capped collection, you must specify a size limit as well. Age-out will be based on the number of documents in the collection, unless the collection runs out of space before the limit is reached. In that case, age-out will be based on collection size, as in any other capped collection.
Another option for creating a capped collection is to convert an
existing, regular collection into a capped collection. This can be done
using the convertToCapped command—in the following example, we
convert the test collection to a capped collection
of 10,000 bytes:
> db.runCommand({convertToCapped: "test", size: 10000});
{ "ok" : true }
Sorting Au Naturel
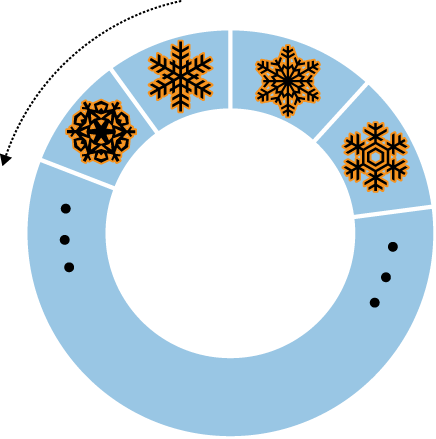
There is a special type of sort that you can do with capped collections, called a natural sort. Natural order is just the order that documents appear on disk (see Figure 7-3).
Because documents in a capped collection are always kept in insertion order, natural order is the same as insertion order. As mentioned earlier, queries on a capped collection return documents in insertion order by default. You can also sort in reverse insertion order with a natural sort (see Figure 7-4):
> db.my_collection.find().sort({"$natural" : -1})Sorting by {"$natural" : 1} is identical to the
default sort. Noncapped collections do not guarantee that documents are
stored in any particular order, so their natural ordering is not as
significant.

Tailable Cursors
Tailable cursors are a very special type of persistent cursor that are not closed when their results are exhausted. They were inspired by the tail -f command and, similar to the command, will continue fetching output for as long as possible. Because the cursors do not die when they runs out of results, they can continue to fetch new results as they are added to the collection. Tailable cursors can be used only on capped collections.
Again, the Mongo shell does not allow you to use tailable cursors, but using one in PHP looks something like the following:
$cursor = $collection->find()->tailable();

while (true) {
    if (!$cursor->hasNext()) {
        if ($cursor->dead()) {
            break;
        }
        sleep(1);
    }
    else {
        while (cursor->hasNext()) {
            do_stuff(cursor->getNext());
        }
    }
}
Although the cursor has not died, it will be either processing results or waiting for more results to arrive.
GridFS: Storing Files
GridFS is a mechanism for storing large binary files in MongoDB. There are several reasons why you might consider using GridFS for file storage:
Using GridFS can simplify your stack. If you’re already using MongoDB, GridFS obviates the need for a separate file storage architecture.
GridFS will leverage any existing replication or autosharding that you’ve set up for MongoDB, so getting failover and scale-out for file storage is easy.
GridFS can alleviate some of the issues that certain filesystems can exhibit when being used to store user uploads. For example, GridFS does not have issues with storing large numbers of files in the same directory.
You can get great disk locality with GridFS, because MongoDB allocates data files in 2GB chunks.
Getting Started with GridFS: mongofiles
The easiest way to get up and running with GridFS is by using the
mongofiles utility. mongofiles is
included with all MongoDB distributions and can be used to upload,
download, list, search for, or delete files in GridFS. As with any of
the other command-line tools, run mongofiles --help
to see the options available for mongofiles. The
following session shows how to use mongofiles to
upload a file from the filesystem to GridFS, list all of the files in
GridFS, and download a file that we’ve previously uploaded:
$ echo "Hello, world" > foo.txt
$ ./mongofiles put foo.txt
connected to: 127.0.0.1
added file: { _id: ObjectId('4c0d2a6c3052c25545139b88'),
              filename: "foo.txt", length: 13, chunkSize: 262144,
              uploadDate: new Date(1275931244818),
              md5: "a7966bf58e23583c9a5a4059383ff850" }
done!
$ ./mongofiles list
connected to: 127.0.0.1
foo.txt 13
$ rm foo.txt
$ ./mongofiles get foo.txt
connected to: 127.0.0.1
done write to: foo.txt
$ cat foo.txt
Hello, world
In the previous example, we perform three basic operations using
mongofiles: put,
list, and get. The
put operation takes a file in the filesystem and adds
it to GridFS, list will list any files that have been
added to GridFS, and get does the inverse of
put: it takes a file from GridFS and writes it to the
filesystem. mongofiles also supports two other
operations: search for finding files in GridFS by
filename and delete for removing a file from
GridFS.
Working with GridFS from the MongoDB Drivers
We’ve seen how easy it is to work with GridFS from the command
line, and it’s equally easy to work with from the MongoDB drivers. For
example, we can use PyMongo, the Python driver for MongoDB, to perform
the same series of operations as we did with
mongofiles:
>>> from pymongo import Connection
>>> import gridfs
>>> db = Connection().test
>>> fs = gridfs.GridFS(db)
>>> file_id = fs.put("Hello, world", filename="foo.txt")
>>> fs.list()
[u'foo.txt']
>>> fs.get(file_id).read()
'Hello, world'
The API for working with GridFS from PyMongo is very similar to
that of mongofiles: we can easily perform the basic
put, get, and
list operations. Almost all of the MongoDB drivers follow this basic pattern
for working with GridFS, while often exposing more advanced
functionality as well. For driver-specific information on GridFS, please
check out the documentation for the specific driver you’re using.
Under the Hood
GridFS is a lightweight specification for storing files that is built on top of normal MongoDB documents. The MongoDB server actually does almost nothing to “special-case” the handling of GridFS requests; all of the work is handled by the client-side drivers and tools.
The basic idea behind GridFS is that we can store large files by splitting them up into chunks and storing each chunk as a separate document. Because MongoDB supports storing binary data in documents, we can keep storage overhead for chunks to a minimum. In addition to storing each chunk of a file, we store a single document that groups the chunks together and contains metadata about the file.
The chunks for GridFS are stored in their own collection. By default chunks will use the collection fs.chunks, but this can be overridden if needed. Within the chunks collection the structure of the individual documents is pretty simple:
{
    "_id" : ObjectId("..."),
    "n" : 0,
    "data" : BinData("..."),
    "files_id" : ObjectId("...")
}
Like any other MongoDB document, the chunk has its own unique
"_id". In addition, it has a couple of other keys.
"files_id" is the "_id" of the
file document that contains the metadata for this chunk.
"n" is the chunk number; this attribute tracks the
order that chunks were present in the original file. Finally,
"data" contains the binary data that makes up this
chunk of the file.
The metadata for each file is stored in a separate collection, which defaults to fs.files. Each document in the files collection represents a single file in GridFS and can contain any custom metadata that should be associated with that file. In addition to any user-defined keys, there are a couple of keys that are mandated by the GridFS specification:
- _id
A unique id for the file—this is what will be stored in each chunk as the value for the
"files_id"key.- length
The total number of bytes making up the content of the file.
- chunkSize
The size of each chunk comprising the file, in bytes. The default is 256K, but this can be adjusted if needed.
- uploadDate
A timestamp representing when this file was stored in GridFS.
- md5
An md5 checksum of this file’s contents, generated on the server side.
Of all of the required keys, perhaps the most interesting (or
least self-explanatory) is "md5". The value for
"md5" is generated by the MongoDB server using the
filemd5 command, which computes the md5 checksum of
the uploaded chunks. This means that users can check the value of the
"md5" key to ensure that a file was uploaded
correctly.
When we understand the underlying GridFS specification, it becomes
trivial to implement features that the driver we’re using might not
implement for us. For example, we can use the
distinct command to get a list of unique filenames
stored in GridFS:
> db.fs.files.distinct("filename")
[ "foo.txt" ]
Server-Side Scripting
JavaScript can be executed on the server using the
db.eval function. It can also be stored in the
database and is used in some database commands.
db.eval
db.eval is a function that allows you to
execute arbitrary JavaScript on the MongoDB server. It takes a string of
JavaScript, sends it to MongoDB (which executes it), and returns the
result.
db.eval can be used to imitate multidocument
transactions: db.eval locks the database, executes
the JavaScript, and unlocks the database. There’s no built-in rollback,
but this does give you a guarantee of a series of operations occurring
in a certain order (unless an error occurs).
There are two options for sending code: enclosing it in a function or not. The following two lines are equivalent:
> db.eval("return 1;")
1
> db.eval("function() { return 1; }")
1
Defining an enclosing function is necessary only if you are
passing in arguments. These can be passed using
db.eval’s second argument, which is an array of
values. For example, if we wanted
to pass the username as an argument to a function, we could say the
following:
> db.eval("function(u) { print('Hello, '+u+'!'), }", [username])You can pass in as many arguments as necessary. For instance, if we want a sum of three numbers, we can do the following:
> db.eval("function(x,y,z) { return x + y + z; }", [num1, num2, num3])num1 becomes x,
num2 becomes y, and
num3 becomes z. If you would like
to use a variable number of parameters, arguments in JavaScript are
stored in an arguments array when a function is
called.
As a db.eval expression becomes more complex,
debugging can be tricky. The JavaScript code is run by the database and
often doesn’t have useful line numbers in error messages. A good way of
debugging is printing to the database log, which you can do with the
print function:
> db.eval("print('Hello, world'),");Stored JavaScript
MongoDB has a special collection for each database called
system.js, which can store JavaScript variables.
These variables can then be used in any of MongoDB’s JavaScript
contexts, including "$where" clauses,
db.eval calls, and MapReduce jobs. You can add
variables to system.js with a simple
insert:
> db.system.js.insert({"_id" : "x", "value" : 1})
> db.system.js.insert({"_id" : "y", "value" : 2})
> db.system.js.insert({"_id" : "z", "value" : 3})
This defines variables x, y,
and z in the global scope. Now, if we want to find
their sum, we can execute the following:
> db.eval("return x+y+z;")
6
system.js can be used to store JavaScript code as well as simple values. This can be handy for defining your own utilities. For example, if you want to create a logging function to use in JavaScript code, you can store it in system.js:
> db.system.js.insert({"_id" : "log", "value" :
... function(msg, level) {
...     var levels = ["DEBUG", "WARN", "ERROR", "FATAL"];
...     level = level ? level : 0; // check if level is defined
...     var now = new Date();
...     print(now + " " + levels[level] + msg);
... }})
Now, in any JavaScript context, you can call this log function:
> db.eval("x = 1; log('x is '+x); x = 2; log('x is greater than 1', 1);");The database log will then contain something like this:
Fri Jun 11 2010 11:12:39 GMT-0400 (EST) DEBUG x is 1
Fri Jun 11 2010 11:12:40 GMT-0400 (EST) WARN x is greater than 1
There are downsides to using stored JavaScript: it keeps portions of your code out of source control, and it can obfuscate JavaScript sent from the client.
The best reason for storing JavaScript is if you have multiple parts of your code (or code in different programs or languages) using a single JavaScript function. Keeping such functions in a central location means they do not need to be updated in multiple places if changes are required. Stored JavaScript can also be useful if your JavaScript code is long and executed frequently, because storing it once can cut down on network transfer time.
Security
Executing JavaScript is one of the few times you must be careful about security with MongoDB. If done incorrectly, server-side JavaScript is susceptible to injection attacks similar to those that occur in a relational database. Luckily, it is very easy to prevent these attacks and use JavaScript safely.
Suppose you want to print “Hello,
username!” to the user. If the username is in
a variable called username, you could write a
JavaScript function such as the following:
> func = "function() { print('Hello, "+username+"!'), }"If username is a user-defined variable, it
could contain the string "'), db.dropDatabase();
print('", which would turn the code into this:
> func = "function() { print('Hello, '), db.dropDatabase(); print('!'), }"Now your entire database has been dropped!
To prevent this, you should use a scope to pass in the username. In PHP, for example, this looks like this:
$func = new MongoCode("function() { print('Hello, "+username+"!'), }",
... array("username" => $username));
Now the database will harmlessly print this:
Hello, '), db.dropDatabase(); print('!Most drivers have a special type for sending code to the database, since code can actually be a composite of a string and a scope. A scope is just a document mapping variable names to values. This mapping becomes a local scope for the JavaScript function being executed.
Note
The shell does not have a code type that includes scope; you can only use strings or JavaScript functions with it.
Database References
Perhaps one of the least understood features of MongoDB is its support for database references, or DBRefs. DBRefs are like URLs: they are simply a specification for uniquely identifying a reference to document. They do not automatically load the document any more than a URL automatically loads a web page into a site with a link.
What Is a DBRef?
A DBRef is an embedded document, just like any other embedded document in MongoDB. A DBRef, however, has specific keys that must be present. A simple example looks like the following:
{"$ref" : collection, "$id" : id_value}The DBRef references a specific
collection and an
id_value that we can use to find a single
document by its "_id" within that collection. These
two pieces of information allow us to use a DBRef to uniquely identify
and reference any document within a MongoDB database. If we want to
reference a document in a different database, DBRefs support an optional
third key that we can use, "$db":
{"$ref" : collection, "$id" : id_value, "$db" : database}Note
DBRefs are one place in MongoDB where the order of keys in a
document matters. The first key in a DBRef must be
"$ref", followed by "$id", and
then (optionally) "$db".
Example Schema
Let’s look at an example schema that uses DBRefs to reference
documents across collections. The schema consists of two collections,
users and notes. Users can
create notes, which can reference users or other notes. Here are a
couple of user documents, each with a unique username as its
"_id" and a separate free-form
"display_name":
{"_id" : "mike", "display_name" : "Mike D"}
{"_id" : "kristina", "display_name" : "Kristina C"}
Notes are a little more complex. Each has a unique
"_id". Normally this "_id" would
probably be an ObjectId, but we use an integer
here to keep the example concise. Notes also have an
"author", some "text", and an
optional set of "references" to other notes or
users:
{"_id" : 5, "author" : "mike", "text" : "MongoDB is fun!"}
{"_id" : 20, "author" : "kristina", "text" : "... and DBRefs are easy, too",
 "references": [{"$ref" : "users", "$id" : "mike"}, {"$ref" : "notes", "$id" : 5}]}
The second note contains some references to other documents, each
stored as a DBRef. Our application
code can use those DBRefs to get the documents for the “mike” user and
the “MongoDB is fun!” note, both of which are associated with Kristina’s
note. This dereferencing is easy to implement; we use the value of the
"$ref" key to get the collection to query on, and we
use the value of the "$id" key to get the
"_id" to query
for:
> var note = db.notes.findOne({"_id" : 20});
> note.references.forEach(function(ref) {
... printjson(db[ref.$ref].findOne({"_id" : ref.$id}));
... });
{ "_id" : "mike", "display_name" : "Mike D" }
{ "_id" : 5, "author" : "mike", "text" : "MongoDB is fun!" }
Driver Support for DBRefs
One thing that can be confusing about DBRefs is that not all drivers treat them as normal embedded documents. Some provide a special type for DBRefs that will be automatically translated to and from the normal document representation. This is mainly provided as a convenience for developers, because it can make working with DBRefs a little less verbose. As an example, here we represent the same note as earlier using PyMongo and its DBRef type:
>>> note = {"_id": 20, "author": "kristina",
...         "text": "... and DBRefs are easy, too",
...         "references": [DBRef("users", "mike"), DBRef("notes", 5)]}
When the note is saved, the DBRef instances will automatically be translated to the equivalent embedded documents. When the note is returned from a query, the opposite will happen, and we’ll get DBRef instances back.
Some drivers also add other helpers for working with DBRefs, like methods to handle dereferencing or even mechanisms for automatically dereferencing DBRefs as they are returned in query results. This helper functionality tends to vary from driver to driver, so for up-to-date information on what’s supported, you should reference driver-specific documentation.
When Should DBRefs Be Used?
DBRefs are not essential for representing references to other
documents in MongoDB. In fact, even the previous example does some
referencing using a different mechanism: the "author"
key in each note just stores the value of the author document’s
"_id" key. We don’t need to use a DBRef because we
know that each author is a document in the users
collection. We’ve seen another example of this type of referencing as
well: the "files_id" key in GridFS chunk documents is
just an "_id" reference to a file document. With this
option in mind, we have a decision to make each time we need to store a
reference: should we use a DBRef or just store an
"_id"?
Storing "_id"s is nice because they are more
compact than DBRefs and also can be a little more lightweight for
developers to work with. DBRefs, on the other hand, are capable of
referencing documents in any collection (or even database) without the
developer having to know or remember what collection the referenced
document might reside in. DBRefs also enable drivers and tools to
provide some more enhanced functionality (e.g., automatic dereferencing)
and could allow for more advanced support on the server side in the
future.
In short, the best times to use DBRefs are when you’re storing
heterogeneous references to documents in different collections, like in
the previous example or when you want to take advantage of some
additional DBRef-specific functionality in a driver or tool. Otherwise,
it’s generally best to just store an "_id" and use
that as a reference, because that representation tends to be more
compact and easier to work with.