Chapter 9. Replication
Perhaps the most important job of any MongoDB administrator is making sure that replication is set up and functioning correctly. Use of MongoDB’s replication functionality is always recommended in production settings, especially since the current storage engine does not provide single-server durability (see Appendix C for details). Replicas can be used purely for failover and data integrity, or they can be used in more advanced ways, such as for scaling out reads, taking hot backups, or as a data source for offline batch processing. In this chapter, we’ll cover everything you need to know about replication.
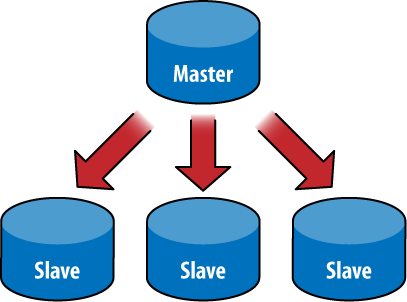
Master-Slave Replication
Master-slave replication is the most general replication mode supported by MongoDB. This mode is very flexible and can be used for backup, failover, read scaling, and more (see Figures 9-1 and 9-2).

The basic setup is to start a master node and one or more slave
nodes, each of which knows the address of the master. To start the master,
run mongod --master. To start a slave, run
mongod --slave --source
master_address, where
master_address is the address of the master
node that was just started.
It is simple to try this on a single machine, although in production you would use multiple servers. First, create a directory for the master to store data in and choose a port (10000):
$ mkdir -p ~/dbs/master
$ ./mongod --dbpath ~/dbs/master --port 10000 --master
Now set up the slave, choosing a different data directory and port.
For a slave, you also need to tell it who its master is with the
--source option:
$ mkdir -p ~/dbs/slave
$ ./mongod --dbpath ~/dbs/slave --port 10001 --slave --source localhost:10000
All slaves must be replicated from a master node. There is currently no mechanism for replicating from a slave (daisy chaining), because slaves do not keep their own oplog (see How It Works for more on the oplog).
There is no explicit limit on the number of slaves in a cluster, but having a thousand slaves querying a single master will likely overwhelm the master node. In practice, clusters with less than a dozen slaves tend to work well.
Options
There are a few other useful options in conjunction with master-slave replication:
- --only
Use on a slave node to specify only a single database to replicate. (The default is to replicate all databases.)
- --slavedelay
Use on a slave node to add a delay (in seconds) to be used when applying operations from the master. This makes it easy to set up delayed slaves, which can be useful in case a user accidentally deletes important documents or inserts bad data. Either of those operations will be replicated to all slaves. By delaying the application of operations, you have a window in which recovery from the bad operation is possible.
- --fastsync
Start a slave from a snapshot of the master node. This option allows a slave to bootstrap much faster than doing a full sync, if its data directory is initialized with a snapshot of the master’s data.
- --autoresync
Automatically perform a full resync if this slave gets out of sync with the master (see How It Works).
- --oplogSize
Size (in megabytes) for the master’s oplog (see How It Works for more on the oplog).
Adding and Removing Sources
You can specify a master by starting your slave with the
--source option, but you can also configure its
source(s) from the shell.
Suppose we have a master at localhost:27017. We
could start a slave without any source and then add the master to the
sources collection:
$ ./mongod --slave --dbpath ~/dbs/slave --port 27018
Now we can add localhost:27017 as a source for
our slave by starting the shell and running the following:
> use local
> db.sources.insert({"host" : "localhost:27017"})
If you watch the slave’s log, you can see it sync to
localhost:27017.
If we do a find on the
sources collection immediately after inserting the
source, it will show us the document we inserted:
> db.sources.find()
{
    "_id" : ObjectId("4c1650c2d26b84cc1a31781f"),
    "host" : "localhost:27017"
}
Once the slave’s log shows that it has finished syncing, the document will be updated to reflect this:
> db.sources.find()
{
    "_id" : ObjectId("4c1650c2d26b84cc1a31781f"),
    "host" : "localhost:27017",
    "source" : "main",
    "syncedTo" : {
        "t" : 1276530906000,
        "i" : 1
    },
    "localLogTs" : {
        "t" : 0,
        "i" : 0
    },
    "dbsNextPass" : {
        "test_db" : true
    }
}
Now, suppose we are going into production and we want to change
the slave’s configuration such that it slaves off of
prod.example.com. We can change the source for the
slave using insert and
remove:
> db.sources.insert({"host" : "prod.example.com:27017"})
> db.sources.remove({"host" : "localhost:27017"})
As you can see, sources can be manipulated like a normal collection and provides a great deal of flexibility for managing slaves.
Replica Sets
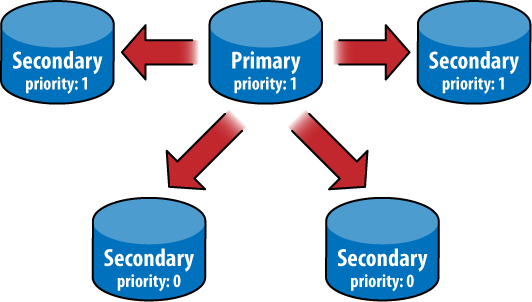
A replica set is basically a master-slave cluster with automatic failover. The biggest difference between a master-slave cluster and a replica set is that a replica set does not have a single master: one is elected by the cluster and may change to another node if the current master goes down. However, they look very similar: a replica set always has a single master node (called a primary) and one or more slaves (called secondaries). See Figures 9-3, 9-4, and 9-5.
The nice thing about replica sets is how automatic everything is. First, the set itself does a lot of the administration for you, promoting slaves automatically and making sure you won’t run into inconsistencies. For a developer, they are easy to use: you specify a few servers in a set, and the driver will automatically figure out all of the servers in the set and handle failover if the current master dies.


Initializing a Set
Setting up a replica set is a little more involved than setting up a master-slave cluster. We’ll just start out by setting up the smallest set possible: two servers.
Note
You cannot specify localhost addresses as
members, so you need to figure out what the hostname is of your
machine. On *NIX, this can be done with the following:
$ cat /etc/hostname
morton
First, we create our data directories and choose ports for each server:
$ mkdir -p ~/dbs/node1 ~/dbs/node2
We have one more decision to make before we start up the servers:
we must choose a name for this replica set. This
name makes it easy to refer to the set as a whole and distinguish
between sets. We’ll call our replica set
"blort".
Now we can actually start up the servers. The only new option is
--replSet, which lets the server know that it’s a
member of the replSet "blort" that
contains another member at morton:10002 (which hasn’t
been started yet):
$ ./mongod --dbpath ~/dbs/node1 --port 10001 --replSet blort/morton:10002
We start up the other server in the same way:
$ ./mongod --dbpath ~/dbs/node2 --port 10002 --replSet blort/morton:10001
If we wanted to add a third server, we could do so with either of these commands:
$ ./mongod --dbpath ~/dbs/node3 --port 10003 --replSet blort/morton:10001
$ ./mongod --dbpath ~/dbs/node3 --port 10003 --replSet blort/morton:10001,morton:10002
One of the nice things about replica sets is that they are self-detecting: you can specify a single server in the set, and MongoDB will figure out and connect to the rest of the nodes automatically.
Once you have a few servers up, you’ll notice that the server logs are complaining about the replica set not being initialized. This is because there’s one more step: initializing the set in the shell.
Connect to one of the servers (we use
morton:10001 in the following example) with the
shell. Initializing the set is a database command that has to be run
only once:
$ ./mongo morton:10001/admin
MongoDB shell version: 1.5.3
connecting to localhost:10001/admin
type "help" for help
> db.runCommand({"replSetInitiate" : {
... "_id" : "blort",
... "members" : [
...    {
...        "_id" : 1,
...        "host" : "morton:10001"
...    },
...    {
...        "_id" : 2,
...        "host" : "morton:10002"
...    }
... ]}})
{
        "info" : "Config now saved locally.  Should come online in about a minute.",
        "ok" : true
}
The initialization document is a bit complicated, but going through it key by key should make sense:
"_id" : "blort"The name of this set.
"members" : [...]A list of servers in the set. You can add more later. Each server document has (at least) two keys:
"_id" :NEach server needs a unique ID.
"host" :hostnameThis is the key that actually specifies the host.
Now you should see some log messages about which server is being elected primary.
If we connect to the other server and do a find
on the local.system.replset namespace, you can see
that the configuration has been propagated to the other server in the
set.
Note
At the time of this writing, replica sets are still under development and have not yet been released in a production version of MongoDB. As such, the information here is subject to change. For the most up-to-date documentation on replica sets, see the MongoDB wiki.
Nodes in a Replica Set
At any point in time, one node in the cluster is primary, and the rest are secondary. The primary node is essentially the master, the difference being that which node is designated as primary can vary over time.
There are several different types of nodes that can coexist in a replica set:
- standard
This is a regular replica set node. It stores a full copy of the data being replicated, takes part in voting when a new primary is being elected, and is capable of becoming the primary node in the set.
- passive
Passive nodes store a full copy of the data and participate in voting but will never become the primary node for the set.
- arbiter
An arbiter node participates only in voting; it does not receive any of the data being replicated and cannot become the primary node.
The difference between a standard node and a passive node is
actually more of a sliding scale; each participating
node (nonarbiter) has a priority
setting. A node with priority 0 is passive and will
never be selected as primary. Nodes with nonzero priority will be
selected in order of decreasing priority, using freshness of data to
break ties between nodes with the same priority. So, in a set with two
priority 1 nodes and a priority
0.5 node, the third node will be elected primary only
if neither of the priority 1 nodes are
available.
Standard and passive nodes can be configured as part of a node’s
description, using the priority key:
> members.push({
... "_id" : 3,
... "host" : "morton:10003",
... "priority" : 40
... });
The default priority is 1, and priorities must be between 0 and 1000 (inclusive).
Arbiters are specified using the "arbiterOnly"
key.
> members.push({
... "_id" : 4,
... "host" : "morton:10004",
... "arbiterOnly" : true
... });
There is more information about arbiters in the next section.
Secondary nodes will pull from the primary node’s oplog and apply operations, just like a slave in a master-slave system. A secondary node will also write the operation to its own local oplog, however, so that it is capable of becoming the primary. Operations in the oplog also include a monotonically increasing ordinal. This ordinal is used to determine how up-to-date the data is on any node in the cluster.
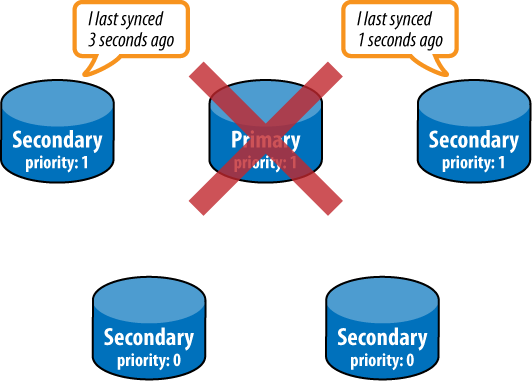
Failover and Primary Election
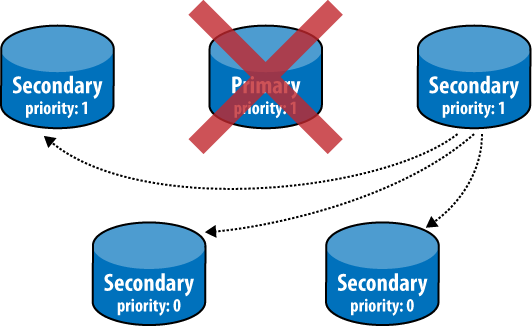
If the current primary fails, the rest of the nodes in the set will attempt to elect a new primary node. This election process will be initiated by any node that cannot reach the primary. The new primary must be elected by a majority of the nodes in the set. Arbiter nodes participate in voting as well and are useful for breaking ties (e.g., when the participating nodes are split into two halves separated by a network partition). The new primary will be the node with the highest priority, using freshness of data to break ties between nodes with the same priority (see Figures 9-6, 9-7, and 9-8).
The primary node uses a heartbeat to track how many nodes in the cluster are visible to it. If this falls below a majority, the primary will automatically fall back to secondary status. This prevents the primary from continuing to function as such when it is separated from the cluster by a network partition.
Whenever the primary changes, the data on the new primary is assumed to be the most up-to-date data in the system. Any operations that have been applied on any other nodes (i.e., the former primary node) will be rolled back, even if the former primary comes back online. To accomplish this rollback, all nodes go through a resync process when connecting to a new primary. They look through their oplog for operations that have not been applied on the primary and query the new primary to get an up-to-date copy of any documents affected by such operations. Nodes that are currently in the process of resyncing are said to be recovering and will not be eligible for primary election until the process is complete.
Performing Operations on a Slave
The primary purpose and most common use case of a MongoDB slave is to function as failover mechanism in the case of data loss or downtime on the master node. There are other valid use cases for a MongoDB slave, however. A slave can be used as a source for taking backups (see Chapter 8). It can also be used for scaling out reads or for performing data processing jobs on.
Read Scaling
One way to scale reads with MongoDB is to issue queries against slave nodes. By issuing queries on slaves, the workload for the master is reduced. In general, this is a good approach to scaling when your workload is read heavy—if you have a more write-intensive workload, see Chapter 10 to learn how to scale with autosharding.
Note
One important note about using slaves to scale reads in MongoDB is that replication is asynchronous. This means that when data is inserted or updated on the master, the data on the slave will be out-of-date momentarily. This is important to consider if you are serving some requests using queries to slaves.
Scaling out reads with slaves is easy: just set up master-slave
replication like usual, and make connections directly to the slave
servers to handle queries. The only trick is that there is a special
query option to tell a slave server that it is allowed to handle a
query. (By default, queries will not be executed on a slave.) This
option is called slaveOkay, and all MongoDB drivers
provide a mechanism for setting it. Some drivers also provide facilities
to automate the process of distributing queries to slaves—this varies on
a per-driver basis, however.
Using Slaves for Data Processing
Another interesting technique is to use slaves as a mechanism for
offloading intensive processing or aggregation to avoid degrading
performance on the master. To do this, start a normal slave, but with
the addition of the --master command-line argument.
Starting with both --slave and
--master may seem like a bit of a paradox. What it
means, however, is that you’ll be able to write to the slave, query on
it like usual, and basically treat it like you would a normal MongoDB
master node. In addition, the slave will continue to replicate data from
the actual master. This way, you can perform blocking operations on the
slave without ever affecting the performance of the master
node.
Warning
When using this technique, you should be sure never to write to any database on the slave that is being replicated from the master. The slave will not revert any such writes in order to properly mirror the master.
The slave should also not have any of the databases that are being replicated when it first starts up. If it does, those databases will not ever be fully synced but will just update with new operations.
How It Works
At a very high level, a replicated MongoDB setup always consists of at least two servers, or nodes. One node is the master and is responsible for handling normal client requests. The other node(s) is a slave and is responsible for mirroring the data stored on the master. The master keeps a record of all operations that have been performed on it. The slave periodically polls the master for any new operations and then performs them on its copy of the data. By performing all of the same operations that have been performed on the master node, the slave keeps its copy of the data up-to-date with the master’s.
The Oplog
The record of operations kept by the master is called the oplog, short for operation log. The oplog is stored in a special database called local, in the oplog.$main collection. Each document in the oplog represents a single operation performed on the master server. The documents contain several keys, including the following:
- ts
Timestamp for the operation. The timestamp type is an internal type used to track when operations are performed. It is composed of a 4-byte timestamp and a 4-byte incrementing counter.
- op
Type of operation performed as a 1-byte code (e.g., “i” for an insert).
- ns
Namespace (collection name) where the operation was performed.
- o
Document further specifying the operation to perform. For an insert, this would be the document to insert.
One important note about the oplog is that it stores only operations that change the state of the database. A query, for example, would not be stored in the oplog. This makes sense because the oplog is intended only as a mechanism for keeping the data on slaves in sync with the master.
The operations stored in the oplog are also not exactly those that
were performed on the master server itself. The operations are
transformed before being stored such that they are idempotent. This
means that operations can be applied multiple times on a slave with no
ill effects, so long as the operations are applied in the correct order
(e.g., an incrementing update, using "$inc", will be
transformed to a "$set" operation).
A final important note about the oplog is that it is stored in a
capped collection (see Capped Collections). As new
operations are stored in the oplog, they will automatically replace the
oldest operations. This guarantees that the oplog does not grow beyond a
preset bound. That bound is configurable using the
--oplogSize option when starting the server, which
allows you to specify the size of the oplog in megabytes. By default,
64-bit instances will use 5 percent of available free space for the
oplog. This space will be allocated in the local
database and will be preallocated when the server starts.
Syncing
When a slave first starts up, it will do a full sync of the data on the master node. The slave will copy every document from the master node, which is obviously an expensive operation. After the initial sync is complete, the slave will begin querying the master’s oplog and applying operations in order to stay up-to-date.
If the application of operations on the slave gets too far behind the actual operations being performed on the master, the slave will fall out of sync. An out-of-sync slave is unable to continue to apply operations to catch up to the master, because every operation in the master’s oplog is too “new.” This could happen if the slave has had downtime or is busy handling reads. It can also happen following a full sync, if the sync takes long enough that the oplog has rolled over by the time it is finished.
When a slave gets out of sync, replication will halt, and the
slave will need to be fully resynced from the master. This resync can be
performed manually by running the command {"resync" :
1} on the slave’s admin database or
automatically by starting the slave with the
--autoresync option. Either way, doing a resync is a
very expensive operation, and it’s a situation that is best avoided by
choosing a large enough oplog size.
To avoid out of sync slaves, it’s important to have a large oplog so that the master can store a long history of operations. A larger oplog will obviously use up more disk space, but in general this is a good trade-off to make (hence the default oplog size of 5 percent of free space). For more information on sizing the oplog, see Administration.
Replication State and the Local Database
The local database is used for all internal replication state, on both the master and the slave. The local database’s name is local, and its contents will never be replicated. Thus, the local database is guaranteed to be local to a single MongoDB server.
Tip
Use of the local database isn’t limited to MongoDB internals. If you have documents that you don’t want to replicate, just store them in a collection in the local database.
Other replication state stored on the
master includes a list of its slaves. (Slaves perform a handshake using
the handshake command when they connect to the
master.) This list is stored in the slaves
collection:
> db.slaves.find()
{ "_id" : ObjectId("4c1287178e00e93d1858567c"), "host" : "127.0.0.1",
  "ns" : "local.oplog.$main", "syncedTo" : { "t" : 1276282710000, "i" : 1 } }
{ "_id" : ObjectId("4c128730e6e5c3096f40e0de"), "host" : "127.0.0.1",
  "ns" : "local.oplog.$main", "syncedTo" : { "t" : 1276282710000, "i" : 1 } }
Slaves also store state in the local database. They store a unique
slave identifier in the me collection, and a list of
sources, or nodes, that they are slaving from, in
the sources collection:
> db.sources.find()
{ "_id" : ObjectId("4c1287178e00e93d1858567b"), "host" : "localhost:27017",
  "source" : "main", "syncedTo" : { "t" : 1276283096000, "i" : 1 },
  "localLogTs" : { "t" : 0, "i" : 0 } }
Both the master and slave keep track of how up-to-date a slave is,
using the timestamp stored in "syncedTo". Each time
the slave queries the oplog for new operations, it uses
"syncedTo" to specify which new operations it needs
to apply or to find out if it is out of sync.
Blocking for Replication
MongoDB’s getLastError command allows
developers to enforce guarantees about how up-to-date replication is by
using the optional "w" parameter. Here we run a
getLastError that will block until at least
N servers have replicated the last write
operation:
> db.runCommand({getLastError: 1, w: N});If N is not present or is less than
two, the command will return immediately. If
N is two,
the master won’t respond to the command until at least one
slave has replicated the last operation. (The master itself is included
toward N.) The master uses the "syncedTo" information stored in
local.slaves to track how up-to-date each slave
is.
When specifying "w",
getLastError takes an additional parameter,
"wtimeout", which is a timeout in milliseconds. This
allows the getLastError to time out and return an
error before the last operation has replicated to
N servers. (By default the command has no
timeout.)
Blocking for replication will cause write operations to slow down
significantly, particularly for large values of "w".
In practice, setting "w" to two or three for
important operations will yield a good combination of efficiency and
safety.
Administration
In this section, we’ll introduce some administration concepts that are specific to replication.
Diagnostics
MongoDB includes a couple of useful administrative helpers for
inspecting the status of replication. When connected to the master, use
the db.printReplicationInfo function:
> db.printReplicationInfo();
    configured oplog size:   10.48576MB
    log length start to end: 34secs (0.01hrs)
    oplog first event time:  Tue Mar 30 2010 16:42:57 GMT-0400 (EDT)
    oplog last event time:   Tue Mar 30 2010 16:43:31 GMT-0400 (EDT)
    now:                     Tue Mar 30 2010 16:43:37 GMT-0400 (EDT)
This gives information about the size of the oplog and the date ranges of operations contained in the oplog. In this example, the oplog is about 10MB and is only able to fit about 30 seconds of operations. This is almost certainly a case where we should increase the size of the oplog (see the next section). We want the log length to be at least as long as the time it takes to do a full resync—that way, we don’t run into a case where a slave is already out of sync by the time its initial sync (or resync) is finished.
Note
The log length is computed by taking the time difference between the first and last operation in the oplog. If the server has just started, then the first operation will be relatively recent. In that case, the log length will be small, even though the oplog probably still has free space available. The log length is a more useful metric for servers that have been operational long enough for the oplog to “roll over.”
We can also get some information when connected to the slave,
using the db.printSlaveReplicationInfo
function:
> db.printSlaveReplicationInfo();
    source:   localhost:27017
    syncedTo: Tue Mar 30 2010 16:44:01 GMT-0400 (EDT)
    = 12secs ago (0hrs)
This will show a list of sources for the slave, each with information about how far behind the master it is. In this case, we are only 12 seconds behind the master.
Changing the Oplog Size
If we find that the oplog size needs to be changed, the simplest
way to do so is to stop the master, delete the files for the
local database, and restart with a new setting for
--oplogSize. To change the oplog
size to size, we shut down the master and run
the following:
$ rm /data/db/local.*
$ ./mongod --master --oplogSize size
size is specified in megabytes.
Note
Preallocating space for a large oplog can be time-consuming and might cause too much downtime for the master node. It is possible to manually preallocate data files for MongoDB if that is the case; see the MongoDB documentation on halted replication for more detailed information.
After restarting the master, any slaves should either be restarted
with the --autoresync or have a
manual resync performed.
Replication with Authentication
If you are using replication in tandem with MongoDB’s support for authentication (see Authentication Basics), there is some additional configuration that needs to be performed to allow the slave to access the data on the master. On both the master and the slave, a user needs to be added to the local database, with the same username and password on each node. Users on the local database are similar to users on admin; they have full read and write permissions on the server.
When the slave attempts to connect to the master, it will
authenticate using a user stored in
local.system.users. The first
username it will try is “repl,” but if no such user is found, it will
just use the first available user in
local.system.users. So, to set
up replication with authentication, run the following code on both the
master and any slaves, replacing
password with a secure password:
> use local
switched to db local
> db.add User("repl", password);
{
    "user" : "repl",
    "readOnly" : false,
    "pwd" : "..."
}
The slave will then be able to replicate from the master.