In this chapter, we will study the practical use of trigonometry to cause sprites to rotate, move in any direction, and “look” at a target point on the screen. This topic was first introduced back in Chapter 6, “Bitmap Graphics: The Orbiting Spaceship Demo,” where we used trigonometry to cause a space ship to rotate in a simulated orbit around a planet. The concept is a powerful one in game programming, so we will explore it further here and learn new ways to put it to use.
You will learn how to:
Use trigonometry to calculate the velocity at any angle
Cause a tank turret to point toward a targeting cursor
Make a really dumb computer A.I. tank that is easy to kill
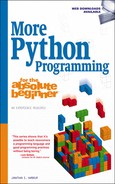
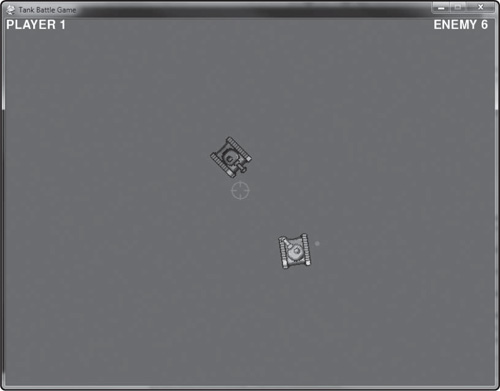
The Tank Battle Game, shown in Figure 12.1, involves a tank that can be rotated and moved forward or backward in any direction (by applying angular velocity, one of our most powerful game programming tools). Furthermore, the tank’s gun turret rotates independently of the tank chassis, controlled by the mouse that is represented by a crosshair cursor. The player must maneuver the tank with arrow or W-A-S-D keys and use the mouse to fire at enemy tanks. The figure shows the interesting gameplay to be found in The Tank Battle Game. Simply use the mouse cursor to position the crosshair in the direction you wish to fire, and the turret will not only follow the crosshair but will fire in that very same direction!
Angular velocity describes the velocity (or speed) that an object moves at, represented in terms of X and Y, along any direction among the 360 degrees around the object. The velocity is calculated from the current angle or direction in which the object is facing, with angle 0 degrees being north (up), 90 degrees east (right), 180 degrees south (down), and 270 degrees west (left). However, the velocity need not be limited to the four cardinal directions, because we can calculate angular velocity at any angle, from 0 to 359.999 degrees—and yes, decimals are relevant as well! A partial degree such as 10.5, represents an angle in between 10 and 11 degrees. It is true that trigonometry functions produce values where angle 0 points to the right (east) rather than up (north), so we adjust for that by subtracting 90 degrees from an angle before rotating a sprite.
Note
Pygame uses degrees for sprite rotation. When using trigonometry functions Like math.atan2() for targeting, be sure to convert the resulting radian angle to degrees with the math.degrees() function before using it to rotate a sprite.
You have already seen the trigonometry calculations for angular velocity, but we had not put a name to it at the time (back in Chapter 6). Here are the calculations:
Velocity X = cosine( radian angle )
Velocity Y = sine( radian angle )
We can codify this in Python like so. Note the use of our custom Point class—that is the return type.
# calculates velocity of an angle
def angular_velocity(angle):
    vel = Point(0,0)
    vel.x = math.cos( math.radians(angle) )
    vel.y = math.sin( math.radians(angle) )
    return vel
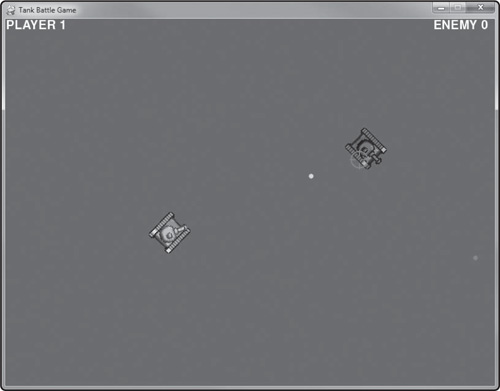
We first learned how to rotate a sprite in Chapter 5, “Math and Graphics: The Analog Clock Demo,” which featured a program that displayed an analog clock with rotating clock pointers. It’s pretty easy to rotate a sprite that never moves, but just sits in one place. But when you need to move a sprite and also rotate it, there is a problem. Pygame does not correctly adjust for the change in image size when a sprite is rotated. Take a look at Figure 12.2. This early version of The Tank Battle Game shows a tank chassis (without the turret) used as an example sprite. Note the values printed on the top-left corner. The third line shows the bounding rectangle of the base sprite image (the tank chassis). According to these numbers, the frame has a size of 50 × 60, and the center is at (25,30).

Now compare these numbers with those shown in Figure 12.3. When the sprite is rotated 50 degrees, the bounding rectangle changes to 78 × 76, with a center of (39,38). This is normal for rotation. When a square image is rotated, the corners will require more space at the diagonals than they did before. As a result, the image enlarged by 28 × 16 pixels, and the center moved accordingly. Unfortunately for us, Pygame does not properly take this problem into account like a proper sprite rotation algorithm should (like you find in most other sprite libraries, such as sprite handling in Allegro, DirectX, XNA, and others). But, no matter, we can adjust the sprite ourselves—it just takes a little more work, which is unfortunate given the impression that Python is a fairly quick and easy language to use.
The solution to the bounding rectangle problem with a rotated sprite is to shift the image by the amount of change in dimensions from the normal image to the rotated image. We could change the image property internally in the MySprite class so that self.image represents a rotated sprite at the adjusted position, and then allow pygame.sprite.Sprite and pygame.sprite.Group to continue to draw the image for us. But, that ended up being even more work than just taking control of the update and draw process on our own. So, that is the direction I’ll take here. Let’s see how to do it.
First, we’ll need a scratch image for rotation. I’ve just called it scratch, but you could call it rotated_image to be more descriptive. Rather than modify MySprite, I’ve opted instead to create a new class that derives from MySprite, and it is called Tank.
Angular velocity can be used for more than just moving a bullet or arrow in any direction. We can also use it to move a game object (like a tank) forward and backward based on user input. This is where gameplay becomes really interesting! We can actually rotate our game sprite left or right, and then move it forward or backward based on the direction it’s pointing. This is brilliant for vehicles like cars and tanks, because it makes them move more realistically! We can even make a sprite slow down at whatever direction it’s moving. I have used this technique to good effect in space combat games where the ship can rotate in any direction and fire while still going in the direction of its momentum. If you wish to make a sci-fi game, like an Asteroids clone, you will be able to with the information gleaned in this chapter. For good measure, here again is the target_angle() function added to MyLibrary in the previous chapter:
# calculates angle between two points
def target_angle(x1,y1,x2,y2):
    delta_x = x2 - x1
    delta_y = y2 - y1
    angle_radians = math.atan2(delta_y,delta_x)
    angle_degrees = math.degrees(angle_radians)
    return angle_degrees
We can use this function, along with a tank’s rotation angle, to cause one of our tanks in The Tank Battle Game to move forward or backward at any angle. Now, this could be used to move the enemy tanks as well, but to keep the already rather complex code down to a manageable level, the enemy tanks will just move in one direction and fire only forward (without rotating the turret). If you want the enemy tanks to also rotate their turrets and move around more realistically, that would be a good upgrade to the game that you may wish to make (see the Challenges at the end of the chapter).
Put into use, this function produces an angle we can use immediately in our gameplay code. First, we get the velocity, then we update the position of the sprite using that velocity. The only problem is, pygame.sprite.Sprite (from which our MySprite class is derived) uses integer properties for the sprite’s position (a Rect, actually). This obliterates our velocity code! Unfortunately, we have to write a workaround for this small problem. The solution is a new property added to our own new custom class (which will be called Tank), called float_pos. We just have to be sure to update MySprite.position with the values in float_pos before drawing.
self.velocity = angular_velocity(angle)
self.float_pos.x += self.velocity.x
self.float_pos.y += self.velocity.y
Despite this capability, The Tank Battle Game just keeps the tanks moving forward at a constant velocity to simplify the gameplay. During testing, I found that targeting with the mouse cursor and rotating and moving the tank all at once was asking a bit too much from the player. Instead, the tank moves forward and you may turn left or right.
I think that is enough information to go on at this point in order to get started on The Tank Battle Game. This is the most complex game we have developed so far in the book. The complexity is not necessarily due to the game being complex, as in, gameplay, but rather in the significant amount of workaround code we have to write to get our sprites to behave correctly when Pygame does not quite handle things in a logical way. It happens. But we just need to learn how these workarounds work and be aware of any issues that crop up as a result.
By far the largest class in this game is the Tank class. The reason for its size is that Tank is fully self-contained. All of the code for initialization and logic is here in the class, including gameplay code, rather than outside in the main program. The Tank.update() function is the largest one we have seen to date. The class was primarily designed for the player’s tank, not enemy tanks. But it was easily adapted to enemy tanks with a wrapper class called EnemyTank. Tank, of course, inherits from MySprite. An interesting feature of Tank is that the chassis and turret rotate independently of each other, which makes for some very interesting gameplay. The arrow keys or W-A-S-D keys are used to move the tank, while the turret tracks the mouse cursor using target_angle(). While moving the tank around, just point with the mouse cursor at your target and the turret automatically points at it! The gameplay is actually quite fun for as limited as it is.
Now let’s start with the Tank constructor. As is to be expected, a call to the MySprite constructor comes first. Since we are wrapping MySprite, it makes sense to also handle image loading for the sprite rather than leaving that entirely in the hands of the programmer (although the default tank sprite filenames may be replaced).
class Tank(MySprite):
    def __init__(self,tank_file="tank.png",turret_file="turret.png"):
        MySprite.__init__(self)
        self.load(tank_file, 50, 60, 4)
        self.speed = 0.0
        self.scratch = None
        self.float_pos = Point(0,0)
        self.velocity = Point(0,0)
        self.turret = MySprite()
        self.turret.load(turret_file, 32, 64, 4)
        self.fire_timer = 0
This is one monster of an update() function, but it does have some gameplay code as well as class code. The code in Tank.update() handles the difficult problem of movement so our main program remains cleaner and easier to understand. The first section of code here in update() creates the scratch image for the tank’s rotation. Remember, MySprite already does animation, and our tank sprite is animated with four frames (see Figure 12.4). I removed the turret from Ari Feldman’s original tank sprite, separating the two so that the turret could be moved independently from the chassis.
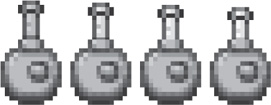
The turret sprite image is shown in Figure 12.5. Although there are four frames for the turret, The Tank Battle Game only uses the first frame. If you want to use the other frames, that would be an interesting upgrade to the game since the turret looks quite good when animated as a shot is fired.
def update(self,ticks):
    #update chassis
    MySprite.update(self,ticks,100)
    self.rotation = wrap_angle(self.rotation)
    self.scratch = pygame.transform.rotate(self.image, -self.rotation)
    angle = wrap_angle(self.rotation-90)
    self.velocity = angular_velocity(angle)
    self.float_pos.x += self.velocity.x
    self.float_pos.y += self.velocity.y

    #warp tank around screen edges (keep it simple)
    if self.float_pos.x < -50: self.float_pos.x = 800
    elif self.float_pos.x > 800: self.float_pos.x = -50
    if self.float_pos.y < -60: self.float_pos.y = 600
    elif self.float_pos.y > 600: self.float_pos.y = -60

    #transfer float position to integer position for drawing
    self.X = int(self.float_pos.x)
    self.Y = int(self.float_pos.y)

    #update turret
    self.turret.position = (self.X,self.Y)
    self.turret.last_frame = 0
    self.turret.update(ticks,100)
    self.turret.rotation = wrap_angle(self.turret.rotation)
    angle = self.turret.rotation+90
    self.turret.scratch = pygame.transform.rotate(self.turret.image,
        -angle)
The Tank.draw() function has a lot of work to do, because it must take into account animation frames and rotation of the chassis as well as the problematic turret. The turret sprite really is difficult to manage. It has to move along with the chassis (the main tank sprite), and also rotate to aim toward the mouse cursor. Because targeting produces results that somewhat conflicts with Pygame’s normal behavior, we have to adjust the position of the sprite as it is drawn without affecting the base position of the sprite (otherwise it would appear to shake or wobble on the screen).
    def draw(self,surface):
        #draw the chassis
        width,height = self.scratch.get_size()
        center = Point(width/2,height/2)
        surface.blit(self.scratch, (self.X-center.x, self.Y-center.y))
        #draw the turret
        width,height = self.turret.scratch.get_size()
        center = Point(width/2,height/2)
        surface.blit(self.turret.scratch, (self.turret.X-center.x,
            self.turret.Y-center.y))
We have a minor override of the __str__() function so that information about the tank can be easily returned as a string and used to print out the status of the object for debugging purposes. Note that the base MySprite string function is called first, and an extra value is just added to the end of it. This way, we still have the basic information coming from MySprite, while adding new properties as needed.
    def __str__(self):
        return MySprite.__str__(self) + "," + str(self.velocity)
The EnemyTank class is derived from Tank, adding some specialty code to make it work a little better (simple A.I. code). The enemy tank only moves in one direction and fires once per second in the same direction. This is really simplistic behavior, but we have to start somewhere and most of the work in this game has been devoted to the player’s tank controls. So, think of the enemy tank at this point as just a clay pigeon, or a moving target that poses little threat, but which has potential to be an intelligent foe.
class EnemyTank(Tank):
    def __init__(self,tank_file="enemy_tank.png",turret_file="enemy_turret.png"):
        Tank.__init__(self,tank_file,turret_file)

    def update(self,ticks):
        self.turret.rotation = wrap_angle(self.rotation-90)
        Tank.update(self,ticks)

    def draw(self,surface):
        Tank.draw(self,surface)
The Bullet class helps with projectile management in the game. There are also three additional helper functions outside of the class that make firing a bullet from any tank rather easy to do.
class Bullet():
    def __init__(self,position):
        self.alive = True
        self.color = (250,20,20)
        self.position = Point(position.x,position.y)
        self.velocity = Point(0,0)
        self.rect = Rect(0,0,4,4)
        self.owner = ""

    def update(self,ticks):
        self.position.x += self.velocity.x * 10.0
        self.position.y += self.velocity.y * 10.0
        if self.position.x < 0 or self.position.x > 800
            or self.position.y < 0 or self.position.y > 600:
                self.alive = False
        self.rect = Rect(self.position.x, self.position.y, 4, 4)

    def draw(self,surface):
        pos = (int(self.position.x), int(self.position.y))
        pygame.draw.circle(surface, self.color, pos, 4, 0)

def fire_cannon(tank):
    position = Point(tank.turret.X, tank.turret.Y)
    bullet = Bullet(position)
    angle = tank.turret.rotation
    bullet.velocity = angular_velocity(angle)
    bullets.append(bullet)
    play_sound(shoot_sound)
    return bullet

def player_fire_cannon():
    bullet = fire_cannon(player)
    bullet.owner = "player"
    bullet.color = (30,250,30)

def enemy_fire_cannon():
    bullet = fire_cannon(enemy_tank)
    bullet.owner = "enemy"
    bullet.color = (250,30,30)
Now that we have all of the prerequisite classes and functions done, we can address the main gameplay code of The Tank Battle Game. At this point, there will be more initialization code than gameplay code, but we’ll go over each section.
The header for the program is always helpful to see spelled out, even if the import list has not changed in quite some time.
# Tank Battle Game
# Chapter 12
import sys, time, random, math, pygame
from pygame.locals import *
from MyLibrary import *
Our consistent use of game_init() to initialize Pygame, the display, and global variables helps to organize the source code of the game and make it much more readable. Just be sure to add any new globals to the global definitions at the top of the function.
#this function initializes the game
def game_init():
    global screen, backbuffer, font, timer, player_group, player,
           enemy_tank, bullets, crosshair, crosshair_group

    pygame.init()
    screen = pygame.display.set_mode((800,600))
    backbuffer = pygame.Surface((800,600))
    pygame.display.set_caption("Tank Battle Game")
    font = pygame.font.Font(None, 30)
    timer = pygame.time.Clock()
    pygame.mouse.set_visible(False)

    #load mouse cursor
    crosshair = MySprite()
    crosshair.load("crosshair.png")
    crosshair_group = pygame.sprite.GroupSingle()
    crosshair_group.add(crosshair)

    #create player tank
    player = Tank()
    player.float_pos = Point(400,300)

    #create enemy tanks
    enemy_tank = EnemyTank()
    enemy_tank.float_pos = Point(random.randint(50,760), 50)
    enemy_tank.rotation = 135

    #create bullets
    bullets = list()
The Tank Battle Game has rudimentary audio in the form of two sound clips—one for firing a bullet, another for hitting a target. Audio has not played a large role in any of the examples, but suffice it to say, sound is extremely important in a production game, and even a little music wouldn’t hurt. Of course, for a small sample project like this even a small sound clip here and there is a welcome improvement to what is otherwise purely a graphics and gameplay demo.
# this function initializes the audio system
def audio_init():
    global shoot_sound, boom_sound

    #initialize the audio mixer
    pygame.mixer.init()

    #load sound files
    shoot_sound = pygame.mixer.Sound("shoot.wav")
    boom_sound = pygame.mixer.Sound("boom.wav")
# this function uses any available channel to play a sound clip
def play_sound(sound):
    channel = pygame.mixer.find_channel(True)
    channel.set_volume(0.5)
    channel.play(sound)
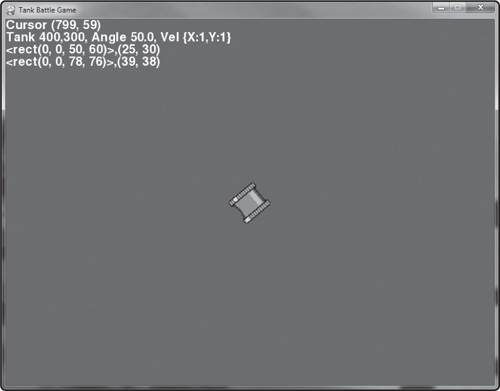
The gameplay code (the main code of the game) follows. This code is rather short considering how much gameplay there is with the tanks, due to the fact that a lot of that code is found in the Tank class itself. That’s good news for our gameplay code here, because any duplicate tanks would have to be updated manually even if in a list. Pay particular attention to the bullet update code, which is where collision detection between the bullets and tanks occurs. There is an identifier in the Bullet class called Bullet.owner that is set to either “player” or “enemy” to aid in collision testing. Without this distinction, it is very hard to keep tanks from blowing themselves up as soon as they fire a bullet! Figure 12.6 shows the two tanks facing off. The player’s bullets are green, while the enemy’s bullets are red.
#main program begins
game_init()
audio_init()
game_over = False
player_score = 0
enemy_score = 0
last_time = 0
mouse_x = mouse_y = 0

#main loop
while True:
    timer.tick(30)
    ticks = pygame.time.get_ticks()

    #reset mouse state variables
    mouse_up = mouse_down = 0
    mouse_up_x = mouse_up_y = 0
    mouse_down_x = mouse_down_y = 0

    #event section
    for event in pygame.event.get():
        if event.type == QUIT: sys.exit()
        elif event.type == MOUSEMOTION:
            mouse_x,mouse_y = event.pos
            move_x,move_y = event.rel
        elif event.type == MOUSEBUTTONDOWN:
            mouse_down = event.button
            mouse_down_x,mouse_down_y = event.pos
        elif event.type == MOUSEBUTTONUP:
            mouse_up = event.button
            mouse_up_x,mouse_up_y = event.pos

    #get key states
    keys = pygame.key.get_pressed()
    if keys[K_ESCAPE]: sys.exit()

    elif keys[K_LEFT] or keys[K_a]:
        #calculate new direction velocity
        player.rotation -= 2.0

    elif keys[K_RIGHT] or keys[K_d]:
        #calculate new direction velocity
        player.rotation += 2.0

    #fire cannon!
    if keys[K_SPACE] or mouse_up > 0:
        if ticks > player.fire_timer + 1000:
            player.fire_timer = ticks
            player_fire_cannon()

    #update section
    if not game_over:
        crosshair.position = (mouse_x,mouse_y)
        crosshair_group.update(ticks)

        #point tank turret toward crosshair
        angle = target_angle(player.turret.X,player.turret.Y,
            crosshair.X + crosshair.frame_width/2,
            crosshair.Y + crosshair.frame_height/2)
        player.turret.rotation = angle

        #move tank
        player.update(ticks)

        #update enemies
        enemy_tank.update(ticks)
        if ticks > enemy_tank.fire_timer + 1000:
            enemy_tank.fire_timer = ticks
            enemy_fire_cannon()

        #update bullets
        for bullet in bullets:
            bullet.update(ticks)
            if bullet.owner == "player":
                if pygame.sprite.collide_rect(bullet, enemy_tank):
                    player_score += 1
                    bullet.alive = False
                    play_sound(boom_sound)
            elif bullet.owner == "enemy":
                if pygame.sprite.collide_rect(bullet, player):
                    enemy_score += 1
                    bullet.alive = False
                    play_sound(boom_sound)

    #drawing section
    backbuffer.fill((100,100,20))

    for bullet in bullets:
        bullet.draw(backbuffer)
    enemy_tank.draw(backbuffer)
    player.draw(backbuffer)
    crosshair_group.draw(backbuffer)

    screen.blit(backbuffer, (0,0))

    if not game_over:
        print_text(font, 0, 0, "PLAYER " + str(player_score))
        print_text(font, 700, 0, "ENEMY " + str(enemy_score))
    else:
        print_text(font, 0, 0, "GAME OVER")

    pygame.display.update()

    #remove expired bullets
    for bullet in bullets:
        if bullet.alive == False:
            bullets.remove(bullet)
This chapter showed how to use awesome trigonometry functions to make game sprites behave like the sprites in a professional game. We learned advanced concepts like targeting and demonstrated how it works with a game that allows the user to rotate a tank turret to point at the mouse cursor. This is the basis for even more advanced behaviors such as chasing and evading another object, and finding a path around obstacles.