The previous chapter was a pretty good introduction to bitmap graphics programming. We learned that Pygame has a lot of good features for working with bitmaps. But, aside from the capabilities of the pygame.transform module, which includes scaling and rotation of bitmaps, there is no practical way to do animation with it. This is where the pygame.sprite module takes over, and that is the subject we’re learning about in this chapter.
In this chapter, you will learn to:
Manually animate a sprite with a special calculation
Use features in the
pygame.spritemoduleMake a game called Escape the Dragon!
The sample game in this chapter will help you to understand sprite programming with Python and Pygame. The premise of the game is very simple: a dragon is chasing your character, so you must jump over flaming arrows coming toward you so that they hit the dragon and stop it from chasing you. The concept comes from one of the mini-games in the Facebook game Ninja Wars.
The pygame.sprite module contains a class called Sprite that we can use as a starting point for our game sprites. I say starting point because pygame.sprite.Sprite is not a complete solution, it’s just a limited class that knows how to work with groups to update and draw itself. Even that is a bit of a stretch, given that we have to write the code to do these things. From the most objective point of view, a Pygame sprite contains an image (image) and a position (rect). We have to extend this with our own class to provide the features we want in a fully functional game sprite class.
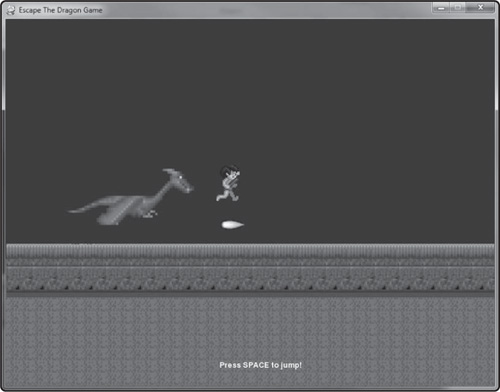
Animation with Pygame is a bit tricky, only because we have to know how pygame.sprite.Sprite works in order to write our own animation code. A Pygame sprite will be based around its image and rect properties, as already mentioned, so the trick is to wrap animation code around these two properties. When that is done, then the sprite group will automatically update the animation frame image and draw the specific frame (rather than the whole sprite sheet image). Let’s look at a sprite sheet image first to get an idea how this is going to work. Figure 7.2 shows just such an image.
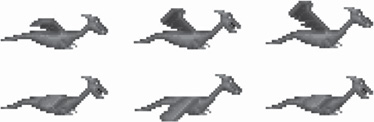
Figure 7.2. The dragon sprite image has six frames of animation. Courtesy of Ari This was cutoff on my printout.
Note
The animated dragon sprite was drawn by Ari Feldman (www.flyingyogi.com). You can download his collection of free game sprites, called SpriteLib, from his website.
A sprite sheet image contains rows and columns of “tiles” or “frames,” each of which is one frame of the animation sequence. Figure 7.3 shows one frame highlighted in a sprite sheet with the rows and columns labeled for easier reference. Note that they are 0-based! This is important, as the calculations rely on counting the frame number starting at zero, not one.
The sprite sheet images shown here will be loaded and retained as the master image used for animation. While a sprite is being moved and drawn in a game, a call to the update() method will be made by the sprite group automatically, as is the call to draw(). We can write our own update() method, but draw() is not replaced, it’s passed on to the parent pygame.sprite.Sprite.draw() method. What we must do is make sure the image property of pygame.sprite.Sprite contains the image of the current frame of the animation, not the whole sprite sheet. Because of the way this works, the sprite sheet (master image) will be loaded as an independent class variable, not loaded directly into Sprite.image.
When we load the master image, we must tell our sprite class how large one frame is—that is, the width and height of a single frame are passed as parameters when a new sprite is created. Usually the most sensible name for the method is load(), and typically it will have a filename parameter. In addition to frame width and height, we must also tell our sprite class how many columns there are in the sprite sheet. Take a look at the illustration in Figure 7.3 again for reference. Note that the highlighted frame is under column 3. This is really all we need to know, the number of columns, because the number of rows does not matter in the calculation to draw a single frame.
Let’s try writing a function that will get the job done of loading an image and setting a sprite’s properties. The function definition below requires a filename, width, height, and columns as parameters. These are the bare essentials for doing sprite animation. We’ll peruse a complete class listing after going over the theory behind these concepts, so don’t worry about typing in any of this code just yet.
    def load(self, filename, width, height, columns):
        self.master_image = pygame.image.load(filename).convert_alpha()
        self.frame_width = width
        self.frame_height = height
        self.rect = 0,0,width,height
        self.columns = columns
Normally, animation proceeds one frame at a time from first to last. A more advanced animation system will allow a sprite to animate forward, backward, and within any specified range of the animation set. We’ll keep it simple by just animating from first to last frame, then wrapping around to the first frame again. This is pretty easy to write in code:
    self.frame += 1
    if self.frame > self.last_frame:
        self.frame = self.first_frame
The trick is not so much changing the frame number, but making that happen at a certain time interval. Yes, we have to use timing code! It’s a bit of a challenge to wrap your mind around at first. At least, it was for me! But once you learn the basic Python code for getting the current time value in ticks, then the rest of the process is pretty easy to handle.
First, we need to create an object variable from pygame.time.Clock(). I have called my variable framerate:
framerate = pygame.time.Clock()
When this Clock() method is called, it starts an internal timer running from that point forward that we can use to get incremental time update values, with even the option to set the game running at a fixed framerate. Inside the main while loop in a game, then, call:
framerate.tick(30)
The parameter, 30, can be set to any desired framerate. It does a pretty good job of keeping the game running at this speed, but 30 might be too slow for some games that would run better at 40 or 60 (the most common framerates used).
That’s the first step, just to get the game loop running at a consistent framerate. Next, we need a timing variable that works not at the speed of framerates, but at the millisecond level. The pygame.time module has a method called get_ticks() that will meet our needs for the purpose of timing sprite animation.
ticks = pygame.time.get_ticks()
This ticks variable can be passed to our own sprite class’ update() method to give our sprites independent animation timing at any desired framerate. In the code below, note that unless the timing is correct, the animation frame does not change.
    def update(self, current_time, rate=0):
        if current_time > self.last_time + rate:
            self.frame += 1
            if self.frame > self.last_frame:
                self.frame = self.first_frame
            self.last_time = current_time
In addition to the animation frame update code shown here, we also will be copying the current frame image into Sprite.image (self.image, in this case), which is the subject of the next paragraph.
Knowing that Sprite.draw() is called automatically by the sprite group, we will not be writing our own drawing code, only setting up the properties to make the draw happen the way we want it to. That is done in the update() method of our custom sprite class. Sprite.draw() expects that Sprite.image and Sprite.rect are set to valid values or else an error will occur (a common error is an invalid position when the rect is undefined).
To draw a single frame from a sprite sheet, we must calculate the X,Y position of the frame’s top-left corner, and then copy the frame image based on the frame’s width and height. The X position represents the column number. The Y position represents the row number. We calculate Y, or row, by dividing the frame number by the number of columns, and then multiplying that value by the frame height:
Y = (frame / columns) * height
To calculate the X, or column value, we divide frame by columns again, but this time we only care about the remainder, not the quotient (in mathematical terms, that is the answer to a division problem). We can get the remainder by using modulus rather than division, and then multiply the value by the frame width:
X = (frame % columns) * width
These formulas can be written using Python code to update the Sprite.image used to draw a single frame. To get the frame image out of the sprite sheet, Surface.blit() could be used, but there’s a far easier way. Using the X and Y position values along with the frame width and height, we can just create a Rect and pass it to a different, and rather interesting method called subsurface(). This does not actually copy or blit the image at all, it just sets up a pointer to the existing master image! So, in effect, we’re going to be doing lightning-fast updates of the frame image because no pixels have to be copied at all!
    frame_x = (self.frame % self.columns) * self.frame_width
    frame_y = (self.frame // self.columns) * self.frame_height
    rect = ( frame_x, frame_y, self.frame_width, self.frame_height )
    self.image = self.master_image.subsurface(rect)
Pygame uses sprite groups to manage updating and drawing sprites, as a means to handle a large number of entities usually found in a typical game. This is a good idea, as it saves us the trouble of doing it manually. It’s odd, though, that the Pygame creators thought to include an iterated sprite entity manager but did not include even rudimentary animation support. No matter, we’ll use what is provided and add our own code as needed!
A sprite group is a simple entity container that will call a sprite class’ update() method with whatever parameters it supports, and then draw all sprites contained in the container. A sprite group is created with pygame.sprite.Group() like so:
group = pygame.sprite.Group()
group.add(sprite)
where the sprite parameter is a sprite object that has already been created. After creating a group, any number of sprites can be added to the group container so that they can be managed more easily, and this also cuts down on global variable use. When we’re ready to update and draw the sprites in our game, we do this entirely with the group rather than the individual sprites:
    group.update(ticks)
    group.draw(screen)
The real power here is not containing all game sprites inside one group and using it to manage them, but creating several groups for each type of game sprite! This allows custom behaviors to be applied to specific types of sprites managed by their own group container objects. Another great advantage to using groups is that the updating and drawing code need not change when game objects are added or removed—the same update() and draw() methods are called and the group updates all of its attached sprite objects.
Note
Be careful not to accidentally overwrite the base Sprite.rect property with a basic tuple. That’s an easy mistake to make! Always set Sprite.rect to a new Rect(), like Rect(0,0,100,100), and not just an undefined tuple like (0,0,100,100). Python allows you to do that, and it can create the most bizarre error messages when things are expecting Sprite.rect to be a Rect, but it’s been replaced with a tuple! This is confusing because some rectangle code still works with the tuple-ized version!
We can put all of this code into a reusable class which I’ll just call MySprite for lack of a better name. This class directly inherits (that is, extends) pygame.sprite.Sprite, and works directly with pygame.sprite.Group, for automated update and drawing. There are quite a few properties in this enhanced sprite class called MySprite, properties dealing with the animation, the master image, and so forth, that are not already in the base sprite class. But also, our new MySprite class is not overly complex, not filled with complex methods or properties, so think of this class as just a starting point for your own future sprite programming work. This is intentionally simple, a skeleton class for working with animated sprites. There are also three properties in the MySprite class: X, Y, and position. These are meant to help with setting the position of the sprite. Without these properties, we have to modify the rect which is kind of a pain when you just want to change the X or Y value.
class MySprite(pygame.sprite.Sprite):
    def __init__(self, target):
        pygame.sprite.Sprite.__init__(self) #extend the base Sprite class
        self.master_image = None
        self.frame = 0
        self.old_frame = -1
        self.frame_width = 1
        self.frame_height = 1
        self.first_frame = 0
        self.last_frame = 0
        self.columns = 1
        self.last_time = 0

    #X property
    def _getx(self): return self.rect.x
    def _setx(self,value): self.rect.x = value
    X = property(_getx,_setx)

    #Y property
    def _gety(self): return self.rect.y
    def _sety(self,value): self.rect.y = value
    Y = property(_gety,_sety)

    #position property
    def _getpos(self): return self.rect.topleft
    def _setpos(self,pos): self.rect.topleft = pos
    position = property(_getpos,_setpos)

    def load(self, filename, width, height, columns):
        self.master_image = pygame.image.load(filename).convert_alpha()
        self.frame_width = width
        self.frame_height = height
        self.rect = Rect(0,0,width,height)
        self.columns = columns
        #try to auto-calculate total frames
        rect = self.master_image.get_rect()
        self.last_frame = (rect.width // width) * (rect.height // height) - 1

    def update(self, current_time, rate=30):
        #update animation frame number
        if current_time > self.last_time + rate:
            self.frame += 1
            if self.frame > self.last_frame:
                self.frame = self.first_frame
            self.last_time = current_time

        #build current frame only if it changed
        if self.frame != self.old_frame:
            frame_x = (self.frame % self.columns) * self.frame_width
            frame_y = (self.frame // self.columns) * self.frame_height
            rect = Rect(frame_x, frame_y, self.frame_width, self.frame_height)
            self.image = self.master_image.subsurface(rect)
            self.old_frame = self.frame

    def __str__(self):
        return str(self.frame) + "," + str(self.first_frame) +
               "," + str(self.last_frame) + "," + str(self.frame_width) +
               "," + str(self.frame_height) + "," + str(self.columns) +
               "," + str(self.rect)
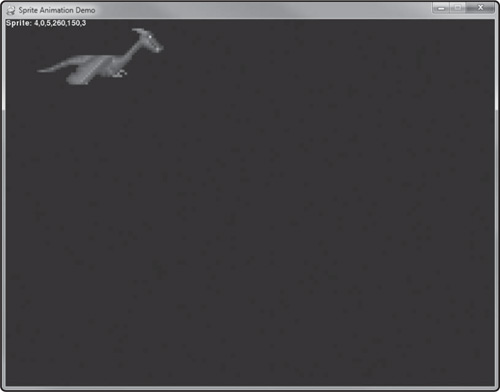
Figure 7.4 shows the output of the Sprite Animation Demo program, and the code listing follows. The MySprite class was just listed above, so it’s not repeated here; just be sure to include it in the program’s source code before trying to run the program.
import pygame
from pygame.locals import *

# remember to include MySprite here

#print_text function
def print_text(font, x, y, text, color=(255,255,255)):
    imgText = font.render(text, True, color)
    screen.blit(imgText, (x,y))

#initialize pygame
pygame.init()
screen = pygame.display.set_mode((800,600),0,32)
pygame.display.set_caption("Sprite Animation Demo")
font = pygame.font.Font(None, 18)
framerate = pygame.time.Clock()

#create the dragon sprite
dragon = MySprite(screen)
dragon.load("dragon.png", 260, 150, 3)
group = pygame.sprite.Group()
group.add(dragon)

#main loop
while True:
    framerate.tick(30)
    ticks = pygame.time.get_ticks()

    for event in pygame.event.get():
        if event.type == pygame.QUIT: sys.exit()
    key = pygame.key.get_pressed()
    if key[pygame.K_ESCAPE]: sys.exit()

    screen.fill((0,0,100))
    group.update(ticks)
    group.draw(screen)
    print_text(font, 0, 0, "Sprite: " + str(dragon))
    pygame.display.update()
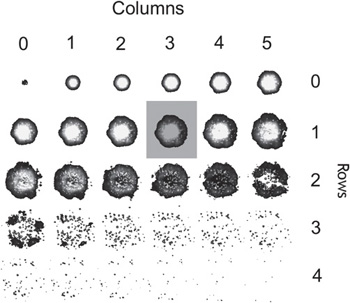
Now we’ll use the MySprite class and the new sprite animation code just studied to create a simple game to demonstrate how to use the new class. Figure 7.5 shows one of the two ways to finish the game, and this does not bode well for the caveman character!
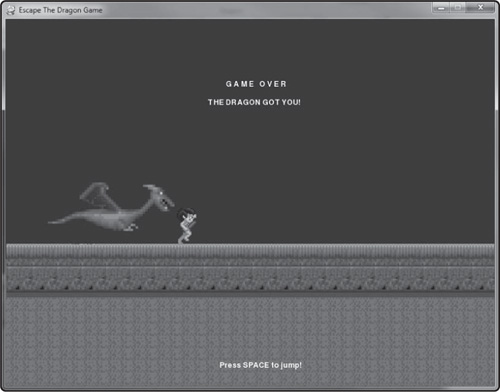
The gameplay is simple—jump over the flaming arrows so they will hit the dragon, and escape! The Space key is used to jump over the arrows. The way this works is very simple in concept, but a bit challenging to understand at first. A Y velocity value is set to a negative number like -8.0. While the player is in “jumping mode,” so to speak, the velocity is increased by a small amount every frame. In this game, we want the player’s caveman sprite to jump up quickly but also fall back down quickly to make the game challenging. So, the modifier is a value of 0.5 (added to the velocity every frame). You can see the player jumping over a flaming arrow by flipping back to Figure 7.1 again. The end result is as follows:
-8.0 + 0.5 = -7.5
-7.5 + 0.5 = -7.0
-7.0 + 0.5 = -6.5
-6.5 + 0.5 = -6.0
-6.0 + 0.5 = -5.5
and so on, until we reach:
-0.5 + 0.5 = 0.0
At this point, the sprite will have peaked at the top of the jump and will begin moving back down again toward the ground:
0.0 + 0.5 = 0.5
0.5 + 0.5 + 1.0
1.0 + 0.5 = 1.5
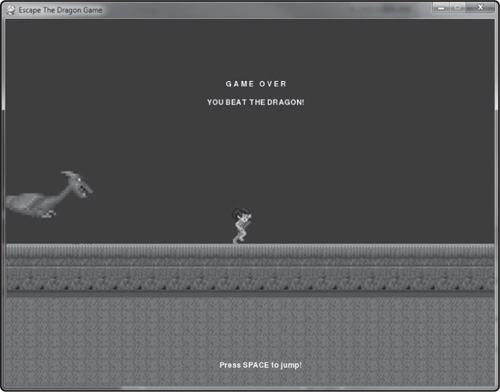
and so on until the sprite reaches the starting Y position, at which point the jump cycle ends and the velocity is no longer used. When the player presses Space to jump again, that velocity value is restarted at -8.0 again. You can experiment with different heights by adjusting this and the incremental value to tweak the gameplay. Figure 7.6 shows what happens when the dragon is hit by enough arrows that it is pushed off the screen. That’s how to win, by jumping over the arrows so they hit the dragon!
We haven’t covered sprite collisions yet, and won’t get into it in detail until the next chapter, so a quick perusal is in order now. There are several functions we can use to detect when two sprites collide with each other, using either the so-called “bounding rectangle” technique or “bounding circle.” Bounding rectangle collision detection works by comparing the rectangles of two sprites to see if they overlap. That is the technique used in this game to determine when the arrow has hit the player or the dragon, or when the dragon has “eaten” the player. Here is one example, comparing the arrow with the dragon sprite to see if there’s a collision:
pygame.sprite.collide_rect(arrow, dragon)
As long as we have inherited from pygame.sprite.Sprite for our own sprite class, then the rect property will be available, as that is what pygame.sprite.collide_rest() uses to see if the two sprites have hit each other.
Here is the source code for The Escape the Dragon Game. I hope you enjoy it.
import sys, time, random, math, pygame
from pygame.locals import *

# insert MySprite class definition here

def print_text(font, x, y, text, color=(255,255,255)):
    imgText = font.render(text, True, color)
    screen.blit(imgText, (x,y))

def reset_arrow():
    y = random.randint(250,350)
    arrow.position = 800,y

#main program begins
pygame.init()
screen = pygame.display.set_mode((800,600))
pygame.display.set_caption("Escape The Dragon Game")
font = pygame.font.Font(None, 18)
framerate = pygame.time.Clock()

#load bitmaps
bg = pygame.image.load("background.png").convert_alpha()

#create a sprite group
group = pygame.sprite.Group()

#create the dragon sprite
dragon = MySprite(screen)
dragon.load("dragon.png", 260, 150, 3)
dragon.position = 100, 230
group.add(dragon)

#create the player sprite
player = MySprite(screen)
player.load("caveman.png", 50, 64, 8)
player.first_frame = 1
player.last_frame = 7
player.position = 400, 303
group.add(player)

#create the arrow sprite
arrow = MySprite(screen)
arrow.load("flame.png", 40, 16, 1)
arrow.position = 800,320
group.add(arrow)

arrow_vel = 8.0
game_over = False
you_win = False
player_jumping = False
jump_vel = 0.0
player_start_y = player.Y

#repeating loop
while True:
    framerate.tick(30)
    ticks = pygame.time.get_ticks()

    for event in pygame.event.get():
        if event.type == QUIT: sys.exit()
    keys = pygame.key.get_pressed()
    if keys[K_ESCAPE]: sys.exit()
    elif keys[K_SPACE]:
        if not player_jumping:
            player_jumping = True
            jump_vel = -8.0

    #update the arrow
    if not game_over:
        arrow.X -= arrow_vel
        if arrow.X < -40: reset_arrow()

    #did arrow hit player?
    if pygame.sprite.collide_rect(arrow, player):
        reset_arrow()
        player.X -= 10

    #did arrow hit dragon?
    if pygame.sprite.collide_rect(arrow, dragon):
        reset_arrow()
        dragon.X -= 10

    #did dragon eat the player?
    if pygame.sprite.collide_rect(player, dragon):
        game_over = True

    #did the dragon get defeated?
    if dragon.X < -100:
        you_win = True
        game_over = True

    #is the player jumping?
    if player_jumping:
        player.Y += jump_vel
        jump_vel += 0.5
        if player.Y > player_start_y:
            player_jumping = False
            player.Y = player_start_y
            jump_vel = 0.0

    #draw the background
    screen.blit(bg, (0,0))

    #update sprites
    if not game_over:
        group.update(ticks, 50)

    #draw sprites
    group.draw(screen)

    print_text(font, 350, 560, "Press SPACE to jump!")

    if game_over:
        print_text(font, 360, 100, "G A M E   O V E R")
        if you_win:
            print_text(font, 330, 130, "YOU BEAT THE DRAGON!")
        else:
            print_text(font, 330, 130, "THE DRAGON GOT YOU!")

    pygame.display.update()
Whew, sprite programming requires a lot of code just to get started, doesn’t it? I feel like we just invented our own Python module just to get animation up and running. The good news is we now have a great new class called MySprite that can be modified and enhanced for any purpose from here on out. I’m sure we’ll add new features to it in future chapters.