15. Getting More Out of OneNote

In this chapter, you learn how to get more out of OneNote notebooks, including creating new notebooks, syncing notebooks, and inserting links and files. Topics include the following:
![]() Adding links to a page
Adding links to a page
![]() Inserting spreadsheets and other files
Inserting spreadsheets and other files
You learned the basics of working with OneNote in Chapter 14, “Building a OneNote Notebook,” but there’s much more the program can do. In this chapter, you extend your OneNote education by learning a few more useful tasks, such as creating and syncing notebooks, adding data such as the current date and time and links to other objects, and inserting files on a page.
Working with Notebooks
The hierarchical structure of a OneNote notebook means that you can break down your data in a number of ways. That is, you can assign major topics their own sections and then subdivide each topic into multiple pages within a section. That works well for most people, and it’s common to use only a single notebook. However, you might find that your notebook has so many sections that it is difficult to navigate and to find the data you need. In that case, you might consider creating a second notebook. For example, many people maintain one notebook for personal data and another for business data. Similarly, if you share your computer with other people but haven’t set up separate user accounts, you’ll no doubt prefer that everyone use her own notebook.
Create a New Notebook
You can create a new notebook either locally on your PC or remotely on your OneDrive. For the latter, you need to be logged in to your Microsoft account.
1. Click File.
2. Click New Notebook.

3. Click the color you want to use for the new notebook.
4. Type a name for the notebook.
5. Click Create. OneNote creates and then opens the new notebook.

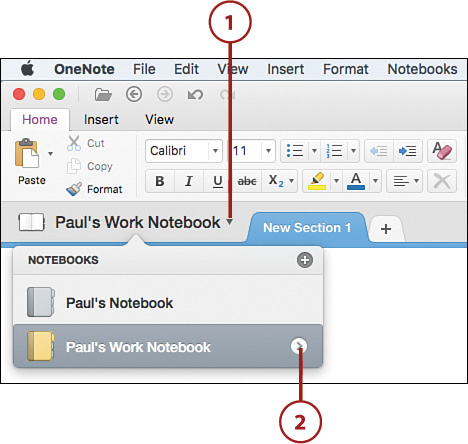
Switch Between Notebooks
Once you have two or more notebooks open, OneNote gives you a quick and easy method for switching from one to another.
1. Click the name of the current notebook. OneNote displays the Notebook pane.
2. Click the notebook you want to use. OneNote switches to that workbook.

Closing a Workbook
If you no longer want a particular notebook to appear in the Notebook pane, you need to close it. Display the Notebook pane, right-click (or Control-click) the notebook you want to close, and then click Close. (You can also close the current notebook by pressing Shift+Command+W.)
Sync a Notebook
Syncing a notebook means saving your changes to OneDrive, and OneNote performs this task automatically. However, if OneNote fails to sync automatically, or if you have important changes you want to ensure are saved, you can sync a notebook manually.
1. Click the name of the current notebook. OneNote displays the Notebook pane.
2. Click the View Notebook Actions icon for the notebook you want to sync.
3. Click Sync. OneNote syncs the notebook with OneDrive.

Syncing All Notebooks
You can sync all your notebooks with OneDrive by clicking File and then clicking Sync All Notebooks. (You can also press Shift+Command+S.)
Adding Data to a Page
The straightforward click-and-type nature of a OneNote page makes it easy to add simple notes, lists, and other text snippets. And, of course, you’re free to take advantage of the techniques you learned in Chapter 3, “Working with Office 2016 for Mac Graphics,” to populate a page with pictures, SmartArt, WordArt, and shapes. The inherent free-form approach offered by OneNote also means that you can add plenty of other data types to a page. The most common of these are the date and time, links, Excel worksheets, and files, each of which is described in the next few sections.
Insert the Date
Some of the content you add to a OneNote page will be date-sensitive. For such content, you should date-stamp the placeholder by inserting the current date and, optionally, the current time.
1. Click the section you want to use.
2. Click the page you want to use.
3. Position the insertion point where you want to insert the date.

5. Click Date. OneNote inserts today’s date.

Keyboard Shortcut
You can also insert today’s date by pressing Command+D. To insert today’s date and time, press Shift+Command+D.
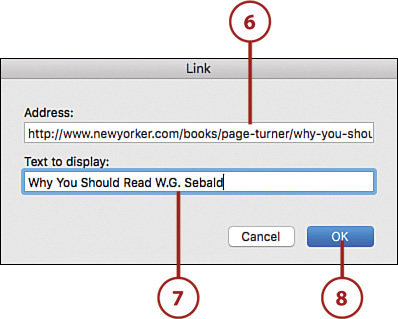
Add a Link to a Website
OneNote comes with a Links command that enables you to insert links to websites. This is handy if you use your pages to store links to websites you visit often or want to visit in the future.
1. Click the section you want to use.
2. Click the page you want to use.
3. Position the insertion point where you want to insert the link. You can also select existing text that you want to turn into a link.
4. Click the Insert tab.
5. Click Link. OneNote displays the Link dialog box.

Keyboard Shortcut
You can also display the Link dialog box by pressing Command+K.
6. Type the link address, or paste it from your browser’s address box.
7. If you didn’t select text in advance, type the link text.
8. Click OK. OneNote inserts the link.
To make changes to a link, right-click (or Control-click) the link and then click Edit Link.
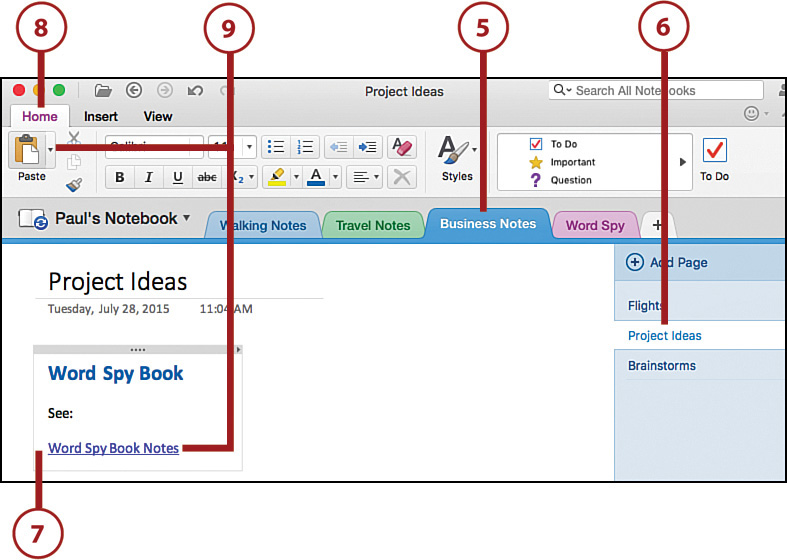
Add a Link to a OneNote Location
Besides linking to a website, OneNote also enables you to create a link to another OneNote location: a notebook, a section within a notebook, a page within a section, or even a note within a page. This makes navigating OneNote easy because you can click a link to jump instantly to that location.
1. If you want to link to a location within a section, click the section.
2. If you want to link to a location within a page, click the page.
3. Right-click (or Control-click) the location you want to use for your link.
4. Click Copy Link to Location, where Location is the type of item (such as Page, as shown here).

5. Select the section where you want the link to appear.
6. Select the page where you want the link to appear.
7. Position the insertion point where you want to insert the link.
8. Click the Home tab.
9. Click Paste. OneNote inserts the link.
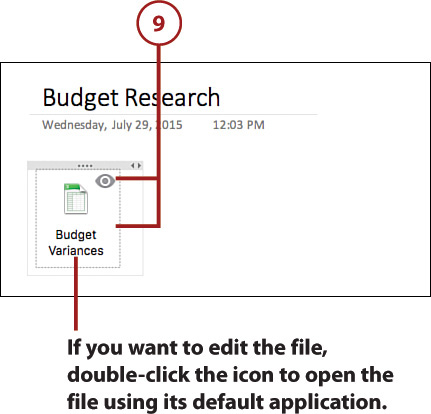
Attach a File
If you want quick access to any type of file, you can attach that file to a OneNote page.
1. Click the section you want to use.
2. Click the page you want to use.
3. Click where you want the file icon to appear.
4. Click the Insert tab.
5. Click File Attachment. OneNote displays the Choose a File or a Set of Files to Insert dialog box.

6. Select a location.
7. Click the file you want to attach.
8. Click Insert. OneNote inserts an icon for the file into the page.
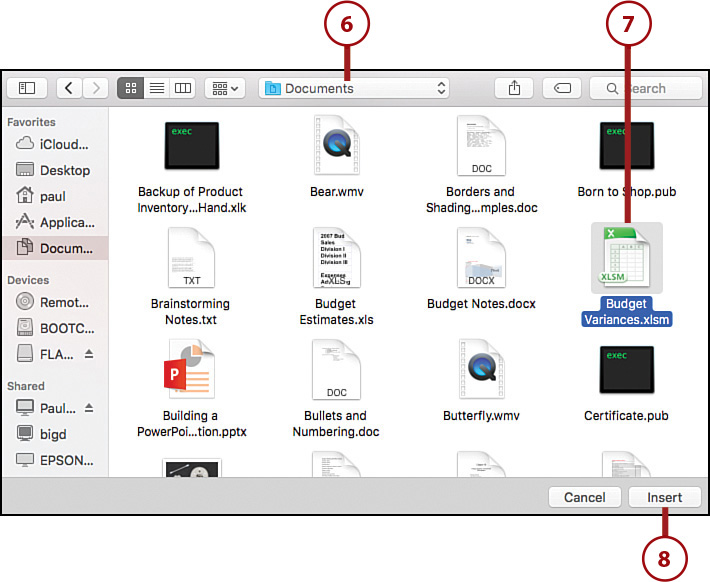
9. To view the file, click the icon and then click Quick Look. OneNote opens the document in a Quick Look window.