15. Transferring and Sharing Files
This chapter explains how to transfer selected files between your phone, a computer, and other phones. Topics include the following:
→ Using Samsung Kies to wirelessly transfer files
→ Manually transferring files over a USB cable
→ Transferring files using Bluetooth
→ Using Wi-Fi Direct, S Beam, and Share Shot to transfer files between phones
Although certain types of data, such as Calendar items and Contact records, can be automatically synchronized between the phone and a computer, most other file types—such as photos, videos, music, and various documents—must be manually copied from one device to another or must rely on software that isn’t included with the phone. Using the techniques and tools discussed in this chapter, you’ll discover many of the ways that you can transfer files between your phone and your computer, as well as between a pair of phones.
You can find instructions for synchronizing Calendar and Contacts data in Chapter 16.
Using Samsung Kies to Transfer Files over Wi-Fi
If you have a wireless router or modem, you can copy files between your phone and computer—or any computer on your network. In this section, you’ll see how to accomplish this by running Samsung Kies, a computer application that’s used with the phone’s Kies via Wi-Fi setting. You can also use Samsung Kies to transfer data over a USB cable, as explained in “Performing USB Transfers with Samsung Kies,” later in this chapter.
Setup and Basic Operation
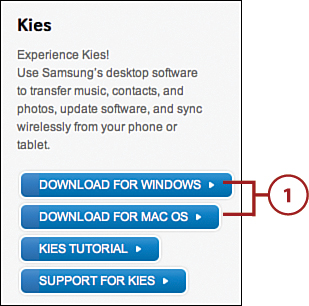
1. First use only. Download and install the Windows or Mac version of Samsung Kies from http://www.samsung.com/us/kies/.
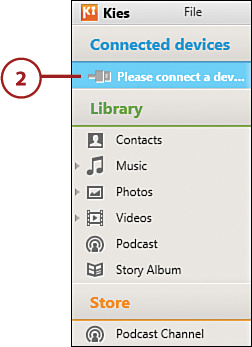
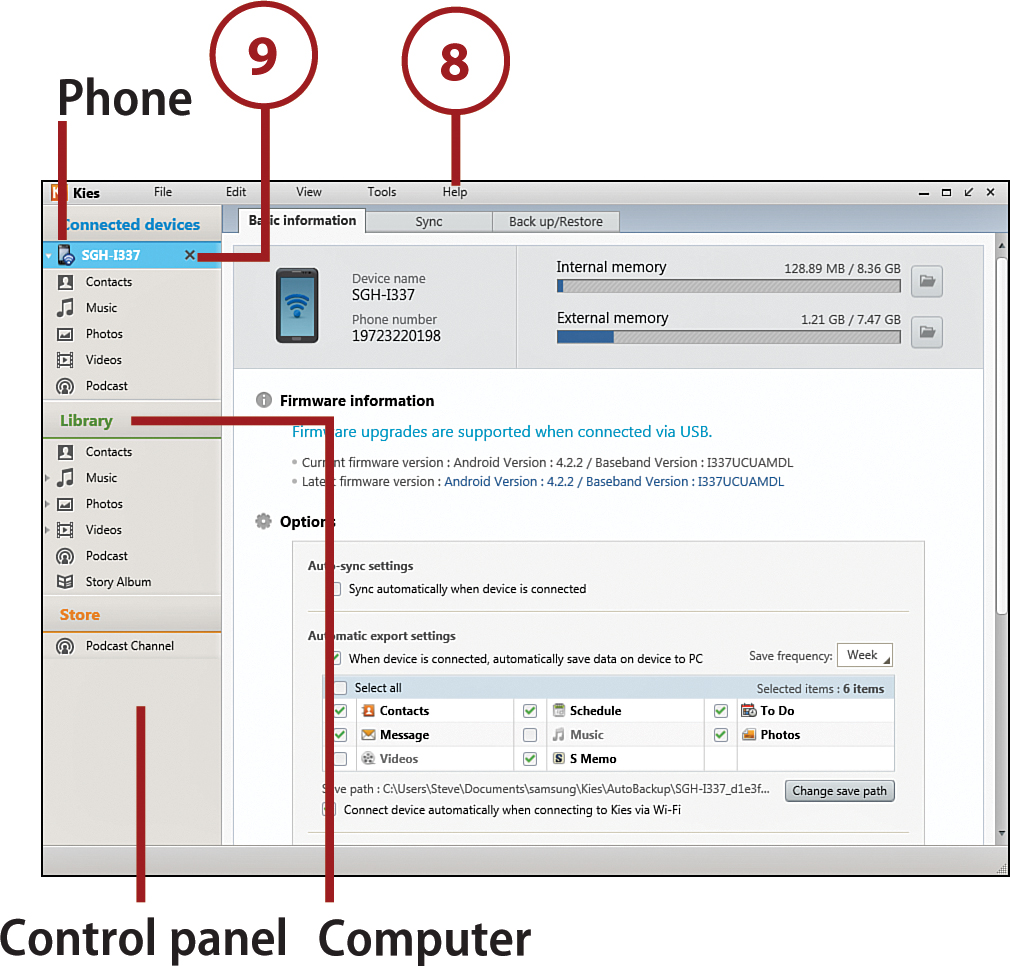
2. Launch Samsung Kies on your computer. The control panel on the left edge shows there are no connected devices.
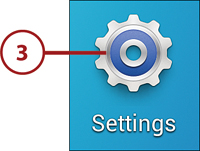
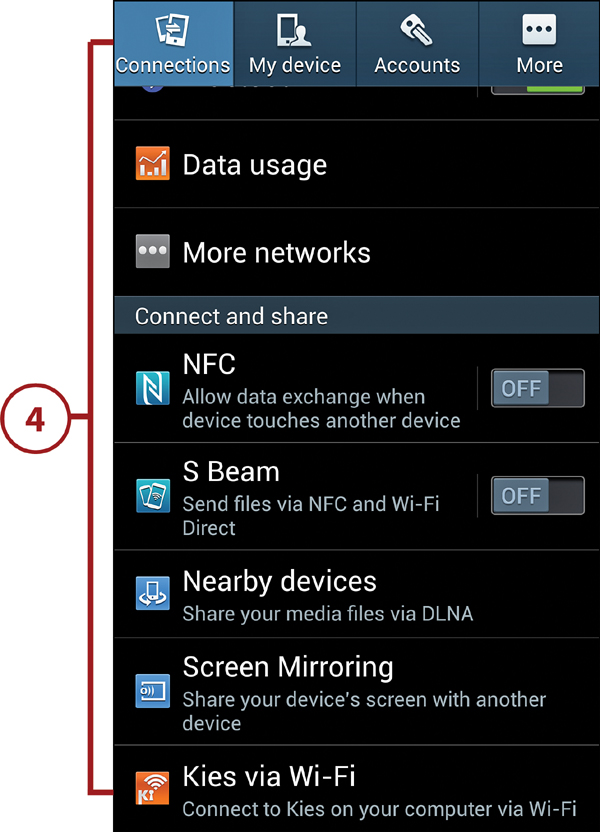
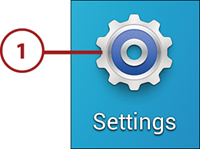
3. On the phone’s Home screen, tap Apps, followed by Settings.
4. Select the Connections tab, scroll to the bottom of the screen, and tap Kies via Wi-Fi.
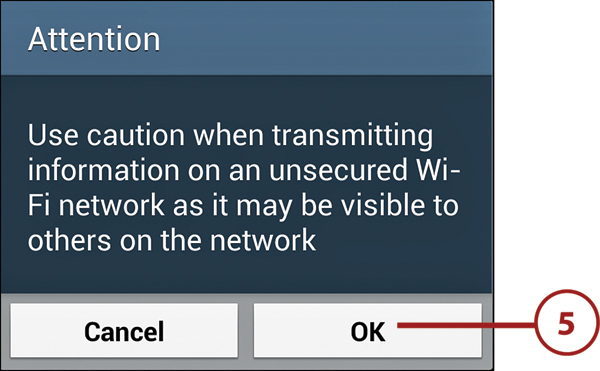
5. Read the Attention dialog box and tap OK.
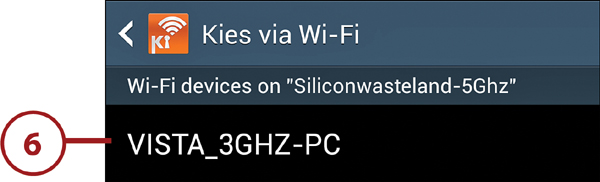
6. Tap the name of the computer to which you want to connect. If it isn’t displayed, tap the Scan Devices button at the bottom of the screen.
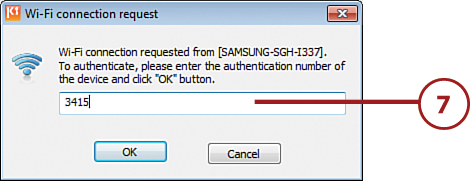
7. First run only. A Kies via Wi-Fi dialog box appears on the phone. Enter the displayed passkey in the Wi-Fi Connection Request dialog box that appears on the computer, and then tap OK.

8. After the connection is established, the Kies default view appears and phone content is backed up to the computer. You can restore this default view at any time by clicking the name of your phone in the control panel. As explained in the following task, you can use Samsung Kies to copy files from computer to phone or from phone to computer.
About the Control Panel
The control panel has two main sections. The top one (showing your phone’s model number) lists the various content categories that are on the phone. The second section (Library) lists content that’s stored on your computer. If you expand either section and select a category such as Music or Photos, a list of these items appears in the window’s main area.
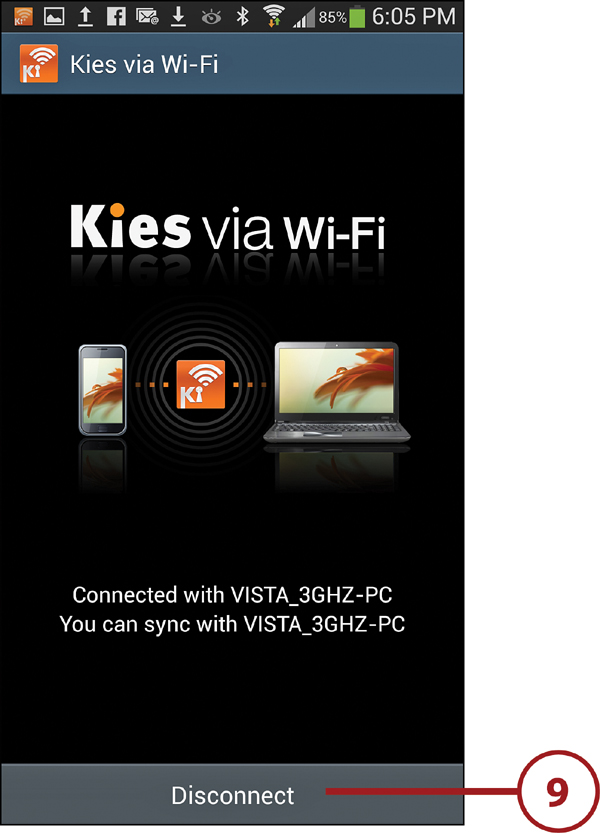
9. When you finish using Samsung Kies, tap the Disconnect button on the phone or click the x beside the phone’s name in the Samsung Kies control panel. Then quit the computer program by choosing File, Exit.
Copying Files
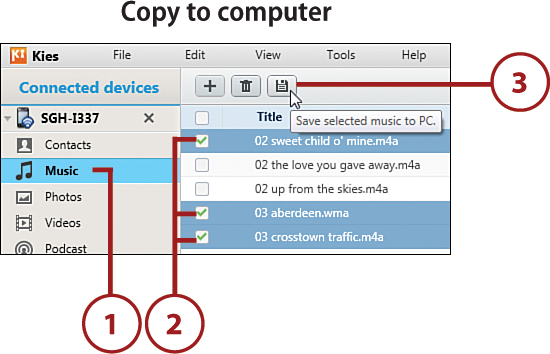
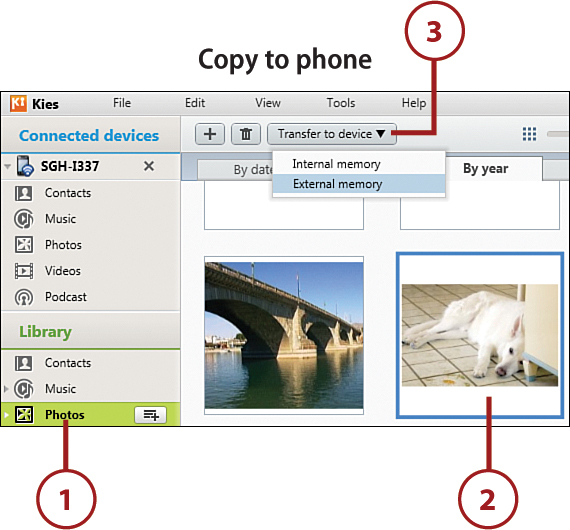
1. In the control panel, expand the phone and Library sections. Select the source and category of material to copy. (To copy from phone to computer, select a category in the phone’s section. To copy from computer to phone, select a category in the Library section.)
2. Select the files to copy by clicking their check boxes (in List view) or thumbnails (in Thumbnail view).
Working in Thumbnail View
To select multiple thumbnails, you can Shift-click, Ctrl-click (Windows) or Command-click (Mac) the items.
3. Do one of the following:
• Copying from phone to computer. Click the Save button above the list. In the Select Folder dialog box that appears on the computer, select the computer folder into which the files will be copied, and then click the Select Folder button.
• Copying from computer to phone. Click the Transfer to Device button. (If a memory card is installed, you must choose Internal Memory or External Memory. The latter represents the memory card.)
4. The selected material is copied to the computer or phone.
>>>Go Further: More Options
• You can double-click most items. When you do, songs and videos play; photos open.
• When you double-click a photo that’s on the phone in order to view it, you can immediately save it to your computer by clicking the Save button that appears.
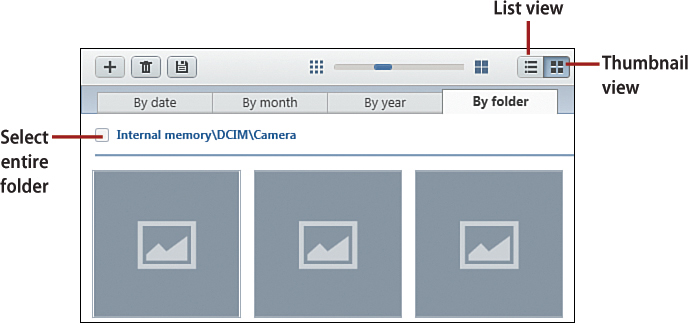
• Photos can be viewed in List or Thumbnail view by clicking the appropriate icon at the top of the window. Select Thumbnail view and the By Folder tab when you want to quickly copy an entire folder (such as Camera) to the computer.
>>>Go Further: What About Kies Air?
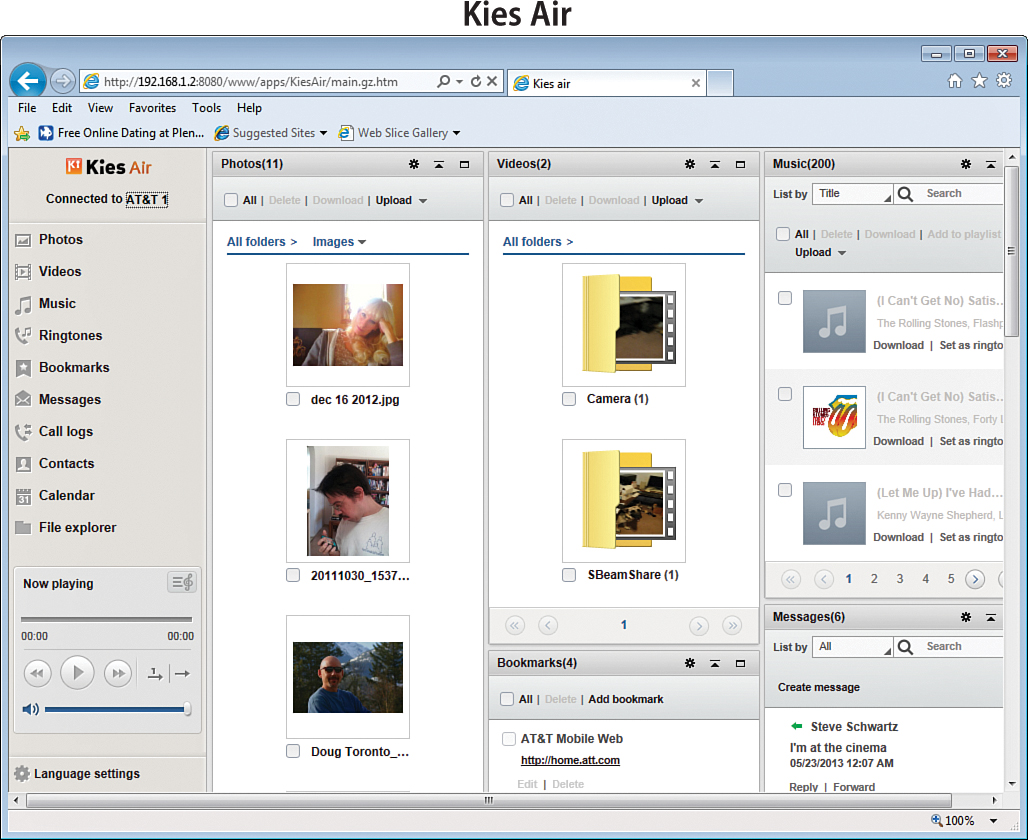
Save the URL
To avoid manually entering the numeric URL each time you use Kies Air, save it as a browser favorite or bookmark. Although the URL may change in later sessions, editing the URL is faster than entering it from scratch each time.
Transferring Files over USB
Using the USB cable provided with your phone, you can connect the phone to a PC or Mac and freely copy files in either direction. The following task temporarily turns your phone into the equivalent of a flash drive. (Note that if you’re a Mac user, you must first download and install a free Mac application from www.android.com/filetransfer.)
Windows USB Drivers
To use any USB file transfer method with a Windows PC, you must first install the Samsung USB drivers, as explained in “Tethering the Phone and a PC” in Chapter 18.
Manual USB Transfers to and from a Mac
1. Using the phone’s USB cable, connect the phone and the Mac.
2. Open the Notification panel on the phone. In the Ongoing section, it should say Connected as a Media Device. If it says Connected as a Camera, tap the entry and select Media Device (MTP) in the screen that appears.

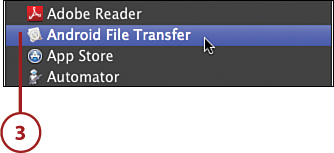
3. First run only. Open the Applications folder on the Dock and select Android File Transfer. (The program should launch automatically in subsequent sessions.)
4. A window appears that lists all files on your phone. Transfer copies of files from the phone by dragging them onto the Mac’s Desktop or into a folder. Transfer copies of files from the Mac by dragging them into an appropriate folder in the window.
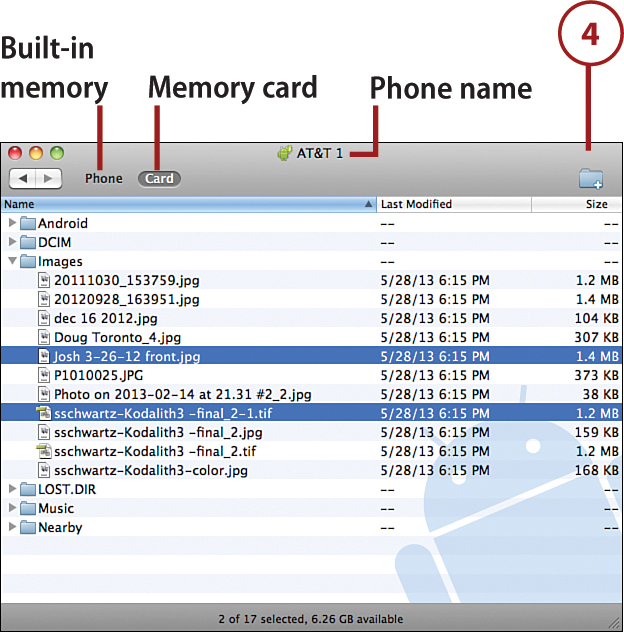
Phone or Card?
If you’ve installed a memory card in the phone, you can access both the built-in memory and the add-in memory card by selecting Phone or Card, respectively.
5. When you finish, disconnect the USB cable from the phone and the Mac. Android File Transfer should quit automatically.
Other Quit Options
If necessary, you can manually quit by pressing Command+Q or by choosing Android File Transfer, Quit Android File Transfer. If that fails, right-click the Android File Transfer icon in the Dock and choose Force Quit.
Manual USB Transfers to and from a PC
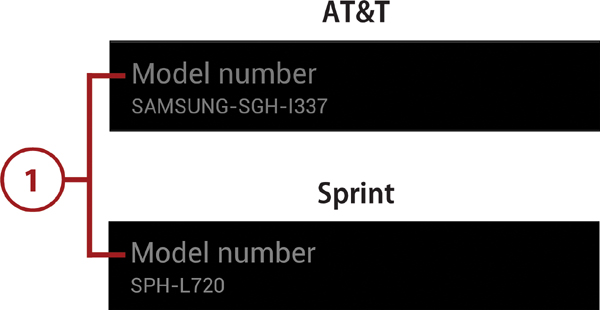
1. If you haven’t already done so, visit the Support section of Samsung’s website (http://www.samsung.com/us/support/) and download the Windows USB driver for your carrier’s phone. See “Tethering the Phone and a PC” in Chapter 18 for instructions. You can find your model number by launching Settings, selecting the More tab, and tapping About Device. Note that installing this driver is a one-time process.
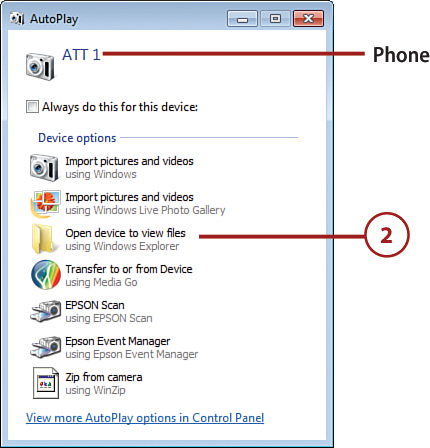
2. Using the phone’s USB cable, connect the phone and the PC. After the PC recognizes the connected phone and installs the driver software (if necessary), an AutoPlay dialog box appears. Click the option to Open Device to View Files.
Connect as a Media Device or as a Camera?
Samsung recommends connecting the phone as a Media Device when transferring most types of files and as a Camera to transfer photos from phone to PC. However, my experience with Windows 7 is that it doesn’t make a difference. Both AutoPlay dialog boxes offer the option to Open Device to View Files, for example.
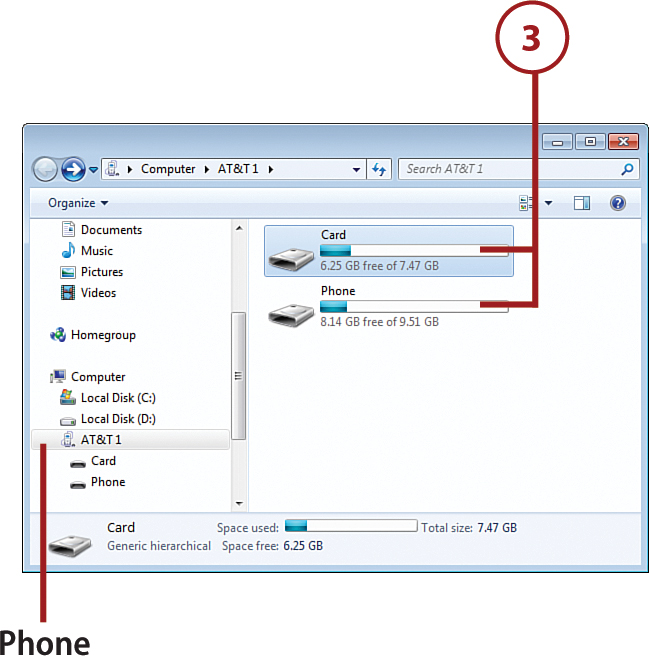
3. A file window opens, displaying Phone and Card (if you’ve installed a memory card) as “drives” or only Phone (if there’s no installed memory card). Open Phone to view the folders and files in the phone’s internal memory, or open Card to see the folders and files on the memory card. Transfer files from the phone by dragging them onto the Desktop or into a folder. Transfer files from the PC by dragging them into an appropriate folder on the phone or its memory card.
Where Are My Files?
The hardest part of performing manual USB file transfers from a computer to a phone is that you’re expected to know where those files are stored on your computer. If you have no idea, check the Documents folder and its subfolders first. You may find it helpful to explore your hard drive beforehand, making a note of the names and locations of music, photo, and video folders.
When transferring photos from iPhoto (Mac) to the phone, you may find it easier if you first launch iPhoto and drag the image thumbnails onto the Desktop. Transfer those images to the phone, and then delete the Desktop copies when you finish.
4. When you finish, disconnect the USB cable from the phone and the PC.
Transferring Files Using Bluetooth
The Samsung Galaxy S 4 is a Bluetooth device and can use Bluetooth to wirelessly exchange data with any Bluetooth-equipped computer, such as an iMac or some current laptops.
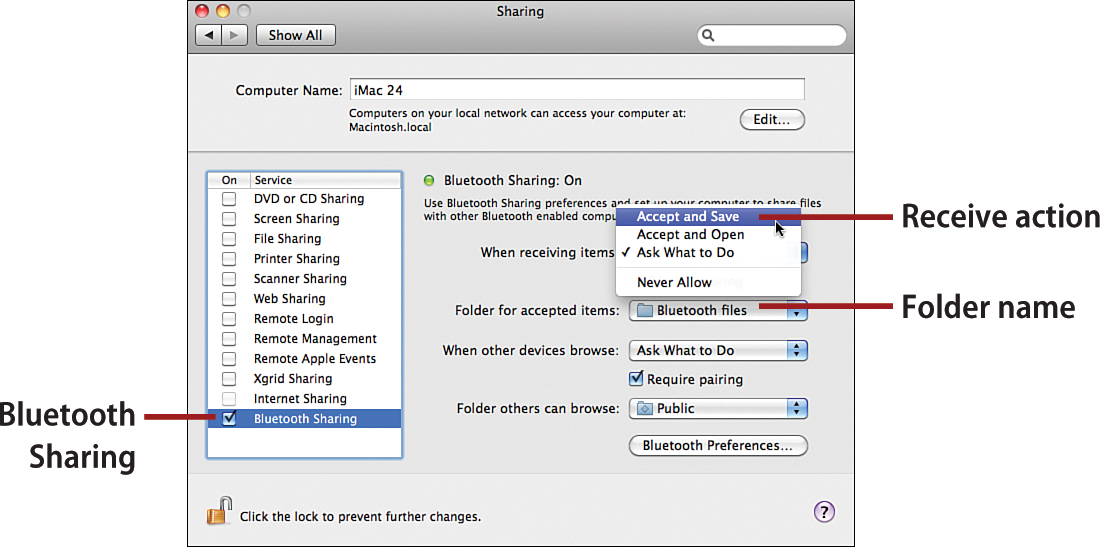
Pairing the Phone with the Computer
To use Bluetooth for data transfers, the phone and computer must first be linked (known as pairing). The following steps show how to accomplish this one-time procedure on an iMac with its built-in Bluetooth support. If you have a different computer, refer to its Help for instructions on Bluetooth pairing.
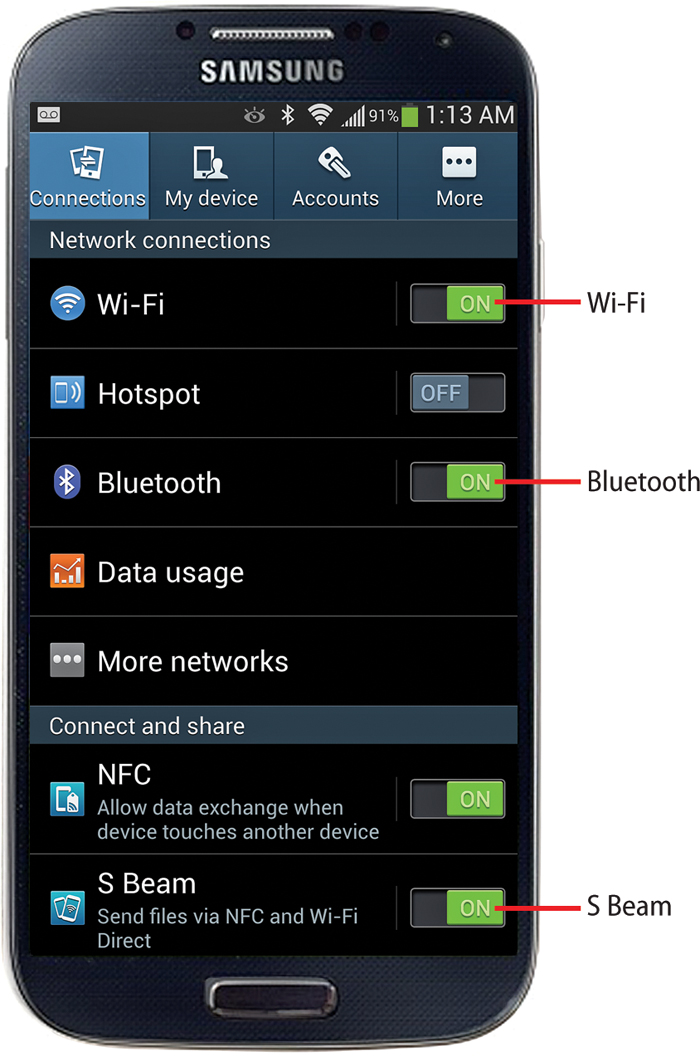
1. On the Home screen, tap Apps, followed by Settings.
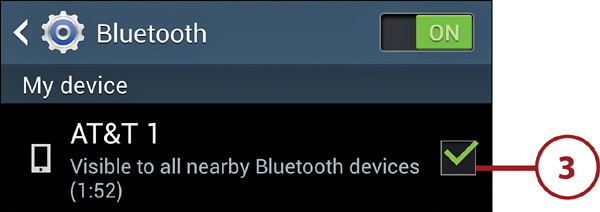
2. Select the Connections tab, ensure that the Bluetooth slider is On, and tap Bluetooth.
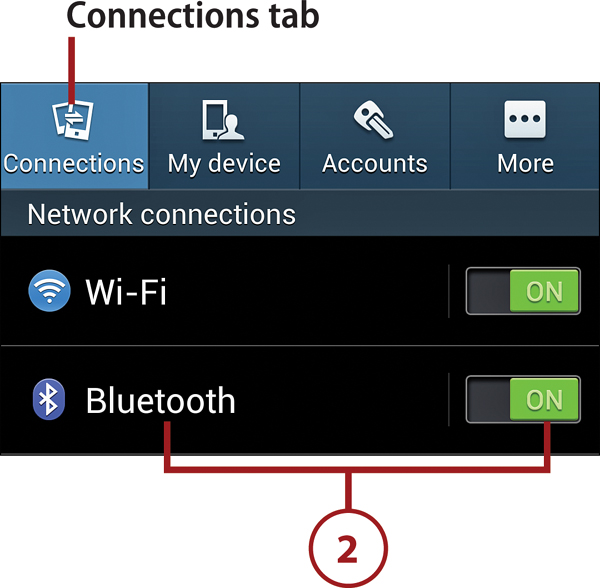
3. Ensure that your phone is checked, making it visible to other devices such as your iMac or laptop.
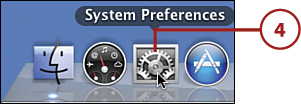
4. On the iMac’s Dock, click the System Preferences icon.
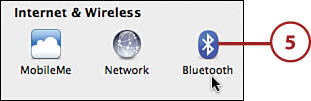
5. In the Internet & Wireless section of System Preferences, click the Bluetooth icon.
6. Ensure that On and Discoverable are checked, and then click the plus (+) button to add a new Bluetooth device—your Galaxy S 4.
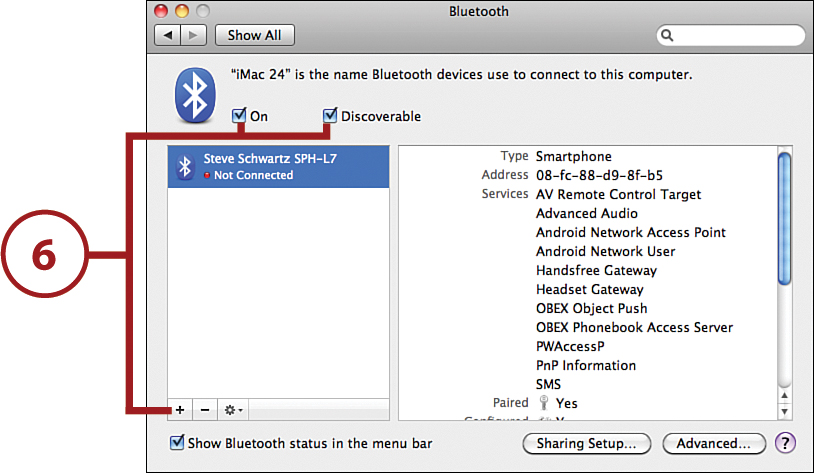
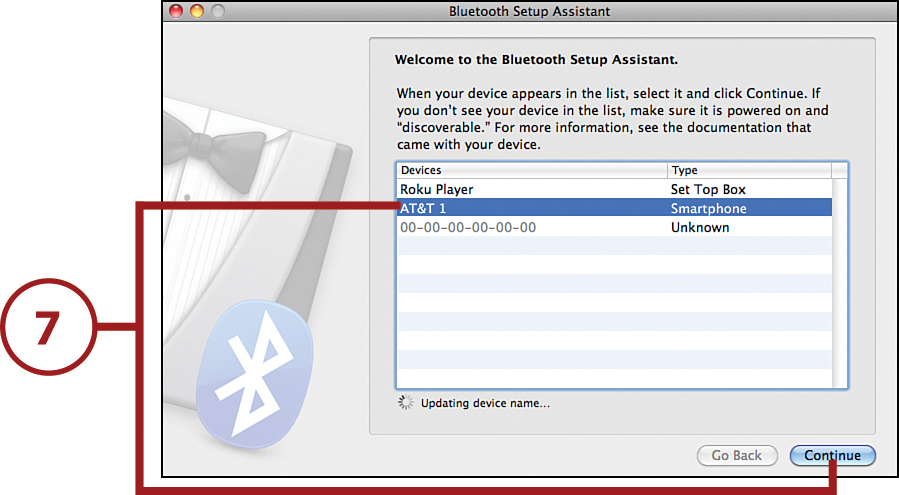
7. The Bluetooth Setup Assistant launches. The phone should be listed as a visible Bluetooth device. Select it in the Devices list and click Continue.
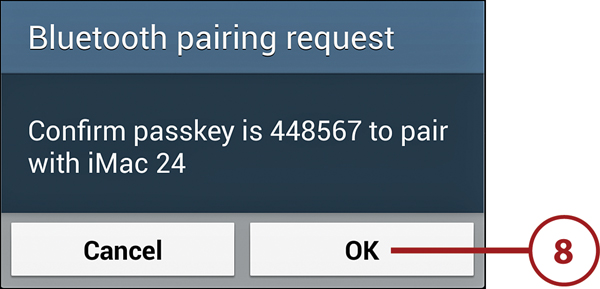
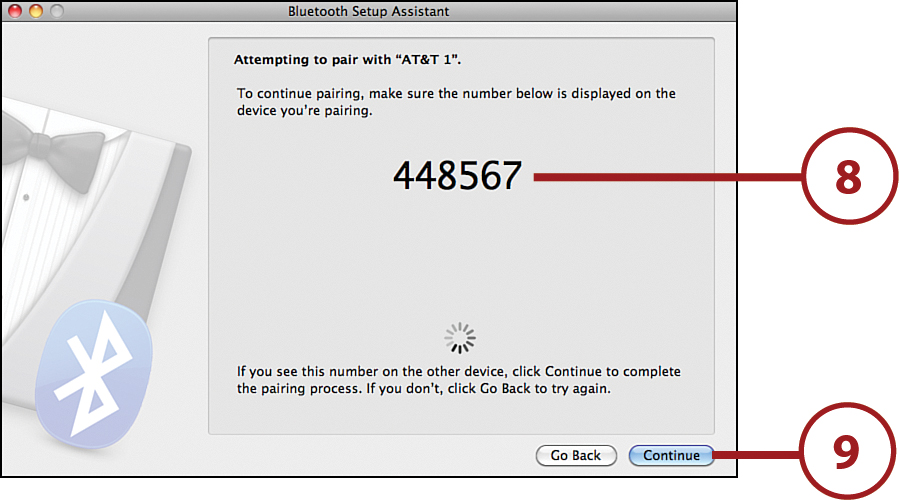
8. The Bluetooth Setup Assistant attempts to pair the phone with the iMac. In the Bluetooth Pairing Request that appears on your phone, tap OK if the number matches the one on the iMac’s screen.
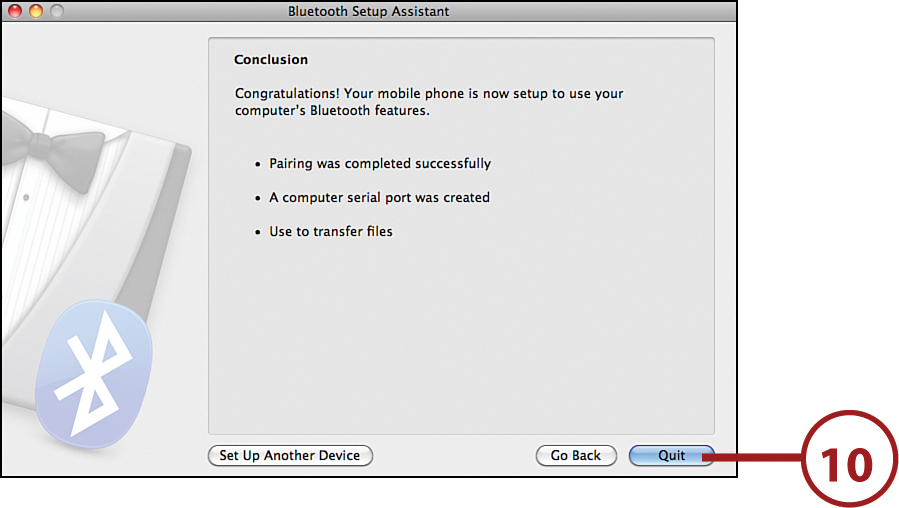
9. Click Continue in the Bluetooth Setup Assistant.
10. Click Quit to exit the Bluetooth Setup Assistant. Close the Bluetooth preferences dialog box.
11. A phone-specific hierarchical menu is added to the iMac’s Bluetooth menu.
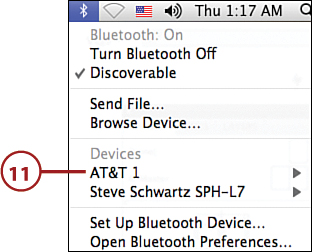
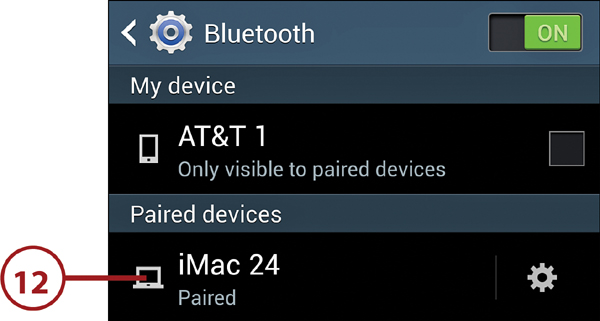
12. An entry also appears on the phone’s Bluetooth settings screen showing that the phone is paired to the iMac. Whenever you perform a Bluetooth operation on the phone, you’ll see this pairing information.
Sending Files from Computer to Phone
When the phone is paired with the computer, you can easily transmit selected files in either direction. The following tasks show how to transfer files over Bluetooth from or to an iMac.
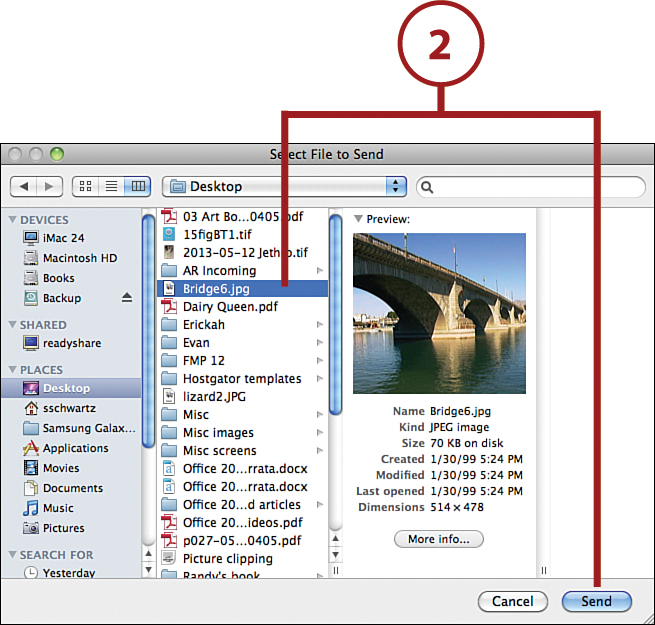
1. From the iMac’s Bluetooth menu, choose Send File from the phone name submenu.
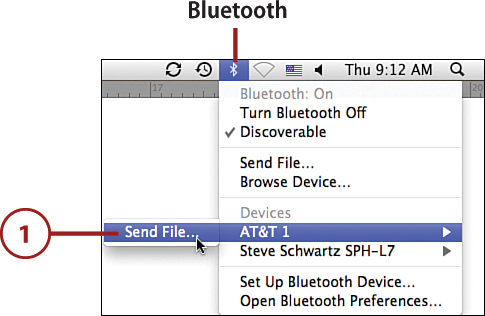
2. Select a file in the Select File to Send dialog box. (To select more than one file, hold down the Command key as you click filenames.) Click the Send button.
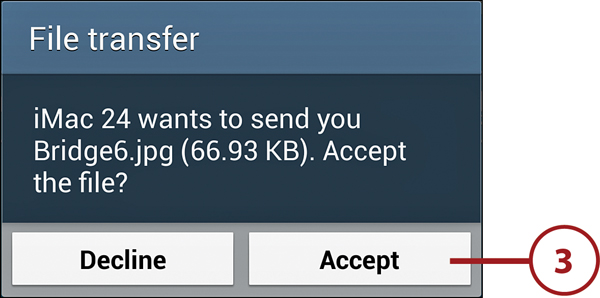
3. The phone receives a File Transfer request. Tap Accept to receive the file(s) on your phone.
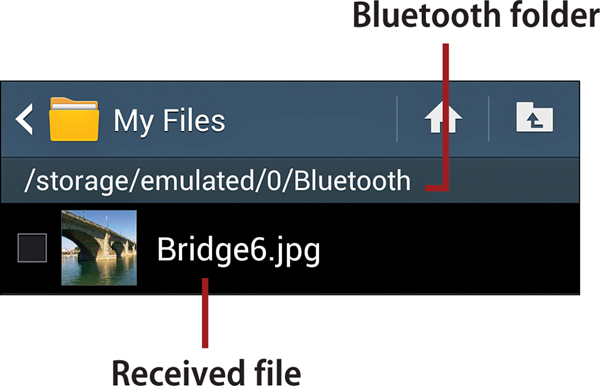
Filing the Files
All files transmitted to the phone via Bluetooth are copied to the Bluetooth folder. To see the files, go to the Home screen, tap the Apps icon, tap My Files, and then open the Bluetooth folder.
It isn’t necessary to move these files from the Bluetooth folder into their normal folders. Music, Gallery, and other apps can find new files without any heroic measures on your part—regardless of where they’re stored.
Sending Files from Phone to Computer
Similarly, you can transmit files from your phone to a paired Bluetooth-equipped computer. For example, photos created with the phone’s camera are convenient to send using Bluetooth. The following task shows how to send photo files to an iMac.
1. On the Home screen, tap Apps, followed by Gallery or tap a Gallery shortcut.
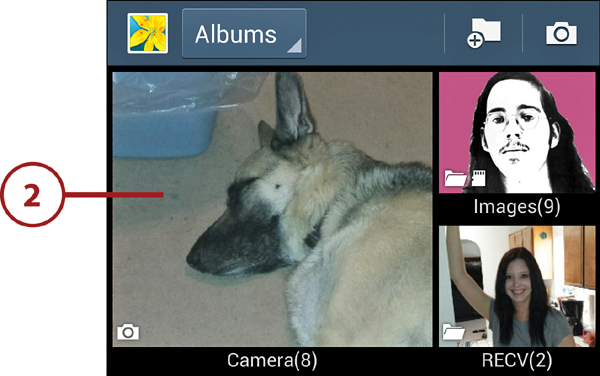
2. Open the folder that contains the pictures that you want to send to the computer. (All image folders are shown, regardless of where on the phone they’re stored. The number following each folder name is the number of pictures in the folder.)
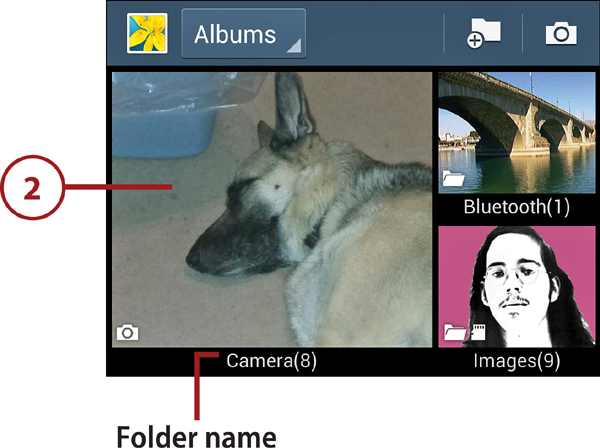
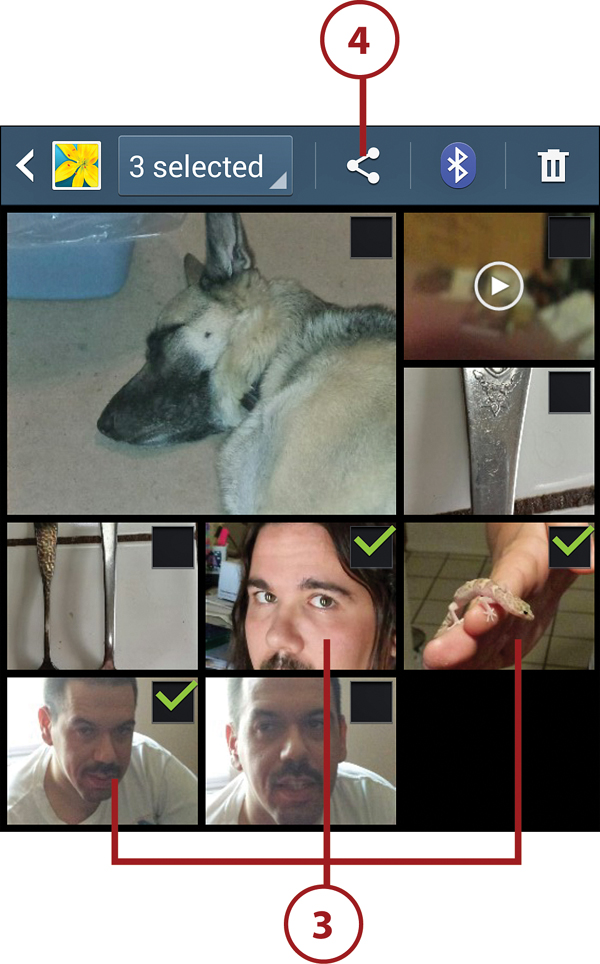
3. Thumbnails for the folder’s images appear. To transmit a single photo, tap its thumbnail to view the image. If you want to transmit multiple photos, firmly press one of the thumbnails to select it (indicated by a green check mark) and tap the thumbnails of other photos that you also want to transmit.
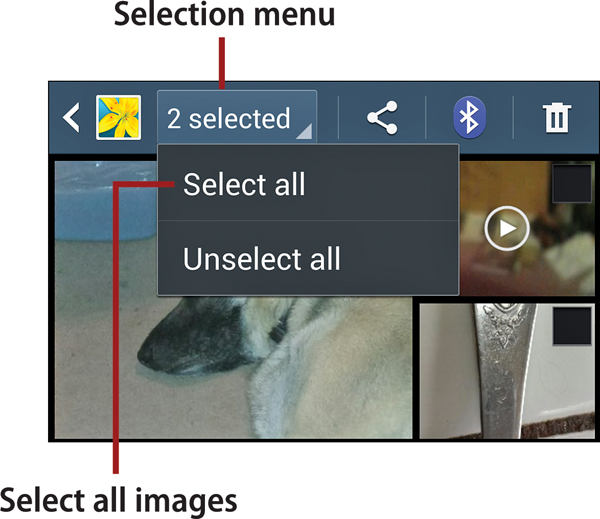
Using Select All
If a folder contains many images and you want to transmit all or most of them, select any thumbnail, open the Selection menu, and tap Select All. Then tap the thumbnails of the photos that you do not want to send, removing their check marks.
Another way to select an entire folder of images is to press and hold its thumbnail on the opening Gallery screen (resulting in a green check mark on the folder).
4. Tap the Bluetooth icon in the toolbar. (If the toolbar isn’t visible, tap the image once to make the toolbar appear.)
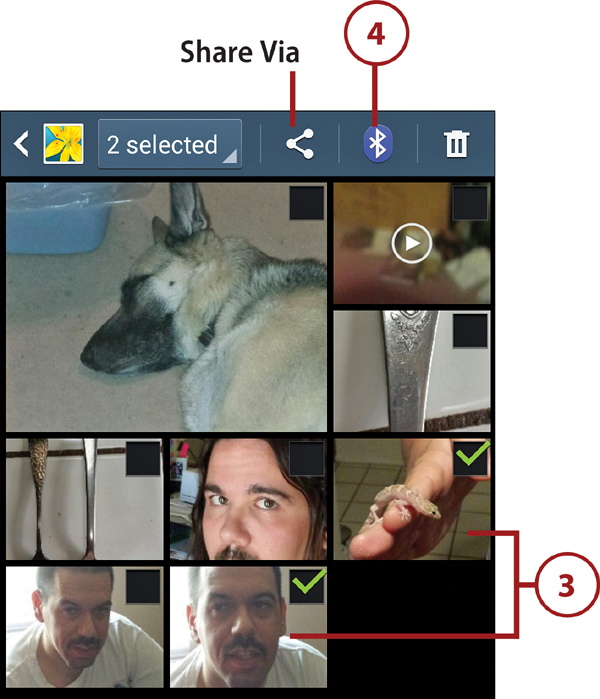
No Bluetooth Icon
The toolbar icon shown represents the sharing method you most recently used. If it’s not the Bluetooth icon, tap the Share Via icon and select Bluetooth.
In other apps, the Bluetooth transfer command may be worded differently or found somewhere other than on a toolbar. You may have to open a menu or press and hold the item to reveal a pop-up menu.
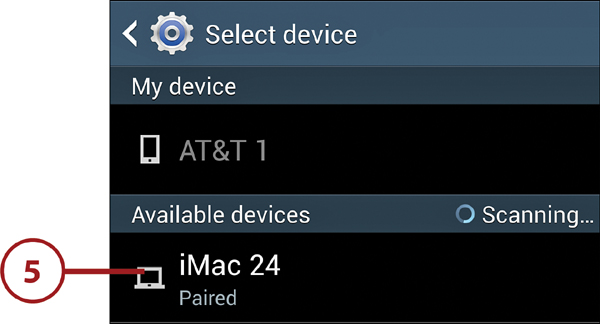
5. On the Select Device screen, tap the name of your paired computer. That device will receive the transmitted files.
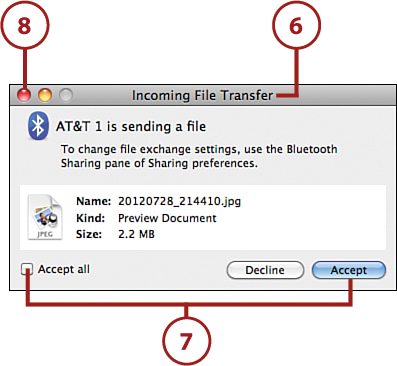
6. An Incoming File Transfer dialog box appears on the iMac.
7. If only one file is being transmitted, click the Accept button. If multiple files are being transmitted, click the Accept All check box and then click Accept. The file(s) are transmitted to the iMac and stored in the default folder.
8. When the transmission(s) finishes, close the Incoming File Transfer dialog box by clicking the red button.
Emailing Files
You can also use email to move files from your phone to your computer. As long as the final size of the attachment(s) doesn’t exceed the maximum allowable message size for your or the recipient’s email account, your phone and most email systems will allow the message to be transmitted. This means that if you restrict yourself to sending photos taken with the phone’s camera or songs purchased on the phone, you can deliver them to your computer by emailing them to yourself. Of course, you can also use these techniques to email your photos to friends and relatives.
Emailing Photos from Gallery
The most direct way to email one or more photos from your phone is to use the Gallery app. The images can be sent from any email account that you’ve added to the Email app.
Work Directly in Email
You can also send photos by composing a new message in Email, tapping the Attach button (the paper clip), and selecting the photo(s) you want to send.
1. On the Home screen, tap Apps, followed by Gallery or tap a Gallery shortcut.
2. In Gallery, open the folder where the pictures are stored by tapping the folder’s thumbnail.
3. Do one of the following:
• To send a single photo, tap its thumbnail to view the photo—opening it on a new screen.
• To send multiple photos, press and hold the first photo’s thumbnail to select the photo. Then lightly tap each additional thumbnail that you also want to send, marking each with a green check mark.
Send the Entire Folder
If you want to select every picture in the current folder, tap the Selection icon on the toolbar and tap Select All. Alternatively, you can press and hold a folder in step 2 to select the entire folder.
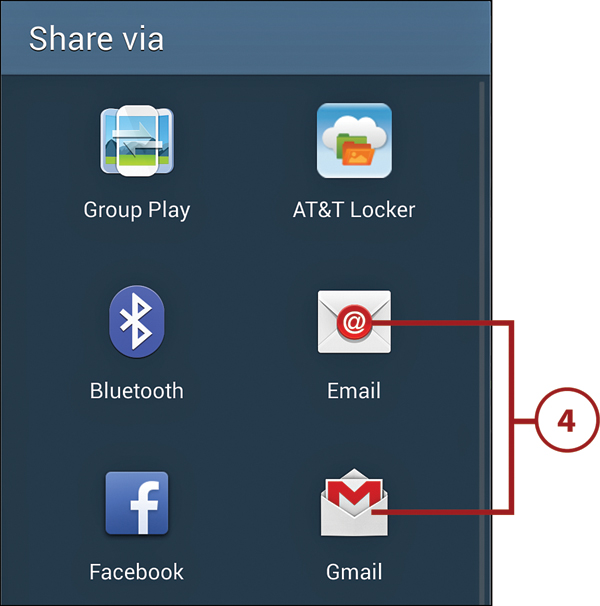
4. Tap the Share Via icon, and then select Email or Gmail. (If the Share Via icon isn’t visible, tap the image once to reveal the toolbar.)
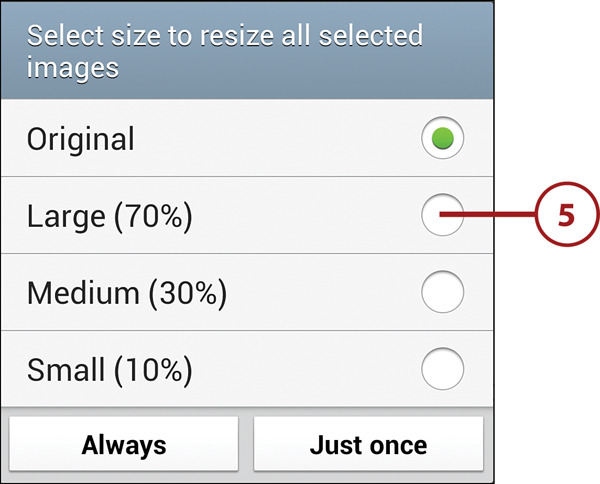
5. Images can optionally be resized prior to sending. Select a scaling percentage or Original (unaltered). Tap Just Once to apply the specified scaling only for this message, or tap Always to apply the same scaling to future image attachments.
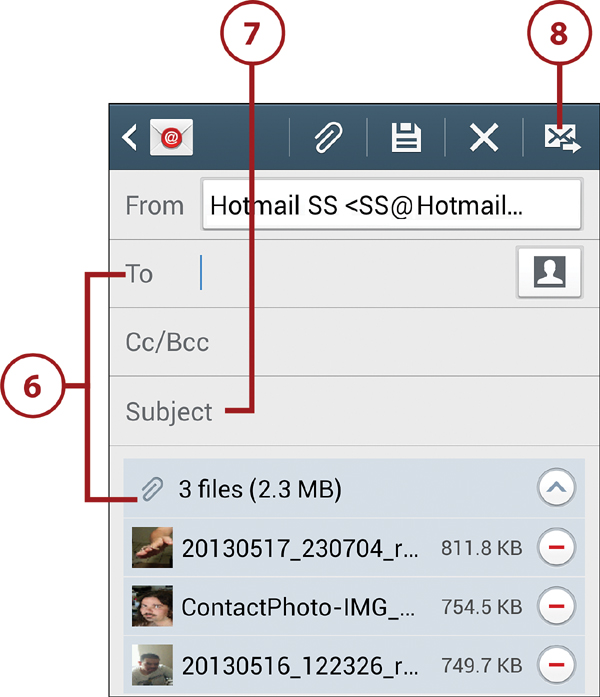
6. The file(s) are added as attachments to a new email message. Specify your own email address in the To box.
7. Optional: Add a subject and message text.
8. Tap the Send icon.
9. When your PC or Mac email program receives the message, save the photo files to any convenient location or drag them onto the Desktop.
Emailing Songs from My Files
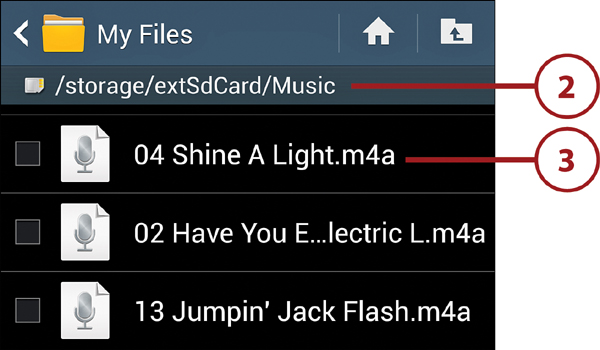
If you’ve purchased a song using your phone, you can listen to it on your computer, too. You can email songs as attachments using the Email app or do so directly from My Files, as described here. In either case, you need to know the folder in which the song is stored.
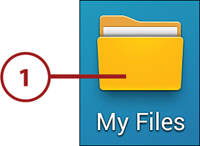
1. On the Home screen, tap Apps, followed by My Files.
2. Navigate to the folder in which the song is stored.
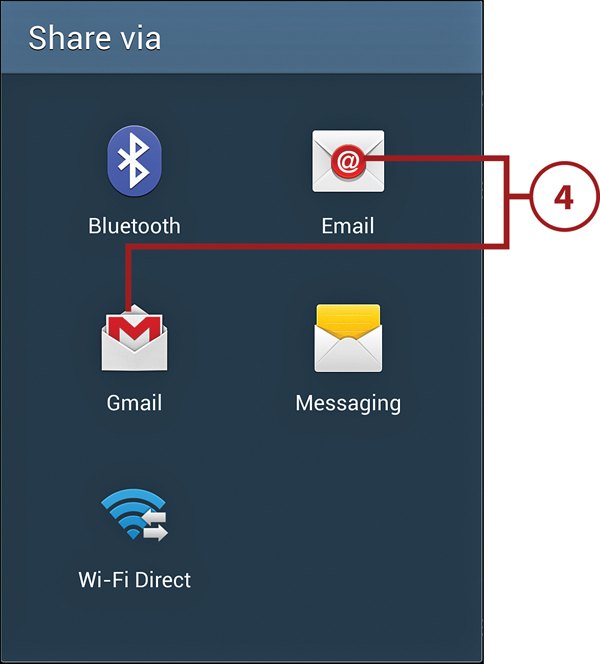
3. Press and hold the song title until a dialog box appears. Tap Share Via.

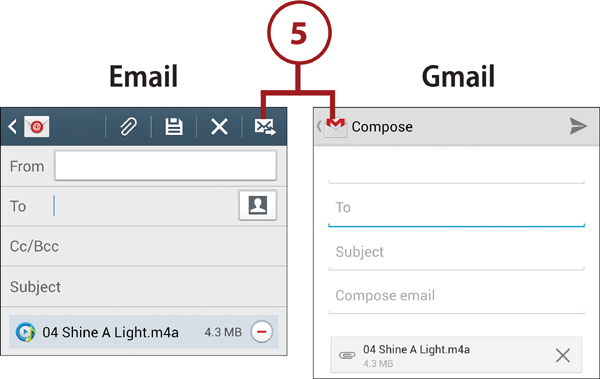
4. Select Email or Gmail as the sharing method.
5. The song file is added as an attachment to a new email message. Finish by performing steps 6–9 of the “Emailing Photos from Gallery” task, earlier in this chapter. Then add or import the song(s) into the music organizer program on your computer, such as iTunes or Windows Media Player.
Some Help, Please
The Android filing system automatically stores files in folders that it creates. For example, as mentioned later in this chapter, folders for files transferred to the phone are often named according to the transfer method used, such as Bluetooth and SBeamShare. For the most part, an app doesn’t care where its files are stored. This information is generally invisible—and irrelevant—to you...until, of course, you must know it. To find your song files, start with the Music folder. Then check folders named according to the methods you used to transfer the song files. Finally, if you’ve added a memory card, be sure to check its folders, too.
Transferring Files Between Phones
By taking advantage of the Galaxy S 4’s Wi-Fi Direct support, there are several methods that you can use to exchange files with other Wi-Fi Direct-enabled phones, as well as view material on each other’s phones.
Using Wi-Fi Direct
If two phones support Wi-Fi Direct, they can exchange files wirelessly—without the need for a common wireless access point or router. The following task shows how to do it with a pair of Galaxy S 4 phones. The other user should enable Wi-Fi Direct on his or her phone while you’re performing these steps.
1. On the Home screen, tap Apps, followed by Settings. (Both users should activate Wi-Fi Direct by performing steps 1–7.)
Other Wi-Fi Direct-Capable Phones
Other phones that also support Wi-Fi Direct may have different procedures for enabling the feature.
2. Select the Connections tab, and then tap the Wi-Fi text.
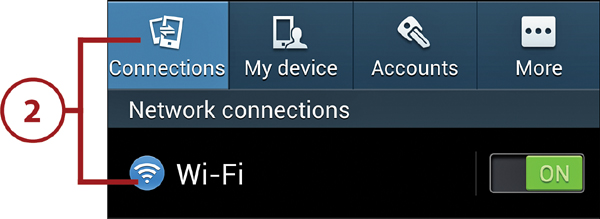
3. If Wi-Fi isn’t currently enabled, move its slider to the On position.
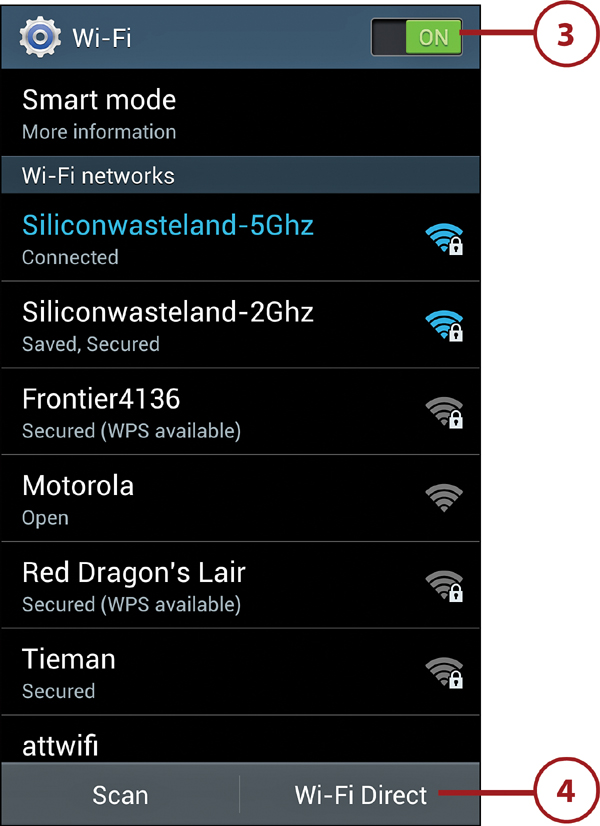
A Wi-Fi Direct Shortcut
To go directly to the Wi-Fi screen, open the Notification panel, and press and hold the Wi-Fi icon.
4. Enable Wi-Fi Direct by tapping its button.
5. The Wi-Fi Direct screen appears, and the phone scans for nearby Wi-Fi Direct-enabled devices. When your phone displays the name of the phone to which you want to connect, tap its name. (Only one user needs to do this to establish the two-way connection.)
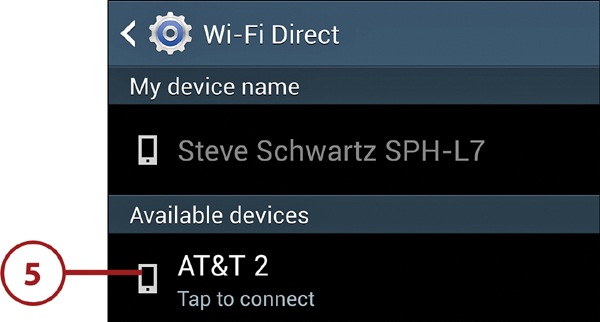
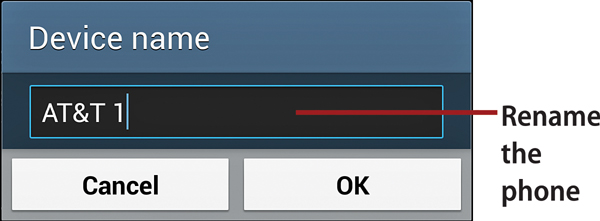
Naming Your Phone
To give your phone a friendlier name, open Settings, select the More tab, tap About Device, and tap Device Name. Enter a new name in the Device Name dialog box, and tap OK.
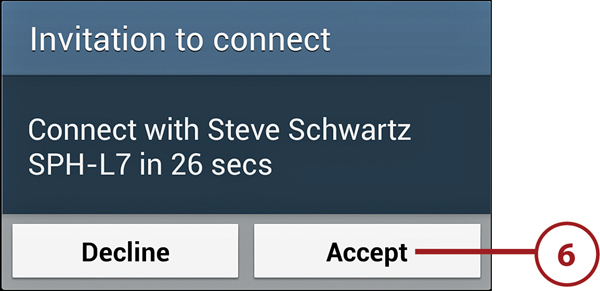
6. An Invitation to Connect dialog box appears on the other phone. To allow the connection, the person taps Accept.
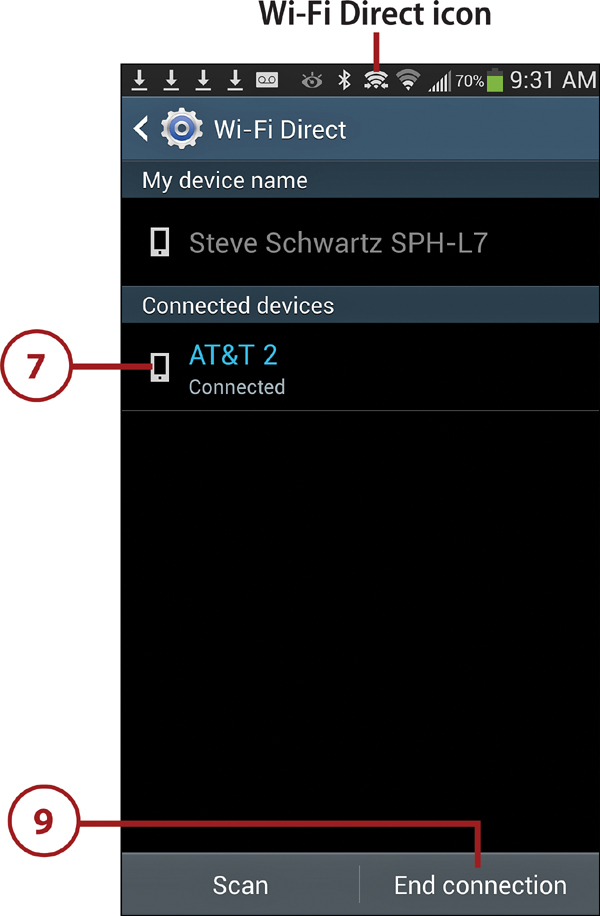
7. Each phone lists the other as a connected device, and the Wi-Fi Direct icon appears in the status bar.
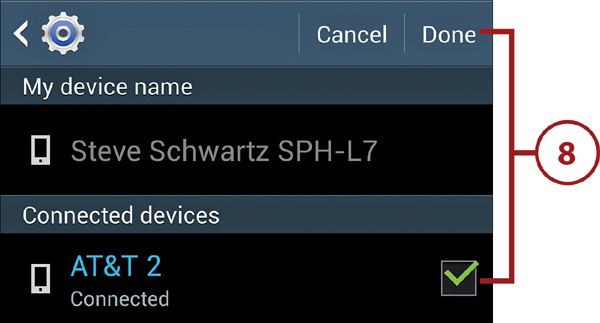
8. To send a file such as a photo, song, or video from one phone to the other, select the item(s) in My Files, Gallery, or an appropriate app, and issue a Share or Share Via command, followed by Wi-Fi Direct. (You may have to scroll to see the Wi-Fi Direct command icon.) Select the device to which you want to send the file(s) and tap Done.
9. To finish the Wi-Fi Direct session, either person can return to the Wi-Fi Direct screen, tap the End Connection button, and then tap OK in the End Connection dialog box that appears.
File Sharing Notes
Consider the following when using Wi-Fi Direct to transmit files between devices:
• The wording of the Share command may vary, depending on the type of selected material and the app you use. It may be Share, Share Via, or Share Music Via, for example.
• Files can be transmitted in either direction between connected devices. They are received in the ShareViaWiFi folder.
• Wi-Fi Direct file transmissions—both successes and failures—are listed in the Notification panel.
Using S Beam
Using a combination of Near Field Communication (NFC) and Wi-Fi Direct, S Beam enables you to exchange files and other materials (such as photos, videos, contact records, websites, maps, and YouTube videos) between a pair of Galaxy S 4 phones. NFC must be enabled on both phones; only the sending phone is required to have S Beam enabled.
1. On the Home screen, tap Apps, followed by Settings.
Sending, Receiving, or Both
If both people intend to send files, each must enable S Beam by performing steps 1–7. Otherwise, only the sender must enable S Beam, whereas the recipient must enable NFC (at a minimum).
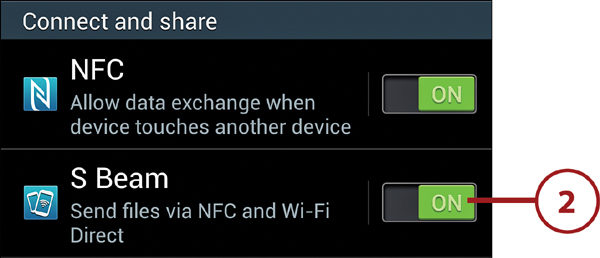
2. Select the Connections tab. In the Connect and Share section of the screen, drag the S Beam slider to the On position. Doing so simultaneously enables both S Beam and NFC.
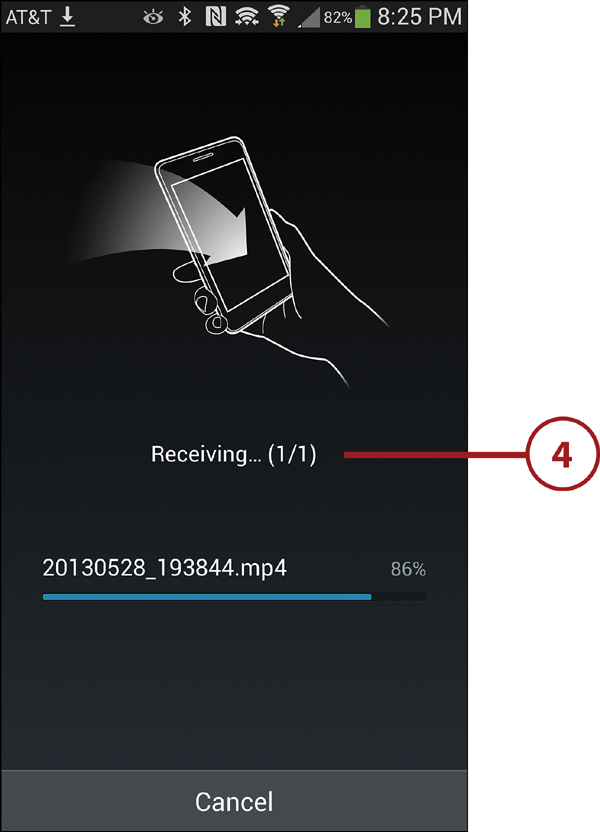
3. On the sending phone, launch the app that contains the material you want to transmit, and then display the material. Press the phones back to back, ensuring that neither is displaying the lock screen. Within 10 seconds, a connection is made between the phones, and Touch to Beam appears on the sending phone’s screen. Tap the thumbnail to initiate the file transfer. You can separate the two phones while the data transmits.

4. The material is transmitted. When the transmission ends, the material displays on the receiving phone in the appropriate app, such as Gallery or Video. The recipient can find the files in the SBeamShare folder.
Sending Multiple Gallery Items
You can simultaneously send multiple photos in Gallery. Open the folder that contains the photos, select the thumbnails, and then press the phones together.
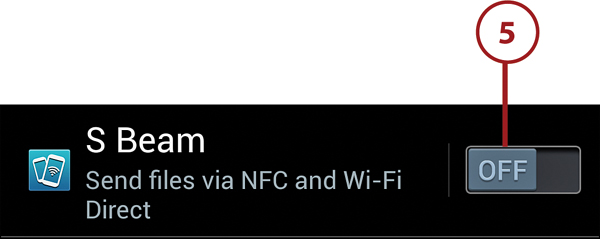
5. When you finish transmitting material, the phone(s) can disable S Beam by dragging its slider to the Off position.
Using Share Shot
Share shot enables you to shoot photos with the Galaxy S 4 camera and—using Wi-Fi Direct—instantly transmit them to as many as five nearby friends. Before you proceed, instruct all participants to enable Wi-Fi Direct by performing steps 1–4 of “Using Wi-Fi Direct,” earlier in this chapter.
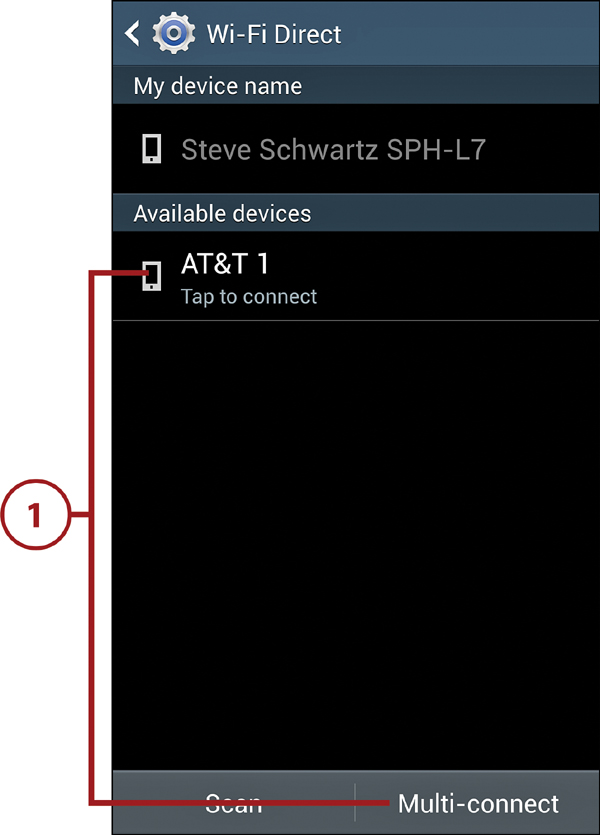
1. On the Wi-Fi Direct screen, the phone scans for nearby phones and devices that have Wi-Fi Direct enabled. Do one of the following:
• To share with one other phone or device, tap its name.
• To share with multiple phones or devices, tap the Multi-Connect button, select the devices, and tap Done.
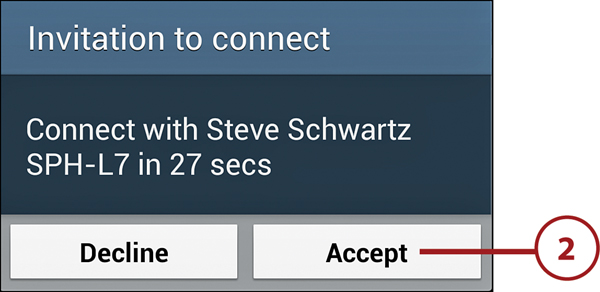
2. An Invitation to Connect appears on each screen. Each user must tap Accept.
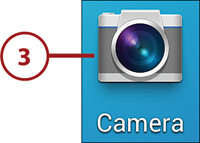
3. On your phone, launch Camera by tapping its Home screen icon, tapping Apps and then Camera, or dragging the lock screen Camera icon upward (if present).
4. In Camera, tap the Settings icon.
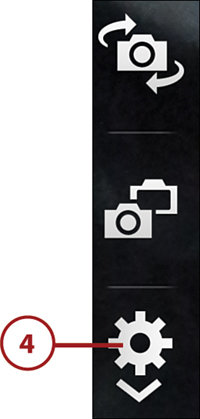
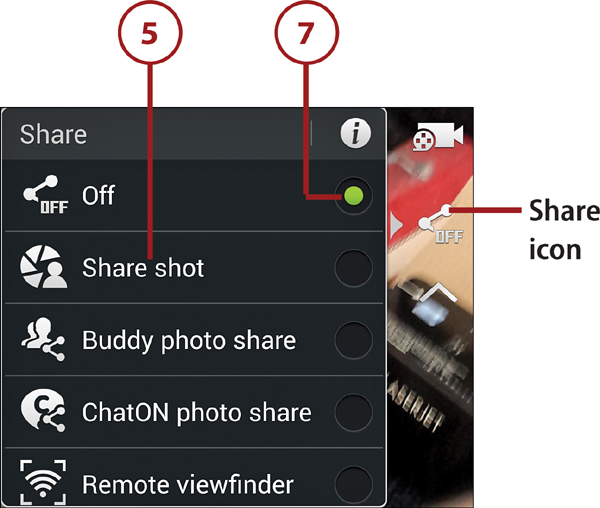
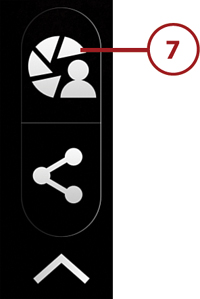
5. Tap the Share icon, and then tap Share Shot.
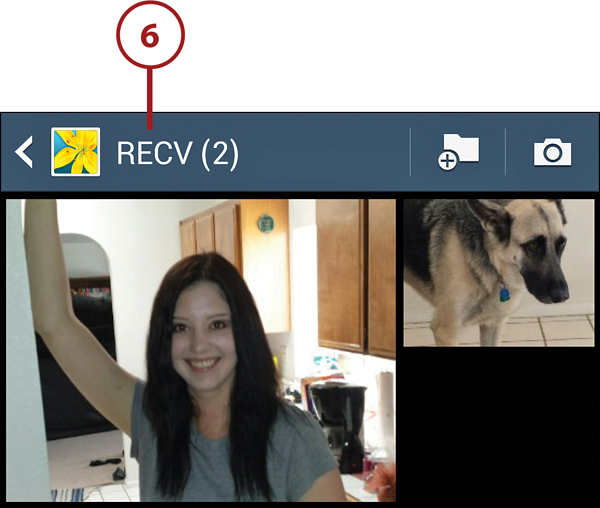
6. Shoot the photos. As each picture is taken, it’s stored in your phone’s ShareShot folder and transmitted to recipients’ RECV folder.
7. When you finish, disable sharing by tapping the Settings icon, followed by the Share Shot icon. Then choose Off in the Share menu.
8. The phone that initiated the connection should tap the End Connection button at the bottom of the Wi-Fi Direct screen. If Wi-Fi is no longer needed, you can disable it, too.