7. Browsing the Web
In this chapter, you learn how to use the Internet app, one of the web browsers on the Galaxy S 4. Topics include the following:
→ Setting options for viewing pages
→ Creating and organizing bookmarks
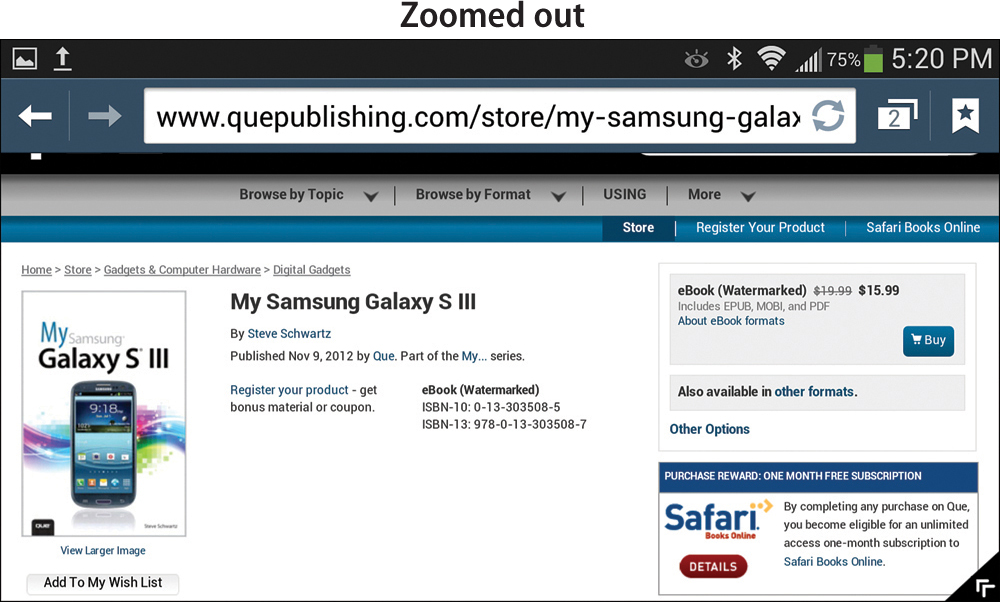
You’re probably already familiar with the basics of using a web browser. Making the transition from browsing on a computer to doing so on your phone is relatively easy. As with a desktop browser, you can enter page addresses by typing, tapping links, and selecting bookmarks for your favorite sites.
Note that the Galaxy S 4 ships with a second browser: Google Chrome. Although this chapter focuses on using the Internet app as your browser, you might also want to check out Chrome. You can use whichever browser you prefer, as well as switch between them when you like.
Launching the Browser
You can launch the Internet app in several ways. The most common are as follows:
• On the Home screen, tap the Internet icon at the bottom of the screen. The browser opens to its home page.
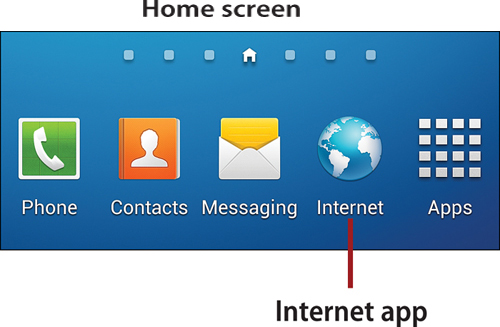
• On the Home screen, tap Apps, followed by Internet. The browser opens to its home page.
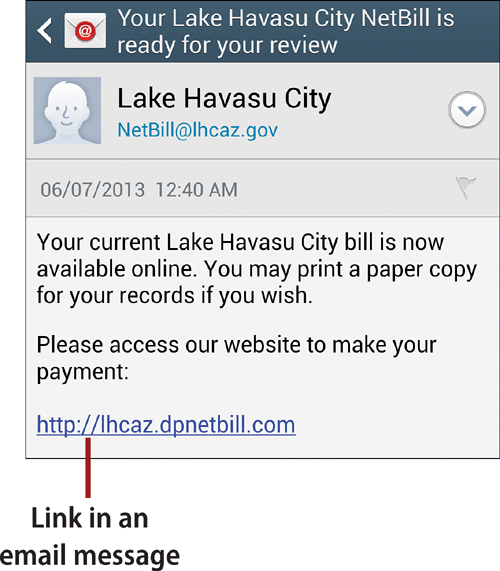
• Tap a web link in an email message. Links can be blue underlined text, images, or other objects. If the item you tap is indeed a link, the linked page appears in the browser.
Complete Action Using
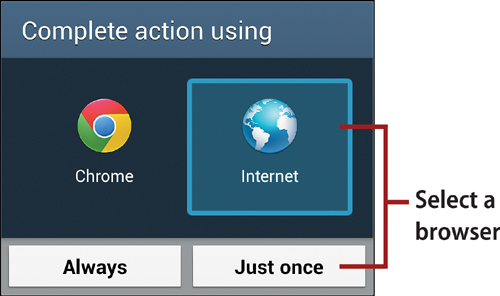
Because there are two browser apps installed on the phone, whenever you perform an indirect action that requires a browser (such as tapping a link), a Complete Action Using dialog box appears that asks which browser to launch. Tap a browser icon (Internet or Chrome), and then tap Just Once. After familiarizing yourself with both browsers, you can specify a default browser to use for all future indirect launches by tapping Always.
If you ever want to reverse your decision, open Settings, select the More tab, and tap Applications Manager. Select the All tab, scroll to find the browser that you previously set as the default (Internet or Chrome), and tap its name. In the Launch by Default section of the app’s page, tap the Clear Defaults button.
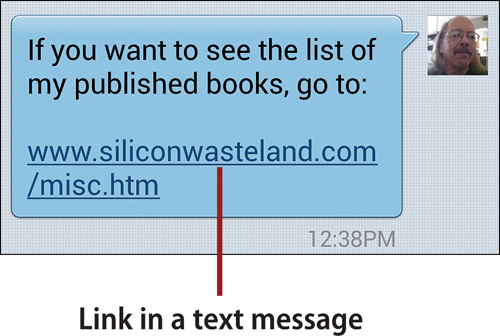
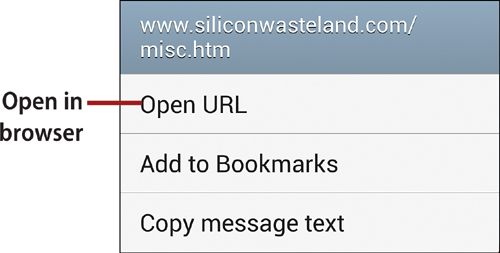
• Tap a blue underlined link in a text or multimedia message. In the dialog box that appears, tap Open URL to open the page in the browser or press the Back key if you change your mind.
Unexpected Web Redirections
Apps and certain documents can contain links that automatically redirect you to web pages, causing the browser to launch if it isn’t currently running. For example, if you tap text, an icon, or a button in some apps when searching for instructions, a help file or manual might open in the browser.
Visiting Web Pages
You can go to a particular web page (called an address or URL) using the same methods that you use with Internet Explorer, Safari, Firefox, and other popular desktop web browsers. The most common methods are typing the address, tapping a link on the current page, choosing a bookmarked or recently visited (History) site or page, and searching for a site or page with one of the popular search engines.
Typing the Address
1. If the browser isn’t currently running, go to the Home screen and tap the Internet icon.

2. Tap the Address field. The current page’s address is selected.
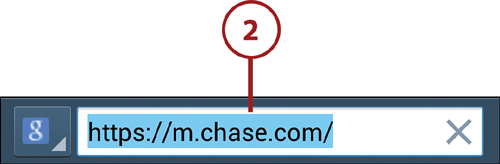
3. Enter the new address and tap Go. (Because the current address is already selected, typing anything immediately replaces the address.) The web page loads.
Fast Address Selection
As you type, a list of possible addresses appears. If you see the one you want, you can tap it instead of completing the address.
Following a Link
In the browser, if you tap an object, graphic, or text that represents a web link, the link briefly turns blue and the linked page appears.

Not Every Link Leads to a Page
Other than special mobile versions of web pages (designed for viewing on cell phones), the pages displayed in the Internet app are identical to those you see in Internet Explorer, Safari, and other desktop browsers. That means that they also contain links designed to download PC and Mac applications, device drivers, and the like. Of course, such programs and drivers can’t be used by your phone, but you may not be prevented from downloading them.
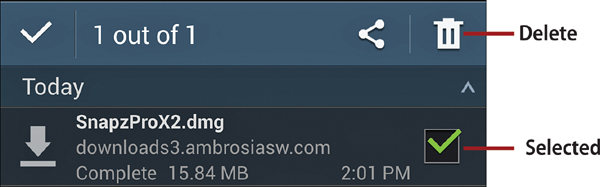
To remove these downloads, go to the Home screen and tap Apps, followed by Downloads. Tap the check box for each inappropriate download and then tap the Delete button.
Visiting a Bookmarked, Recent, or Saved Page
1. Scroll the page up until the Address field is visible, and tap the star icon on the right.

2. To visit a bookmarked page (one whose address you stored), expand sections and open folders as necessary, and then tap the page’s thumbnail or name. (For information about creating and managing bookmarks, see “Working with Bookmarks,” later in this chapter.)
Display Options
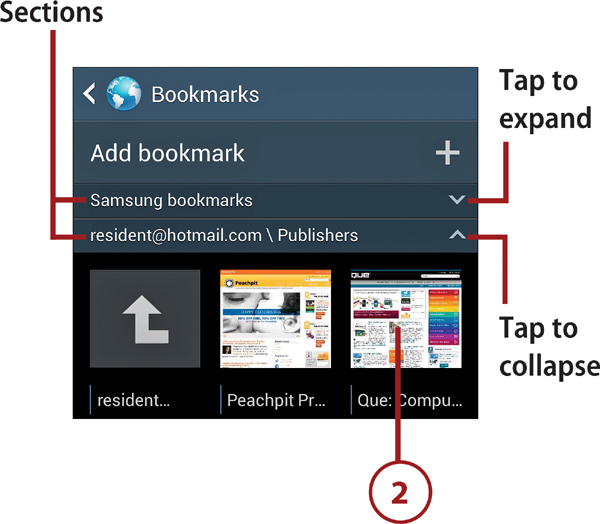
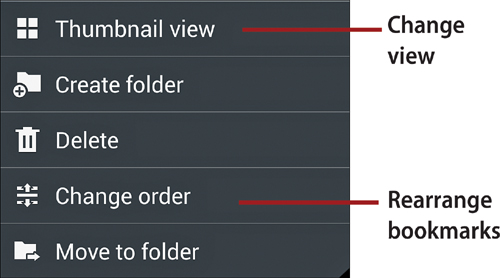
You can view bookmarks as a thumbnail grid or a scrolling list. To switch views, press the Menu key and tap List View or Thumbnail View. To expand or collapse bookmark sections, tap the arrow icon on the right side of the section name.
You can change the order of your personal bookmarks by pressing the Menu key and tapping Change Order. If you’ve created multiple or nested folders, you’ll be asked to select the parent folder whose contents you want to rearrange. In Thumbnail View, press and hold any thumbnail and drag it to a new location. In List View, select a bookmark by pressing the dot grid to its right, drag it up or down in the list, and release when it’s in the desired position. When you’re satisfied with the changes, tap Done—or tap Cancel to ignore the changes.
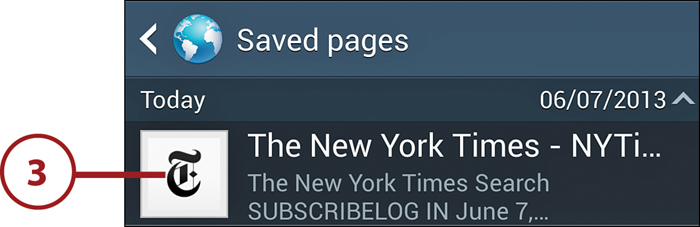
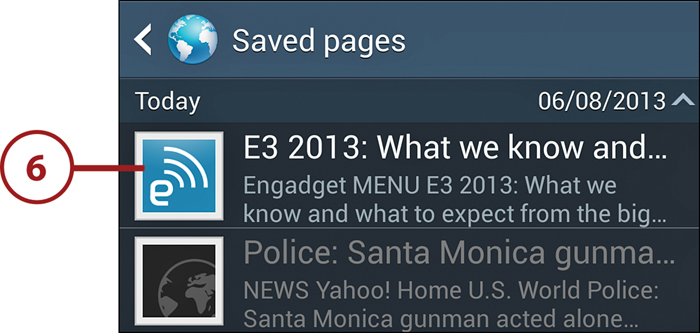
3. To go from the current page to a saved page (one that you saved for later or offline reading), press the Menu key, tap Saved Pages, locate the page in the scrolling list, and tap its thumbnail.
Saving a Page
To store a copy of the current page in Saved Pages, press the Menu key and tap Save Page. Use this command for any page that you want to read later or that might not be readily available online, such as a receipt for an online purchase.
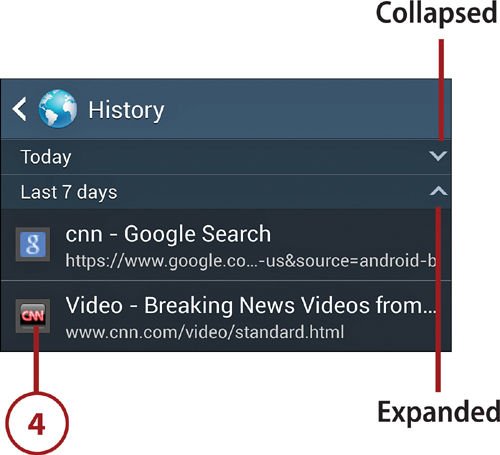
4. To return to a recently viewed page, press the Menu key and tap History, locate the page in the scrolling list, and tap its name. To make it easier to find the page, you can expand (show) or collapse (hide) selected page-view periods (Today, Last 7 Days, and so on) by tapping section heads.
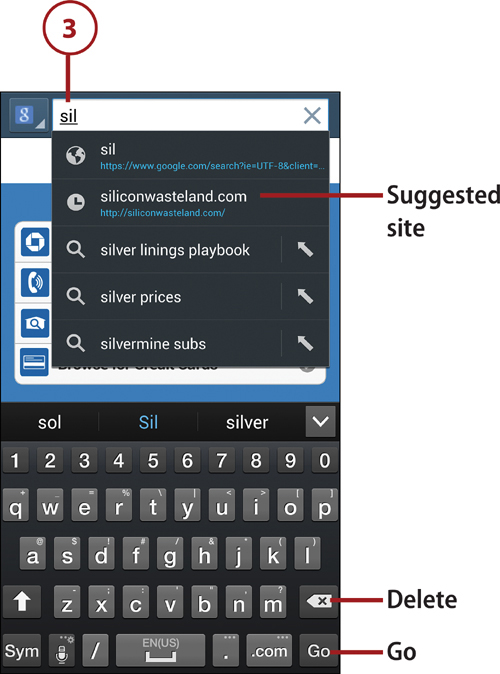
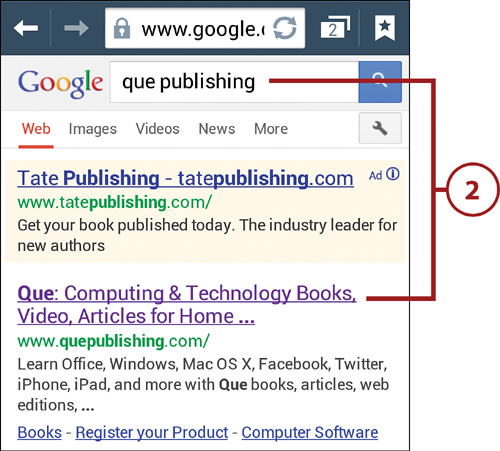
Searching for a Site or Page
1. Enter your search phrase in the address box, such as “exercise machines” or “trimming a parrot’s beak.” As you type, the search engine builds a list of possible sites and search topics. (The search links take you to your default search engine’s site and perform the search; other entries go directly to the specified page.)
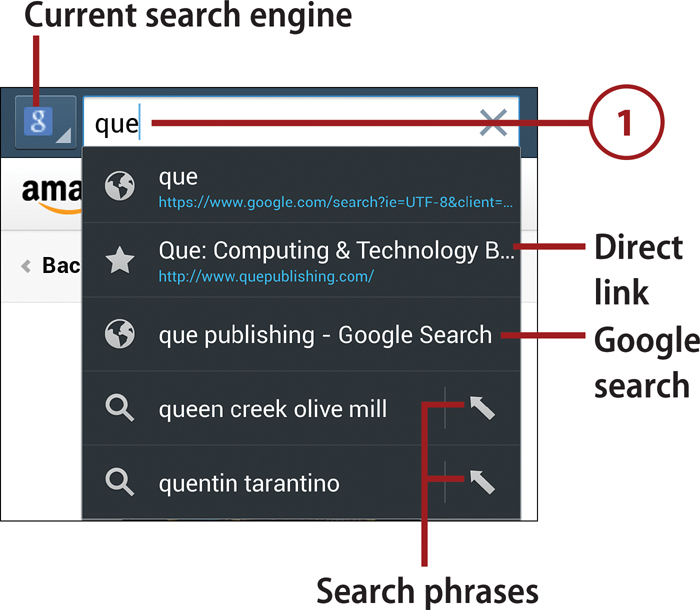
• Tap a direct link in the suggestion list to load that page.
• Tap a search entry—that is, an entry preceded by a magnifying glass or one that includes the word Search—to perform that search in the default or specified search engine’s site.
• Tap the Go key on the keyboard to perform a search using the exact wording and spelling of your search phrase.
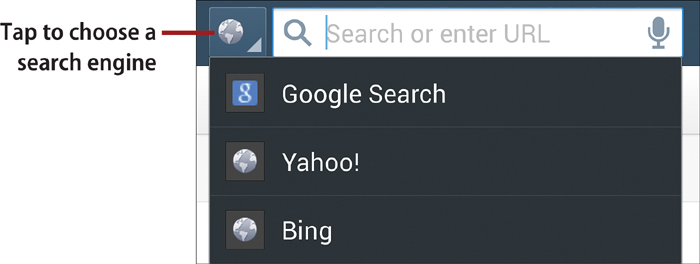
Changing Search Engines
The active search engine’s icon is shown to the left of the address box. To switch search engines, tap the icon and choose a different one.
Viewing Pages
Similar to your computer’s browser, the Internet app provides several ways for you to view pages, such as viewing in portrait or landscape mode, scrolling the page, changing the magnification, reloading the page, and displaying multiple pages in separate windows.
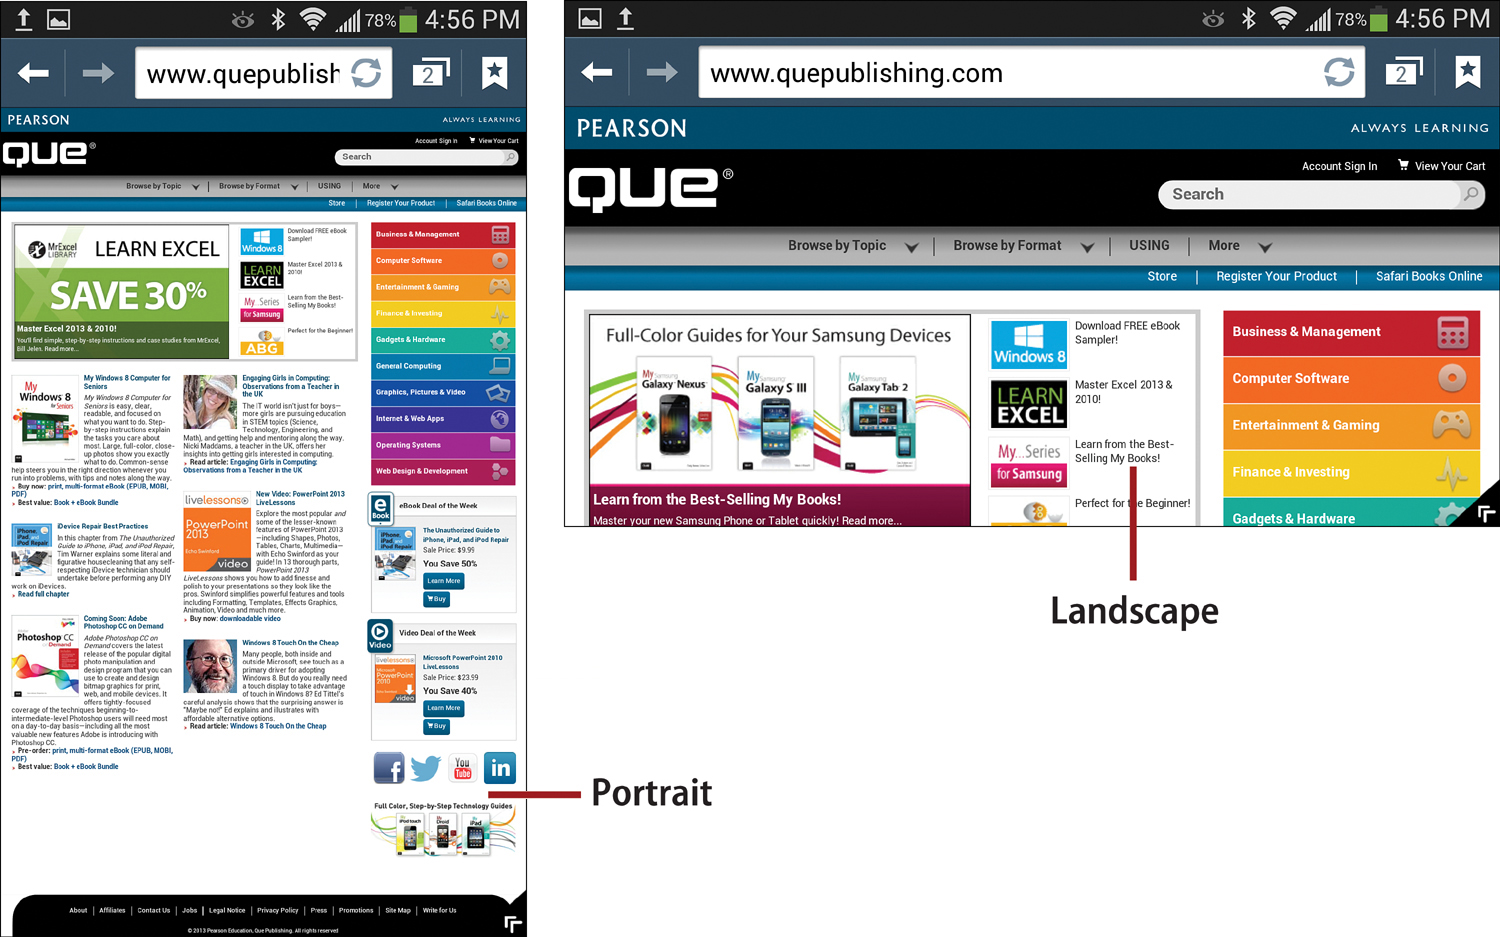
Portrait or Landscape View
Depending on the direction that you rotate the phone, you can view any page in portrait (normal) or landscape (sideways) mode. You can change the phone’s orientation whenever you want; the page adjusts automatically. (If the orientation doesn’t change when you rotate the phone, launch Settings, select the My Device tab, tap Display, and enable Auto-Rotate Screen.)
Scrolling the Page
Many pages don’t fit entirely onscreen. To view parts that are off-screen, flick or drag up, down, right, or left, depending on the direction you want the page’s material to scroll. If you want to take advantage of some new tricks, you can scroll by tilting your head up and down (Smart Scroll) or by waving your hand up and down over the sensor at the top of the phone (Air Jump).
• To activate Smart Scroll, open Settings, select My Device, tap Smart Screen, and enable Smart Scroll.
• To activate Air Jump, open Settings, select My Device, tap Motions and Gestures, enable and then tap Air Gesture, and enable Air Jump.
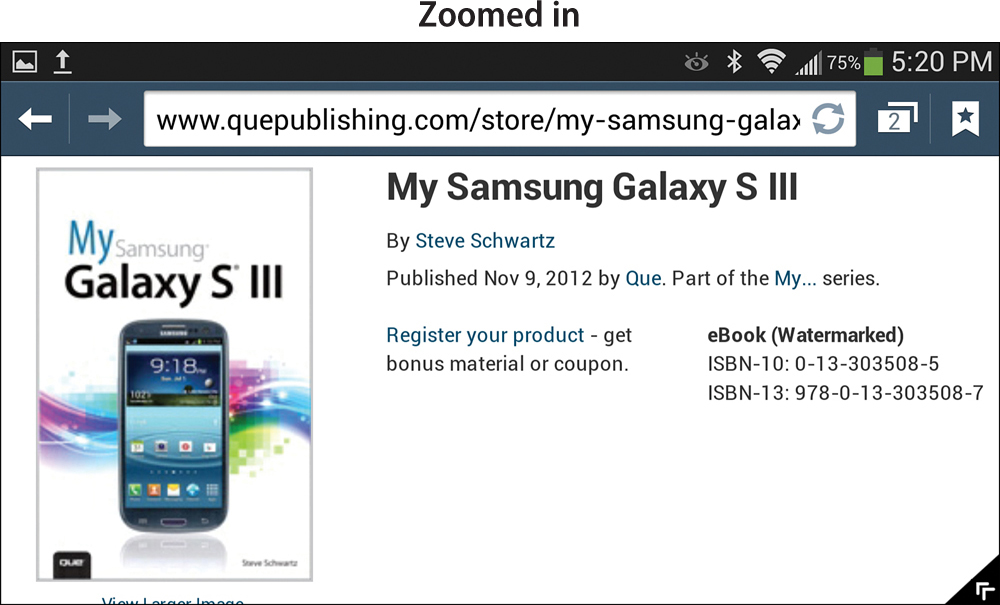
Magnification (Zoom)
You can increase the magnification of the current page to make it easier to read (zoom in) or reduce it to get a bird’s-eye view of the entire page (zoom out).
• To zoom in (making everything on the page larger), put your thumb and forefinger on the page and spread them apart.
• To zoom out (making everything on the page smaller), put your thumb and forefinger on the page and pinch them together.
Zoom by Tapping, Tilting, or Almost Touching
You can quickly zoom in or out by double-tapping the screen. Repeat to reverse the zoom. If you’ve enabled Zoom (a Motion setting), you can place two fingertips on the screen and tilt it toward you to zoom in or away from you to zoom out. If Webpage Magnifier (an Air View setting) is enabled, you can create the effect of a magnifying glass by hovering your fingertip over text that you want to magnify.
• To activate Zoom, open Settings, select My Device, tap Motions and Gestures, enable and then tap Motion, and enable Zoom.
• To activate Web Page Magnifier, open Settings, select My Device, enable and then tap Air View, and enable Webpage Magnifier.
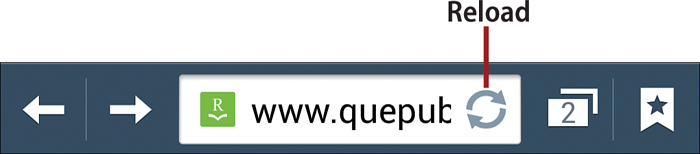
Refreshing the Page
If the current page didn’t load correctly or you think the content might have changed while you were viewing it, you can refresh the page. Tap the Reload icon in the address box.
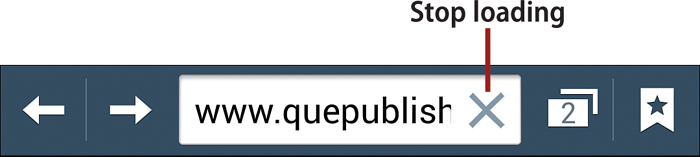
If a page is loading slowly, you can stop it by tapping the X icon in the address box.
Working with Windows
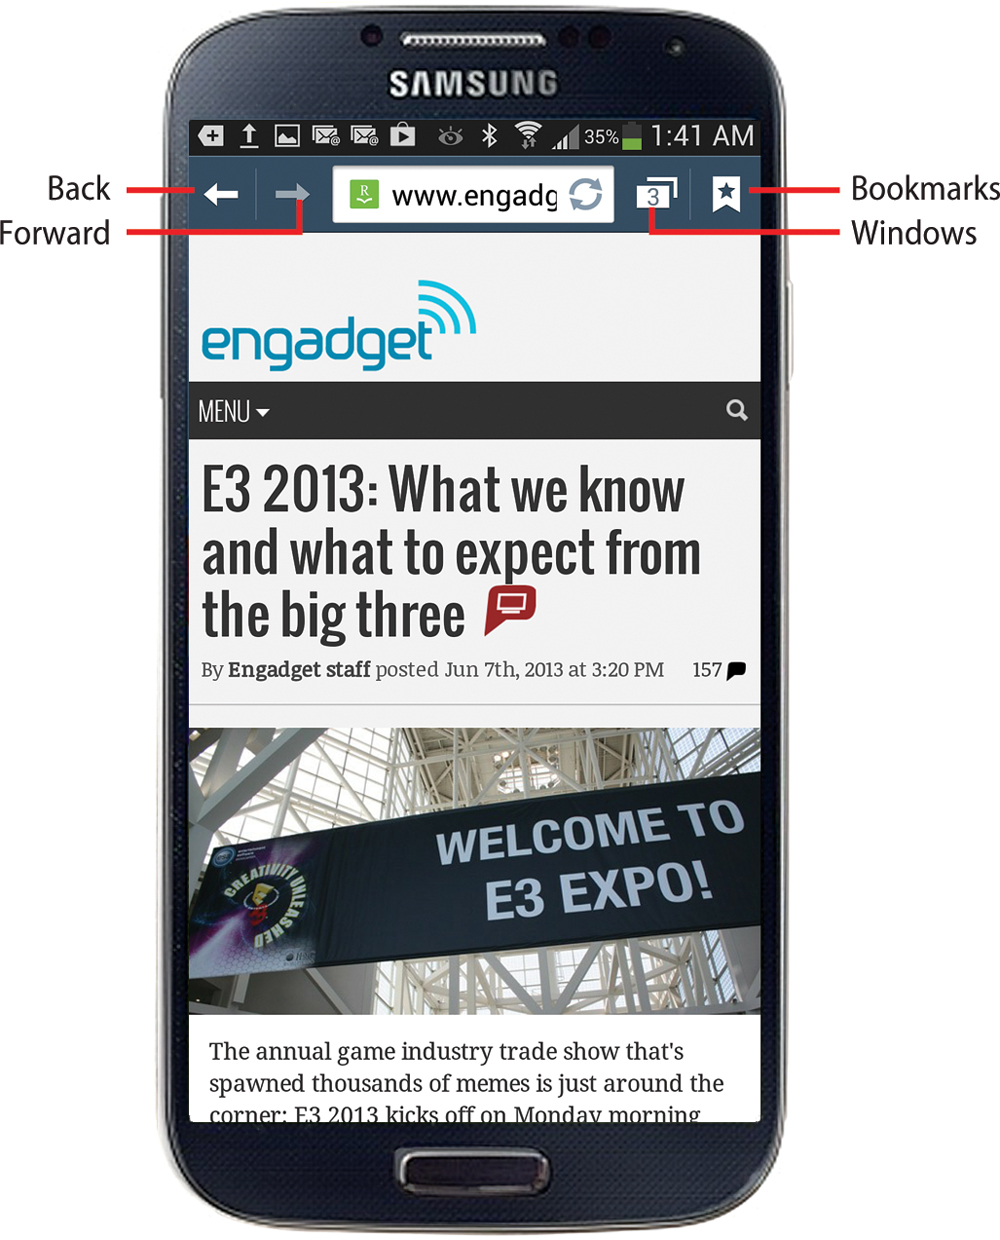
The tabbed interface of current computer browsers enables you to keep several web pages open simultaneously and easily switch among them. The Internet app mimics this feature by enabling you to open multiple windows. Each window is the equivalent of a new browser and operates independently of other open windows.
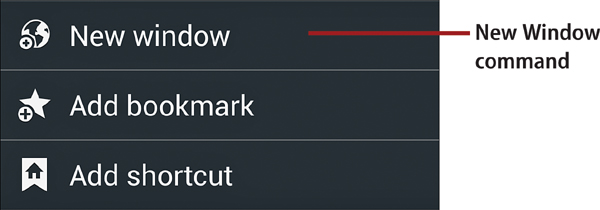
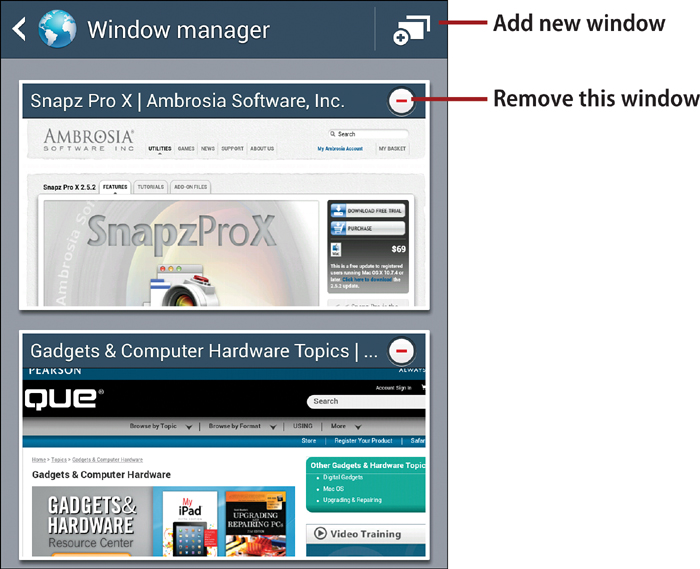
• To create a new window, press the Menu key and tap New Window. You can also tap the Windows icon to the right of the address box and then tap the plus (+) icon in Window Manager. A window opens, displaying your home page.

Another Way to Create a New Window
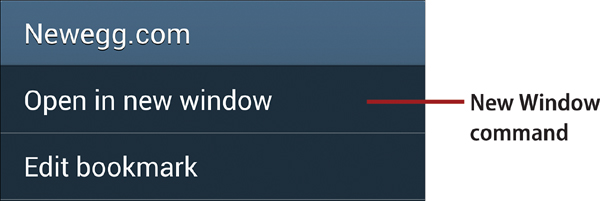
If you press and hold a site’s name in Bookmarks or History, you can tap Open in New Window in the menu that appears. Doing so opens the website or page in a new window.
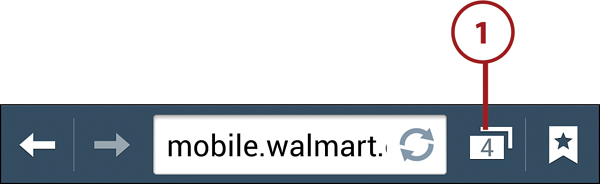
• To navigate among or manage the open windows, tap the Windows icon to open the Window Manager and then scroll up and down. To switch to one of the windows, tap its thumbnail. To remove a window that you no longer need, tap its minus (–) icon or swipe the window horizontally off the screen.
Page Navigation
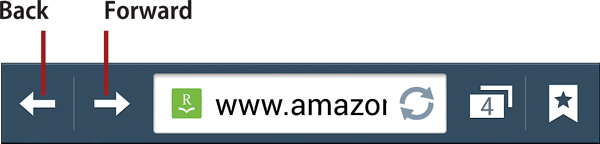
As you replace the current page with new ones by entering new addresses, tapping links, and selecting bookmarks, you can tap icons to move through the stack of pages. To return to the previous page, tap the Back icon or press the Back key. You’ll go back one page for each tap or key press. If you’ve gone back one or more pages, you can move forward through the stack by tapping the Forward icon.
Incognito Browsing
The Internet app supports incognito browsing in which entries aren’t recorded in History, searches aren’t recorded, and cookies aren’t stored. Rather than make this a general browser setting, Internet enables it only for pages loaded into a designated incognito window.
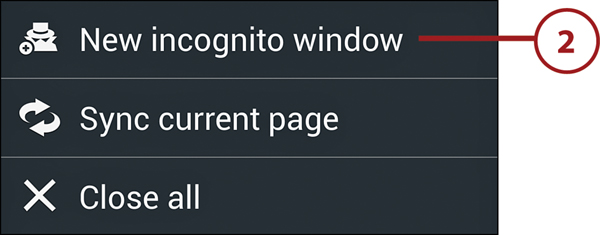
1. Tap the Windows icon at the top of any browser page.
2. In Window Manager, press the Menu key and tap New Incognito Window.
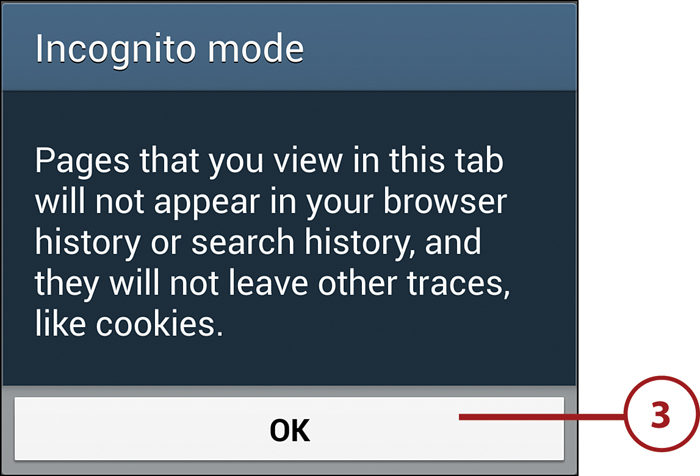
3. Review the text in the Incognito Mode dialog box, and tap OK to dismiss it.
4. A new incognito window appears. Web activities performed in this window are secure; activities performed in other Internet windows are recorded normally.
Quickly Switching to Incognito Mode
In addition to creating a new window for incognito mode, you can initiate it in the page you’re currently viewing by pressing the Menu key and tapping Incognito Mode.
5. To restore normal browsing, open the Window Manager, find the incognito page, and delete it by tapping the minus (–) icon in its upper-right corner.
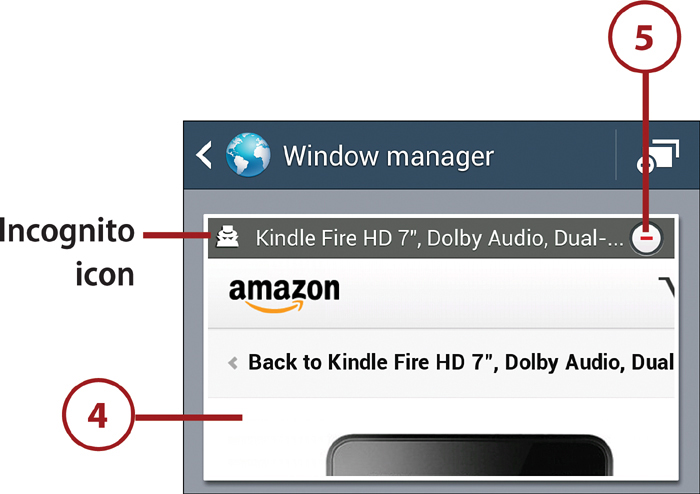
Which One Is the Incognito Window?
Although there’s no visible indication that you’re working in an incognito window, there are two ways to tell. First, press the Menu key. If Incognito Mode is grayed out, it’s an incognito window. Second, when examined in Window Manager, an incognito window has a special icon in its upper-left corner.
Working with Bookmarks
As explained earlier in this chapter, bookmarks are stored addresses of websites and pages that you regularly visit. The purpose of creating a bookmark is to enable you to view the site or page again by simply tapping its entry in the Bookmarks grid or list rather than having to reenter the address.
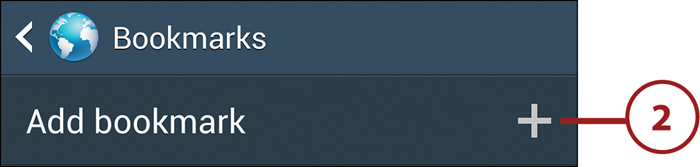
Creating a Bookmark from the Current Page
It’s common to decide to bookmark a page while you’re viewing it.
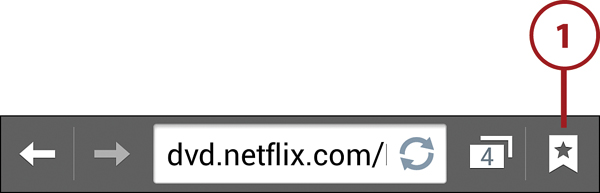
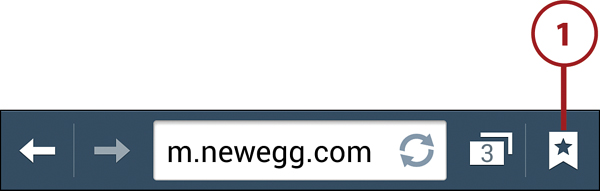
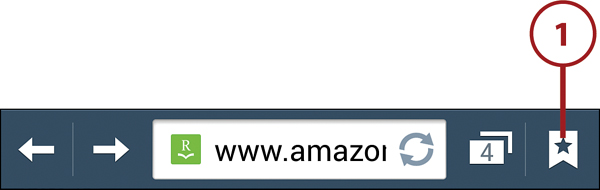
1. Tap the star icon at the right of the address bar.
A Bookmark Shortcut
With the page that you want to bookmark onscreen, you can jump to step 3 by pressing the Menu key and tapping Add Bookmark.
2. Tap Add Bookmark.
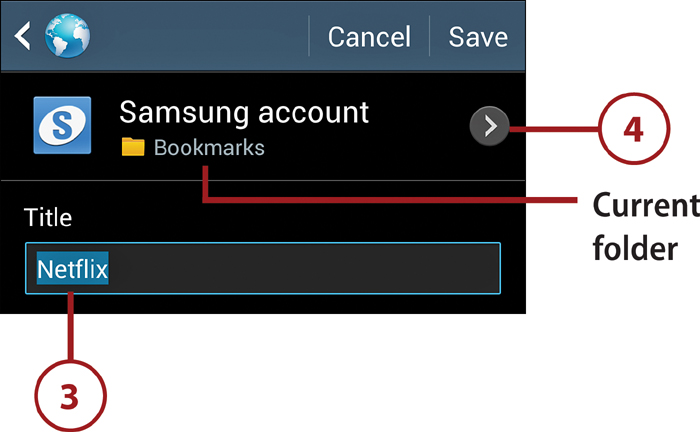
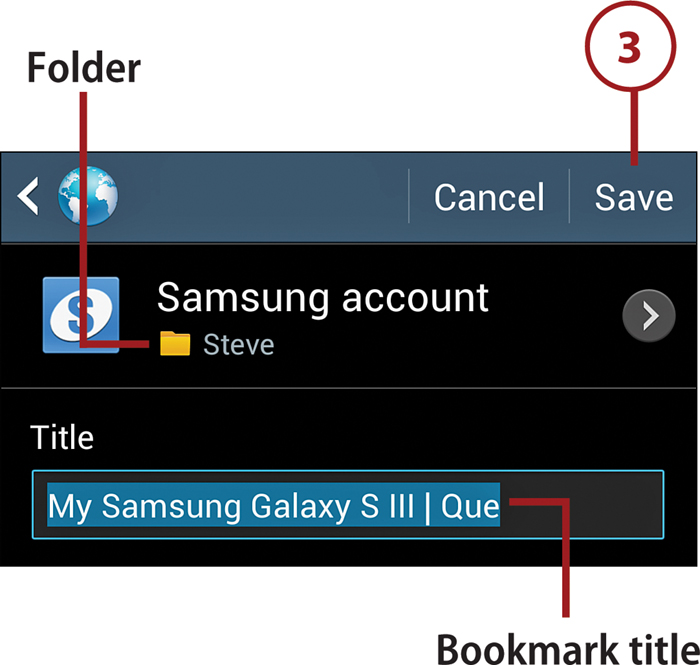
3. Edit the bookmark name, if necessary.
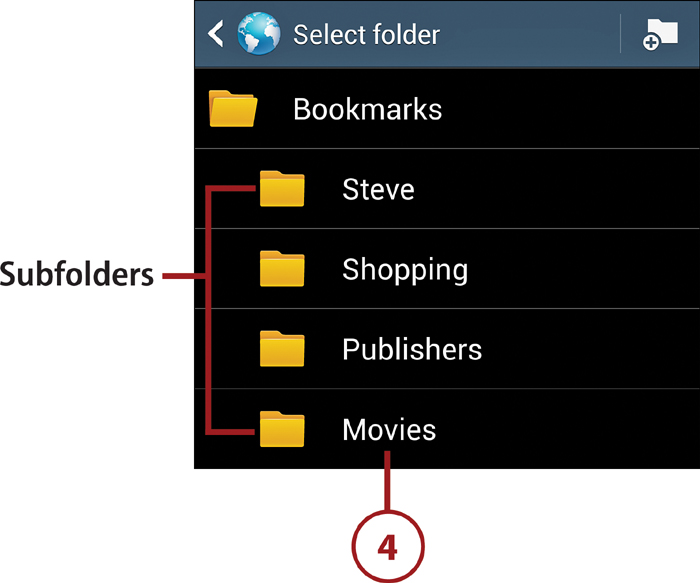
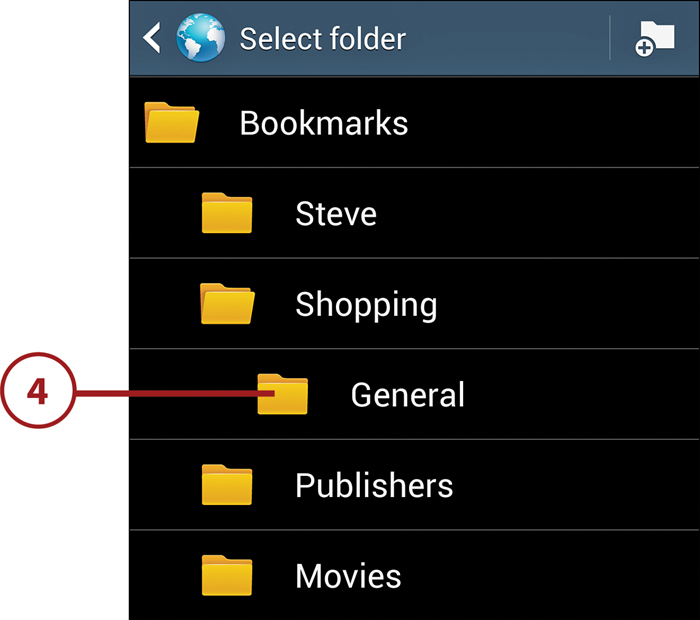
4. Specify the folder in which to store the bookmark. By default, new bookmarks are stored in the Bookmarks folder.
Get Organized
If you’ve created other folders (see “Moving Bookmarks into Folders,” later in this section), you can tap the arrow icon to select a subfolder in which to store the bookmark.
5. Tap Save to store the new bookmark.

Creating a Bookmark from the History List
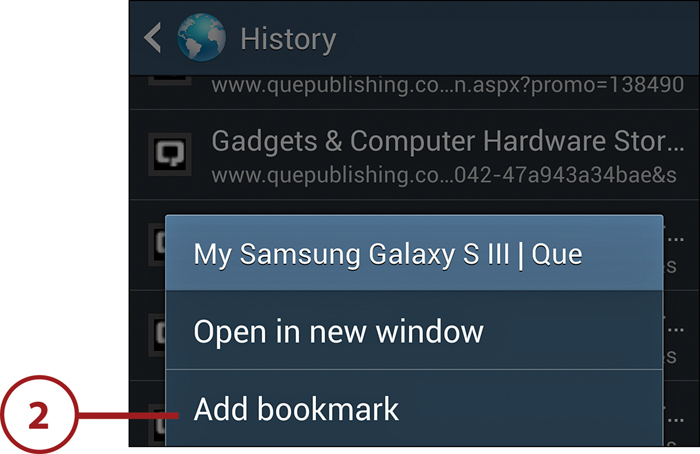
If you’ve recently visited a page, the quickest way to add it as a new bookmark is to locate it in the History list.
1. With any web page onscreen, press the Menu key and tap History. (You may have to scroll the menu to find the History command.)

2. In the History list, locate the page that you want to bookmark. Press and hold the entry, and tap Add Bookmark.
3. Perform steps 3–5 from the previous task: editing the name, selecting a storage location, and saving the new bookmark.
Editing Bookmarks
You can edit a bookmark’s title, its address (setting it for a site’s main page or another specific page), or the folder in which it’s stored.
1. In the Bookmarks list, find the bookmark that you want to edit.

2. Press and hold the bookmark until the menu appears, and tap Edit Bookmark.
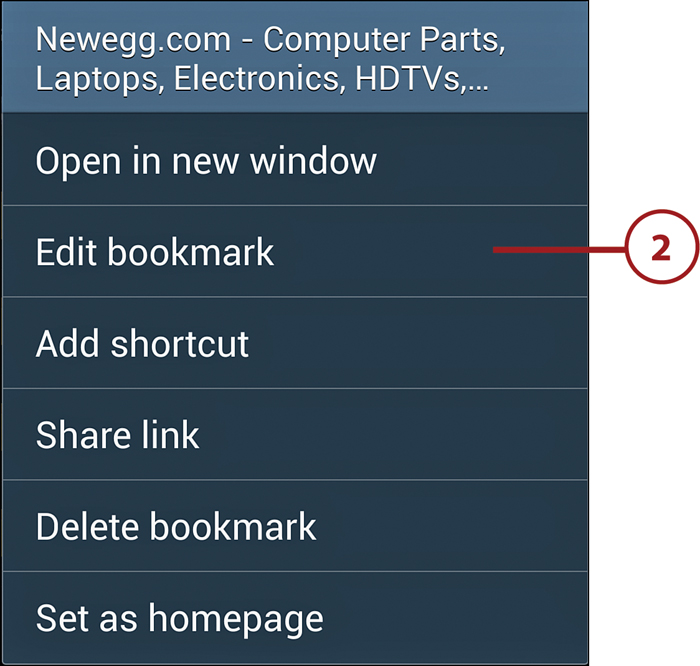
Other Options
The same menu enables you to set the current bookmark as your home page, share it with a friend, create a desktop shortcut from it, or delete it.
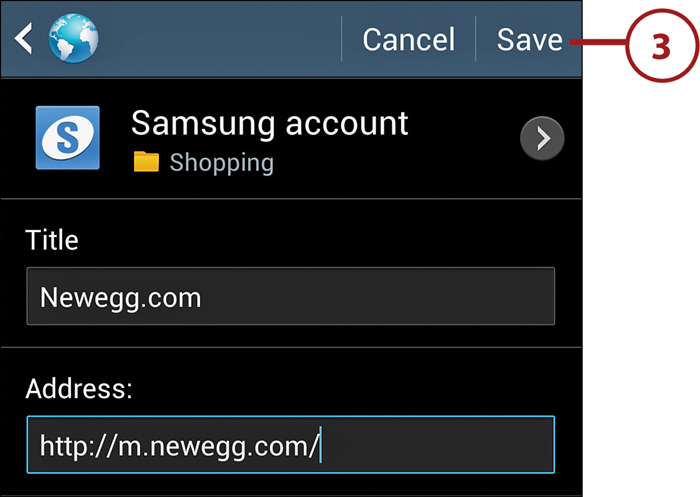
3. In the Edit Bookmark dialog box, make the desired changes to the title, address, and/or folder, and then tap Save.
Editing the Address
Although you normally won’t want to edit a page’s address if it requires a lot of typing, it’s relatively simple to change a page-specific URL to one that goes to a site’s main page. In the example shown in step 3, I changed the reference from a promotions page to the site’s main page by deleting the extraneous material to the right of http://m.newegg.com/.
Using Bookmark Folders
After amassing more than a handful of bookmarks, you can optionally create additional folders in which to organize your bookmarks—rather than storing them all in Bookmarks, the main folder. When creating a new bookmark or editing an existing one, you can move it into the most appropriate folder.
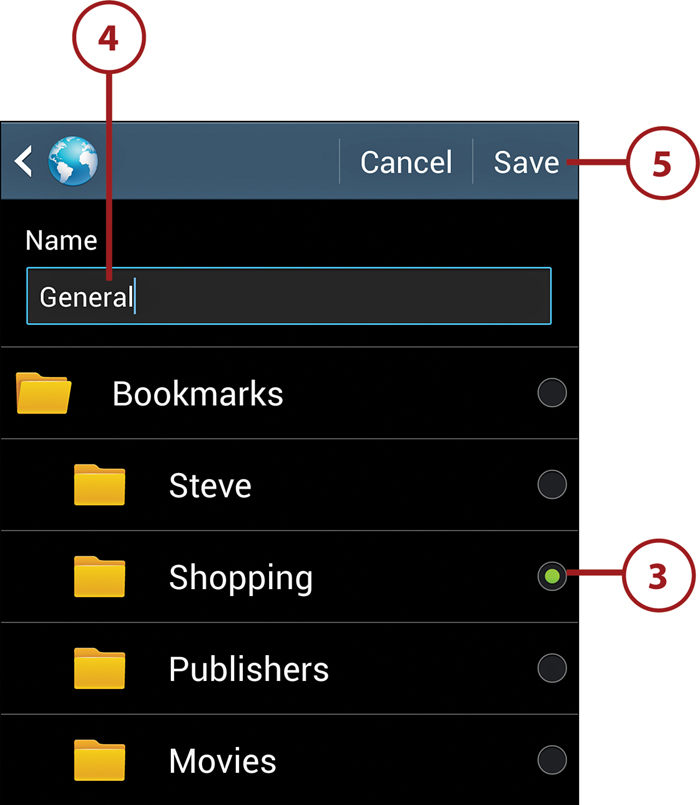
Creating a Bookmark Folder
1. Tap the star icon at the right of the address bar.
2. Press the Menu key and tap Create Folder.
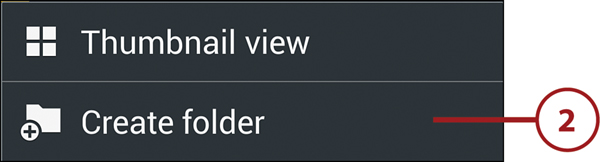
3. Select a parent (containing) folder for the new folder.
4. Enter a name for the new folder.
5. Tap Save. The new folder is created within the selected folder and added to the Bookmarks list.
Moving Bookmarks into Folders
1. Tap the star icon at the right of the address bar.
2. Press the Menu key and tap Move to Folder.

3. As necessary, open folders to expose the bookmarks that you want to move. (Note that the bookmarks to be moved must all have the same destination folder.) Select each bookmark by tapping its check box (in List View) or its thumbnail (in Thumbnail View), and then tap Done.

4. Select the destination folder by tapping it. The selected bookmarks move into the folder.
Deleting Bookmarks
You can delete any bookmark that you no longer use.
1. Tap the star icon at the right of the address bar.

2. Expanding sections and opening folders as necessary, press and hold the bookmark that you want to delete.
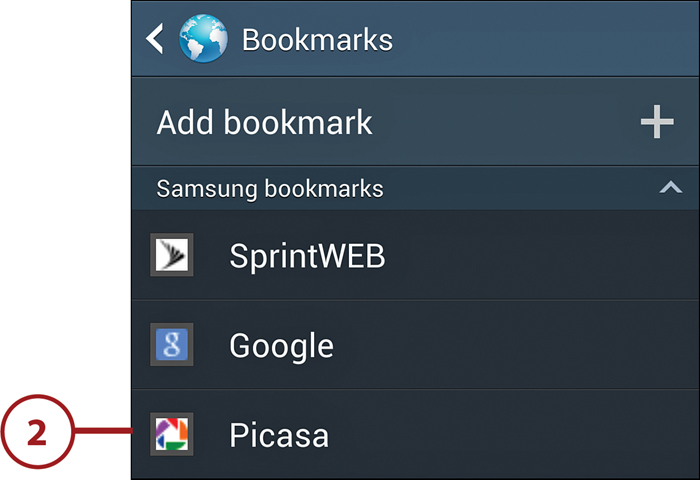
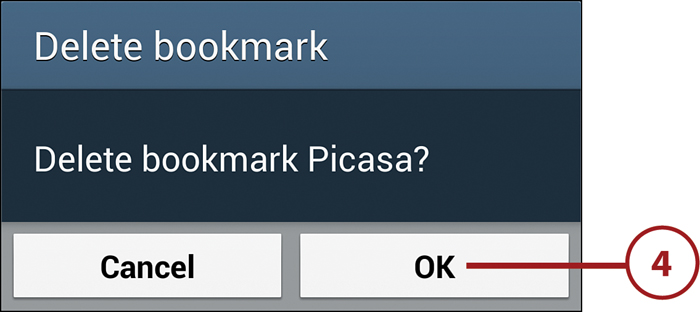
3. Tap Delete Bookmark in the menu that appears.

4. Confirm the deletion by tapping OK.
Deleting Multiple Bookmarks
When deleting a single bookmark, the method described in this task is very efficient. If you want to clean house, though, you can simultaneously delete as many bookmarks as you want.
With the Bookmarks list displayed, press the Menu key and tap Delete. Scroll through the bookmarks and tap the check box of each bookmark that you want to delete. (If necessary, you can open folders by tapping their names.) You can also delete an entire bookmark folder and its contents by selecting the folder. When you finish making selections, tap Delete. Deletions are immediate; no confirmation dialog box appears.

More Menu Commands
The main menu contains additional useful commands that haven’t been discussed so far. Here’s an explanation of what the remaining ones do.
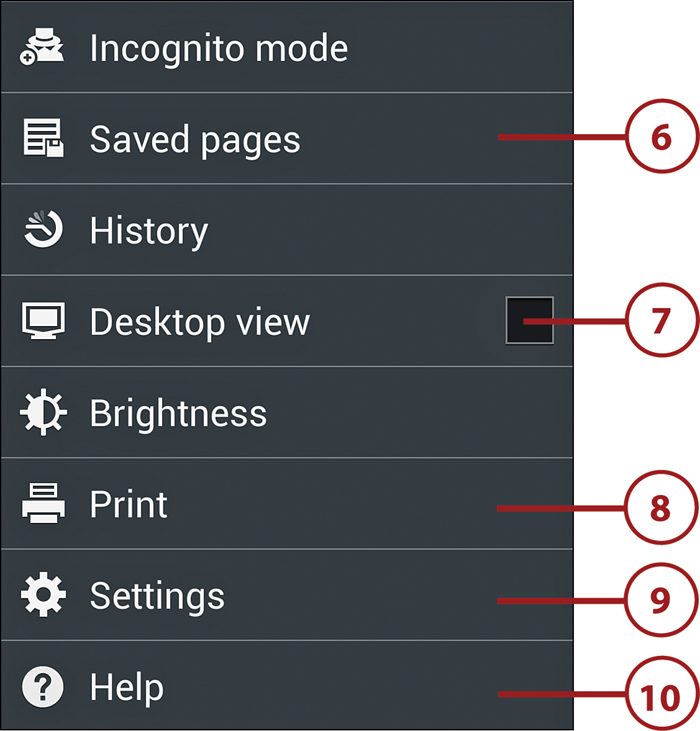
1. With any web page displayed, press the Menu key to reveal the scrolling menu. Other than Saved Pages, History, Desktop View, Brightness, Settings, and Help (in the lower half of the menu), each command applies only to the current page.
2. Homepage. Display your home page in the current window.
3. Add Shortcut. Create a Home screen shortcut for the current page. When you tap the shortcut, the Internet app launches and displays the web page.
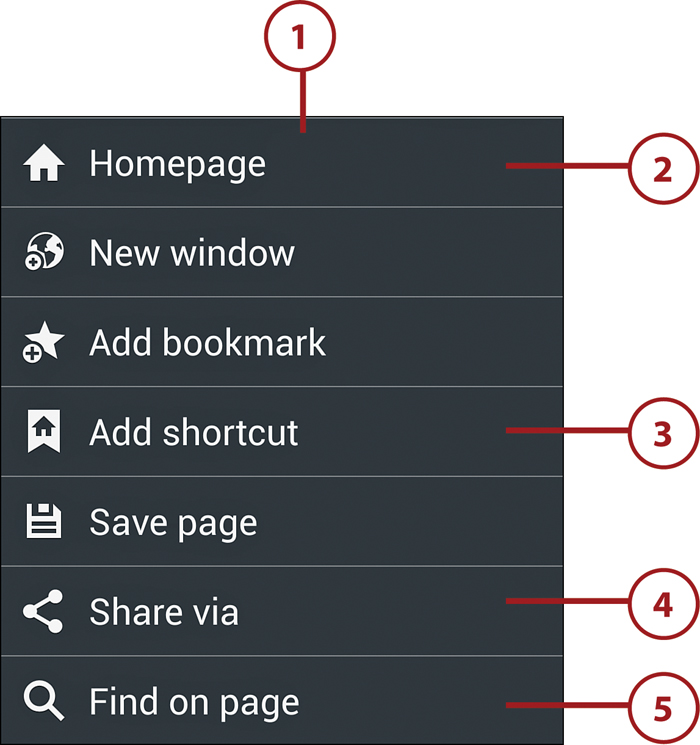
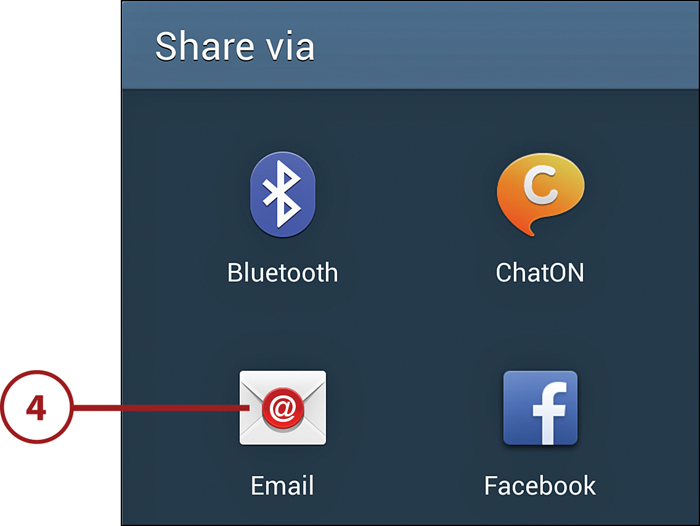
4. Share Via. Share the page with another person or device using a variety of methods.
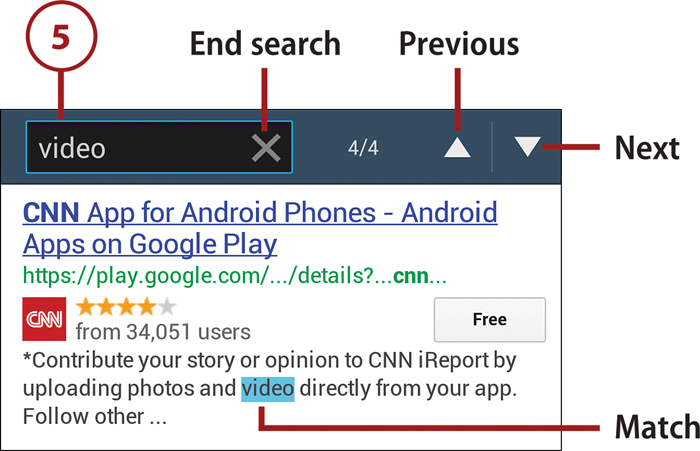
5. Find on Page. Search the current page for a text string. Each match (if any) is highlighted. To move between matches, tap an arrow key. The page scrolls as necessary to display each match.
6. Saved Pages. Displays the pages that you previously saved for later or offline reading using the Save Page command. Tap a page to open it. To manage a saved page, press and hold it, and then select a command from the menu that appears. To manage all saved pages, press the Menu key, and tap Delete or Sort By.
7. Desktop View. Display all pages as though they were being viewed in a desktop browser.
8. Print. Print the current page on a compatible Samsung Wi-Fi printer.
9. Settings. View and modify Internet app preferences (see “Configuring the Browser,” in the next section).
10. Help. Get help using the Internet app.
Configuring the Browser
As is the case with a Mac or PC browser, you can configure the Internet app to match your preferred way of working and perform common browser actions, such as clearing the cache and managing cookies.
1. With any web page displayed, press the Menu key and tap Settings.

2. The Settings screen appears, divided into six categories:
• Set Homepage. Specify a new home page.
• Auto Fill Forms. Enable web form auto-fill.
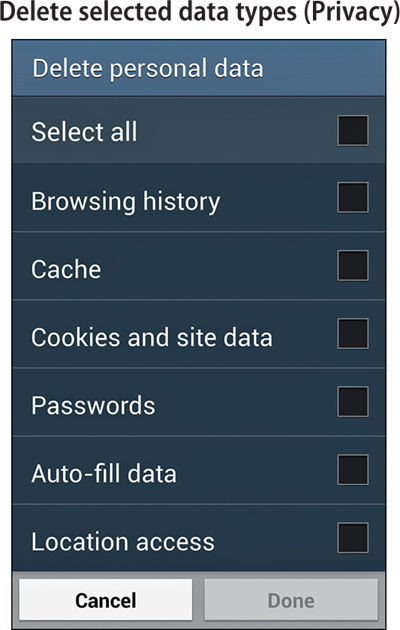
• Privacy. Remember form data and passwords; delete a variety of cached data types.
• Accessibility. Zoom control and full-screen mode; text size and scaling.
• Content Settings. Accept cookies; enable/disable location information access and JavaScript; block pop-ups; specify the default storage location; and reset browser settings to defaults.
• Bandwidth Management. Preload pages; disable image downloads.
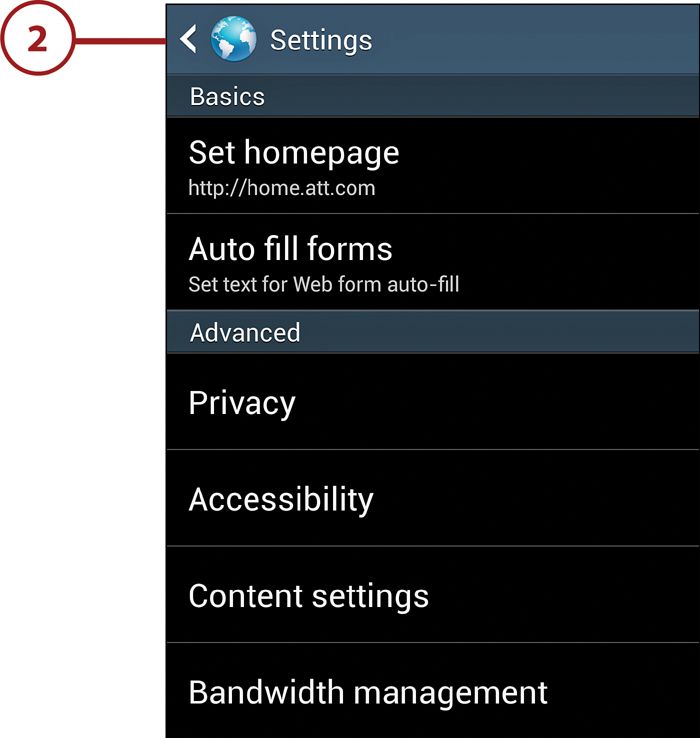
To view or modify settings, tap a category, make the necessary changes, and press the Back key repeatedly until the browser screen reappears.