
7. Preparing Items for Sale
In this chapter, you learn everything you need to do before you list an item for sale or auction on eBay.
→ Writing an Effective Description
Before you list an item for sale, you have to get it ready. That means working up descriptive copy for the listing, shooting some attractive photos of the item, figuring out what category it best fits in, and more. Read on to learn everything you need to know before you create your first item listing.
Finding Items to Sell
You might be surprised how much stuff you have that might be of interest to eBay buyers. But where can you find it?
Around the House
Most eBay sellers get started by selling items they find in their attics, garages, and basements. It’s true; just about anything you have laying around the house can be sold on eBay.
Think of eBay as a giant garage sale. You have stuff you no longer want or need; somebody somewhere wants or needs it. eBay is just the way of connecting your old stuff with its new owners.
You see, eBay buyers are always looking for bargains. Maybe that’s a good price on some slightly used clothing, or a deal on that tennis racket you’ve never gotten much use out of. If you don’t want it, that doesn’t mean nobody does. There’s somebody somewhere who wants your old stuff. Use eBay to reach them and sell it to them.
Friends and Family
After you deplete all the stores of used stuff in your garage or attic, that doesn’t mean you’re done selling on eBay. When you get the hang of it, you can seek out other items to buy for the express purpose of reselling on eBay.
When you’re looking for more merchandise to sell on eBay, think about your friends and family. Maybe they have stuff they no longer need—and maybe you can help them sell it. Think about cutting a deal as a “middleman” to sell your friends’ and family’s stuff on eBay, especially if they’re unfamiliar with the process themselves. (And remember to keep a fair share of the profits for yourself; you’re doing all the work, right?)
Garage Sales and Yard Sales
Many successful eBay sellers scrounge around their local garage and yard sales, looking for items that they can sell for more money on eBay. It isn’t difficult; you can pick up a lot of stuff for a quarter or a dollar at a garage sale and then sell it for 5 or 10 times that price online. Just be sure to get to the sale early, or all the good bargains will be picked over already!
Flea Markets
Flea markets offer merchandise similar to what you find in garage sales. The bargains might be a little less easy to come by, however, but if you keep a sharp eye, you can find some items particularly suited for eBay auction.
Live Auctions
Any live auction in your area is worth checking out, at least once. Just don’t let yourself get caught up in the bidding process—you want to be able to make a profit when you resell the merchandise on eBay!
Vintage and Used Retailers
There’s potential aplenty when you visit retailers that sell “vintage” and used clothing and other merchandise. These stores are particularly good sources of collectibles, although you might have to haggle a little to get down to a decent price.
Thrift Stores
Think Goodwill and similar stores here. You can typically find some decent merchandise at low cost—and help out a nonprofit organization, to boot.
Discount and Dollar Stores
These “big lot” retailers are surprisingly good sources of eBay-ready merchandise. Most of these retailers carry overruns and closeouts at attractive prices. You can pick up merchandise here cheap, and then make it sound very attractive in your eBay listing (“brand new,” “last year’s model,” “sealed in box,” and so on).
Closeout Sales
You don’t have to shop at a cheap retailer to find a good deal. Many mainline merchants offer terrific deals at the end of a season or when it’s time for next year’s merchandise to arrive. If you can get enough good stuff at a closeout price, you have a good starting inventory for your eBay sales.
Going Out of Business Sales
Even better, look for a merchant flying the white flag of surrender. When a retailer is going out of business and says “everything must go,” that means that bargains are yours to be had—and don’t be afraid to try to make a lower-priced deal.
What You Can’t Sell on eBay
That’s not to say that everything you find can be sold on eBay. Even though eBay is a vast online marketplace, it does have some rules about what is and isn’t allowable for sale or auction. This list of what you can’t buy or sell on eBay makes a lot of sense; most of these items are illegal, are controversial, or could expose eBay to various legal actions.
eBay’s list of prohibited items includes the following:
• Alcohol, except for pre-approved wine listings
• Animals and wildlife products, except for tropical fish and domestic aquatic snails
• Artifacts and antiquities protected under federal laws
• Bootleg or counterfeit recordings of CDs, videos, computer software, or other items that infringe on someone else’s copyright or trademark
• Cell phones covered under an existing service contract (you can sell the phone, but not the service contract)
• Counterfeit currency and stamps
• Credit and debit cards (unless they’re more than 10 years old, in which case they’re collectible)
• Drugs and drug paraphernalia
• Electronic jamming devices
• Embargoed goods and goods from prohibited countries
• Firearms, ammunition, and knives (except for some collectible knives and swords)
• Government and transit documents, IDs, licenses, and uniforms
• Hazardous materials
• Human remains and body parts
• Items that contain the image, likeness, name, or signature of a person, unless the person has authorized the product in question
• Items that encourage illegal activity, such as instructions for making a bomb
• Law enforcement badges, uniforms, and equipment
• Lockpicking devices
• Lottery tickets
• Mailing lists and personal information
• Medical devices that require a prescription
• Military ordinance, vehicles, and uniforms
• Multilevel marketing, pyramid, and matrix programs
• Offensive material, such as items that promote or glorify hatred, violence, racial, sexual, or religious intolerance
• Pesticides classified as restricted, or stored in open or repackaged containers
• Postage meters
• Prescription drugs
• Recalled items
• Satellite and cable TV descramblers
• Slot machines
• Snake venom
• Stocks and other securities (unless they’re collectible certificates)
• Stolen property and property with removed serial numbers
• Surveillance equipment
• Tobacco
• Unauthorized artwork and reproductions
• Used cosmetics and applicators
• Used underwear, g-strings, and jockstraps
Then there’s eBay’s Everything Else > Adult Only category. While pre-approved sellers can sell certain sex toys and clothing within the Adult Only category, you can’t include any nude images in your listings. You can also sell old Playboy and Penthouse magazines in the Books > Magazine Back Issues, as long as you don’t include any nudity or sexually explicit content in the listing.
This list covers just the general restricted items; there are even more details for specific items in certain categories. For more information, or if you’re in doubt about a particular item, check out eBay’s Prohibited and Restricted Items page at pages.ebay.com/help/policies/items-ov.html.
Preparing Items for Sale
Before you list your first item, you need to make sure the item is ready to be sold. Just as you might clean or fold or otherwise spruce up an item before you put it on a table at a garage sale, you want to make whatever it is you’re selling look as attractive as possible. Remember—good-looking items are more likely to sell, and for more money, than dumpy-looking stuff.
So here’s a short checklist of things to do to make an item ready for sale on eBay:
• Make sure that the item exists and is on hand. Don’t assume that the box that says “gift soaps” actually contains gift soaps; open up previously opened containers to make sure the right items are inside—including all necessary accessories.
• If you have the original box for an item, use it. Selling a used item in its original box increases its value.
• Take the time to clean the item you’re selling. If something’s been up in your attic or out in your garage, chances are it’s at least gotten a little dusty. Dust it off, wipe off the dirt and grime, maybe get out the soap and water do a little cleaning. Spruce it up and shine it up to make it look as close to brand-new as possible. (That is, unless cleaning an item might reduce its value—which can be the case with some collectibles.) When you do your cleaning, make sure you’re familiar with the proper cleaning process for that item; what works on one thing might actually damage something else.
• If the item has any flaws, dings, missing parts, or other damages, note them. (You’ll want to mention any flaws in the item listing.)
• If the item smells of cigarette smoke or mildew, spritz it with a little Febreze. If that doesn’t work, you’ll need to note the odor in the item listing—which will reduce its value. And if the item comes from a smoke-free (or even pet-free) home, state that in the listing; many buyers will pay more for items from a super-clean environment.
• Determine how you’ll be packing the item. In most cases, you’ll have to purchase a box or envelope or whatever, along with appropriate packing material, such as Styrofoam peanuts.
• Weigh the item, along with all the packing material you’ll be using. You’ll need the item weight to calculate shipping costs.
• Determine how you’ll be shipping the item (U.S. Postal Service, FedEx, UPS, or similar) and use the weight of the item to calculate approximate shipping costs.
Packing and Shipping
Learn more about how to pack and ship items in Chapter 13, “Packaging and Shipping the Items You Sell.”
This is all necessary. You need to make your item as attractive as possible to potential buyers. A good-looking item sells faster and for more money than the same item that’s not in as good a condition.
Picking the Right Category
After you’ve prepped an item for sale, it’s time to start thinking about the item listing itself. One of the first things to determine is in what category you’ll list the item.
Understand eBay’s Product Categories
As you’ve learned when shopping on the eBay site, eBay organizes its listings by product category. There are a few dozen major categories, each of which is subdivided into dozens of more targeted subcategories. Here are the major categories:
• Antiques
• Art
• Baby
• Books
• Business & Industrial
• Cameras & Photo
• Cell Phones & Accessories
• Clothing, Shoes, and Accessories
• Coins & Paper Money
• Collectibles
• Computers/Tablets & Networking
• Consumer Electronics
• Crafts
• Dolls & Bears
• DVDs & Movies
• eBay Motors
• Entertainment Memorabilia
• Gift Cards & Coupons
• Health & Beauty
• Home & Garden
• Jewelry & Watches
• Music
• Musical Instruments & Gear
• Pet Supplies
• Pottery & Glass
• Real Estate
• Specialty Services
• Sporting Goods
• Sports Memorabilia, Cards, & Fan Shop
• Stamps
• Tickets & Experiences
• Toys & Hobbies
• Travel
• Video Games & Accessories
• Everything Else
Most of these major categories are further divided into more specific subcategories. For example, the major category of Clothing, Shoes, & Accessories is subdivided into a variety of smaller categories, such Men’s Clothing, Women’s Clothing, Women’s Shoes, Vintage, and so on. To make it easier to find specific items, these subcategories are further subdivided into even more targeted subcategories; for example, the Women’s Clothing subcategory is subdivided into further subcategories for Athletic Apparel, Coats & Jackets, Dresses, Sweaters, and so on.
Choosing a Category
When you understand eBay’s categories, choosing the right one for your item sounds simple. It’s just a matter of drilling down the hierarchy until you find the subcategory that best fits what you’re selling. For example, if you’re selling a DVD of Casablanca, you’d choose the DVDs & Movies > DVD category. Like I said, pretty easy.
But it isn’t always that easy. What do you do if you want to sell a model of an American Airlines jet? Does it go in the Collectibles & Art > Collectibles > Transportation > Aviation > Airlines > American category, or the Toys & Hobbies > Models & Kits > Aircraft (Non-Military) category?
The category in which you list your item should be dictated by where the highest number of potential buyers will look for it. Search the item listings to get an idea of which items are in what categories, and for those categories that have a higher success rate. In the American Airlines jet model example, if there are more bidders traipsing through the Collectibles category, put it there; if there are more potential buyers who think of this as a model toy thing, put it in that category. (In reality, you’ll probably find listings for this sort of item in both categories.) Think like your potential buyers, and put it where you would look for it if you were them.
If you really can’t decide—if your item really does belong in more than one category—eBay lets you list your item in two categories. It costs twice the regular listing fee, but it potentially doubles your exposure.
Taking Product Photos
After you have the category decided, it’s time to get out your digital camera and take a few pictures. After all, nobody wants to buy anything sight unseen. You need to include a photo or two (or three) in your item listings, to show potential buyers exactly what it is you’re selling.
Tips for Taking Great Product Photos
Although this really isn’t the place for a basic photography lesson, I can give you a few tips on how to take the right kinds of pictures to use in your eBay listings.
• Use a digital camera—or your smartphone. We’re talking digital photos here, so use your handy dandy digital camera. Just about any digital camera will do; you don’t need one of those expensive D-SLR models. (Although those do shoot some darned fine photos.) A typical point-and-shoot digital camera with a decent zoom lens should do the job. For that matter, the cameras built into most smartphones today are probably adequate for shooting these types of product photos.

Point-and-shoot digital camera (photo courtesy Canon)
• Use a tripod. You want crystal clear photos of your item, not blurry ones. That means taking care to hold the camera steady while you’re shooting. Even better, invest in a tripod to hold the camera rock solid when you’re shooting.

Tripod (photo courtesy Velbon)
• Shoot in strong light. One of the worst photographic offenses is to shoot under standard indoor room light. Although you can touch up the photo somewhat afterward (see the “Edit Your Photos” section, later in this chapter), you can’t put in light that wasn’t there to begin with. Open all the windows, turn on all the room lights, use a flash or external lighting kit, or just take the item outdoors where there’s plenty of sunlight. What you want is a well-lighted photograph that shows off your item to best possible effect. That’s much, much better than dimly lit photos where potential buyers can’t see all the details.

• Avoid glare. If you’re shooting a glass or plastic item, an item still in plastic wrap or packaging, or just an item that’s naturally shiny, you have to work hard to avoid glare from whatever lighting source you’re using. This is one reason why I typically don’t recommend using the type of single-point flash built into most of today’s digital cameras—without any fill lighting, it produces too much glare. You avoid glare by not using a flash, using external lights (to the sides of the object), diffusing the lighting source (by bouncing the light off a reflector of some sort), or just turning the item until the glare goes away. A simpler solution is to shoot in an area with strong natural light—such as outside on a nice day.

Glare on shiny item (bad)
• Shoot against a plain background. If you shoot your item against a busy background, it detracts from the item itself. Hang a white or black sheet (or T-shirt) behind the item; it will make the main object stand out in the photo. Even better, invest in a roll of seamless background paper, which you can find in most photo stores; you want the buyer to focus on what you’re selling, not what’s behind it in the picture.
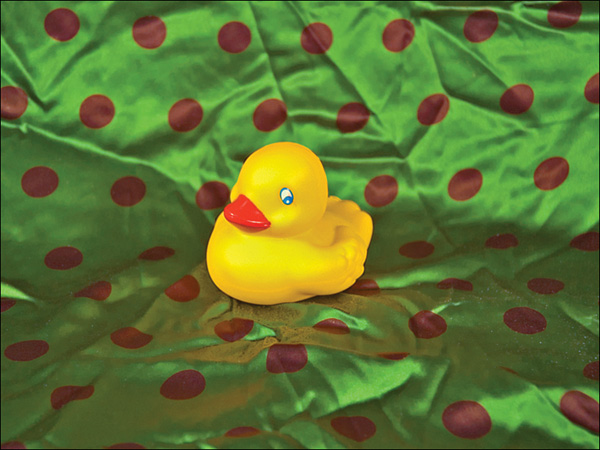
Item shot against busy background (bad)
• Use a photo studio kit. If you’re selling small items, like jewelry or miniatures or other collectibles, consider investing in a photo studio kit. This is a small tent or box into which you place your item; the kit functions as the item’s background and contains its own built-in lighting. Just aim your camera through the open end and shoot; the result is quite professional.

Photo studio kit (photo courtesy Polaroid)
• Frame the picture. To take effective photographs, you have to learn proper composition. That means centering the item in the middle of the photo, and getting close enough to the object so that it fills up the entire picture. Don’t stand halfway across the room and shoot a very small object; get close up and make it big!
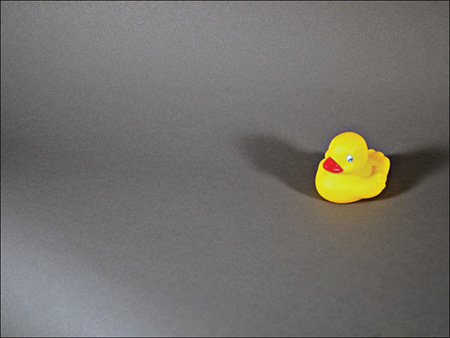
Poorly framed item—too small and off center
• Focus! Okay, this one sounds obvious, but I see a lot of blurry pictures on eBay. Make sure that you know how to focus your camera, or how to use the auto-focus function. (And make sure the focus is on your item, not on the background behind it!)
• Use macro mode. If you’re shooting a small item, your camera might have difficulty focusing if you get too close. Use your camera’s macro focus mode to enable sharp focus closer to the object.
• Take more than one photo. Don’t snap off a quick picture with your iPhone and assume that you’ve done your job. Shoot your item from several different angles and distances—and remember to get a close-up of any important area of the item, such as a serial number or a damaged area. You might want to include multiple photos in your listing—or just have a good selection of photos to choose from for that one best picture.
• Shoot clothing as worn. If you’re selling new or used clothing, don’t just lay it on your bed and shoot. People want to get an idea of how it will look when worn. You can do this by hanging a shirt or sweater on a hanger, using a mannequin or dressmaker’s form, or having a model wear it.
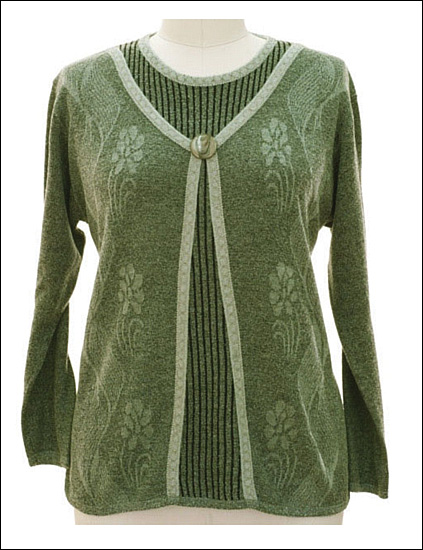
A sweater shot on a dressmaker’s form
• Scan instead of shoot. If you’re selling relatively flat items (books, comics, CDs, and even small boxes), you might be better off with a scanner than a camera. Just lay the object on a flatbed scanner and scan the item into a file on your computer. It’s actually easier to scan something like a book or a DVD case than it is to take a good steady picture of it!
Use eBay’s Stock Photos
If you’re selling certain types of eBay items—books, CDs, DVDs, digital cameras, consumer electronics products, and the like—you might not need any photos at all. That’s because eBay automatically inserts a stock product photo when you use the prefilled item description option to create your item listing. If the item you’re selling is listed in eBay’s product database—and you like the photo provided—save yourself the trouble and let eBay insert the picture for you.

eBay stock photo for Blu-ray listing
Edit Your Photos
After you’ve taken your digital photos (typically in a JPG file, the graphics file type of choice for eBay), you can do a little editing to “clean it up” for eBay use. Here’s a short list of how you can improve your eBay product photos:
• Lighten photos shot in low light.
• Correct the color and tint in poorly shot photos.
• Crop the picture to focus on only the item you’re selling.
For best results, upload your photos in JPG format, with a minimum resolution of 500 pixels on the longest side. For the best possible display, shoot and edit your photos with 1600 pixels on the longest side.
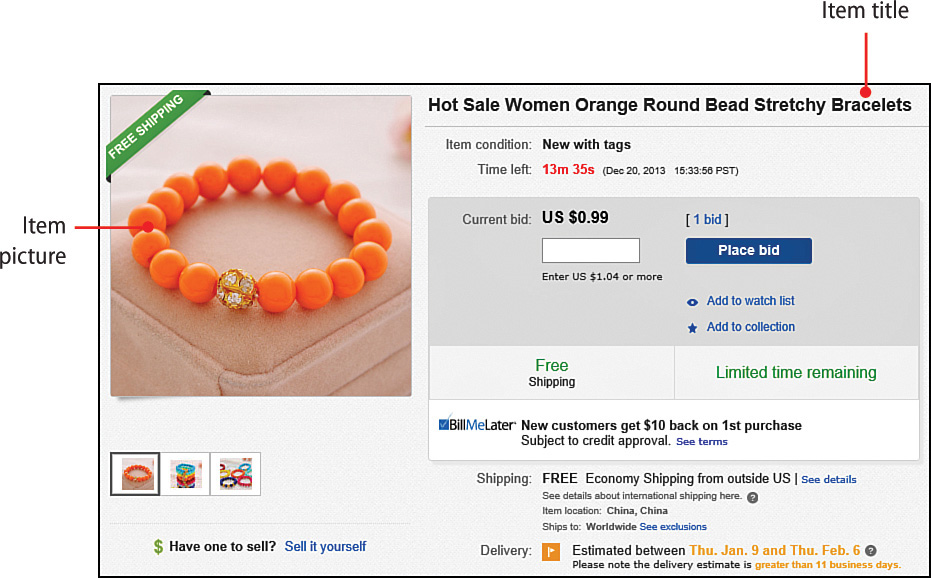
Writing an Effective Title
When it comes to improving the effectiveness of your eBay item listings, the best place to start is at the top—with the listing title. This is what most potential buyers see first; if the title isn’t convincing, buyers may never click through to see the rest of the listing.
eBay lets you use up to 80 letters, numbers, characters, and spaces in your listing title. Within these confines, you need to accomplish two things:
• Include the appropriate information so that anyone searching for a similar item will find your item in his search results.
• Make your title stand out from all the other titles on those long listing pages.
Do those two things and you significantly increase your chances of getting your item noticed and sold.
Include Key Information
Let’s tackle the first point first. You have to think like the people who will be looking for your item.
As an example, let’s say you’re selling a set of six golf clubs. They’re the R7 series from Taylor Made with stiff steel shafts, irons only. You purchased the clubs in 2008, and you have the complete set from the 4 iron to the 9 iron. How do you list this item?
You have to make sure that you get all the right keywords in your title. For this example, it’s obvious that you should use the words golf, club, and irons. You should also include the manufacturer (Taylor Made) in the title, along with the keyword phrase stiff steel shafts. If you have space, you should also include the series (R7) and the word used.
What you end up with is a title something like this:
Taylor Made R7 Used Golf Clubs 4, 5, 6, 7, 8, 9 Irons Stiff Steel Shafts 2008
That’s 77 characters, including spaces, just under the 80-character limit. It gets the point across and buyers will know exactly what they’re buying.
You should include different information with different types of items. With some items, you’ll want to include the year it was made or purchased. With other items, a full item number is helpful. Don’t forget brand and product names, when they matter. And include as many item details, such as color and size, as you can fit in.
Make Your Title Stand Out
Beyond including as many relevant facts as possible in your title, how do you make your title stand out from all the other boring listings? Obviously, one technique is to employ the judicious use of CAPITAL LETTERS. The operative word here is judicious; titles with ALL capital letters step over the line into overkill. Some buyers just tune out titles that are SHOUTING at them, so it could definitely work against you.
Instead, I advise you to think like an advertising copywriter. What words almost always stop consumers in their tracks? Use attention-getting words such as FREE and NEW and BONUS and EXTRA and DELUXE and RARE—as long as these words truly describe the item you’re selling and don’t mislead the potential bidder. (And don’t bump more important search words for these fluffier marketing terms—that won’t help your item show up in bidder searches.)
Try this one on for size: Which would you rather bid on, a 1964 Aurora Superman Model Kit or a RARE Aurora 1964 Superman Model Kit? I’m betting you go for the second one—and mentally prepare yourself to pay more for it, too!
In short, use your title to both inform and attract attention—and include as many potential search keywords as possible.
Writing an Effective Description
If the listing title is the headline of your ad, the listing description is your ad’s body copy. Which means it’s time to put on your copywriter’s hat and get down to the nitty-gritty details.
Take All the Space You Need
What makes for a good product description? First, you have all the space you need, so say as much as you need to say. Unlike with the title description, you don’t have to scrimp on words or leave anything out. If you can describe your item adequately in a sentence, great; if it takes three paragraphs, that’s okay, too.
When you’re writing the description for your listing, be sure to mention anything and everything that a potential buyer might need to know. Note any defects or imperfections of the item. If the object is graded or evaluated in any way, include that assessment in your description. In other words, include everything you can think of that will eliminate any surprises for the buyer.
First Things First
You should always put the most important and motivating information in the initial paragraph of your listing. That’s because a lot of folks won’t read any farther than that. Think of your first paragraph like a lead paragraph in a newspaper story: Grab ’em with something catchy, give them the gist of the story, and lead them into reading the next paragraph and the one after that.
The Bare Necessities
There are certain key data points that users expect to see in your item description. Here’s the bare minimum you should include:
• Name (or title)
• Condition
• Age
• Original use (what you used it for)
• Value (if you know it)
• Important measurements, contents, colors, materials, and so on
• Any included accessories (including the original instruction manual, if you have it)
• Any known defects or damage
If you don’t know some of this information, that’s okay—as long as you admit it. If you’re not that familiar with the type of merchandise you’re selling, just say so. Better to plead ignorance upfront than to have a savvier buyer cause problems for you after the sale.
Describe It—Accurately
Because potential buyers will be shopping your item sight unseen, you have to make the process as easy as possible for them. That means describing the item as accurately as possible, and in as much detail as possible. If the item has a scratch or blemish, note it. If the paint is peeling, note it. If it includes a few non-original parts, note it. Buyers don’t have the item to hold in their hands and examine in person, so you have to be their eyes and ears.
That’s right; you need to describe the item in painful detail, and be completely honest about what you’re selling. If you’re not honest in your description, it will come back to haunt you—in the form of an unhappy and complaining buyer.
Stress Benefits, Not Features
Although you need to be descriptive (in some collectibles categories, obsessively so), it doesn’t hurt to employ a little marketing savvy and salesmanship. Yes, you should talk about the features of your item, but it’s even better if you can talk about your product’s benefits to the potential buyer.
Let’s say you’re selling a used computer keyboard with a split design. Saying simply that it’s an “ergonomic keyboard” merely states a feature of the item; saying instead that “the keyboard’s ergonomic design lets you work for longer periods without causing hand pain” is describing a benefit. Remember, a feature is something your item has; a benefit is something your item does for the user.
Break It Up
You should include as much descriptive copy as you need in your listing, but you should also make sure that every sentence sells your item.
And if your listing starts to get a little long, you should break it into more readable chunks. Use separate paragraphs to present different types of information, or just to break one long paragraph into several shorter, more readable ones. You can even use eBay’s formatting options to use different type sizes and colors for different portions of your listing description.
Don’t Forget the Fine Print
Breaking up your description into smaller chunks enables you to put a lot more info into your description, yet still maintain readability. When it comes to informing potential buyers, it’s impossible to be too complete. (And if you don’t define a detail, the buyer will—in his or her mind.) Don’t assume that buyers know anything; take the time to spell out all the details about payment and shipping and the like.
Here is some of the “fine print” you might want to include at the bottom of your item description:
• Bidding restrictions, such as “No bidders with negative feedback,” “Bidders with positive feedback of at least 10 only,” or “United States buyers only.”
• Payment restrictions, such as “United States funds only,” “No personal checks,” or “Personal checks take two weeks to clear.”
• Shipping/handling charges (if you know them) and restrictions, such as “Buyer pays shipping/handling” or “Shipping via USPS Priority Mail only.”
• The grade of your item, if your item has been graded (discussed later in this chapter). Note that this information can also be included in the main body of the item description, as well as in the fine print section.
Include Alternative Wording
The very last things you can put into your listing, at the bottom, are some extra words. Remember, not every person uses the same words to describe things. If you’re selling a plastic model kit, for example, some users will search for model, others for kit, still others for statue or figure or styrene. Although you can’t put all these variations into the item title, you can throw them in somewhere in the description—or, if all else fails, at the bottom of the item description. (Remember, they’ll be picked up by eBay’s search engine if they’re anywhere in the description area.)
While you’re at it, throw in any alternative spellings you can think of. For example, you might know that the correct spelling of Spider-Man includes the hyphen in the middle, but less informed users might search for the unhyphenated Spiderman. Whichever variation you use in your title, throw the other one in at the bottom of the description.
Making the Grade
When you’re selling items on eBay, it helps to know what kind of shape your items are in. For many types of collectible items, that means grading the item’s condition—according to some very formal rules.
Grading is a way of noting the condition of an item, according to a predetermined standard. Collectors use these grading scales to help evaluate and price items within a category. If you know the grade of your item, you can include the grade in the item’s title or description, and thus more accurately describe the item to potential bidders.
Making a Mint
Unfortunately, there is no such thing as a “universal” grading system for all items; different types of collectibles have their own unique grading systems. For example, trading cards are graded from A1 to F1; stamps are graded from Poor to Superb.
That said, many collectible categories use a variation of the Mint grading system, as shown in Table 7.1.
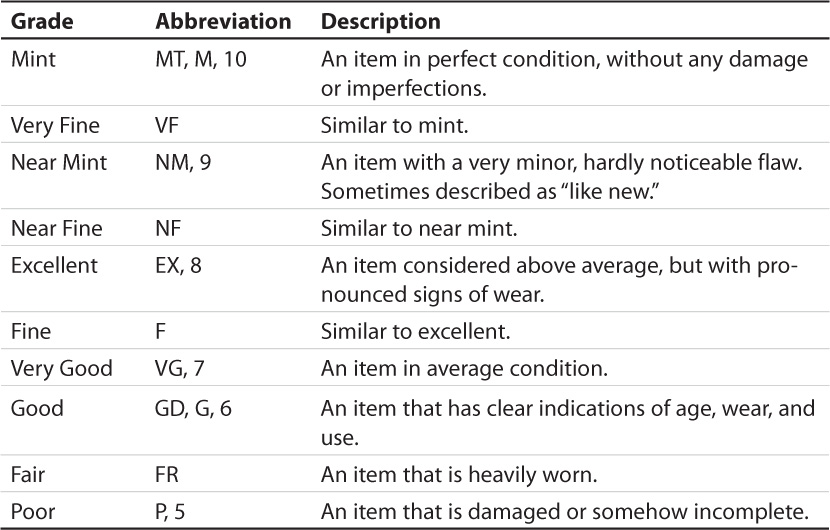
Degrees between grade levels are indicated with a + or –. For example, an item a little better than Fine but not quite Near Fine would be designated as F+. Naturally, the definition of a Mint or Fair item differs by item type.
Getting Graded
If you’re not sure what grade an item is, you might want to utilize a professional grading and authentication service. These services will examine your item, authenticate it (confirm that it’s the real deal), and give it a professional grade. Some services will even encase your item in a sealed plastic container or bag.
Where can you get your items graded? Table 7.2 lists some popular websites for grading and authenticating collectible items.

eBay provides a page of links to authorized authentication services at http://pages.ebay.com/help/buy/authentication.html.
The cost of these authentication services varies wildly, depending on what you’re authenticating, the age or value of the item, and the extent of the service itself. For example, Professional Sports Authenticator rates range from $5 to $150 per sports card; Professional Stamps Experts rates range from $15 to $500 per stamp. Make sure that the item you’re selling is worth it before you go to this expense—and that you can recoup this expense in your auction.
Other Ways to Describe Your Item
There are some other grading-related abbreviations you can use in your item listings. As you can see in Table 7.3, these abbreviations help you describe your item (especially in the title) without wasting a lot of valuable space.
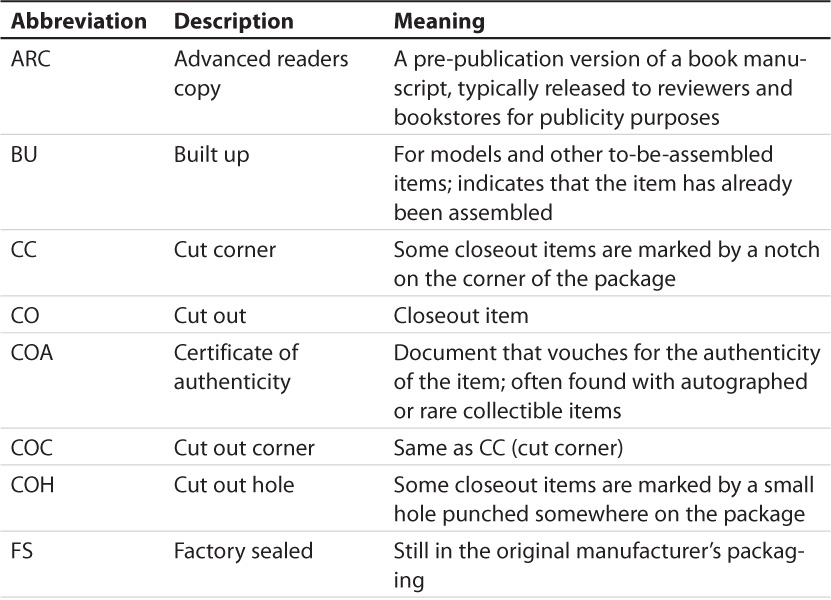
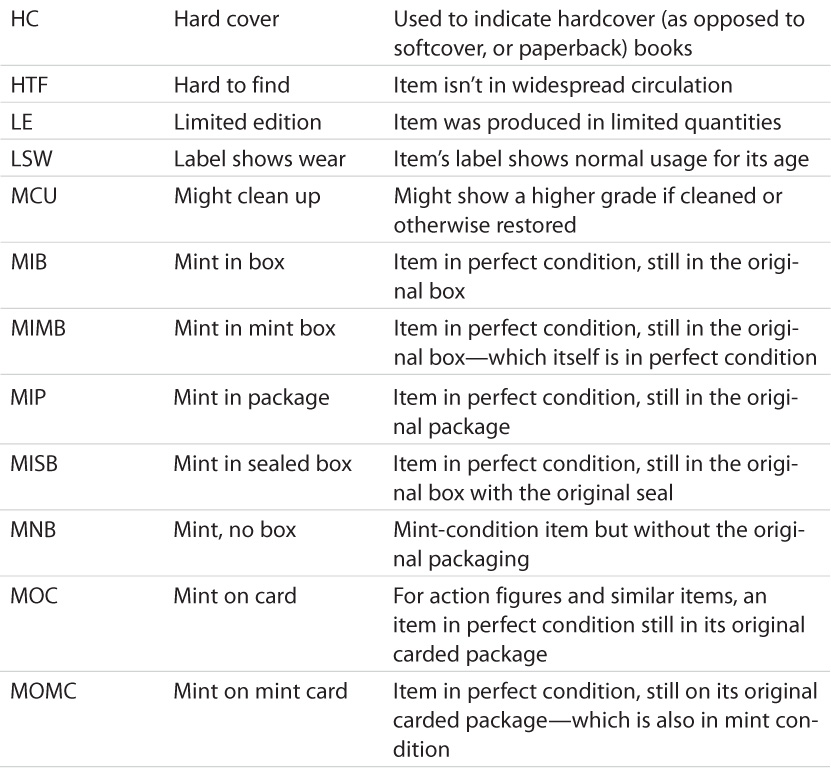
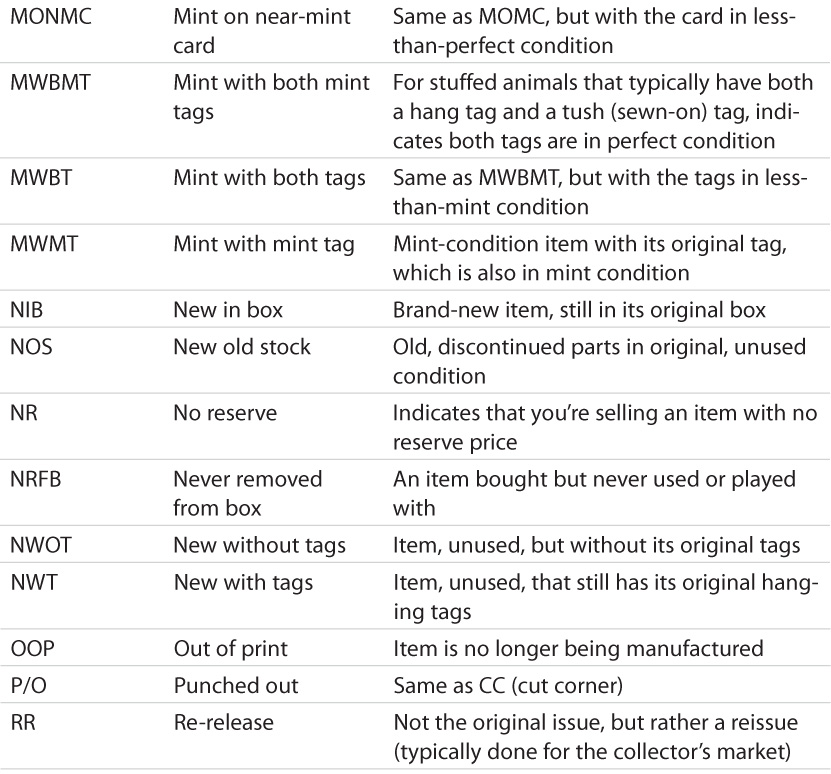

The big challenge with any grading system is that grading is subjective. Although there might be guidelines for different grading levels, the line between “very good” and “excellent” is often a fine one. You should be very careful about assigning your own grading levels; even better, supplement the grade with a detailed description and photographs so that bidders can make up their own minds as to your item’s true value.