
10. Selling One-of-a-Kind Items via Auction

In this chapter, you learn how to list items for sale using eBay’s traditional online auction process.
→ What Types of Things Should You List via Online Auction?
→ Before You List: Setting the Right Starting Price
→ Adding Fixed-Price Selling to Your Auctions with Buy It Now
→ Setting a Higher Minimum with a Reserve Price Auction
→ After the Auction—Now What Happens?
eBay started out as an online auction site, and even though the majority of sales today are non-auction listings, the online auction format still is best for selling certain types of items. If you think you have a rare or collectible item that could be of value to bidders, you can list that item as an auction on eBay. The process is surprisingly simple, and watching an in-progress auction can actually be a bit of fun.
What Types of Things Should You List via Online Auction?
When you start creating a new item listing, eBay makes a determination as to whether that item should best be sold at a fixed price or via online auction, and then recommends that format during the listing process. More often than not, eBay recommends fixed-price listings for new items and auction listings for used items.
That new-versus-used distinction is surprisingly accurate, although not 100 percent so. That is, most used items you want to sell—clothing, electronics, books, and collectibles—are best sold via the bidding process that enables interested buyers to determine the item’s market value. Most new items, on the other hand, have a fixed value (because they’re typically also available from traditional retailers) and thus should be sold via a fixed-price listing.
This is not a hard and fast rule, however. Some gently used items have a distinct market value (at a slight discount from a similar brand-new item), and thus can be sold at a fixed price. And if you want to move an item quickly, even if it is used, going the fixed-price route is often speedier than engaging in the normal 7-day auction process.
That said, here’s a short list of the kinds of items you might have for sale that should probably be sold via the online auction process:
• Used items (except for gently used clothing or electronics)
• Rare items, even new ones, that aren’t widely available from traditional retailers
• Collectible items
• Any item you want to move quickly
Before You List: Setting the Right Starting Price
How should you price an item in an eBay auction listing? If you set your minimum or starting price too high, you might scare off potential buyers. If you set your minimum price too low, you’ll probably get more interested bidders, but you might end up selling your item for less than you want or than what it’s worth.
So, what’s the right starting price? There are several strategies you should consider.
Set It Low Enough to Be Attractive...
If you’re going to stand out among thousands of similar listings on the eBay site, you have to set a starting price that’s low enough to get some initial bidding going. But you don’t want to set the price so low that bidding won’t eventually get up to the price you think the item can really sell for.
How do you know what the final selling price will be? You don’t. But you can get a good idea by searching eBay for completed auctions of similar items. eBay keeps most auctions on file for 30 days, so if anything similar has sold in that period of time, you can find it from eBay’s advanced search page.
At the least, you want to be sure you’re not setting the starting bid higher than the final selling price for similar items. If you do a search for completed auctions and find that sets of knitted golf club covers have been selling between $10 and $15, don’t put a $20 starting price on those club covers you want to sell. Ignore precedence and you won’t get any bids.
Instead, gauge the previous final selling prices and place your starting price at about a quarter of that level. Using our golf club cover example, you might set a starting price of $3—about 25% of the $12 average selling price of similar items. Anything more than that and your particular item won’t seem to be much of a good deal.
...But Don’t Set It So Low That It’s Not Believable
In some instances, you might need to worry about setting too low a starting price. That’s because if you set too low a minimum bid for your item, some potential bidders might think that something is wrong with what you’re selling. (It’s the old “if it’s too good to be true, it probably is” syndrome.)
Although you might assume that bidding will take the price up into reasonable levels, too low a starting price can make your item look too cheap or otherwise flawed. If you start getting a lot of emails asking why you’ve set the price so low, you should have set a higher price.
Make Sure You Recover Your Costs
Another factor in setting the starting price is what the item actually cost you. Now, if you’re just selling some stuff you found in the attic, this isn’t a big concern. But if you’ve specifically purchased items to sell on eBay for a profit, you don’t want to sell too many items below what you paid for them.
With this in mind, many professional sellers like to set their starting price at their item cost, plus maybe another buck to cover eBay’s various listing and selling fees. If the item cost you $5, for example, you set the minimum bid at $6, and see what happens from there. If it only sells for the minimum $6 price, at least you haven’t lost any money.
eBay Fees
Don’t forget to include eBay’s fees in your cost calculations. After the first 50 (free) listings each month, you pay a $0.30 insertion fee for each new listing you create, as well as a 10 percent final value fee when you sell an item. Learn more about eBay’s fees in Chapter 6, “Understanding eBay’s Selling Fees.”
Make Sure You Can Live with a Single Bid
What happens if you set the starting price at $5 and you get only one bid—at $5? Even if you thought the item was worth twice that, you can’t back out now; you have to honor all bids in your auction, even if there’s only one of them. You can’t email the bidder and say, “Sorry, I really can’t afford to sell it for this price.” If you listed it, you agreed to sell it for any price at or above your minimum. It’s a binding contract. So, if the bidding is low, you’d better get comfortable with it—it’s too late to change your mind now!
Creating an Auction Listing
If you have a used item for sale, eBay assumes that you want to sell it via an online auction, and starts the listing with that in mind. In most ways, except for pricing and listing length, creating an auction listing is very similar to creating a fixed-price listing.
Create a New Listing
As you learned in Chapter 7, “Preparing Items for Sale,” you need to do some pre-listing homework before you create a listing. With an auction-style listing, that also includes determining your starting bid price.
After you’ve done this homework, you can start creating the listing. It’s a simple matter of filling in the blanks.
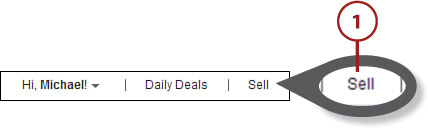
![]() Click Sell on the eBay toolbar to display the opening sales listing page.
Click Sell on the eBay toolbar to display the opening sales listing page.

![]() Enter a brief description of what you’re selling into the big box at the top of the page. (If you know the item’s model number, ISBN code, or UPC code, skip down to the next section, “Create a New Listing—When eBay Knows What You’re Selling.”)
Enter a brief description of what you’re selling into the big box at the top of the page. (If you know the item’s model number, ISBN code, or UPC code, skip down to the next section, “Create a New Listing—When eBay Knows What You’re Selling.”)
![]() Click the Get Started button.
Click the Get Started button.

By default, eBay displays the basic listing page, which offers the most common listing options. If you want more control over your listing, or if you need options not displayed on the basic page, click Switch to Advanced Tool at the top of any listing creation page.
![]() On the next page, eBay displays the suggested product category for this item. If this is not the category you want, click the Change link and select a different category.
On the next page, eBay displays the suggested product category for this item. If this is not the category you want, click the Change link and select a different category.
![]() Click the Create Your Listing button to display the Describe Your Item page.
Click the Create Your Listing button to display the Describe Your Item page.

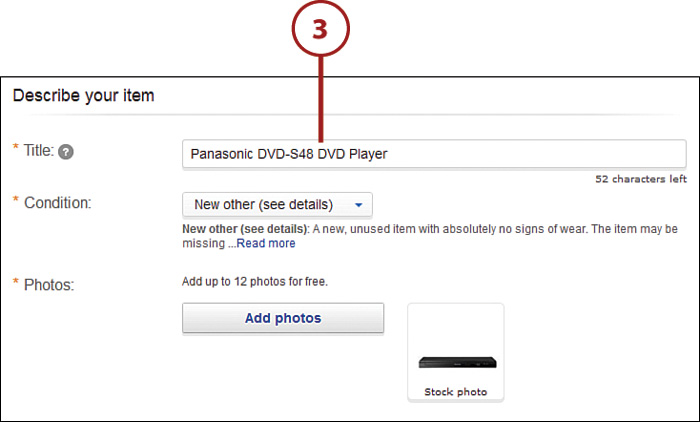
![]() If necessary, enter a more complete title for the item into the Title box. Use as many descriptive words as possible within the 80-character limit.
If necessary, enter a more complete title for the item into the Title box. Use as many descriptive words as possible within the 80-character limit.
![]() Pull down the Condition list and select the item’s condition—New, Used, and so on.
Pull down the Condition list and select the item’s condition—New, Used, and so on.
![]() eBay lets you include up to 12 photos at no charge. (You can pay extra for additional photos, but you probably won’t even need all the first dozen.) Click the Add Photos button to display the Open dialog box.
eBay lets you include up to 12 photos at no charge. (You can pay extra for additional photos, but you probably won’t even need all the first dozen.) Click the Add Photos button to display the Open dialog box.

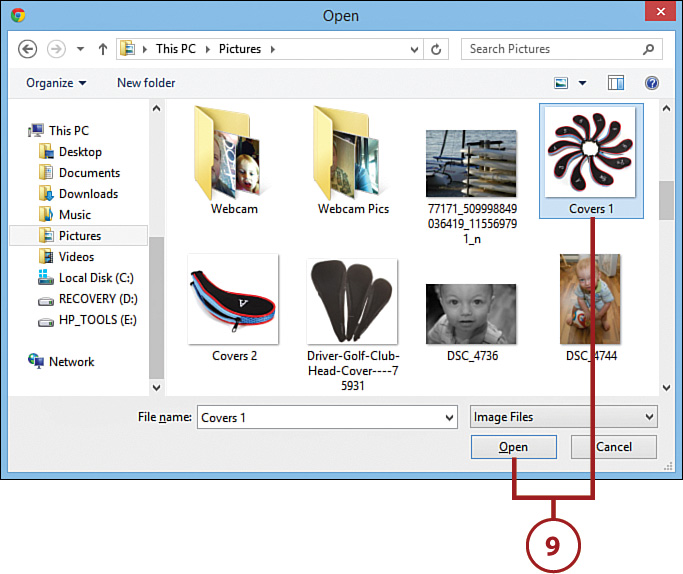
![]() Select the photo you want to appear first in your listing and then click the Open button.
Select the photo you want to appear first in your listing and then click the Open button.
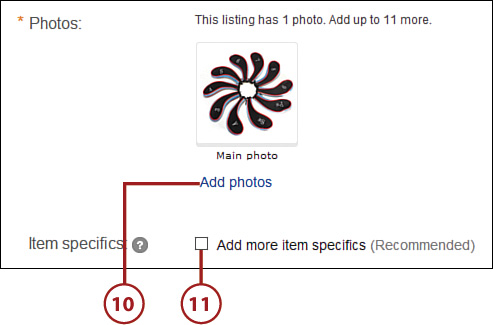
![]() The photo you selected now appears in the Photos section of the Describe Your Item page. To include additional photos, click Add Photos and repeat step 8.
The photo you selected now appears in the Photos section of the Describe Your Item page. To include additional photos, click Add Photos and repeat step 8.
![]() To add more details about this item, check the Add More Item Specifics box to display product fields specific to this type of item. For example, if you’re selling a set of golf clubs, you can select the brand, model, club type, shaft material, flex, and other similar options. Make the appropriate selections.
To add more details about this item, check the Add More Item Specifics box to display product fields specific to this type of item. For example, if you’re selling a set of golf clubs, you can select the brand, model, club type, shaft material, flex, and other similar options. Make the appropriate selections.
![]() Scroll to the Details section and enter your own description of the item you’re selling. Use the formatting controls at the top of this section to format your text (font, font size, bold, italic, and so on).
Scroll to the Details section and enter your own description of the item you’re selling. Use the formatting controls at the top of this section to format your text (font, font size, bold, italic, and so on).

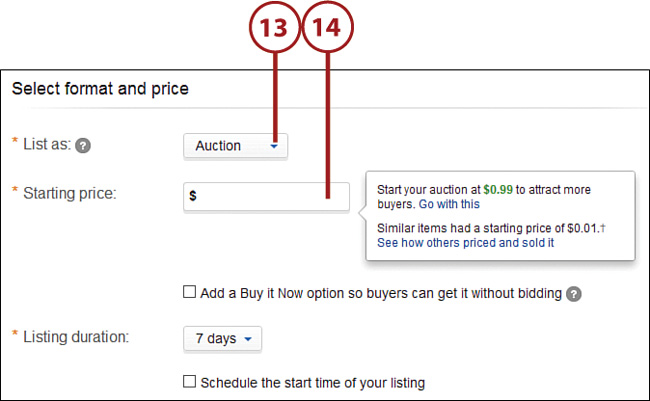
![]() For most non-new items, eBay suggests that you list the item as an auction. If eBay doesn’t, you need to manually select Auction from the List As list.
For most non-new items, eBay suggests that you list the item as an auction. If eBay doesn’t, you need to manually select Auction from the List As list.
![]() Enter your desired minimum/starting bid price for this item into the Starting Price box.
Enter your desired minimum/starting bid price for this item into the Starting Price box.
Suggested Prices
For many items, eBay suggests a starting price, based on past auctions on the site. You can accept eBay’s advice, or just set your own starting bid price.
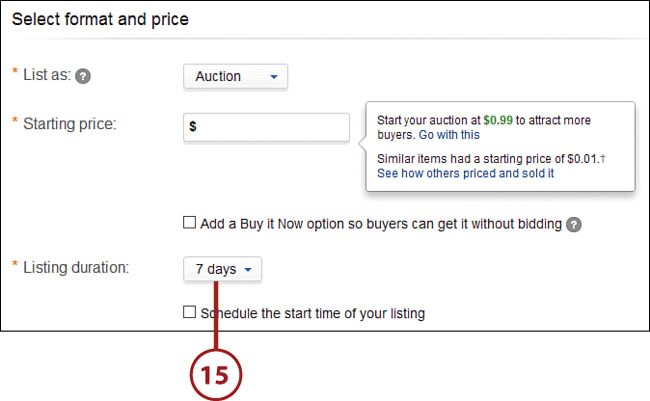
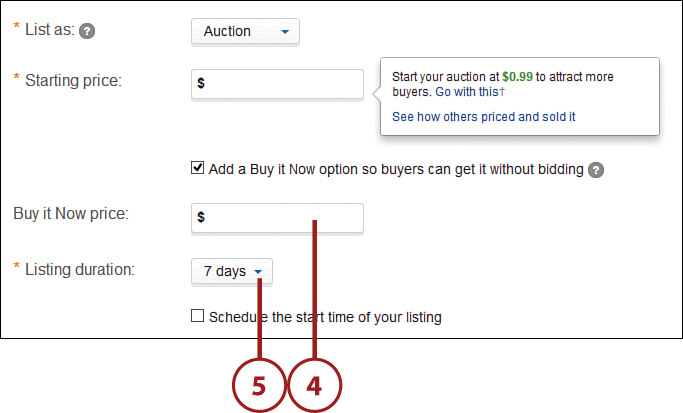
![]() Pull down the Listing Duration list and select how long you want the auction to last—1, 3, 5, or 7 days. The 7-day option is the default.
Pull down the Listing Duration list and select how long you want the auction to last—1, 3, 5, or 7 days. The 7-day option is the default.
![]() Go to the How You’ll Ship It section to examine your shipping options. If you want eBay to determine the best shipping option, based on similar items sold on the site, click Select Shipping for Me.
Go to the How You’ll Ship It section to examine your shipping options. If you want eBay to determine the best shipping option, based on similar items sold on the site, click Select Shipping for Me.
![]() Check the Offer Free Shipping to Attract More Buyers option if you want to offer free shipping on this item. If you don’t want to offer free shipping, make sure this option is unchecked.
Check the Offer Free Shipping to Attract More Buyers option if you want to offer free shipping on this item. If you don’t want to offer free shipping, make sure this option is unchecked.

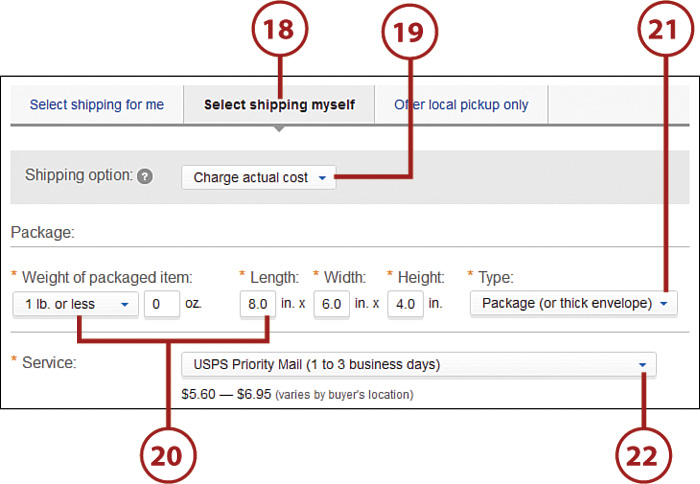
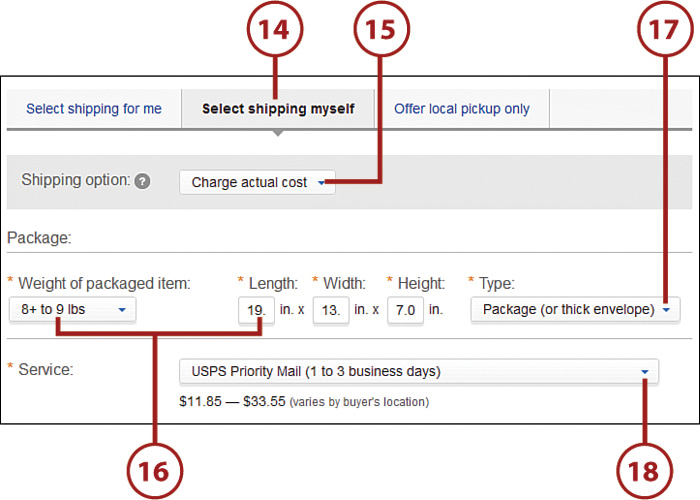
![]() Click Select Shipping Myself if you want to ship via a different service. The How You’ll Ship It panel now changes to display more shipping options.
Click Select Shipping Myself if you want to ship via a different service. The How You’ll Ship It panel now changes to display more shipping options.
![]() To calculate exact shipping costs, pull down the Shipping Option list and select Charge Actual Cost.
To calculate exact shipping costs, pull down the Shipping Option list and select Charge Actual Cost.
![]() Enter the weight and dimensions of your shipping package.
Enter the weight and dimensions of your shipping package.
![]() Pull down the Type list and select the type of package you’re using.
Pull down the Type list and select the type of package you’re using.
![]() Pull down the Service list and select which shipping service you’re using.
Pull down the Service list and select which shipping service you’re using.
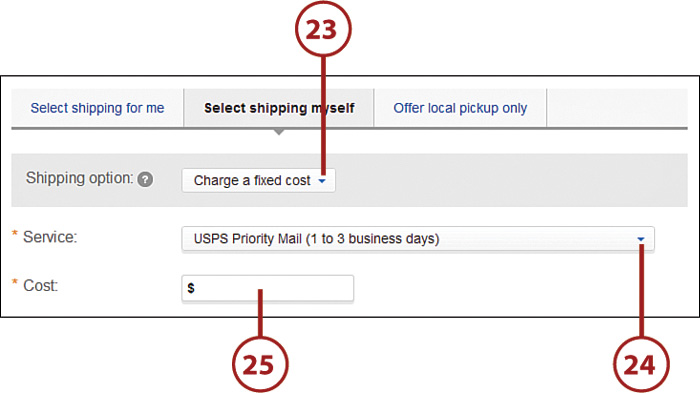
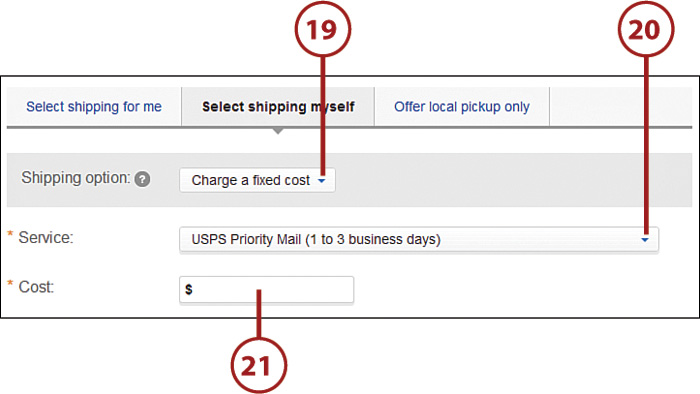
![]() To offer flat-rate shipping (one cost for all buyers, regardless of location), pull down the Shipping Option list and select Charge a Fixed Cost.
To offer flat-rate shipping (one cost for all buyers, regardless of location), pull down the Shipping Option list and select Charge a Fixed Cost.
![]() Pull down the Service list and select which shipping service you’re using.
Pull down the Service list and select which shipping service you’re using.
![]() Enter the shipping/handling fee you want to charge into the Cost box.
Enter the shipping/handling fee you want to charge into the Cost box.
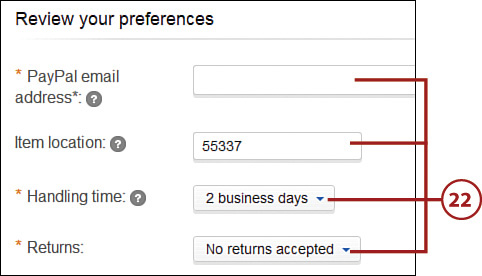
![]() Scroll to the Review Your Preferences section and review or change your PayPal email address, item location (ZIP Code), handling time, and returns policy.
Scroll to the Review Your Preferences section and review or change your PayPal email address, item location (ZIP Code), handling time, and returns policy.
![]() Check the Automatically Relist This Item option if you want to automatically relist your item if it doesn’t sell. If you don’t want to automatically relist an unsold item, uncheck this option.
Check the Automatically Relist This Item option if you want to automatically relist your item if it doesn’t sell. If you don’t want to automatically relist an unsold item, uncheck this option.

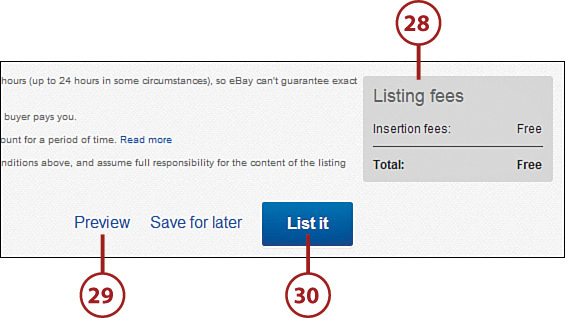
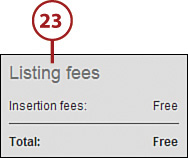
![]() Review your fees (if any) for this item in the Listing Fees section.
Review your fees (if any) for this item in the Listing Fees section.
![]() Scroll to the bottom of the page and click Preview to see what your listing will look like.
Scroll to the bottom of the page and click Preview to see what your listing will look like.
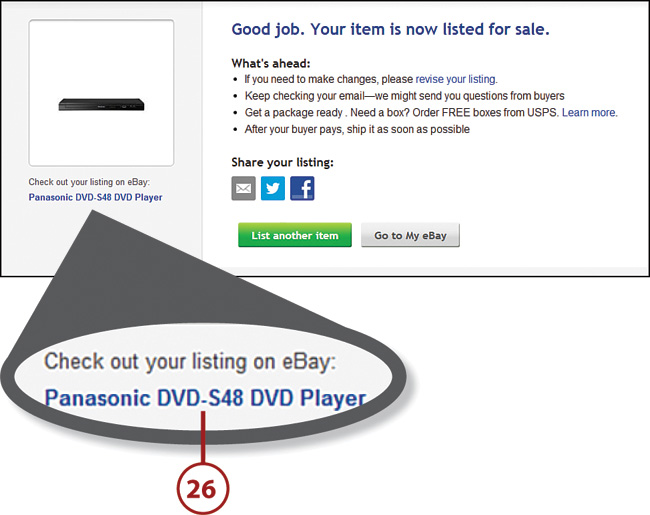
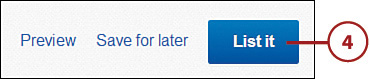
![]() Click the List It button to post your listing. The listing completion page displays, and eBay also sends you an email confirming your listing.
Click the List It button to post your listing. The listing completion page displays, and eBay also sends you an email confirming your listing.
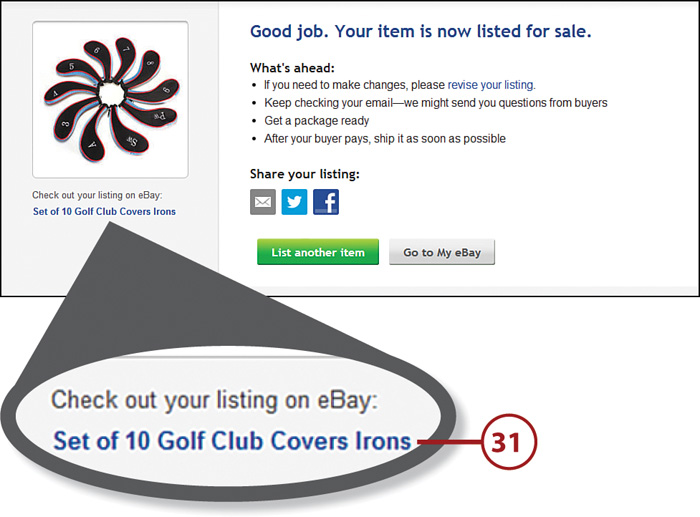
![]() Click the Check Out Your Listing on eBay link on this page or in the email to view your new listing.
Click the Check Out Your Listing on eBay link on this page or in the email to view your new listing.
Pay eBay with PayPal
If this is your first listing, you’re prompted to authorize payment of your eBay fees from your PayPal account. If you already have a PayPal account, enter your email address and password to proceed. If you don’t yet have a PayPal account, click the Click Here link create a new account.
Create a New Listing—When eBay Knows What You’re Selling
If you know the product name, model number, UPC code, or (for a book) ISBN code for a given item, chances are that eBay has information about that item in its product database—even if you’re selling a used item. For items that eBay knows about, you don’t have to enter as much information. Instead, you can use the information—and, in many cases, product photo—that eBay provides to complete the majority of your listing.
![]() Click Sell on the eBay toolbar to display the opening sales listing page.
Click Sell on the eBay toolbar to display the opening sales listing page.
![]() Enter item’s name, model number, ISBN code, or UPC code into the big box at the top of the page.
Enter item’s name, model number, ISBN code, or UPC code into the big box at the top of the page.
![]() Click the Get Started button.
Click the Get Started button.

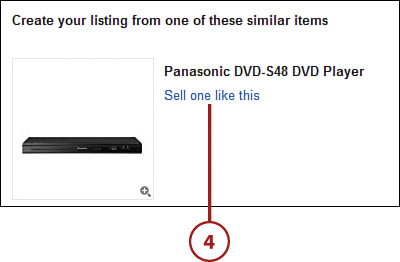
![]() If eBay has this item in its database, it displays a thumbnail for this and sometimes similar items. Click Sell One Like This for the item that best matches what you’re selling.
If eBay has this item in its database, it displays a thumbnail for this and sometimes similar items. Click Sell One Like This for the item that best matches what you’re selling.
Nothing Found
If eBay does not have this item in its database, or if the items it suggests are not the item you’re selling, scroll down to the bottom of the page and click the Continue to Listing Form button. You can then manually complete a regular listing, as previously described.
![]() You now see the Describe Your Item page for this item, with many of the item specifics already entered. Pull down the Condition list and select the item’s condition—New, Used, and so on.
You now see the Describe Your Item page for this item, with many of the item specifics already entered. Pull down the Condition list and select the item’s condition—New, Used, and so on.
![]() Click the Add Photos button to add your own photos to the listing’s stock photo.
Click the Add Photos button to add your own photos to the listing’s stock photo.

![]() Check the Add More Item Specifics option and then enter the necessary details to add more specific information about the item.
Check the Add More Item Specifics option and then enter the necessary details to add more specific information about the item.
![]() If you want, go to the Details section and enter your own description of the item you’re selling. Use the formatting controls at the top of this section to format your text (font, font size, bold, italic, and so on).
If you want, go to the Details section and enter your own description of the item you’re selling. Use the formatting controls at the top of this section to format your text (font, font size, bold, italic, and so on).

![]() For most non-new items, eBay suggests that you list the item as an auction. If eBay doesn’t, you need to manually select Auction from the List As list.
For most non-new items, eBay suggests that you list the item as an auction. If eBay doesn’t, you need to manually select Auction from the List As list.
![]() Enter your desired minimum/starting bid price for this item into the Starting Price box.
Enter your desired minimum/starting bid price for this item into the Starting Price box.
![]() Pull down the Listing Duration list and select how long you want the auction to last—1, 3, 5, or 7 days. The 7-day option is the default.
Pull down the Listing Duration list and select how long you want the auction to last—1, 3, 5, or 7 days. The 7-day option is the default.

![]() Go to the How You’ll Ship It section to examine your shipping options. If you want eBay to determine the best shipping option, based on similar items sold on the site, click Select Shipping for Me.
Go to the How You’ll Ship It section to examine your shipping options. If you want eBay to determine the best shipping option, based on similar items sold on the site, click Select Shipping for Me.
![]() Check the Offer Free Shipping to Attract More Buyers option if you want to offer free shipping on this item.
Check the Offer Free Shipping to Attract More Buyers option if you want to offer free shipping on this item.

![]() Click Select Shipping Myself if you want to ship via a different service. The How You’ll Ship It panel now changes to display more shipping options.
Click Select Shipping Myself if you want to ship via a different service. The How You’ll Ship It panel now changes to display more shipping options.
![]() Pull down the Shipping Option list and select Charge Actual Cost to calculate exact shipping costs.
Pull down the Shipping Option list and select Charge Actual Cost to calculate exact shipping costs.
![]() Enter the weight and dimensions of your shipping package.
Enter the weight and dimensions of your shipping package.
![]() Pull down the Type list and select the type of package you’re using.
Pull down the Type list and select the type of package you’re using.
![]() Pull down the Service list and select which shipping service you’re using.
Pull down the Service list and select which shipping service you’re using.
![]() To offer flat-rate shipping (one cost for all buyers, regardless of location), pull down the Shipping Option list and select Charge a Fixed Cost.
To offer flat-rate shipping (one cost for all buyers, regardless of location), pull down the Shipping Option list and select Charge a Fixed Cost.
![]() Pull down the Service list and select which shipping service you’re using.
Pull down the Service list and select which shipping service you’re using.
![]() Enter the shipping/handling fee you want to charge into the Cost box.
Enter the shipping/handling fee you want to charge into the Cost box.
![]() Scroll to the Review Your Preferences section and review or change your PayPal email address, item location (ZIP Code), handling time, and returns policy.
Scroll to the Review Your Preferences section and review or change your PayPal email address, item location (ZIP Code), handling time, and returns policy.
![]() Review your fees (if any) for this item in the Listing Fees section.
Review your fees (if any) for this item in the Listing Fees section.
![]() Scroll to the bottom of the page and click Preview to see what your listing will look like.
Scroll to the bottom of the page and click Preview to see what your listing will look like.
![]() Click the List It button to post your listing. The listing completion page displays, and eBay also sends you an email confirming your listing.
Click the List It button to post your listing. The listing completion page displays, and eBay also sends you an email confirming your listing.

![]() Click the Check Out Your Listing on eBay link on this page or in the email to view your new listing.
Click the Check Out Your Listing on eBay link on this page or in the email to view your new listing.
Pay eBay with PayPal
If this is your first listing, you’re prompted to authorize payment of your eBay fees from your PayPal account. If you already have a PayPal account, enter your email address and password to proceed. If you don’t yet have a PayPal account, click the Click Here link create a new account.
Adding Fixed-Price Selling to Your Auctions with Buy It Now
The process in the preceding section creates a basic 7-day auction-style listing. However, there are options available beyond the basics—chief of which is the Buy It Now (BIN) option.
The BIN option lets you add a fixed-price option to your auction listing. The way BIN works is that you name a fixed price for your item; if a user decides to pay that price, the auction is automatically closed and that user is named the auction winner.
Note, however, that the BIN price is active only until the first bid is placed. If a potential buyer decides to bid a lower price instead of pay the BIN price, the BIN price is removed and the auction proceeds normally.
Why would you add the BIN feature to an auction? I find that many sellers who use BIN are retailers with a large quantity of similar inventory. That is, they’re likely to place the same item up for auction week after week; in this scenario, the BIN price becomes the de facto retail price of the item.
You might also want to consider BIN around the Christmas holiday, when buyers don’t always want to wait around 7 days to see whether they’ve won an item; desperate Christmas shoppers will sometimes pay a premium to get something now, which is where BIN comes in.
Buy It Now Fees
There are no fees for adding the Buy It Now option to an auction listing.
Add Buy It Now to an Auction Listing
You can add a Buy It Now price to your item you first create the item listing. Both the starting bid price and Buy It Now price are then displayed in the listing itself.
![]() Click Sell on the eBay toolbar and begin creating your auction listing as normal.
Click Sell on the eBay toolbar and begin creating your auction listing as normal.

![]() Proceed to the listing creation page, scroll to the Select Format and Price section, and then enter the minimum/starting bid price into the Starting Price box.
Proceed to the listing creation page, scroll to the Select Format and Price section, and then enter the minimum/starting bid price into the Starting Price box.
![]() Check Add a Buy It Now Option to display the Enter Buy It Now Price box.
Check Add a Buy It Now Option to display the Enter Buy It Now Price box.
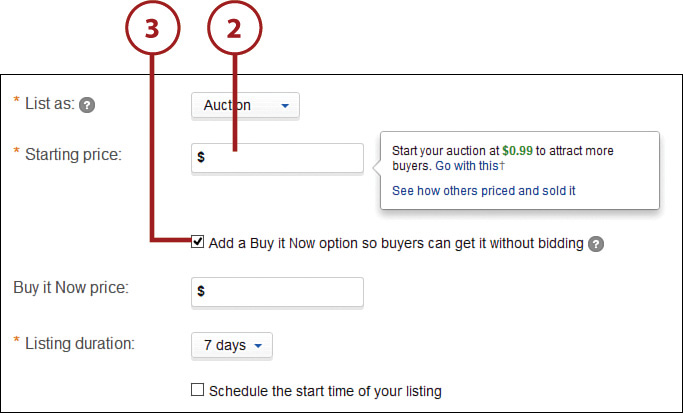
![]() Enter the desired fixed price into the Buy It Now Price box. The BIN price should be higher than the starting bid price.
Enter the desired fixed price into the Buy It Now Price box. The BIN price should be higher than the starting bid price.
![]() Complete the rest of the item listing as normal.
Complete the rest of the item listing as normal.
Setting a Higher Minimum with a Reserve Price Auction
There’s another auction option you might want to consider for some items. This is the reserve price option, where you reserve the right to sell the item unless bidding reaches a specified level. This level, called the reserve price, is set higher than the starting bid price, and is typically kept secret from potential bidders.
In a reserve price auction, your initial bid price really isn’t the minimum price you’ll accept. Even though bids might exceed the initial bid price, if they don’t hit your reserve price, you don’t have to sell. If your auction ends and the high bid is below your reserve price, you don’t have to do anything—you are not obligated to sell the item, and the auction ends without a winning bidder.
Creating an auction with the reserve price option means setting two prices when you create the listing. You have to set the starting/minimum bid price, of course, but also the reserve price—the price at which you’ll really sell the item. The starting bid price is public, whereas the reserve price is hidden from potential bidders.
Many buyers—especially those just getting started, or less familiar with the auction process—don’t like reserve price auctions, and shy away from them. That’s probably because they appear more complicated than regular auctions (and they are, just a little), and because the reserve price is never disclosed to bidders. The result is that you’ll likely have fewer bidders in a reserve price auction than in one without a reserve price.
This is why I’m not a big fan of the reserve price option, except in the following special circumstances:
• When you’re unsure of the real value of a higher-priced item and don’t want to appear to be asking too much for it. You can reserve the right to refuse to sell the item if the market value is below a certain price.
• When you want to use a low initial bid price to get the bidding going more quickly than if the true desired minimum price (now the reserve price) was listed. The reserve price still guarantees that you won’t have to sell below a minimum acceptable price.
Remember, if no one bids the reserve price or higher, no one wins.
Add a Reserve Price to an Auction Listing
You add the reserve price option when you’re initially creating the auction listing. Unfortunately, the only way to add a reserve price is via eBay’s Advanced Selling Tool. For this reason, the reserve price option is only recommended for more experienced sellers.
![]() Click Sell on the eBay toolbar and begin creating your auction listing as normal.
Click Sell on the eBay toolbar and begin creating your auction listing as normal.

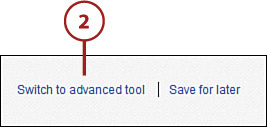
![]() Enter as much information as you can, then click the Switch to Advanced Tool link at the top of the page to display the advanced Create a Listing form.
Enter as much information as you can, then click the Switch to Advanced Tool link at the top of the page to display the advanced Create a Listing form.
![]() Scroll to the Choose a Format and Price section and enter the minimum bid price into the Starting Price box.
Scroll to the Choose a Format and Price section and enter the minimum bid price into the Starting Price box.
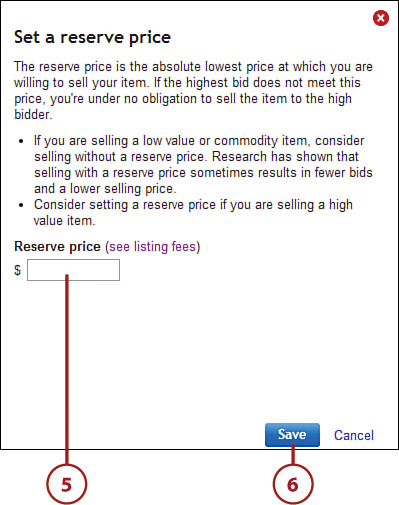
![]() Click Change next to No Reserve Price Has Been Set for This Item to display the Set a Reserve Price panel.
Click Change next to No Reserve Price Has Been Set for This Item to display the Set a Reserve Price panel.

![]() Enter the desired reserve price into the Reserve Price box.
Enter the desired reserve price into the Reserve Price box.
![]() Click the Save button to return to the Create a Listing form.
Click the Save button to return to the Create a Listing form.
![]() Use the Advanced Listing Tool to complete your item listing.
Use the Advanced Listing Tool to complete your item listing.

Managing Your Item Listing
When your listing is complete, the auction itself begins. But what if, for whatever reason, you need to make a change to your listing—or cancel the auction altogether?
Edit a Listing
You should always carefully look over your auction listing after you’ve posted it. Maybe it’s perfect, and if so, great. Maybe it isn’t, which is not so great. Fortunately, if there’s something wrong in your listing, eBay lets you revise it.
If you haven’t received any bids yet (and more than 12 hours remain until the end of your auction), you can edit anything you want about your listing—the title, description, pictures, starting price, you name it. If the item has received a bid, you can only add information to your description—you can’t change the existing description or other information. (And if there’s less than 12 hours left, you’re stuck—you can’t change anything.)
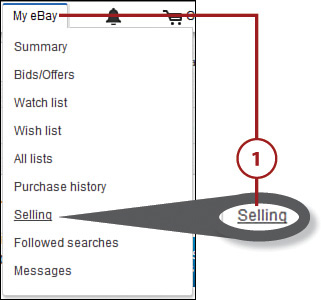
![]() Mouse over My eBay on the eBay toolbar and select Selling.
Mouse over My eBay on the eBay toolbar and select Selling.

![]() Scroll down the page to the Active Selling section and then check the listing you want to edit.
Scroll down the page to the Active Selling section and then check the listing you want to edit.
![]() Click the Edit button to display the editing page for this item.
Click the Edit button to display the editing page for this item.

![]() Make the necessary changes.
Make the necessary changes.

![]() Scroll to the bottom of the page and click the Revise It button. The listing is now changed.
Scroll to the bottom of the page and click the Revise It button. The listing is now changed.

Cancel an Auction
What if your auction starts and you decide you really don’t want to sell that item? You need a good excuse, but you can cancel eBay auctions.
![]() Mouse over My eBay on the eBay toolbar and select Selling.
Mouse over My eBay on the eBay toolbar and select Selling.

![]() Scroll down the page to the Active Selling section, then check the listing you wish to end.
Scroll down the page to the Active Selling section, then check the listing you wish to end.
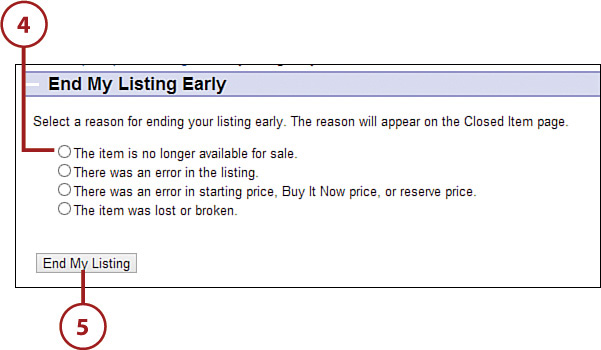
![]() Click the End button to display the End My Listing Early page.
Click the End button to display the End My Listing Early page.

![]() Check why you want to end this listing.
Check why you want to end this listing.
![]() Click the End My Listing button. The listing is now ended and no longer visible on the eBay site.
Click the End My Listing button. The listing is now ended and no longer visible on the eBay site.
Block Unwanted Buyers
Here’s something else you’ll eventually run into. Not every member of eBay is worth dealing with. When you run into a deadbeat bidder or otherwise slimy customer in one of your auctions, you don’t want to have to deal with that person again. The best way to remove this person from your life is to block that bidder from all your future auctions.
To block a bidder, you have to add that user to your Blocked Bidder/Buyer List. You need to know that person’s eBay user ID, then it’s easy to do.
![]() Go directly to the Block Bidders or Buyers From Your Listings page: http://cgi1.ebay.com/ws/eBayISAPI.dll?bidderblocklogin.
Go directly to the Block Bidders or Buyers From Your Listings page: http://cgi1.ebay.com/ws/eBayISAPI.dll?bidderblocklogin.
![]() Enter that member’s user ID into the Blocked Bidder/Buyer List box.
Enter that member’s user ID into the Blocked Bidder/Buyer List box.
![]() Click the Submit button.
Click the Submit button.

Unblock a Buyer
You can remove blocked buyers from your list at any time. Just return to the Block Bidders or Buyers from Your Listings page and delete the username you want to unblock and then click Submit.
Relist an Unsold Item
Not all items up for auction end up selling. If you have no bidders (or, in a reserve price auction, the bidding doesn’t reach your reserve price), the item doesn’t sell.
Fortunately, eBay makes it easy to relist an unsold auction item. This gives your item a second chance to sell.
![]() Mouse over My eBay on the eBay toolbar and select Selling.
Mouse over My eBay on the eBay toolbar and select Selling.
![]() Scroll down the page to the Unsold section and then click Relist for the item you want to relist.
Scroll down the page to the Unsold section and then click Relist for the item you want to relist.

![]() This displays the listing creation page for this item. Make any changes as necessary.
This displays the listing creation page for this item. Make any changes as necessary.
![]() Scroll to the bottom of the page and click the List It button to relist the item.
Scroll to the bottom of the page and click the List It button to relist the item.
Rethink Things
If your item didn’t sell the first time around, there was probably a good reason for it—maybe the starting price was too high, or the description stank, or you didn’t include a picture. When you relist an item, take the opportunity to spruce up the listing, revisit the pricing, and so on, to try to make the item more attractive to potential bidders.
After the Auction—Now What Happens?
The days go by and finally your auction ends. If you’re fortunate, you’ve received a high bid that far exceeds your starting bid or reserve price—which means that you have a buyer.
What happens next?
At the end of a successful auction, eBay notifies you that you have a winning bidder. eBay also notifies the winning bidder and prompts her to pay for the auction item, typically via PayPal.
After the buyer pays, you receive another email from eBay notifying you that the payment has been made. You now need to pack and ship the item to the buyer. You can also take this opportunity to withdraw the funds for the payment from your PayPal account.
Learn more about what happens after the sale in Chapter 12, “After the Sale—Concluding the Transaction and Leaving Feedback.”