3. Using Your iPhone’s Core Features

In this chapter, you learn to use some of your iPhone’s core features. Topics include the following:
➔ Connecting to the Internet using Wi-Fi networks
➔ Connecting to the Internet using cellular data networks
In this chapter, you learn fundamental skills that apply across multiple apps and functions of your phone. For example, when you are using your iPhone, you want to be connected to the Internet most of the time and you frequently work with text.
Getting Started
Here are the core features and concepts you learn about in this chapter:
The Internet—Your iPhone has many functions that rely on an Internet connection; most of the apps you use either require or can use a connection to the Internet to do what they do for you. For example, to send and receive email, your iPhone has to be connected to the Internet.
Wi-Fi—Wi-Fi stands for Wireless Fidelity and encompasses a whole slew of technical specifications around connecting devices together without using cables or wires. The most important thing to know is that you can use Wi-Fi networks to connect your iPhone to the Internet. This is great because Wi-Fi networks are available in many places you go. You probably also have a Wi-Fi network available in your home. (If you connect your computers to the Internet without a cable from your computer to a modem or network hub, you are using a Wi-Fi network.)
Cellular data networks—In addition to connecting to Wi-Fi networks, your iPhone can transmit and receive data over the cellular network to which it is connected. This enables you to connect your iPhone to the Internet just about anywhere you are. You use the cellular network provided by your cell phone company. There are many different cell phone providers that support iPhones. In the United States, these include AT&T, Sprint, T-Mobile, and Verizon. You don’t need to configure your iPhone to use the cellular data network, as it is set up from the start to do so.
Security—Connecting your iPhone to the Internet enables you to do lots of useful, and sometimes amazing, things. But that connection comes with some risk because of the sensitive information you store on your iPhone and the tasks you perform with it. The good news is that you can protect your information with a few relatively simple precautions.
Text—You enter text on your iPhone for many different purposes, including sending messages and emails and writing notes. You can type text using the iPhone’s onscreen keyboards. You can also dictate text wherever you might need to create it. The iPhone has many features to help you make the text you enter “just right.” For example, text is automatically checked for correct spelling, and the Predictive Text feature suggests text you might want to enter with just a tap.
Search—Your iPhone has a lot of information on it. This includes apps, emails, music, and much more. The iPhone’s Search tool enables you to find what you want to work with quickly and easily.
Siri Suggestions—You frequently want to “go back” to something you were using recently, such as an app or a search. The Siri Suggestions tool presents these recent items so that you can return to them with a single tap. Siri can also make recommendations based on your location, such as presenting a store’s app when you are close to that store. Siri also can learn from what you do and make suggestions about what you might find useful; for example, when you correct a text message that you’ve dictated, Siri can make suggestions about what you might have intended to say.
Print—The paperless world has never become a reality—and probably never will. Fortunately, you can print emails, documents, and other content directly from your iPhone.
Connecting to the Internet Using Wi-Fi Networks
Your iPhone is designed to seamlessly connect to the Internet so apps that use the Internet to work, such as Safari to browse the Web, are always ready when you need them. Wi-Fi networks provide fast Internet connections and you usually have an unlimited amount of data to work with, so you don’t have to worry about paying more based on how you are using your iPhone. Because of their speed and unlimited data (usually), Wi-Fi networks are the best way for your iPhone to connect to the Internet.
Wi-Fi networks are available just about everywhere you go, including homes, offices, hotels, restaurants, airports, stores, and other locations. Fortunately, it’s very easy to connect your iPhone to the Wi-Fi networks you encounter. (And, if there isn’t a Wi-Fi network available, your iPhone uses its cellular data network to connect to the Internet, which is covered later in this chapter.)
Almost all Wi-Fi networks broadcast their identifying information so that you can easily see them with your iPhone; these are called open networks. Anyone who is in range can attempt to join known networks because they appear on Wi-Fi devices automatically. The Wi-Fi networks you can see on your iPhone in public places (such as airports and hotels) are all open. Likewise, any Wi-Fi networks in your home or office are very likely to be open as well. To connect your iPhone to an open network, you tap its name and then enter its password (if required).
Your iPhone remembers Wi-Fi networks you’ve connected to previously and joins one of them automatically when available; these are called known networks. For example, if you have a Wi-Fi network at home and another in your office, when you change locations, your iPhone automatically changes Wi-Fi networks.
If your iPhone can’t connect to a known network, it automatically searches for other Wi-Fi networks to join. If one or more are available, a prompt appears showing the networks available to your iPhone. You can select and join one of these networks by tapping its name on the list of networks and entering its password. (If a password is required, you need to obtain it from the source of the network, such as a hotel or restaurant, to be able to join that network.)
If no Wi-Fi networks are available or you choose not to connect to one, your iPhone automatically switches to its cellular data connection (covered in “Connecting to the Internet Using Cellular Data Networks” later in this chapter).
Connecting to Open Wi-Fi Networks
To connect your iPhone to a Wi-Fi network, perform the following steps:
1 On the Home screen, tap Settings. Next to Wi-Fi, you see the status of your Wi-Fi connection. It is Off if Wi-Fi is turned off, Not Connected if Wi-Fi is turned on and your phone isn’t currently connected to Wi-Fi, or the name of the Wi-Fi network to which your iPhone is connected.
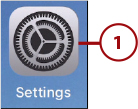
2 Tap Wi-Fi.
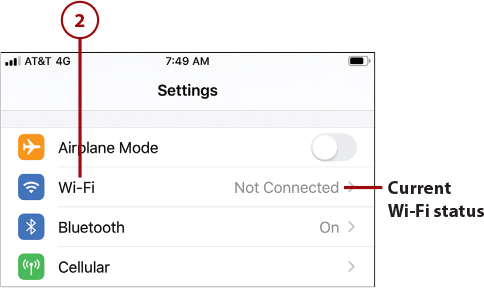
3 If Wi-Fi isn’t enabled already, slide the Wi-Fi switch to on (green) and your iPhone searches for available networks. A list of available networks is displayed in the NETWORKS section (it can take a moment for all the networks available in an area to be shown). Along with each network’s name, icons indicating whether it requires a password (the padlock icon) to join and the current signal strength (the radio waves icon) are displayed. As long as you see at least two “waves,” the signal should be strong enough to use. You want to choose the strongest signal available because that usually means you get the best speed.

4 Tap the network you want to join. Of course, when a network requires a password, you must know that password to be able to join it.

5 At the prompt, enter the password for the network you selected. If you aren’t prompted for a password, skip to step 7. (You’re likely to find networks that don’t require a password in public places; see the next section for information on these types of networks.)
6 Tap Join. If you provided the correct password, your iPhone connects to the network and gets the information it needs to connect to the Internet. If not, you’re prompted to enter the password again. After you successfully connect to the network, you return to the Wi-Fi screen.

7 Review the network information. The network to which you are connected appears just below the Wi-Fi switch and is marked with a check mark. You also see the signal strength for that network.
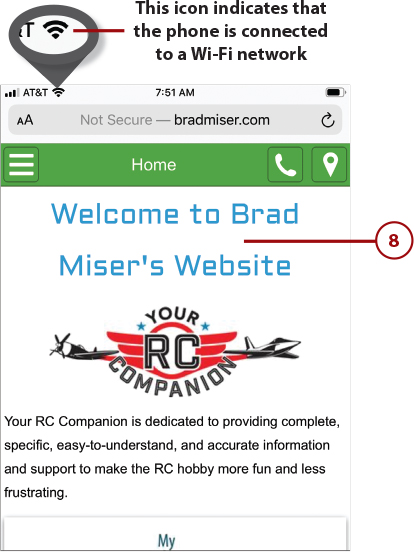
8 Try to move to a web page, such as www.bradmiser.com, to test your Wi-Fi connection. (See Chapter 14, “Surfing the Web,” for details.) If the web page opens, you’re ready to use the Internet on your phone. If you go to a log-in web page for a Wi-Fi provider rather than the page you were trying to access, see the next task. If you see a message saying the Internet is not available, there’s a problem with the network you joined. Go back to step 4 to select a different network.
9 Move back to the Wi-Fi Settings page.
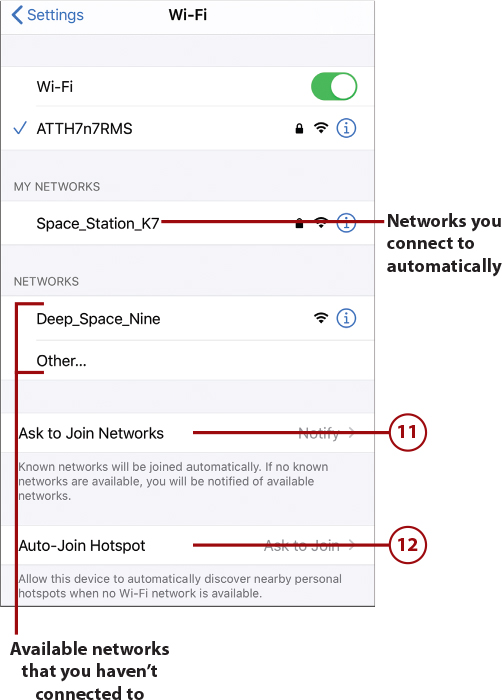
10 Continue to add Wi-Fi networks that you use in various locations. Your iPhone remembers these networks (they become known networks) and connects to them automatically; these are shown in the MY NETWORKS section of the screen. Available networks that you haven’t used before continue to be shown in the NETWORKS section.
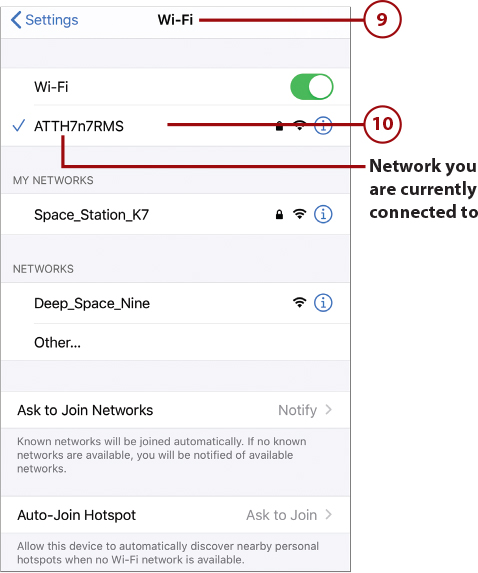
11 To change how your iPhone works when it can’t find a known network, tap Ask to Join Networks and select one of the three options. Off means your iPhone won’t take any action when it encounters a network you haven’t used. Notify means your iPhone sees that a new network is available, but you need to manually select that network to sign in. Ask pops up a dialog inviting you to join the found network. If you frequently get interrupted by network prompts, set this to Off. You can always use steps 4 through 6 to join available networks.
12 If you want to use available hotspots, tap Auto-Join Hotspot (see the following Go Further sidebar for an explanation of hotspots). Choose one of the three options. Choose Never if you don’t want to use hotspots. Choose Ask to Join if you want to be prompted when your iPhone encounters a hotspot. Or choose Automatic if you want to automatically join networks provided by a known hotspot.
>>>Go Further
Connecting to Wi-Fi Networks
As you connect to Wi-Fi networks, consider the following:
Quick Access to Wi-Fi Controls—You can quickly turn Wi-Fi on or off using the Control Center, which you can open by swiping down from the upper-right corner of the screen (iPhones without a Home button) or swiping up from the bottom of the screen (iPhones with a Home button). If the Wi-Fi icon (it looks like the signal strength indicator on the Wi-Fi Settings screen) is blue, Wi-Fi is on. Tap that icon to turn Wi-Fi off (the icon becomes white). Tap it again to turn Wi-Fi on and reconnect to a known network. Tap and hold on the icon to see another palette of icons. When you touch and hold on the Wi-Fi icon on that palette, you can quickly choose from available networks to join one of them. See Chapter 6, “Making Your iPhone Work for You,” for more information about working with the Control Center.
Typing passwords—As you type a password, each character is shown for a moment and then hidden by a dot. Keep an eye on characters as you enter them so you can fix a mistake as soon as you make it rather than finding out after you’ve entered the entire password and having to start over.
Changing networks—You can use these same steps to change the Wi-Fi network you are using at any time. For example, if you have to pay to use one network while a different one is free, simply choose the free network in step 4. Another reason you might want to change Wi-Fi networks is if the signal strength on another available network is stronger.
Security recommendation—If you are connected to a network that doesn’t use what Apple considers sufficient security, you see the words “Security Recommendation” under the network’s name. If you tap Info (i) for that network, you see its Info screen. At the top of that screen, you see the type of security the network is using and a recommendation about the type of security it should use. If the Wi-Fi network comes from a router or modem you own or rent, contact your Internet service provider, such as a cable company, to learn how the security provided by that router or modem can be reconfigured to be more secure. If the network is in a public place or business, you just have to use it as is (unless you can contact the administrator of that network to see if better security is available).
Privacy Warning—If you are connected to a network that doesn’t have sufficient privacy protection, you see the words “Privacy Warning” under the network’s name. Tap Info (i) for that network to move to its Info screen. At the top of that screen, you see information about Private Wi-Fi addressing being turned off. Set the Private Address switch to on (green). Tap Disconnect to temporarily disconnect your phone from the network. Your phone then reconnects to the network. When it does, it uses a private address, which makes the phone harder to track. (I recommend you turn Private Address on whenever you have the opportunity to do so. This is especially important when you are using networks in public places.) When you return to the Wi-Fi screen, the Privacy Warning message is gone, indicating you are using a private address.
Have a network, but no Internet—If you successfully connect to a network, but there is an exclamation point on top of the signal strength icon, the network you are connected to might not have a current Internet connection. Sometimes, that’s because you need to provide additional information to reach the Internet (as described in the next section). At other times, it’s because the network has lost its connection to the Internet. You’ll need to get that connection restored (such as by resetting the modem or contacting your provider) before you can use that network to connect to the Internet. (If you are working with a network inside your home or business that you control, try resetting the modem, which usually involves unplugging the modem, waiting for about 30 seconds, and plugging it in again. This often solves the issue and should be the first thing you try, even before contacting your provider.)
Hotspots— iPhones and iPads can share their cellular Internet connection with other devices by providing a Wi-Fi network to which you can connect your iPhone—the device providing a network is called a hotspot. The icons for hotspot networks consist of two connected loops rather than the wave icon that indicates a “regular” Wi-Fi network. You can select and use hotspot networks just like the other types of networks being described in this chapter. The speed of your access is determined mostly by the speed of the device’s cellular data connection. Also, the data you use while connected to the hotspot’s network counts against the data plan for the device to which you are connected.
You can configure your iPhone to be a hotspot. The details of configuring a hotspot and how much it costs depend on your cellular provider. To get started, contact your provider to get specific instructions to set up your phone as a hotspot and to understand any limitations or applicable fees. After your phone is a hotspot, you can connect other devices to its network using its password (which is automatically generated).
Connecting to Public Wi-Fi Networks
Many Wi-Fi networks in public places, such as hotels or airports, require that you pay a fee or provide information to access the Internet through that network; even if access is free, you usually have to accept terms and conditions for the network to be able to use it.
When you connect to one of these public networks, you’re prompted to provide whatever information is required. This can involve different details for different networks, but the general steps are the same. Connect to the public network and follow the instructions that appear.
Better Safe Than Sorry
Many public Wi-Fi networks have limited or no security. This means the information being transmitted from your iPhone to the Internet (and vice versa) is susceptible to being intercepted by hackers and others who are looking for personal information. It’s best practice not to use these networks for sensitive information, such as to access your bank account, to shop, or in other areas where you provide sensitive information (including user names, account numbers, or passwords). Public Wi-Fi networks are perfectly fine for browsing the Web, email, and other such activities.
Make It Private
If you see a Privacy Warning when you connect to a public network, refer to the bullet “Privacy Warning” in the previous section.
Following are the general steps to connect to many types of public Wi-Fi networks:
1 Move to the Settings screen by tapping the Settings app on the Home screen.
2 Tap Wi-Fi.

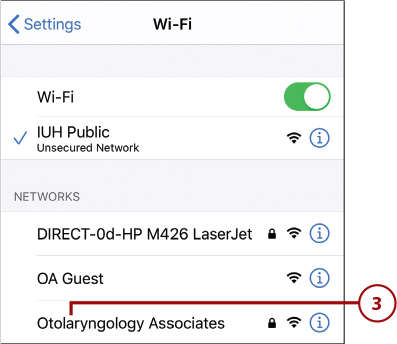
3 Tap the network you want to join. You move to that network’s Log In screen. Follow the onscreen prompts to complete the process. This often involves accepting terms of use for that network as this example shows.
4 Swipe up the screen to read the terms and conditions (or browse them).

Your Experience Might Vary
You often select from different connection options, such as a free low-speed or a high-speed connection, and provide additional information before you can perform step 5. For example, when connecting from a hotel room, you probably need to provide a last name and room number. If a fee is required, you have to provide payment information. (If you’re in a hotel, the fee is added to your room charges.) In most cases, you at least have to indicate that you accept the terms and conditions for using the network, which you typically do by checking a check box or reading the terms as in this example.
5 Tap the icon to join the network. This icon can have different labels depending on the type of access, such as Connect, Authenticate, Done, Free Access, Login, and so on.

6 Tap Done (if required).

7 Try to move to a web page, such as www.wikipedia.org, to test your Wi-Fi connection (not shown). (See Chapter 14 for details.) If the web page opens, you’re ready to use the Internet on your phone. If you go to a log-in web page for the Wi-Fi network’s provider, you need to provide the required information to be able to use the Internet. For example, when access is free, as it is at most airports, you usually just have to accept the terms of use.
>>>Go Further
More on Connecting to the Net
As you use the Internet through different networks, following are a few points to keep in mind:
No Prompt—Not all public networks prompt you to log in as these steps explain. Sometimes, you use the network’s website to log in instead. After you join the network (step 3 in the prior task), your iPhone is connected to the network without any prompts. When you try to move to a web page as explained in step 7, you’re prompted to log in to or create an account with the network’s provider on the web page that appears.
Forget a network—As you learned earlier, your iPhone remembers networks you have joined and connects to them automatically as needed; these are known networks. For one reason or another, you might want to stop using that network. You can make your iPhone “forget” a known network so that it won’t keep connecting to it automatically.
To do this, tap Info (i) for the network you want to forget. Tap Forget This Network and then tap Forget at the prompt. Your iPhone stops using and forgets the network.
You can rejoin a forgotten network at any time, just as you did the first time you connected to it.
Auto-Join—On the Info screen for a network, which you open by tapping (i) for that network, you see the Auto-Join switch. If you want to stop automatically joining the network but keep its password on your iPhone, set the Auto-Join switch to off (white). Your iPhone stops automatically connecting to that network, but you can rejoin it at any time by tapping it; you don’t have to re-enter the password as you do if you forget a network.
Connecting to the Internet Using Cellular Data Networks
When you don’t have a Wi-Fi network available or you don’t want to use one that is available (such as if it has a fee or is slow), your iPhone can connect to the Internet through a cellular data network.
The provider for your iPhone provides a cellular data connection through which your iPhone connects to the Internet automatically when you aren’t using a Wi-Fi network (such as when you are in a location that doesn’t have one). (Your iPhone first tries to connect to an available Wi-Fi network before using a cellular data connection because Wi-Fi is typically less expensive and faster to use.) These cellular networks cover large geographic areas and the connection to them is automatic; your iPhone chooses and connects to the best cellular network currently available. Access to these networks is part of your monthly account fee; you choose from among various amounts of data (ideally, you can choose an account with unlimited data) per month for different monthly fees.
Most providers have multiple cellular data networks, such as a low-speed network that is available widely and one or more higher-speed networks that have a more limited coverage area.
The cellular data networks you can use are determined based on your provider, your data plan, the model of iPhone, and your location within your provider’s networks or the roaming networks available (when you’re outside of your provider’s coverage area). Your iPhone automatically uses the fastest connection available to it at any given time (assuming you haven’t disabled that option, as explained later).
In the United States, the major iPhone providers are AT&T, Sprint, T-Mobile, and Verizon. There are also other smaller providers, such as Virgin Mobile. All these companies offer high-speed 5GE or Long Term Evolution (LTE) cellular networks along with the slower 4G and 3G networks. In other locations, the names and speeds of the networks available might be different.
The following information is focused on 5GE networks because I happen to live in the United States and use AT&T as my cell phone provider. If you use another provider, you’re able to access your provider’s networks similarly, though some details might be different. For example, the icon on the Home screen reflects the name of your provider’s network, which might or might not be 5GE.
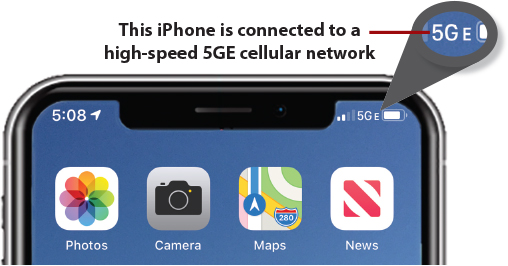
5GE, 5G, LTE, or other high-speed wireless networks provide very fast Internet access from many locations. (Note: These networks might not be available everywhere, but you can usually access them near populated areas.) To connect to the cellular network, you don’t need to do anything. If you aren’t connected to a Wi-Fi network, you haven’t turned off the high-speed network, and your iPhone isn’t in Airplane mode, the iPhone automatically connects to the fastest network available. If you can’t access the fastest network, such as when you aren’t in its coverage area, the iPhone automatically connects to the next fastest network available, such as 4G. If that isn’t available, it connects to the next fastest and so on until it finds a network to which it can connect if there is one available. If it can’t connect to any network, you see No Service instead of a network’s name; this indicates that you currently can’t connect to any network, and so you aren’t able to access the Internet.
One thing to keep in mind when using a cellular network is that your cell phone plan might include a limited amount of data per month. When your data use exceeds this limit, you might be charged overage fees, which can be very expensive. Most providers send you warning texts or emails as your data use approaches your plan’s limit, at which point you need to be careful about what you do while using the cellular data network to avoid an overage fee. Some tasks, such as watching YouTube videos or downloading large movie files, can chew up a lot of data very quickly and should be saved for when you are on a Wi-Fi network to avoid exceeding your plan’s monthly data allowance. Other tasks, such as using email, typically don’t use very much data.
Fortunately, most of the major providers now offer unlimited data plans for a reasonable fee. If you don’t already have an account with unlimited data, check with your provider periodically to see if an unlimited data plan is available. As competition has increased among cell providers, unlimited data plans have become more common and less expensive in many areas. If other cell providers are available to you, check to see whether they offer unlimited data plans; if so, you can consider changing providers or using a competitor’s plan to get your provider to lower the cost of your plan. Having an unlimited data plan is good because you don’t need to worry about overage charges from using more data than your plan allows.
When you move outside your primary network’s geographic coverage area, you are in roaming territory, which means a different provider might provide cellular phone or data access, or both. The iPhone automatically selects a roaming provider, if there is only one available, or allows you to choose one, if there is more than one available.
When you’re outside of your primary provider’s coverage area, roaming charges can be associated with calls or data use. These charges are often very expensive. The roaming charges associated with phone calls are easier to manage because it’s more obvious when you make or receive a phone call in a roaming area. However, data roaming charges are much more insidious, especially if Push functionality (where emails and other updates are pushed to your iPhone from the server automatically) is active. And when you use some applications, such as Maps to navigate, you don’t really know how much data is involved. Because data roaming charges are harder to notice, the iPhone is configured by default to prevent data roaming. When data roaming is disabled, the iPhone is unable to access the Internet when you are outside of your cellular network, unless you connect to a Wi-Fi network. (You can still use the cellular roaming network for telephone calls.)
You can configure some aspects of how your cellular network is used, as the following task demonstrates. You can also allow individual apps to use, or prevent them from using, your cellular data network. This is especially important when your data plan has a monthly limit. (If you have an unlimited plan, you usually don’t need to bother.)
In most cases, the first time you launch an app, you’re prompted to allow or prevent it from using cellular data. At any time, you can use the Cellular Data options in the Settings app to enable or disable an app’s access to your cellular data network.
The options you have for configuring how your iPhone uses its cellular data connection depend on the provider your iPhone is connected to and the model of iPhone you use. For example, if you live in the United States and use Sprint as your cellular provider, the Cellular screens in the Settings app look a bit different than the figures in this section (which are based on AT&T’s service). Regardless of the specific options you see on your phone, the basic purpose is the same, which is to configure how your iPhone uses its high-speed network and to enable and disable roaming.
Configuring Cellular Data Use
The following steps show configuring cellular data use on an iPhone using AT&T in the United States; you can use similar steps to configure these options on an iPhone from a different provider:
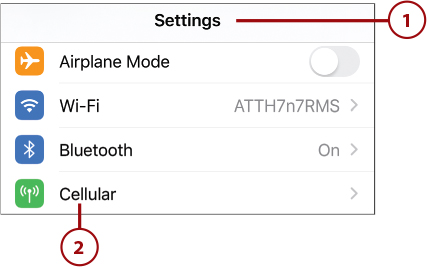
1 Open the Settings app.
2 Tap Cellular.
Your Terminology Might Vary
The labels you see on the Settings screens depend on the region you are in. For example, in the United States, you see the Cellular label, whereas in the UK, the label is Mobile. Although the labels might be different, the selection process is the same.
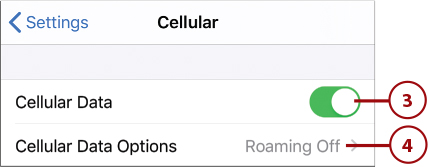
3 To use a cellular Internet connection, set the Cellular Data switch to on (green) and move to step 4; if you don’t want to use a cellular Internet connection, set this switch to off (white) and skip the rest of these steps. To use the Internet when the Cellular Data switch is off, you have to connect to a Wi-Fi network that provides Internet access.
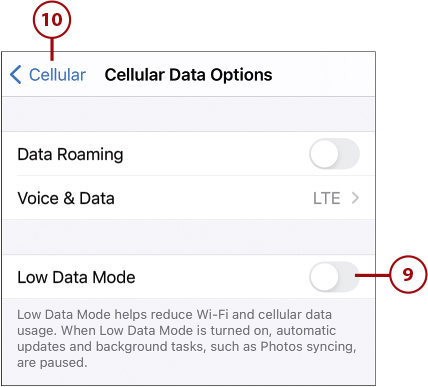
4 Tap Cellular Data Options.
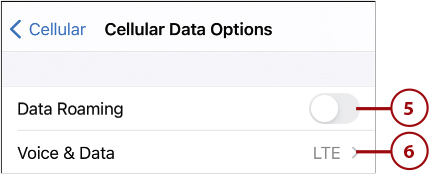
5 If you want to allow data roaming, slide the Data Roaming switch to the on (green) position. With some providers, Roaming is an option instead of a switch; tap Roaming and use the resulting switches to enable or disable roaming for voice or data and then tap Back (<). You should usually leave Data Roaming off so that you don’t unknowingly start using roaming (which can lead to high fees) should you be moving around a lot. You can then enable it as needed so you know exactly when roaming is on.
6 To configure the high-speed network, tap Voice & Data.
7 Ensure high-speed network (where high-speed network is the name of your provider’s high-speed network) is selected (has the check mark); if you want to limit your connection to slower speeds, choose one of the other options instead.
8 Tap Back (<).

9 If you have a limited data plan, consider enabling the Low Data Mode switch (green). This can cause specific apps to use less data. If you have an unlimited plan, you should leave this disabled (white).
10 Tap Cellular (<) to go back to the previous screen.
11 Use the controls in the PROVIDER section, where PROVIDER is the name of your provider, to configure how the cellular service interacts with other services, such as to enable Wi-Fi calling, calls on other devices, and so on. Some of the options are explained in “More On Cellular Data” at the end of this section.

12 Swipe up the screen until you see apps and services. This section enables you to allow or prevent individual apps from accessing a cellular data network. To limit the amount of data you use, it’s a good idea to review this list and allow only those apps that you rely on to use the cellular data network. (Of course, if you’re fortunate enough to have an unlimited cellular data plan, you can leave cellular data for all the apps enabled.) This list can be quite long if you have a lot of apps stored on your iPhone.
13 Set an app’s switch to on (green) if you want it to be able to use a cellular data network to access the Internet.
14 Set an app’s switch to off (white) if you want it to be able to access the Internet only when you’re connected to a Wi-Fi network.

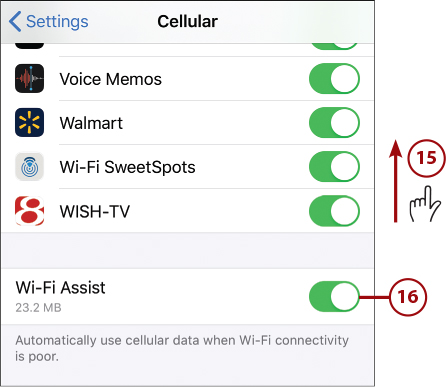
15 Swipe up until you reach the bottom of the screen.
16 Set the Wi-Fi Assist switch to on (green) if you want your iPhone to automatically switch to its cellular connection when the Wi-Fi connection is weak. If you have a limited cellular data plan, you might want to set this switch to off (white) to minimize cellular data use. If you have an unlimited plan, you should leave this on.
>>>Go Further
More on Cellular Data
Using a cellular network to connect to the Internet means you seldom have to be without a connection unless you choose to be. Here are some things to keep in mind as you keep connected:
Wi-Fi Calling—When this option is enabled, calls you make use a Wi-Fi network, which can improve the reception in certain locations. When you enable this option, you are prompted to configure an address associated with the number in case you need to call for emergency services. You also have the option to enable Wi-Fi calling for other devices.
Calls on Other Devices—When enabled, you use other devices, such as an iPad or a Mac computer, to receive or place calls. When you turn the switch on, you’re prompted to enable or disable this feature for each device. Be aware that the devices have to be on the same Wi-Fi network as your iPhone.
Control from the Control Center— You can quickly turn cellular data on or off from the Control Center. For example, if you want to stop using cellular data (perhaps you’re reaching the cap of your cellular data plan), you can open the Control Center and tap the Cellular Data icon to disable cellular data use. Tap the icon again to enable it. (When the icon is green, cellular data is enabled.)
Unlimited Data but Limited Speed—Under an unlimited data plan, some providers limit the speed at which your cellular data service operates if you pass a threshold amount of data used that month. You can continue to use all the data you want, but the performance of the connection might be slower. Check your plan’s details to see if it has one of these limits, and if so, how much speed reduction is applied. You probably won’t hit that threshold unless you watch a lot of video on your phone, but it’s good to be aware of such limitations on your account.
GSM versus CDMA—There are two fundamental types of cellular networks, which are GSM (Global System for Mobile Communications) or CDMA (Code-Division Multiple Access). The cellular provider you use determines which type of network your iPhone uses; the two types are not compatible. GSM is used by most of the world whereas some very large carriers in the United States (such as Verizon and Sprint) use CDMA. There are differences between the two, which is why you might see different cellular options than shown in the figures here. (They show the options for AT&T, which uses GSM.)
Apps’ cellular data use—Just under each app’s name in the CELLULAR DATA section, you see how much data the app has used since the counter was reset. This number can help you determine how much data a particular app uses. For example, if an app’s use is shown in megabytes (MB), it’s used a lot more data than an app whose use is shown in kilobytes (KB). If you have a limited data plan and you see an app uses a lot of data, you might want to disable its cellular data use.
Cellular data use reset—You can reset the statistics on the Cellular screen by swiping up until you reach the bottom of the screen and see Reset Statistics. Here you can see the date of the last reset. To reset the statistics, tap Reset Statistics and then tap Reset Statistics again.
Securing Your iPhone
Even though you won’t often be connecting a cable to it, an iPhone is a connected device, meaning that it sends information to and receives information from other devices, either directly or via the Internet, during many different activities. Some are obvious, such as sending text messages or browsing the Web, whereas others might not be so easy to spot, such as when an app is determining your iPhone’s location. Whenever data is exchanged between your iPhone and other devices, there is always a chance your information will get intercepted by someone you didn’t intend or that someone will access your iPhone without you knowing about it.
The good news is that with some simple precautions, the chances of someone obtaining your information or infiltrating your iPhone are quite small (much less than the chance of someone obtaining your credit card number when you use it in public places, for example). Following are some good ways to protect the information you’re using on your iPhone:
Always have a passcode on your iPhone so it can’t be unlocked without entering the passcode. Configuring a passcode is explained in Chapter 2, “Getting Started with Your iPhone.”
Use Face ID (iPhones without a Home button) or Touch ID (iPhones with a Home button) to make entering your passcode and passwords much easier and more secure. Configuring Face ID and Touch ID also are explained in Chapter 2.
Never let someone you don’t know or trust use your iPhone, even if he needs it “just for a second to look something up.” If you get a request like that, look up the information for the person and show him rather than letting him touch your iPhone.
Learn how to use the Find My iPhone feature in case you lose or someone steals your iPhone. This is explained in Chapter 18, “Maintaining and Protecting Your iPhone and Solving Problems.”
Never click a link to verify your account in an email or text message that you aren’t expecting. If you haven’t requested some kind of change, such as signing up for a new service, virtually all such requests are scams, seeking to get your account information, such as username and password, or your identification, such as full name and Social Security number. And many of these scam attempts look like email from actual organizations. For example, I receive many of these emails that claim, and sometimes even look like, they’re from Apple. However, Apple doesn’t request updates to account information using a link in an email unless you’ve made some kind of change, such as registering a new email address for iMessages. Legitimate organizations never include links in an email to update account information when you haven’t requested or made any changes.
To reinforce this concept, there are two types of requests for verification you might receive via email. The legitimate type is sent to you after you sign up for a new service, such as creating a new account on a website, to confirm that the email address you provided is correct and that you are really you. If you make changes to an existing account, you might also receive confirmation request emails. You should respond to these requests to finish the configuration of your account.
If you receive a request for account verification, but you haven’t done anything with the company or organization from which you received the request, don’t respond to it. For example, if you receive a request that appears to be from Apple, PayPal, or other organization, but you haven’t made any changes to your account, the email request is bogus and is an attempt to scam you. Likewise, if you’ve never done anything with the organization apparently sending the email, it’s also definitely an attempt to scam you.
If you have any doubt, contact the organization sending the request directly (not by responding to the email) before responding to the email.
If you need to change or update account information, you can go directly to the related website using an address that you type in or have saved as a bookmark using the Safari app. This protects you because it ensures you can move directly to the legitimate website rather than clicking a link in an email that might take you to a fraudulent website.
Be aware that when you use a Wi-Fi network in a public place, such as a coffee shop, hotel, or airport, there’s a chance that the information you send over that network might be intercepted by others. The risk of this is usually quite small, but you need to be aware that there’s always some level of risk. To have the lowest risk, don’t use apps that involve sensitive information, such as online banking or shopping apps, when you’re using a public Wi-Fi network.
If you don’t know how to do it, have someone who really knows what they’re doing set up a wireless network in your home. Wireless networks need to be configured properly to be secure. Your home’s Wi-Fi network should require a password to join.
For the least risk, only use your home’s Wi-Fi network (that has been configured properly) or your cellular data connection (you can turn Wi-Fi off when you aren’t home) for sensitive transactions, such as shopping, accessing bank accounts, or accessing other financial information.
Never accept a request to share information from someone you don’t know. In Chapter 17, “Working with Other Useful iPhone Apps and Features,” you learn about AirDrop, which enables you to easily share photos and lots of other things with other people using iOS or iPadOS devices. If you receive an AirDrop request from someone you don’t recognize, always decline it. In fact, if you have any doubt, decline such requests. It’s much easier for someone legitimate to confirm with you and resend a request than it is for you to recover from damage that can be done if you inadvertently accept a request from someone you don’t know.
Passwords
Secure your information by using complex passwords. You can use apps, such as LastPass, or built-in capabilities, such as Safari’s suggested passwords, to create passwords for you. Since passwords can be saved on your device, you don’t have to type them so it doesn’t matter how complicated they are. And don’t use the same password for multiple accounts.
Reality Check
Internet security is a complex topic, and it can be concerning to think about. It’s best to keep in mind the relative level of risk when you use your iPhone compared to other risks in the physical world that most of us don’t think twice about. For example, every time you hand your credit card to someone, there is a chance that that person will record the number and use it without your knowledge or permission. Even when you swipe a credit card in a reader, such as at a gas station, that information is communicated across multiple networks and can be intercepted. (For example, there have been numerous compromises of credit card information at a number of well-known retailers.) If you take basic precautions like those described here, the risks to you when you’re using your iPhone are similar to or less than the other risks we all face in everyday life.
My recommendation is to take the basic precautions, and then don’t worry about it overly much. However, you might want to consider signing up with an identity theft protection company, which is a company that looks for possible threats against you like someone trying to get a new credit card using your data, and it alerts you to this happening. (Of course, this can happen whether you use an iPhone or don’t use one.) Try to find an identity theft protection company that assigns someone to do the work of recovering for you should your identity be stolen because the recovery process can be very time-consuming and difficult. You can research available companies by performing a web search for “identity theft protection services.” Be cautious, however; some of these companies charge high fees without providing recovery services, which is the most important part of the service.
Working with Text
You can do lots of things with an iPhone that require you to provide text input, such as writing emails, sending text messages, or taking notes. There are a couple of ways you can enter text, the most obvious of which is by typing. The iPhone’s keyboard pops up automatically whenever you need it, whether it’s for emailing, messaging, entering a website URL, performing a search, or in any other typing situation.
You can also dictate text, which can often be faster and easier than typing.
Typing Your Way

To type, just tap the keys. As you tap each key, you hear audio feedback (you can disable this sound in the Settings app by going to Sounds then turning off the Keyboard Clicks switch) and the key you tapped pops up in a magnified view on the screen (this can also be disabled using the Settings app). The keyboard includes all the standard keys, plus a few for special uses. To change from letters to numbers and special characters, just tap the 123 key. Tap the #+= key to see more special characters. Tap the 123 key to move back to the numbers and special characters or the ABC key to return to letters. The keyboard also has contextual keys that appear when you need them. For example, when you enter a website address, the .com key appears so you can enter those four characters with a single tap.
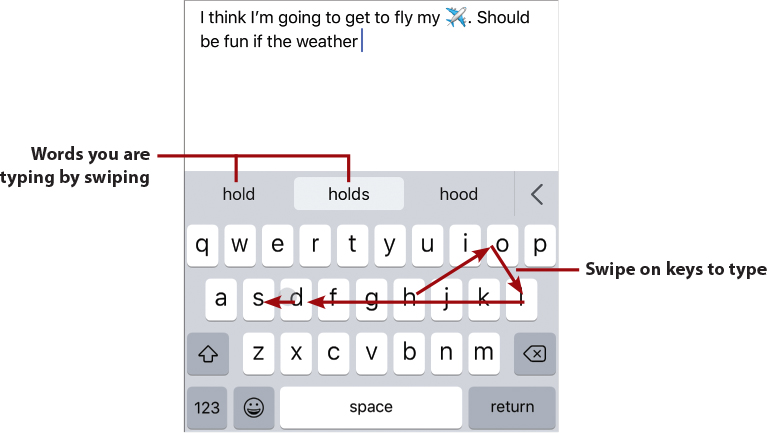
You can also type by swiping on the keys without taking your finger off the screen. For example, to type “holds,” touch “h” and then swipe to “o,” “l,” “d,” and “s.” Pause your finger when you get to the last letter in the word, and it’s entered for you followed by a space. Swipe the letters of the next word, pause when you reach the end of it, and so on. As you swipe, an arrow traces your path on the keyboard so you can see what you’re entering.
You’ll probably either love swiping to type or hate it. Give it a good try to see which is the case for you. It can be a faster way to type, but it definitely requires some practice.
Keyboard Settings
You can change how you work with text through Keyboard Settings. These are explained in Chapter 6.
Working with Predictive Text
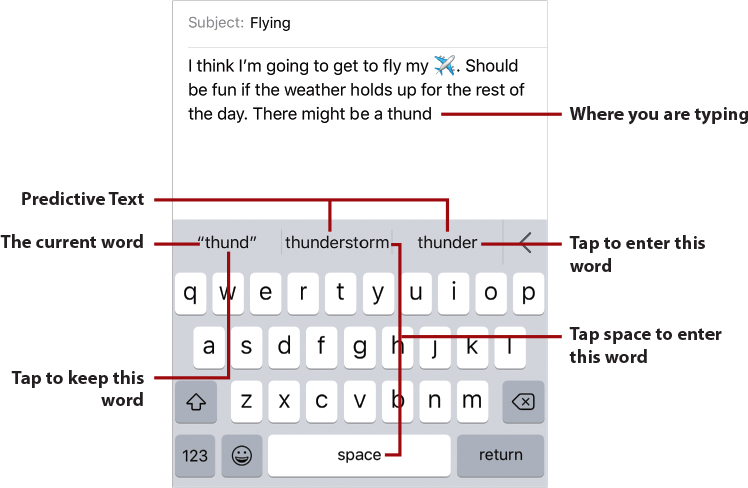
You can also use Predictive Text, which tries to predict text you want to enter based on the context of what you are currently typing and what you have typed before. The choices that Predictive Text provides appear in the bar between the text and the keyboard and present you with three or more options. The option on the far left in quotes is what you’re currently typing. The other options are words or phrases that you might want to type based on context and what you’ve typed before. The second option from the left is the one that Predictive Text has selected as the most likely word. To the right of that you might see other text options or one or more emojis (more on these later).
Don’t Like Predictive Text?
If you don’t want to use the Predictive Text feature, open the Settings app, tap General, tap Keyboard, and then set the Predictive switch to off (white).
If you want to enter the most likely option (the second from the left), tap the space key; that word or phrase is entered followed by a space so you can keep typing. If the option to the right is what you want to enter, tap it to add it to the text at the current location of the cursor. To keep what you have currently typed, tap the word in quotes that appears on the left.
If you don’t see an option you want to enter, keep typing; the options change as the text you are typing changes. You can tap an option on the Predictive Text bar at any time to enter it.
The nice thing about Predictive Text is that it gets better at predicting your text needs over time. In other words, the more you use it, the better it gets at predicting what you want to type. And it can even suggest phrases based on what you’re typing; tap a phrase to enter it.
Predictive Text Need Not Apply
When you’re entering text where Predictive Text doesn’t apply, such as when you’re typing email addresses, the Predictive Text bar is hidden. This makes sense because there’s no way text in things such as email addresses can be predicted. When you move back into an area where it does apply, the Predictive Text bar appears again.
Using Other Writing Tools

When you tap the left-facing arrow (<) on the end of the Predictive Text bar, you see a palette of tools you can use to format text and to add other types of content to it. For example, you can insert a photo you’ve taken or even take a new photo and insert it into the current location. These tools work similarly, and a quick example explaining how to format text will help you use the other options.
Position the cursor where you want to start formatting text as you type it. Then tap the left-facing arrow to open the tool palette. Tap Format text. The Formatting tools appear.

Tap the options you want to apply to the text you’re going to type. For example, tap B to apply bold or the large A to increase the size of the text. When you’re done selecting options, tap close (x).

Continue typing. As you type, you see the current formatting options applied to the text. When you want to change the formatting, such as to go back to the prior format, open the Formatting tools and “undo” the selections you made earlier.
Later in this chapter, you learn how to select text to work with it. If you want to format a portion of your text, it’s usually easier to apply formatting after you’ve typed it because you can quickly select the part that you want to format and apply the options only to that text. If you format as you type, you have to open the formatting tool, choose the formats you want to use, close the formatting tool, type the text you are formatting, and then reset the format tool to stop formatting the next text you type.
The other tools enable you to insert various types of content at the current position of your cursor. For example, in addition to using the Camera tool to take and insert a photo, you can use the Photo tool to insert a photo you already have on your iPhone or use the Drawing tool to insert drawings.
You probably aren’t likely to be writing complex documents on your iPhone, but these additional tools are nice to have when you want to enhance what you write in emails, text messages, or notes.
Working with Keyboards
The great thing about a virtual keyboard like the iPhone’s is that it can change to reflect the language or symbols you want to type. As you learn in Chapter 6, you can install multiple keyboards, such as one for your primary language and more for your secondary languages. You can also install third-party keyboards to take advantage of their features.
By default, two keyboards are available for you to use. One is for the primary language configured for your iPhone (for example, mine is U.S. English). The other is the Emoji keyboard (more on this shortly). How you change the keyboard depends on whether you’ve installed additional keyboards and the orientation of the iPhone.
If you haven’t installed additional keyboards, you can change keyboards by tapping the Emoji key, which has a smiley face on it. You see the Emoji keyboard. Tap ABC to return to letters and numbers.
If you’ve installed other keyboards, you change keyboards by tapping the Globe key.
Each time you tap this key, the keyboard changes to be the next keyboard installed; along with the available keys changing, you briefly see the name of the current keyboard in the space key. When you have cycled through all the keyboards, you return to the one where you started.
Orient Yourself
As you type, try holding the phone in landscape orientation. The keyboard is much wider and can be easier to use, especially when you’re typing a lot. The downside to this is that the area you are typing in is smaller. Try typing in both orientations to see which works best for you.

You also can select the specific keyboard you want to use and access keyboard and text options by touching and holding on the Globe key (or the Emoji key if you don’t see the Globe key). The Keyboard menu appears. Tap a keyboard to switch to it. Tap Keyboard Settings to jump to the Keyboards screen in the Settings app where you can configure keyboards and enable or disable text options (these settings are covered in Chapter 6).
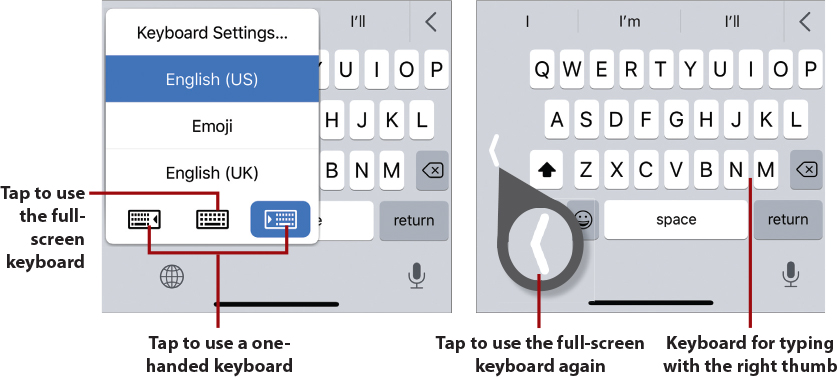
Because you often type on your iPhone while you’re moving around, it has a one-handed keyboard (this needs to be enabled via the Keyboard settings covered in Chapter 6). This keyboard “squishes” all the keys to the left or right side of the screen to suit typing with a thumb. To use a one-handed keyboard, touch and hold the Globe or Emoji key to open the Keyboard menu (this only works when the iPhone is held vertically). Tap the left or right keyboard; the keyboard compresses toward the side you selected and you can more easily tap its keys with one thumb. To return to the full-screen keyboard, tap the right- or left-facing arrow that appears in the “empty” space on the side of the screen not being used for the keyboard or open the Keyboard menu and tap the full-screen keyboard.
Using Emojis

Emojis are icons you insert into your text to liven things up, communicate your feelings, or just have some fun. You can open the Emoji keyboard by tapping its key (the smiley face), by tapping the Globe until it appears, or by selecting it on the Keyboard menu. You see a palette containing many emojis, organized into groups. You can change the groups of emojis you’re browsing by tapping the icons at the bottom of the screen. Swipe to the left or right on the emojis to browse the emojis in the current group. Tap an emoji to enter it at the cursor’s location in your message, email, or other type of document. To use an emoji you’ve used often, tap the Clock icon to see emojis you’ve used frequently; you’ll probably find that you use this set of emojis regularly so this can save a lot of time. To return to the mundane world of letters and symbols, tap the ABC key.

The Predictive Text feature also suggests one or more emojis when you type certain words; just tap an emoji before you tap the space key to replace the current word with it. Or, if you’ve already tapped the space key, tap the emoji to add it after the word.
Emoji Options
If you tap and hold on some emojis, you see options. For example, if you tap and hold on the thumbs-up emoji, you see a menu with the emoji in different flesh tones. Slide your finger over the menu and tap the version you want to use. The version you select becomes the new default for that emoji. You can go back to a previous version by opening the menu and selecting it.
Correcting Spelling as You Type
If you type a word that the iPhone doesn’t recognize, that word is flagged as a possible mistake and suggestions are made to help you correct it. How this happens depends on whether Predictive Text is enabled.

If Predictive Text is enabled, suspicious words are highlighted in blue. Potential replacements for suspicious words appear in the Predictive Text bar. When you tap the space key, the suspicious word is replaced with the most likely word toward the center of the Predictive Text bar. Tap the word on the far left to keep what you’ve typed (because it isn’t a mistake) or tap another word or emoji to enter it instead of what you’ve typed.
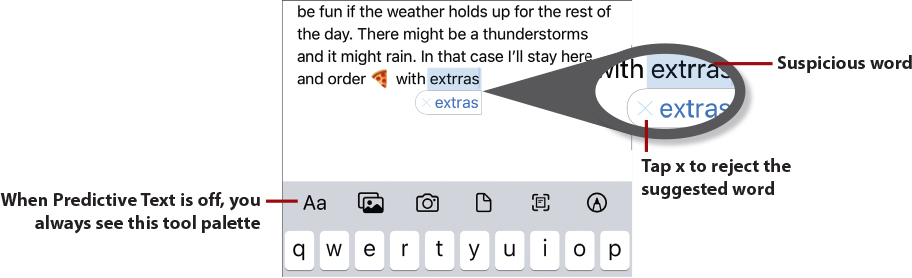
If Predictive Text isn’t enabled, a suspicious word is highlighted and a suggestion about what might be the correct word appears in a pop-up box. To accept the suggestion, tap the space key. To reject the suggestion, tap the x in the pop-up box to close it and keep what you typed. You can also use this feature for shorthand typing. For example, to type “I’ve” you can simply type “Ive” and iPhone suggests “I’ve,” which you can accept by tapping the space key.
Typing Tricks
Many keys, especially symbols and punctuation, have additional characters. To see a character’s options, touch and hold on it. If it has options, a menu pops up after a second or so. To enter one of the optional characters, drag over the menu until the one you want to enter is highlighted, and then lift your finger off the screen. The optional character you selected is entered. For example, if you tap and hold on the period when you’re writing text, you can select an ellipsis (…). If you tap and hold on the period when you’re typing a web or email address, you can select .com or .edu.
By default, the iPhone attempts to correct the capitalization of what you type. It also automatically selects the Shift key when you start a new sentence, start a new paragraph, or in other places where its best guess is that you need a capital letter. If you don’t want to enter a capital character, simply tap the Shift key before you type. You can enable the Caps Lock key by tapping the Shift key twice. When the Caps Lock key is highlighted (the upward-facing arrow is black), everything you type is in uppercase letters.
No Caps Lock?
You can enable or disable the Caps Lock key by opening the Settings app, tapping General, tapping Keyboard, and then setting the Enable Caps Lock to on (green) or off (white).
Editing Text

To edit text you’ve typed, touch and hold the screen. You see a large cursor. Drag your finger until the cursor is placed where you want to start editing. Then lift your finger from the screen. The cursor remains in that location, and you can use the keyboard to make changes to the text or to add text at that location.
Selecting, Copying, Cutting, Pasting, or Formatting Text
Many times, you’ll want to select text before editing or formatting it. You also can select text or images to copy and paste the selected content into a new location or to replace that content.
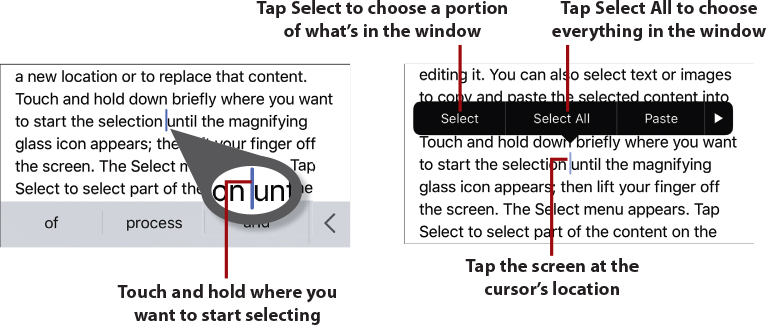
Touch and hold down briefly where you want to start the selection to position the cursor there. Tap the screen. The Select menu appears. Tap Select to select part of the content on the screen, or tap Select All to select everything in the current window.
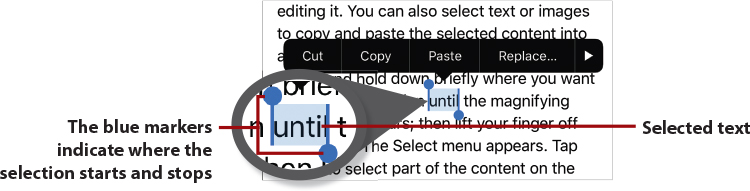
You see markers indicating where the selection starts and stops. (The iPhone attempts to select something logical, such as the word or sentence.) New commands appear on the menu; these provide actions for the text currently selected.

Drag the two markers so that the content you want to select is between them; the selected portion is highlighted in blue. When the selection markers are located correctly, lift your finger from the screen. (If you tapped the Select All command, you don’t need to do this because the content you want is already selected.)
Tap Cut to remove the content from the current window, or tap Copy to just copy it.
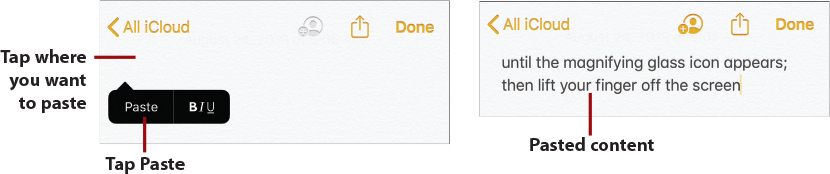
Move to where you want to paste the content you selected; for example, use the App Switcher to change to a different app. Tap where you want the content to be pasted. The menu appears. Then tap Paste.
The content you copied or cut appears where you placed the cursor.
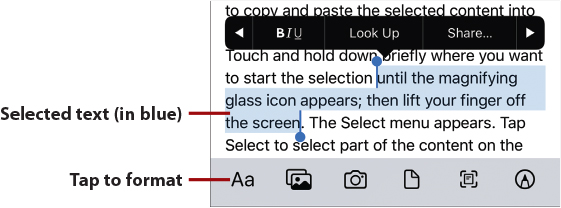
You can use similar steps to format text using the Formatting tools you learned about earlier. Select the text you want to format as described previously. Tap Format (Aa).

Tap the format options you want to apply such as strikethrough or tap the color wheel and choose a color. The formatting options you choose are applied to the selected text. Tap Close (x) to close the Format tools.
More Commands
Some menus that appear when you’re making selections and performing actions have a right-facing arrow at the right end. Tap this to see a new menu that contains additional commands. These commands are contextual, meaning that you see different commands depending on what you’re doing at that specific time. You can tap the left-facing arrow to move back to a previous menu.
Correcting Spelling After You’ve Typed
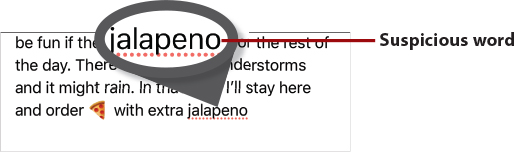
The iPhone also has a spell-checking feature that comes into play after you have entered text (as opposed to the Predictive Text and autocorrect/suggests features that change text as you type it). When you’ve entered text the iPhone doesn’t recognize, it’s underlined in red.

Tap the underlined word. It’s shaded in red to show you what’s being checked, and a menu appears with one or more replacements that might be the correct spelling. If one of the options is the one you want, tap it. The incorrect word is replaced with the one you tapped.
Undo
The iPhone has a somewhat hidden undo command. To undo what you’ve just done, such as typing text, gently shake your phone back and forth a couple of times. An Undo prompt appears on the screen. Tap Undo to undo the last thing you did, or tap Cancel if you activated the undo command accidentally.
Speaking Text Instead of Typing
You can also enter text by dictating it. This is a fast and easy way to type, and you’ll be amazed at how accurate the iPhone is at translating your speech into typed words. Dictation is available almost anywhere you need to enter text.
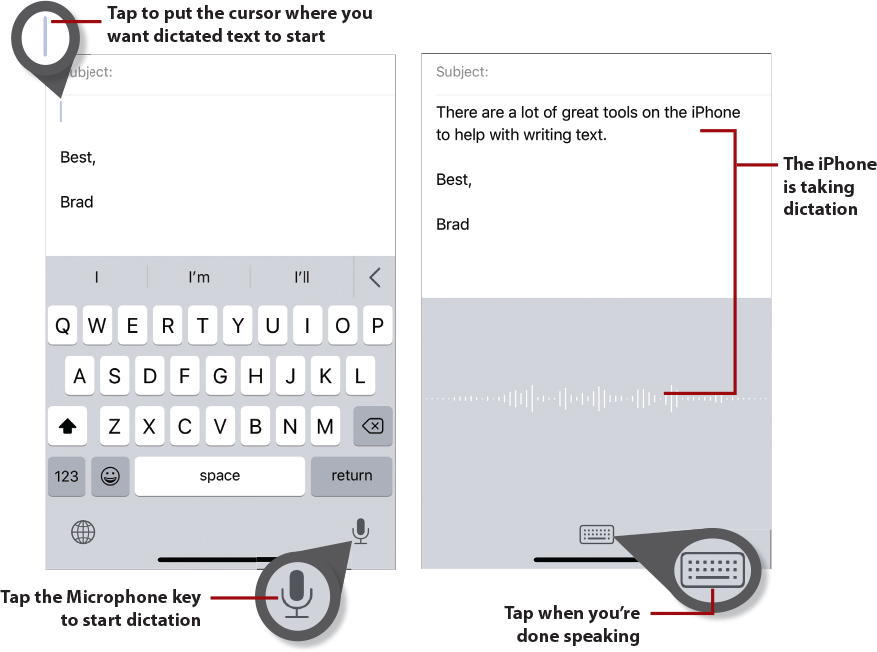
To start dictating, tap where you want the dictated text to start and then tap the Microphone key. The iPhone goes into Dictation mode. A gray bar appears at the bottom of the window. As the iPhone “hears” you, the line oscillates.
Start speaking the text you want the iPhone to type. As you speak, the text is entered starting from the location of the cursor. Speak punctuation when you want to enter it. For example, when you reach the end of a sentence, say “period,” or to enter a colon say “colon.” To start a new paragraph, say “new paragraph.”

When you’ve finished dictating, tap Keyboard. The keyboard reappears and you see the text you spoke. This feature is amazingly accurate and can be a much faster and more convenient way to enter text than typing it.
You can edit or format text you dictated just like text you typed using the keyboard.
Searching on Your iPhone
You can use the Search tool to search your iPhone to find many different types of information, including locations, emails, messages, or apps.

There are a couple of ways you can start a search:
On a Home screen, swipe down from the center of the screen. The Search bar appears at the top of the screen.
Swipe to the right to open the Widget Center. The Search bar is at the top of the screen.
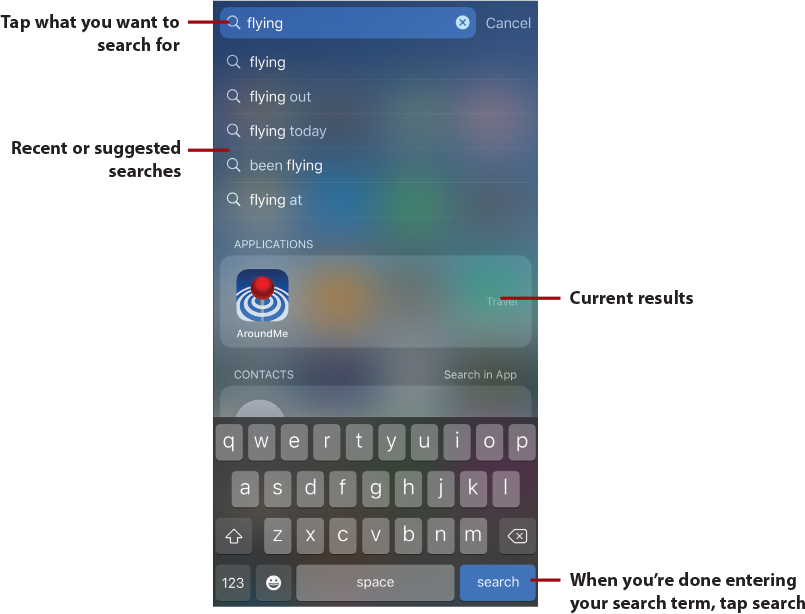
To perform a search, tap in the Search bar and type the search term using the onscreen keyboard. As you type, recent or suggested searches appear just below the Search bar; tap a search to perform it. Under the search list, you see the current items that match your search. If you don’t tap one of the recent or suggested searches, when you finish typing the search term, tap search to see the full list of results.

The results are organized into sections, such as CONTACTS, MAIL, MESSAGES, APPLICATIONS, MAPS, MUSIC, and so on. Swipe up and down the screen to browse all of the results. To work with an item you find, such as to view a location you found, tap it; you move to a screen showing more information or into the associated app and see the search result that you tapped.
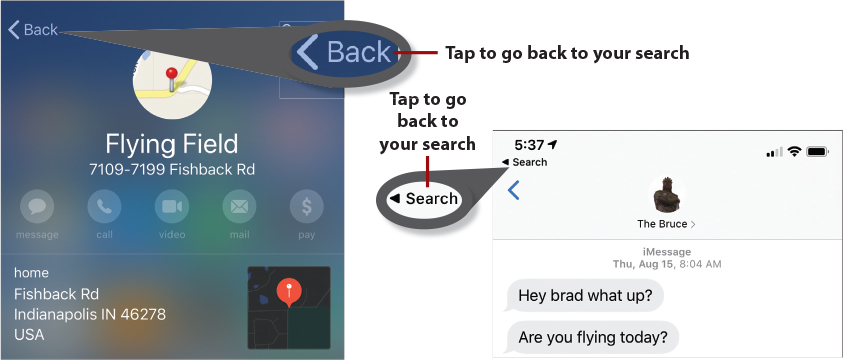
The results remain in the Search tool as you work with them. To move back to the search results, tap Back (<) in the upper-left corner of the screen or tap Search. (The option you see depends on the result you tapped on.)

The results of the most recent search are still listed. To clear the search term, tap Clear (x). To close the Search tool without going to one of the results, tap Cancel.
Tell Me More
If one of the categories you find in a search has a lot of entries, you see the Show More command. Tap this to show more of the results for that category. Tap Show Less to collapse the category again. When you can search within an app, you see the Search in App text on the right side of the screen aligned with the results section; tap this to open the app and perform the search within that app.
Working with Siri Suggestions
Siri Suggestions can make it easy to get back to apps, searches, or other items you’ve used recently. These can also be tasks that Siri thinks you might want to do, such as making a call to someone. Using Siri Suggestions can lead you to useful things you weren’t necessarily looking for. These suggestions show up in many different areas on your iPhone and you can access them directly at any time.

To access Siri Suggestions, swipe down from the center of a Home screen. Just under the Search bar, you see the Siri Suggestions panel. This panel shows you apps you’ve used recently or apps that might be useful to you based on your location. For example, the Starbucks app may be suggested when you are near a Starbucks location. Tap an app to open it.
You might also see actions Siri has created for you. These can be actions you recently performed or actions Siri has created based on your activity. Tap a suggested action to perform it.
Siri Suggestions can also appear in other apps. Siri monitors your activity and “learns” from what you do to improve the suggestions it makes. These suggestions can appear in many different places, such as when you’re entering email addresses in a new email, dealing with new contact information, performing searches, or editing a text message. When you see a list of Siri Suggestions, you can tap the suggestion you want to use. For example, if it’s an email address, that address is entered for you. If it’s a search, the search is performed.
Printing from Your iPhone
You can print directly from your iPhone to AirPrint-compatible printers.
First, set up and configure your AirPrint printer (see the instructions that came with the printer you use).
AirPrint?
AirPrint is an Apple technology that enables an iOS device to wirelessly print to an AirPrint-compatible printer without installing any printer drivers on the iOS device. To be able to print directly to a printer via Wi-Fi, the printer must support AirPrint (a large number of them do). When an iOS device, such as your iPhone, is on the same Wi-Fi network as an AirPrint printer, it automatically detects that printer and is able to print to it immediately.

When you are in the app from which you want to print, tap Share. You see the Share menu with a number of actions. Swipe up the menu and tap Print. (If you don’t see Share or the Print command on the Share menu, the app you’re using doesn’t support printing.)

The first time you print, you need to select the printer you want to use. On the Printer Options screen, tap Select Printer. Then tap the printer you want to use. As long as your AirPrint-compatible printer is turned on and the Wi-Fi has been enabled, you should see it there. You move back to the Printer Options screen and see the printer you selected.

Tap – or + to set the number of copies; the current number of copies is shown to the left of the controls. You can use other controls that appear to configure the print job, such as the Black & White switch to print in black and white on a color printer; the controls you see depend on the capabilities of the printer you selected and the type of content you are printing. Tap Print to print the document.
The next time you print, if you want to use the same printer, you can skip the printer selection process because the iPhone remembers the last printer you used. To change the printer, tap Printer and then tap the printer you want to use.