5. Customizing Your iPhone with Apps and Widgets
In this chapter, you learn how to make an iPhone into your iPhone by making it work the way you want it to. Topics include the following:
Your iPhone comes with a lot of very useful apps that can do all sorts of amazing things. But that’s just for starters. An iPhone gets even more useful as you add apps that enable you to do all types of useful and fun things.
Getting Started
The iPhone is a powerful computing platform that software developers can use to deliver amazing apps for you to use. And, because of the App Store (which is an app in and of itself), installing and maintaining apps on your iPhone is very simple.
Following are some key concepts you’ll use as you explore the wonderful world of iPhone apps:
App Store app—This app connects your iPhone to Apple’s App Store, which is where you find apps that you can explore and download to your phone—some free, some for a fee. In addition to being very easy to use, the App Store also protects you from harmful apps. That’s because before an app can be posted in the App Store, it must pass a rigorous set of tests by Apple to ensure that it can’t do any damage to your iPhone or to your information.
Apple ID—To access the Apple App Store, you need to have an Apple ID. See Chapter 4, “Setting Up and Using an Apple ID, iCloud, and Other Online Accounts,” for the details of obtaining and configuring an Apple ID on your iPhone. As part of that process, you likely provided payment information to Apple, such as a credit or debit card. If you did, it’s very convenient to pay for purchases from the App Store. If you didn’t set up a payment method, you’ll need to provide that information if you download any apps that have a price. Even without payment information, you can still shop for, download, and use thousands of apps for free.
Face ID—As discussed in Chapter 2, “Getting Started with Your iPhone,” your iPhone’s Face ID feature enables you to sign into accounts or enter passwords by simply looking at your iPhone. You can configure the App Store to accept Face ID so that you don’t have to enter your Apple ID password every time you download an app.
Touch ID—Also covered in Chapter 2, Touch ID enables you to enter passwords or sign into accounts by touching a finger to the Touch ID/Home button. Using Touch ID makes downloading apps easier and faster because you only have to touch your phone rather than typing in a password each time.
Widgets—Some apps provide widgets, which are mini versions of those apps that provide key information or functionality in a small window. You can move into the full app by tapping its widget.
Widget Center—The Widget Center provides a collection of widgets that are ready for you to use. You can determine the widgets that are in the Widget Center and how they are organized.
Smart Stacks—You can “stack” widgets on top of each other so that you can access multiple widgets from one location.
Installing apps on your iPhone enables it to do so much more than it can “out of the box.” You’ll want to explore and download apps to completely customize how you use your iPhone; the possibilities of what your phone can do with apps are limitless!
Widgets make using apps even easier and more convenient. You can configure widgets to suit your preferences, and you might find that widgets are just as, or more, useful than their associated apps.
Customizing How Your iPhone Works with Apps
Installing apps on your iPhone enables you to add more functionality than you can probably imagine. As the old Apple ad used to proclaim, “There’s an app for that.” And in all likelihood, there probably is an app for a lot of what you would like to use your iPhone for. The App Store app enables you to find, download, and install apps onto your iPhone.
Before you jump into the App Store, take a few moments to ensure your iPhone is configured for maximum ease and efficiency of dealing with new apps.
First Things First
The rest of this chapter assumes you have configured an Apple ID on your iPhone and that you have Face ID or Touch ID set up. If you don’t have an Apple ID yet, see Chapter 4. If you haven’t configured your iPhone for Face ID or Touch ID, go back to Chapter 2, “Getting Started with Your iPhone,” and do so. Then come back here.
Configuring Your iPhone to Download and Maintain Apps
Use the following steps to configure your iPhone so that it’s extremely easy to download and install apps and to keep them current:
1 Open the Settings app.

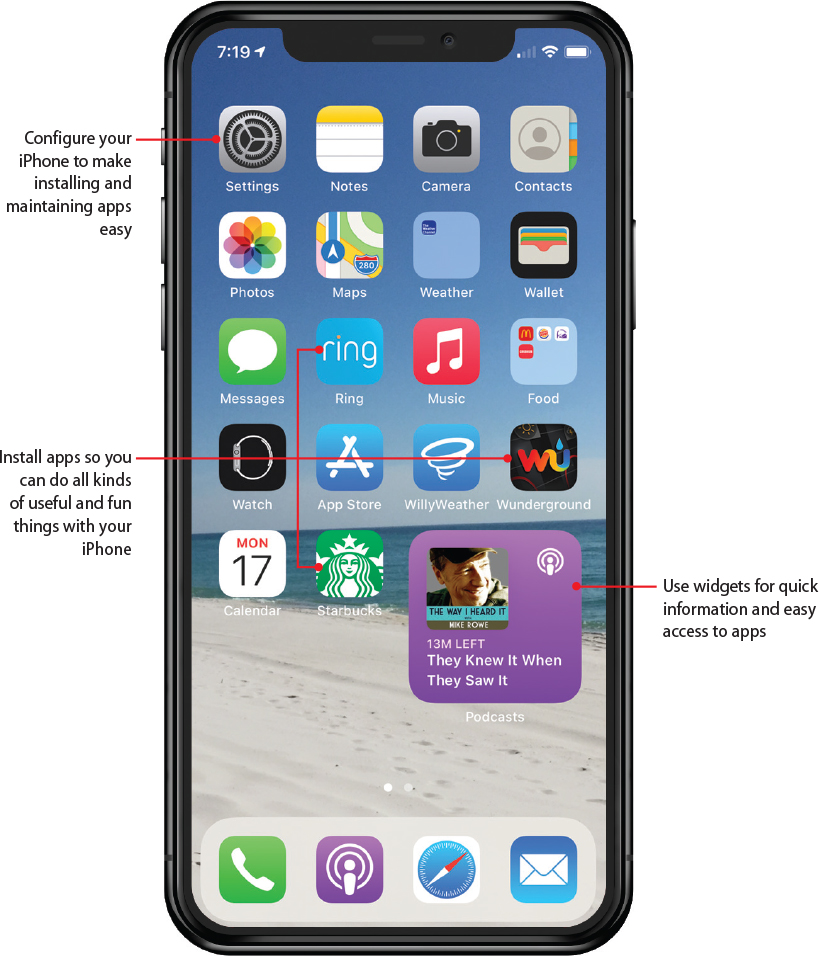
2 Tap App Store.

3 Ensure the Apps switch is on (green); this causes any apps you download onto other devices using the same Apple ID to be installed on your iPhone automatically. This helps you have the same apps available on all your devices.
4 Ensure the App Updates switch is on (green); this causes any updates to apps you have installed on your iPhone to be downloaded and installed automatically. I recommend you use this option so you can be sure you are always running the most current versions of your apps.
5 If you don’t have an unlimited cellular data plan, you might want to set Automatic Downloads to off (white) so apps and other content are downloaded only when you’re connected to a Wi-Fi network. If this is enabled (green), apps and content are downloaded to your iPhone when you’re using a cellular network, which can consume significant amounts of your data plan.
6 If you have Automatic Downloads enabled, tap App Downloads. If not, skip to step 9.
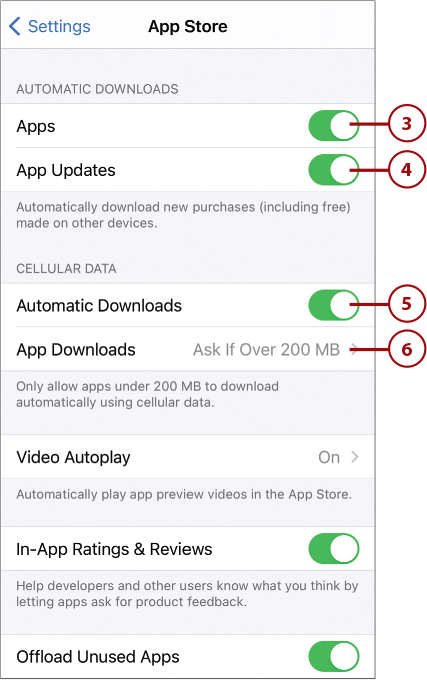
7 Choose how you want apps and updates to be downloaded when you’re using a cellular connection. The options are Always Allow, Ask If Over 200 MB, or Always Ask. If you choose one of the latter two options, you’re prompted to allow downloads in the corresponding situations.
8 Tap App Store (<).
9 Tap Video Autoplay.
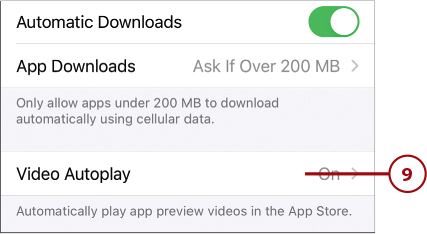
10 Some content in the App Store has a video preview; if you want this video to play automatically, leave Video Autoplay set to On. If you want it to play only when you’re using Wi-Fi, tap Wi-Fi Only; this is a good option if you have a limited cellular data plan. If you don’t want video previews to play at all, tap Off.
11 Tap App Store (<).

12 If you want to be able to provide feedback about apps you use, set In-App Ratings & Reviews to on (green). If you set this to off (white) instead, you won’t be prompted to rate and review apps as you use them.
13 If you want apps that you don’t use to be removed from your iPhone, set the Offload Unused Apps to on (green). This is handy because you likely won’t end up using all the apps you download or you might use some for only a short time and then not need them again. When Offload Unused Apps is on, these unused apps are removed automatically so they aren’t cluttering up your phone or taking up storage space. (Any data or documents are saved and reinstalled if you ever install the app again.)
14 Tap Settings.

15 Tap Face ID & Passcode.

You’ve Got the Touch
These steps show setting up an iPhone for the App Store on an iPhone that uses Face ID. If your iPhone uses Touch ID instead, the steps are nearly identical, but you see references to Touch ID on your screens rather than to Face ID as shown in the figures.
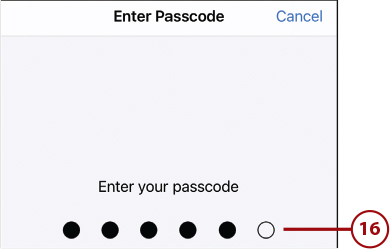
16 Enter your passcode.
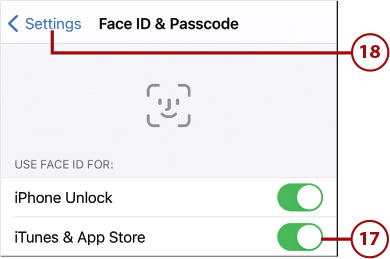
17 Ensure the iTunes & App Store switch is on (green). If it isn’t enabled, tap the switch, enter your Apple ID password, and tap OK to enable it.
18 Tap Settings (<).
19 Tap Home Screen.

20 Tap Add to Home Screen if you want apps you download to be added directly to a Home screen or App Library Only if you don’t want them added directly to a Home screen (they are only available via the App Library). Refer to “Working with the App Library” later in this chapter for an explanation of the App Library.
21 If you want badges to appear on app icons when those apps are in the App Library, set the Show in App Library switch to on (green). With this switch off, app badges only appear when an app is on a Home screen.

Using the App Store App to Find and Install iPhone Apps
The App Store app enables you to quickly and easily browse and search for apps, view information about them, and then download and install them on your iPhone with just a few taps.
When you use the App Store app, you can find apps to download using any of the following options:
Today—This tab takes you to apps featured in the App Store on the day you visit the store. When you tap any of the items on the Today screen, you move into the group or app on which you tapped.
Games—Easily the most popular category of apps, Games enables you to find those critical games you need to prove your skills and pass the time. Games are grouped in various ways, such as What to Play This Week, Popular Games, New Games We Love, and More Games You Might Like.
Apps—This category leads you to apps that aren’t games. On this screen, you see a number of lists including New to iPhone?, Popular Apps, Apps We Love Right Now, Top Free Apps, and Top Paid Apps. You can use the Top Categories list to see apps organized by category, which is a useful way to find apps you want to use for specific purposes. You can browse apps in the top categories directly from the list or tap See All to browse all categories.
Arcade—This option enables you to subscribe to Apple’s Arcade service that provides many games you can play without ads or in-game charges. Apple regularly adds to the games in the Arcade so you can always find new games to try. You can try the Arcade service for a month for free; thereafter, a monthly fee is required.
Search—This tool enables you to search for apps. You can search by name, developer, and other keywords.
Finding and downloading any kind of app follows this same pattern:
Find the app you’re interested in. You can use the options described in the previous list to find apps by browsing for them, or you can use the search option to find a specific app quickly and easily.
Evaluate the app. The information screen for apps provides lots of information that you can use to decide whether you want to download an app (or not). The information available includes a text description, screenshots, and ratings and reviews from users.
Download and install the app. This usually requires only a tap, two presses of the Side button, and a glance at your iPhone (Face ID) or a tap and then a touch on the Touch ID/Home button (Touch ID). If you don’t have Face ID or Touch ID configured, you have to enter your Apple ID password to download apps.
The following tasks provide detailed examples for each of these steps.
Searching for Apps
If you know something about an app, such as its name, its developer, or its purpose you can quickly search the App Store to find the app. Here’s how to search for an app:
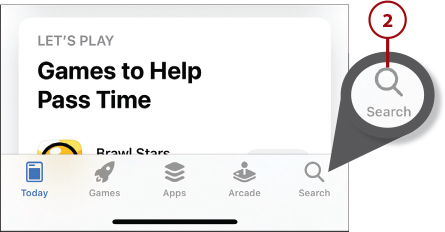
1 Move to the Home screen and tap App Store.

2 Tap Search.
3 Tap in the Search box.
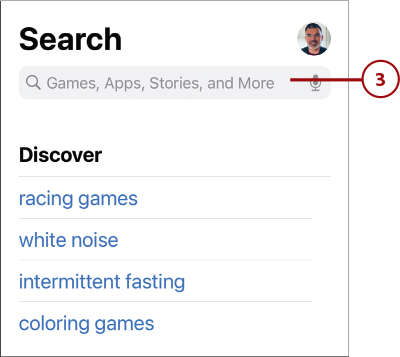
Follow the Trends?
Before you enter a search term on the Search screen, you see the Trending section, which shows the searches that are being performed most frequently. You can tap one of these to use it to search for apps.
4 Type a search term. This can be the type of app you’re looking for based on its purpose (such as Travel) or the name of someone associated with the app, its title, its developer, or even a topic. As you type, the app suggests searches that are related to what you’re typing.
5 Tap the search you want to perform or tap the Search key on the keyboard to search for the term you entered in step 4. The apps that meet your search term appear.

6 Swipe up and down on the screen to review the apps in the search results.
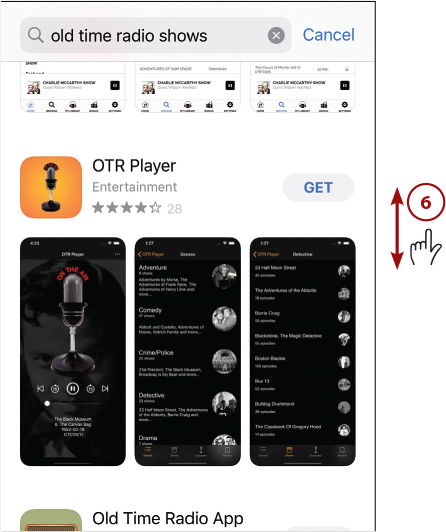
7 If none of the apps are what you are looking for, tap Clear (x) in the Search box and repeat steps 4–6.
8 When you find an app of interest to you, tap it. You move to the app’s information screen.

9 Use the app’s information on the information screen to evaluate the app and decide if you want to download it. You can read about the app, see screenshots (tap them to make them larger), play video previews, and read other people’s reviews to help you decide. If you want to download the app, see “Downloading Apps” later in this chapter for the details.

Browsing for Apps
If you don’t know of a specific app you want, you can browse the App Store. To browse, you can tap any graphics or links you see in the App Store app. One of the most useful ways to browse for apps is by using categories.
1 Open the App Store app.

2 Tap Apps (browsing for games or using the Today option works very similarly).
3 Swipe up the screen until you see the Top Categories section.
4 Tap See All to browse all available categories. (If you see a category on the Top Categories list that interests you, tap it instead and skip to step 6.)

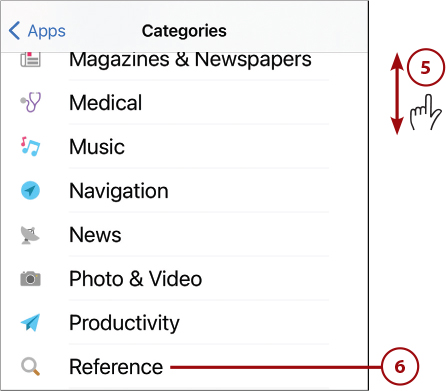
5 Swipe up and down to browse the categories.
6 Tap a category in which you are interested.
7 Swipe up and down to browse the groupings of apps, such as Top Free, Apps We Love, or Top Paid.
8 Tap See All for a grouping to browse the apps it contains.

9 Swipe up and down to browse the apps in the group you selected in step 7.
10 Tap an app in which you are interested. You move to that app’s information screen.

11 Use the information on the information screen to decide whether you want to download the app. You can read about the app, see screenshots, play video previews, and read other people’s reviews to help you decide. If you want to download the app, see “Downloading Apps” later in this chapter for the details. Or you can continue browsing by tapping Back (<) in the top-left corner of the screen to return to the previous list.

>>>Go Further
More on Finding Apps
Following are a few pointers to help you use the App Store:
Some apps include video previews indicated by the Play icon on an image. Tap the Play icon to watch it. Tap Done in the upper-left corner of the screen to move back to the screenshots.
After you have used an app, you can add a review by moving back to its Reviews tab and tapping Write a Review. You move to the Write a Review screen where you have to enter your App Store account information before you can write and submit a review. If the In-App Ratings & Reviews setting is enabled, you’re prompted to provide feedback for apps that you use.
You can read user reviews of the apps in the App Store. You should take these with a grain of salt. Some people have an issue with the developer or the type of app, are reviewing an older version of the app, or are commenting on issues unrelated to the app itself; these issues can cause an unfairly low rating. The most useful individual user reviews are very specific, as in “I wanted the app to do x, but it only does y.” Sometimes, it can be more helpful to look at the number of reviews and the average user rating than reading the individual reviews.
Downloading Apps
Downloading and installing apps is about as easy as things get, as you can see:
1 In the App Store, view the app you want to download.
2 Tap GET (for free apps) or the price (for apps that have a license fee). You’re prompted to download and install the app.

Why Apple ID? Why?
At times, you might be prompted to enter your Apple ID password to download an app even if you have Face ID or Touch ID set up to work with the App Store. This can happen for a variety of reasons so don’t be too surprised if it happens to you. After you’ve used Face ID or Touch ID for a while, you might find it annoying to have to actually type a password… at least I do.
More Interruptions?
Periodically, you might have to review and update payment information, license agreements, and the like. When this happens, follow the onscreen directions to complete whatever you need to do. When that process is complete, you go back to downloading the app. Fortunately, these interruptions don’t happen that often.
3 Press the Side button twice and look at the screen to confirm that you want to download and install the app (Face ID) or touch the Touch ID/Home button (Touch ID) (Touch ID not shown in the figures).

After you see the Done message, the app starts to download, and you see the progress of the process.
Wait for It… Or Not
You can do something else while apps are downloading; for example, look for and download other apps or move into a different app. The download process completes on its own.
When the process is complete, the status information is replaced by the OPEN button. You can tap OPEN to start using the app.
>>>Go Further
More on Apps
As you use the App Store app to install apps on your iPhone, keep the following hints handy:
When you install an app, it is placed in the first “open” position on the Home screens if you selected the Add to Home Screen option on the Home Screen settings page. You can move it to a more convenient location as described in Chapter 7, “Customizing How Your iPhone Looks.” If you selected the App Library option instead, apps you download are available only in the App Library.
Like other software, apps are updated regularly to fix problems, add features, or make other changes. If you set the Updates setting to on (green) as described earlier in this chapter, updates to your apps happen automatically in the background. Your apps are always current so you don’t have to update them manually. (More information on updating apps is in Chapter 18, “Maintaining and Protecting Your iPhone and Solving Problems.”)
If you tap the icon for your user account located in the upper-right corner of the App Store app’s screen, you access a number of other features on the Account screen. You can tap your account to update it. You can see the apps you’ve downloaded (called Purchased regardless of if they are free or required a fee), see your subscriptions, redeem gift cards, and more. At the bottom of the Account screen, you see a list of apps that have been updated recently.
If you see the Download icon next to an app rather than GET or BUY, that means you have previously downloaded (and paid for, if it isn’t free) the app but it’s not currently installed on your iPhone. Tap the icon to download and install it; if it’s a paid app, you won’t have to pay for it again.
To let someone else know about an app, tap the Share icon on the app’s page and then tap how you want to let him know; options include AirDrop, Messages, and Mail.
Apps can work in the background to keep their information current, such as Weather and Stocks. To configure this, open the Settings app, tap General, and tap Background App Refresh. Tap Background App Refresh again and tap Off to disable this, Wi-Fi to enable it only when your iPhone is connected to a Wi-Fi network, or Wi-Fi & Cellular Data to allow it any time your iPhone is connected to the Internet. Tap Back (<), located in the upper-left corner of the screen, to see the list of apps installed on your iPhone. To enable an app to work in the background, set its switch to on (green). To disable background activity for an app, set its switch to off (white).
After you install an app, move to the Settings screen and look for the app’s icon. If it’s there, the app has additional settings you can use to configure the way it works. Tap the app’s icon in the Settings app and use its Settings screen to configure it. If you don’t see an app you have installed on the Settings screen, move back to a Home screen and tap the app’s icon to launch it. (You might have to had opened an app once for it to appear.) Move back to the Settings screen and look for the app again. If it isn’t there, it doesn’t have settings.
Working with the App Library
It is likely you will have a lot of apps installed on your iPhone. When you install an app, it is placed on the next available slot on your Home screen (unless you chose the App Library Only option, in which case new apps are not added to a Home screen). Over time, you can end up with many pages of the Home screen. Swiping through all of these pages to find a specific app can be time consuming and annoying. Of course, you can quickly search for a specific app (see “Searching on Your iPhone,” in Chapter 3, “Using Your iPhone’s Core Features”) to locate and use it.
You can also use the App Library to find apps that you want to use. On the App Library screen, you can search for apps or browse apps in categories that are created for you automatically. For example, apps you use to listen to podcasts or watch television shows are grouped into the Entertainment category.
Keeping Things Tidy
You can organize your iPhone such that the first page or two of the Home screens contain the apps you use most frequently. You can use the App Library to get to those you don’t use that often. You can hide all the pages of the Home screens that you don’t use that often to make accessing the App Library even faster. (See Chapter 7, “Customizing How Your iPhone Looks,” for details.)
To keep your Home screens even tidier, use the App Library Only setting so that new apps only appear in the App Library. You can move apps you end up using frequently to a Home screen for faster access.
The App Library provides several ways to quickly find apps you want to use.
Using the App Library’s Categories to Find Apps
The App Library automatically groups apps by category. These categories make it easy to get to apps.
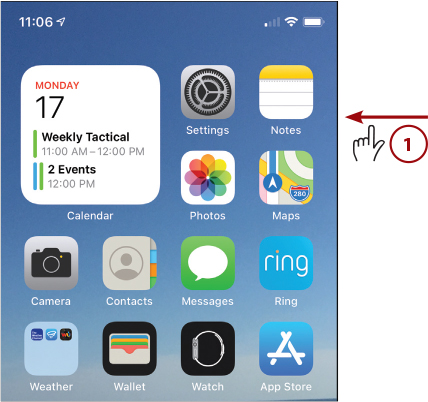
1 Move to a Home screen and swipe to the left as far as you can. The App Library appears.
2 Swipe up or down the screen to see the categories of apps available. Within the categories, you see two sizes of app icon. Larger icons lead you directly into an app. Smaller icons lead you to a group of apps.
3 To open an app, tap its large icon. The app launches, and you can skip the rest of these steps.
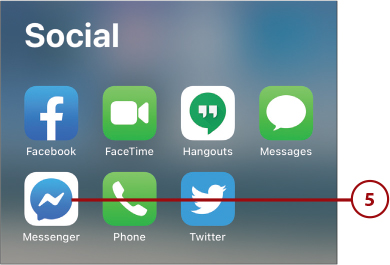
4 To use a small-icon app, tap the group in which it is contained. The group expands to show all of the apps in that group.
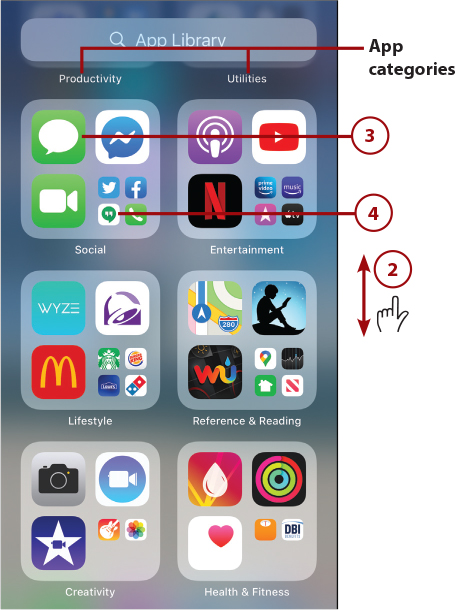
5 Tap the app you want to use.
Using the App Library to Search for Apps
You can use the App Library to search for apps as follows:
1 Move to a Home screen and swipe to the left as far as you can. The App Library appears.

2 Tap in the Search bar.

3 Type your search term. As you type, the list of apps shown narrows to just those that match your search.
4 When you see the app you want to use, tap it.

Using the App Library to Browse for Apps
Browsing the App Library is fast and can sometimes help you find an app when you don’t remember what it was called or you might have even forgotten it is on your phone.
1 Open the App Library and tap in the Search bar. You see a list of all the apps installed on your phone.

2 Swipe up the screen. The keyboard closes and the list of apps fills the screen.
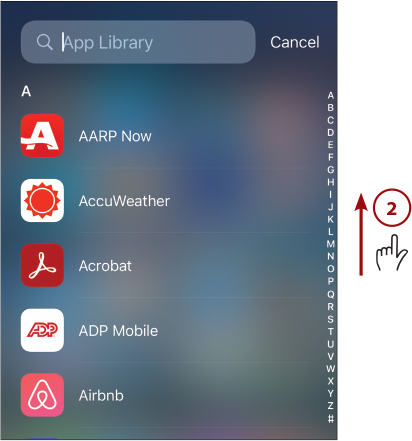
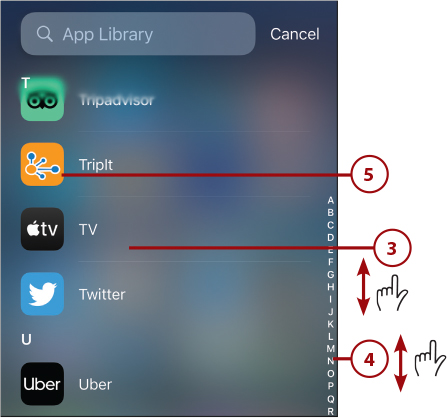
3 Swipe up and down the screen to browse the list of apps.
4 Swipe up and down on the index to browse rapidly.
5 When you see the app you want to use, tap it.
Deleting Apps
As you accumulate apps, it is likely that you’ll end up with a number of apps on your phone that you never or seldom use. These clutter your screen and consume some of your iPhone’s memory. It’s a good idea of get rid of apps you don’t use.
The Phone Does It for You
If you enabled the Offload Unused Apps setting as described earlier in the chapter, unused apps disappear from your phone automatically.
To get rid of an app whose time has come, perform the following steps:
1 Move to a Home screen containing the app you want to remove.
2 Touch and hold on the app’s icon until the menu appears.
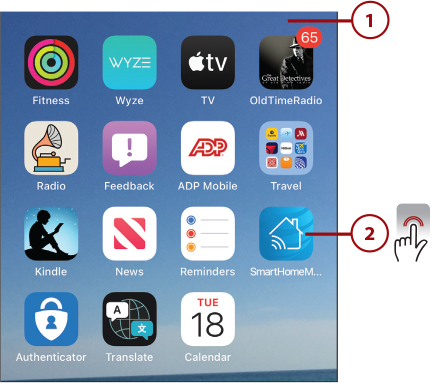
3 Tap Remove App.

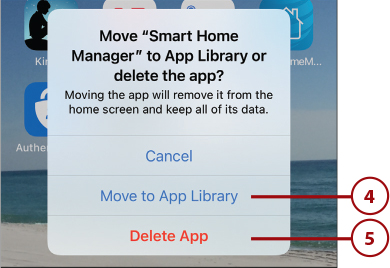
4 To remove the app from the Home screen but keep it on your phone, tap Move to App Library. The icon disappears from the Home screen, but you can still access the app through the App Library. This is useful if you aren’t sure that you won’t want the app or its data again. Skip the rest of these steps.
5 To delete the app from your phone, tap Delete App.
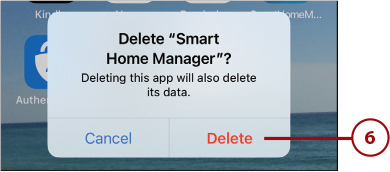
6 If you are sure you won’t need any data stored by the app, tap Delete. The app and its data are deleted from your phone.
When It’s Gone, It’s Gone
When you delete an app from your phone, any data associated with that app that is only stored on your phone is deleted, too. So, make sure you don’t need that data any more before you delete the app.
Pay Once, Download Forever
Don’t be concerned about deleting apps that you have paid for because you can download and install them again for no additional fee.
>>>Go Further
App Clips
App clips enable you to use an app’s functionality quickly and easily without needing to install the app on your phone. For example, suppose you want to park in a lot that uses an app to collect payment but you don’t have that app installed on your phone. Instead of taking the time to find and download the app, you can scan a QR code, an App Clip code, or Near Field Communication (NFC) tag. The associated app clip appears automatically, and you can complete whatever you are trying to do, such as to pay for a parking spot.

And in some cases, you might want to use the app only once so it’s not worth installing on your phone. App clips can help prevent your phone from being overloaded with unused or seldom-used apps.
To use app clips, look for a sign or placard providing an app clip code that you can scan. Point your phone at the code; if the code isn’t recognized and scanned automatically, press the Side button at the prompt to scan it. When the clip appears, tap Open and follow the onscreen prompts to use the app’s functionality. Any identification or payment you need to provide comes from your Apple ID and Apple Pay, so you don’t have to create additional accounts or provide payment information to complete the action you are performing.
App clips that you have used recently can be found in the App Library. When you want to get back to a clip, swipe all the way to the left on a Home screen to open the App Library. Browse or search for the clip you want to use. Tap it to launch it.
Customizing How Your iPhone Works with Widgets
Widgets are “mini” versions of apps installed on your iPhone that provide you with information at-a-glance and enable you to move into the associated app. You can access widgets from three locations:
Widget Center—The Widget Center provides a collection of widgets that you can access and use quickly. You can determine which widgets are installed and how those widgets are organized.
Smart stacks—A smart stack enables you to access multiple widgets that share the same space on the screen. All the widgets appear within the same window; you can swipe through them to change the active widget. Smart stacks can also be configured to “flip” through widgets automatically.
Widgets on Home screens—You can put widgets and smart stacks on Home screens, which makes them even easier to access. They appear alongside app and folder icons and work similarly.
Working with the Widget Center

You can open the Widget Center in a number of ways:
Wake your iPhone and swipe to the right on the Lock screen.
Move to a Home page and swipe all the way to the right.
Open the Notification Center and then swipe to the right.
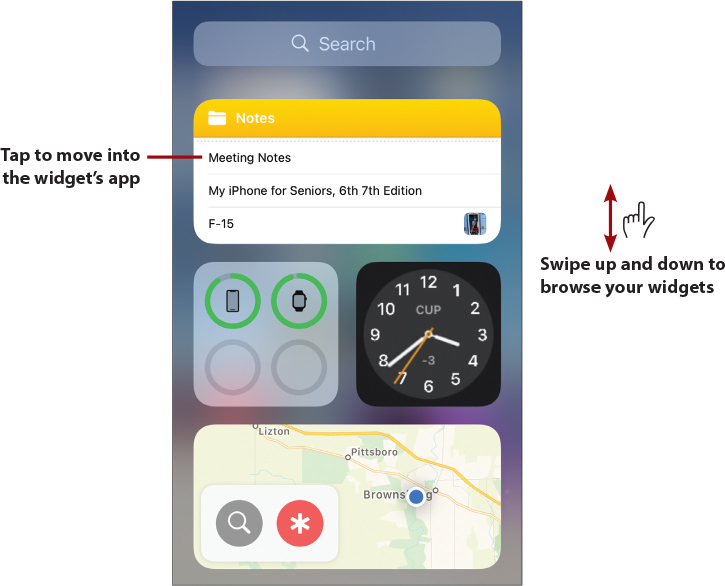
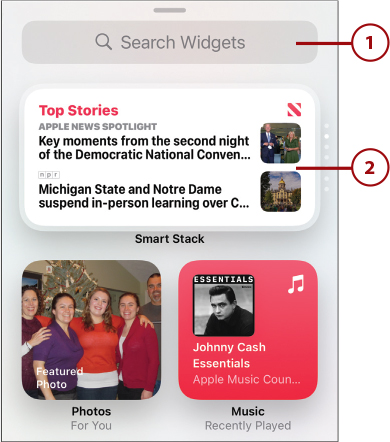
At the top of the Widget Center, you see the Search tool. Beneath that, you see widgets for apps installed on your iPhone. Swipe up and down the screen to browse your widgets.
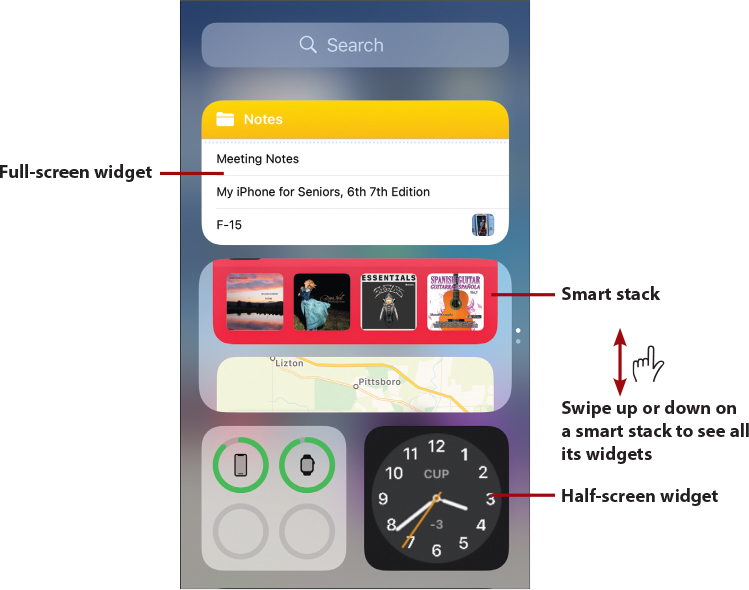
Widgets come in two different sizes: half-screen or full-screen. Half-screen widgets can be placed side by side so two of them appear on the same row. Full-screen widgets take up an entire row.
Each widget provides information or functions based on its app. For example, you can use the Notes widget to see your recent notes or notes folder. You can see your daily calendar in the associated widget, get news in the News app’s widget, or control music in the Music widget.
You can interact with widgets in several ways. Some widgets provide information that you can view within the widget, such as Calendar, Stocks, or Weather. When you tap something within some widgets (Notes is an example), the associated app opens and either performs the task you indicated or shows more information about what you selected.
Smart stacks contain multiple widgets. You can move among the widgets in a stack by swiping up and down on the stack. As you swipe, the next widget in the stack appears. You can keep swiping until you return to the first widget in the stack. Smart stacks can also be configured to rotate between widgets automatically.
If you don’t move into an app from a widget, you can close the Widget Center by swiping to the left. You move back to the screen you came from, such as a Home screen. If you do move into an app from a widget, you work with that app just as if you moved into it from a Home screen.
Be aware that there are two basic types of widgets: core iPhone widgets or app widgets. Core iPhone widgets are installed automatically and behave in specific ways. Some apps that you install on your phone also have widgets; these behave and are configured slightly differently than the core widgets. App widgets always appear at the bottom of the Widget Center.
You can determine which widgets appear in the Widget Center and the order in which those widgets appear on the screen; for example, you might want your most frequently used widgets to be at the top of the screen.
Organizing the Widget Center
To organize the Widget Center, perform the following steps:
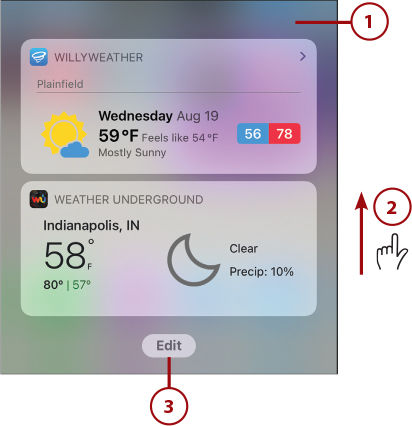
1 Open the Widget Center by moving to a Home screen and swiping all the way to the right.
2 Swipe all the way up the screen.
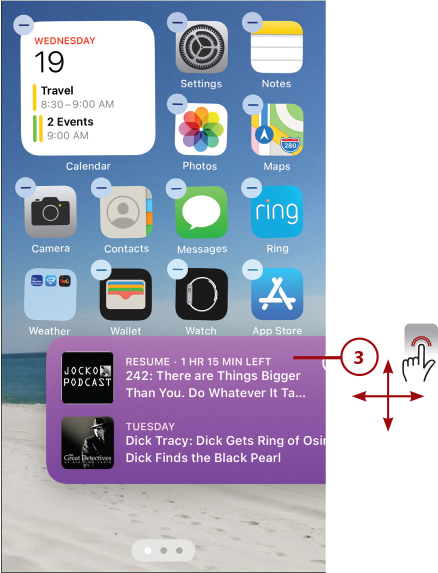
3 Tap Edit. The widgets start jiggling and you see the delete (–) symbol in the upper-left corner of the widgets.
4 To remove a widget, tap remove (–).

5 Tap Remove at the prompt. This removes the widget from the Widget Center (you can add it back if you change your mind).

6 Touch and hold on a widget and drag it up or down the screen to change its location. If you drag a half-screen widget that has another one in the same row, both widgets move at the same time. You can’t change the position of app widgets, which always appear at the bottom of the Widget Center.
7 When the widget is where you want it to be, take your finger off the screen. The widget stays in its new location.
8 When you’re done removing or moving widgets, tap Done. The widgets are locked in place.

Adding Core Widgets to the Widget Center
You add core widgets to the Widget Center with the following steps:
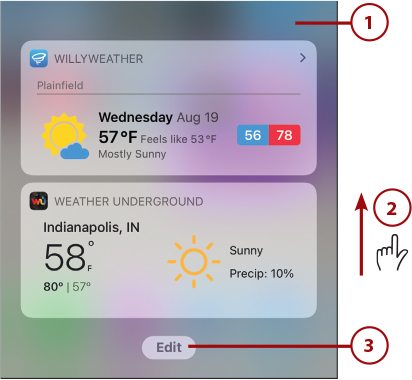
1 Open the Widget Center by moving to a Home screen and swiping all the way to the right.
2 Swipe all the way up the screen.
3 Tap Edit. The widgets start jiggling and you see the delete (–) symbol in the upper-left corner of the widgets.
4 Tap Add (+). The palette of available widgets appears.

5 Find the widget you want to add by swiping up or down the screen to browse for widgets or by searching for a specific widget.
6 Tap the widget you want to add.

7 Swipe left and right to see the widget’s options.
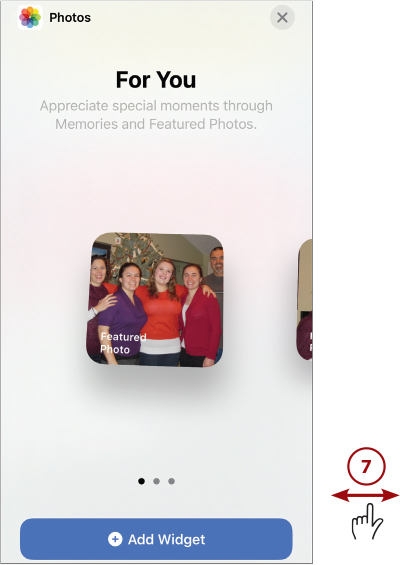
8 When you see the option you want to add, tap Add Widget. The widget is added to the Widget Center.

9 Drag the widget to where you want it to appear on the Widget Center.
10 Tap Done.

Adding and Configuring a Default Smart Stack
You can add and configure a smart stack that contains default widgets as follows:
1 Perform steps 1 through 4 in the previous task to put the Widget Center in Edit mode and move to the Add screen.
2 Tap the Smart Stack widget.
3 Swipe left and right to see the smart stack options.
4 When you see the option you want to add, tap Add Widget. The smart stack is added to the Widget Center.

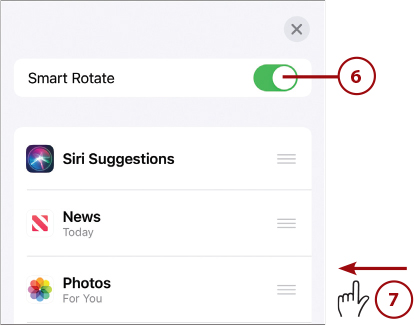
5 Tap twice on the smart stack. The configure sheet appears.

6 If you don’t want the widgets inside the smart stack to rotate automatically, set the Smart Rotate switch to off (white).
7 To remove a widget from the stack, swipe to the left on it.
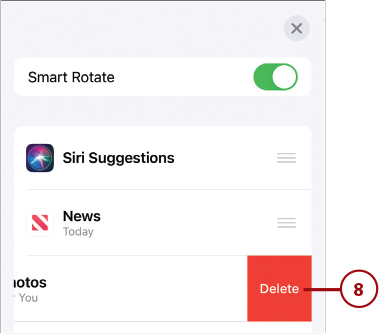
8 Tap Delete. The widget is removed from the stack.
9 To change the order in which the widgets appear in the stack, drag widgets up or down by their list order icon.
10 When you’re done configuring the stack, tap close (x).

11 Drag the stack up or down the Widget Center.
12 When you’re done configuring the stack, tap Done.

>>>Go Further
App Widgets
App widgets (which come with apps you install on your phone) behave a bit differently than core widgets that are associated with apps preinstalled on your phone. App widgets always appear in a section at the bottom of the Widget Center. Like core widgets, you can view their information or tap them to move into the associated app.
You can also configure app widgets: Put the Widget Center in Edit mode and swipe all the way up the screen. Tap Customize in the app widget section at the bottom of the Widget Center. You see the Add Widgets screen.
At the top of the screen, you see the app widgets currently installed on the Widget Center. Tap Delete (–) to remove them or drag them up or down to change the order in which they appear.
In the MORE WIDGETS section, you see all of the app widgets available. Tap Add (+) to add a widget to the Widget Center. The widget moves to the top of the screen, and you can drag it up or down to change the order in which it appears.
When you are finished configuring app widgets, tap Done. You see the new set of app widgets at the bottom of the Widget Center.
Adding Widgets to Home Screens
You can put your favorite widgets on Home screens to make them more accessible.
1 Open the Widget Center, put it in Edit mode, and swipe the screen so you can see the widget you want to put on a Home screen.

2 Drag the widget to the right until the Home screen appears.

3 Drag the widget around the Home screen or onto a different Home screen until it is where you want it to be placed.
4 Tap Done.

Configuring Widgets on Home Screens
You can configure widgets on Home screens just as you can apps and folders. For more details, see “Customizing Your Home Screens” in Chapter 7.