
7. Communicating with the Phone and FaceTime Apps
In this chapter, you explore all the cell phone and FaceTime functionality that your iPhone has to offer. Topics include the following:
Although it’s also a lot of other great things, such as a music player, web browser, email tool, and such, there’s a reason the word phone is in iPhone. It’s a feature-rich cell phone that includes some amazing features, two of which are visual voicemail and FaceTime. Other useful features include a speakerphone, conference calling, and easy-to-use onscreen controls. Plus your iPhone’s phone functions are integrated with its other features. For example, when using the Maps application, you might find a location, such as a business, that you’re interested in contacting. You can call that location just by tapping the number you want to call directly on the Maps screen.
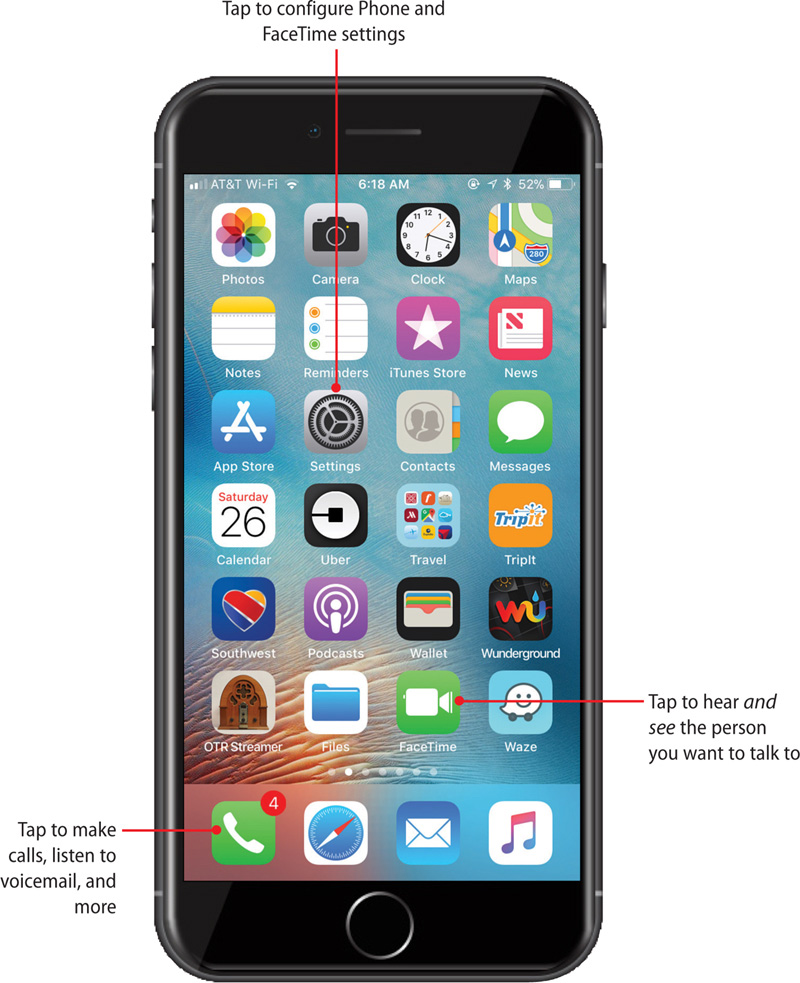
Phone app—The iPhone can run many different kinds of apps that do all sorts of useful things. The iPhone’s cell phone functionality is provided by the Phone app. You use this app whenever you want to make calls, answer calls, or listen to voicemail.
Visual Voicemail—The Phone app shows you information about your voicemails, such as the person who left each message, a time and date stamp, and the length of the message. The Phone app provides a lot more control over your messages, too; for example, you can easily fast forward to specific parts of a message that you want to hear. (This is particularly helpful for capturing information, such as phone numbers.) And if that wasn’t enough, you can also read transcripts of voicemails so you don’t have to listen to them at all.
FaceTime—This app enables you to have videoconferences with other people (using iPhones or Mac computers) so that you can both see and hear them. Using FaceTime is intuitive so you won’t find it any more difficult than making a phone call.
FaceTime Audio—You can make FaceTime calls using only audio; this is similar to making a phone call. One difference is that when you are using a Wi-Fi network to place a FaceTime audio call, there are no extra costs for the call, no matter if you are calling someone next-door or halfway around the world.
Configuring Phone Settings
Of course, we all know that your ringtone is the most important phone setting, and you’ll want to make sure your iPhone’s ringtones are just right. Use the iPhone’s Sounds settings to configure custom or standard ringtones and other phone-related sounds, including the new voicemail sound. You can also configure the way your phone vibrates when you receive a call. These are explained in Chapter 5, “Customizing How Your iPhone Looks and Sounds.”
You can also have different ringtones and vibrations for specific people so you can know who is calling just by the sound and feel when a call comes in (configuring contacts is explained in Chapter 6, “Managing Contacts”).
And you’ll want to configure notifications for the Phone app. These include alerts, the app’s badge, sounds, and vibrations. Configuring notifications is explained in Chapter 4, “Customizing How Your iPhone Works.”
It is likely that you can use the Phone app with its default settings just fine. However, you might want to take advantage of some of its features by configuring the settings described in the following table. To access these settings, open the Settings app and tap Phone.
Provider Differences
The settings for the Phone app depend on the cell phone provider you use. The table lists most, but certainly not all, of the options you might have available. Depending on the provider you use, you may see more, fewer, or different settings than shown in the table. It’s a good idea to open your Phone settings to see the options available to you.
Phone Settings
Making Voice Calls
There are a number of ways to make calls with your iPhone; after a call is in progress, you can manage it in the same way no matter how you started it.
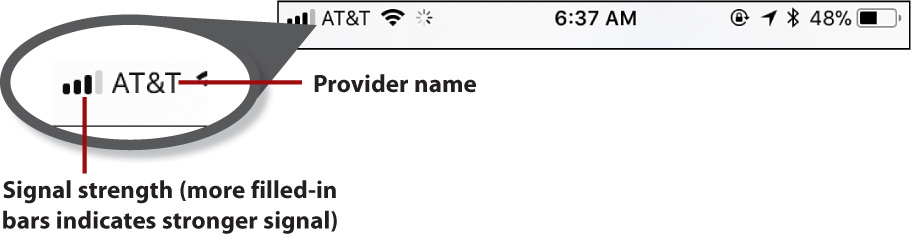
You can tell you are able to make a call or receive calls using your cellular network when you see your provider’s information at the top of the screen along with the strength of the signal your phone is receiving. As long as you see at least one bar shaded in, you should be able to place and receive calls via the cellular network. More shaded bars are better because they mean you have a stronger signal, meaning the call quality will be better.
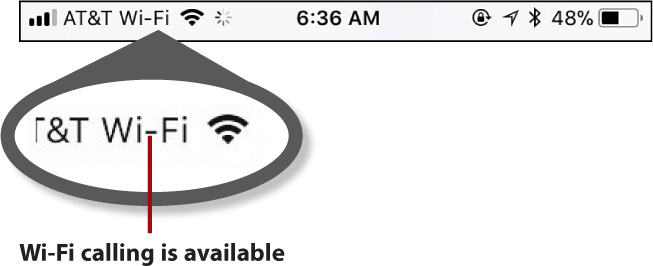
If the Wi-Fi calling feature is enabled and your phone is connected to a Wi-Fi network, you see the Wi-Fi calling icon for your provider at the top of the screen.
With a reasonably strong cellular signal or connection to a Wi-Fi network with Wi-Fi calling enabled, you are ready to make calls.
When you leave the coverage area for your provider and move into an area that is covered by another provider that supports roaming, your iPhone automatically connects to the other provider’s network. When you are roaming, you see a different provider near the signal strength indicator at the top of the screen. For example, if AT&T is your provider and you travel to Toronto, Canada, the provider might become Rogers instead of AT&T, which indicates you are roaming. (In most cases, your provider sends a text message to you explaining the change in networks, including information about roaming charges.) Although the change to a roaming network is automatic, you need to be very aware of roaming charges, which can be significant depending on where you use your iPhone and what your default network is. Before you travel outside of your default network’s coverage, check with your provider to determine the roaming rates that apply to where you are going. Also, see if there is a discounted roaming plan for that location. If you don’t do this before you leave, you might get a nasty surprise when the bill arrives because roaming charges can be substantial.
Dialing with the Keypad
The most obvious way to make a call is to dial the number.
![]() On the Home screen, tap Phone. The Phone app opens.
On the Home screen, tap Phone. The Phone app opens.

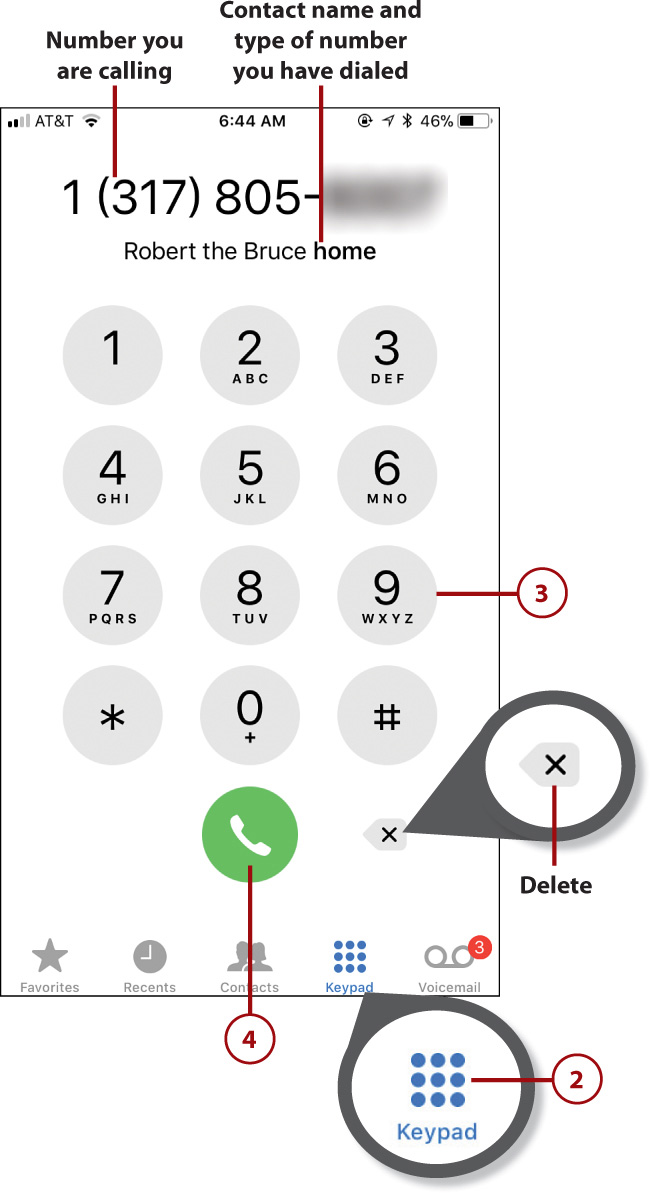
![]() If you don’t see the keypad on the screen, tap Keypad.
If you don’t see the keypad on the screen, tap Keypad.
![]() Tap numbers on the keypad to dial the number you want to call. If you dial a number associated with one or more contacts, you see the contact’s name and the type of number you’ve dialed just under the number. (If you make a mistake in the number you are dialing, tap the Delete icon located to the right of the Call icon to delete the most recent digit you entered.)
Tap numbers on the keypad to dial the number you want to call. If you dial a number associated with one or more contacts, you see the contact’s name and the type of number you’ve dialed just under the number. (If you make a mistake in the number you are dialing, tap the Delete icon located to the right of the Call icon to delete the most recent digit you entered.)
![]() Tap the Call icon. The app dials the number, and the Call screen appears.
Tap the Call icon. The app dials the number, and the Call screen appears.
![]() Use the Call screen to manage the call (not shown in the figure); see “Managing In-Process Voice Calls” later in this chapter for the details.
Use the Call screen to manage the call (not shown in the figure); see “Managing In-Process Voice Calls” later in this chapter for the details.
Dialing with Contacts
As you saw in Chapter 6, the Contacts app is a complete contact manager so you can store various kinds of phone numbers for people and organizations. To make a call using a contact, follow these steps.
![]() On the Home screen, tap Phone.
On the Home screen, tap Phone.
![]() Tap Contacts.
Tap Contacts.

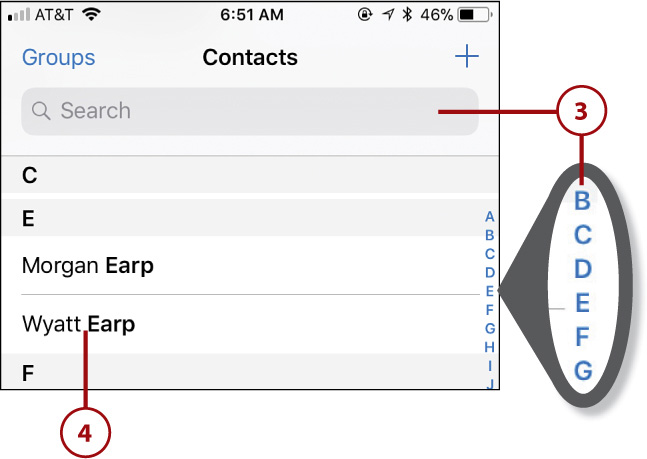
![]() Browse the list, search it, or use the index to find the contact you want to call. (Refer to Chapter 6 for information about using the Contacts app.)
Browse the list, search it, or use the index to find the contact you want to call. (Refer to Chapter 6 for information about using the Contacts app.)
![]() Tap the contact you want to call.
Tap the contact you want to call.
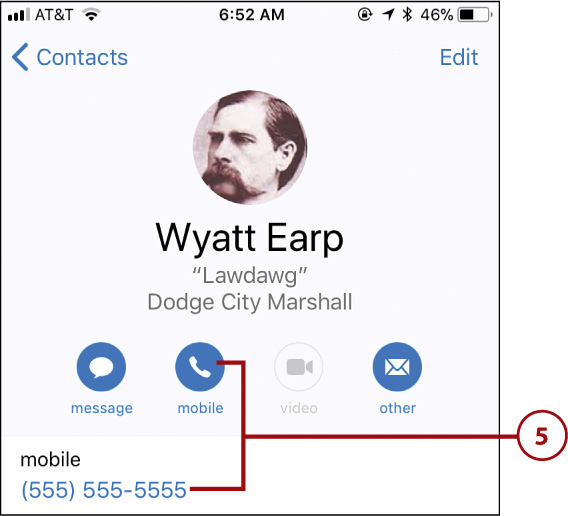
![]() Tap the number you want to dial; or tap the Call icon that is labeled with the type of number under the contact’s name (if the person has more than one phone number, you are then prompted to tap the number you want to call). The app dials the number, and the Call screen appears.
Tap the number you want to dial; or tap the Call icon that is labeled with the type of number under the contact’s name (if the person has more than one phone number, you are then prompted to tap the number you want to call). The app dials the number, and the Call screen appears.
![]() Use the Call screen to manage the call (not shown in the figure); see “Managing In-Process Voice Calls” later in this chapter for the details.
Use the Call screen to manage the call (not shown in the figure); see “Managing In-Process Voice Calls” later in this chapter for the details.
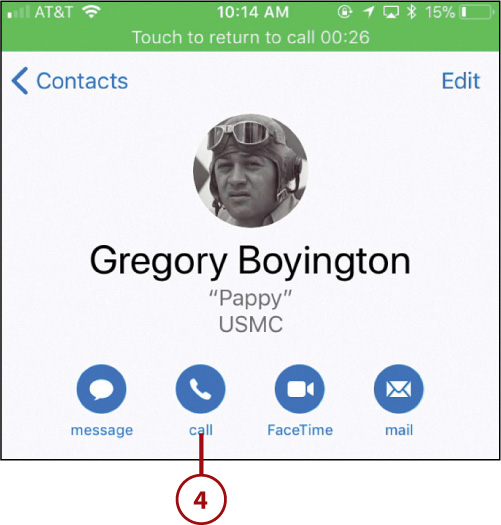
Call Icon
At the top of a contact’s screen, you see the Call icon (the receiver). If a contact has only one number, this icon is labeled with the label applied to that number, such as iPhone or mobile; tap the icon to call that number. If the person has more than one number, the icon is labeled with call; when you tap the call icon, you see all of the person’s numbers and can tap the number you want to dial.
Dialing with Favorites
You can save contacts as favorites to make calling or videoconferencing them even simpler. (You learn how to save favorites in various locations later in this chapter. You learn how to make a contact into a favorite in Chapter 6.)
![]() On the Home screen, tap Phone.
On the Home screen, tap Phone.
![]() Tap the Favorites icon.
Tap the Favorites icon.
![]() Browse the list until you see the favorite you want to call. Under the contact’s name, you see the type of favorite, such as a phone number (identified by the label in the Contacts app, for example, iPhone or mobile) or FaceTime.
Browse the list until you see the favorite you want to call. Under the contact’s name, you see the type of favorite, such as a phone number (identified by the label in the Contacts app, for example, iPhone or mobile) or FaceTime.
![]() Tap the favorite you want to call; to place a voice call, tap a phone number (if you tap a FaceTime contact, a FaceTime call is placed instead). The app dials the number, and the Call screen appears.
Tap the favorite you want to call; to place a voice call, tap a phone number (if you tap a FaceTime contact, a FaceTime call is placed instead). The app dials the number, and the Call screen appears.
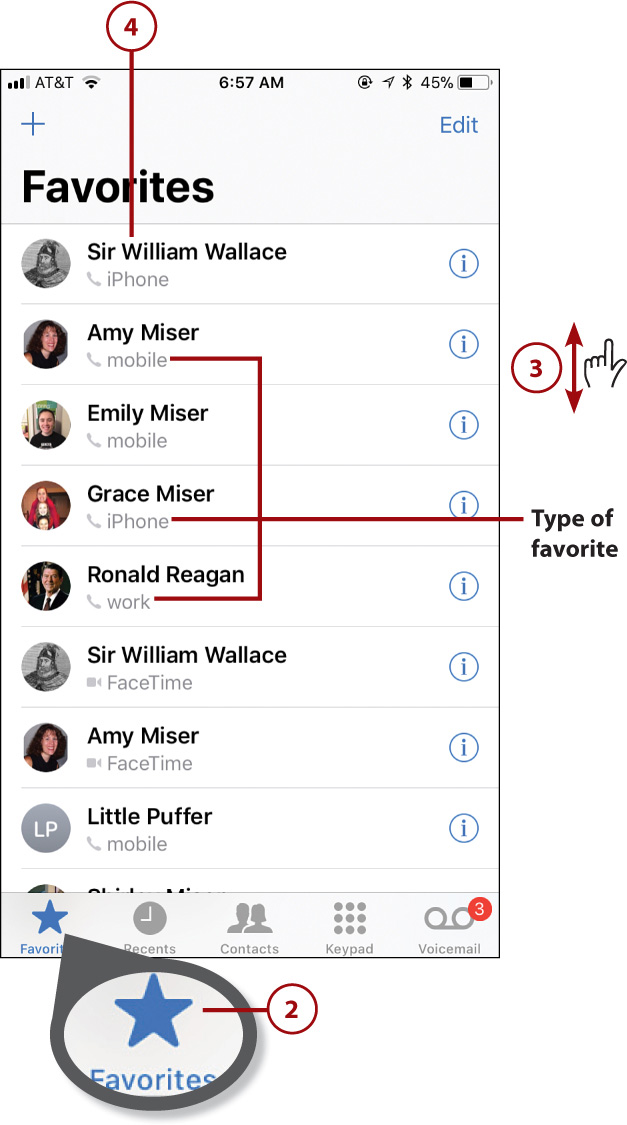
![]() Use the Call screen to manage the call (not shown in the figure); see “Managing In-Process Voice Calls” later in this chapter for the details.
Use the Call screen to manage the call (not shown in the figure); see “Managing In-Process Voice Calls” later in this chapter for the details.
Nobody’s Perfect
If your iPhone can’t complete the call for some reason, such as not having a strong enough signal, the Call Failed screen appears. Tap Call Back to try again and maybe try moving to another location that might have a stronger signal or tap Done to give up. When you tap Done, you return to the screen from which you came.
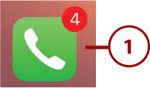
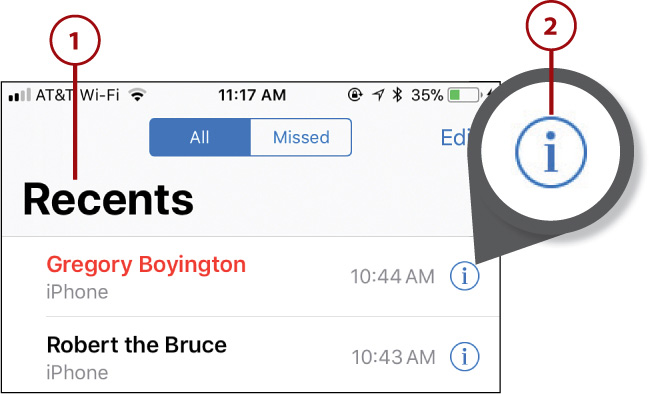
Dialing with Recents
As you make, receive, or miss calls, your iPhone keeps tracks of all the numbers on the Recents list. You can use the Recents list to make calls.
![]() On the Home screen, tap Phone.
On the Home screen, tap Phone.
![]() Tap Recents.
Tap Recents.
![]() Tap All to see all calls.
Tap All to see all calls.
![]() Tap Missed to see only calls you missed.
Tap Missed to see only calls you missed.
![]() If necessary, browse the list of calls.
If necessary, browse the list of calls.
![]() To call the number associated with a recent call, tap the title of the call, such as a person’s name, or the number if no contact is associated with it. The app dials the number, and the Call screen appears. Skip to step 10.
To call the number associated with a recent call, tap the title of the call, such as a person’s name, or the number if no contact is associated with it. The app dials the number, and the Call screen appears. Skip to step 10.
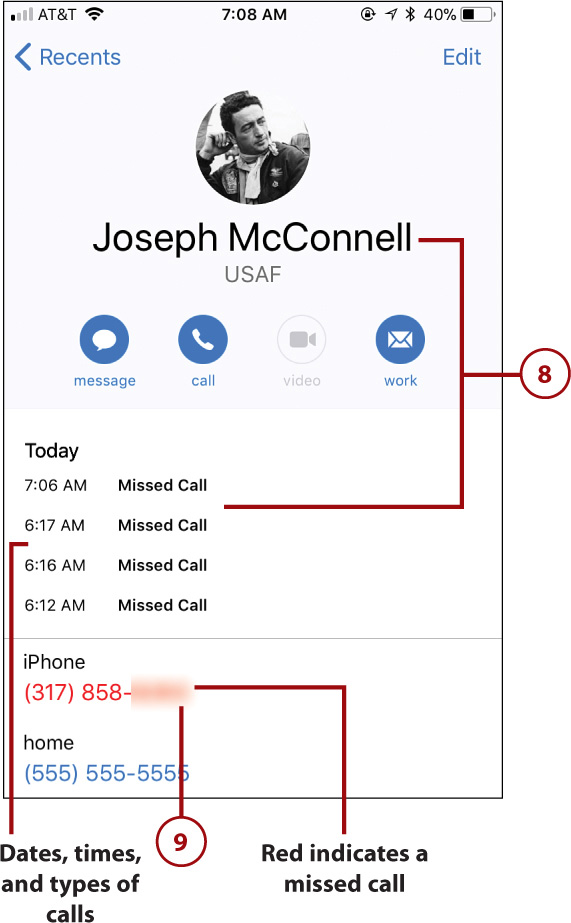
![]() To get more information about a recent call, for example, to see exactly what time yesterday they called, tap its Info (i) icon. The Info screen appears.
To get more information about a recent call, for example, to see exactly what time yesterday they called, tap its Info (i) icon. The Info screen appears.
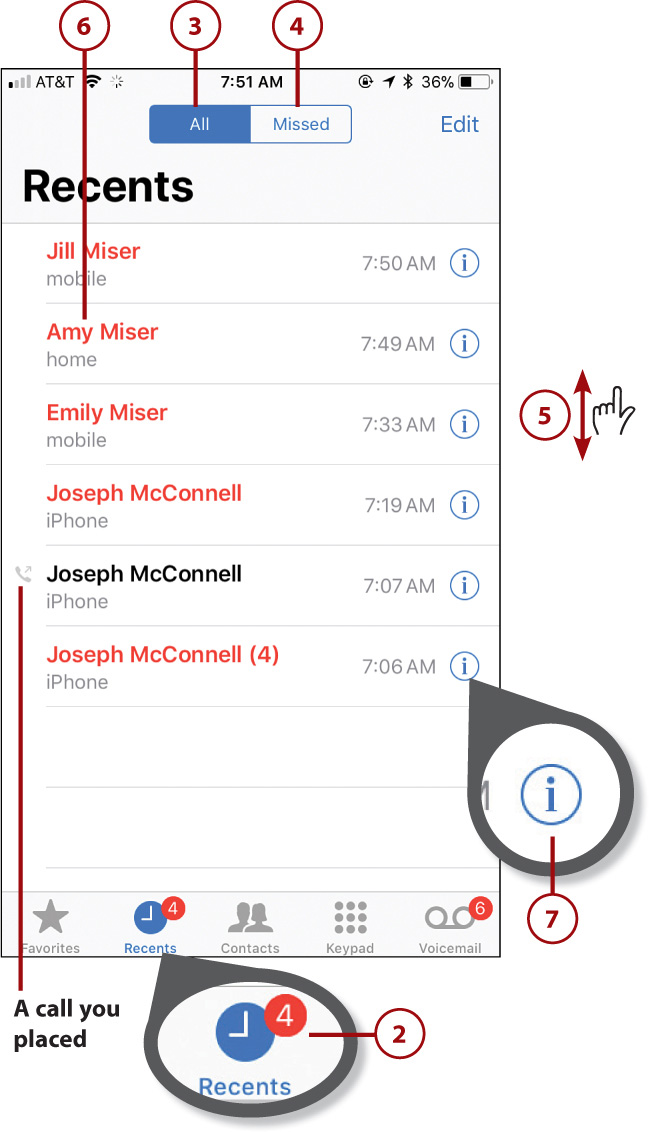
Info on the Recents Screen
If you have a contact on your iPhone associated with a phone number, you see the person’s name and the label for the number (such as mobile). If you don’t have a contact for a number, you see the number itself. If a contact or number has more than one call associated with it, you see the number of recent calls in parentheses next to the name or number. If you initiated a call, you see the phone icon next to the contact’s name and label.
![]() Read the information about the call or calls. For example, if the call is related to someone in your Contacts list, you see detailed information for that contact. If there are multiple recent calls, you see information for each call, such as its status (Missed Call, Canceled Call, or Outgoing Call, for example) and time.
Read the information about the call or calls. For example, if the call is related to someone in your Contacts list, you see detailed information for that contact. If there are multiple recent calls, you see information for each call, such as its status (Missed Call, Canceled Call, or Outgoing Call, for example) and time.
![]() Tap a number on the Info screen. The app dials the number, and the Call screen appears.
Tap a number on the Info screen. The app dials the number, and the Call screen appears.
Going Back
To return to the Recents screen without making a call, tap Recents.
![]() Use the Call screen to manage the call (not shown in the figure); see “Managing In-Process Voice Calls” later in this chapter for the details.
Use the Call screen to manage the call (not shown in the figure); see “Managing In-Process Voice Calls” later in this chapter for the details.
Dialing from the FAVORITES Widget
Using the FAVORITES widget, you can quickly call a favorite. Use the following steps.
Managing Widgets
If you don’t see the FAVORITES widget, you need to add it. See Chapter 4 for the steps to manage your widgets.
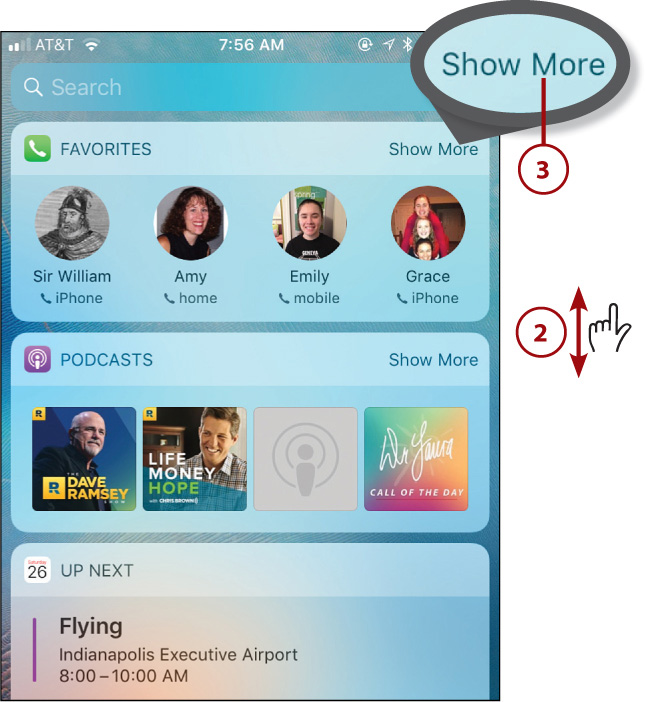
![]() From the Home or Lock screen, swipe to the right to open your widgets.
From the Home or Lock screen, swipe to the right to open your widgets.
![]() Swipe up or down until you see the FAVORITES widget.
Swipe up or down until you see the FAVORITES widget.
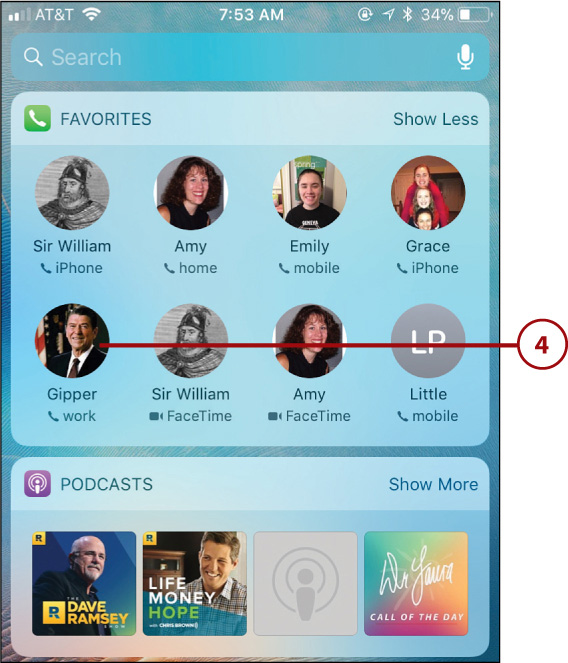
![]() Tap Show More to see the full list of favorites. The list expands.
Tap Show More to see the full list of favorites. The list expands.
![]() Tap the person you want to call.
Tap the person you want to call.
![]() Use the Call screen to manage the call (not shown in the figure); see the next section for the details.
Use the Call screen to manage the call (not shown in the figure); see the next section for the details.
You’ve Got the Touch
If your iPhone supports 3D Touch (iPhone 6s/6s Plus and later), you can also place calls to favorites by pressing on the Phone app. The FAVORITES pane appears; tap a favorite to place a call. You can also access the most recent voicemail or see the most recent call.
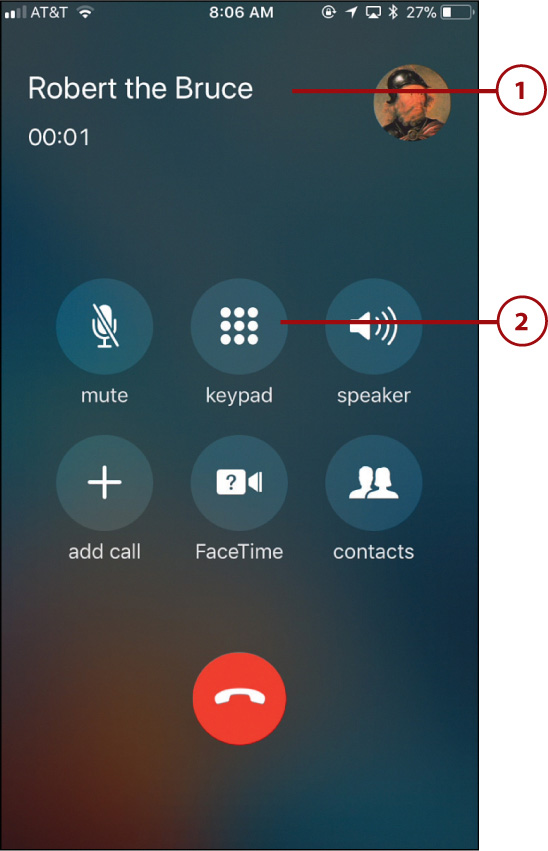
Managing In-Process Voice Calls
When you place a call, there are several ways to manage it. The most obvious is to place your iPhone next to your ear and use your iPhone like any other phone you’ve ever used. As you place your iPhone next to your ear, the controls on its screen become disabled so you don’t accidentally tap onscreen icons with the side of your face or your ear. When you take your iPhone away from your ear, the Call screen appears again and the Phone app’s controls become active again.
When you are on a call, press the Volume buttons on the left side of the iPhone to increase (top button) or decrease (bottom button) its volume. Some of the other things you can do while on a call might not be so obvious, as you learn in the next few tasks.
Following are some of the icons on the Call screen that you can use to manage an active call:
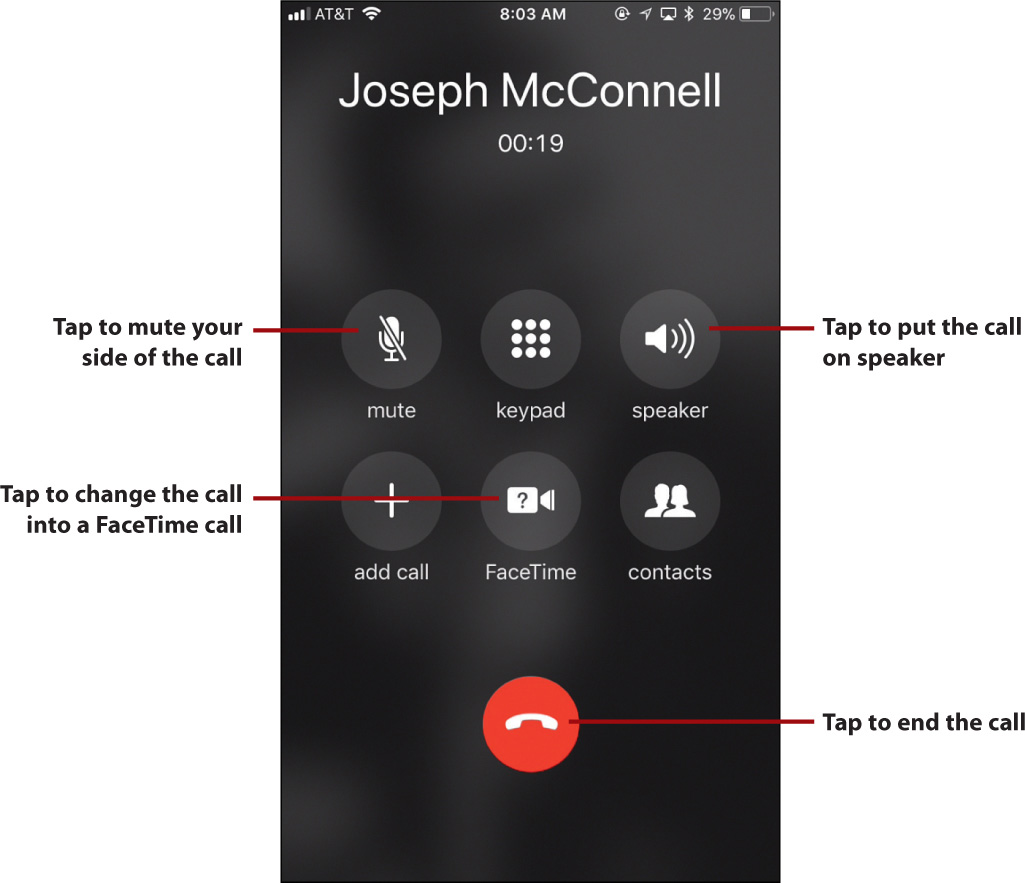
Mute your side of the call by tapping mute. You can hear the person on the other side of the call, but he can’t hear anything on your side.
Tap speaker to use the iPhone’s speakers to hear the call. You can speak with the phone held away from your face, too.
Tap FaceTime to convert the voice call into a FaceTime call (read more on FaceTime later in this chapter).
When you’re done with the call, tap the Receiver icon to end it.
Contact Photos on the Call Screen
If someone in your contacts calls you, or you call her, the photo associated with the contact appears on the screen. Depending on how the image was captured, it either appears as a small icon at the top of the screen next to the contact’s name or fills the entire screen as the background wallpaper.
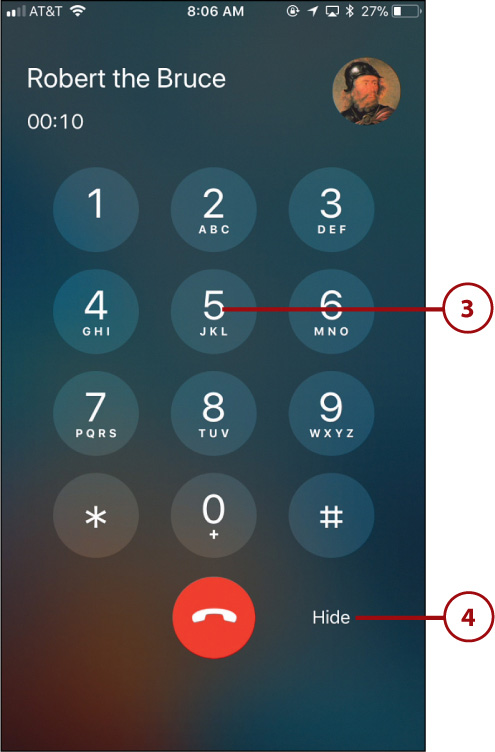
Entering Numbers During a Call
You often need to enter numbers during a call, such as to log in to a voicemail system, access an account, or enter a meeting code for an online meeting.
![]() Place a call using any of the methods you’ve learned so far.
Place a call using any of the methods you’ve learned so far.
![]() Tap keypad.
Tap keypad.
![]() Tap the numbers you want to enter.
Tap the numbers you want to enter.
![]() When you’re done, tap Hide. You return to the Call screen.
When you’re done, tap Hide. You return to the Call screen.
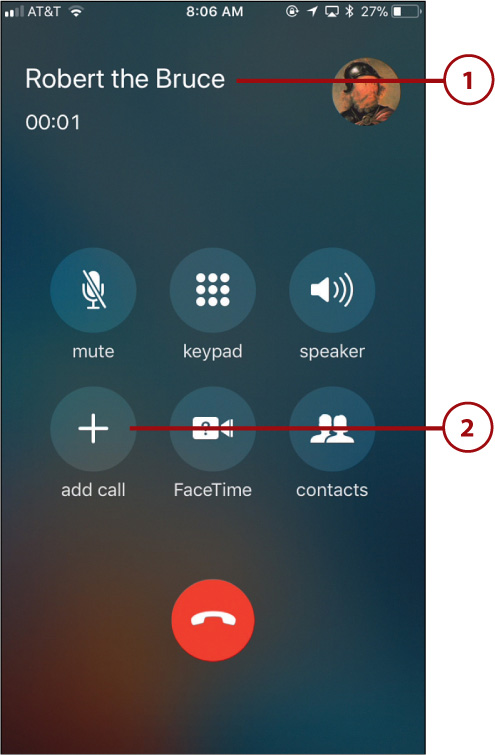
Making Conference Calls
Your iPhone makes it easy to talk to multiple people at the same time. You can have two separate calls going on at any point in time. You can even create conference calls by merging them together. Not all cell providers support two on-going calls or conference calling, though. If yours doesn’t, you won’t be able to perform the steps in this section.
![]() Place a call using any of the methods you’ve learned so far.
Place a call using any of the methods you’ve learned so far.
![]() Tap add call.
Tap add call.
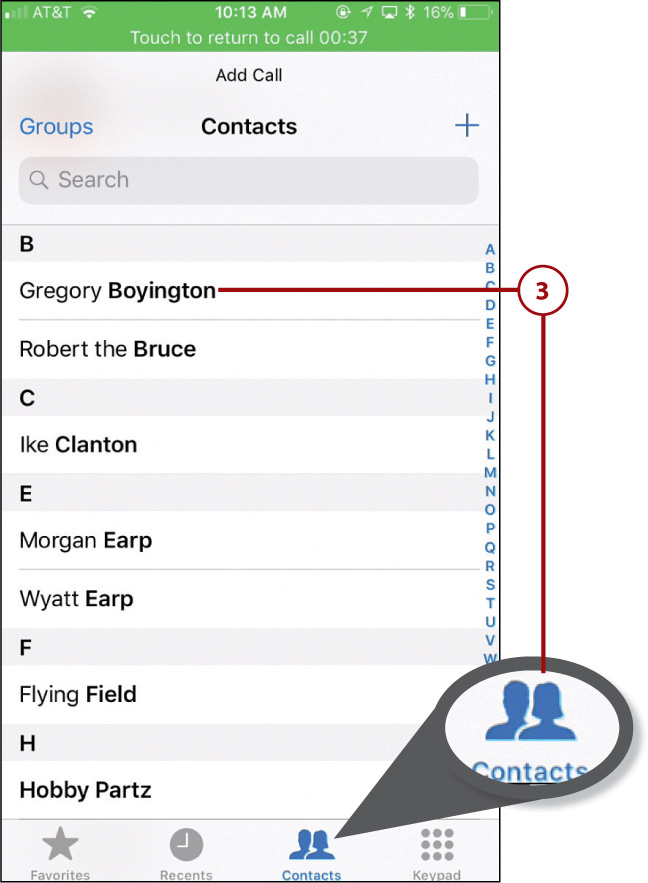
![]() Tap the icon you want to use to place the next call. Tap Favorites to call a favorite, tap Recents to use the Recents list, tap Contacts to place the call using the Contacts app, or tap Keypad to dial the number. These work just as they do when you start a new call.
Tap the icon you want to use to place the next call. Tap Favorites to call a favorite, tap Recents to use the Recents list, tap Contacts to place the call using the Contacts app, or tap Keypad to dial the number. These work just as they do when you start a new call.
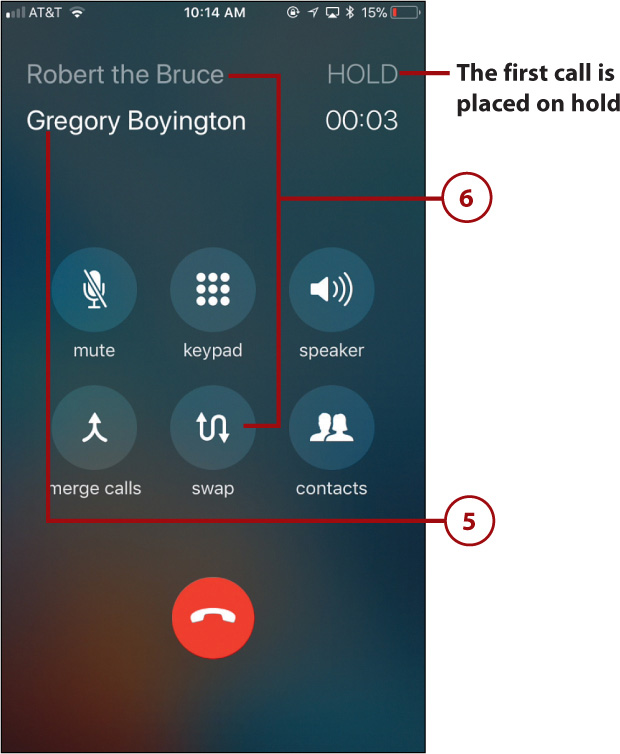
![]() Place the call using the option you selected in step 3. Doing so places the first call on hold and moves you back to the Call screen while the Phone app makes the second call. The first call’s information appears at the top of the screen, including the word hold so you know the first call is on HOLD. The app displays the second call just below that, and it is currently the active call.
Place the call using the option you selected in step 3. Doing so places the first call on hold and moves you back to the Call screen while the Phone app makes the second call. The first call’s information appears at the top of the screen, including the word hold so you know the first call is on HOLD. The app displays the second call just below that, and it is currently the active call.
Similar but Different
If you tap contacts instead of add call, you move directly into the Contacts screen. This might save you one screen tap if the person you want to add to the call is in your Contacts app.
![]() Talk to the second person you called; the first remains on hold.
Talk to the second person you called; the first remains on hold.
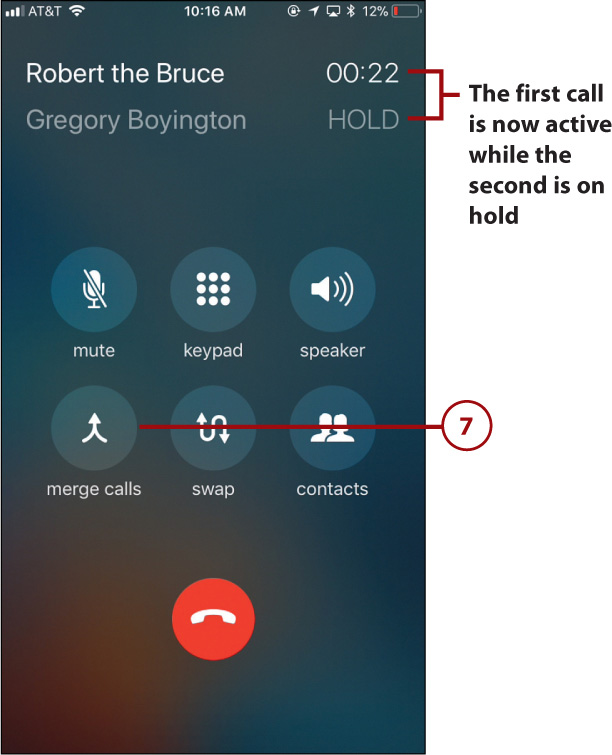
![]() To switch to the first call, tap it on the list or tap swap. This places the second call on hold and moves it to the top of the call list, while the first call becomes active again.
To switch to the first call, tap it on the list or tap swap. This places the second call on hold and moves it to the top of the call list, while the first call becomes active again.
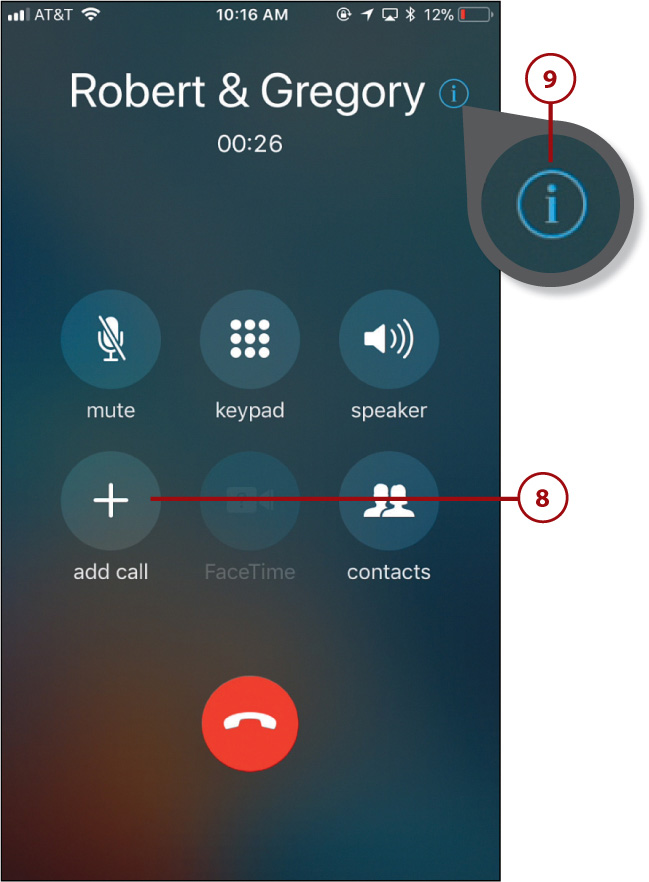
![]() Tap merge calls to join the calls so all parties can hear you and each other. The iPhone combines the two calls, and you see a single entry at the top of the screen to reflect this.
Tap merge calls to join the calls so all parties can hear you and each other. The iPhone combines the two calls, and you see a single entry at the top of the screen to reflect this.
Merging Calls
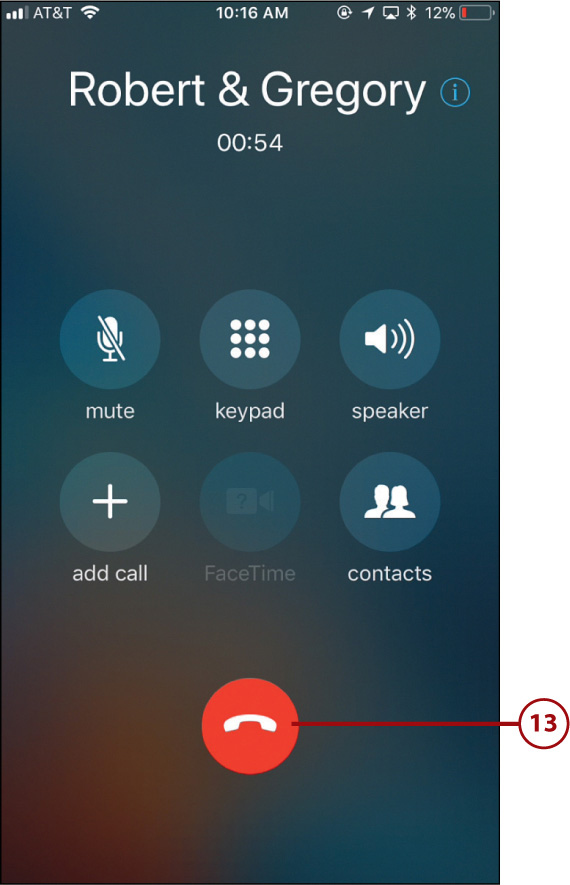
As you merge calls, your iPhone attempts to display the names of the callers at the top of the Call screen. As the text increases, your iPhone scrolls it so you can read it. Eventually, the iPhone replaces the names with the word Conference.
Number of Callers
Your provider and the specific technology of the network you use can limit the number of callers you place in a conference call. When you reach the limit, the add call icon is disabled.
![]() To add another call, repeat steps 2−7. Each time you merge calls, the second line becomes free so you can add more calls.
To add another call, repeat steps 2−7. Each time you merge calls, the second line becomes free so you can add more calls.
![]() To manage a conference call, tap the Info (i) icon at the top of the screen.
To manage a conference call, tap the Info (i) icon at the top of the screen.
![]() To speak with one of the callers privately, tap Private (if the Private icons are disabled, you can’t do this with the current calls). Doing so places the conference call on hold and returns you to the Call screen showing information about the active call. You can merge the calls again by tapping merge calls.
To speak with one of the callers privately, tap Private (if the Private icons are disabled, you can’t do this with the current calls). Doing so places the conference call on hold and returns you to the Call screen showing information about the active call. You can merge the calls again by tapping merge calls.
![]() Tap End to remove a caller from the call. The app disconnects that caller from the conference call. When you have only one person left on the call, you return to the Call screen and see information about the active call.
Tap End to remove a caller from the call. The app disconnects that caller from the conference call. When you have only one person left on the call, you return to the Call screen and see information about the active call.
![]() Tap Back to move back to the Call screen. You move to the Call screen and can continue working with the call, such as adding more people to it.
Tap Back to move back to the Call screen. You move to the Call screen and can continue working with the call, such as adding more people to it.
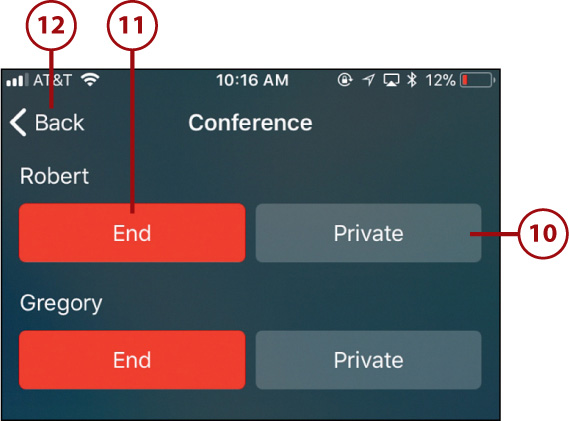
![]() To end the call for all callers, tap the Receiver icon.
To end the call for all callers, tap the Receiver icon.
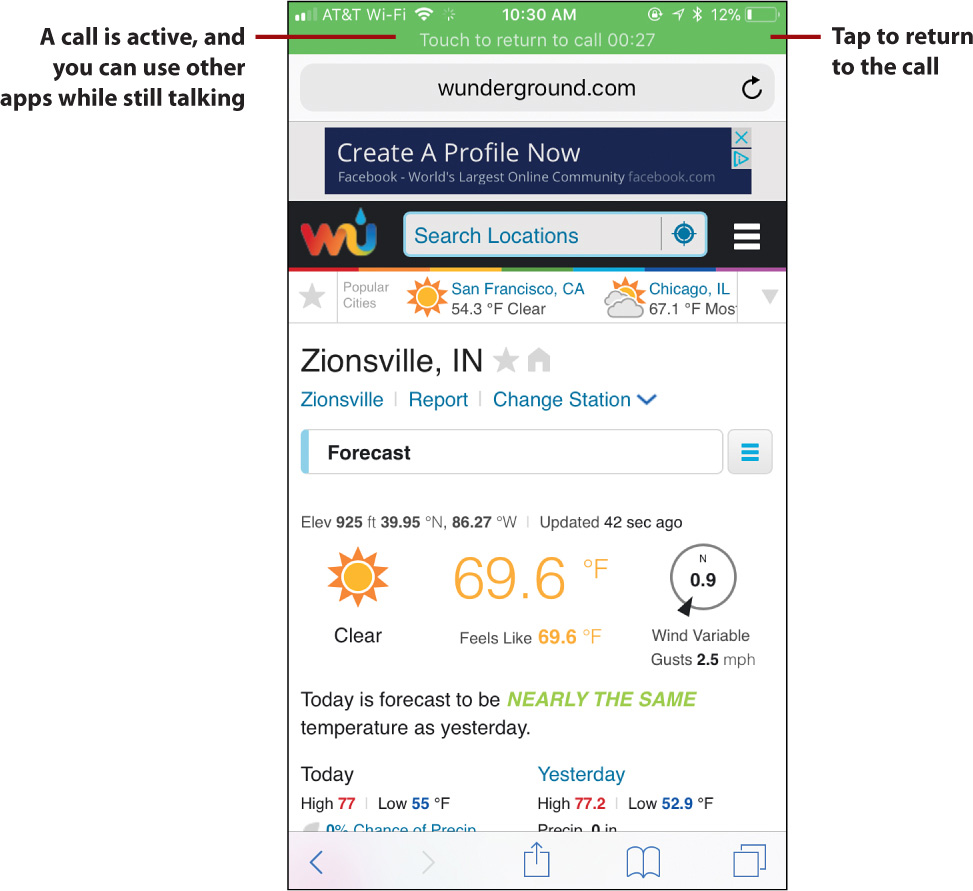
If your provider’s technology supports it, you can use your iPhone for other tasks while you are on a call. When you are on a call, press the Touch ID/Home button (all models except iPhone X) or swipe up from the bottom of the screen (iPhone X) to move to a Home screen and then tap a different app (placing the call in speaker mode before you switch to a different app or using headphones are best for this). Or, you can press the Touch ID/Home button twice (all models except iPhone X) or swipe up from the bottom of the screen and pause toward the middle of the screen (iPhone X) to open the App Switcher to move into a different app. The call remains active and you see the active call information in a green bar at the top of the screen. You can perform other tasks, such as looking up information, sending emails, and visiting websites. You can continue to talk to the other person just like when the Call screen is showing. To return to the call, tap the green bar.
Receiving Voice Calls
Receiving calls on your iPhone enables you to access the same great tools you can use when you make calls, plus a few more for good measure.
Answering Calls
When your iPhone rings, it’s time to answer the call—or not. If you configured the ringer to ring, you hear your default ringtone or the one associated with the caller’s contact information when a call comes in. If vibrate is turned on, your iPhone vibrates whether the ringer is on or not. If you enabled the announce feature, the name of the caller is announced (if available). And if those ways aren’t enough, a message appears on your iPhone’s screen to show you information about the incoming call. If the number is in your Contacts app, you see the contact with which the number is associated, the label for the number, and the contact’s image if there is one. If the number isn’t in your contacts, you see the number only.
Wallpaper
If the photo associated with a contact was taken with your iPhone or came from a high-resolution image, you see the contact’s image at full screen when the call comes in, instead of the small icon at the top of the screen.
Calls on Other Devices
By default, when you receive a call on your iPhone, it also comes to any iOS 8 or later devices or Macs running Yosemite or later that are on the same Wi-Fi network, and you can take the call on those devices. To disable this, set the Calls on Other Devices setting to off as described earlier in this chapter.
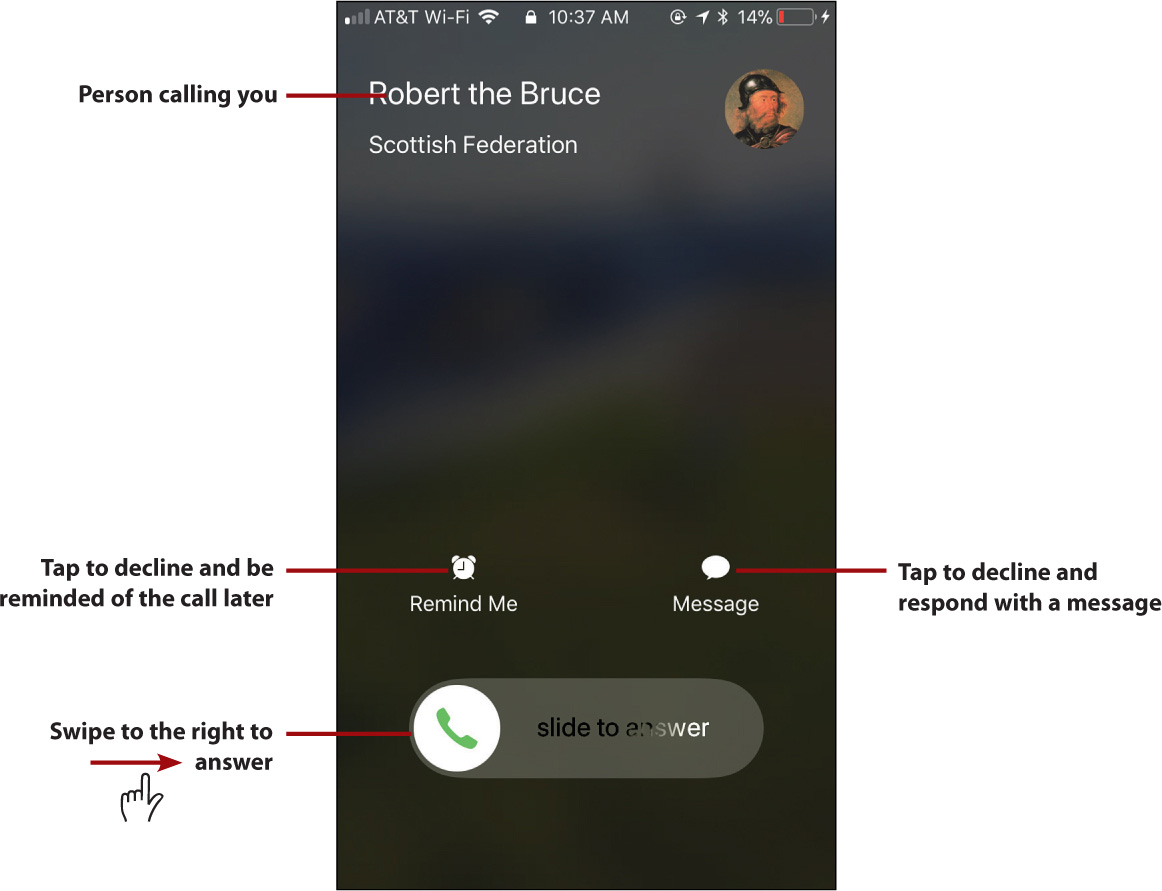
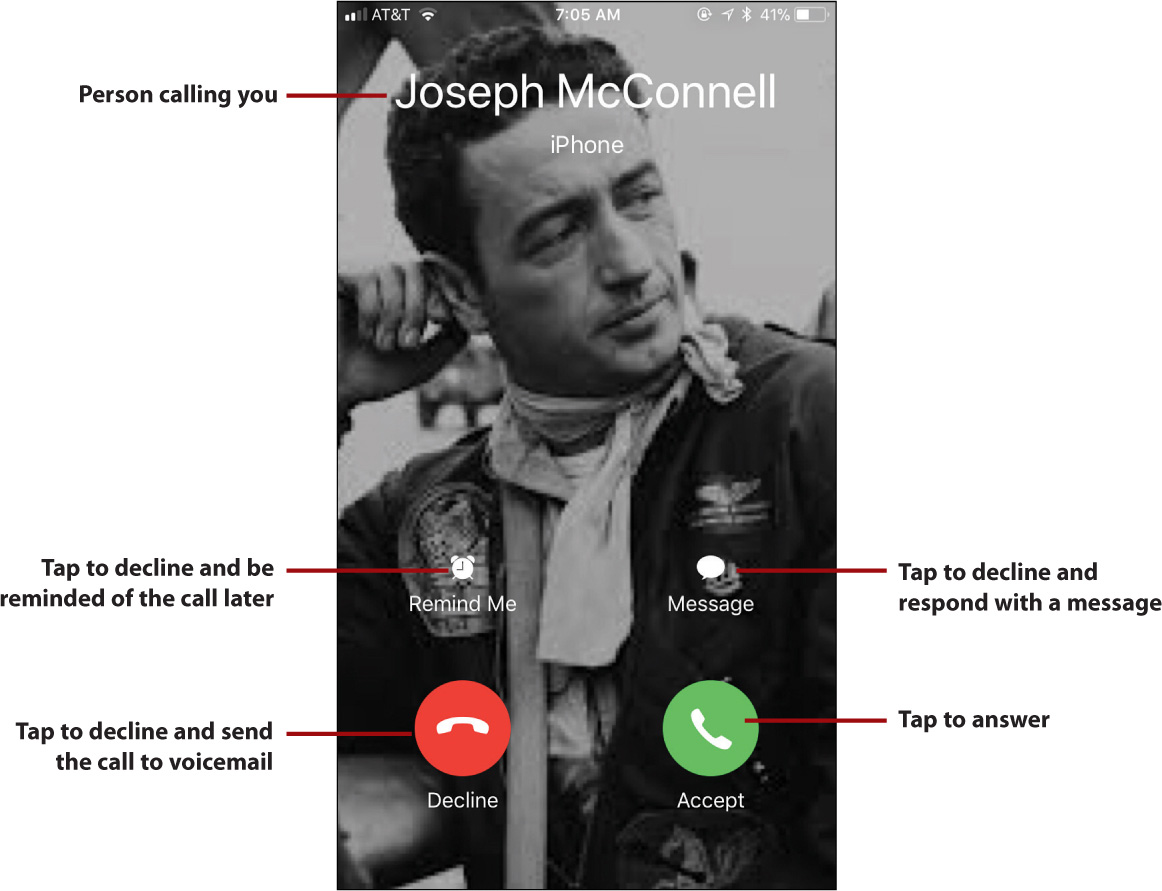
If your iPhone is locked when a call comes in, swipe the slider to the right to answer it or use the Remind Me and Message icons, which work just like they do when a call comes in when the iPhone isn’t locked.
When you receive a call, you have the following options:
Answer—Tap Accept (if the iPhone is unlocked) or swipe the slider to the right (if the iPhone is locked) to take the call (you don’t have to unlock the phone to answer a call). You move to the Call screen and can work with the call just like calls you place. For example, you can add a call, merge calls, place the call on hold, or end the call.
Decline—If you tap Decline (when the iPhone is unlocked), the Phone app immediately routes the call to voicemail. You can also decline a call by quickly pressing the Side button twice.
Silence the ringer—To silence the ringer without sending the call directly to voicemail, press the Side button once or press either volume button once. The call continues to come in, and you can answer it even though you shut off the ringer.
Respond with a message—Tap Message to send the call to voicemail and send a message back in response. You can tap one of the default messages, or you can tap Custom to create a unique message (the table at the beginning of the chapter explains where to find the setting to create custom messages). Of course, the device the caller is using to make the call must be capable of receiving messages for this to be useful.
Decline the call but be reminded later—Tap Remind Me and the call is sent to voicemail. Tap When I leave, When I get home, When I get to work, or In 1 hour to set the timeframe in which you want to be reminded. A reminder is created in the Reminders app to call back the person who called you, and it is set to alert you at the time you select.
Silencio!
To mute your iPhone’s ringer, slide the Mute switch located above the Volume switch toward the back so the orange line appears. The Mute icon (a bell with a slash through it) appears on the screen to let you know you turned off the ringer. To turn it on again, slide the switch forward. The bell icon appears on the screen to show you the ringer is active again. To set the ringer’s volume, use the Volume controls (assuming that setting is enabled) when you aren’t on a call and aren’t listening to an app, such as the Music app.
Answering Calls During a Call
As mentioned earlier, your iPhone can manage multiple calls at the same time. If you are on a call and another call comes in, you have a number of ways to respond.
Decline incoming call—Tap Send to Voicemail to send the incoming call directly to voicemail.
Place the first call on hold and answer the incoming call—Tap Hold & Accept to place the current call on hold and answer the incoming one. After you do this, you can manage the two calls just as when you call two numbers from your iPhone. For example, you can place the second call on hold and move back to the first one, merge the calls, and add more calls.
End the first call and answer the incoming call—Tap End & Accept to terminate the active call and answer the incoming call.
Respond with message or get reminded later—These options work just as they do when you are dealing with any incoming phone call.
Auto-Mute
If you are listening to music or video when a call comes in, the app providing the audio, such as the Music app, automatically pauses. When the call ends, that app picks up right where it left off.
Managing Voice Calls
You’ve already learned most of what you need to know to use your iPhone’s cell phone functions. In the following sections, you learn the rest.
Clearing Recent Calls
Previously in this chapter, you learned about the Recents tool that tracks call activity on your iPhone. As you read, this list shows both completed and missed calls; you can view all calls by tapping the All tab or only missed calls by tapping Missed. On either tab, missed calls are always in red, and you see the number of missed calls since you last looked at the list in the badge on the Recents tab. You also learned how you can get more detail about a call, whether it was missed or made.
Over time, you’ll build a large Recents list, which you can easily clear.
![]() Tap Phone.
Tap Phone.
![]() Tap Recents.
Tap Recents.
![]() Tap Edit.
Tap Edit.
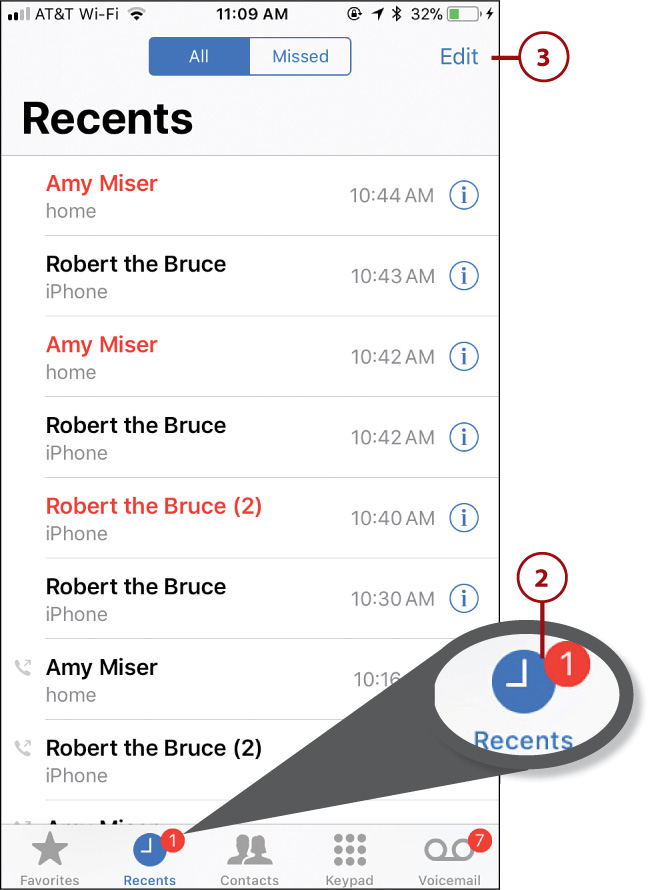
![]() Tap Clear to clear the entire list; to delete a specific recent call, skip to step 6.
Tap Clear to clear the entire list; to delete a specific recent call, skip to step 6.

![]() Tap Clear All Recents. The Recents list is reset and you can skip to the rest of these steps.
Tap Clear All Recents. The Recents list is reset and you can skip to the rest of these steps.

Delete Faster
On the Recents screen, you can delete an individual recent item by swiping to the left on it (starting to the left of the i icon) and tapping Delete.
![]() Tap a recent item’s Unlock (−) icon.
Tap a recent item’s Unlock (−) icon.
![]() Tap Delete. The recent item is deleted.
Tap Delete. The recent item is deleted.
![]() When you are done managing your recent calls, tap Done.
When you are done managing your recent calls, tap Done.
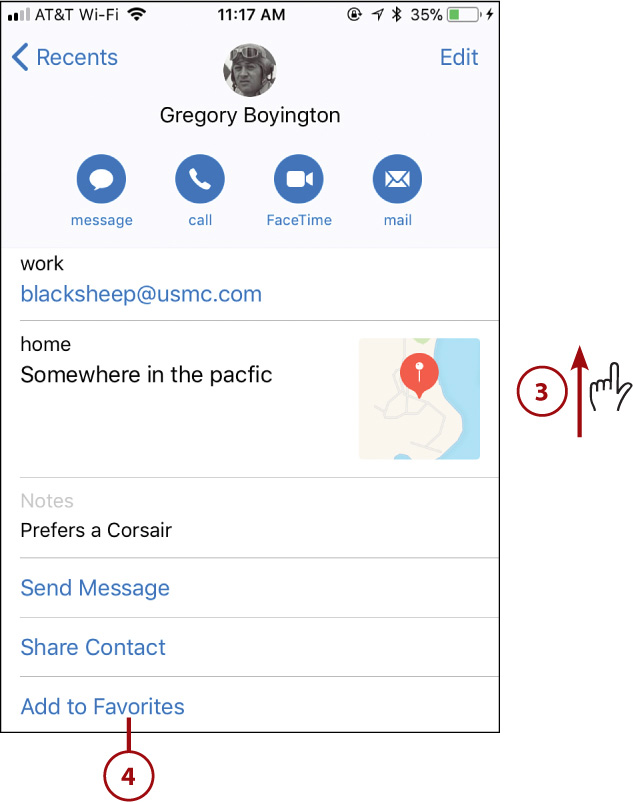
Adding Calling Information to Favorites
Earlier you learned how simple it is to place calls to someone on your Favorites list. There are a number of ways to add people to this list, including adding someone on your Recents list.
![]() Move to the Recents list.
Move to the Recents list.
![]() Tap the Info (i) icon for the person you want to add to your favorites list. The Info screen appears. If the number is associated with a contact, you see that contact’s information.
Tap the Info (i) icon for the person you want to add to your favorites list. The Info screen appears. If the number is associated with a contact, you see that contact’s information.
![]() Swipe up to move to the bottom of the screen.
Swipe up to move to the bottom of the screen.
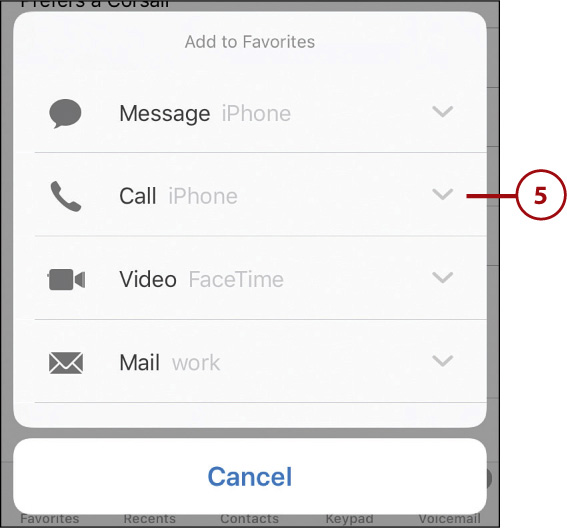
![]() Tap Add to Favorites. If the person has multiple types of contact information, such as phone numbers, email addresses, and so on, you see each type of information available.
Tap Add to Favorites. If the person has multiple types of contact information, such as phone numbers, email addresses, and so on, you see each type of information available.
![]() Tap the type of information you want to add as a favorite, such as Call to make a phone number a favorite.
Tap the type of information you want to add as a favorite, such as Call to make a phone number a favorite.
![]() Tap the number or email address you want to add as a favorite.
Tap the number or email address you want to add as a favorite.
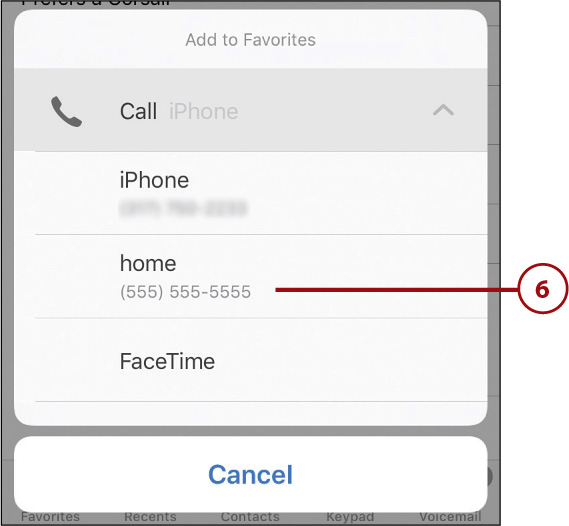
![]() Repeat steps 5 and 6 if you want to add the contact’s other numbers or addresses to the favorites list. (If all the numbers and email addresses are assigned as favorites, Add to Favorites doesn’t appear on the contact’s screen.)
Repeat steps 5 and 6 if you want to add the contact’s other numbers or addresses to the favorites list. (If all the numbers and email addresses are assigned as favorites, Add to Favorites doesn’t appear on the contact’s screen.)
Make Contact First
To make someone a favorite, he needs to be a contact in the Contacts app. Refer to Chapter 6 to learn how to make someone who has called you into a contact.
Using the iPhone’s Headset for Calls
Your iPhone includes an EarPods headset with a microphone on one of its cords. The mic includes a button in the center of the switch on the right side of the EarPod’s cable that you can use to do the following:
Answer—Press the mic button once to answer a call.
End a call—Press the mic button while you are on a call to end it.
Decline a call—Press and hold the mic button for about two seconds. Two beeps sound when you release the button to let you know that your iPhone sent the call to voicemail.
Put a current call on hold and switch to an incoming call—Press the mic button once and then press again.
End a current call on hold and switch to an incoming call—Press the mic button once and hold for about two seconds. Release the button and you hear two beeps to let you know you ended the first call. The incoming call is ready for you.
Activate Siri—Press and hold the mic button until you hear the Siri chime. This is useful when you want to make a call to someone without looking at or touching your phone.
When you have EarPods plugged into your iPhone and you receive a call, the ringtone plays on both the iPhone’s speaker (unless the ringer is muted, of course) and through the EarPods.
Using Visual Voicemail
Visual voicemail just might be the best of your iPhone’s many great features. No more wading through long, uninteresting voicemails to get to one in which you are interested. You simply jump to the message you want to hear. If that isn’t enough for you, you can also jump to any point within a voicemail to hear just that part, such as to repeat a phone number that you want to write down. Even better, the iPhone creates a transcript of voicemails, so you can read them instead of listening to them.
The Phone app can access your voicemails directly so don’t need to log in to hear them.
Recording a New Greeting
The first time you access voicemail, you are prompted to record a voicemail greeting. Follow the onscreen instructions to do so.
You can also record a new greeting at any time.
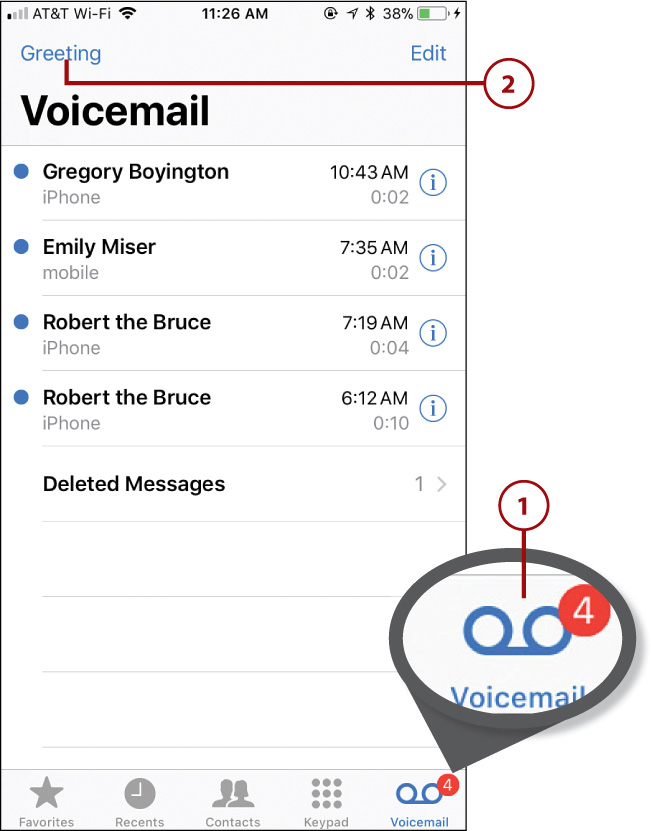
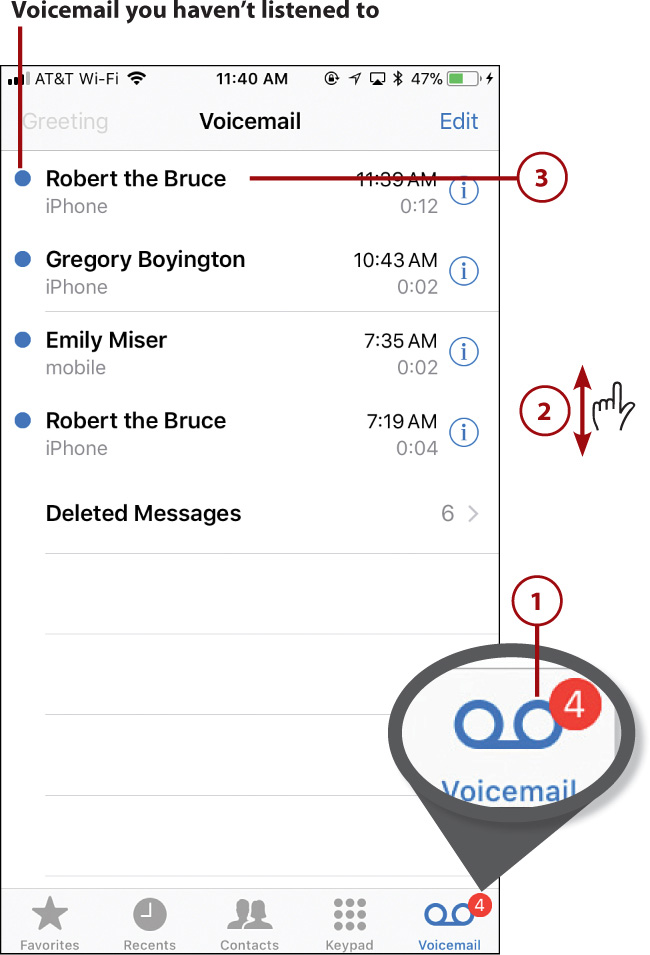
![]() Move to the Phone screen and tap Voicemail. If badge notifications are enabled for the Phone app, you see the number of voicemails you haven’t listened to yet in the badge on the Voicemail icon.
Move to the Phone screen and tap Voicemail. If badge notifications are enabled for the Phone app, you see the number of voicemails you haven’t listened to yet in the badge on the Voicemail icon.
![]() Tap Greeting.
Tap Greeting.
![]() To use a default greeting that provides only the iPhone’s phone number, tap Default and skip to step 10.
To use a default greeting that provides only the iPhone’s phone number, tap Default and skip to step 10.
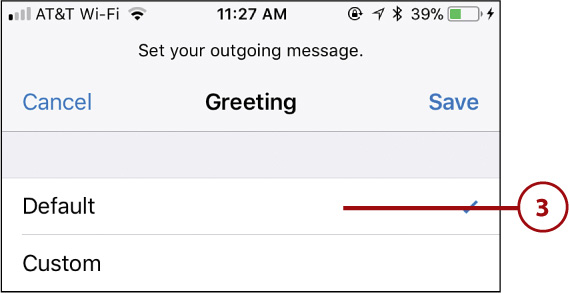
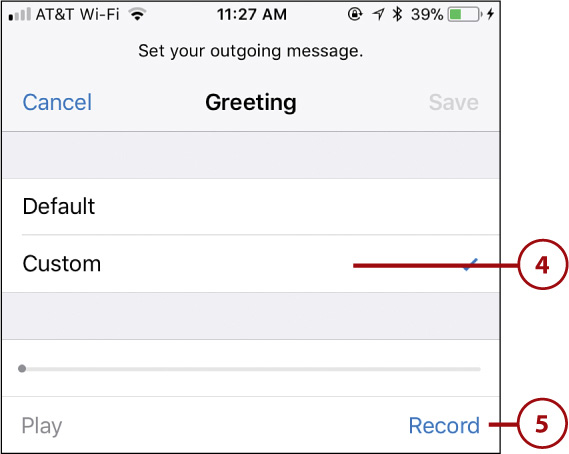
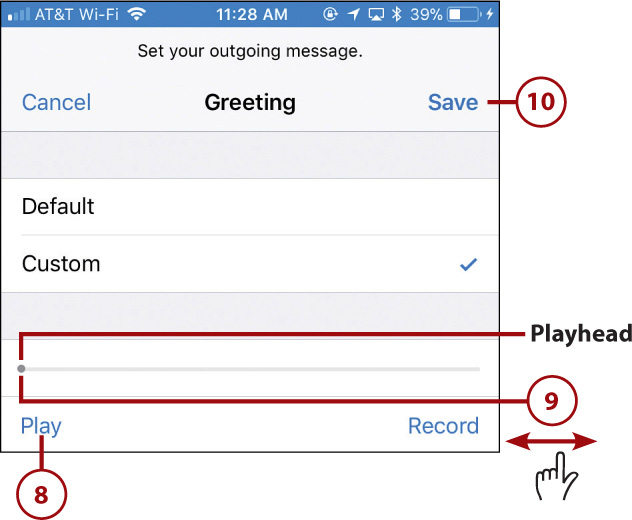
![]() Tap Custom to record a personalized greeting. If you have previously used a custom greeting, it is loaded into the editor. You can replace it by continuing with these steps.
Tap Custom to record a personalized greeting. If you have previously used a custom greeting, it is loaded into the editor. You can replace it by continuing with these steps.
![]() Tap Record. Recording begins.
Tap Record. Recording begins.
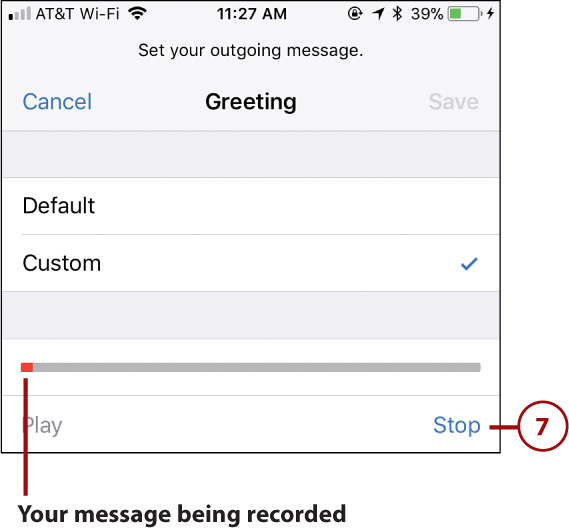
![]() Speak your greeting. As you record your message, the red area of the timeline indicates (relatively) how long your message is.
Speak your greeting. As you record your message, the red area of the timeline indicates (relatively) how long your message is.
![]() When you’re done recording, tap Stop.
When you’re done recording, tap Stop.
For the Very First Time
Some providers require that you dial into your voicemail number the first time you use it. If you tap Voicemail and the phone starts to dial instead of you seeing Visual Voicemail as shown in these figures, this is your situation. You call the provider’s voicemail system, and you’re prompted to set up your voicemail. When you’ve completed that process, you can use these steps to record your greeting.
![]() Tap Play to hear your greeting.
Tap Play to hear your greeting.
![]() If you aren’t satisfied, drag the Playhead to the beginning and repeat steps 5−8 to record a new message.
If you aren’t satisfied, drag the Playhead to the beginning and repeat steps 5−8 to record a new message.
![]() When you are happy with your greeting, tap Save. The Phone app saves the default or custom greeting as the active greeting and returns you to the Voicemail screen.
When you are happy with your greeting, tap Save. The Phone app saves the default or custom greeting as the active greeting and returns you to the Voicemail screen.
Adding to a Custom Message
To add onto or replace part of an existing greeting, drag the playhead to where you want to start recording and tap Record. Tap Stop when you’re done.
No Visual Voicemail?
If your voicemail password isn’t stored on your iPhone when you tap Voicemail, your phone dials into your voicemail instead of moving to the Voicemail screen. If that happens, something has gone wrong with your password and you need to reset it. Follow your provider’s instructions to reset the password. When you have the new password, open the Phone Settings screen, tap Change Voicemail Password, enter the reset password, create a new password, and re-enter your new password. (You need to tap Done after each time you enter a password.)
Change Greeting
To switch between the default and the current custom greeting, move to the Greeting screen, tap the greeting you want to use (which is marked with a check mark), and tap Save. When you choose Custom, you use the custom greeting you most recently saved.
Listening to, Reading, and Managing Voicemails
Unless you turned off the voicemail sound, you hear the sound you selected each time a caller leaves a voicemail for you. The number in the badge on the Phone icon and on the Voicemail icon on the Phone screen increases by 1 (unless you’ve disabled the badge). (Note that the badge number on the Phone icon includes both voicemails left for you and missed calls, whereas the badge number on the Voicemail icon indicates only the number of voicemails left for you.) (A new voicemail is one to which you haven’t listened, not anything to do with when it was left for you.) If you’ve configured visual notifications for new voicemails (see Chapter 4), you see those on the screen as well.
If you receive a voicemail while your iPhone is locked, you see a message on the screen alerting you that your iPhone received a voicemail (unless you have disabled these notifications from appearing on the Lock screen). (It also indicates a missed call, which is always the case when a call ends up in voicemail.) Press (3D Touch iPhones) or swipe to the right (non-3D Touch models) on the notification to jump to the Voicemail screen so that you can work with your messages.
And in yet another scenario, if you are using your iPhone when a message is left, you see a notification (unless you have turned off notifications for the Phone app) that enables you to deal with the new message.
Missing Password
If something happens to the password stored on your iPhone for your voicemail, such as if you restore the iPhone, you are prompted to enter your password before you can access your voicemail. Do so at the prompt and tap OK. The iPhone signs you in to voicemail, and you won’t have to enter your password again (unless something happens to it again of course).
Contacts or Numbers?
Like phone calls, if a contact is associated with a number from which you’ve received a voicemail, you see the contact’s name associated with the voicemail message. If no contact exists for the number, you see the number only.
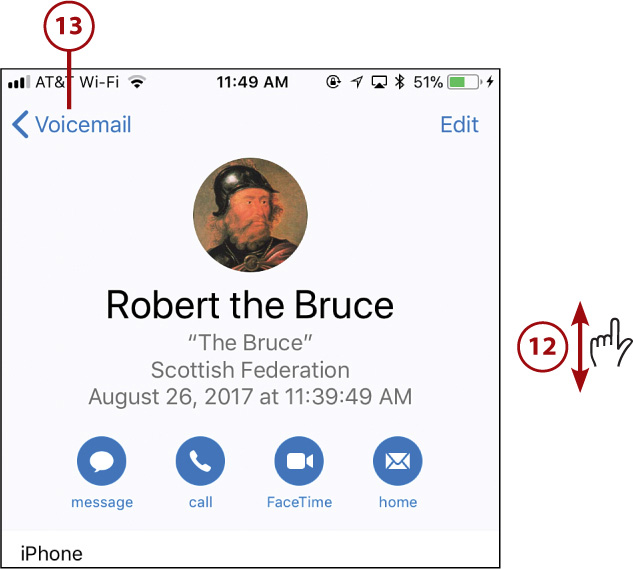
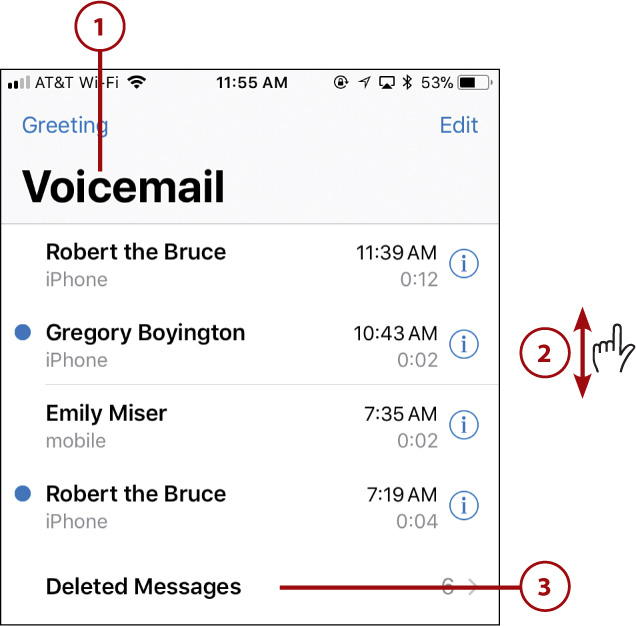
![]() Move into the Phone app and tap Voicemail (if you pressed or swiped on a new message notification, you jump directly to the Voicemail screen).
Move into the Phone app and tap Voicemail (if you pressed or swiped on a new message notification, you jump directly to the Voicemail screen).
![]() Swipe up and down the screen to browse the list of voicemails. Voicemails you haven’t listened to are marked with a blue circle.
Swipe up and down the screen to browse the list of voicemails. Voicemails you haven’t listened to are marked with a blue circle.
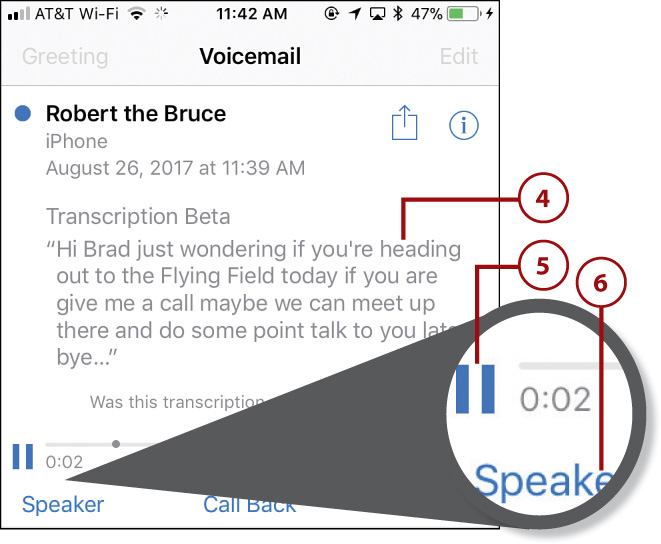
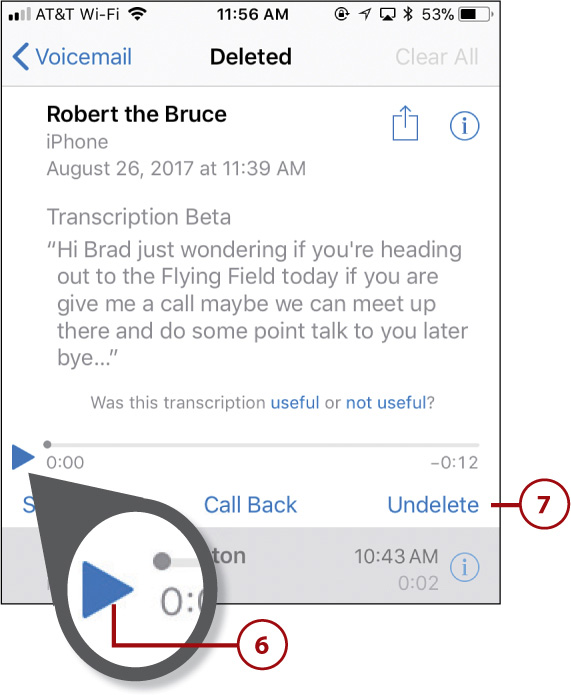
![]() To listen to or read a voicemail, tap it. You see the timeline bar and controls and the message plays.
To listen to or read a voicemail, tap it. You see the timeline bar and controls and the message plays.
![]() Read the message if you don’t want to listen to it.
Read the message if you don’t want to listen to it.
![]() Tap the Pause icon to pause a message.
Tap the Pause icon to pause a message.
![]() Tap Speaker to hear the message on your iPhone’s speaker.
Tap Speaker to hear the message on your iPhone’s speaker.
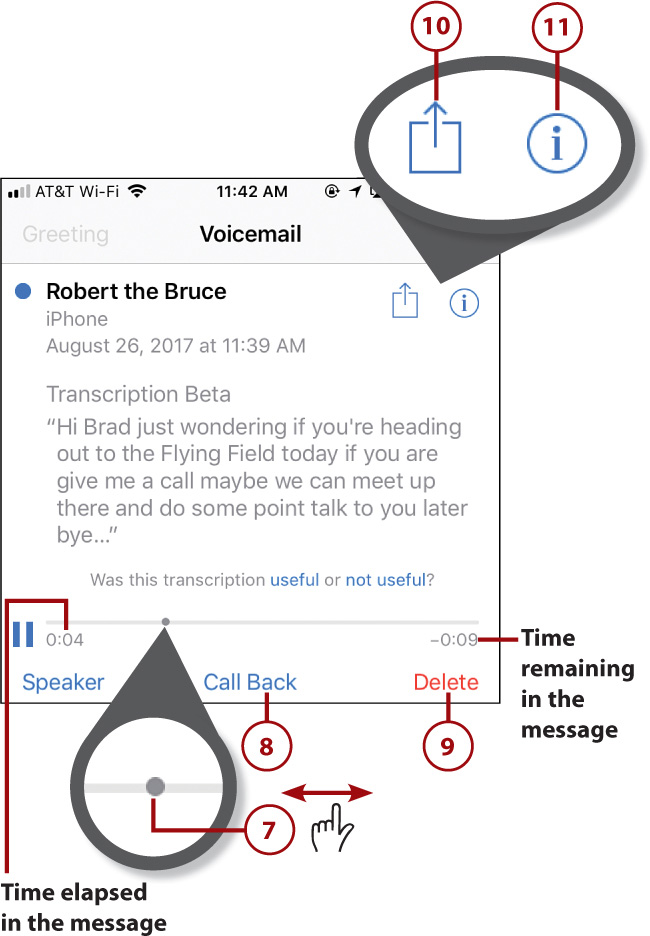
![]() To move to a specific point in a message, drag the Playhead to the point at which you want to listen.
To move to a specific point in a message, drag the Playhead to the point at which you want to listen.
Moving Ahead or Behind
You can also drag the Playhead while a message is playing to rewind or fast-forward it. This is also helpful when you want to listen to specific information without hearing the whole message again.
![]() Tap Call Back to call back the person who left the message.
Tap Call Back to call back the person who left the message.
![]() Tap Delete to delete the message.
Tap Delete to delete the message.
![]() Tap the Share icon to share the message, and then tap how you want to share it, such as Message or Mail. For example, when you tap Mail, you send the voicemail to someone else using the Mail app, so he can listen to the message.
Tap the Share icon to share the message, and then tap how you want to share it, such as Message or Mail. For example, when you tap Mail, you send the voicemail to someone else using the Mail app, so he can listen to the message.
![]() Tap the Info (i) icon to get more information about a message. The Info screen appears. If the person who left the message is on your contacts list, you see her contact information. The number associated with the message is highlighted in blue.
Tap the Info (i) icon to get more information about a message. The Info screen appears. If the person who left the message is on your contacts list, you see her contact information. The number associated with the message is highlighted in blue.
![]() Swipe up or down the screen to review the caller’s information.
Swipe up or down the screen to review the caller’s information.
![]() Tap Voicemail.
Tap Voicemail.
![]() To listen to a message you have listened to before (one that doesn’t have a blue dot), tap the message and then tap the Play icon. It begins to play. You can also read its transcript (if available).
To listen to a message you have listened to before (one that doesn’t have a blue dot), tap the message and then tap the Play icon. It begins to play. You can also read its transcript (if available).
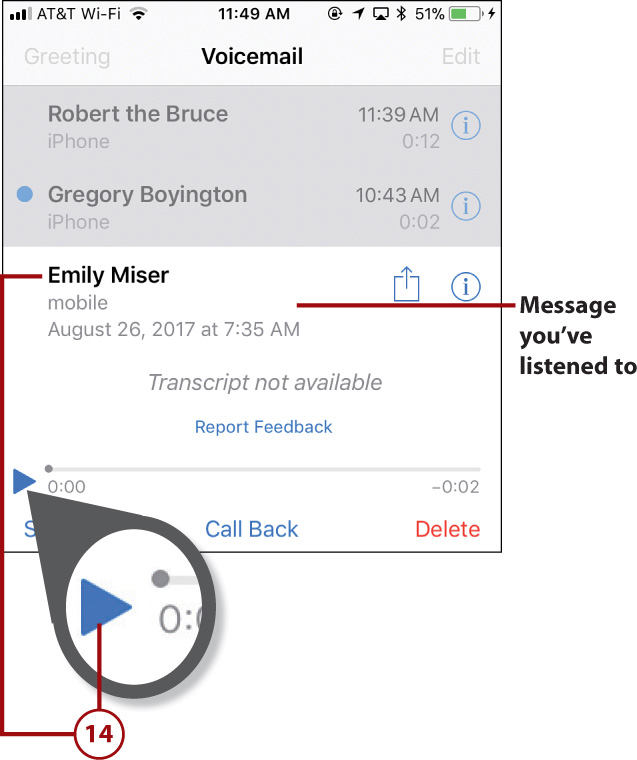
Deleting Messages
To delete a voicemail message that isn’t the active message, tap it so it becomes the active message and then tap Delete. Or swipe to the left on the message you want to delete and tap Delete. Or swipe quickly all the way to the left on the message to delete it.
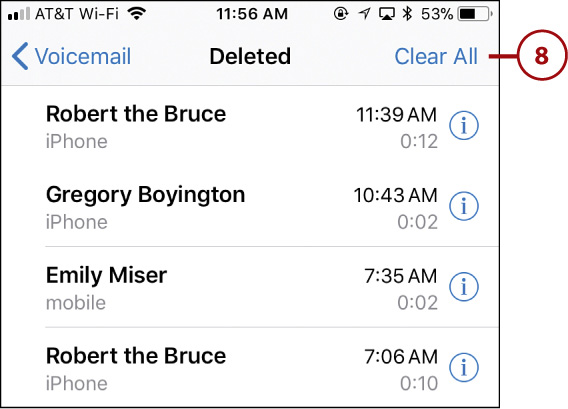
Listening to and Managing Deleted Voicemails
When you delete messages, they are moved to the Deleted Message folder. You can work with deleted messages as follows:
![]() Move to the Voicemail screen.
Move to the Voicemail screen.
![]() If necessary, swipe up the screen until you see the Deleted Messages option.
If necessary, swipe up the screen until you see the Deleted Messages option.
![]() Tap Deleted Messages.
Tap Deleted Messages.
In case you’re wondering, your iPhone considers any call you didn’t answer to be a missed call. So if someone calls and leaves a message, that call is included in the counts of both missed calls and new voicemails. If the caller leaves a message, you see a notification informing you that you have a new voicemail and showing who it is from (if available). If you don’t answer and the caller doesn’t leave a message, it’s counted only as a missed call and you see a notification showing a missed call along with the caller’s identification (if available).
![]() Swipe up or down the screen to browse all the deleted messages.
Swipe up or down the screen to browse all the deleted messages.
![]() Tap a message to listen to it or to read its transcript.
Tap a message to listen to it or to read its transcript.
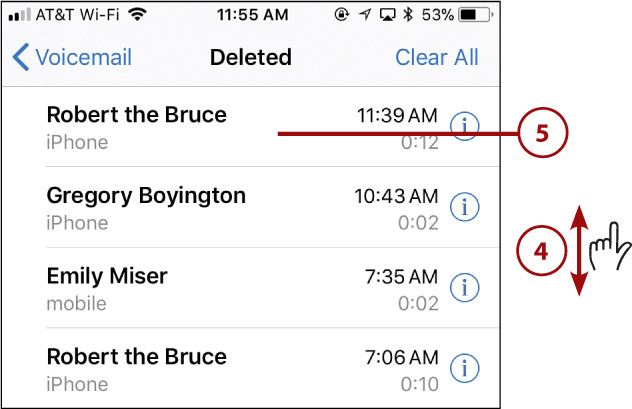
![]() Tap the Play icon to hear the message. You can use the other playback tools just like you can with undeleted messages.
Tap the Play icon to hear the message. You can use the other playback tools just like you can with undeleted messages.
![]() Tap Undelete to restore the deleted message. The iPhone restores the message to the Voicemail screen.
Tap Undelete to restore the deleted message. The iPhone restores the message to the Voicemail screen.
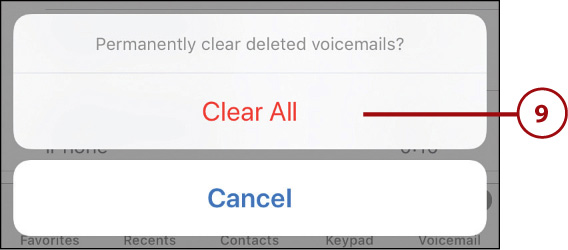
![]() Tap Clear All to remove all deleted messages permanently. (If this is disabled, close the open message by tapping it.)
Tap Clear All to remove all deleted messages permanently. (If this is disabled, close the open message by tapping it.)
![]() Tap Clear All at the prompt. The deleted messages are erased and you return to the Deleted screen.
Tap Clear All at the prompt. The deleted messages are erased and you return to the Deleted screen.
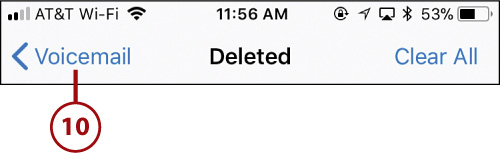
![]() Tap Voicemail to return to the Voicemail screen.
Tap Voicemail to return to the Voicemail screen.
Lost/Forgot Your Password?
If you have to restore your iPhone or it loses your voicemail password for some other reason and you can’t remember it, you need to have the password reset to access your voicemail on the iPhone. For most cell phone providers, this involves calling the customer support number and accessing an automated system that sends a new password to you via a text message. For AT&T, which is one of the iPhone providers in the United States, call 611 on your iPhone and follow the prompts to reset your password (which you receive via a text). No matter which provider you use, it’s a good idea to know how to reset your voicemail password because it is likely you will need to do so at some point.
Communicating with FaceTime
FaceTime enables you to see, as well as hear, people with whom you want to communicate. This feature exemplifies what’s great about the iPhone; it takes complex technology and makes it simple. FaceTime works great, but there are two conditions that have to be true for you and the people you want some FaceTime with. To be able to see each other, both sides have to use a device that has the required cameras (this includes iPhone 4s and newer, iPod touches third generation and newer, iPad 2s and newer, and Macs running Snow Leopard and newer), and have FaceTime enabled (via the settings on an iOS device that are explained below or via the FaceTime application on a Mac). And each device has to be able to communicate over a network; an iPhone or cellular iPad can use a cellular data network (if that setting is enabled) or a Wi-Fi network while Macs have to be connected to the Internet through a Wi-Fi or other type of network. When these conditions are true, making and receiving FaceTime calls are simple tasks.
In addition to making video FaceTime calls, you can also make audio-only FaceTime calls. These work similarly to making a voice call except the minutes don’t count against your voice plan when you use a Wi-Fi network (if you are making the call over the cellular network, the data does count against your data plan, so be careful about this).
Assuming you are in a place where you don’t have to pay for the data you use, such as when you use a Wi-Fi network, you don’t have to pay for a FaceTime call (video or audio-only) either.
Configuring FaceTime Settings
FaceTime is a great way to use your iPhone to hear and see someone else. There are a few FaceTime settings you need to configure for FaceTime to work. You can connect with other FaceTime users via your phone number or an email address.
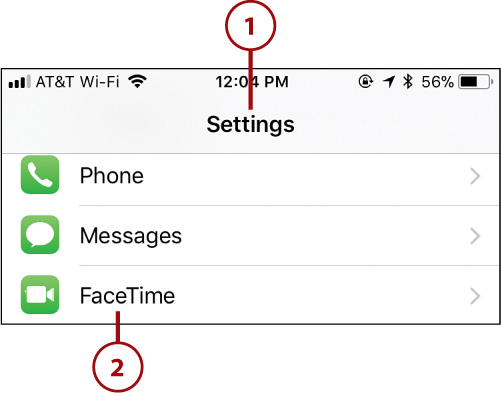
![]() Move to the Settings screen.
Move to the Settings screen.
![]() Tap FaceTime.
Tap FaceTime.
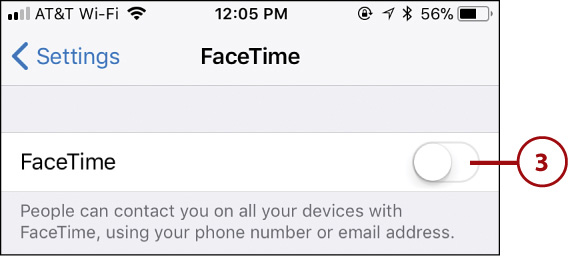
![]() If the FaceTime switch is off (white), tap the FaceTime switch to turn it on (green). If the FaceTime switch is on and you see an Apple ID, you are already signed into an account; in this case, you see the current FaceTime settings and can follow along starting with step 7 to change these settings. You can sign out of the current account by tapping it, and then tapping Sign Out; proceed to step 4 to sign in with a different account.
If the FaceTime switch is off (white), tap the FaceTime switch to turn it on (green). If the FaceTime switch is on and you see an Apple ID, you are already signed into an account; in this case, you see the current FaceTime settings and can follow along starting with step 7 to change these settings. You can sign out of the current account by tapping it, and then tapping Sign Out; proceed to step 4 to sign in with a different account.
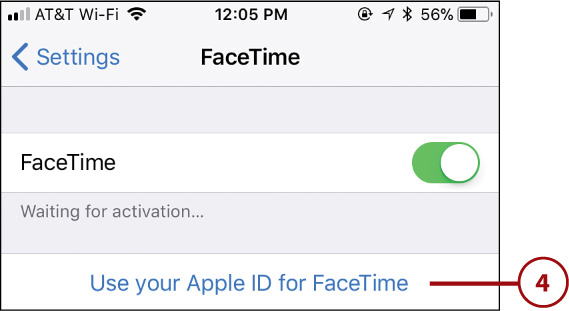
![]() To use your Apple ID for FaceTime calls, tap Use your Apple ID for FaceTime (if you haven’t signed into an Apple ID account, see Chapter 3, “Setting Up and Using an Apple ID, iCloud, and Other Online Accounts” to do so and then come back here to enable FaceTime). If you don’t sign in to an Apple ID, you can still use FaceTime, but it is always via your cellular connection, which isn’t ideal because then FaceTime counts under your voice minutes on your calling plan or as data on your data plan.
To use your Apple ID for FaceTime calls, tap Use your Apple ID for FaceTime (if you haven’t signed into an Apple ID account, see Chapter 3, “Setting Up and Using an Apple ID, iCloud, and Other Online Accounts” to do so and then come back here to enable FaceTime). If you don’t sign in to an Apple ID, you can still use FaceTime, but it is always via your cellular connection, which isn’t ideal because then FaceTime counts under your voice minutes on your calling plan or as data on your data plan.
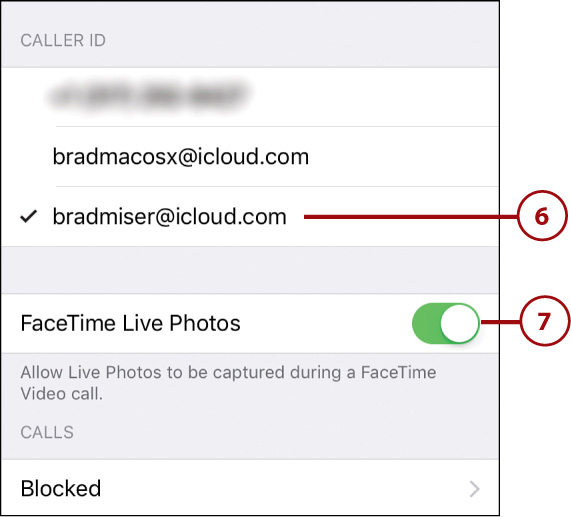
![]() Configure the email addresses you want people to be able to use to contact you for FaceTime sessions by tapping them to enable each address (enabled addresses are marked with a check mark) or to disable addresses (these don’t have a check mark). (If you don’t have any email addresses configured on your iPhone, you are prompted to enter email addresses.)
Configure the email addresses you want people to be able to use to contact you for FaceTime sessions by tapping them to enable each address (enabled addresses are marked with a check mark) or to disable addresses (these don’t have a check mark). (If you don’t have any email addresses configured on your iPhone, you are prompted to enter email addresses.)
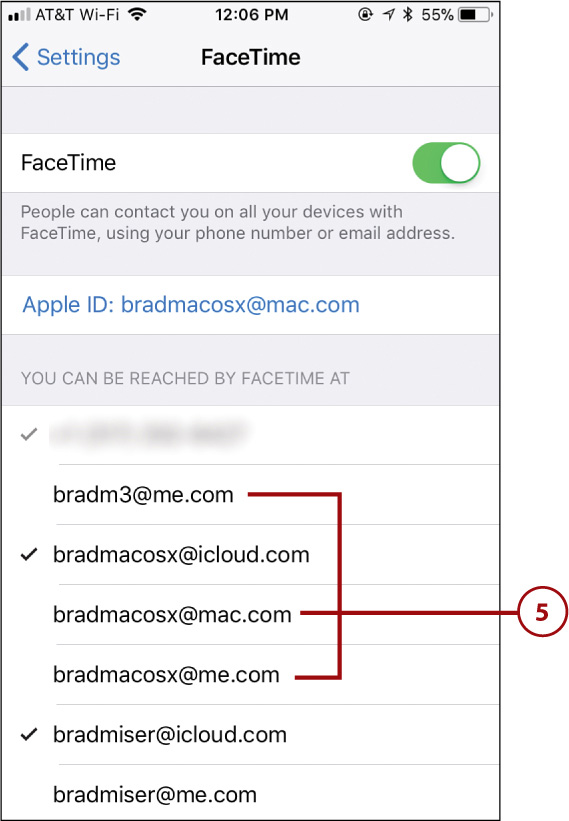
![]() Tap the phone number or email address by which you will be identified to the other caller during a FaceTime call.
Tap the phone number or email address by which you will be identified to the other caller during a FaceTime call.
![]() If you want to allow Live Photos to be captured while you are in a FaceTime session, set the FaceTime Live Photos switch to on (green); if you disable this, photos you take during FaceTime calls are static images instead. (To learn more about Live Photos, see Chapter 13, “Taking Photos and Video with Your iPhone.”)
If you want to allow Live Photos to be captured while you are in a FaceTime session, set the FaceTime Live Photos switch to on (green); if you disable this, photos you take during FaceTime calls are static images instead. (To learn more about Live Photos, see Chapter 13, “Taking Photos and Video with Your iPhone.”)
Blocking FaceTime
If you tap Blocked at the bottom of the FaceTime Settings screen, you see the names, phone numbers, and email addresses that are currently blocked from making calls, sending messages, or making FaceTime requests to your iPhone. To block someone else, tap Add New and then tap the contact you want to block.
Making FaceTime Calls
FaceTime is a great way to communicate with someone because you can hear and see him (or just hear him if you choose an audio-only FaceTime call). Because iPhones have cameras facing each way, it’s also easy to show something to the person you are talking with. You make FaceTime calls starting from the FaceTime, Contacts, or Phone apps and from the FAVORITES widget. No matter which way you start a FaceTime session, you manage it in the same way.
Careful
If your iPhone is connected to a Wi-Fi network, you can make all the FaceTime calls you want (assuming you have unlimited data on that network). However, if you are using the cellular data network, be aware that FaceTime calls may use data under your data plan. If you have a limited plan, it’s a good idea to use FaceTime primarily when you are connected to a Wi-Fi network. (Refer to Chapter 2, “Using Your iPhone’s Core Features,” for information on connecting to Wi-Fi networks.)
To start a FaceTime call from the Contacts app, do the following:
![]() Use the Contacts app to open the contact with whom you want to chat (refer to Chapter 6 for information about using the Contacts app).
Use the Contacts app to open the contact with whom you want to chat (refer to Chapter 6 for information about using the Contacts app).
![]() To place an audio-only FaceTime call, tap the FaceTime audio icon. (The rest of these steps show a FaceTime video call, but a FaceTime audio-only is very similar to voice calls described earlier in this chapter.)
To place an audio-only FaceTime call, tap the FaceTime audio icon. (The rest of these steps show a FaceTime video call, but a FaceTime audio-only is very similar to voice calls described earlier in this chapter.)
![]() Tap the contact’s FaceTime icon. The iPhone attempts to make a FaceTime connection. You hear the FaceTime “chirping” and see status information on the screen while the call is attempted. When the connection is complete, you hear a different tone and see the other person in the large window and a preview of what she is seeing (whatever your iPhone’s front-side camera is pointing at—most likely your face) in the small window. If the person you are trying to FaceTime with isn’t available for FaceTime for some reason (perhaps she doesn’t have a FaceTime-capable device or is not connected to the Internet), you see a message saying that the person you are calling is unavailable for FaceTime, and the call terminates.
Tap the contact’s FaceTime icon. The iPhone attempts to make a FaceTime connection. You hear the FaceTime “chirping” and see status information on the screen while the call is attempted. When the connection is complete, you hear a different tone and see the other person in the large window and a preview of what she is seeing (whatever your iPhone’s front-side camera is pointing at—most likely your face) in the small window. If the person you are trying to FaceTime with isn’t available for FaceTime for some reason (perhaps she doesn’t have a FaceTime-capable device or is not connected to the Internet), you see a message saying that the person you are calling is unavailable for FaceTime, and the call terminates.
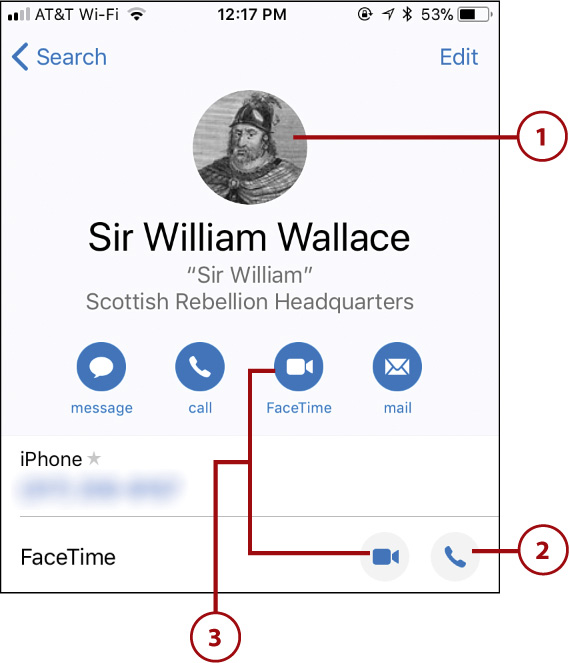
If you’ve set a FaceTime contact as a favorite, you can open the Phone app, tap Favorites, and tap the FaceTime favorite to start the FaceTime session.
![]() After the call is accepted, manage the call as described in the “Managing FaceTime Calls” task later in this chapter.
After the call is accepted, manage the call as described in the “Managing FaceTime Calls” task later in this chapter.
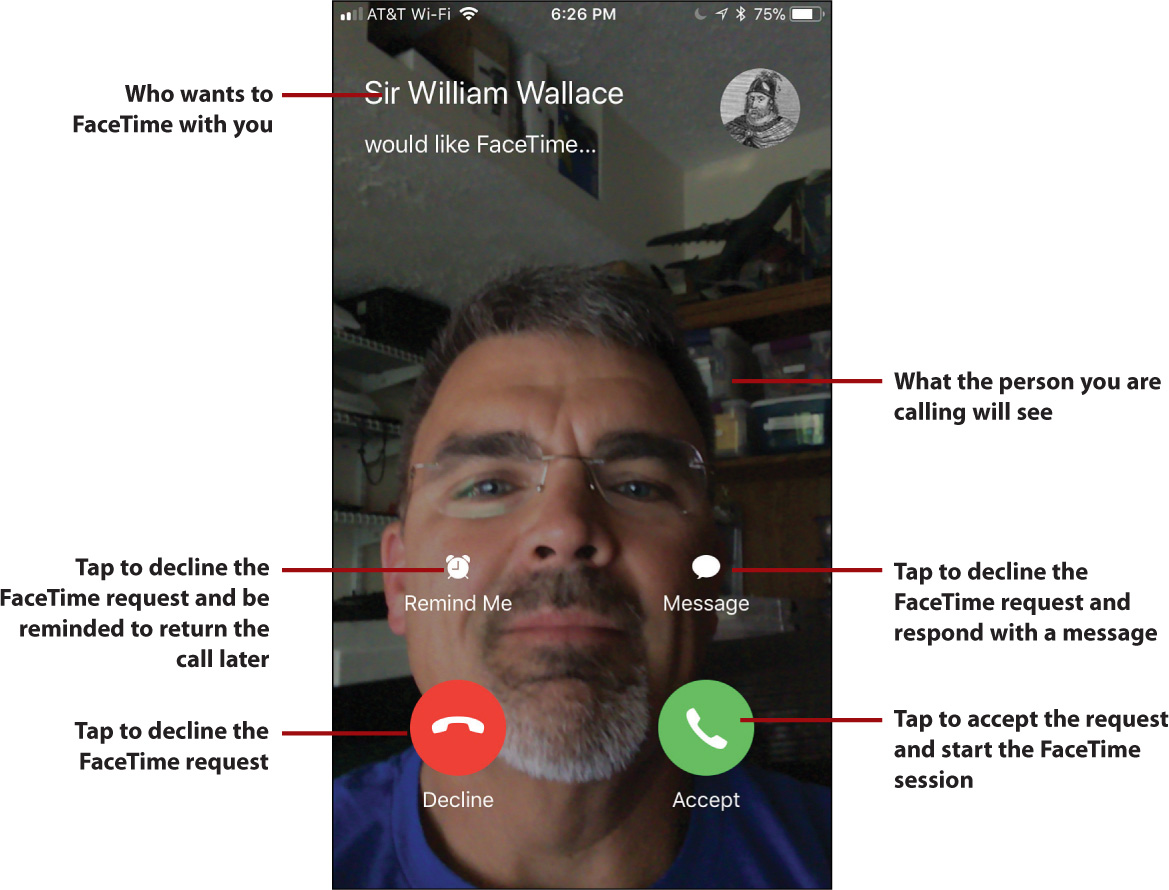
When someone tries to FaceTime with you, you see the incoming FaceTime request screen message showing who is trying to connect with you and the image you are currently broadcasting. Tap Accept to accept the request and start the FaceTime session. Manage the FaceTime call as described in the “Managing FaceTime Calls” task.
Tap Remind Me to decline the FaceTime request and create a reminder or Message to decline the request and send a message. These options work just as they do for a voice call (you have the same custom message options). You can also press the Side button to decline the request.
When a FaceTime request comes in while your iPhone is locked, you swipe to the right on the slider to accept the call or use the Remind Me or Message options if you don’t want to take the call (this is the same as when you receive a voice call via the Phone app).
If you decline the FaceTime request, the person trying to call you receives a message that you’re not available (and a message if you choose that option). She can’t tell whether there is a technical issue or if you simply declined to accept the request.
Tracking FaceTime Calls
FaceTime calls are tracked just as voice calls are. Open the FaceTime app and tap Video to see recent video FaceTime calls or Audio to see recent audio FaceTime calls. On the recents list, FaceTime calls are marked with the video camera icon. FaceTime audio-only calls are marked with a telephone receiver icon. FaceTime calls that didn’t go through are in red and are treated as missed calls. You can do the same tasks with recent FaceTime calls that you can with recent voice calls.
Managing FaceTime Calls
During a FaceTime call (regardless of who placed the call initially), you can do the following:
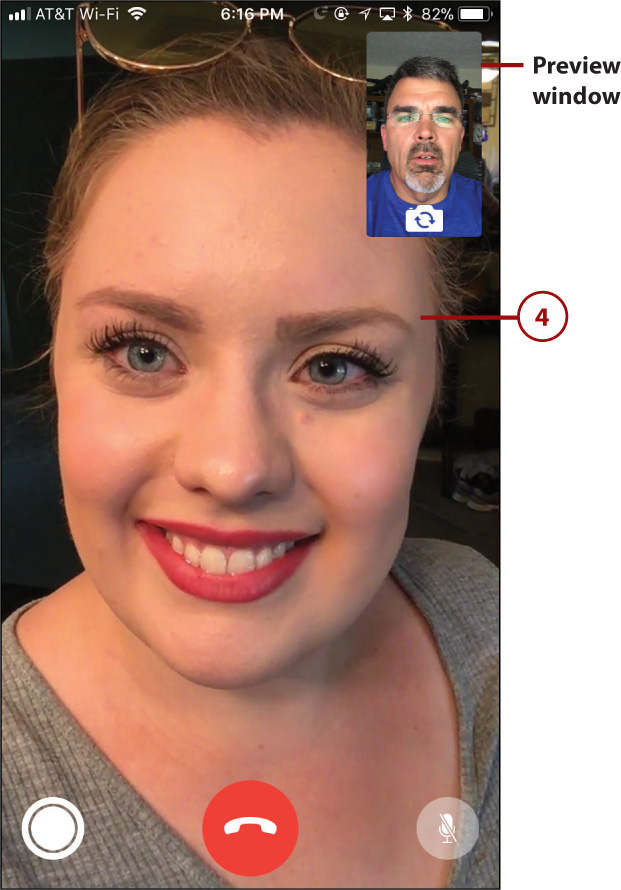
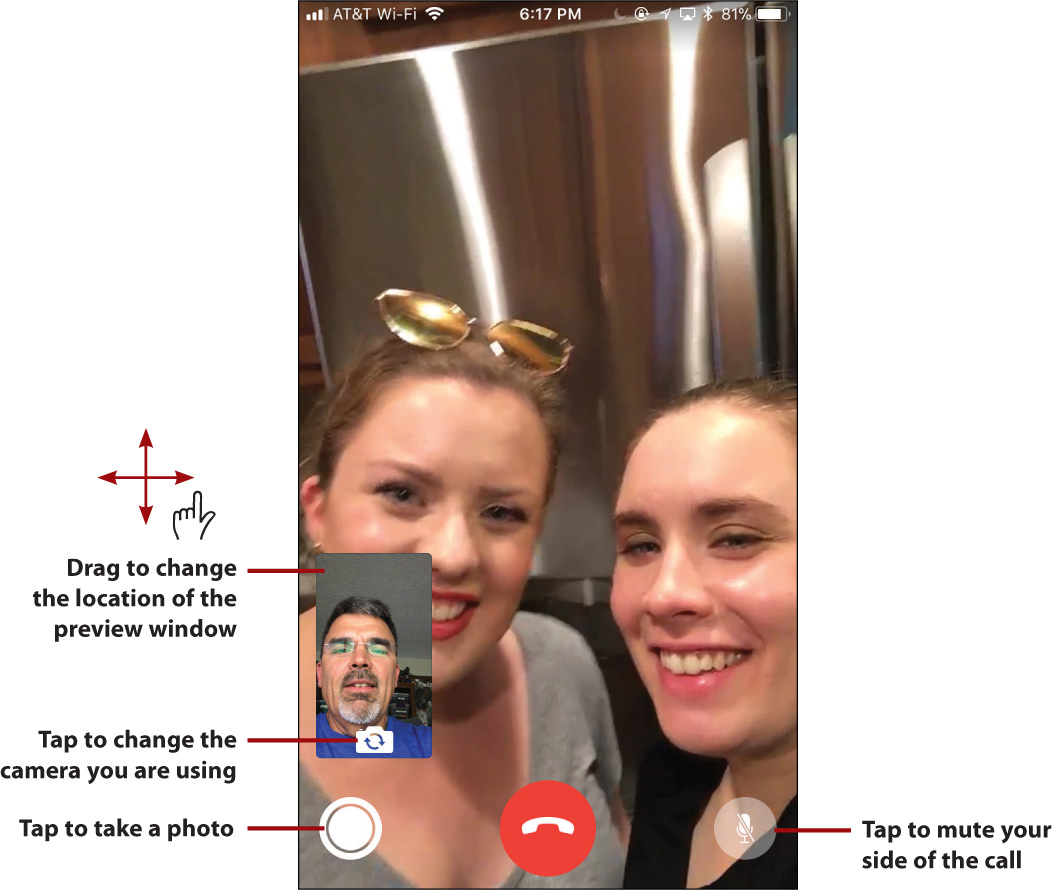
Drag the preview window, which shows the image that the other person is seeing, around the screen to change its location. It “snaps” into place in the closest corner when you lift your finger up.
Move your iPhone and change the angle you are holding it to change the images you are broadcasting to the other person. Use the preview window to see what the other person is seeing.
Tap Mute to mute your side of the conversation. Your audio is muted and you see the Mute icon in the preview window. Video continues to be broadcast so the other person can still see you.
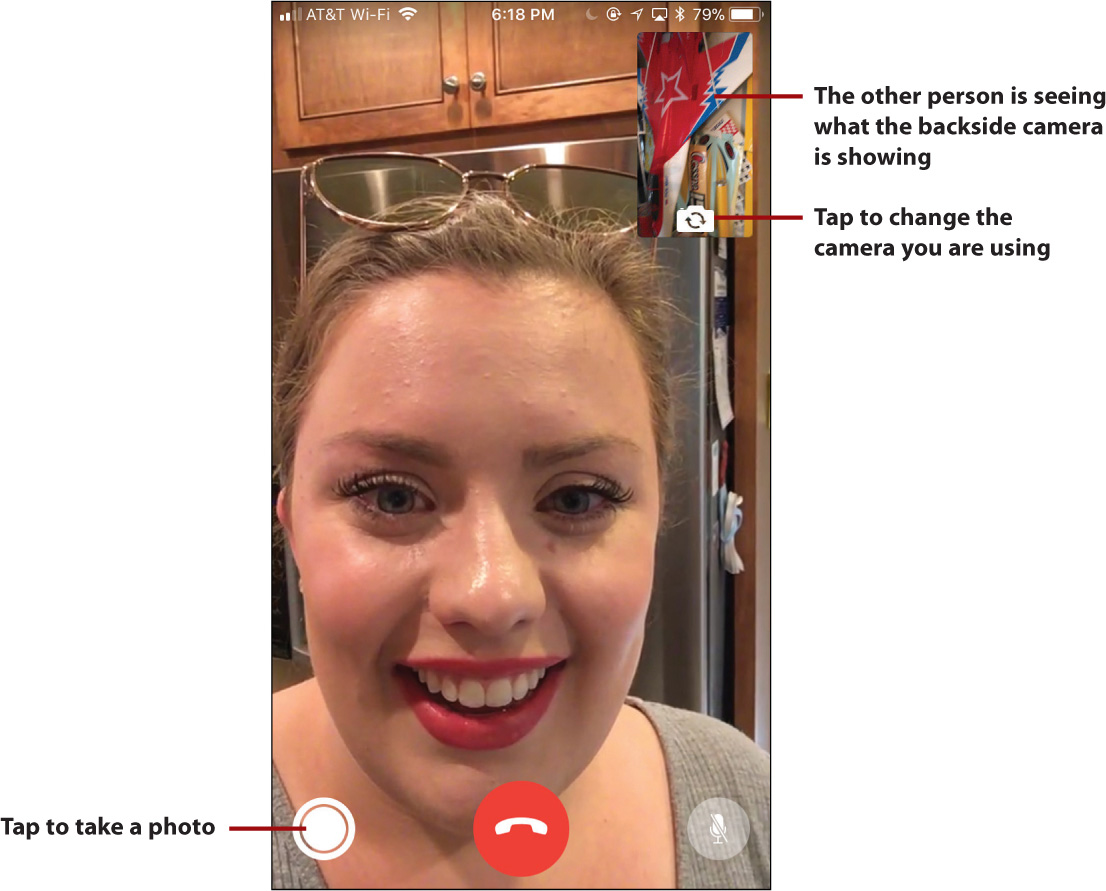
To use the camera on the backside of the iPhone, tap the Change Camera icon. The other person now sees whatever you have the camera on the back of the iPhone pointed at. If the other person changes her camera, you see what her backside camera is pointing at.
Tap the Shutter icon to take a Live Photo (if that setting is enabled) or a static photo of the image you are seeing in the FaceTime window.
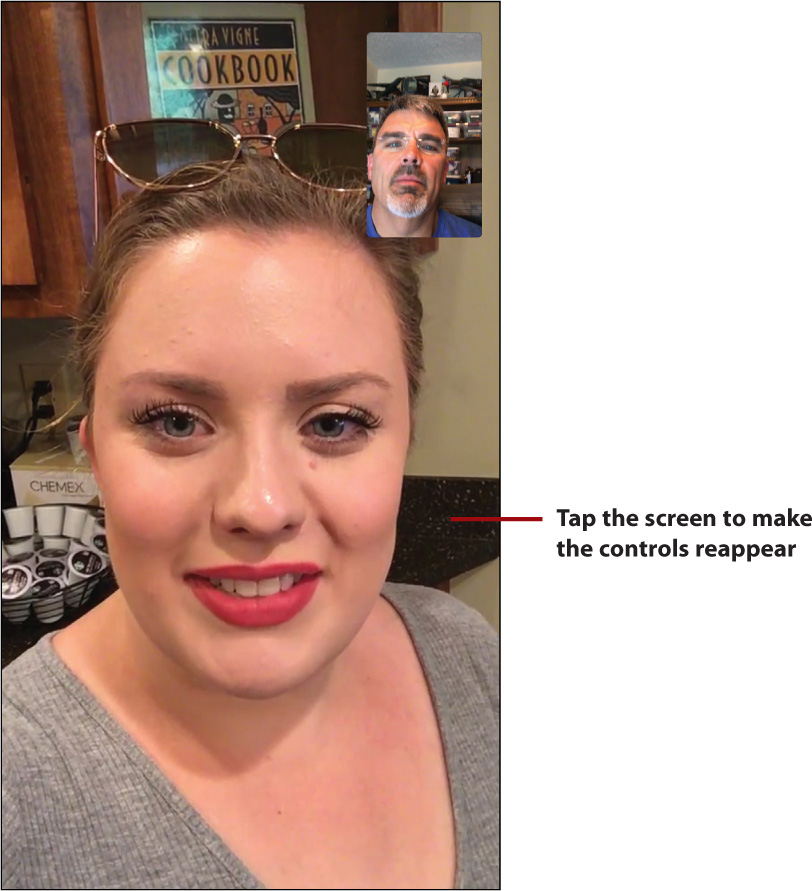
After a few moments, the controls disappear. Tap the screen to make them reappear.
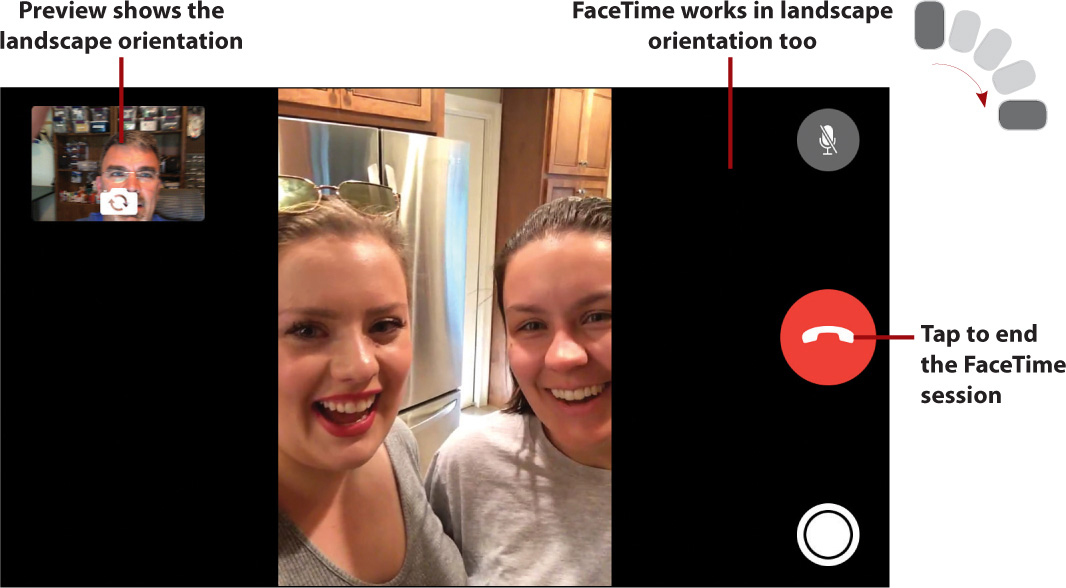
Rotate your iPhone to change the orientation to horizontal. This affects what the other person sees (as reflected in your preview), but you continue to see the other person in her iPhone’s current orientation.
Tap the Receiver icon to end the FaceTime session.
FaceTime Break
Just like when you are in a voice call, you can move into and use other apps (if your provider’s technology supports this functionality). You see the green FaceTime in progress bar at the top of the screen. The audio part of the session continues, but the other person sees a still image with a Camera icon and the word “Paused.” As soon as you move back into the FaceTime session, the video resumes. Likewise, if the other person moves out of the FaceTime app, you see the Paused icon.