7 MySQL Client and Utility Programs
There are many different MySQL client programs that connect to the server to access databases or perform administrative tasks. Other utilities are available as well. These do not communicate with the server but perform MySQL-related operations.
This chapter provides a brief overview of these programs and then a more detailed description of each one. The descriptions indicate how to invoke the programs and the options they understand. See Chapter 3, “Using MySQL Programs,” for general information on invoking programs and specifying program options.
The following list briefly describes the MySQL client programs and utilities:
![]()
myisampack
A utility that compresses MyISAM tables to produce smaller read-only tables. See Section 7.2, “myisampack, the MySQL Compressed Read-only Table Generator.”
![]()
mysql
The command-line tool for interactively entering SQL statements or executing them from a file in batch mode. See Section 7.3, “mysql, the Command-Line Tool".”
![]()
mysqlaccess
A script that checks the access privileges for a host, user, and database combination.
A client that performs administrative operations, such as creating or dropping databases, reloading the grant tables, flushing tables to disk, and reopening log files. mysqladmin can also be used to retrieve version, process, and status information from the server. See Section 7.4, “mysqladmin, Administering a MySQL Server.”
![]()
mysqlbinlog
A utility for reading statements from a binary log. The log of executed statements contained in the binary log files can be used to help recover from a crash. See Section 7.5, “The mysqlbinlog Binary Log Utility.”
![]()
mysqlcc
A client that provides a graphical interface for interacting with the server. See Section 7.6, “mysqlcc, the MySQL Control Center.”
![]()
mysqlcheck
A table-maintenance client that checks, repairs, analyzes, and optimizes tables. See Section 7.7, “The mysqlcheck Table Maintenance and Repair Program.”
![]()
mysqldump
A client that dumps a MySQL database into a file as SQL statements or as tab-separated text files. Enhanced freeware originally by Igor Romanenko. See Section 7.8, “The mysqldump Database Backup Program.”
![]()
mysqlhotcopy
A utility that quickly makes backups of MyISAM or ISAM tables while the server is running. See Section 7.9, “The mysqlhotcopy Database Backup Program”.”
![]()
mysqlimport
A client that imports text files into their respective tables using LOAD DATA INFILE. See Section 7.10, “The mysqlimport Data Import Program.”
![]()
mysqlshow
A client that displays information about databases, tables, columns, and indexes. See Section 7.11, “mysqlshow, Showing Databases, Tables, and Columns.”
![]()
perror
A utility that displays the meaning of system or MySQL error codes. See Section 7.12, “perror, Explaining Error Codes.”
![]()
replace
A utility program that changes strings in place in files or on the standard input. See Section 7.13, “The replace String-Replacement Utility.”
Each MySQL program takes many different options. However, every MySQL program provides a --help option that you can use to get a full description of the program’s different options. For example, try mysql --help.
MySQL clients that communicate with the server using the mysqlclient library use the following environment variables:
|
|
The default Unix socket file; used for connections to |
|
|
The default port number; used for TCP/IP connections |
|
|
The default password |
|
|
Debug trace options when debugging |
|
|
The directory where temporary tables and files are created |
Use of MYSQL_PWD is insecure. See Section 4.5.6, “Keeping Your Password Secure.”
You can override the default option values or values specified in environment variables for all standard programs by specifying options in an option file or on the command line. See Section 3.3, “Specifying Program Options.”
The myisampack utility compresses MyISAM tables. myisampack works by compressing each column in the table separately. Usually, myisampack packs the data file 40%-70%.
When the table is used later, the information needed to decompress columns is read into memory. This results in much better performance when accessing individual records, because you only have to uncompress exactly one record, not a much larger disk block as when using Stacker on MS-DOS.
MySQL uses mmap() when possible to perform memory mapping on compressed tables. If mmap() doesn’t work, MySQL falls back to normal read/write file operations.
A similar utility, pack_isam, compresses ISAM tables. Because ISAM tables are deprecated, this section discusses only myisampack, but the general procedures for using myisampack are also true for pack_isam unless otherwise specified.
Please note the following:
![]() If the
If the mysqld server was invoked with the --skip-external-locking option, it is not a good idea to invoke myisampack if the table might be updated by the server during the packing process.
![]() After packing a table, it becomes read-only. This is generally intended (such as when accessing packed tables on a CD). Allowing writes to a packed table is on our TODO list, but with low priority.
After packing a table, it becomes read-only. This is generally intended (such as when accessing packed tables on a CD). Allowing writes to a packed table is on our TODO list, but with low priority.
![]()
myisampack can pack BLOB or TEXT columns. The older pack_isam program for ISAM tables cannot.
shell> myisampack [options] filename ...
Each filename should be the name of an index (.MYI) file. If you are not in the database directory, you should specify the pathname to the file. It is permissible to omit the .MYI extension.
myisampack supports the following options:
![]()
--help, -?
Display a help message and exit.
![]()
--backup, -b
Make a backup of the table data file using the name tbl_name.OLD.
![]()
--debug[=debug_options], -# [debug_options]
Write a debugging log. The debug_options string often is ’d:t:o,file_name’.
![]()
--force, -f
Produce a packed table even if it becomes larger than the original or if the temporary file from an earlier invocation of myisampack exists. (myisampack creates a temporary file named tbl_name.TMD while it compresses the table. If you kill myisampack, the .TMD file might not be deleted.) Normally, myisampack exits with an error if it finds that tbl_name.TMD exists. With --force, myisampack packs the table anyway.
![]()
--join=big_tbl_name , -j big_tbl_name
Join all tables named on the command line into a single table big_tbl_name. All tables that are to be combined must have identical structure (same column names and types, same indexes, and so forth).
![]()
--packlength=# , -p #
Specify the record length storage size, in bytes. The value should be 1, 2, or 3. myisampack stores all rows with length pointers of 1, 2, or 3 bytes. In most normal cases, myisampack can determine the right length value before it begins packing the file, but it may notice during the packing process that it could have used a shorter length. In this case, myisampack will print a note that the next time you pack the same file, you could use a shorter record length.
![]()
--silent, -s
Silent mode. Write output only when errors occur.
![]()
--test, -t
Don’t actually pack the table, just test packing it.
![]()
--tmp_dir=path , -T path
Use the named directory as the location in which to write the temporary table.
Verbose mode. Write information about the progress of the packing operation and its result.
![]()
--version, -V
Display version information and exit.
![]()
--wait, -w
Wait and retry if the table is in use. If the mysqld server was invoked with the --skip-external-locking option, it is not a good idea to invoke myisampack if the table might be updated by the server during the packing process.
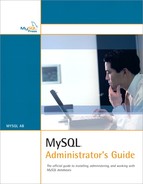
The following sequence of commands illustrates a typical table compression session:
shell> ls -l station.*
-rw-rw-r-- 1 monty my 994128 Apr 17 19:00 station.MYD
-rw-rw-r-- 1 monty my 53248 Apr 17 19:00 station.MYI
-rw-rw-r-- 1 monty my 5767 Apr 17 19:00 station.frm
shell> myisamchk -dvv station
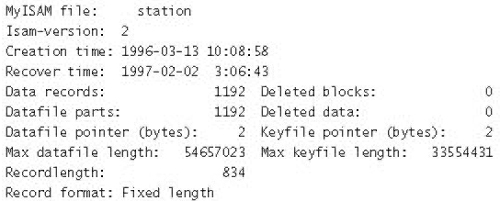
table description:
Key Start Len Index Type Root Blocksize Rec/key
1 2 4 unique unsigned long 1024 1024 1
2 32 30 multip. text 10240 1024 1
Field Start Length Type
1 1 1
2 2 4
3 6 4
4 10 1
5 11 20
6 31 1
7 32 30
8 62 35
9 97 35
10 132 35
11 167 4
12 171 16
13 187 35
14 222 4
15 226 16
16 242 20
17 262 20
18 282 20
19 302 30
20 332 4
21 336 4
22 340 1
23 341 8
24 349 8
25 357 8
26 365 2
27 367 2
28 369 4
29 373 4
30 377 1
31 378 2
32 380 8
33 388 4
34 392 4
35 396 4
36 400 4
37 404 1
38 405 4
39 409 4
40 413 4
41 417 4
42 421 4
43 425 4
44 429 20
45 449 30
46 479 1
47 480 1
48 481 79
49 560 79
50 639 79
51 718 79
52 797 8
53 805 1
54 806 1
55 807 20
56 827 4
57 831 4
shell> myisampack station.MYI
Compressing station.MYI: (1192 records)
- Calculating statistics
normal: 20 empty-space: 16 empty-zero: 12 empty-fill: 11
pre-space: 0 end-space: 12 table-lookups: 5 zero: 7
Original trees: 57 After join: 17
- Compressing file
87.14%
Remember to run myisamchk -rq on compressed tables
shell> ls -l station.*
-rw-rw-r-- 1 monty my 127874 Apr 17 19:00 station.MYD
-rw-rw-r-- 1 monty my 55296 Apr 17 19:04 station.MYI
-rw-rw-r-- 1 monty my 5767 Apr 17 19:00 station.frm
shell> myisamchk -dvv station
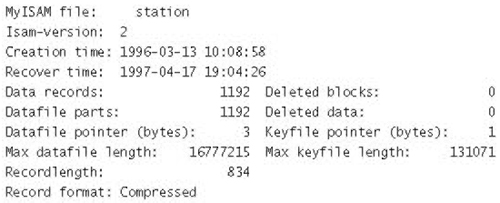
table description:
Key Start Len Index Type Root Blocksize Rec/key
1 2 4 unique unsigned long 10240 1024 1
2 32 30 multip. text 54272 1024 1
myisampack displays the following kinds of information:
![]()
normal
The number of columns for which no extra packing is used.
![]()
empty-space
The number of columns containing values that are only spaces; these will occupy one bit.
![]()
empty-zero
The number of columns containing values that are only binary zeros; these will occupy one bit.
![]()
empty-fill
The number of integer columns that don’t occupy the full byte range of their type; these are changed to a smaller type. For example, a BIGINT column (eight bytes) can be stored as a TINYINT column (one byte) if all its values are in the range from -128 to 127.
![]()
pre-space
The number of decimal columns that are stored with leading spaces. In this case, each value will contain a count for the number of leading spaces.
![]()
end-space
The number of columns that have a lot of trailing spaces. In this case, each value will contain a count for the number of trailing spaces.
![]()
table-lookup
The column had only a small number of different values, which were converted to an ENUM before Huffman compression.
![]()
zero
The number of columns for which all values are zero.
![]()
Original trees
The initial number of Huffman trees.
![]()
After join
The number of distinct Huffman trees left after joining trees to save some header space.
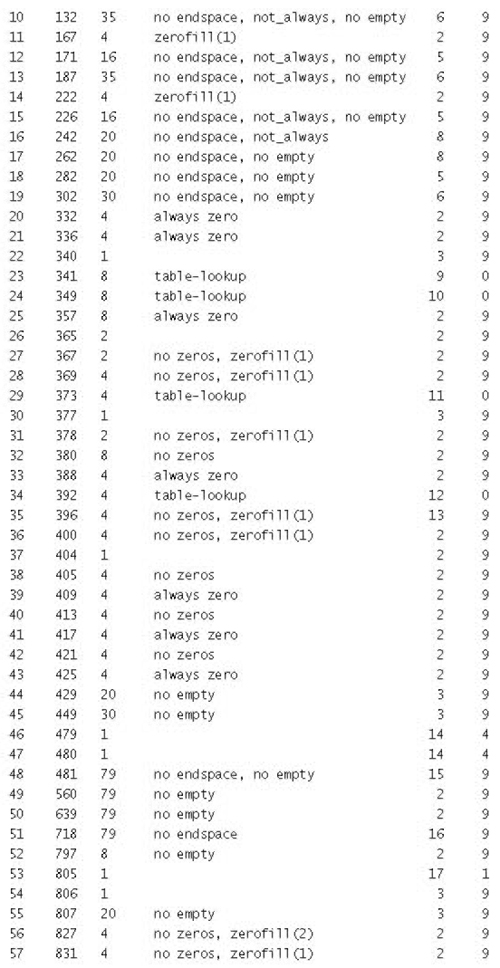
After a table has been compressed, myisamchk -dvv prints additional information about each column:
![]()
Type
The column type. The value may contain any of the following descriptors:
![]()
constant
All rows have the same value.
Don’t store endspace.
![]()
no endspace, not_always
Don’t store endspace and don’t do endspace compression for all values.
![]()
no endspace, no empty
Don’t store endspace. Don’t store empty values.
![]()
table-lookup
The column was converted to an ENUM.
![]()
zerofill(n)
The most significant n bytes in the value are always 0 and are not stored.
![]()
no zeros
Don’t store zeros.
![]()
always zero
Zero values are stored using one bit.
![]()
Huff tree
The number of the Huffman tree associated with the column.
![]()
Bits
The number of bits used in the Huffman tree.
After you run myisampack, you must run myisamchk to re-create any indexes. At this time, you can also sort the index blocks and create statistics needed for the MySQL optimizer to work more efficiently:
shell> myisamchk -rq --sort-index --analyze tbl_name.MYI
A similar procedure applies for ISAM tables. After using pack_isam, use isamchk to re-create the indexes:
shell> isamchk -rq --sort-index --analyze tbl_name.ISM
After you have installed the packed table into the MySQL database directory, you should execute mysqladmin flush-tables to force mysqld to start using the new table.
To unpack a packed table, use the --unpack option to myisamchk or isamchk.
mysql is a simple SQL shell (with GNU readline capabilities). It supports interactive and non-interactive use. When used interactively, query results are presented in an ASCII-table format. When used non-interactively (for example, as a filter), the result is presented in tab-separated format. The output format can be changed using command-line options.
If you have problems due to insufficient memory for large result sets, use the --quick option. This forces mysql to retrieve results from the server a row at a time rather than retrieving the entire result set and buffering it in memory before displaying it. This is done by using mysql_use_result() rather than mysql_store_result() to retrieve the result set.
Using mysql is very easy. Invoke it from the prompt of your command interpreter as follows:
shell> mysql db_name
Or:
shell> mysql --user=user_name --password=your_password db_name
Then type an SQL statement, end it with ';', g, or G and press Enter.
You can run a script simply like this:
shell> mysql db_name < script.sql > output.tab
mysql supports the following options:
![]()
--help, -?
Display a help message and exit.
![]()
--batch, -B
Print results using tab as the column separator, with each row on a new line. With this option, mysql doesn’t use the history file.
![]()
--character-sets-dir=path
The directory where character sets are installed. See Section 4.7.1, “The Character Set Used for Data and Sorting.”
![]()
--compress, -C
Compress all information sent between the client and the server if both support compression.
![]()
--database=db_name , -D db_name
The database to use. This is useful mainly in an option file.
![]()
--debug[=debug_options], -# [debug_options]
Write a debugging log. The debug_options string often is ’d:t:o,file_name'. The default is ’d:t:o,/tmp/mysql.trace'.
![]()
--debug-info, -T
Print some debugging information when the program exits.
![]()
--default-character-set=charset
Use charset as the default character set. See Section 4.7.1, “The Character Set Used for Data and Sorting.”
![]()
--execute=statement , -e statement
Execute the statement and quit. The default output format is like that produced with --batch.
![]()
--force, -f
Continue even if an SQL error occurs.
![]()
--host=host_name , -h host_name
Connect to the MySQL server on the given host.
![]()
--html, -H
Produce HTML output.
![]()
--ignore-space, -i
Ignore spaces after function names. The effect of this is described in the discussion for IGNORE_SPACE in Section 4.2.2, “The Server SQL Mode.”
![]()
--local-infile[={0|1}]
Enable or disable LOCAL capability for LOAD DATA INFILE. With no value, the option enables LOCAL. It may be given as --local-infile=0 or --local-infile=1 to explicitly disable or enable LOCAL. Enabling LOCAL has no effect if the server does not also support it.
![]()
--named-commands, -G
Named commands are enabled. Long format commands are allowed as well as shortened * commands. For example, quit and q both are recognized.
![]()
--no-auto-rehash, -A
No automatic rehashing. This option causes mysql to start faster, but you must issue the rehash command if you want to use table and column name completion.
![]()
--no-beep, -b
Do not beep when errors occur.
![]()
--no-named-commands, -g
Named commands are disabled. Use the * form only, or use named commands only at the beginning of a line ending with a semicolon (';'). As of MySQL 3.23.22, mysql starts with this option enabled by default! However, even with this option, long-format commands still work from the first line.
![]()
--no-pager
Do not use a pager for displaying query output. Output paging is discussed further in Section 7.3.1, “mysql Commands.”
![]()
--no-tee
Do not copy output to a file. Tee files are discussed further in Section 7.3.1, “mysql Commands.”
![]()
--one-database, -O
Ignore statements except those for the default database named on the command line. This is useful for skipping updates to other databases in the binary log.
Use the given command for paging query output. If the command is omitted, the default pager is the value of your PAGER environment variable. Valid pagers are less, more, cat [> filename], and so forth. This option works only on Unix. It does not work in batch mode. Output paging is discussed further in Section 7.3.1, “mysql Commands.”
![]()
--password[=password], -p[password]
The password to use when connecting to the server. Note that if you use the short option form (-p), you cannot have a space between the option and the password. If no password is given on the command line, you will be prompted for one.
![]()
--port=port_num , -P port_num
The TCP/IP port number to use for the connection.
![]()
--prompt=format_str
Set the prompt to the specified format. The default is mysql>. The special sequences that the prompt can contain are described in Section 7.3.1, “mysql Commands.”
![]()
--protocol={TCP | SOCKET | PIPE | MEMORY}
The connection protocol to use. New in MySQL 4.1.
![]()
--quick, -q
Don’t cache each query result, print each row as it is received. This may slow down the server if the output is suspended. With this option, mysql doesn’t use the history file.
![]()
--raw, -r
Write column values without escape conversion. Often used with the --batch option.
![]()
--reconnect
If the connection to the server is lost, automatically try to reconnect. A single reconnect attempt is made each time the connection is lost. To suppress reconnection behavior, use --skip-reconnect. New in MySQL 4.1.0.
![]()
--safe-updates, --i-am-a-dummy, -U
Allow only UPDATE and DELETE statements that specify rows to affect using key values. If you have this option in an option file, you can override it by using --safe-updates on the command line. See Section 7.3.3, “mysql Tips,” for more information about this option.
![]()
--silent, -s
Silent mode. Produce less output. This option can be given multiple times to produce less and less output.
![]()
--skip-column-names, -N
Don’t write column names in results.
![]()
--skip-line-numbers, -L
Don’t write line numbers for errors. Useful when you want to compare result files that include error messages.
![]()
--socket=path , -S path
The socket file to use for the connection.
![]()
--table, -t
Display output in table format. This is the default for interactive use, but can be used to produce table output in batch mode.
![]()
--tee=file_name
Append a copy of output to the given file. This option does not work in batch mode. Tee files are discussed further in Section 7.3.1, “mysql Commands.”
![]()
--unbuffered, -n
Flush the buffer after each query.
![]()
--user=user_name , -u user_name
The MySQL username to use when connecting to the server.
![]()
--verbose, -v
Verbose mode. Produce more output. This option can be given multiple times to produce more and more output. (For example, -v -v -v produces the table output format even in batch mode.)
![]()
--version, -V
Display version information and exit.
![]()
--vertical, -E
Print the rows of query output vertically. Without this option, you can specify vertical output for individual statements by terminating them with G.
![]()
--wait, -w
If the connection cannot be established, wait and retry instead of aborting.
![]()
--xml, -X
Produce XML output.
You can also set the following variables by using --var_name=value options:
![]()
connect_timeout
The number of seconds before connection timeout. (Default value is 0.)
![]()
max_allowed_packet
The maximum packet length to send to or receive from the server. (Default value is 16MB.)
![]()
max_join_size
The automatic limit for rows in a join when using --safe-updates. (Default value is 1,000,000.)
![]()
net_buffer_length
The buffer size for TCP/IP and socket communication. (Default value is 16KB.)
![]()
select_limit
The automatic limit for SELECT statements when using --safe-updates. (Default value is 1,000.)
It is also possible to set variables by using --set-variable=var_name=value or -O var_name=value syntax. However, this syntax is deprecated as of MySQL 4.0.
On Unix, the mysql client writes a record of executed statements to a history file. By default, the history file is named .mysql_history and is created in your home directory. To specify a different file, set the value of the MYSQL_HISTFILE environment variable.
If you do not want to maintain a history file, first remove .mysql_history if it exists, and then use either of the following techniques:
![]() Set the
Set the MYSQL_HISTFILE variable to /dev/null. To cause this setting to take effect each time you log in, put the setting in one of your shell’s startup files.
![]() Create
Create .mysql_histfile as a symbolic link to /dev/null:
shell> ln -s /dev/null $HOME/.mysql_history
You need do this only once.
mysql sends SQL statements that you issue to the server to be executed. There is also a set of commands that mysql itself interprets. For a list of these commands, type help or h at the mysql> prompt:

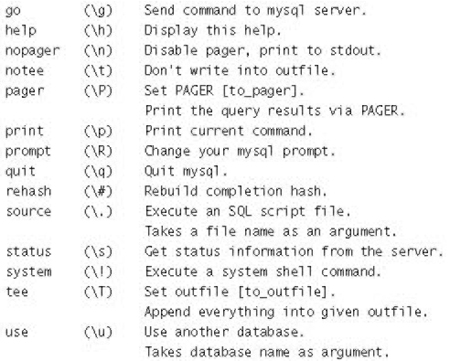
The edit, nopager, pager, and system commands work only in Unix.
The status command provides some information about the connection and the server you are using. If you are running in --safe-updates mode, status also prints the values for the mysql variables that affect your queries.
To log queries and their output, use the tee command. All the data displayed on the screen will be appended into a given file. This can be very useful for debugging purposes also. You can enable this feature on the command line with the --tee option, or interactively with the tee command. The tee file can be disabled interactively with the notee command. Executing tee again re-enables logging. Without a parameter, the previous file will be used. Note that tee flushes query results to the file after each statement, just before mysql prints its next prompt.
Browsing or searching query results in interactive mode by using Unix programs such as less, more, or any other similar program is now possible with the --pager option. If you specify no value for the option, mysql checks the value of the PAGER environment variable and sets the pager to that. Output paging can be enabled interactively with the pager command and disabled with nopager. The command takes an optional argument; if given, the paging program is set to that. With no argument, the pager is set to the pager that was set on the command line, or stdout if no pager was specified.
Output paging works only in Unix because it uses the popen() function, which doesn’t exist on Windows. For Windows, the tee option can be used instead to save query output, although this is not as convenient as pager for browsing output in some situations.
A few tips about the pager command:
![]() You can use it to write to a file and the results will go only to the file:
You can use it to write to a file and the results will go only to the file:
mysql> pager cat > /tmp/log.txt
You can also pass any options for the program that you want to use as your pager:
mysql> pager less -n -i -S
![]() In the preceding example, note the
In the preceding example, note the -S option. You may find it very useful for browsing wide query results. Sometimes a very wide result set is difficult to read on the screen. The -S option to less can make the result set much more readable because you can scroll it horizontally using the left-arrow and right-arrow keys. You can also use -S interactively within less to switch the horizontal-browse mode on and off. For more information, read the less manual page:
shell> man less
![]() You can specify very complex pager commands for handling query output:
You can specify very complex pager commands for handling query output:
mysql> pager cat | tee /dr1/tmp/res.txt
| tee /dr2/tmp/res2.txt | less -n -i -S
In this example, the command would send query results to two files in two different directories on two different filesystems mounted on /dr1 and /dr2, yet still display the results onscreen via less.
You can also combine the tee and pager functions. Have a tee file enabled and pager set to less, and you will be able to browse the results using the less program and still have everything appended into a file the same time. The difference between the Unix tee used with the pager command and the mysql built-in tee command is that the built-in tee works even if you don’t have the Unix tee available. The built-in tee also logs everything that is printed on the screen, whereas the Unix tee used with pager doesn’t log quite that much. Additionally, tee file logging can be turned on and off interactively from within mysql. This is useful when you want to log some queries to a file, but not others.
From MySQL 4.0.2 on, the default mysql> prompt can be reconfigured. The string for defining the prompt can contain the following special sequences:
|
Option |
Description |
|
|
The server version |
|
|
The current database |
|
|
The server host |
|
|
The current TCP/IP host |
|
|
Your username |
|
|
Your full |
|
|
A literal ' |
|
|
A newline character |
|
|
A tab character |
|
|
A space (a space follows the backslash) |
|
|
A space |
|
The current time, in 24-hour military time (0-23) |
|
|
|
The current time, standard 12-hour time (1-12) |
|
|
Minutes of the current time |
|
|
The current year, two digits |
|
|
The current year, four digits |
|
|
The full current date |
|
|
Seconds of the current time |
|
|
The current day of the week in three-letter format (Mon, Tue, ...) |
|
|
am/pm |
|
|
The current month in numeric format |
|
|
The current month in three-letter format (Jan, Feb, ...) |
|
|
A counter that increments for each statement you issue |
‘' followed by any other letter just becomes that letter.
If you specify the prompt command with no argument, mysql resets the prompt to the default of mysql>.
You can set the prompt in several ways:
![]() Use an environment variable
Use an environment variable
You can set the MYSQL_PS1 environment variable to a prompt string. For example:
shell> export MYSQL_PS1="(u@h) [d]> "
![]() Use an option file
Use an option file
You can set the prompt option in the [mysql] group of any MySQL option file, such as /etc/my.cnf or the .my.cnf file in your home directory. For example:
[mysql]
prompt=(\u@\h) [\d]>\_
In this example, note that the backslashes are doubled. If you set the prompt using the prompt option in an option file, it is advisable to double the backslashes when using the special prompt options. There is some overlap in the set of allowable prompt options and the set of special escape sequences that are recognized in option files. (These sequences are listed in Section 3.3.2, “Using Option Files.”) The overlap may cause you problems if you use single backslashes. For example, s will be interpreted as a space rather than as the current seconds value. The following example shows how to define a prompt within an option file to include the current time in HH:MM:SS> format:
[mysql]
prompt="\r:\m:\s> "
You can set the --prompt option on the command line to mysql. For example:
shell> mysql --prompt="(u@h) [d]> "
(user@host) [database]>
![]() Interactively
Interactively
You can change your prompt interactively by using the prompt (or R) command. For example:
mysql> prompt (u@h) [d]>\_
PROMPT set to '(u@h) [d]>\_'
(user@host) [database]>
(user@host) [database]> prompt
Returning to default PROMPT of mysql>
mysql>
The mysql client typically is used interactively, like this:
shell> mysql db_name
However, it’s also possible to put your SQL statements in a file and then tell mysql to read its input from that file. To do so, create a text file text_file that contains the statements you wish to execute. Then invoke mysql as shown here:
shell> mysql db_name < text_file
You can also start your text file with a USE db_name statement. In this case, it is unnecessary to specify the database name on the command line:
shell> mysql < text_file
If you are already running mysql, you can execute an SQL script file using the source or . command:
mysql> source filename;
mysql> . filename
This section describes some techniques that can help you use mysql more effectively.
Some query results are much more readable when displayed vertically, instead of in the usual horizontal table format. For example, longer text values that include newlines often are much easier to read with vertical output:
mysql> SELECT * FROM mails WHERE LENGTH(txt) < 300 LIMIT 300,1G
*************************** 1. row ***************************
msg_nro: 3068
date: 2000-03-01 23:29:50
time_zone: +0200
mail_from: Monty
reply: [email protected]
mail_to: "Thimble Smith" <[email protected]>
sbj: UTF-8
txt: >>>>> "Thimble" == Thimble Smith writes:
Thimble> Hi. I think this is a good idea. Is anyone familiar
Thimble> with UTF-8 or Unicode? Otherwise, I’ll put this on my
Thimble> TODO list and see what happens.
Yes, please do that.
Regards,
Monty
file: inbox-jani-1
hash: 190402944
1 row in set (0.09 sec)
For beginners, a useful startup option is --safe-updates (or --i-am-a-dummy, which has the same effect). This option was introduced in MySQL 3.23.11. It is helpful for cases when you might have issued a DELETE FROM tbl_name statement but forgotten the WHERE clause. Normally, such a statement will delete all rows from the table. With --safe-updates, you can delete rows only by specifying the key values that identify them. This helps prevent accidents.
When you use the --safe-updates option, mysql issues the following statement when it connects to the MySQL server:
SET SQL_SAFE_UPDATES=1,SQL_SELECT_LIMIT=1000, SQL_MAX_JOIN_SIZE=1000000;
The SET statement has the following effects:
![]() You are not allowed to execute an
You are not allowed to execute an UPDATE or DELETE statement unless you specify a key constraint in the WHERE clause or provide a LIMIT clause (or both). For example:
UPDATE tbl_name SET not_key_column=# WHERE key_column=#;
UPDATE tbl_name SET not_key_column=# LIMIT 1;
![]() All large
All large SELECT results are automatically limited to 1,000 rows unless the statement includes a LIMIT clause.
![]() Multiple-table
Multiple-table SELECT statements that will probably need to examine more than 1,000,000 row combinations are aborted.
To specify limits other than 1,000 and 1,000,000, you can override the defaults by using --select_limit and --max_join_size options:
shell> mysql --safe-updates --select_limit=500 --max_join_size=10000
If the mysql client loses its connection to the server while sending a query, it will immediately and automatically try to reconnect once to the server and send the query again. However, even if mysql succeeds in reconnecting, your first connection has ended and all your previous session objects and settings are lost: temporary tables, the autocommit mode, and user and session variables. This behavior may be dangerous for you, as in the following example where the server was shut down and restarted without you knowing it:
mysql> SET @a=1;
Query OK, 0 rows affected (0.05 sec)
mysql> INSERT INTO t VALUES(@a);
ERROR 2006: MySQL server has gone away
No connection. Trying to reconnect...
Connection id: 1
Current database: test
Query OK, 1 row affected (1.30 sec)
mysql> SELECT * FROM t;
+-------+
| a |
+-------+
| NULL |
+-------+
1 row in set (0.05 sec)
The @a user variable has been lost with the connection, and after the reconnection it is undefined. If it is important to have mysql terminate with an error if the connection has been lost, you can start the mysql client with the --skip-reconnect option.
mysqladmin is a client for performing administrative operations. You can use it to check the server’s configuration and current status, create and drop databases, and more.
shell> mysqladmin [options] command [command-option] command ...
mysqladmin supports the following commands:
![]()
create databasename
Create a new database.
![]()
drop databasename
Delete a database and all its tables.
![]()
extended-status
Display the server status variables and their values.
![]()
flush-hosts
Flush all information in the host cache.
![]()
flush-logs
Flush all logs.
![]()
flush-privileges
Reload the grant tables (same as reload).
![]()
flush-status
Clear status variables.
![]()
flush-tables
Flush all tables.
![]()
flush-threads
Flush the thread cache. (Added in MySQL 3.23.16.)
![]()
kill id,id,...
Kill server threads.
![]()
password new-password
Set a new password. This changes the password to new-password for the account that you use with mysqladmin for connecting to the server.
![]()
ping
Check whether the server is alive.
![]()
processlist
Show a list of active server threads. This is like the output of the SHOW PROCESSLIST statement. If the --verbose option is given, the output is like that of SHOW FULL PROCESSLIST.
![]()
reload
Reload the grant tables.
Flush all tables and close and open log files.
![]()
shutdown
Stop the server.
![]()
start-slave
Start replication on a slave server. (Added in MySQL 3.23.16.)
![]()
status
Display a short server status message.
![]()
stop-slave
Stop replication on a slave server. (Added in MySQL 3.23.16.)
![]()
variables
Display the server system variables and their values.
![]()
version
Display version information from the server.
All commands can be shortened to any unique prefix. For example:
shell> mysqladmin proc stat

Uptime: 10077 Threads: 1 Questions: 9 Slow queries: 0
Opens: 6 Flush tables: 1 Open tables: 2
Memory in use: 1092K Max memory used: 1116K
The mysqladmin status command result displays the following values:
![]()
Uptime
The number of seconds the MySQL server has been running.
![]()
Threads
The number of active threads (clients).
![]()
Questions
The number of questions (queries) from clients since the server was started.
![]()
Slow queries
The number of queries that have taken more than long_query_time seconds. See Section 4.8.5, “The Slow Query Log.”
![]()
Opens
The number of tables the server has opened.
The number of flush ..., refresh, and reload commands the server has executed.
![]()
Open tables
The number of tables that currently are open.
![]()
Memory in use
The amount of memory allocated directly by mysqld code. This value is displayed only when MySQL has been compiled with --with-debug=full.
![]()
Maximum memory used
The maximum amount of memory allocated directly by mysqld code. This value is displayed only when MySQL has been compiled with --with-debug=full.
If you execute mysqladmin shutdown when connecting to a local server using a Unix socket file, mysqladmin waits until the server’s process ID file has been removed, to ensure that the server has stopped properly.
mysqladmin supports the following options:
![]()
--help, -?
Display a help message and exit.
![]()
--character-sets-dir=path
The directory where character sets are installed. See Section 4.7.1, “The Character Set Used for Data and Sorting.”
![]()
--compress, -C
Compress all information sent between the client and the server if both support compression.
![]()
--count=# , -c #
The number of iterations to make. This works only with --sleep (-i).
![]()
--debug[=debug_options], -# [debug_options]
Write a debugging log. The debug_options string often is ’d:t:o,file_name'. The default is ’d:t:o,/tmp/mysqladmin.trace'.
![]()
--force, -f
Don’t ask for confirmation for the drop database command. With multiple commands, continue even if an error occurs.
![]()
--host=host_name , -h host_name
Connect to the MySQL server on the given host.
![]()
--password[=password], -p[password]
The password to use when connecting to the server. Note that if you use the short option form (-p), you cannot have a space between the option and the password. If no password is given on the command line, you will be prompted for one.
The TCP/IP port number to use for the connection.
![]()
--protocol={TCP | SOCKET | PIPE | MEMORY}
The connection protocol to use. New in MySQL 4.1.
![]()
--relative, -r
Show the difference between the current and previous values when used with -i. Currently, this option works only with the extended-status command.
![]()
--silent, -s
Exit silently if a connection to the server cannot be established.
![]()
--sleep=delay , -i delay
Execute commands again and again, sleeping for delay seconds in between.
![]()
--socket=path , -S path
The socket file to use for the connection.
![]()
--user=user_name , -u user_name
The MySQL username to use when connecting to the server.
![]()
--verbose, -v
Verbose mode. Print out more information on what the program does.
![]()
--version, -V
Display version information and exit.
![]()
--vertical, -E
Print output vertically. This is similar to --relative, but prints output vertically.
![]()
--wait[=#], -w[#]
If the connection cannot be established, wait and retry instead of aborting. If an option value is given, it indicates the number of times to retry. The default is one time.
You can also set the following variables by using --var_name=value options:
![]()
connect_timeout
The number of seconds before connection timeout. (Default value is 0.)
![]()
shutdown_timeout
The number of seconds to wait for shutdown. (Default value is 0.)
It is also possible to set variables by using --set-variable=var_name=value or -O var_name=value syntax. However, this syntax is deprecated as of MySQL 4.0.
The binary log files that the server generates are written in binary format. To examine these files in text format, use the mysqlbinlog utility. It is available as of MySQL 3.23.14.
Invoke mysqlbinlog like this:
shell> mysqlbinlog [options] log-file ...
For example, to display the contents of the binary log binlog.000003, use this command:
shell> mysqlbinlog binlog.0000003
The output includes all statements contained in binlog.000003, together with other information such as the time each statement took, the thread ID of the client that issued it, the timestamp when it was issued, and so forth.
Normally, you use mysqlbinlog to read binary log files directly and apply them to the local MySQL server. It is also possible to read binary logs from a remote server by using the --read-from-remote-server option. However, this is deprecated because we instead want to make it easy to apply binary logs to a local MySQL server.
When you read remote binary logs, the connection parameter options can be given to indicate how to connect to the server, but they are ignored unless you also specify the --read-from-remote-server option. These options are --host, --password, --port, --protocol, --socket, and --user.
You can also use mysqlbinlog to read relay log files written by a slave server in a replication setup. Relay logs have the same format as binary log files.
The binary log is discussed further in Section 4.8.4, “The Binary Log.”
mysqlbinlog supports the following options:
![]()
--help, -?
Display a help message and exit.
![]()
--database=db_name , -d db_name
List entries for just this database (local log only).
![]()
--force-read, -f
Force reading of unknown binary log events.
![]()
--host=host_name , -h host_name
Get the binary log from the MySQL server on the given host.
![]()
--local-load=path , -l path
Prepare local temporary files for LOAD DATA INFILE in the specified directory.
![]()
--offset=N , -o N
Skip the first N entries.
![]()
--password[=password], -p[password]
The password to use when connecting to the server. Note that if you use the short option form (-p), you cannot have a space between the option and the password. If no password is given on the command line, you will be prompted for one.
![]()
--port=port_num , -P port_num
The TCP/IP port number to use for connecting to a remote server.
![]()
--position=N , -j N
Start reading the binary log at position N.
![]()
--protocol={TCP | SOCKET | PIPE | MEMORY}
The connection protocol to use. New in MySQL 4.1.
![]()
--read-from-remote-server, -R
Read the binary log from a MySQL server. Any connection parameter options are ignored unless this option is given as well. These options are --host, --password, --port, --protocol, --socket, and --user.
![]()
--result-file=name , -r name
Direct output to the given file.
![]()
--short-form, -s
Display only the statements contained in the log, without any extra information.
![]()
--socket=path , -S path
The socket file to use for the connection.
![]()
--user=user_name , -u user_name
The MySQL username to use when connecting to a remote server.
![]()
--version, -V
Display version information and exit.
You can also set the following variable by using --var_name=value options:
![]()
open_files_limit
Specify the number of open file descriptors to reserve.
You can pipe the output of mysqlbinlog into a mysql client to execute the statements contained in the binary log. This is used to recover from a crash when you have an old backup (see Section 4.6.1, “Database Backups”):
shell> mysqlbinlog hostname-bin.000001 | mysql
Or:
shell> mysqlbinlog hostname-bin.[0-9]* | mysql
You can also redirect the output of mysqlbinlog to a text file instead, if you need to modify the statement log first (for example, to remove statements that you don’t want to execute for some reason). After editing the file, execute the statements that it contains by using it as input to the mysql program.
mysqlbinlog has the --position option, which prints only those statements with an offset in the binary log greater than or equal to a given position.
If you have more than one binary log to execute on the MySQL server, the safe method is to process them all using a single connection to the server. Here is an example that demonstrates what may be unsafe:
shell> mysqlbinlog hostname-bin.000001 | mysql # DANGER!!
shell> mysqlbinlog hostname-bin.000002 | mysql # DANGER!!
Processing binary logs this way using different connections to the server will cause problems if the first log file contains a CREATE TEMPORARY TABLE statement and the second log contains a statement that uses the temporary table. When the first mysql process terminates, the server will drop the temporary table. When the second mysql process attempts to use the table, the server will report “unknown table.”
To avoid problems like this, use a single connection to execute the contents of all binary logs that you want to process. Here is one way to do that:
shell> mysqlbinlog hostname-bin.000001 hostname-bin.000002 | mysql
Another approach is to do this:
shell> mysqlbinlog hostname-bin.000001 > /tmp/statements.sql
shell> mysqlbinlog hostname-bin.000002 >> /tmp/statements.sql
shell> mysql -e "source /tmp/statements.sql"
In MySQL 3.23, the binary log did not contain the data to load for LOAD DATA INFILE statements. To execute such a statement from a binary log file, the original data file was needed. Starting from MySQL 4.0.14, the binary log does contain the data, so mysqlbinlog can produce output that reproduces the LOAD DATA INFILE operation without the original data file. mysqlbinlog copies the data to a temporary file and writes a LOAD DATA LOCAL INFILE statement that refers to the file. The default location of the directory where these files are written is system-specific. To specify a directory explicitly, use the --local-load option.
Because mysqlbinlog converts LOAD DATA INFILE statements to LOAD DATA LOCAL INFILE statements (that is, it adds LOCAL), both the client and the server that you use to process the statements must be configured to allow LOCAL capability.
Warning:The temporary files created for LOAD DATA LOCAL statements are not automatically deleted because they are needed until you actually execute those statements. You should delete the temporary files yourself after you no longer need the statement log. The files can be found in the temporary file directory and have names like original_file_name-#-#.
In the future, we will fix this problem by allowing mysqlbinlog to connect directly to a mysqld server. Then it will be possible to safely remove the log files automatically as soon as the LOAD DATA INFILE statements have been executed.
Before MySQL 4.1, mysqlbinlog could not prepare output suitable for mysql if the binary log contained intertwined statements originating from different clients that used temporary tables of the same name. This is fixed in MySQL 4.1.
mysqlcc, the MySQL Control Center, is a platform-independent client that provides a graphical user interface (GUI) to the MySQL database server. It supports interactive use, including syntax highlighting and tab completion. It provides database and table management, and allows server administration.
mysqlcc is not included with MySQL distributions, but can be downloaded separately at http://dev.mysql.com/downloads/. Currently, mysqlcc runs on Windows and Linux platforms.
Invoke mysqlcc by double-clicking its icon in a graphical environment. From the command line, invoke it like this:
shell> mysqlcc [options]
mysqlcc supports the following options:
![]()
--help, -?
Display a help message and exit.
![]()
--blocking_queries, -b
Use blocking queries.
![]()
--compress, -C
Compress all information sent between the client and the server if both support compression.
![]()
--connection_name=name , -c name
This option is a synonym for --server.
![]()
--database=db_name , -d db_name
The database to use. This is useful mainly in an option file.
![]()
--history_size=# , -H #
The history size for the query window.
![]()
--host=host_name, -h host_name
Connect to the MySQL server on the given host.
Enable or disable LOCAL capability for LOAD DATA INFILE. With no value, the option enables LOCAL. It may be given as --local-infile=0 or --local-infile=1 to explicitly disable or enable LOCAL. Enabling LOCAL has no effect if the server does not also support it.
![]()
--password[=password], -p[password]
The password to use when connecting to the server. Note that if you use the short option form (-p), you cannot have a space between the option and the password. If no password is given on the command line, you will be prompted for one.
![]()
--plugins_path=name , -g name
The path to the directory where MySQL Control Center plugins are located.
![]()
--port=port_num , -P port_num
The TCP/IP port number to use for the connection.
![]()
--query, -q
Open a query window on startup.
![]()
--register, -r
Open the Register Server dialog on startup.
![]()
--server=name , -s name
The MySQL Control Center connection name.
![]()
--socket=path , -S path
The socket file to use for the connection.
![]()
--syntax, -y
Enable syntax highlighting and completion.
![]()
--syntax_file=name , -Y name
The syntax file for completion.
![]()
--translations_path=name , -T name
The path to the directory where MySQL Control Center translations are located.
![]()
--user=user_name , -u user_name
The MySQL username to use when connecting to the server.
![]()
--version, -V
Display version information and exit.
You can also set the following variables by using --var_name=value options:
![]()
connect_timeout
The number of seconds before connection timeout. (Default value is 0.)
The maximum packet length to send to or receive from the server. (Default value is 16MB.)
![]()
max_join_size
The automatic limit for rows in a join. (Default value is 1,000,000.)
![]()
net_buffer_length
The buffer size for TCP/IP and socket communication. (Default value is 16KB.)
![]()
select_limit
The automatic limit for SELECT statements. (Default value is 1,000.)
It is also possible to set variables by using --set-variable=var_name=value or -O var_name=value syntax. However, this syntax is deprecated as of MySQL 4.0.
The mysqlcheck client checks and repairs MyISAM tables. It can also optimize and analyze tables. mysqlcheck is available as of MySQL 3.23.38.
mysqlcheck is similar in function to myisamchk, but works differently. The main operational difference is that mysqlcheck must be used when the mysqld server is running, whereas myisamchk should be used when it is not. The benefit of using mysqlcheck is that you do not have to stop the server to check or repair your tables.
mysqlcheck uses the SQL statements CHECK TABLE, REPAIR TABLE, ANALYZE TABLE, and OPTIMIZE TABLE in a convenient way for the user. It determines which statements to use for the operation you want to perform, then sends the statements to the server to be executed.
There are three general ways to invoke mysqlcheck:
shell> mysqlcheck [options] db_name [tables]
shell> mysqlcheck [options] --databases DB1 [DB2 DB3...]
shell> mysqlcheck [options] --all-databases
If you don’t name any tables or use the --databases or --all-databases option, entire databases will be checked.
mysqlcheck has a special feature compared to the other clients. The default behavior of checking tables (--check) can be changed by renaming the binary. If you want to have a tool that repairs tables by default, you should just make a copy of mysqlcheck named mysqlrepair, or make a symbolic link to mysqlcheck named mysqlrepair. If you invoke mysqlrepair, it will repair tables by default.
The following names can be used to change mysqlcheck default behavior:
|
|
The default option will be |
|
|
The default option will be |
|
|
The default option will be |
mysqlcheck supports the following options:
![]()
--help, -?
Display a help message and exit.
![]()
--all-databases, -A
Check all tables in all databases. This is the same as using the --databases option and naming all the databases on the command line.
![]()
--all-in-1, -1
Instead of issuing a statement for each table, execute a single statement for each database that names all the tables from that database to be processed.
![]()
--analyze, -a
Analyze the tables.
![]()
--auto-repair
If a checked table is corrupted, automatically fix it. Any necessary repairs are done after all tables have been checked.
![]()
--character-sets-dir=path
The directory where character sets are installed. See Section 4.7.1, “The Character Set Used for Data and Sorting.”
![]()
--check, -c
Check the tables for errors.
![]()
--check-only-changed, -C
Check only tables that have changed since the last check or that haven’t been closed properly.
![]()
--compress
Compress all information sent between the client and the server if both support compression.
![]()
--databases, -B
Process all tables in the named databases. With this option, all name arguments are regarded as database names, not as table names.
![]()
--debug[=debug_options], -# [debug_options]
Write a debugging log. The debug_options string often is ’d:t:o,file_name'.
![]()
--default-character-set=charset
Use charset as the default character set. See Section 4.7.1, “The Character Set Used for Data and Sorting.”
![]()
--extended, -e
If you are using this option to check tables, it ensures that they are 100% consistent but will take a long time.
If you are using this option to repair tables, it runs an extended repair that may not only take a long time to execute, but may produce a lot of garbage rows also!
![]()
--fast, -F
Check only tables that haven’t been closed properly.
![]()
--force, -f
Continue even if an SQL error occurs.
![]()
--host=host_name , -h host_name
Connect to the MySQL server on the given host.
![]()
--medium-check, -m
Do a check that is faster than an --extended operation. This finds only 99.99% of all errors, which should be good enough in most cases.
![]()
--optimize, -o
Optimize the tables.
![]()
--password[=password], -p[password]
The password to use when connecting to the server. Note that if you use the short option form (-p), you cannot have a space between the option and the password. If no password is given on the command line, you will be prompted for one.
![]()
--port=port_num , -P port_num
The TCP/IP port number to use for the connection.
![]()
--protocol={TCP | SOCKET | PIPE | MEMORY}
The connection protocol to use. New in MySQL 4.1.
![]()
--quick, -q
If you are using this option to check tables, it prevents the check from scanning the rows to check for incorrect links. This is the fastest check method.
If you are using this option to repair tables, it tries to repair only the index tree. This is the fastest repair method.
![]()
--repair, -r
Do a repair that can fix almost anything except unique keys that aren’t unique.
![]()
--silent, -s
Silent mode. Print only error messages.
The socket file to use for the connection.
![]()
--tables
Overrides the --databases or -B option. All arguments following the option are regarded as table names.
![]()
--user=user_name , -u user_name
The MySQL username to use when connecting to the server.
![]()
--verbose, -v
Verbose mode. Print information about the various stages of program operation.
![]()
--version, -V
Display version information and exit.
The mysqldump client can be used to dump a database or a collection of databases for backup or for transferring the data to another SQL server (not necessarily a MySQL server). The dump will contain SQL statements to create the table and/or populate the table.
If you are doing a backup on the server, you should consider using the mysqlhotcopy instead. See Section 7.9, “The mysqlhotcopy Database Backup Program.”
There are three general ways to invoke mysqldump:
shell> mysqldump [options] db_name [tables]
shell> mysqldump [options] --databases DB1 [DB2 DB3...]
shell> mysqldump [options] --all-databases
If you don’t name any tables or use the --databases or --all-databases option, entire databases will be dumped.
To get a list of the options your version of mysqldump supports, execute mysqldump --help.
If you run mysqldump without the --quick or --opt option, mysqldump will load the whole result set into memory before dumping the result. This will probably be a problem if you are dumping a big database. As of MySQL 4.1, --opt is on by default, but can be disabled with --skip-opt.
If you are using a recent copy of the mysqldump program and you are going to generate a dump that will be reloaded into a very old MySQL server, you should not use the --opt or -e options.
Out-of-range numeric values such as -inf and inf, as well as NaN (not-a-number) values are dumped by mysqldump as NULL. You can see this using the following sample table:
mysql> CREATE TABLE t (f DOUBLE);
mysql> INSERT INTO t VALUES(1e+111111111111111111111);
mysql> INSERT INTO t VALUES(-1e111111111111111111111);
mysql> SELECT f FROM t;
+------+
| f |
+------+
| inf |
| -inf |
+------+
For this table, mysqldump produces the following data output:
--
-- Dumping data for table `t`
--
INSERT INTO t VALUES (NULL);
INSERT INTO t VALUES (NULL);
The significance of this behavior is that if you dump and restore the table, the new table has contents that differ from the original contents.
mysqldump supports the following options:
![]()
--help, -?
Display a help message and exit.
![]()
--add-drop-table
Add a DROP TABLE statement before each CREATE TABLE statement.
![]()
--add-locks
Surround each table dump with LOCK TABLES and UNLOCK TABLES statements. This results in faster inserts when the dump file is reloaded. See Section 6.2.12, “Speed of INSERT Queries.”
![]()
--all-databases, -A
Dump all tables in all databases. This is the same as using the --databases option and naming all the databases on the command line.
![]()
--allow-keywords
Allow creation of column names that are keywords. This works by prefixing each column name with the table name.
![]()
--comments[={0|1}]
If set to 0, suppresses additional information in the dump file such as program version, server version, and host. --skip-comments has the same effect as --comments=0. The default value is 1 to not suppress the extra information. New in MySQL 4.0.17.
Produce output that is compatible with other database systems or with older MySQL servers. The value of name can be mysql323, mysql40, postgresql, oracle, mssql, db2, sapdb, no_key_options, no_table_options, or no_field_options. To use several values, separate them by commas. These values have the same meaning as the corresponding options for setting the server SQL mode. See Section 4.2.2, “The Server SQL Mode.”
This option requires a server version of 4.1.0 or higher. With older servers, it does nothing.
![]()
--complete-insert, -c
Use complete INSERT statements that include column names.
![]()
--compress, -C
Compress all information sent between the client and the server if both support compression.
![]()
--create-options
Include all MySQL-specific table options in the CREATE TABLE statements. Before MySQL 4.1.2, use --all instead.
![]()
--databases, -B
To dump several databases. Note the difference in usage. In this case, no tables are given. All name arguments on the command line are regarded as database names. A USE db_name statement is included in the output before each new database.
![]()
--debug[=debug_options], -# [debug_options]
Write a debugging log. The debug_options string often is ’d:t:o,file_name'.
![]()
--default-character-set=charset
Use charset as the default character set. See Section 4.7.1, “The Character Set Used for Data and Sorting.” If not specified, mysqldump from MySQL 4.1.2 or later uses utf8; earlier versions use latin1.
![]()
--delayed
Insert rows using INSERT DELAYED statements.
![]()
--delete-master-logs
On a master replication server, delete the binary logs after performing the dump operation. This option automatically enables --first-slave. It was added in MySQL 3.23.57 (for MySQL 3.23) and MySQL 4.0.13 (for MySQL 4.0).
![]()
--disable-keys, -K
For each table, surround the INSERT statements with /*!40000 ALTER TABLE tbl_name DISABLE KEYS */; and /*!40000 ALTER TABLE tbl_name ENABLE KEYS */; statements. This makes loading the dump file into a MySQL 4.0 server faster because the indexes are created after all rows are inserted. This option is effective only for MyISAM tables.
Use multiple-row INSERT syntax that include several VALUES lists. This results in a smaller dump file and speeds up inserts when the file is reloaded.
![]()
--fields-terminated-by=...

--fields-enclosed-by=...

--fields-optionally-enclosed-by=...

--fields-escaped-by=...

--lines-terminated-by=...
These options are used with the -T option and have the same meaning as the corresponding clauses for LOAD DATA INFILE.
![]()
--first-slave, -x
Locks all tables across all databases.
![]()
--flush-logs, -F
Flush the MySQL server log files before starting the dump. Note that if you use this option in combination with the --all-databases (or -A) option, the logs are flushed for each database dumped.
![]()
--force, -f
Continue even if an SQL error occurs during a table dump.
![]()
--host=host_name , -h host_name
Dump data from the MySQL server on the given host. The default host is localhost.
![]()
--lock-tables, -l
Lock all tables before starting the dump. The tables are locked with READ LOCAL to allow concurrent inserts in the case of MyISAM tables.
Please note that when dumping multiple databases, --lock-tables locks tables for each database separately. So, using this option will not guarantee that the tables in the dump file will be logically consistent between databases. Tables in different databases may be dumped in completely different states.
![]()
--master-data
This option is like --first-slave, but also produces CHANGE MASTER TO statements that will make your slave server start from the correct position in the master’s binary logs if you use this SQL dump of the master to set up the slave.
![]()
--no-create-db, -n
This option suppresses the CREATE DATABASE /*!32312 IF NOT EXISTS*/ db_name statements that are otherwise included in the output if the --databases or --all-databases option is given.
![]()
--no-create-info, -t
Don’t write CREATE TABLE statements that re-create each dumped table.
Don’t write any row information for the table. This is very useful if you just want to get a dump of the structure for a table.
![]()
--opt
This option is shorthand; it is the same as specifying --quick --add-drop-table --add-locks --create-options --disable-keys --extended-insert --lock-tables. It should give you a fast dump operation and produce a dump file that can be reloaded into a MySQL server quickly. As of MySQL 4.1, --opt is on by default, but can be disabled with
--skip-opt. To disable only certain of the options enabled by --opt, use their --skip forms; for example, --skip-add-drop-table or --skip-quick.
![]()
--password[=password], -p[password]
The password to use when connecting to the server. Note that if you use the short option form (-p), you cannot have a space between the option and the password. If no password is given on the command line, you will be prompted for one.
![]()
--port=port_num , -P port_num
The TCP/IP port number to use for the connection.
![]()
--protocol={TCP | SOCKET | PIPE | MEMORY}
The connection protocol to use. New in MySQL 4.1.
![]()
--quick, -q
This option is useful for dumping large tables. It forces mysqldump to retrieve rows for a table from the server a row at a time rather than retrieving the entire row set and buffering it in memory before writing it out.
![]()
--quote-names, -Q
Quote database, table, and column names within '`' characters. If the server SQL mode includes the ANSI_QUOTES option, names are quoted within '"' characters. As of MySQL 4.1.1, --quote-names is on by default, but can be disabled with --skip-quote-names.
![]()
--result-file=file , -r file
Direct output to a given file. This option should be used on Windows, because it prevents newline '
' characters from being converted to '
' carriage return/newline sequences.
![]()
--single-transaction
This option issues a BEGIN SQL statement before dumping data from the server. It is mostly useful with InnoDB tables and READ COMMITTED transaction isolation level, because in this mode it will dump the consistent state of the database at the time when BEGIN was issued without blocking any applications.
When using this option, you should keep in mind that only transactional tables will be dumped in a consistent state. For example, any MyISAM or HEAP tables dumped while using this option may still change state.
The --single-transaction option was added in version 4.0.2. This option is mutually exclusive with the --lock-tables option, because LOCK TABLES causes any pending transactions to be committed implicitly.
![]()
--socket=path , -S path
The socket file to use when connecting to localhost (which is the default host).
![]()
--skip-comments
See the description for the --comments option.
![]()
--tab=path , -T path
Produces tab-separated data files. For each dumped table, mysqldump creates a tbl_name.sql file that contains the CREATE TABLE statement that creates the table, and a tbl_name.txt file that contains its data. The option value is the directory in which to write the files.
By default, the .txt data files are formatted using tab characters between column values and a newline at the end of each line. The format can be specified explicitly using the --fields-xxx and --lines--xxx options.
Note:This option should be used only when mysqldump is run on the same machine as the mysqld server. You must use a MySQL account that has the FILE privilege, and the server must have permission to write files in the directory you specify.
![]()
--tables
Overrides the --databases or -B option. All arguments following the option are regarded as table names.
![]()
--user=user_name , -u user_name
The MySQL username to use when connecting to the server.
![]()
--verbose, -v
Verbose mode. Print out more information on what the program does.
![]()
--version, -V
Display version information and exit.
![]()
--where='where-condition', -w 'where-condition'
Dump only records selected by the given WHERE condition. Note that quotes around the condition are mandatory if it contains spaces or characters that are special to your command interpreter.
Examples:
"--where=user='jimf'"
"-wuserid>1"
"-wuserid<1"
![]()
--xml, -X
Write dump output as well-formed XML.
You can also set the following variables by using --var_name=value options:
![]()
max_allowed_packet
The maximum size of the buffer for client/server communication. The value of the variable can be up to 16MB before MySQL 4.0, and up to 1GB from MySQL 4.0 on. When creating multiple-row-insert statements (as with option --extended-insert or --opt), mysqldump will create rows up to max_allowed_packet length. If you increase this variable, you should also ensure that the max_allowed_packet variable in the MySQL server is at least this large.
![]()
net_buffer_length
The initial size of the buffer for client/server communication.
It is also possible to set variables by using --set-variable=var_name=value or -O var_name=value syntax. However, this syntax is deprecated as of MySQL 4.0.
The most common use of mysqldump is probably for making a backup of entire databases.
shell> mysqldump --opt db_name > backup-file.sql
You can read the dump file back into the server with:
shell> mysql db_name < backup-file.sql
Or:
shell> mysql -e "source /path-to-backup/backup-file.sql" db_name
mysqldump is also very useful for populating databases by copying data from one MySQL server to another:
shell> mysqldump --opt db_name | mysql --host=remote-host -C db_name
It is possible to dump several databases with one command:
shell> mysqldump --databases db_name1 [db_name2 ...] > my_databases.sql
If you want to dump all databases, use the --all-databases option:
shell> mysqldump --all-databases > all_databases.sql
For more information on making backups, see Section 4.6.1, “Database Backups.”
mysqlhotcopy is a Perl script that uses LOCK TABLES, FLUSH TABLES, and cp or scp to quickly make a backup of a database. It’s the fastest way to make a backup of the database or single tables, but it can be run only on the same machine where the database directories are located. mysqlhotcopy works only for backing up MyISAM and ISAM tables. It runs on Unix, and on NetWare as of MySQL 4.0.18.
shell> mysqlhotcopy db_name [/path/to/new_directory]
shell> mysqlhotcopy db_name_1 ... db_name_n /path/to/new_directory
shell> mysqlhotcopy db_name./regex/
mysqlhotcopy supports the following options:
![]()
--help, -?
Display a help message and exit.
![]()
--allowold
Don’t abort if target already exists (rename it by adding an _old suffix).
![]()
--checkpoint=db_name.tbl_name
Insert checkpoint entries into the specified db_name.tbl_name.
![]()
--debug
Enable debug output.
![]()
--dryrun, -n
Report actions without doing them.
![]()
--flushlog
Flush logs after all tables are locked.
![]()
--keepold
Don’t delete previous (now renamed) target when done.
![]()
--method=#
Method for copy (cp or scp).
![]()
--noindices
Don’t include full index files in the backup. This makes the backup smaller and faster. The indexes can be reconstructed later with myisamchk -rq or isamchk -rq.
![]()
--password=password , -ppassword
The password to use when connecting to the server. Note that the password value is not optional for this option, unlike for other MySQL clients.
![]()
--port=port_num , -P port_num
The TCP/IP port number to use when connecting to the local server.
![]()
--quiet, -q
Be silent except for errors.
![]()
--regexp=expr
Copy all databases with names matching the given regular expression.
The Unix socket file to use for the connection.
![]()
--suffix=str
The suffix for names of copied databases.
![]()
--tmpdir=path
The temporary directory (instead of /tmp).
![]()
--user=user_name , -u user_name
The MySQL username to use when connecting to the server.
mysqlhotcopy reads the [client] and [mysqlhotcopy] option groups from option files.
To execute mysqlhotcopy, you must have access to the files for the tables that you are backing up, the SELECT privilege for those tables, and the RELOAD privilege (to be able to execute FLUSH TABLES).
Use perldoc for additional mysqlhotcopy documentation:
shell> perldoc mysqlhotcopy
The mysqlimport client provides a command-line interface to the LOAD DATA INFILE SQL statement. Most options to mysqlimport correspond directly to clauses of LOAD DATA INFILE.
Invoke mysqlimport like this:
shell> mysqlimport [options] db_name textfile1 [textfile2 ...]
For each text file named on the command line, mysqlimport strips any extension from the filename and uses the result to determine the name of the table into which to import the file’s contents. For example, files named patient.txt, patient.text, and patient all would be imported into a table named patient.
mysqlimport supports the following options:
![]()
--help, -?
Display a help message and exit.
![]()
--columns=column_list , -c column_list
This option takes a comma-separated list of column names as its value. The order of the column names indicates how to match up data file columns with table columns.
![]()
--compress, -C
Compress all information sent between the client and the server if both support compression.
![]()
--debug[=debug_options], -# [debug_options]
Write a debugging log. The debug_options string often is ’d:t:o,file_name'.
![]()
--delete, -D
Empty the table before importing the text file.
![]()
--fields-terminated-by=...

--fields-enclosed-by=...

--fields-optionally-enclosed-by=...

--fields-escaped-by=...

--lines-terminated-by=...
These options have the same meaning as the corresponding clauses for LOAD DATA INFILE.
![]()
--force, -f
Ignore errors. For example, if a table for a text file doesn’t exist, continue processing any remaining files. Without --force, mysqlimport exits if a table doesn’t exist.
![]()
--host=host_name , -h host_name
Import data to the MySQL server on the given host. The default host is localhost.
![]()
--ignore, -i
See the description for the --replace option.
![]()
--ignore-lines=n
Ignore the first n lines of the data file.
![]()
--local, -L
Read input files from the client. By default, text files are assumed to be on the server if you connect to localhost (which is the default host).
![]()
--lock-tables, -l
Lock all tables for writing before processing any text files. This ensures that all tables are synchronized on the server.
![]()
--password[=password], -p[password]
The password to use when connecting to the server. Note that if you use the short option form (-p), you cannot have a space between the option and the password. If no password is given on the command line, you will be prompted for one.
![]()
--port=port_num , -P port_num
The TCP/IP port number to use for the connection.
![]()
--protocol={TCP | SOCKET | PIPE | MEMORY}
The connection protocol to use. New in MySQL 4.1.
The --replace and --ignore options control handling of input records that duplicate existing records on unique key values. If you specify --replace, new rows replace existing rows that have the same unique key value. If you specify --ignore, input rows that duplicate an existing row on a unique key value are skipped. If you don’t specify either option, an error occurs when a duplicate key value is found, and the rest of the text file is ignored.
![]()
--silent, -s
Silent mode. Produce output only when errors occur.
![]()
--socket=path , -S path
The socket file to use when connecting to localhost (which is the default host).
![]()
--user=user_name , -u user_name
The MySQL username to use when connecting to the server.
![]()
--verbose, -v
Verbose mode. Print out more information what the program does.
![]()
--version, -V
Display version information and exit.
Here is a sample session that demonstrates use of mysqlimport:
shell> mysql -e 'CREATE TABLE imptest(id INT, n VARCHAR(30))' test
shell> ed
a
100 Max Sydow
101 Count Dracula
.
w imptest.txt
32
q
shell> od -c imptest.txt
0000000 1 0 0 M a x S y d o w
1 0
0000020 1 C o u n t D r a c u l a
0000040
shell> mysqlimport --local test imptest.txt
test.imptest: Records: 2 Deleted: 0 Skipped: 0 Warnings: 0
shell> mysql -e ’SELECT * FROM imptest' test
+------+---------------+
| id | n |
+------+---------------+
| 100 | Max Sydow |
| 101 | Count Dracula |
+------+---------------+
The mysqlshow client can be used to quickly look at which databases exist, their tables, and a table’s columns or indexes.
mysqlshow provides a command-line interface to several SQL SHOW statements. The same information can be obtained by using those statements directly. For example, you can issue them from the mysql client program.
Invoke mysqlshow like this:
shell> mysqlshow [options] [db_name [tbl_name [col_name]]]
![]() If no database is given, all matching databases are shown.
If no database is given, all matching databases are shown.
![]() If no table is given, all matching tables in the database are shown.
If no table is given, all matching tables in the database are shown.
![]() If no column is given, all matching columns and column types in the table are shown.
If no column is given, all matching columns and column types in the table are shown.
Note that in newer MySQL versions, you see only those database, tables, or columns for which you have some privileges.
If the last argument contains shell or SQL wildcard characters ('*', '?', '%', or '_'), only those names that are matched by the wildcard are shown. If a database name contains any underscores, those should be escaped with a backslash (some Unix shells will require two) in order to get a list of the proper tables or columns. '*' and '?' characters are converted into SQL '%' and '_' wildcard characters. This might cause some confusion when you try to display the columns for a table with a '_' in the name, because in this case mysqlshow shows you only the table names that match the pattern. This is easily fixed by adding an extra '%' last on the command line as a separate argument.
mysqlshow supports the following options:
![]()
--help, -?
Display a help message and exit.
![]()
--character-sets-dir=path
The directory where character sets are installed. See Section 4.7.1, “The Character Set Used for Data and Sorting.”
![]()
--compress, -C
Compress all information sent between the client and the server if both support compression.
![]()
--debug[=debug_options], -# [debug_options]
Write a debugging log. The debug_options string often is ’d:t:o,file_name'.
![]()
--default-character-set=charset
Use charset as the default character set. See Section 4.7.1, “The Character Set Used for Data and Sorting.”
![]()
--host=host_name , -h host_name
Connect to the MySQL server on the given host.
![]()
--keys, -k
Show table indexes.
![]()
--password[=password], -p[password]
The password to use when connecting to the server. Note that if you use the short option form (-p), you cannot have a space between the option and the password. If no password is given on the command line, you will be prompted for one.
![]()
--port=port_num , -P port_num
The TCP/IP port number to use for the connection.
![]()
--protocol={TCP | SOCKET | PIPE | MEMORY}
The connection protocol to use. New in MySQL 4.1.
![]()
--socket=path , -S path
The socket file to use when connecting to localhost (which is the default host).
![]()
--status, -i
Display extra information about each table.
![]()
--user=user_name , -u user_name
The MySQL username to use when connecting to the server.
![]()
--verbose, -v
Verbose mode. Print out more information what the program does. This option can be used multiple times to increase the amount of information.
![]()
--version, -V
Display version information and exit.
For most system errors, MySQL displays, in addition to an internal text message, the system error code in one of the following styles:
message ... (errno: #)
message ... (Errcode: #)
You can find out what the error code means by either examining the documentation for your system or by using the perror utility.
perror prints a description for a system error code or for a storage engine (table handler) error code.
Invoke perror like this:
shell> perror [options] errorcode ...
Example:
shell> perror 13 64
Error code 13: Permission denied
Error code 64: Machine is not on the network
Note that the meaning of system error messages may be dependent on your operating system. A given error code may mean different things on different operating systems.
The replace utility program changes strings in place in files or on the standard input. It uses a finite state machine to match longer strings first. It can be used to swap strings. For example, the following command swaps a and b in the given files, file1 and file2:
shell> replace a b b a -- file1 file2 ...
Use the -- option to indicate where the string-replacement list ends and the filenames begin.
Any file named on the command line is modified in place, so you may want to make a copy of the original before converting it.
If no files are named on the command line, replace reads the standard input and writes to the standard output. In this case, no -- option is needed.
The replace program is used by msql2mysql.
replace supports the following options:
![]()
-?, -I
Display a help message and exit.
![]()
-# debug_options
Write a debugging log. The debug_options string often is ’d:t:o,file_name'.
![]()
-s
Silent mode. Print out less information what the program does.
![]()
-v
Verbose mode. Print out more information what the program does.
![]()
-V
Display version information and exit.