
Chapter 16 – Tables, DDL, and Data Types
"To have everything is to possess nothing.“
Buddha
CREATE TABLE Syntax
The following is the syntax for using CREATE TABLE:
CREATE TABLE [<database-name>.]<table-name>
( <column-name> <data-type> [<column-level-attribute>] [<column-level-constraint> ]
[...,<column-name> <data-type> [<column-level-attribute>] [<column-level-constraint>] ] )
[CONSTRAINT <constraint-name>] CHECK (<comparison>) ]
[CONSTRAINT <constraint-name>] FOREIGN KEY ({<column-name> | <column-list>})
REFERENCES <table-name> ({<column-name> | <column-list>}) ]
[CONSTRAINT <constraint-name>] [PRIMARY KEY]
({<column-name> | <column-list>}) ]
[DISTRIBUTE ON [ HASH ] { <column-name> | <up-to-four-column-list> | RANDOM } ] ;
CREATE Table emp_example_table
(emp INTEGER
,dept INTEGER
,lname CHAR(20)
,fname VARCHAR(20)
,salary DECIMAL(10,2)
,hire_date DATE )
DISTRIBUTE ON(emp);
The CREATE table statement establishes the name of the table, a name of each column in the table, its data type, and any data attributes. It also defines the Distribution key for the table. In addition, you may specify data protection features, data attributes, and constraints that dictate data quality. The WITH CHECK OPTION is used to specify that Referential Integrity (RI) is only checked at the end of a batch. The NO option indicates that RI is not enforced.
Viewing the DDL
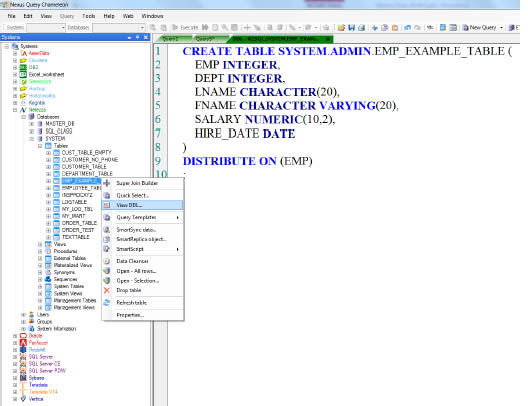
Once you create a table, you can view it in the Nexus tree by right clicking on the table and selecting View DDL.
Netezza Tables - Distribution Key or Random Distribution
You have two choices for distributing the data among the SPUs |
|
You will choose a column(s) in the table to be the Distribution Key as in example 1. |
You will specifically state DISTRIBUTE ON RANDOM as in example 2. |
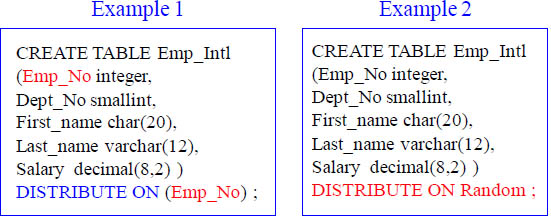
The next couple of pages will show you how Netezza spreads the data among the SPUs.
Table CREATE Examples with 4 different Distribution Keys
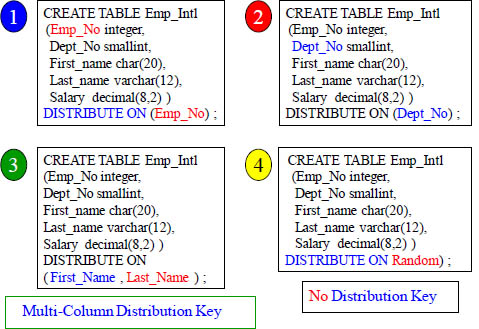
A table can have only one Distribution Key, so picking the right one is essential. Above are four different Examples for your consideration.
The Worst Mistake You Can Make For A Distribution Key

If you make the Distribution Key a Boolean, only two SPUs hold the data.
Imagine that you just made the Distribution Key on the column GENDER. There are only two values (Boolean), and those are 'M' for male or 'F' for Female. All of the rows in your table will go to only two SPUs. It is a good idea to choose the distribution key on a column with more distinct values than the number of SPUs. It is also a good idea to make the Distribution Key the same column as the joining column to another table it joins with so all joins are co-located on the same SPU. When you can’t find a good column that will distribute well, it is a good idea to then go with RANDOM.
Good things to know about Table and Object Names
Table and Column names can be up to 128 characters long
The first character must be alphabetic
Table and Column names are stored as Uppercase Identifiers (default)
Maximum number of columns per table is 1600
Maximum row size is 65535 bytes
You must be an administrator or have object permissions to create a table
Table names must be unique within a database
Table names may NOT be the same name as a data type or system catalog table
Object names must be unique across all object types
Above is some knowledge that might be good to know.
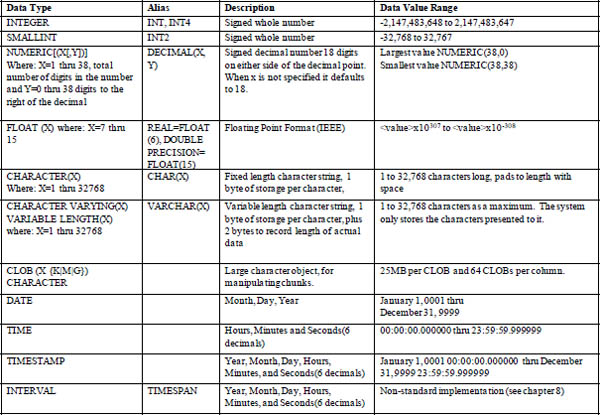
Netezza Data Types
BYTEINT 8-bit values in range –128 to 127
SMALLINT 16-bit values in range –32,768 to 32,767
INTEGER 32-bit values in range –2,147,483,648 to 2,147,483,647
BIGINT 64-bit values in range -9,223,372,036,854,775,808 to 9,223,372,036,854,775,807
NUMERIC(p,s)/DECIMAL Numeric with precision p and scale s. Precision can range from 1 to 38, scale from 0 to the precision
FLOAT(p)/REAL Floating point number with precision p, from 1 to 15
CHAR(n) Fixed length string, maximum 64,000
VARCHAR(n) Variable length string, maximum 64,000
BOOLEAN With value true (T) or false (F)
TIMESTAMP (DATE/TIME) Ranging from January 1, 0001 00:00:00.000000 to December 31, 9999 23:59:59.999999
Listed above are the data types that you can utilize in Netezza.
Netezza Data Types in More Detail
Netezza Data Type Extensions
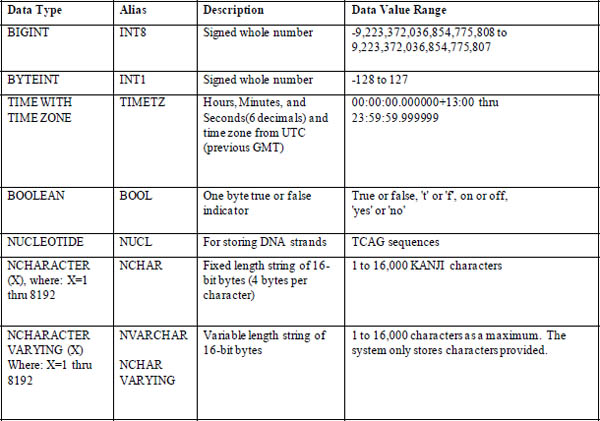
These data types are all available for use within NPS. Notice that there are fixed and variable length data formats. The fixed data types always require the entire defined length on disk for the column. The variable types can be used to maximize data storage within a block by storing only the data provided within a row by the client software.
Reserved Names Within A Table
ROWID – unique value assigned by the hashing process in order to distribute the row to the proper SPU.
DATASLICEID – unique value number assigned to every SPU.
CREATEXID – identification for the transaction that created the row.
DELETEXID – identification for the transaction that deleted the row. This value is zero for active rows.
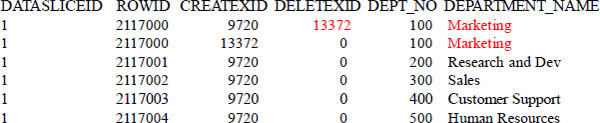
Whether the system is executing a single or multi-statement transaction, it is identified with a TransactionID. Each row in a NPS table has four extra columns: SLICEID, ROWID, CREATEXID, and DELETEXID. The columns uniquely identify every row in every table. Once SLICEID, ROWID, and CREATEXID are assigned, they are never changed during the life of that row. However, DELETEXID is up for grabs. Obviously, it is changed by the transaction that deletes the row. A deleted row stays in the table, but is not available to users because DELETEXID is greater than zero.
There is another time when DELETEXID gets set. Whenever a column in an existing row gets changed, the current row is effectively deleted, and a “new” row inserted. During the life a transaction, the current row’s DELETEXID remains active, and the new row has the identification of the transaction in progress. At the end of the transaction, the system NPS changes the DELETEXID of the new row to zero and the DELETEXID of the original row to the ID of the transaction. At that point, the transaction is finished, the original row is inaccessible, and the new row is ready for use.
How To Query and See Non-Active Rows

When Netezza does a DELETE or an UPDATE, it creates a new row and logically deletes the old row. The logically deleted rows won't show up in a query unless you set the SHOW_DELETED_RECORDS to TRUE. You can easily spot these non-active rows because they have a DELETEXID other than zero. These non-active rows take up space in a table. Once the GROOM Tablename command is run, the non-active rows are physically deleted. Netezza uses this strategy so they don't have to have a journal to handle rollbacks. It is also valuable because there are ways to recover deleted rows.
Column Attributes
Here is a list of NPS COLUMN attributes that can be assigned to a column:
NOT NULL |
Disallow nulls to be stored in the column |
DEFAULT CURRENT_DATE |
Use today’s date as default value |
DEFAULT CURRENT_TIME |
Use current time as default value |
DEFAULT Value |
Use default value if null entered |
DEFAULT USER |
Use the user’s ID as the default value for the column |
DEFAULT NULL |
Use null as the default value for the column |
CREATE Table Employees
(empINTEGER NOT NULL
,deptINTEGER
,lnameCHAR(20) DEFAULT USER
,fnameVARCHAR(20)DEFAULT 'TeraTom'
,salaryDECIMAL(10,2)DEFAULT 0
,hire_dateDATE DEFAULT CURRENT_DATE )
DISTRIBUTE ON(emp);
Alfred North Whitehead once said, “We think in generalities, but we live in details.” We have seen examples in this chapter of creating tables with simple column definitions. These examples have been generalities, but often we need to model our columns in great detail. It is time to take the next step. When defining a table, it is normally advantageous to be more specific regarding the definition of the columns and their attributes. In the above example, the columns have been further defined using column attributes. The emp column is defined with the NOT NULL attribute. This means that a NULL value cannot be stored in the dept column. The lname column has been further defined to default to the user session name. The fname column defaults to TeraTom, salary to zero, and hire_date to today’s date.
Constraints
NPS has some fundamental rules about constraints:
•Always name table level constraints
•Constraint names can be up to 31 characters
•Constraint names must be unique for a table
•Constraints can be specified at the column or table level
•The system does not assign names to constraints you do not name
Constraints can be defined on column values during the CREATE TABLE process or it can be done using the ALTER command once the table has been created. Constraints generally fall into three areas:
•Unique
•Check
•Referential Integrity
Sometimes boundaries are necessary! At times it is advisable to add restrictions to the table and columns within a table. This is done to provide data integrity, availability, and ease of use to the table and its data. Users can still use their imagination and ask any question, but on all inserts, updates, and deletes NPS will be watching. Relational theory describes columns and the attributes a column can have as part of a domain. The domain includes the data type and valid value boundaries based on business requirements or restrictions. Because ANSI does not support a rigorous atomic definition of a domain, it is up to the database designer to define the domains for a table and their legal values by creating constraints on one or more columns. Constraints keep the table in check to enforce certain rules.
Constraints
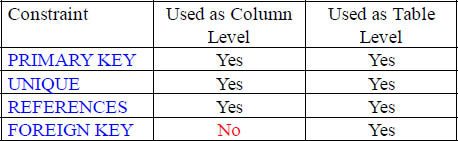
PRIMARY KEY |
A PRIMARY KEY enforces uniqueness. You must have the NOT NULL constraint also defined when defining a PRIMARY KEY. |
UNIQUE |
UNIQUE enforces uniqueness on a column. You must have the NOT NULL constraint also defined when defining a UNIQUE constraint. |
REFERENCES |
Requests a referential integrity check. This requires values to be reference checked or selected from another table before accepting a new row into this table |
The great writer Mark Twain was quoted as saying, “Whenever you find you are on the side of the majority, it is time to pause and reflect.” Sometimes it is good to be on the side of the majority, but at other times it is best to be UNIQUE. The UNIQUE constraint is used to enforce uniqueness of values stored within the column(s). This means that no two rows in the table can have the same value for the column or columns utilizing the UNIQUE constraint. That is the idea behind a constraint. If data fall outside of the constraint, then the system pauses and reflects and sends an error message.
Column Level Constraint Example
CREATE TABLE DEPT_TABLE (
DEPT_NO INTEGER CONSTRAINT Dept_PK PRIMARY KEY,
DEPARTMENT_NAME CHARACTER(20),
MGR_NO INTEGER,
BUDGET NUMERIC(10,2)
) DISTRIBUTE ON (DEPT_NO);
CREATE Table EMP_CONSTRAINT
(emp INTEGERCONSTRAINT EmpPK PRIMARY KEY
,dept INTEGER CONSTRAINT Ref_1 REFERENCES Dept_Table(dept_no)
,lname CHAR(20) NOT NULL
,fnameVARCHAR(20) NOT NULL
,salaryDECIMAL(10,2)
,hire_date DATE
,soc_secINTEGER NOT NULL CONSTRAINT NameUniq UNIQUE ) ;
In the above table, the emp column is defined with a primary key constraint and therefore must have a value because it cannot be null and it must also be unique. The definition would be the same if these two individual constraints were used.
The dept column has an Referential Integrity (RI) constraint named Ref_1 on the column called dept in the Dept_Table. This means that a dept cannot be entered into the employee table unless that dept exists in the department table. This is referential integrity as its best!
The dept column referenced in the department table must be defined as unique in order for this constraint to be defined. The last two constraints are on the soc_sec column. First, there is the NOT NULL that requires a value to be stored there. Then, the NameUniq constraint requires that the value be different from any other value in other rows because it must be unique.
Defining Constraints at the Table Level
CREATE TABLE DEPT_TABLE(
DEPT_NO INTEGER CONSTRAINT Dept_PK PRIMARY KEY,
DEPARTMENT_NAME CHARACTER(20),
MGR_NO INTEGER,
BUDGET NUMERIC(10,2)
) DISTRIBUTE ON (DEPT_NO);
CREATE Table EMP_Constraint2
(emp INTEGER
,dept INTEGER
,lname CHAR(20) NOT NULL
,fnameVARCHAR(20) NOT NULL
,sal DECIMAL(10,2)
,hire_date DATE
,soc_sec INTEGER NOT NULL,
CONSTRAINT EmpPK2 PRIMARY KEY (emp),
CONSTRAINT Ref_1AFOREIGN KEY (dept) REFERENCES Dept_Table(dept_no),
CONSTRAINT NameUniq2 UNIQUE(lname, fname),
CONSTRAINT SSNUniq UNIQUE(soc_sec) ) ;
Besides using column level constraints, table level constraints can also be used. This is the only way to implement multi-column constraints. A multi-column constraint involves more than one column. All table level constraints should always be named. Table level constraints are established after the column definitions.
Utilizing Default Values for a Table
The following rules and guidelines apply to default value control phrases :
•Fields must be defined in CREATE TABLE and ALTER TABLE statements
•Default value controls are not effective for views and expressions.
•The normal default value for a field is null unless you specify NOT NULL.
CREATE TABLE Dept_Defaults
( Dept INTEGERDEFAULT 10
,Dept_Name CHAR(20) DEFAULT'Sales'
,Mgr_Emp_No INTEGER)
DISTRIBUTE ON(Dept);
INSERT INTO DEPT_DEFAULTS DEFAULT VALUES;
SELECT * FROM DEPT_DEFAULTS ;

A default value control phrase determines the action to be taken when you do not supply a value for a field. Default value control phrases are only valid when used with the columns defined in the CREATE TABLE and ALTER TABLE statements. A default value control phrase determines the action to be taken when you do not supply a value for a field. Instead of placing a NULL, the system will place the default value listed in the CREATE or ALTER table command. All columns without a DEFAULT phrase defined for them contain a NULL. However, if a column does not have a DEFAULT defined and has an attribute of NOT NULL, an error is returned and the insert fails.
CTAS (Create Table AS)
Syntax
CREATE [TEMPORARY|TEMP] TABLE <table_name>
[(<column_name>, <column_name>, …)] AS
<SELECT>
[DISTRIBUTE ON (<column_name>)];
Example
CREATE TABLE customer_ctas
AS SELECT * FROM customer_table
DISTRIBUTE ON (customer_number);
Create Table AS (CTAS) is a way to create new tables from existing tables without the reloading data. The table create is bases solely on query results. This is a brilliant way to place tables distribution keys in the order you want to performance tune queries.
CTAS Facts
Example
CREATE TABLE order_ctas
AS SELECT * FROM order_table
DISTRIBUTE ON (customer_number);
|
If you do not define an explicit distribution key(s), a CTAS table inherits its distribution from the parent table. |
|
When the insert of data happens during the CREATE of the CTAS table, the system computes statistics (minimum values, maximum values, zone maps, null and estimated dispersion values automatically) for all of the columns. |
|
You may specify the names of columns in the new table or allow them to default. If column names are not specified, they default to the output column names from the query. |
|
The table can't already exist with the same name as the CTAS table. |
|
A temporary table can be created that has the same name as an existing user table, but this is not a Tera-Tom recommendation. |
Using the CTAS (Create Table AS) Table For Co-Location
Example
CREATE TABLE order_ctas
AS SELECT * FROM order_table
DISTRIBUTE ON (customer_number);
Co-Locating Join
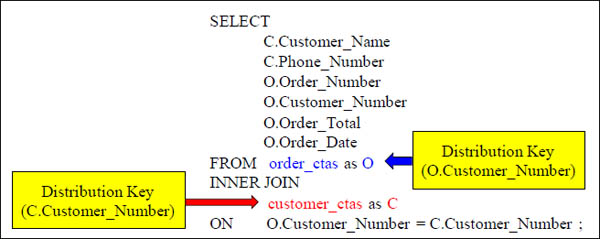
Because both tables are joined on the key Customer_Number and both tables are using Customer_Number as their Distribution Key, the matching rows are physically stored on the same SPU. This has to happen for two rows to be joined. They must be on the same SPU and physically touch in that SPUs memory. It is called Co-Location, and we "on purpose" made our CTAS tables both distribute to achieve Co-Location.
Altering a CTAS Table to Rename It
"The only true wisdom is in knowing you know nothing."
– Socrates
Syntax
ALTER TABLE table_name
RENAME TO new_table_name ;
Example
ALTER TABLE customer_ctas
RENAME TO customer;
FPGA Card and Zone Maps – The Netezza Secret Weapon
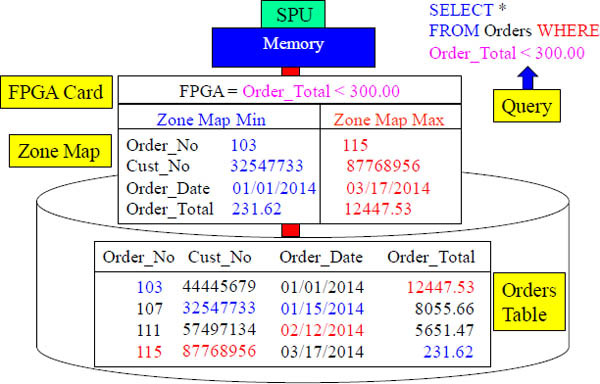
The first 200 columns of every table are automatically zone mapped. A Zone Map lists the min and max value for each column. The Field Programmable Gate Array (FPGA card) analyzes the query and before ordering the block into memory, checks the Zone Map to see if the block cannot possibly have that data. It can then skip reading that block. Where most databases use indexes to determine where data is, Netezza uses Zone Maps to determine where data is NOT! Our query above is looking for data WHERE Order_Total < 300. The Zone Map shows this block will contain rows, and therefore it will be moved into memory for processing. Each SPU has their own separate Zone Map and FPGA card. I have colored the min and max values to illustrate how it all works. No matter what column is in the WHERE clause, Netezza can exclude blocks.
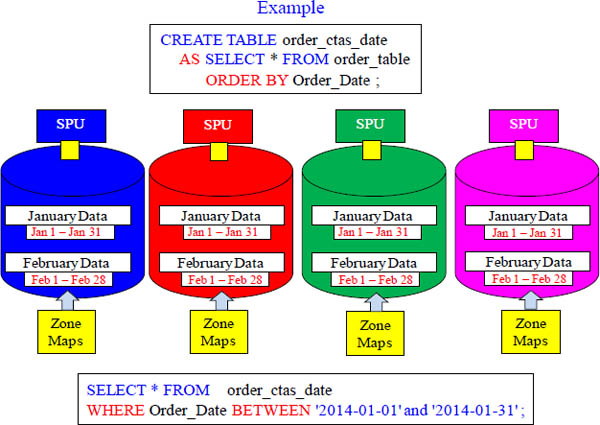
How A CTAS with ORDER BY Improves Queries
The zone maps will eliminate the need to read the majority of blocks (3 MB extents). Since the data is sorted on the column Order_Date, the zone maps min and max values have tight date ranges. Our query only wants January data, so the majority of data blocks won't need to be read. The FPGA card reads the zone map and only reads blocks with January data.
A CTAS Major Sort Benefits over the Minor Sort
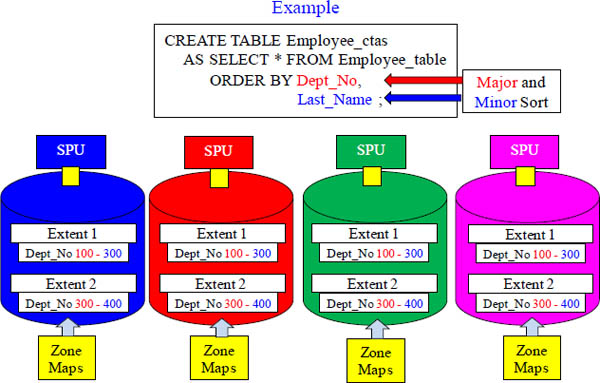
The zone maps will eliminate the need to read the majority of blocks (3 MB extents). Since the data is sorted on the column Dept_No first (major sort), the zone maps min and max values have tight ranges. Any query using Dept_No in the WHERE clause will allow the majority of blocks to be eliminated by the FPGA card because the zone map will show the min and max values for the Dept_No, and the range of values should be small. Because Dept_No is our major sort and Last_Name is our minor sort (and this is a sort with precedence), then Last_Name's zone maps won't benefit nearly as much as Dept_No's.
Altering A Table
Here is a list of the table changes available to the ALTER TABLE:
•Add one or more new columns to an existing table.
•Add new attributes for one or more columns in a table.
•Drop one or more new columns to an existing table.
•Modify constraints on an existing table at the column or table level.
•Change the name of a column in an existing table
The syntax for the ALTER statement is:
ALTER TABLE [<database-name>.]<table-name>
[ ALTER [ COLUMN ] <column-name>
{ SET DEFAULT <default-value> | DROP DEFAULT }
[ RENAME <column-name> TO <new-column-name> ] ;
The only thing in life we can consistently count on is change. This is especially true in a data warehouse environment. As business requirements change, sometimes it is necessary to reflect those changes into the tables. Netezza allows for modification of a table at either the table or column level using the ALTER command.
Altering a Table Examples
This example changes the default value for the column Dept.
ALTER TABLE Dept_Defaults
ALTER Dept SET DEFAULT 400
The next request changes the name of a column. The old column name was Dept_Name, and the new column name is Department_Name.
ALTER TABLE Dept_Defaults
Rename Dept_Name to Department_Name;
The next request changes the column First_Name from a
VARCHAR(12) to a VARCHAR (20).
ALTER TABLE Employee_Table MODIFY
COLUMN (First_Name VARCHAR(20));
There are some restrictions when renaming columns. First of all, a new column name cannot match any existing column name in the same table. Secondly, the affected column cannot be part of a referential integrity constraint.
Drop Table, Truncate, and Delete Compared
DROP Table <Tablename>
(This will Drop a table and the data.)
Truncate Table <Tablename>
(This will delete the table rows completely, and the space is automatically reclaimed.)
Delete Table <Tablename>
(This will delete the rows logically. The GROOM command must then be run to reclaim the space.)
If you want to delete all the rows in the table but maintain the table structure, it is recommended to Truncate the table. Otherwise, you will need to delete the rows and then run the GROOM command.
Creating and Dropping a Netezza Database
Create Database <database-name> ;
DROP DATABASE <database-name> ;
Within the NPS, a database is a storage location for database objects (tables and views). An administrator can use Data Definition Language (DDL) to establish a database by using a CREATE DATABASE command. A database has segment space automatically allocated to it on disk. This segment space establishes the maximum amount of disk space for storing user data rows in any table located in the database.
How to Determine the Database you are in?
SELECT current_catalog /* database name */ ;
SELECT current_db /* database id number */;
Current_Catalog |
Current_DBID |
SQL_Class |
238416 |
To determine the database in which the user is currently residing, use the above. As you can see, the current catalog is SQL_Class, and the current Database ID is 238416.
Netezza Users
CREATE USER <username>
WITH PASSWORD '<password-here>'
[SYSID <override-sys-userid>]
[VALID UNTIL '<valid-date-value>']]
[ROWSETLIMIT [<integer-value>]]
[SESSIONTIMEOUT [<integer-value>]]
[QUERYTIMEOUT [<integer-value>]]
[DEFPRIORITY [ {critical|high|normal|low|none} ]]
[MAXPRIORITY [ {critical|high|normal|low|none} ]] ;
Within the NPS, a user is a database object able to connect to the system. Therefore, to authenticate the user, a password must be established. The password and other attributes are established at the same time that the CREATE USER statement is executed.
Altering a Netezza User
ALTER USER <username> WITH PASSWORD '<password-here>'
[SYSID <override-sys-userid>]
[VALID UNTIL '<valid-date-value>']]
[ROWSETLIMIT [<integer-value>]]
[SESSIONTIMEOUT [<integer-value>]]
[QUERYTIMEOUT [<integer-value>]]
[DEFPRIORITY [ {critical|high|normal|low|none} ]]
[MAXPRIORITY [ {critical|high|normal|low|none} ]] ;
Or
ALTER USER <username> RESET ACCOUNT ;
USERS and DATABASES are peer level objects within the NPS system, so granting access to Databases is a simple matter of granting the user access privileges.
Reserved Words to find out about a User
SELECT CURRENT_USER /* name id */
,USER /* name id */
,SESSION_USER /* name id */
,CURRENT_USERID /* number id */ ;

Above are reserved words to find information out about a user.