Chapter 19 – Nexus Query Chameleon
"I saw the angel in the marble and carved until I set him free.“
-Michelangelo
The Old Nexus Logo
This was the original logo of the Nexus, but after partnering with Microsoft to build the next generation Query Tool, they created the new logo for us (seen on the next page).
The New Nexus Logo
|
NEXUS QUERY CHAMELEON |

Download the Nexus for a free trial at www.CoffingDW.com
Microsoft created the new logo for us to represent the Nexus as an Enterprise tool.
Watch the Video on the new Nexus Super Join Builder

Tera-Tom Trivia
Tom Coffing has been one of the first teachers of Netezza data warehousing in
remote places like Johannesburg Africa. In Africa after Apartheid, Tom trained
both black and white students together which was a first time experience for
many of the students.
Click on the link below or place it in your browser and watch the video on the
Nexus Super Join builder.
http://www.coffingdw.com/TbasicsV12/Nexus.wmv
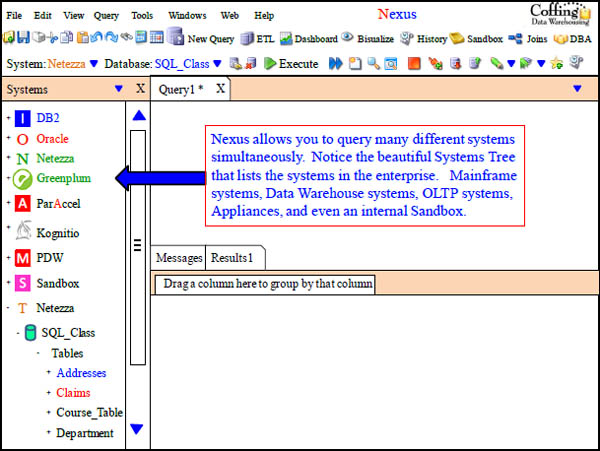

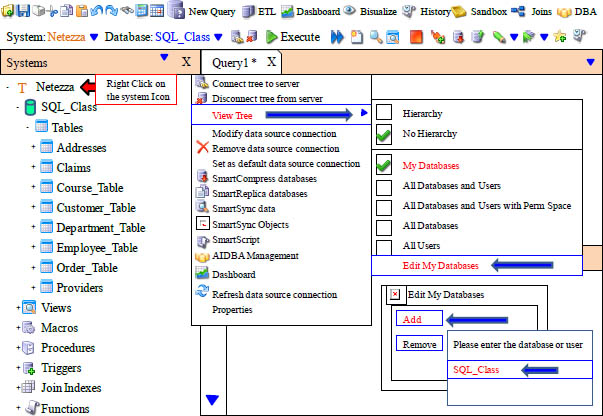
How to Customize your System Tree View

Introducing the new Nexus Super Join Builder

The Super Join Builder has 9 Tabs that are all there for your single query. Manipulate through the tabs and make changes to your query. The Super Join Builder does amazing things!
Define your Joins and tell Nexus to "Add and Remember Me"
Drag two tables inside Nexus and define the Join Columns. Click on "Add and Remember Join" and it’s in the Join Menu permanently. Check out the cool Join Menu on the next page.
Nexus knows what Tables Join together
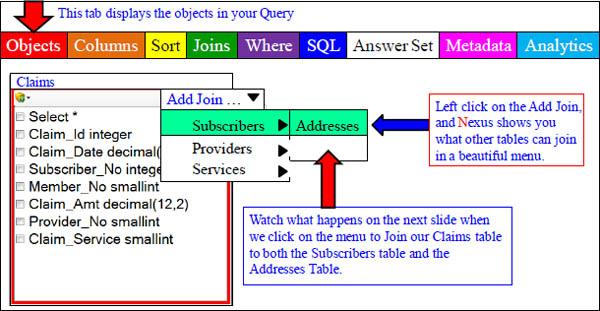
How would you like to NEVER write another Join again? The Nexus makes that possible with the Nexus Super Join Builder. Just Right Click on a table, and the menu tells you what other table(s) are eligible in the join. Then, when you click on the next table, Nexus writes the Join SQL automatically.
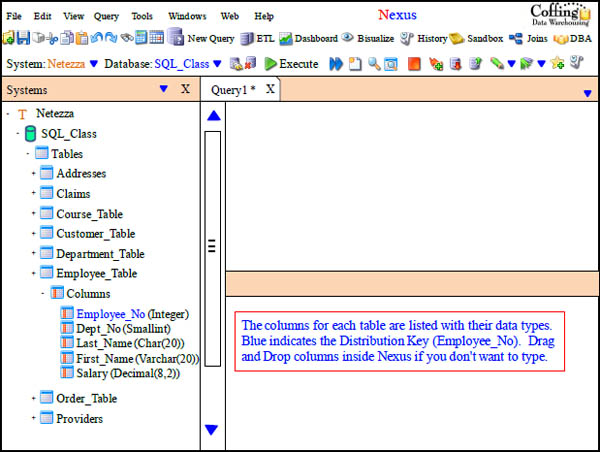
Nexus Presents Tables and their columns in Color

All Three tables we wish to join appear now with their columns and data types. Each table is a different color, so when users utilize the other Tabs, they see the columns in color to indicate which table there from. The Join SQL is already built, but we can use the other tabs to customize the SQL. The next picture will show the SQL already built!
Nexus Builds your SQL Automagically
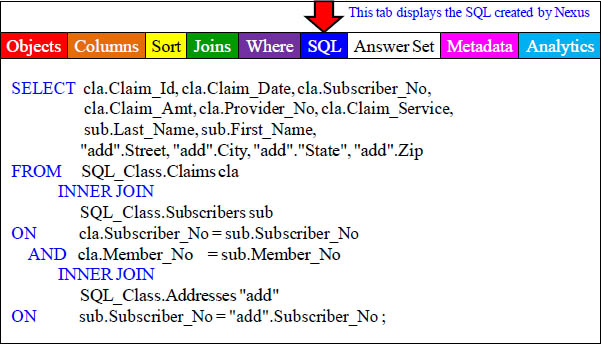
By clicking on the SQL Tab, you can see the SQL generated by the Nexus. All we did was click on the Objects Tab to select the tables, and then we clicked on the columns we wanted on our report. In seconds, the Nexus built this beautiful SQL.
Nexus can Cube a Table and Join to Everything Possible
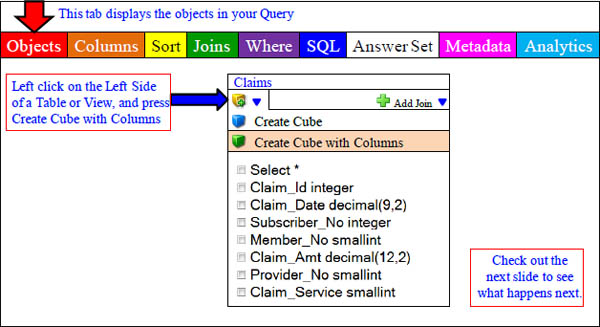
When you click on the left side of a table in the Objects Tab and select CUBE, the Nexus will create the SQL to join every table in the entire relationship together. Watch what happens on the next slide.
Nexus can Cube a Table and Join to Everything Possible
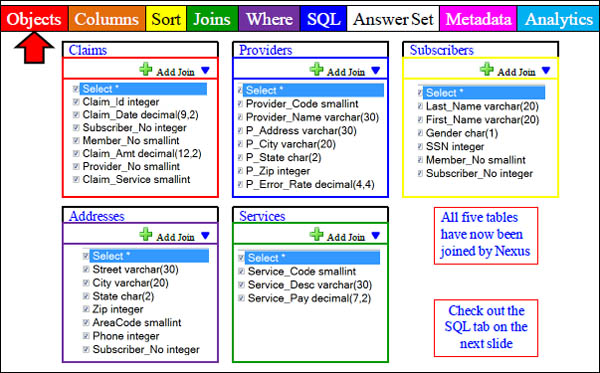
After hitting Cube with all Columns, all tables in the relationship are joined.
The Cube SQL created Automagically
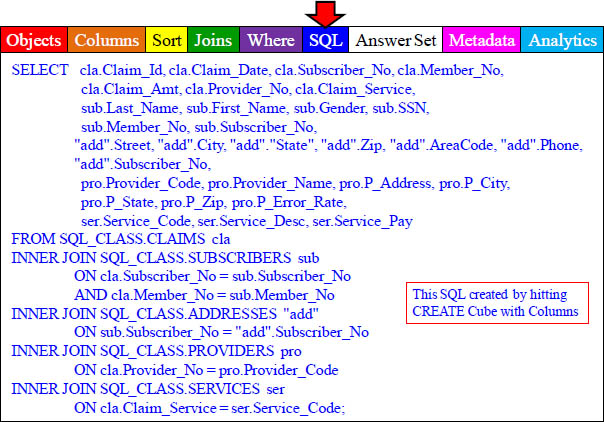
Manipulate the Columns with the Columns Tab
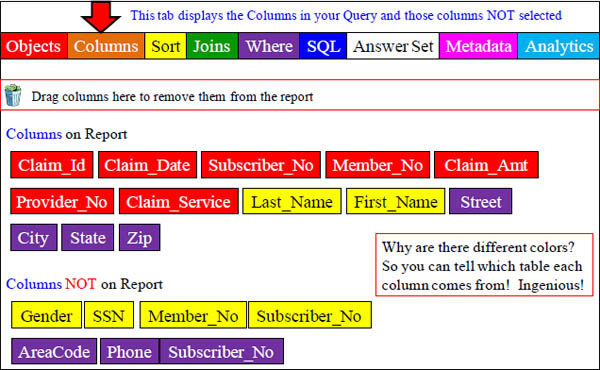
Rearrange the columns in the SELECT list by clicking and dragging. Control Click highlights multiple columns and Shift Click highlights an entire range of columns.
Single Click and ORDER BY using the Sort Tab

Double-Click or drag any column to sort by that column(s) in ASC or DESC mode.
Using the Joins Tab of Nexus

The Joins Tab shows all Join Conditions and allows you to change them to Outer Joins.
The SQL Tab reflects the changes we make in all other Tabs
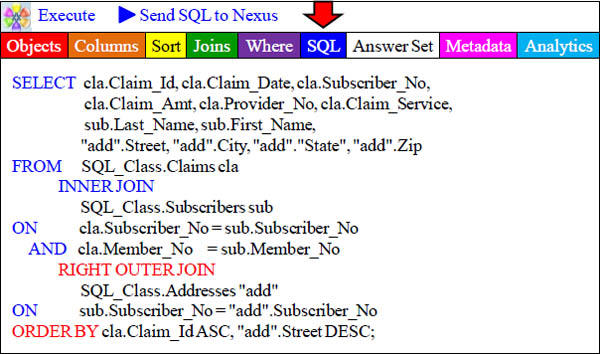
This is the SQL generated after we changed our Join to a Right Outer Join in the Joins Tab and in the Sort Tab dragged columns Claim_Id and Street for our ORDER BY.

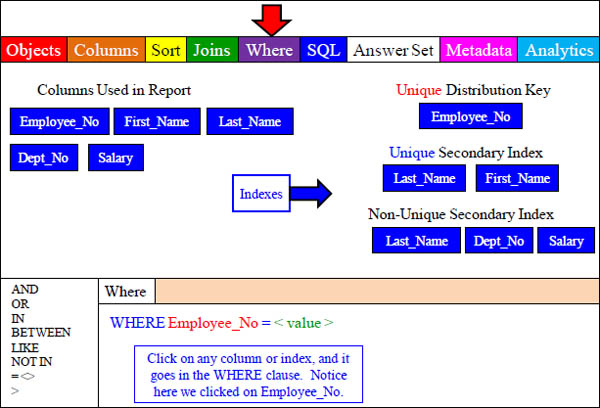
WHERE Tab shows Tables Indexes
The Answer Set Tab shows the Results
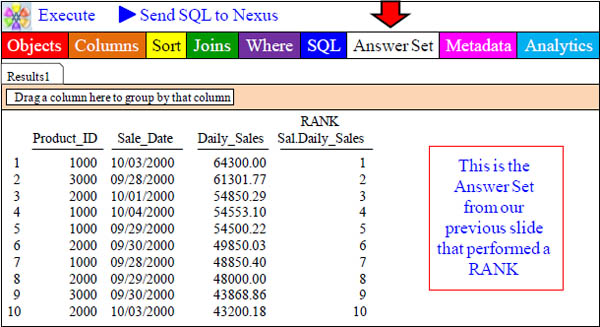
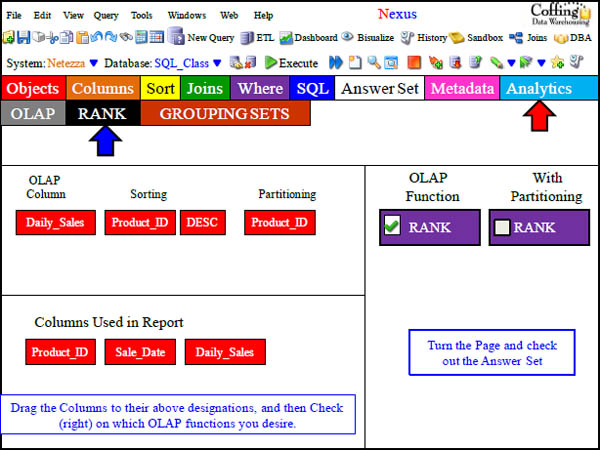
To get here, we put the Sales_Table inside the Super Join Builder. Then, we selected the columns we wanted, and then went to the Analytics Tab. There, we built our RANK report and pressed Execute. Then (above), we received the Answer Set.
The Answer Set Tab shows the Results
To get here, we put the Sales_Table inside the Super Join Builder. Then, we selected the columns we wanted, and then went to the Analytics Tab. There, we built our RANK report and pressed Execute. Then (above), we received the Answer Set.
The Answer Set Tab shows the Results
The Answer Set Tab shows the Results
The Metadata Tab shows Metadata
The Metadata tab allows a company to create Metadata for each table or object. This can be a word document, PowerPoint slide, or whatever the company decides.
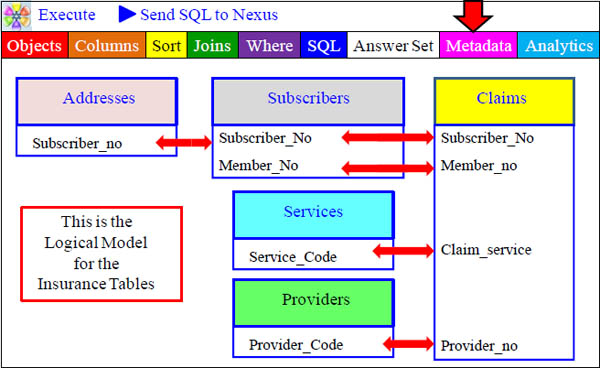
Nexus Makes a View look like a Table

Views in the Super Join Builder look like tables and can join to other views in a menu-driven fashion. Views looking like tables is brilliant and quite beneficial.
Nexus Joins Views to other Views in seconds
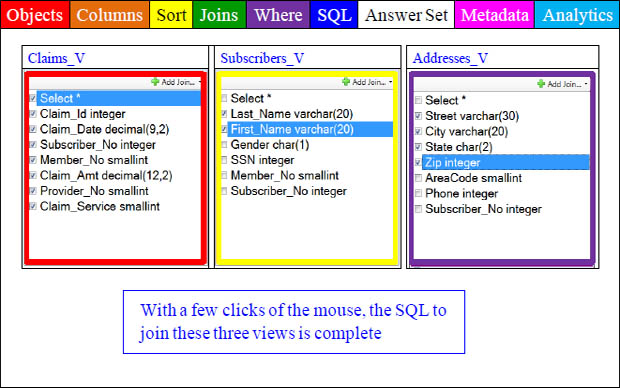
Views looking like tables is brilliant and quite beneficial. We can even join views to other views in seconds and pick the columns we want on our report.
Nexus can Cube a View and Join to all other related Views

When you click on the left side of a View in the Objects Tab and select CUBE, the Nexus will create the SQL to join every View in the entire relationship together. Watch what happens on the next slide.
Nexus Cubes Views in Seconds
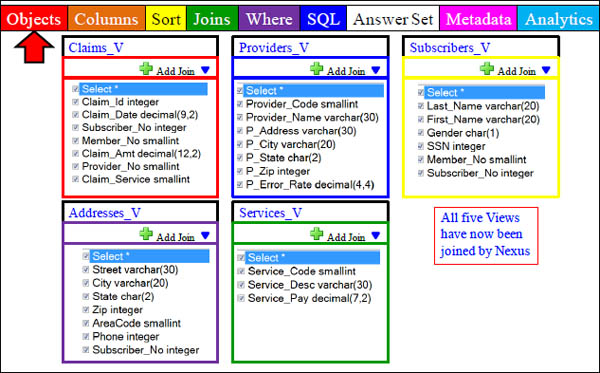
After hitting Cube with all Columns, all Views in the relationship are joined.
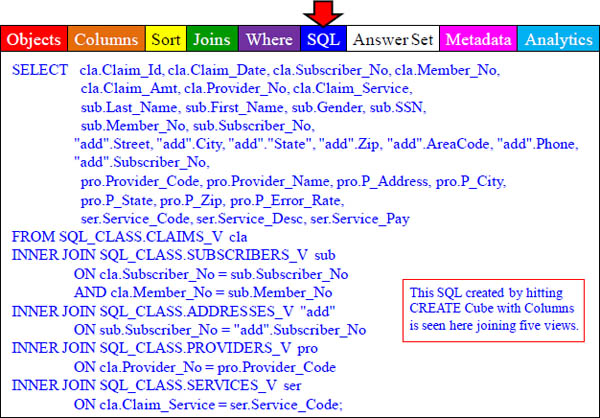
The Cube SQL created on Views is done Automagically
Views with the Underlying Indexes of the Base Tables
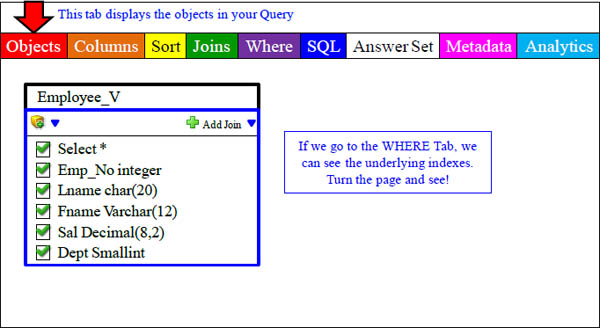
We have just placed a view called Employee_V inside the Super Join Builder. We have selected all the columns. Now, watch what happens when we go to the WHERE Tab.
WHERE Tab shows Views Underlying Base Table Indexes

After an Answer Set Returns, you can do many things

After the Answer Set returns, the Nexus allows you to manipulate the results further. You can perform OLAP calculations, Rank, and many more.
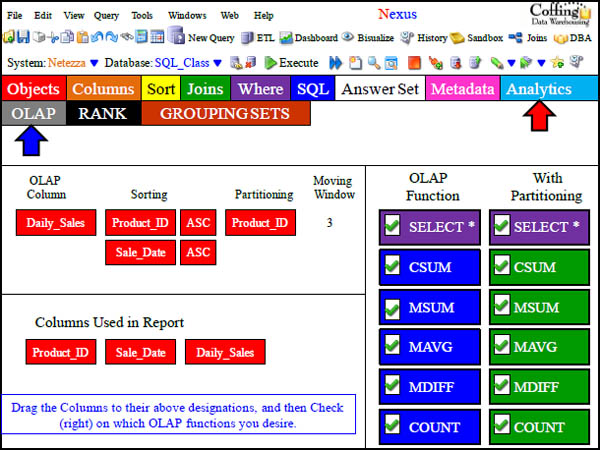
After an Answer Set Returns, Perform OLAP Calculations
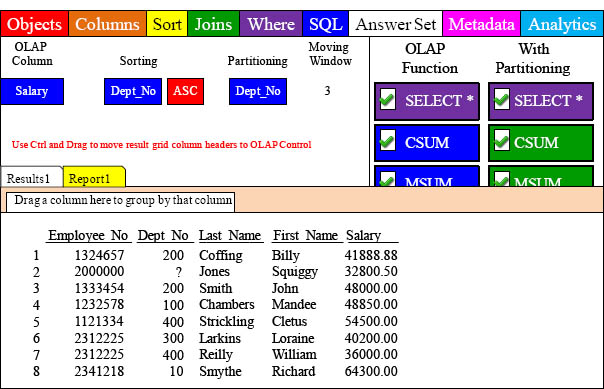
We just performed OLAP on the answer set. Now, the report comes (above in yellow), but what is amazing is that all calculations were performed internally by Nexus.
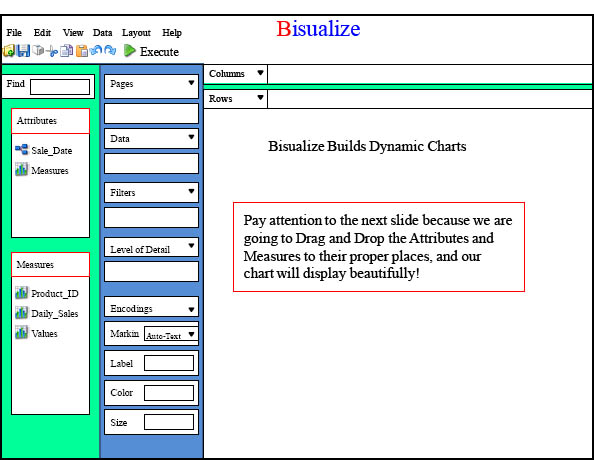
After an Answer Set Returns, you can Graph and Chart
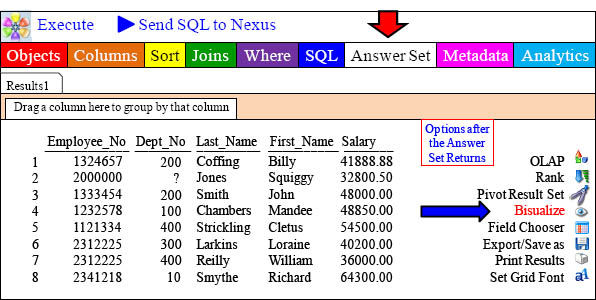
After the Answer Set returns, the Nexus allows you to manipulate the results further. You can use Bisualize to Graph and Chart your answer set dynamically.

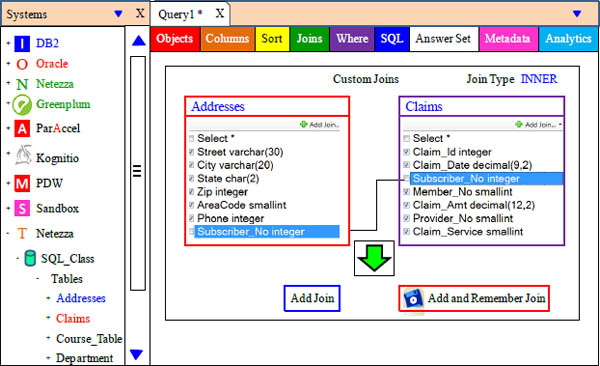
Custom Joins With Nexus
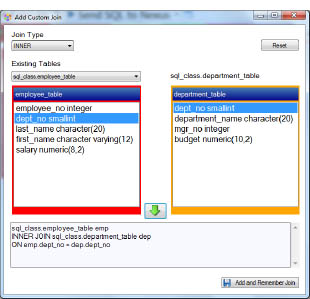
1. Right-click on a table or view and Select "Super Join builder".
2. Drag any table or view in the same system to the "Super Join Builder". The customer joins dialog will open.
3. Select the first set of columns you want to join on, and then click the "down" arrow.
4. The join will be added. Repeat if you want to add additional join columns.
5. Click on the "Add and Remember Join" button, and the join will be added to your User Defined Joins database.
6. You can actually create the model relationships by hand, and then share them with your entire company's Nexus users. Just load your hand modeled database. Right-click on Start and open "Window Explorer" %appdata%/Coffing Data Warehousing/Nexus Portal/Model.
7. Copy the UserDefinedJoins.sdf to your shared drive.
Users Who Want to Load the Model
Users can either put the file in their %appdata%/Coffing Data Warehousing/Nexus Portal/Model
directory or to map to a different model directory they would do this.
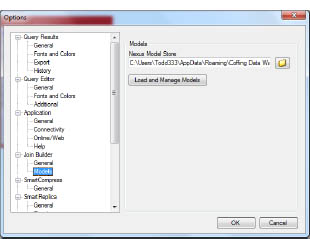
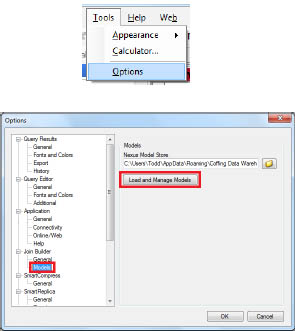
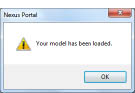
1. Go to Tools > Options and go to "Join Builder" > "Models" in the tree.
2. Click on the folder icon next to open the folder dialog, and select a new model store directory.
3. Click "OK".
4. Go back into Tools > Options > Join Builder > Models, and click on the "Load and Manage Models" button.
Users Who Want to Load the Model (Continued)
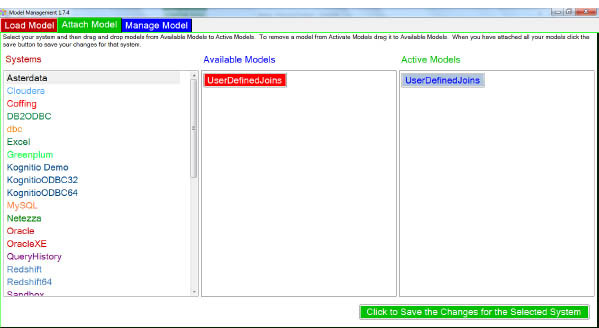
5. Click on the "Attach Model" tab.
6. Select the system you want to attach a model to, and then drag your model from available models to active models.
7. Click the button which says "Click to Save the Changes for the Selected System".
How Custom Joins Will Look in the Super Join Builder
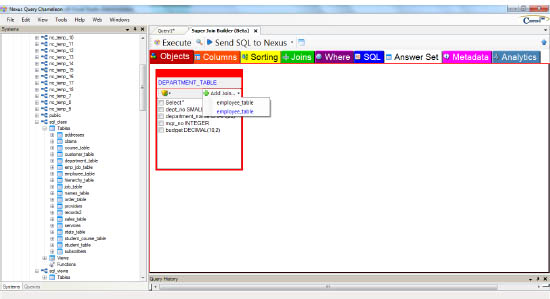
8. Now, when you go back into the Super Join Builder, you should see the joins you have defined in blue. The image below is showing two joins from the department table to the employee table. The first is a join defined in a demo model database we load by default for our sql_class and sql_views schema/databases, and the second is the custom join which we defined.
9. To remove a custom join, just right-click on it and select delete.
Loading an ERwin Mode
1. Click on Tools > Options
2. Under the "Join Builder" tree node, click on the "Models" node. Here you can change the location of your Nexus Model Store which is where all of your Nexus models are saved to and sourced from.
3. To load a new ERwin model, click on the "Load and Manage Models" button.
Loading an ERwin Model (Continued)

4. Enter a name for your model.
5. Click on the "Select model to load" button and select your ERwin model to load.
6. Finally, click the "Load your model" button.
7. When you are finished, you should see the following dialog. Click "OK".
Attaching The ERwin Model
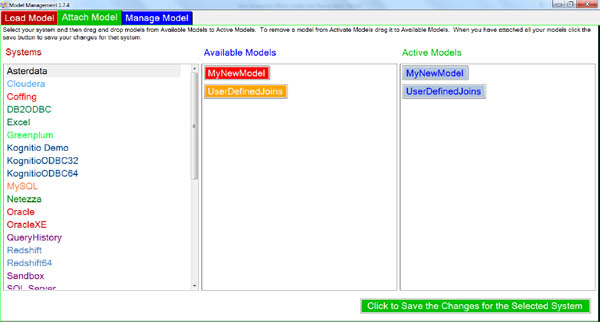
1. Click on the "Attach Model" tab.
2. Select the system you want to attach you model to from the left tree.
3. Drag your model from "Available Models" to "Active Models" (they will turn blue).
Attaching The ERwin Model (Continued)
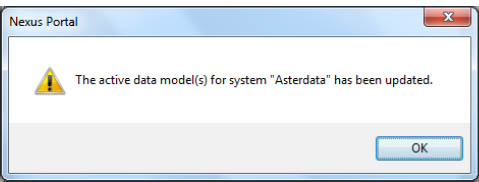
4. Finally, click on the "Click to Save Changes for the Selected System" button. You should see the following confirmation for the system you attached the models to. Your model is saved to an encrypted database which can be read by Nexus and the Super Join Builder.
You may attach multiple models to the same system, however, be aware that duplicates in your models will be reflected in the Super Join Builder.
Managing The ERwin Model (Continued)
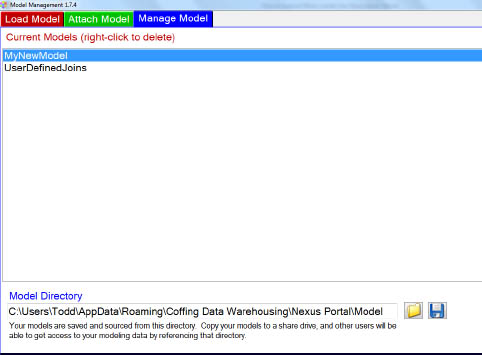
1. Click on the "Manage Model" tab.
2. To delete a model, right-click on it and select "Delete"
3. To change where you save your final models (for example, you may want to save them to a shared drive) click on the "folder" icon to select your new directory and the "save" icon to save it.
Saving an Answer Set in another Format

You can save an Answer Set directly to Excel or to many different formats.
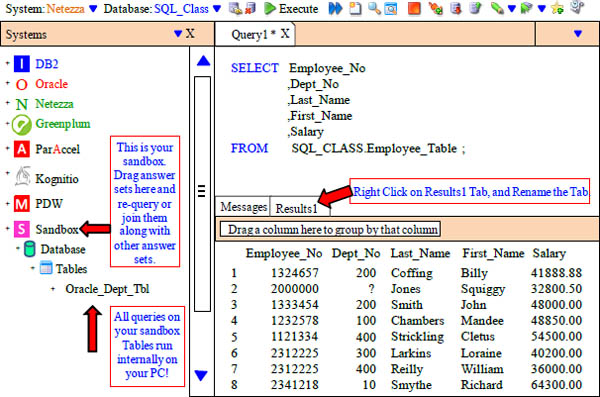
Sandbox – How to Create a Sandbox (1 of 5)

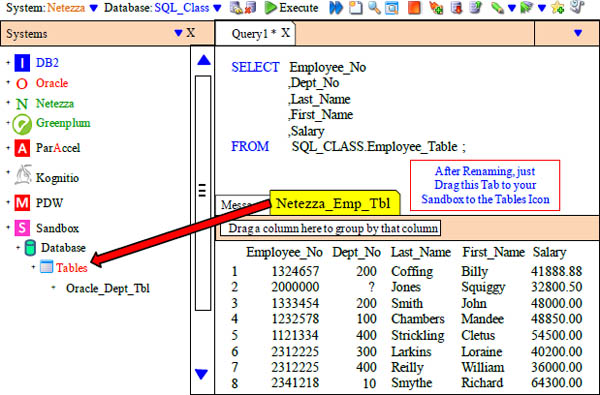
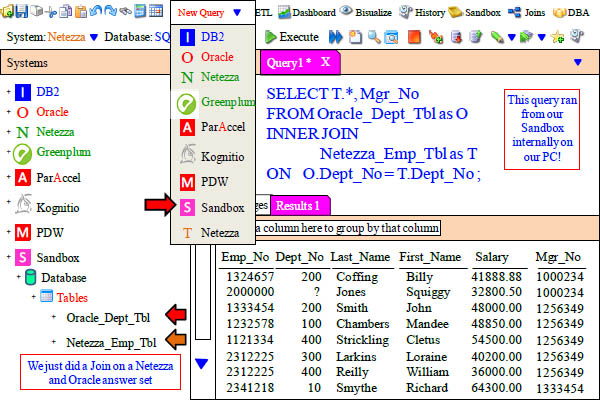
Sandbox - Join Answer Sets from different Systems (2 of 5)
Sandbox - Join Answer Sets from different Systems (3 of 5)
Sandbox - Join Answer Sets from different Systems (4 of 5)
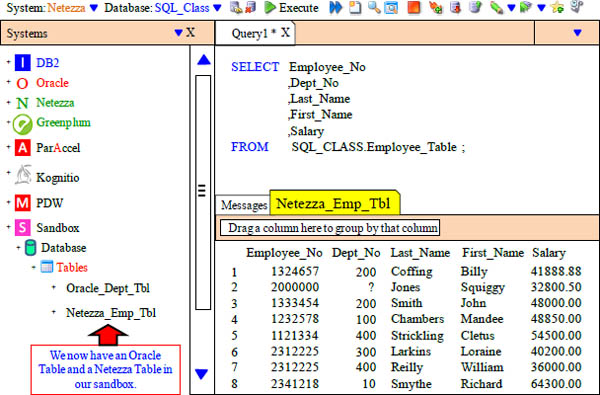
Sandbox - Join Answer Sets from different Systems (5 of 5)
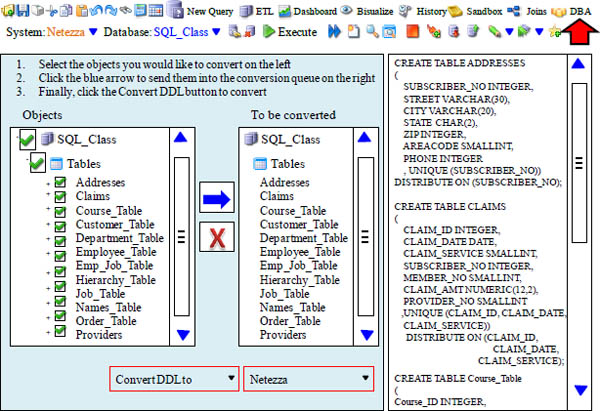
Convert Netezza DDL to Another Database Vendor
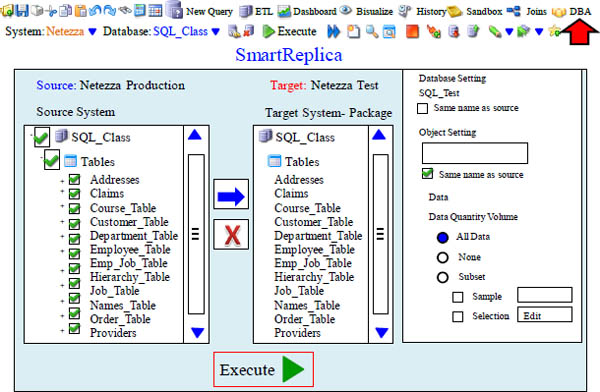
Replicate Data from One Netezza System to Another